How to Block USB Storage Devices in Linux Servers

In order to protect sensitive data extraction from servers by users who have physical access to machines, it’s a best practice to disable all USB storage support in Linux kernel.

In order to disable USB storage support, we first need to identify if the storage driver is loaded into Linux kernel and the name of the driver (module) responsible with storage driver.

Run the lsmod command to list all loaded kernel drivers and filter the output via grep command with the search string “usb_storage”.

# lsmod | grep usb_storage

List USB Storage Drivers

List USB Storage Drivers

From lsmod command, we can see that the sub_storage module is in use by UAS module. Next, unload both USB storage modules from kernel and verify if the removal has been successfully completed, by issuing the below commands.

# modprobe -r usb_storage
# modprobe -r uas
# lsmod | grep usb

Next, list the content of the current runtime kernel usb storage modules directory by issuing the below command and identify the usb-storage driver name. Usually this module should be named usb-storage.ko.xz or usb-storage.ko.

# ls /lib/modules/`uname -r`/kernel/drivers/usb/storage/

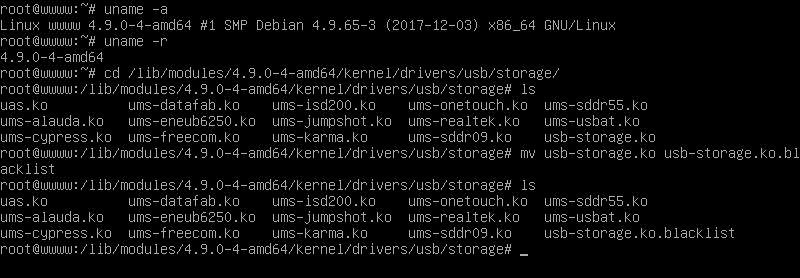
In order to block USB storage module form loading into kernel, change directory to kernel usb storage modules path and rename the usb-storage.ko.xz module to usb-storage.ko.xz.blacklist, by issuing the below commands.

# cd /lib/modules/`uname -r`/kernel/drivers/usb/storage/
# ls
# mv usb-storage.ko.xz usb-storage.ko.xz.blacklist

Block USB Storage in Linux

Block USB Storage in Linux

In Debian based Linux distributions, issue the below commands to block usb-storage module from loading into Linux kernel.

# cd /lib/modules/`uname -r`/kernel/drivers/usb/storage/ 
# ls
# mv usb-storage.ko usb-storage.ko.blacklist

Block USB in Debian and Ubuntu

Block USB in Debian and Ubuntu

Now, whenever you plug-in a USB storage device, the kernel will be fail to load the storage device driver intro kernel. To revert changes, just rename the usb module blacklisted back to its old name.

# cd /lib/modules/`uname -r`/kernel/drivers/usb/storage/
# mv usb-storage.ko.xz.blacklist usb-storage.ko.xz

However, this method applies only to runtime kernel modules. In case you want to blacklist USB storage modules form all available kernels in the system, enter each kernel module directory version path and rename the usb-storage.ko.xz to usb-storage.ko.xz.blacklist.

Source

Showterm.io – A Terminal/Shell Recording, Upload and Share Tool for Linux

For recording Desktop screen there are a bunch of software’s available on the web, but have you ever thought about recording your Terminal? Well, it’s very much possible thanks to this nifty little program called Showterm.

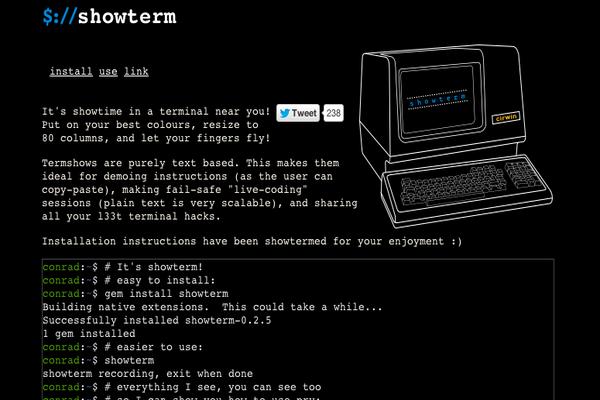
Install Showterm.io in Linux

Install Showterm.io in Linux

What is Showterm?

Showterm is an open source terminal record and upload application that lets you easy to record how-to in your terminal. It will record all your terminal activity in text-base and upload to showterm.io as a video and then generates a link for you to share with your team-mates or embed it in your website as an iframe. Here’s an example of Demo:

Installation of Showterm in Linux

You can install showterm tool using two different methods. The recommended way is to use ruby, if you’ve rubycorrectly installed and configured on your system, then you can install it using gem command. If ruby doesn’t installed, you can install it using following commands.

On Debian/Ubuntu/Linux Mint

# sudo apt-get install ruby rubygems
# sudo gem install showterm
Sample Output
[sudo] password for tecmint: 
Fetching: showterm-0.5.0.gem (100%)
Building native extensions.  This could take a while...
Successfully installed showterm-0.5.0
1 gem installed
Installing ri documentation for showterm-0.5.0...
Installing RDoc documentation for showterm-0.5.0...

On RHEL/CentOS/Fedora

# yum install ruby rubygems
# gem install showterm
Sample Output
Building native extensions.  This could take a while...
Successfully installed showterm-0.5.0
1 gem installed
Installing ri documentation for showterm-0.5.0...
Installing RDoc documentation for showterm-0.5.0...

If your system does not have ruby configured correctly, you can install showterm in your bin directory with the following commands.

$ curl showterm.io/showterm > ~/bin/showterm
$ chmod +x ~/bin/showterm

How to Use Showterm

The syntax to start recording is “showterm [program to run]“. If you omit the program to run and just type in “showterm“.

# showterm

It’ll start recording your shell. Once you are done recording, you can stop it by typing in either exit or “Ctrl­D“.

# exit

Once you type exit it will record and upload your actions. When finished upload, it will generate a link at the end of each recording which you can share.

showterm recording finished.
Uploading...
http://showterm.io/9d34dc53ab91185448ef8

Here is a showterm recording that shows it’s usage:

I will use two showterm recording windows so as to demonstrate how to use it. This is the main showterm recording window inside which I will start another showterm window so as to demonstrate how to use it. In other words, I will use showterm itself to demonstrate how to use showterm! Isn’t that cool?

I start the first showterm recording window and then start another recording window inside the first window by typing command “showterm“.

Now whatever I do here will be recorded in both the first and second showterm window. Typing in exit once will take us out of the second showterm window and typing in exit again will take us out of the first showterm window.

You can also change the speed at which it is played or stop it completely by appending the following to the links:

  1. #slow : To make it go slower. It actually plays the recording at real time speed.
  2. #fast : To make it go faster.It actually plays the recording at double the original speed.
  3. #stop : To stop it.

For example, you can slow the showterm recording by appending #slow to this link as shown below.

http://showterm.io/d1311caa9df1aa7cdb828#slow

Embedding with iframes

If you want to embed showterms in your website, you can embed it using the iframe tag. For example, to embed link “http://showterm.io/d1311caa9df1aa7cdb828“, you can add the following iframe code to your website.

<iframe src=”http://showterm.io/d1311caa9df1aa7cdb828” width=”640” height=”480”></iframe>

Conclusion

There’s a whole range of applications for it! Whether you are teaching a class full of students or want to teach someone about how to install an application or show them how to run a particular program on terminal, showterm is the way to go!

Also, it’s an open source application so, if you want to contribute to it, here’s the link to its source:

  1. Showterm Homepage
  2. Showterm Client on GitHub
  3. Showterm Server on GitHub

Read AlsoRecord Programs and Games Using Simple Screen Recorder

Source

Zulip – Most Productive Chat Application for Group or Team Chat

Zulip is an open source, powerful and easily extendable group or team chat application powered by Electron and React Native. It runs on every major operating system: Linux, Windows, MacOS; Android, iOS, and also has a web client.

It supports over 90 native integrations with external applications, under different categories including interactive bots, version control (Github, Codebase, Bitbucket etc.), communication, customer support, deployment, financial (Stripe), marketing, monitoring tools (Nagios and more), integration frameworks, productivity (Drop box, Google calender etc.) and so many others.

Zulip Features:

  • Supports various types of notifications.
  • Supports keyboard shortcuts.
  • Supports a multilanguage spellchecker.
  • Allows you to sign in to multiple teams.
  • Offers a RESTful API and Python bindings for integration purposes.
  • Supports a multitude of languages.
  • Supports video calls and chat history.
  • Also allows for full-text full-history search.
  • Supports invite-only conversations.
  • Supports private one-on-one or group conversations.
  • Allows you to keep track of messages that are of interest to you.
  • Shows who is currently online.
  • Supports draft messages.
  • Also supports typing notifications and much more.

How to Install Zulip Chat Application on Linux

On Debian/Ubuntu systems, you can install it from the Zulip desktop apt repository via the apt command.

First setup the zulip desktop app repository on your system and add its signing key, as follows, from a terminal.

$ sudo apt-key adv --keyserver pool.sks-keyservers.net --recv 69AD12704E71A4803DCA3A682424BE5AE9BD10D9
$ echo "deb https://dl.bintray.com/zulip/debian/ stable main" | sudo tee -a /etc/apt/sources.list.d/zulip.list

Then update your apt package sources cache and install the zulip client as shown.

$ sudo apt update
$ sudo apt install zulip

Once the installation is complete, search for zulip from your system menu and launch it, or run the zulip command from a terminal.

$ zulip

On other Linux distributions, you can install it via an AppImage. Go to the download page or use the wget command below to grab the appimage.

$ wget -c https://github.com/zulip/zulip-electron/releases/download/v1.9.0/Zulip-1.9.0-x86_64.AppImage

After downloading it, make the file executable and run it.

$ chmod a+x Zulip-x.x.x-x86_64.AppImage 
$ ./Zulip-x.x.x-x86_64.AppImage 

Note: If you use it this way, the app will not update automatically, you will need to repeat the above instructions to upgrade to newer versions.

How to Use Zulip Chat Application

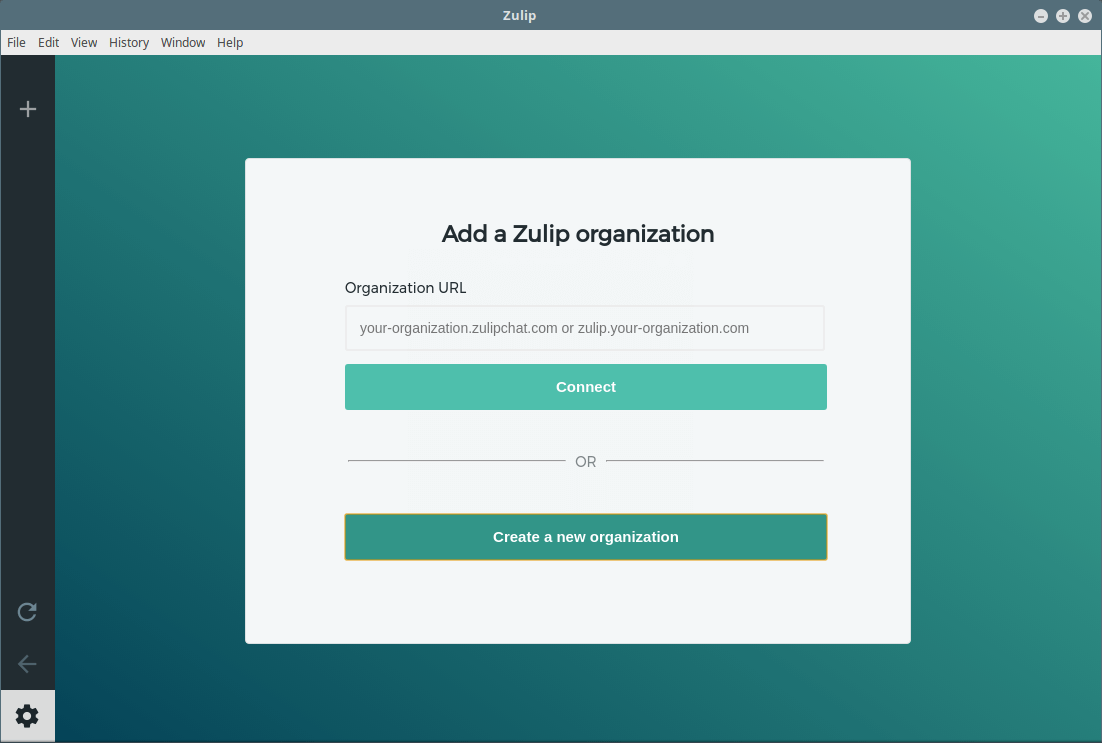
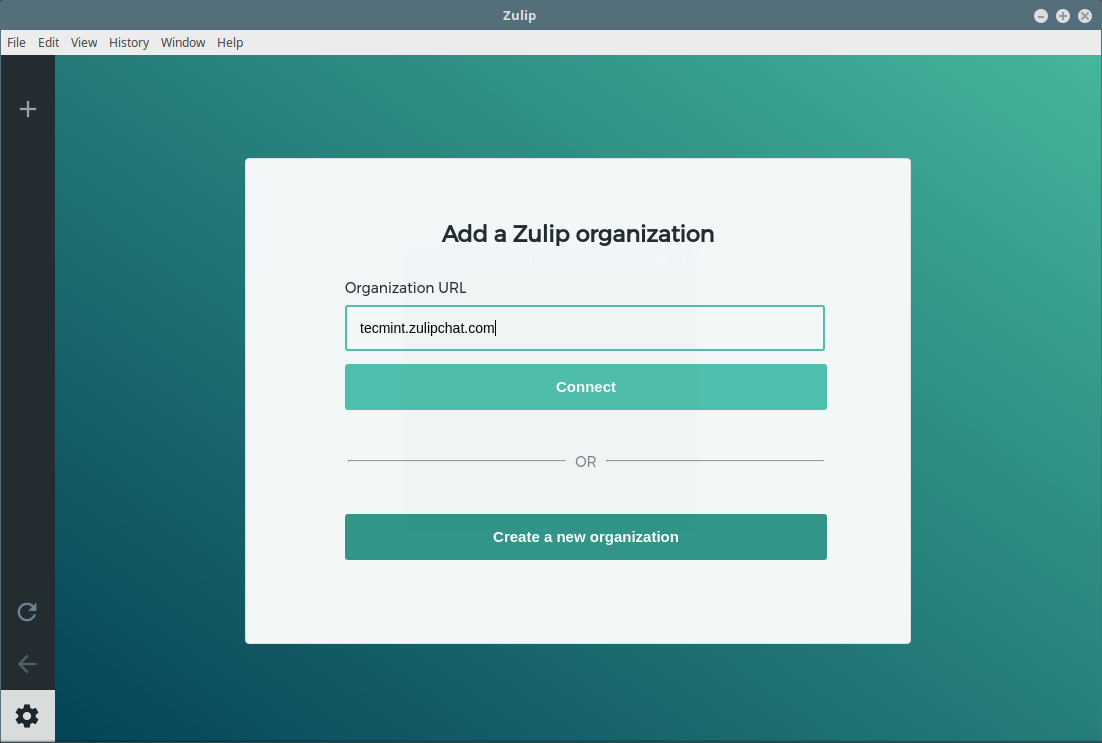
When you launch zulip for the first time, you will land in the interface shown in the following screenshot, where you can add an organization. Click on Create a new organization, you will be redirected to the zulip website where you can create a new organization.

Create Zulip Organization

Create Zulip Organization

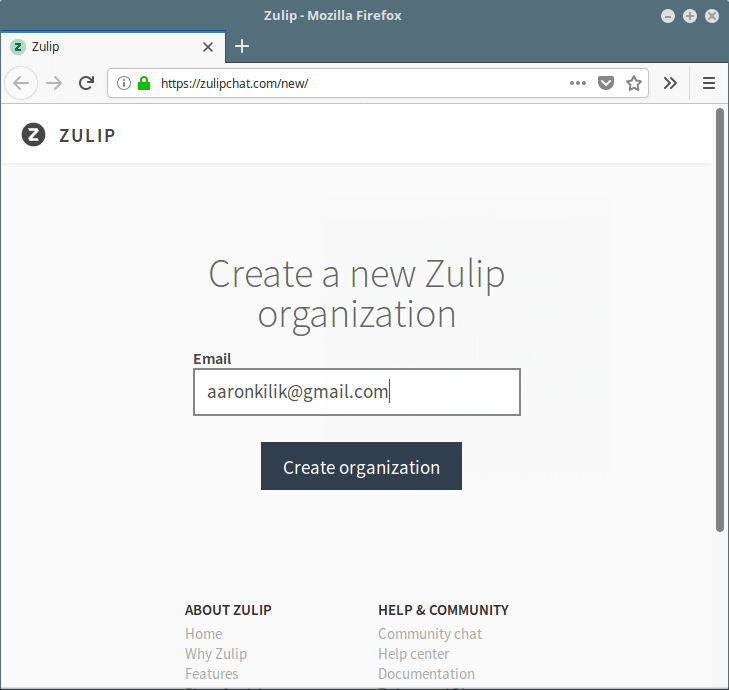
Add your email address and click on Create organization.

Add Organization Email

Add Organization Email

Next, a link to complete your signup will be sent to your email. After opening the link, register by providing your full name, password, organization name, organization URL (address you’ll use to log in to your organization) and accept terms of service. Then click on Sign Up.

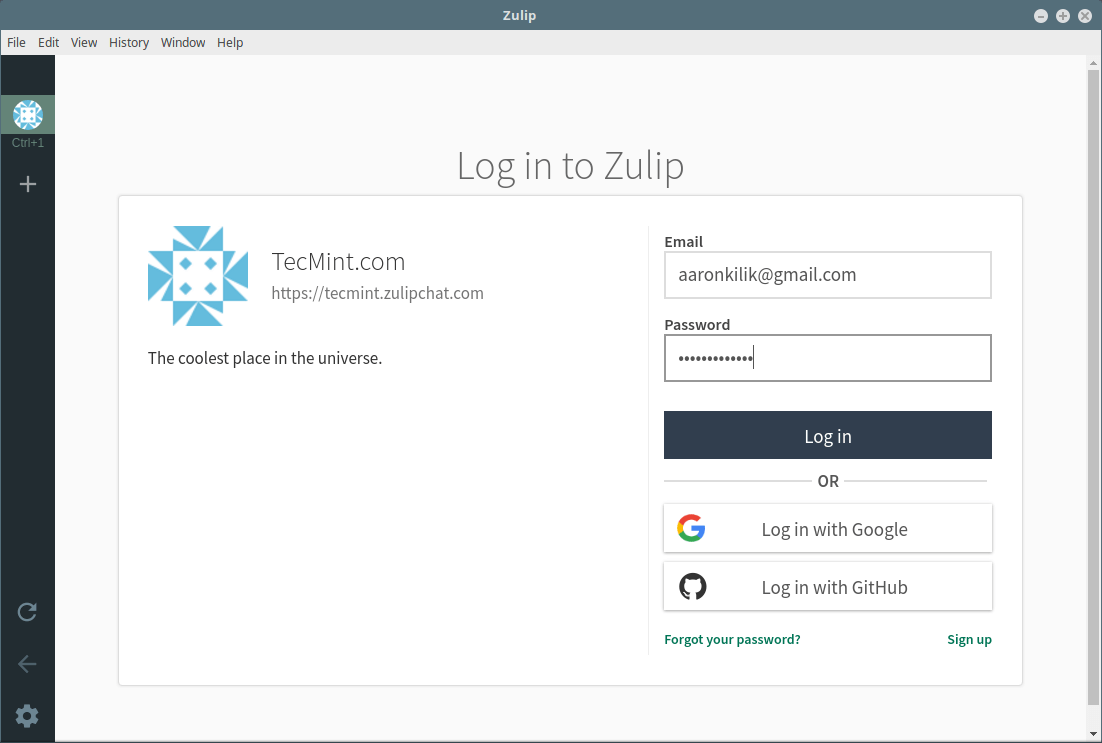
You can continue to use the web client or back on the desktop app, use your organization URL to log in to your organization.

Add Organization URL

Add Organization URL

Then log into zulip with your email address and password as shown in the following screenshot.

Login into Zulip Organization

Login into Zulip Organization

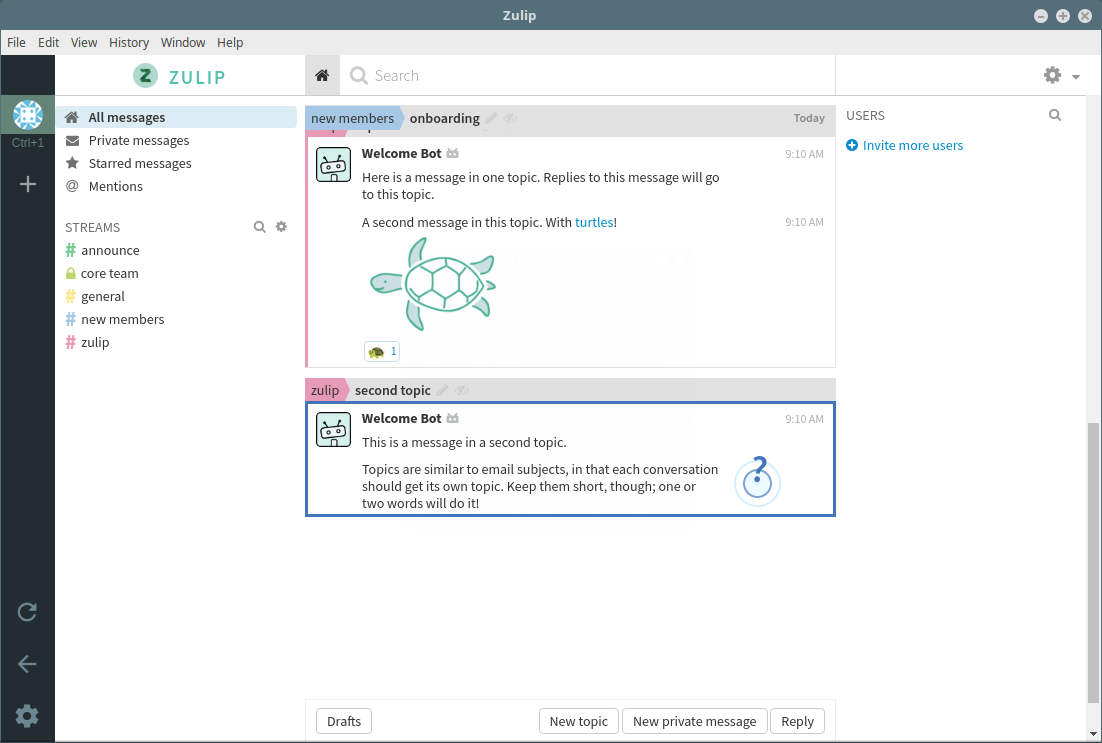
Zulip Organization Chat

Zulip Organization Chat

Next, you can invite more users in your organization, and customize zulip to fit your organization’s needs, under settings.

Zulip Homepagehttps://zulipchat.com/

Zulip is a cross-platform, powerful and highly extensible group chat application. Try it out and share your experience with us via the comment form below.

Source

4 Best Open Source Bulk SMS Gateway Software

Today, SMS (Short Message Service) has become more popular, it widely used all over the world in huge amounts for various business processes such as SMS Marketing, apart from the conventional communication platform. An SMS gateway allows a computer system to send or receive SMS to or from a telecommunications network, thus to or from mobile phones of clients.

There are a number of industry focused open source SMS gateway software solutions you can use to run your bulk SMS services. If you are searching for one, then this article is meant for you, you can check out the list below.

1. Jasmin – SMS Gateway

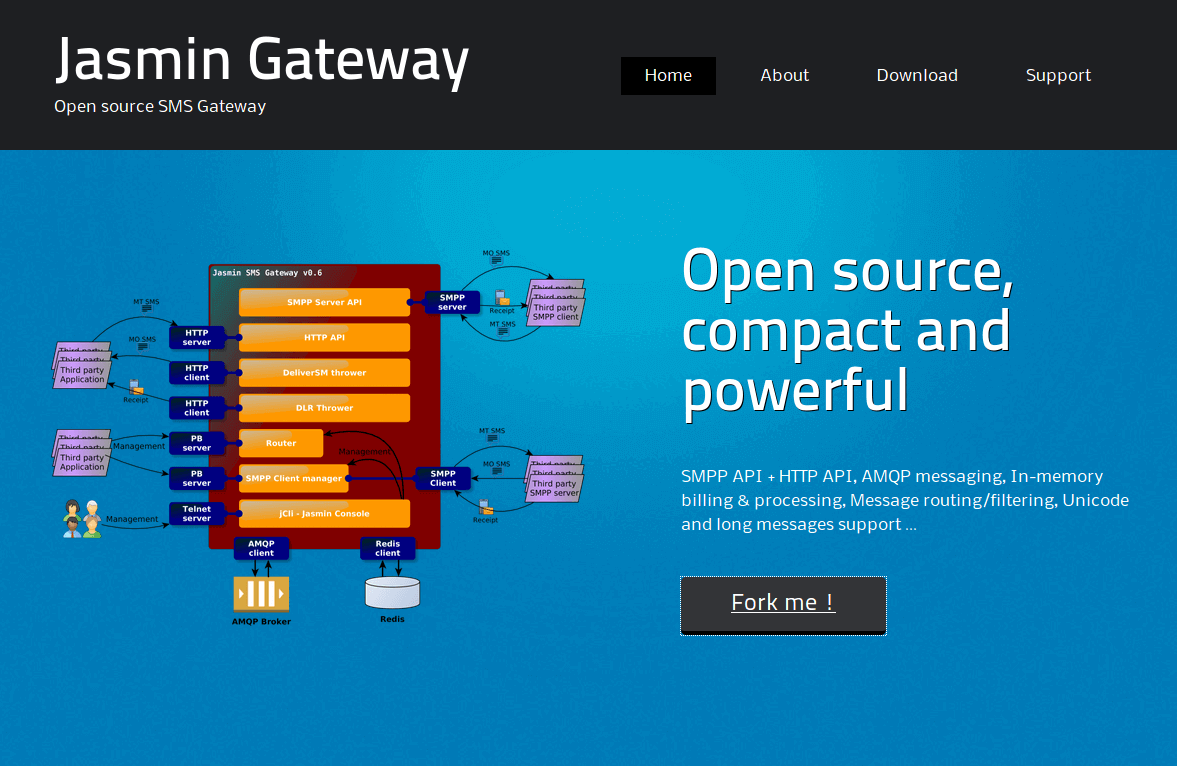
Jasmin is a free, open-source, very powerful, easily customizable, and high-performance SMS Gateway solution, built for full in-memory execution. It is intended for environments with traffic-clogged systems to meet specific business message exchange needs.

Jasmin SMS Gateway

Jasmin SMS Gateway

It comes with several enterprise-grade features for message exchange such as a web UI for SMS management, standard and advanced message filtering, SMPP client/server, HTTP client/server, AMQP messaging, flexible in-memory billing and processing, advanced message routing/filtering, Unicode and long messages support.

It allows for high availability services through auto reconnection and re-routing procedures during the busiest hours or link failover. Jasim supports intelligent routing configurable in real-time via an API, CLI interface or a web backend, and so much more.

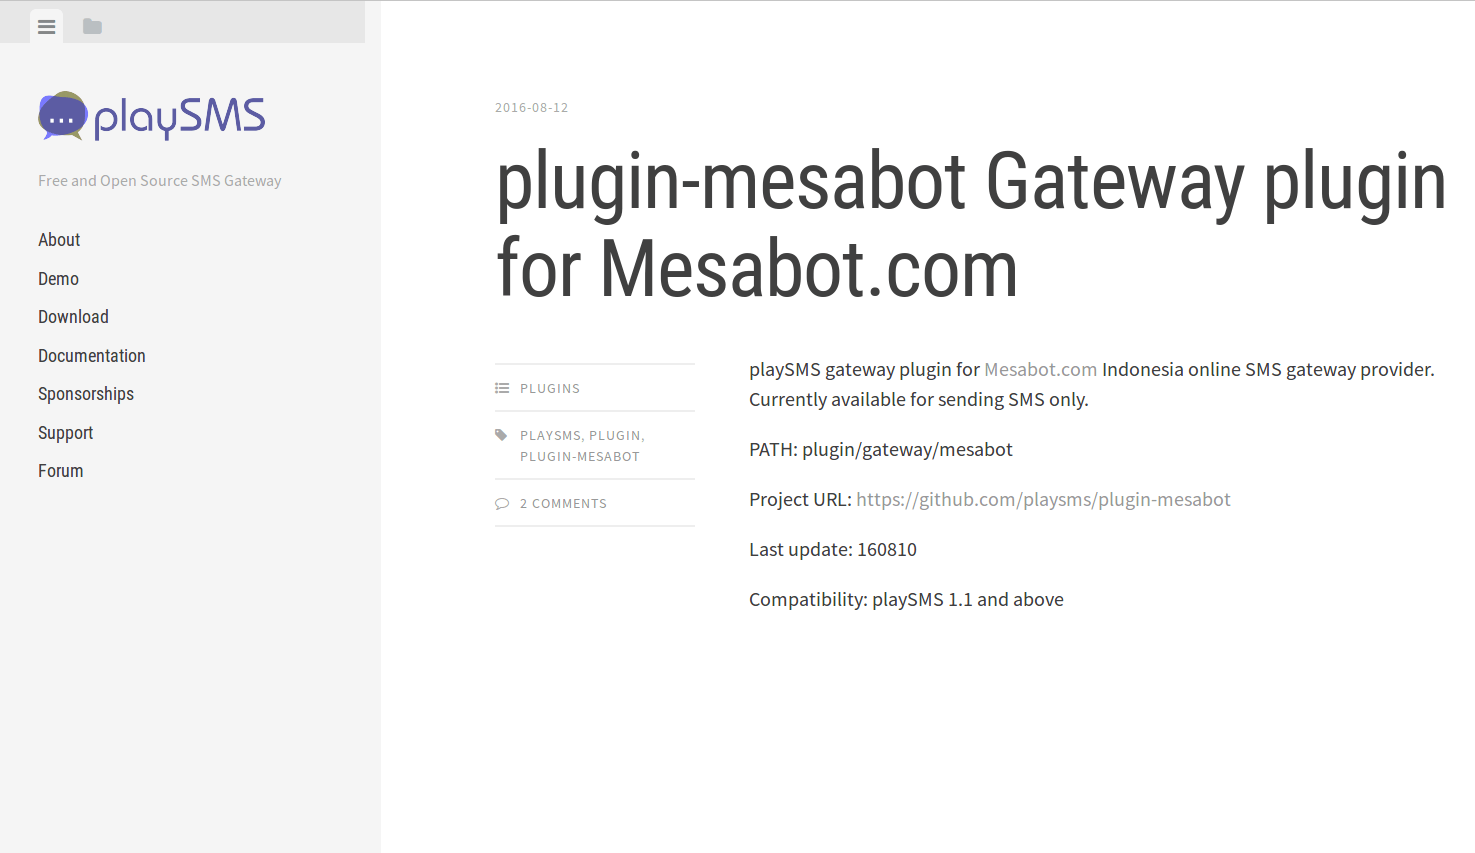
2. PlaySMS – SMS Gateway

PlaySMS is a free, open source, flexible and fully-featured web-based SMS management system. It can be used for services such as an SMS gateway, bulk SMS provider, personal messaging tool, enterprise and group communication system, and it can handle large amount of SMS. Notably, you can configure multiple domains on a single playSMS installation (with site branding for reseller supports).

PlaySMS - SMS Gateway

PlaySMS – SMS Gateway

It supports various ways of handling and routing SMS simply from web-based mobile portal system, with a multi-language user interface. For Linux geeks, PlaySMS can also be used to send SMS command, execute server side shell script via SMS. In addition, there is an Android app you can use, available on Google Play Store, and more.

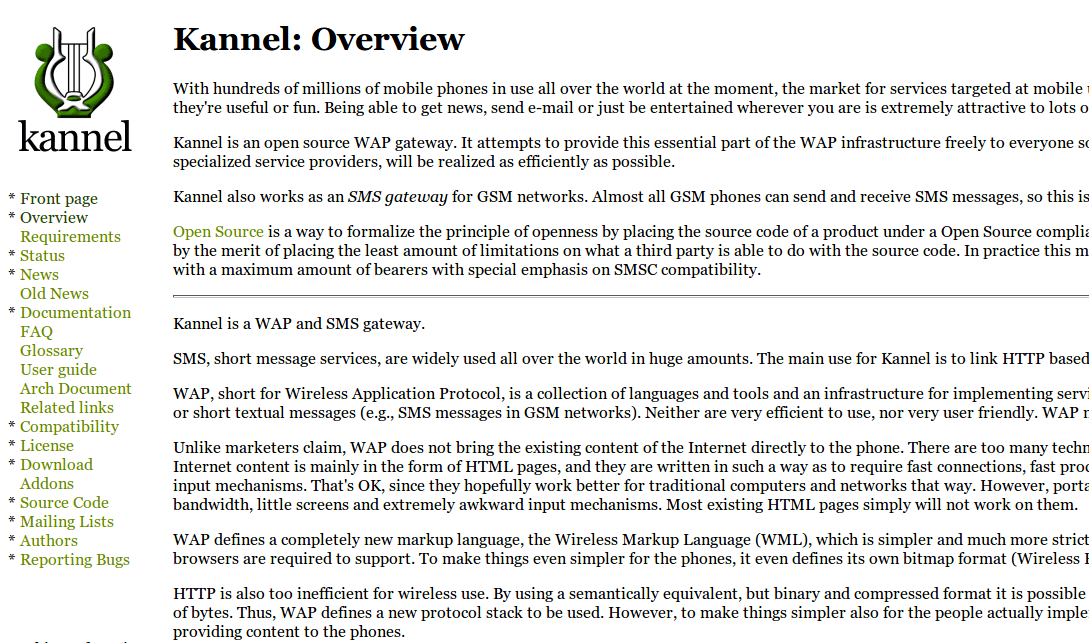
3. Kannel – WAP and SMS Gateway

Kannel is a free, open source, very powerful and widely used popular WAP (Wireless Application Protocol) and SMS gateway solution. It is primarily developed on Linux systems, and can be ported to other Unix-like systems. It is used for SMS exchange, serving WAP Push service indications, as well as providing mobile internet access.

Kannel WAP and SMS Gateway

Kannel WAP and SMS Gateway

Kannel is designed to link HTTP based services to various SMS service centers using little known protocols, and supports most if not all GSM phones for exchanging SMS messages.

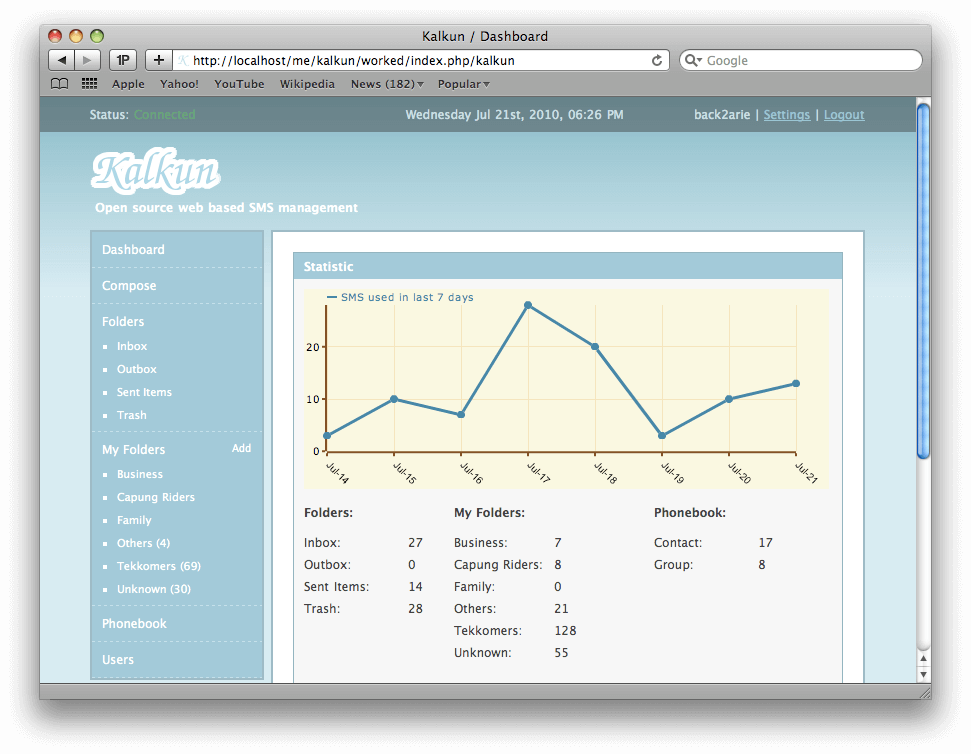
4. Kalkun – SMS Gateway and Management

Kalkun is a free, open source, pluggable, secure, and simple web-based SMS management system. It employs gammu-smsd as an SMS gateway engine to send and retrieve messages from your phone/modem. You can use the default gateway (gammu) or configure your own gateways.

Kalkun SMS Gateway and Management

Kalkun SMS Gateway and Management

It has multi-user support, allows you to setup multiple modems, has a spam filter, supports various SMS templates. Kalkun also helps you to exchange SMS between your custom applications using it’s simple API, and more.

That’s all! If you know of any other open source SMS gateway solutions missing in this list, but deserve to be here, let us know via the feedback form below, we will be grateful.

Source

Install LibreOffice 6.0.4 in RHEL/CentOS/Fedora and Debian/Ubuntu/Linux Mint

LibreOffice is an open source and much powerful personal productivity office suit for LinuxWindows & Mac, that provides feature rich functions for word document, data processing, spreadsheets, presentation, drawing, Calc, Math and much more. LibreOffice has large number of satisfied users across the globe with almost 120million downloads as of now. It supports more than 110 languages and runs on all major operating systems.

The Document Foundation team proudly announced the first major release of LibreOffice 6.0.4 on May 09, 2018, is now available for all major platforms including LinuxWindows and Mac OS.

This new update features a large number of exciting new features, performance and improvements and is targeted to all kinds of users, but especially appealing for enterprise, early adopters and power users.

There are many other changes and features included in the newest LibreOffice 6.0.4 – for a complete list of new features, see the release announcement page.

LibreOffice 6.0.4 Requirements

  1. Kernel 2.6.18 or higher version
  2. glibc2 version 2.5 or higher version
  3. gtk version 2.10.4 or higher version
  4. Minimum 256MB and recommended 512MB RAM
  5. 1.55GB available Hard disk space
  6. Desktop (Gnome or KDE)

Install LibreOffice 6.0.4 on Linux

The installation instructions provided here are for LibreOffice 6.0.4 using language US English on a 64-Bitsystem. For 32-Bit systems, there will be minor differences in directory names, but the installation process is same and hope the installation instructions provide here are not so difficult.

Step 1: Downloading LibreOffice 6.0.4

Select the package for download based on your system bit (i.e. for a 32-bit or 64-bit) using Wget command.

For RHEL/CentOS/Fedora
# cd /tmp

---------------------------- On 32-bit Systems ---------------------------- 
# wget http://download.documentfoundation.org/libreoffice/stable/6.0.4/rpm/x86/LibreOffice_6.0.4_Linux_x86_rpm.tar.gz


---------------------------- On 64-bit Systems ---------------------------- 
# wget http://download.documentfoundation.org/libreoffice/stable/6.0.4/rpm/x86_64/LibreOffice_6.0.4_Linux_x86-64_rpm.tar.gz
Download LibreOffice 6.0.4 on CentOS 7
[root@TecMint ~]# wget http://download.documentfoundation.org/libreoffice/stable/6.0.4/rpm/x86_64/LibreOffice_6.0.4_Linux_x86-64_rpm.tar.gz
--2018-05-09 01:11:08--  http://download.documentfoundation.org/libreoffice/stable/6.0.4/rpm/x86_64/LibreOffice_6.0.4_Linux_x86-64_rpm.tar.gz
Resolving download.documentfoundation.org (download.documentfoundation.org)... 89.238.68.185, 2a00:1828:a012:185::1
Connecting to download.documentfoundation.org (download.documentfoundation.org)|89.238.68.185|:80... connected.
HTTP request sent, awaiting response... 302 Found
Location: https://ftp.gwdg.de/pub/tdf/libreoffice/stable/6.0.4/rpm/x86_64/LibreOffice_6.0.4_Linux_x86-64_rpm.tar.gz [following]
--2018-05-09 01:11:09--  https://ftp.gwdg.de/pub/tdf/libreoffice/stable/6.0.4/rpm/x86_64/LibreOffice_6.0.4_Linux_x86-64_rpm.tar.gz
Resolving ftp.gwdg.de (ftp.gwdg.de)... 134.76.12.6, 2001:638:60f:110::1:2
Connecting to ftp.gwdg.de (ftp.gwdg.de)|134.76.12.6|:443... connected.
HTTP request sent, awaiting response... 200 OK
Length: 213537364 (204M) [application/octet-stream]
Saving to: ‘LibreOffice_6.0.4_Linux_x86-64_rpm.tar.gz’

100%[=================================================================================================================================>] 21,35,37,364  310KB/s   in 15m 35s

2018-02-01 01:26:46 (223 KB/s) - ‘LibreOffice_6.0.4_Linux_x86-64_rpm.tar.gz’ saved [213537364/213537364]
For Debian/Ubuntu/LinuxMint
---------------------------- On 32-bit Systems ---------------------------- 
$ wget http://download.documentfoundation.org/libreoffice/stable/6.0.4/deb/x86/LibreOffice_6.0.4_Linux_x86_deb.tar.gz

---------------------------- On 64-bit Systems ---------------------------- 
$ wget http://download.documentfoundation.org/libreoffice/stable/6.0.4/deb/x86_64/LibreOffice_6.0.4_Linux_x86-64_deb.tar.gz
Download LibreOffice 6.0.4 on Ubuntu
tecmint  ~  wget http://download.documentfoundation.org/libreoffice/stable/6.0.4/deb/x86_64/LibreOffice_6.0.4_Linux_x86-64_deb.tar.gz
--2018-05-09 11:57:23--  http://download.documentfoundation.org/libreoffice/stable/6.0.4/deb/x86_64/LibreOffice_6.0.4_Linux_x86-64_deb.tar.gz
Resolving download.documentfoundation.org (download.documentfoundation.org)... 89.238.68.185
Connecting to download.documentfoundation.org (download.documentfoundation.org)|89.238.68.185|:80... connected.
HTTP request sent, awaiting response... 302 Found
Location: https://ftp.gwdg.de/pub/tdf/libreoffice/stable/6.0.4/deb/x86_64/LibreOffice_6.0.4_Linux_x86-64_deb.tar.gz [following]
--2018-05-09 11:57:23--  https://ftp.gwdg.de/pub/tdf/libreoffice/stable/6.0.4/deb/x86_64/LibreOffice_6.0.4_Linux_x86-64_deb.tar.gz
Resolving ftp.gwdg.de (ftp.gwdg.de)... 134.76.12.6
Connecting to ftp.gwdg.de (ftp.gwdg.de)|134.76.12.6|:443... connected.
HTTP request sent, awaiting response... 200 OK
Length: 213964181 (204M) [application/octet-stream]
Saving to: ‘LibreOffice_6.0.4_Linux_x86-64_deb.tar.gz’

LibreOffice_6.0.0_Linux_x86-64_deb.tar.gz  100%[========================================================================================>] 204.05M   319KB/s    in 15m 17s 

2018-02-01 12:12:41 (228 KB/s) - ‘LibreOffice_6.0.4_Linux_x86-64_deb.tar.gz’ saved [213964181/213964181]

Step 2: Removing Old LibreOffice or OpenOffice Versions

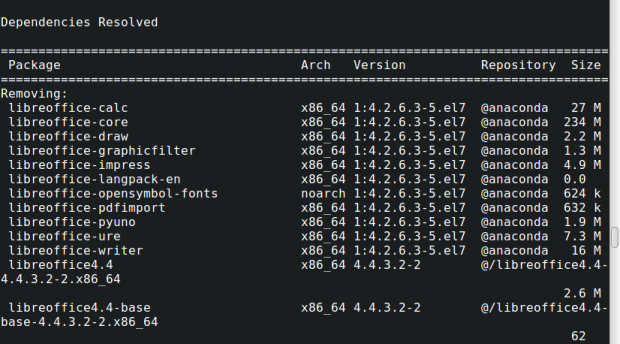
If any previously installed LibreOffice or OpenOffice versions you have, remove it using following command.

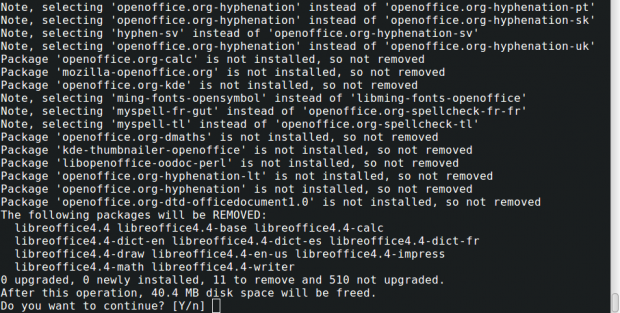
# yum remove openoffice* libreoffice*			[on RedHat based Systems]

Remove Old LibreOffice 4 on CentOS

Remove Old LibreOffice 4 on CentOS

$ sudo apt-get remove openoffice* libreoffice*		[On Debian based Systems]

Remove LibreOffice 4 on Ubuntu

Remove LibreOffice 4 on Ubuntu

Step 3: Extracting LibreOffice 6.0.4 Package

After downloading the LibreOffice 6.0.4 package, use tar command to extract it under /tmp directory or in a directory of your choice.

On RHEL/CentOS/Fedora
# tar -xvf LibreOffice_6.0.4_Linux_x86_rpm.tar.gz		[On 32-Bit Systems]	
# tar -xvf LibreOffice_6.0.4_Linux_x86-64_rpm.tar.gz	        [On 64-Bit Systems]	
On Debian/Ubuntu/Linux Mint
$ tar -xvf LibreOffice_6.0.4_Linux_x86_deb.tar.gz		[On 32-Bit Systems]	
$ tar -xvf LibreOffice_6.0.4_Linux_x86-64_deb.tar.gz		[On 64-Bit Systems]	

Step 4: Installing LibreOffice 6.0.4 Package

After extracting the package, you will get a directory and under this there will be a sub-directory called RPMS. Now, run the following command to install it.

On RHEL/CentOS/Fedora
## For 32 Bit OS ##
# cd /tmp/LibreOffice_6.0.4.2_Linux_x86_rpm/RPMS/
# yum localinstall *.rpm
OR
# dnf install *.rpm    [On Fedora 23+ versions]

## For 64 Bit OS ##
# cd /tmp/LibreOffice_6.0.4.2_Linux_x86-64_rpm/RPMS/
# yum localinstall *.rpm
OR
# dnf install *.rpm    [On Fedora 23+ versions]
Installing LibreOffice 6.0.4 on CentOS 7
[root@localhost RPMS]# yum localinstall *.rpm
Dependencies Resolved

============================================================================================================================================================================
 Package                                                  Arch          Version            Repository                                                                  Size
============================================================================================================================================================================
Installing:
 libobasis6.0-base                                        x86_64        6.0.4.2-2          /libobasis6.0-base-6.0.4.2-2.x86_64                                        7.6 M
 libobasis6.0-calc                                        x86_64        6.0.4.2-2          /libobasis6.0-calc-6.0.4.2-2.x86_64                                         29 M
 libobasis6.0-core                                        x86_64        6.0.4.2-2          /libobasis6.0-core-6.0.4.2-2.x86_64                                        267 M
 libobasis6.0-draw                                        x86_64        6.0.4.2-2          /libobasis6.0-draw-6.0.4.2-2.x86_64                                         48 k
 libobasis6.0-en-US                                       x86_64        6.0.4.2-2          /libobasis6.0-en-US-6.0.4.2-2.x86_64                                       164 k
 libobasis6.0-extension-beanshell-script-provider         x86_64        6.0.4.2-2          /libobasis6.0-extension-beanshell-script-provider-6.0.4.2-2.x86_64         398 k
 libobasis6.0-extension-javascript-script-provider        x86_64        6.0.4.2-2          /libobasis6.0-extension-javascript-script-provider-6.0.4.2-2.x86_64        626 k
 libobasis6.0-extension-mediawiki-publisher               x86_64        6.0.4.2-2          /libobasis6.0-extension-mediawiki-publisher-6.0.4.2-2.x86_64               4.3 M
 libobasis6.0-extension-nlpsolver                         x86_64        6.0.4.2-2          /libobasis6.0-extension-nlpsolver-6.0.4.2-2.x86_64                         2.1 M
 libobasis6.0-extension-pdf-import                        x86_64        6.0.4.2-2          /libobasis6.0-extension-pdf-import-6.0.4.2-2.x86_64                        2.2 M
 libobasis6.0-extension-report-builder                    x86_64        6.0.4.2-2          /libobasis6.0-extension-report-builder-6.0.4.2-2.x86_64                    6.0 M
 libobasis6.0-firebird                                    x86_64        6.0.4.2-2          /libobasis6.0-firebird-6.0.4.2-2.x86_64                                     11 M
 libobasis6.0-gnome-integration                           x86_64        6.0.4.2-2          /libobasis6.0-gnome-integration-6.0.4.2-2.x86_64                           1.2 M
 libobasis6.0-graphicfilter                               x86_64        6.0.4.2-2          /libobasis6.0-graphicfilter-6.0.4.2-2.x86_64                               4.2 M
 libobasis6.0-images                                      x86_64        6.0.4.2-2          /libobasis6.0-images-6.0.4.2-2.x86_64                                       18 M
 libobasis6.0-impress                                     x86_64        6.0.4.2-2          /libobasis6.0-impress-6.0.4.2-2.x86_64                                     2.2 M
 libobasis6.0-kde-integration                             x86_64        6.0.4.2-2          /libobasis6.0-kde-integration-6.0.4.2-2.x86_64                             238 k
 libobasis6.0-librelogo                                   x86_64        6.0.4.2-2          /libobasis6.0-librelogo-6.0.4.2-2.x86_64                                   741 k
 libobasis6.0-math                                        x86_64        6.0.4.2-2          /libobasis6.0-math-6.0.4.2-2.x86_64                                        1.6 M
 libobasis6.0-ogltrans                                    x86_64        6.0.4.2-2          /libobasis6.0-ogltrans-6.0.4.2-2.x86_64                                    298 k
 libobasis6.0-onlineupdate                                x86_64        6.0.4.2-2          /libobasis6.0-onlineupdate-6.0.4.2-2.x86_64                                433 k
 libobasis6.0-ooofonts                                    x86_64        6.0.4.2-2          /libobasis6.0-ooofonts-6.0.4.2-2.x86_64                                     67 M
 libobasis6.0-ooolinguistic                               x86_64        6.0.4.2-2          /libobasis6.0-ooolinguistic-6.0.4.2-2.x86_64                               1.4 k
 libobasis6.0-postgresql-sdbc                             x86_64        6.0.4.2-2          /libobasis6.0-postgresql-sdbc-6.0.4.2-2.x86_64                             3.5 M
 libobasis6.0-python-script-provider                      x86_64        6.0.4.2-2          /libobasis6.0-python-script-provider-6.0.4.2-2.x86_64                       41 k
 libobasis6.0-pyuno                                       x86_64        6.0.4.2-2          /libobasis6.0-pyuno-6.0.4.2-2.x86_64                                        22 M
 libobasis6.0-writer                                      x86_64        6.0.4.2-2          /libobasis6.0-writer-6.0.4.2-2.x86_64                                       16 M
 libobasis6.0-xsltfilter                                  x86_64        6.0.4.2-2          /libobasis6.0-xsltfilter-6.0.4.2-2.x86_64                                  4.3 M
 libreoffice6.0                                           x86_64        6.0.4.2-2          /libreoffice6.0-6.0.4.2-2.x86_64                                           4.5 M
 libreoffice6.0-base                                      x86_64        6.0.4.2-2          /libreoffice6.0-base-6.0.4.2-2.x86_64                                       63  
 libreoffice6.0-calc                                      x86_64        6.0.4.2-2          /libreoffice6.0-calc-6.0.4.2-2.x86_64                                       63  
 libreoffice6.0-dict-en                                   x86_64        6.0.4.2-2          /libreoffice6.0-dict-en-6.0.4.2-2.x86_64                                    24 M
 libreoffice6.0-dict-es                                   x86_64        6.0.4.2-2          /libreoffice6.0-dict-es-6.0.4.2-2.x86_64                                   4.1 M
 libreoffice6.0-dict-fr                                   x86_64        6.0.4.2-2          /libreoffice6.0-dict-fr-6.0.4.2-2.x86_64                                   6.4 M
 libreoffice6.0-draw                                      x86_64        6.0.4.2-2          /libreoffice6.0-draw-6.0.4.2-2.x86_64                                       63  
 libreoffice6.0-en-US                                     x86_64        6.0.4.2-2          /libreoffice6.0-en-US-6.0.4.2-2.x86_64                                      16 k
 libreoffice6.0-freedesktop-menus                         noarch        6.0.4.2-2            /libreoffice6.0-freedesktop-menus-6.0.4.2-2.noarch                            30 M
 libreoffice6.0-impress                                   x86_64        6.0.4.2-2          /libreoffice6.0-impress-6.0.4.2-2.x86_64                                    66  
 libreoffice6.0-math                                      x86_64        6.0.4.2-2          /libreoffice6.0-math-6.0.4.2-2.x86_64                                       63  
 libreoffice6.0-ure                                       x86_64        6.0.4.2-2          /libreoffice6.0-ure-6.0.4.2-2.x86_64                                        38 M
 libreoffice6.0-writer                                    x86_64        6.0.4.2-2          /libreoffice6.0-writer-6.0.4.2-2.x86_64                                     65  

Transaction Summary
============================================================================================================================================================================
Install  41 Packages

Total size: 579 M
Installed size: 579 M
Is this ok [y/d/N]: y
On Debian/Ubuntu/Linux Mint
## For 32 Bit OS ##
$ cd /tmp/LibreOffice_6.0.4.2_Linux_x86_deb/DEBS/
$ sudo dpkg -i *.deb

## For 64 Bit OS ##
$ cd /tmp/LibreOffice_6.0.4.2_Linux_x86-64_deb/DEBS/
$ sudo dpkg -i *.deb
Installing LibreOffice 6.0.4 on Ubuntu
tecmint@TecMint /tmp/LibreOffice_6.0.4.2_Linux_x86-64_deb/DEBS $ sudo dpkg -i *.deb
Selecting previously unselected package libobasis6.0-base.
(Reading database ... 263169 files and directories currently installed.)
Preparing to unpack libobasis6.0-base_6.0.4.2-2_amd64.deb ...
Unpacking libobasis6.0-base (6.0.4.2-2) ...
Selecting previously unselected package libobasis6.0-calc.
Preparing to unpack libobasis6.0-calc_6.0.4.2-2_amd64.deb ...
Unpacking libobasis6.0-calc (6.0.4.2-2) ...
Selecting previously unselected package libobasis6.0-core.
Preparing to unpack libobasis6.0-core_6.0.4.2-2_amd64.deb ...
Unpacking libobasis6.0-core (6.0.4.2-2) ...
...

Step 5: Starting LibreOffice 6.0.4

Once the installation process completes you will have LibreOffice icons in your desktop under Applications –> Office menu or start the application by executing the following command on the terminal.

# libreoffice6.0

Step 6: Screenshot of LibreOffice 6.0.4

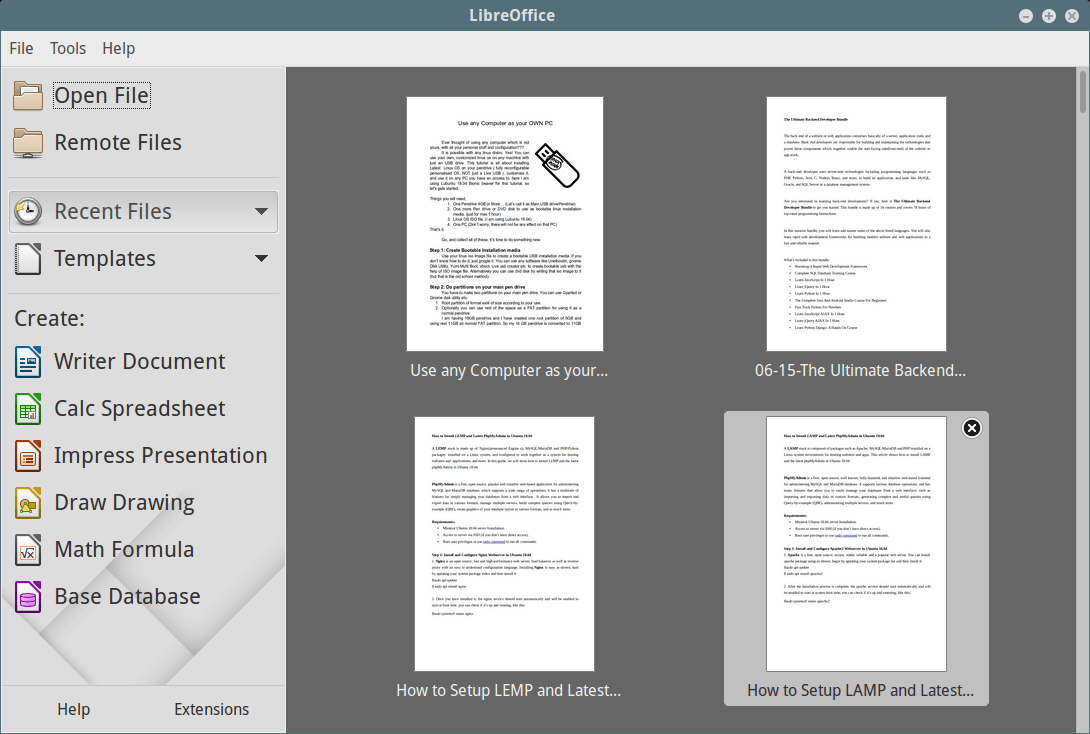
Please see the attached screenshot of LibreOffice 6.0.4 application under my CentOS 7.0.

LibreOffice 6.0.4 Running on CentOS 7

LibreOffice 6.0.4 Running on CentOS 7

Step 7: Installing a Language Pack

If you would like to install LibreOffice in your preferred language, you should select your language pack for installation. The installation instructions can be fount at Language Pack section.

Source

Gerbera – A UPnP Media Server That Let’s You Stream Media on Home Network

Gerbera is a feature-rich and powerful UPnP (Universal Plug and Play) media server with a pleasant and intuitive web user interface, which allows users to stream digital media (videos, images, audio etc..) through a home network and consume it on different types of UPnP compatible devices from mobile phone to tablets and many more.

Gerbera Features:

  • Allows you to browse and playback media via UpnP.
  • Supports metadata extraction from mp3, ogg, flac, jpeg, etc. files.
  • Highly flexible configuration, allowing you to control the behavior of various features of the server.
  • Supports user defined server layout based on extracted metadata.
  • Support for ContentDirectoryService container updates.
  • Offers exif thumbnail support.
  • Supports automatic directory rescans (timed, inotify).
  • Offers a nice Web UI with a tree view of the database and the file system, allowing to add/remove/edit/browse media.
  • Support for external URLs (create links to internet content and serve them via UPnP to your renderer).
  • Supports flexible media format transcoding via plugins / scripts and many more including a number of experimental features.

How to Install Gerbera – UPnP Media Server in Linux

On Ubuntu distribution, there is a PPA created and maintained by Stephen Czetty, from which you can install Gerbera using following commands.

$ sudo add-apt-repository ppa:stephenczetty/gerbera
$ sudo apt update
$ sudo apt install gerbera 

On Debian distribution, Gerbera is available in the testing and unstable repositories, which you can enable by adding the lines below in your /etc/apt/sources.list file.

# Testing repository - main, contrib and non-free branches
deb http://http.us.debian.org/debian testing main non-free contrib
deb-src http://http.us.debian.org/debian testing main non-free contrib

# Testing security updates repository
deb http://security.debian.org/ testing/updates main contrib non-free
deb-src http://security.debian.org/ testing/updates main contrib non-free

# Unstable repo main, contrib and non-free branches, no security updates here
deb http://http.us.debian.org/debian unstable main non-free contrib
deb-src http://http.us.debian.org/debian unstable main non-free contrib

Then update your system package sources cache and install gerbera with the following commands.

# apt update
# apt install gerbera

For other Linux distributions like GentooArch LinuxopenSUSECentOS, etc. follow Gerbera installation guide.

Once you have installed gerbera, start, enable and view the service status using the following commands.

$ sudo systemctl start gerbera.service 
$ sudo systemctl enable gerbera.service
$ sudo systemctl status gerbera.service

Note: If gerbera fails to start on your system, you need to do one of the following.

Check if the log file (/var/log/gerbera) has been created, otherwise create it as shown.

$ sudo touch /var/log/gerbera
$ sudo chown -Rv root:gerbera /var/log/gerbera
$ sudo chmod -Rv 0660 /var/log/gerbera

Secondly, define a network interface that your are currently using as the value of MT_INTERFACE environment variable, the default is “eth0” but if you are using wireless, then set this to something like “wlp1s0”. In Debian/Ubuntu, you can set these settings in /etc/default/gerbera file.

Getting Started with Gerbera Media Server Web UI

Gerbera service listens on port 49152, which you can use to access the web UI via a web browser as shown.

http://domain.com:49152
OR
http://ip-address:49152

Gerbera UI Error

Gerbera UI Error

If you get the error shown in the above screenshot, you need to enable the web UI from the gerbera configuration file.

$ sudo vim /etc/gerbera/config.xml

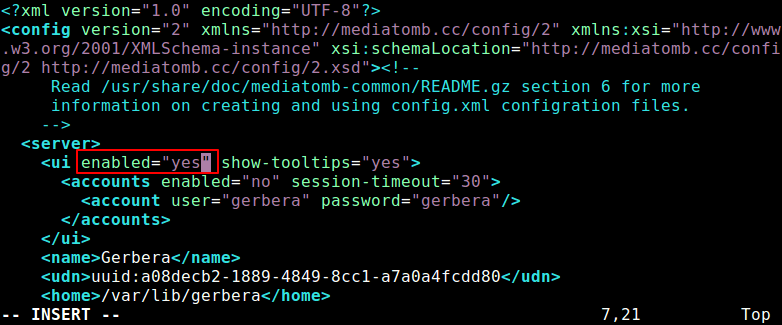
Change the value enabled=”no” to enabled=”yes” as shown in the following screenshot.

Enable Gerbera UI

Enable Gerbera UI

After making above changes, close the file and restart the gerbera service.

$ sudo systemctl restart gerbera.service

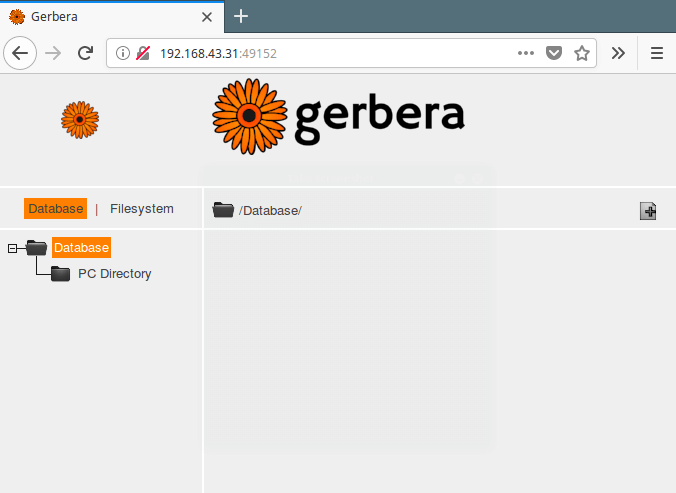
Now go back to your browser and try to open the UI once more in a new tab, this time around it should load. You will see two tabs:

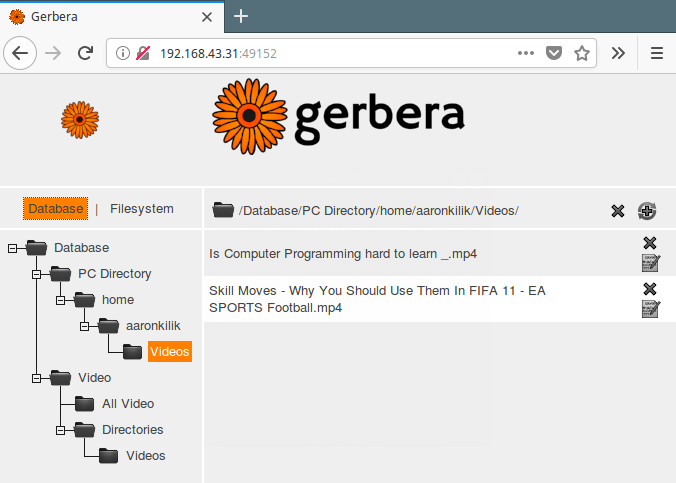
  • Database – shows the files that can be accessed by publicly.

Gerbera Web UI Database

Gerbera Web UI Database

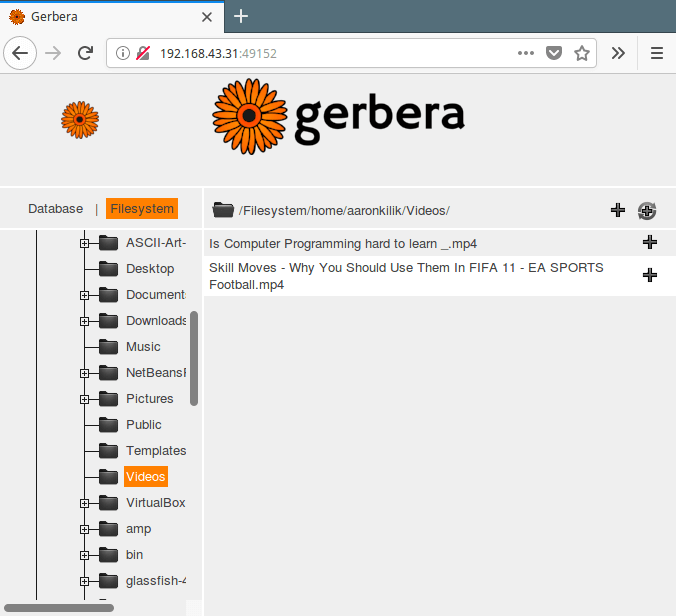
  • Filesystem – this is where you can browse files from your system and select them for streaming. To add a file, simply click on the plus (+) sign.

Gerbera File System

Gerbera File System

After adding files for streaming from the filesystem, the database interface should look like this.

Gerbera Database File System

Gerbera Database File System

Stream Media Files Using Gerbera on Your Home Network

At this point you can start streaming media files over your network from the gerbera server. To test it, we will use a mobile phone as a client. Start by installing a compatible upnp application (like BubbleUpnp) on your phone.

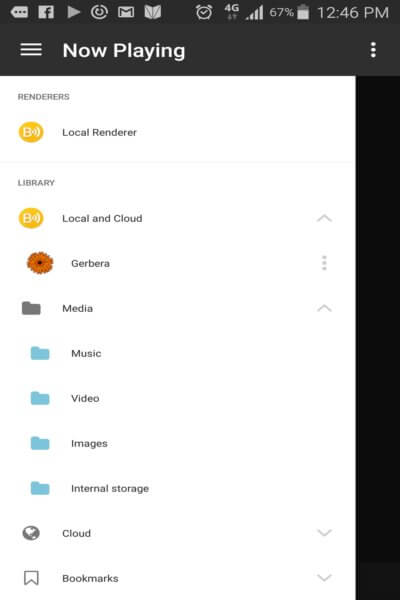
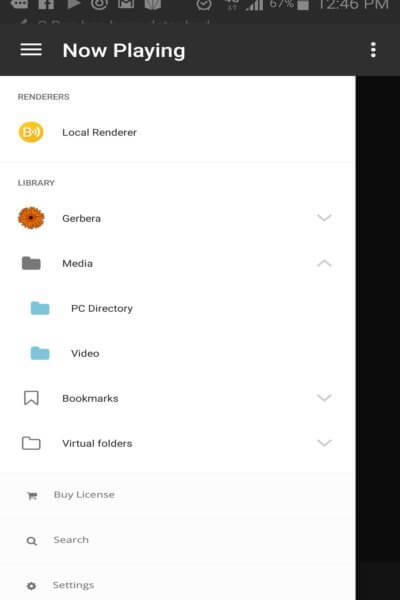
Once installed BubbleUpnp app, open it and on the menu, go to Library and click on Local and Cloud to view available servers, and the gerbera server we created should show in there. Click on it to access added directories and files in them.

Gerbera Media Server

Gerbera Media Server

Gerbera Filesystem View

Gerbera Filesystem View

Finally click on a file that you would like to stream.

Stream Files via Gerbera Server

Stream Files via Gerbera Server

For more information visit, Gerbera Github Repository: https://github.com/gerbera/gerbera.

Gerbera is a feature-rich and powerful Upnp media server, used to stream your digital media through your home network with a nice web user interface. Share your thoughts about it or ask a question via the feedback form.

Source

Lychee – A Great Looking Photo Management System for Linux

Lychee is a free, open source, elegant and easy-to-use photo-management system, which comes with all the necessary features you need for securely managing and sharing photos on your server. It allows you to easily manage (upload, move, rename, describe, delete or search) your photos in seconds from a simple web application.
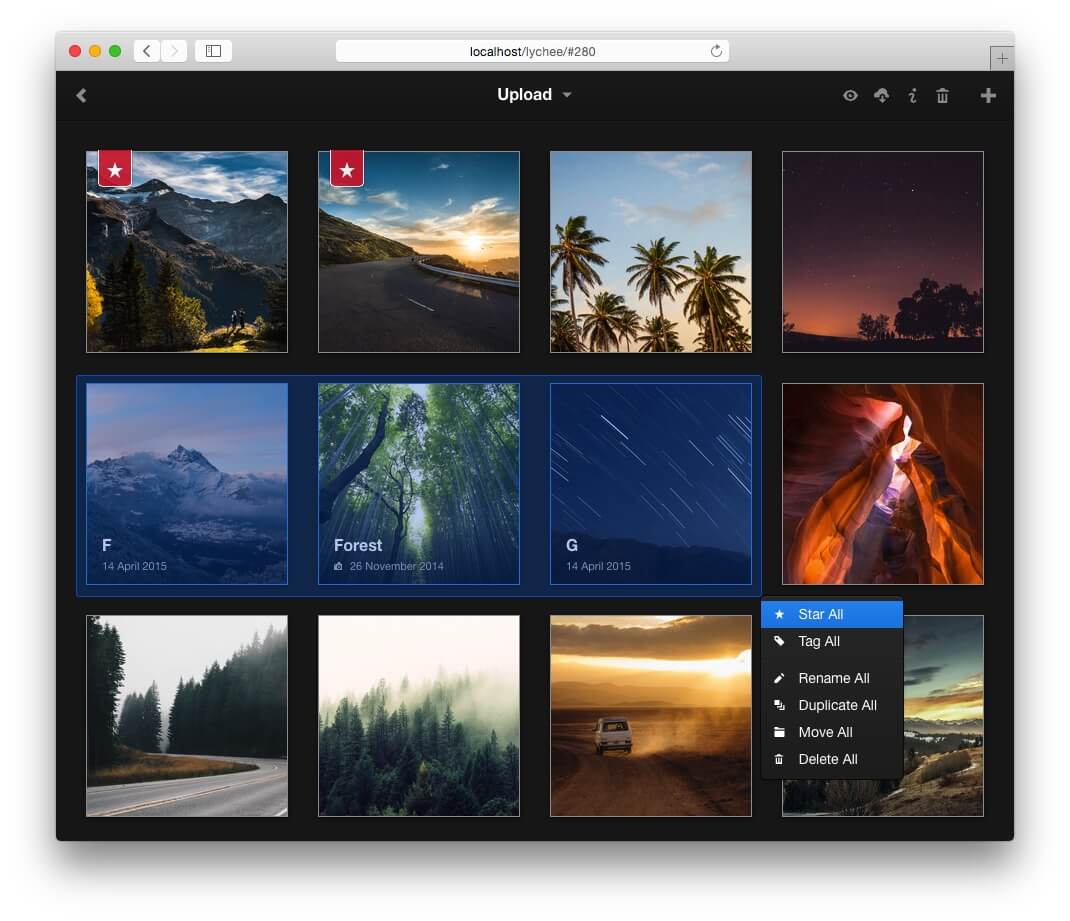
Lychee Photo Management Tool

Lychee Photo Management Tool

Lychee Features

  • A stunning, beautiful interface to manage all your photos in one place, right from your browser.
  • One click photo and album sharing with password protection.
  • View all your images in full-screen mode with forward and backward navigation using your keyboard or let others browse your photos by making them public.
  • Supports importing of photos from various sources: localhost, Dropbox, remote server, or using a link.

To install Lychee, everything you need is a running web-server such as Apache or Nginx with PHP 5.5 or later and a MySQL-Database.

For the purpose of this article, I will be installing Lychee photo-management system with NginxPHP-FPM 7.0and MariaDB on a CentOS 7 VPS with domain name lychee.example.com.

Step 1: Install Nginx, PHP and MariaDB

1. First start by installing NginxPHP with needed extensions and MariaDB database to setup a hosting environment to run Lychee.

On Cent/RHEL 7

# yum install https://dl.fedoraproject.org/pub/epel/epel-release-latest-7.noarch.rpm
# yum install http://rpms.remirepo.net/enterprise/remi-release-7.rpm
# yum install yum-utils
# yum-config-manager --enable remi-php70   [Install PHP 7.0]
# yum install nginx php php-fpm php-mysqli php-exif php-mbstring php-json php-zip php-gd php-imagick mariadb-server mariadb-client

On Ubuntu 16.04 and 18.04

$ sudo apt install nginx php php-fpm php-mysqli php-exif php-mbstring php-json php-zip php-gd php-imagick mariadb-server mariadb-client

2. Once you have installed the necessary packages, start nginxphp-fpm and mariadb services, enable them at boot time and check if these services are up and running.

------------ CentOS/RHEL ------------
# systemctl start nginx php-fpm mariadb
# systemctl status nginx php-fpm mariadb
# systemctl enable nginx php-fpm mariadb
------------ Debian/Ubuntu ------------
$ sudo systemctl start nginx php7.0-fpm mysql
$ sudo systemctl status nginx php7.0-fpm mysql
$ sudo systemctl enable nginx php7.0-fpm mysql

3. Next, if you have a firewall enabled on your system, you need to open the port 80 and 443 in the firewall to allow client requests to the Nginx web server on the HTTP and HTTPS respectively, as shown.

------------ Debian/Ubuntu ------------
$ sudo  ufw  allow 80/tcp
$ sudo  ufw  allow 443/tcp
$ sudo  ufw  reload
------------ CentOS/RHEL ------------
# firewall-cmd --zone=public --permanent --add-port=80/tcp
# firewall-cmd --zone=public --permanent --add-port=443/tcp
# firewall-cmd --reload

4. In order to run Lychee effectively, it is recommended to increase the values of the following properties in php.ini file.

# vim /etc/php/php.ini			#CentOS/RHEL
$ sudo vim /etc/php/7.0/fpm/php.ini     #Ubuntu/Debian 

Search for these PHP parameters and change their values to:

max_execution_time = 200
post_max_size = 100M
upload_max_size = 100M
upload_max_filesize = 20M
memory_limit = 256M

5. Now configure PHP-FPM to set the user and group, listen socket www.conf file as explained.

# vim /etc/php-fpm.d/www.conf		        #CentOS/RHEL
$ sudo vim /etc/php/7.0/fpm/pool.d/www.conf	#Ubuntu/Debian

Look for the directives below to set the Unix user/group of processes (change www-data to nginx on CentOS).

user = www-data
group = www-data

Also change the listen directive on which to accept FastCGI requests to a Unix socket.

listen = /run/php/php7.0-fpm.sock

And set the appropriate ownership permissions for the Unix socket using the directive (change www-data to nginx on CentOS/RHEL).

listen.owner = www-data
listen.group = www-data

Save the file and restart the nginx and php-fpm services.

# systemctl restart nginx php-fpm              #CentOS/RHEL
$ sudo systemctl restart nginx php7.0-fpm      #Ubuntu/Debian

Step 2: Secure MariaDB Installation

6. In this step, you should secure the MariaDB database installation (which is unsecured by default if installed on a fresh system), by running the security script which comes with the binary package.

Run the following command as root, to launch the the script.

$ sudo mysql_secure_installation

You will be prompted to set a root password, remove anonymous users, disable root login remotely and remove test database. After creating a root password, and answer yes/y to the rest of questions.

Enter current password for root (enter for none):
Set root password? [Y/n] y Remove anonymous users? [Y/n] y Disallow root login remotely? [Y/n] y Remove test database and access to it? [Y/n] y Reload privilege tables now? [Y/n] y

Step 3: Install Lychee Photo Management System

7. To install Lychee, first you need to create a database for it with appropriate permissions using following commands.

$ sudo mysql -u root -p
MariaDB [(none)]> CREATE DATABASE lychee; 
MariaDB [(none)]> CREATE USER 'lycheeadmin'@'localhost' IDENTIFIED BY '=@!#@%$Lost';
MariaDB [(none)]> GRANT ALL PRIVILEGES ON  lychee.* TO 'lycheeadmin'@'localhost';
MariaDB [(none)]> FLUSH PRIVILEGES;
MariaDB [(none)]> exit

8. Next, move into the web document root and grab the latest version of Lychee using the git command line tool, as shown.

$ cd /var/www/html/
$ sudo git clone --recurse-submodules https://github.com/LycheeOrg/Lychee.git

9. Then set the correct permissions and ownership on the installation directory as shown (replace admin with a username on your system).

------------ CentOS/RHEL ------------
# chown admin:nginx -R /var/www/html/Lychee
# chmod 775 -R /var/www/html/Lychee
------------ Debian/Ubuntu ------------
$ sudo chown admin:www-data -R /var/www/html/Lychee
$ sudo chmod 775  -R /var/www/html/Lychee

10. In this step, you need to setup composer in the lychee installation directory, which will be used to install PHP dependencies.

# cd Lychee/
# php -r "copy('https://getcomposer.org/installer', 'composer-setup.php');"
# php -r "if (hash_file('sha384', 'composer-setup.php') === '93b54496392c062774670ac18b134c3b3a95e5a5e5c8f1a9f115f203b75bf9a129d5daa8ba6a13e2cc8a1da0806388a8') { echo 'Installer verified'; } else { echo 'Installer corrupt'; unlink('composer-setup.php'); } echo PHP_EOL;"
# php composer-setup.php
# php -r "unlink('composer-setup.php');"
# php composer.phar update

Step 4: Configure Nginx Server Block for Lychee

12. Next, you need to create and configure a Nginx server block for the Lychee application under /etc/nginx/conf.d/.

# vim /etc/nginx/conf.d/lychee.conf

Add the following configuration in the above file, remember to use your own domain name instead of lychee.example.com (this is just a dummy domain).

server {
	listen      80;
	server_name	 lychee.example.com;
	root         	/var/www/html/Lychee/;
	index       	index.html;

	charset utf-8;
	gzip on;
	gzip_types text/css application/javascript text/javascript application/x-javascript 	image/svg+xml text/plain text/xsd text/xsl text/xml image/x-icon;
	location / {
		try_files $uri $uri/ /index.php?$query_string;
	}
	location ~ \.php {
		include fastcgi.conf;
		fastcgi_split_path_info ^(.+\.php)(/.+)$;
		fastcgi_pass unix:/run/php/php7.0-fpm.sock;
	}
	location ~ /\.ht {
		deny all;
	}
}

Then save the file and restart the Nginx web server and PHP-FPM to apply the recent changes.

# systemctl restart nginx php-fpm              #CentOS/RHEL
$ sudo systemctl restart nginx php7.0-fpm      #Ubuntu/Debian

Step 5: Complete Lychee Installation Via Web Browser

13. Now use the URL lychee.example.com to open Lychee web installer in your browser and provide your database connection settings and enter the name of the database you created for lychee and click Connect.
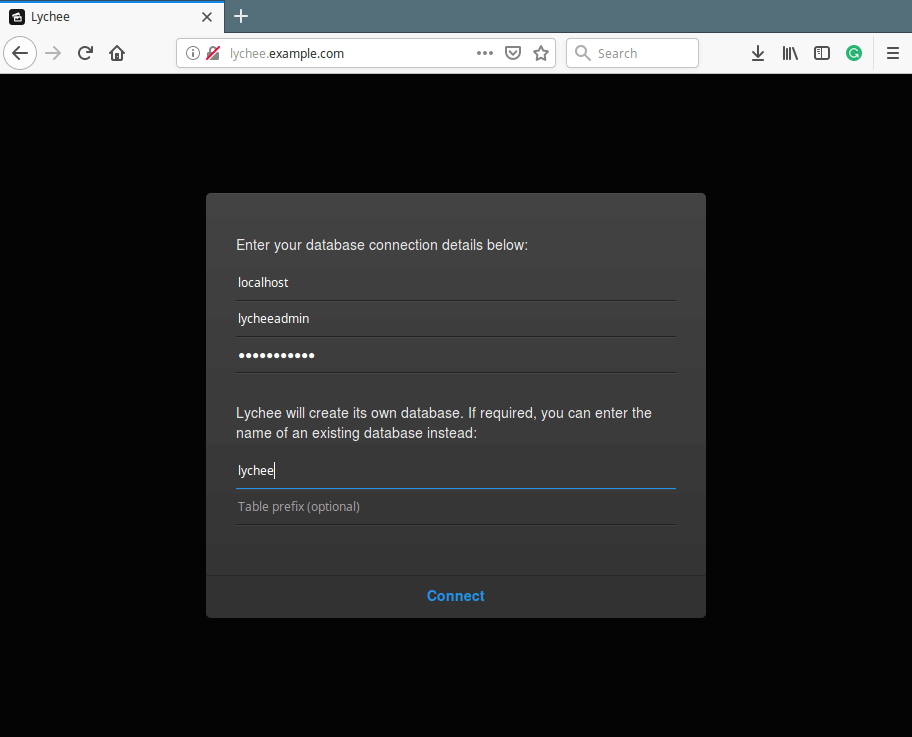
Lychee Database Settings

Lychee Database Settings

14. Next, enter a username and password for your installation and click Create Login. After login, you will land in the admin dashboard which contains the default Albums as shown in the following screenshot.
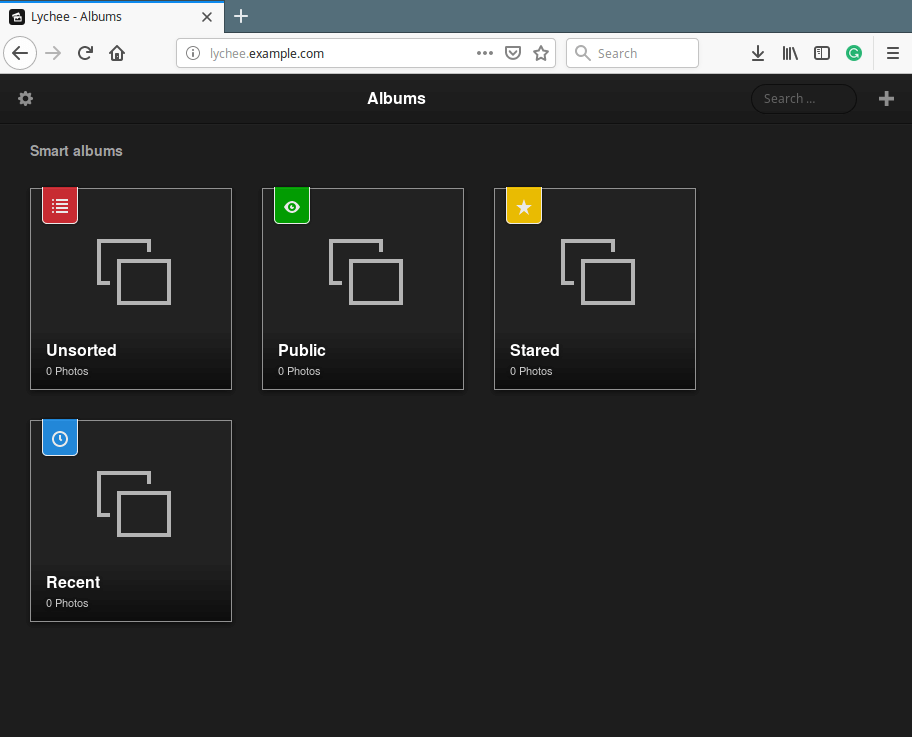
Lychee Admin Dashboard

Lychee Admin Dashboard

To upload a photo or import from a link or import from Dropbox or from another server or add an album, click the + sign. And to view photos in an album, simply click on it.

For more information, visit Lychee Homepage: https://lycheeorg.github.io/

Lychee is an open source, easy-to-use and elegant PHP photo-management system to manage and share photos. If you have any questions or comments, use the form below to write to us.

Source

Fasd – A Commandline Tool That Offers Quick Access to Files and Directories

Fasd (pronounced as “fast“) is command-line productivity booster, a self-contained POSIX shell script which enables quick and more efficient access to files and directories.

It is inspired by tools such as autojump, and the name fasd was created from the default suggested aliases:

  • f(files)
  • a(files/directories)
  • s(show/search/select)
  • d(directories)

It has been tested on the following shells: bash, zsh, mksh, pdksh, dash, busybox ash, FreeBSD 9 /bin/sh and OpenBSD /bin/sh. It keeps track of files and directories you have accessed, so that you can quickly reference them in the command line.

In this article, we will show how to install and use fasd with a few examples in Linux.

How Does fasd Work?

Fasd simply ranks files and directories by “frecency” (word was first invented by Mozilla and used in Firefox, find out more from here) a combination of the words “frequency” and “recency“.

If you use primarily the shell via the terminal to navigate and launch applications, fasd can enable you do it more efficiently. It helps you to open files regardless of which directory you are in.

With simple key strings, fasd can find a “frecent” file or directory and open it with command you specify.

How to Install and Use Fasd in Linux Systems

Fasd can be installed using PPA on Ubuntu and its derivatives.

$ sudo add-apt-repository ppa:aacebedo/fasd
$ sudo apt-get update
$ sudo apt-get install fasd

On other Linux distributions, you can install it from source as shown.

$ git clone https://github.com/clvv/fasd.git
$ cd fasd/
$ sudo make install

Once you have installed Fasd, add the following line to your ~/.bashrc to enable it:

eval "$(fasd --init auto)"

Then source the file like this.

$ source ~/.bashrc

Fasd ships with the following useful default aliases:

alias a='fasd -a'        # any
alias s='fasd -si'       # show / search / select
alias d='fasd -d'        # directory
alias f='fasd -f'        # file
alias sd='fasd -sid'     # interactive directory selection
alias sf='fasd -sif'     # interactive file selection
alias z='fasd_cd -d'     # cd, same functionality as j in autojump
alias zz='fasd_cd -d -i' # cd with interactive selection

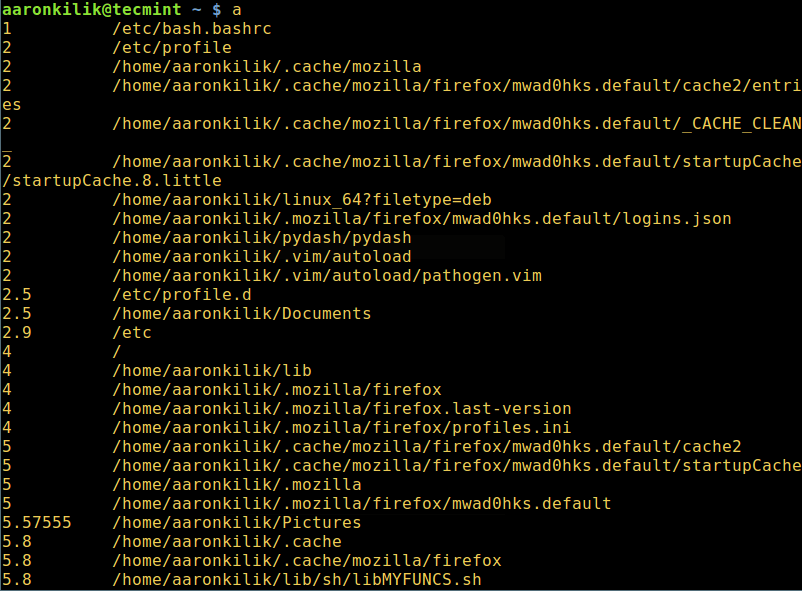
Let’s look at a few usage examples; the following example will list any “frecent” files and directories:

$ a

Fasd - List Recent Files

Fasd – List Recent Files

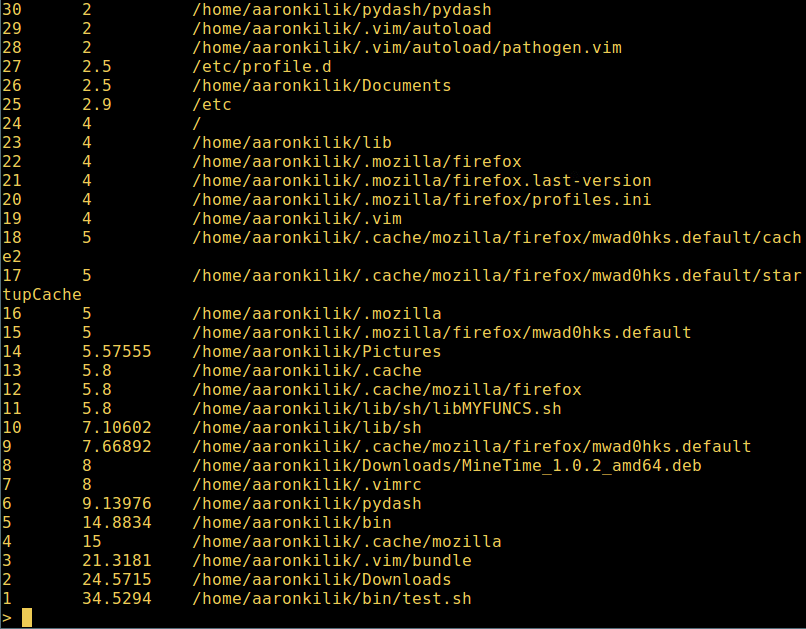
To quickly search a file or directory you accessed previously, use the s alias:

$ s

Fasd - Quickly Search Recent Files

Fasd – Quickly Search Recent Files

To view all files you previously worked with that have the letters “vim”, you can use the f alias as follows:

$ f vim

Fasd - Find Files Using String

Fasd – Find Files Using String

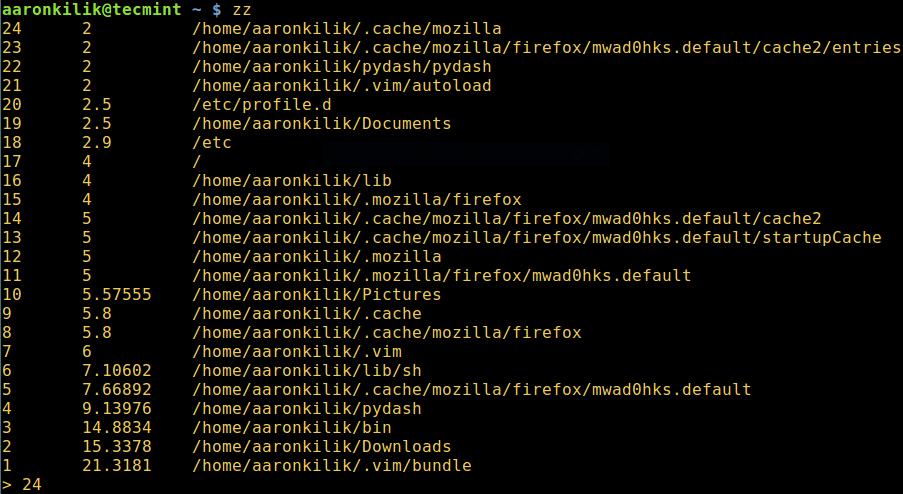
To quickly and interactively cd into a previously accessed directory using the zz alias. Simply select the directory number from the first field (1-24 in the screenshot below):

$ zz

Fasd - Switch Directories

Fasd – Switch Directories

You can add your own aliases in ~/.bashrc to fully utilize the power of fasd as in the examples below:

alias v='f -e vim'   # quick opening files with vim
alias m='f -e vlc'   # quick opening files with vlc player

Then run the following command to source the file:

$ source  ~/.bashrc

To open a file quickly named test.sh in vim, you would type:

$ v test.sh

We will cover one more example where you can use Fasd aliases with other commands:

$ f test
$ cp  `f test` ~/Desktop
$ ls -l ~/Desktop/test.sh

For bash users, call _fasd_bash_hook_cmd_complete to make completion work. For example:

_fasd_bash_hook_cmd_complete  v  m  j  o

For more information, type:

$ man fasd

For additional customizations and usage examples, check out Fasd Github repository: https://github.com/clvv/fasd/

That’s all! In this article, we showed you how to install and use fasd in Linux. Do share with us info about similar tools you have come across out there, together with any other thoughts via the feedback section below.

Source

A Brief Introduction to ‘Makefiles’ in Open Source Software Development with GNU Make

GNU Make is a development utility which determines the parts of a particular code base that are to be recompiled and can issue commands to perform those operations on the code base. This particular make utility can be used with any programming language provided that their compilation can be done from the shell by issuing commands.

Makefiles in Linux

Makefiles in Linux

In order to use GNU Make, we need to have some set of rules which defines the relationship among different files in our program and commands for updating each file. These are written onto a special file called ‘makefile‘. The ‘make‘ command uses the ‘makefile‘ data base and the last modification times of the files to decide which all files are to recompiled again.

Contents of a Makefile

Generally ‘makefiles‘ contain 5 kinds of things namely: implicit rulesexplicit rulesvariable definitionsdirectives, and comments.

  1. An explicit rule specifies how to make/remake one or more files (called targets, will be explained later) and when to do the same.
  2. An implicit rule specifies how to make/remake one or more files based on their names. It describes how a target file name is related to one file with a name similar to the target.
  3. variable definition is a line that specifies a string value for a variable to be substituted later.
  4. directive is an instruction for make to do something special while reading the makefile.
  5. A ‘#’ symbol is used represent the start of a comment inside makefiles. A line starting with ‘#’ is simply ignored.

Structure of Makefiles

The information that tells make how to recompile a system comes from reading a data base called the makefile. A simple makefile will consists of rules of the following syntax:

target ... : prerequisites ... 
	recipe 
... 
...

target is defined to be the output file generated by the program. It can be also phony targets, which will be explained below. Examples of target files include executablesobject files or phony targets like cleaninstalluninstall etc.

prerequisite is a file that is used as an input to create the target files.

recipe is the action that make performs for creating the target file based on the prerequisites. It is necessary to put tab character before each recipe inside the makefiles unless we specify the ‘.RECIPEPREFIX‘ variable to define some other character as prefix to recipe.

A sample Makefile

final: main.o end.o inter.o start.o
	gcc -o final main.o end.o inter.o start.o
main.o: main.c global.h
	gcc -c main.c
end.o: end.c local.h global.h
	gcc -c end.c
inter.o: inter.c global.h
	gcc -c inter.c
start.o: start.c global.h
	gcc -c start.c
clean:
	rm -f main.o end.o inter.o start.o

In the above example we used 4 C source files and two header files for creating the executable final. Here each ‘.o’ file is both a target and a prerequisite inside the makefile. Now take a look at the last target name clean. It is just a action rather than a target file.

Since we normally don’t need this during compilation, it is not written as a prerequisite in any other rules. Targets that do not refer to files but are just actions are called phony targets. They will not have any prerequisites as other target files.

How GNU Make process a Makefile

By default make starts off with the first target in the ‘makefile‘ and is called as ‘default goal’. Considering our example, we have final as our first target. Since its prerequisites include other object files those are to be updated before creating final. Each of these prerequisites are processed according to their own rules.

Recompilation occurs if there are modifications made to source files or header files or if the object file does not exists at all. After recompiling the necessary object files, make decides whether to relink final or not. This must be done if the file final does not exist, or if any of the object files are newer than it.

Thus if we change the file inter.c, then on running make it will recompile the source file to update the object file inter.o and then link final.

Using variables inside Makefiles

In our example, we had to list all the object files twice in the rule for final as shown below.

final: main.o end.o inter.o start.o
	gcc -o final main.o end.o inter.o start.o

In order to avoid such duplications, we can introduce variables to store the list of object files that are being used inside the makefile. By using the variable OBJ we can rewrite the sample makefile to a similar one shown below.

OBJ = main.o end.o inter.o start.o
final: $(OBJ)
	gcc -o final $(OBJ)
main.o: main.c global.h
	gcc -c main.c
end.o: end.c local.h global.h
	gcc -c end.c
inter.o: inter.c global.h
	gcc -c inter.c
start.o: start.c global.h
	gcc -c start.c
clean:
	rm -f $(OBJ)

Rules for cleaning the source directory

As we saw in the example makefile, we can define rules to clean up the source directory by removing the unwanted object files after the compilation. Suppose we happen to have a target file called clean. How can make differentiate the above two situations? Here comes the concept of phony targets.

phony target is one that is not really the name of a file, rather it is just a name for a recipe to be executed whenever an explicit request is made from the makefile. One main reason to use phony target is to avoid a conflict with a file of the same name. Other reason is to improve performance.

To explain this thing, I will reveal one unexpected twist. The recipe for clean will not be executed by default on running make. Instead it is necessary to invoke the same by issuing the command make clean.

.PHONY: clean
clean:
	rm -f $(OBJ)

Now try to create makefiles for your own code base. Feel free to comment here with your doubts.

Source

Linux File System Explained: Boot Loading, Disk Partitioning, BIOS, UEFI and File System Types

The concept of boot loading, disk partitioning, partition table, BIOS, UEFI, File system types, etc. is little known to most of us. We comes across these terminology very often but rarely took the pain to know these and their meaning in details. This article in an effort to fulfil this gap in the most easiest way possible.

Linux File System Types

Linux File System Types

Partition Table

One of the very first decision we comes across while installing a Linux Distribution is the partitioning of its disk, the file-system to use, implement encryption for security which varies with the change in architecture and platform. One of the most widely used Architecture, INTEL is undergoing some changes and it is important to understand these changes which on the other hand requires knowledge of boot process.

Many developers run both Windows and Linux on the same machine which may be a matter of preference or need. Most of the boot-loaders of today are smart enough to recognize any number of Operating System on the same box and provide menu to boot into the preferred one. Another way to achieve the same goal is to use virtualization using XenQEMUKVM or any other preferred visualization tool.

BIOS Vs UEFI

If I remember correctly, till late 90‘s BIOS which stands for Basic Input/Output System was the only way to boot an Intel System. BIOS holds the partitioning Information in an special area called Master Boot Record (MBR) such that additional code gets stored in first sector of every boot-able partition.

In Late 90‘s Microsoft’s intervention with Intel resulted in Universal Extensible Firmware Interface (UEFI) the initial purpose of which was to boot securely. This mechanism of booting proved to be a challenge for rootkits specially which gets attached with boot sectors and were hard to detect with BIOS.

Boot with BIOS

Booting with BIOS requires placing of boot codes or boot sequence in MBR which is placed in the first sector of boot disk. In case if more than one Operating System is installed the installed boot loader is replaced by one common boot loader which places boot codes on every bootable disk during installation and updation automatically, which means user has the choice to boot into any of the installed OS.

However it is seen, specially on windows that a non-windows boot loader won’t update the system specially certain programs viz., IE but again there is not hard and fast rule nor it is documented any where.

Boot with UEFI

UEFI is the latest booting technology developed in close collaboration of Microsoft with Intel. UEFI requires the firmware to be loaded is digitally signed, a way to stop rootkits being attached with the boot partition. However the problem in booting Linux using UEFI is complex. Booting Linux in UEFI requires the keys used needs to be make public under GPL which is against the Linux protocol.

However it is still possible to install Linux on UEFI specification by disabling ‘Secure boot‘ and enabling ‘Legacy Boot‘. Boot codes in UEFI is placed under subdirectories of /EFI, special partition in the first sector of disk.

Types of Linux File Systems

A standard Linux Distribution provides the choice of partitioning disk with the file formats listed below, each of which has special meaning associated with it.

  1. ext2
  2. ext3
  3. ext4
  4. jfs
  5. ReiserFS
  6. XFS
  7. Btrfs

ext2, ext3, ext4

These are the progressive version of Extended Filesystem (ext), which primarily was developed for MINIX. The second extended version (ext2) was an improved version. Ext3 added performance improvement. Ext4 was a performance improvement besides additional providing additional features.

Read AlsoWhat is Ext2, Ext3 & Ext4 and How to Create and Convert Linux File Systems

JFS

The Journaled File System (JFS) was developed by IBM for AIX UNIX which was used as an alternative to system ext. JFS is an alternative to ext4 currently and is used where stability is required with the use of very few resources. When CPU power is limited JFS comes handy.

ReiserFS

It was introduced as an alternative to ext3 with improved performance and advanced features. There was a time when SuSE Linux‘s default file format was ReiserFS but later Reiser went out of business and SuSe had no option other than to return back to ext3. ReiserFS supports file System Extension dynamically which was relatively an advanced feature but the file system lacked certain area of performance.

XFS

XFS was a high speed JFS which aimed at parallel I/O processing. NASA still usages this file system on their 300+ terabyte storage server.

Btrfs

B-Tree File System (Btrfs) focus on fault tolerance, fun administration, repair System, large storage configuration and is still under development. Btrfs is not recommended for Production System.

Clustered File Format

Clustered file System is not required for booting but best suited in shared environment form storage point of view.

Non-Linux File Format

There are lots of File format not available under Linux but are used by other OS’s. Viz., NTFS by Microsoft, HFS by Apple/Mac os, etc. Most of these can be used under Linux by mounting them using certain tools like ntfs-3g to Mount NTFS file system but not preferred under Linux.

Unix File Format

There are certain File formats used widely in Linux but not preferred under Linux specially for installing Linux root System. e.g., UFS of BSD.

Ext4 is the preferred and most widely used Linux file System. In certain Special case XFS and ReiserFS are used. Btrfs is still used in experimental environment.

Disk Partitioning

The first stage is disk Partitioning. While partitioning we should keep the below points in mind.

  1. Partition keeping backup and recovery in mind.
  2. Space limitation mark in partition.
  3. Disk management – Administrative Function.

Logical Volume Management

LVM is a complex partitioning used in Large Storage Installation. The LVM structure overlays the actual physical disk partitioning.

Swap

Swap is used for memory paging in Linux specially during System Hibernation. The current stage of System is written to Swap when the system is paused (Hibernate) at a point of time.

A System which will never go hibernation needs a swap space equal to the size of its RAM.

Encryption

The last stage is encryption which ensures data safely. Encryption can be at the level of Disk as well as Directory. In Disk encryption, the whole disk is encrypted can requires some kind of special codes to decrypt it.

However its an complex issue. The decryption code can not remain on the same disk undergoing encryption hence we need certain special hardware or let the motherboard do it.

The disc encryption is relatively easy to achieve and is less complex. In this case the decryption code remains on the same disk, somewhere in different directory.

Disk encryption is necessary in server building and may be a legal issue based the the geographical location you are implementing it.

Here in this article, we tried throwing lights on File System Management as well as disk management in much more depth fashion. That’s all for now.

Read AlsoLinux Directory Structure and Important Files Paths Explained

Source

WP2Social Auto Publish Powered By : XYZScripts.com