Suplemon is an open source, modern, powerful, intuitive and feature-rich command-line text editor with multi cursor support; it replicates Sublime Text like functionality in the terminal with the use of Nano. It is highly extensible and customizable; allows you to create and use your own extensions.
Suplemon Editor in Action
Suplemon Features:
Supports proper multi cursor editing.
Syntax highlighting with text mate themes.
Supports autocomplete (based on words in the files that are open).
Offers easy Undo/Redo functionality.
Supports copy and paste, with multi line support (and native clipboard support on X11 / Unix-based systems).
Supports multiple files in tabs.
Has a powerful Go To feature for jumping to files and lines.
Offers Find, Find next and Find all functionality.
Once you have Suplemon Text Editor installed, the suplemon configuration file is stored at ~/.config/suplemon/suplemon-config.json and you can use it like any other terminal text editor, like this.
$ suplemon filename  #in current directory
$ suplemon /path/to/filename
To enable system clipboard support, install xsel or pbcopy or xclip package on your system.
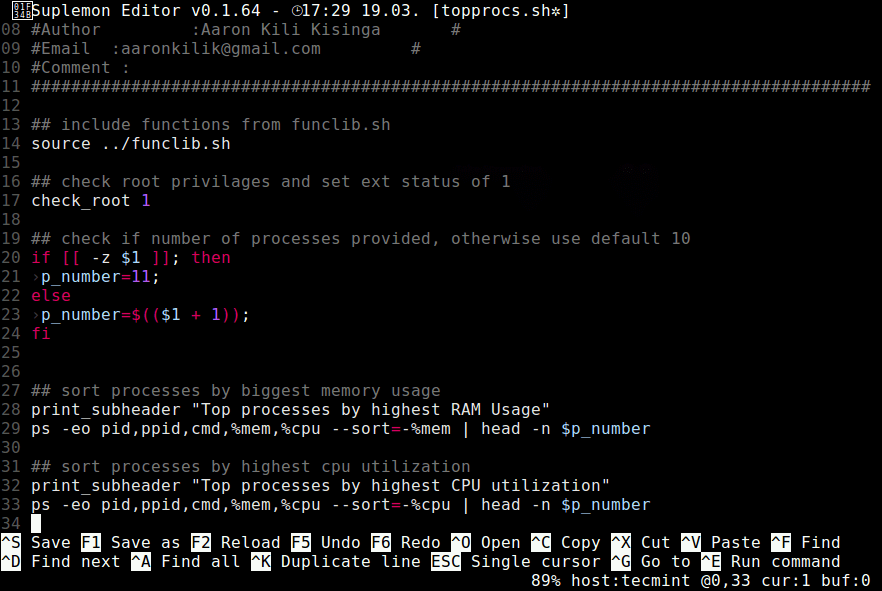
Now try to edit any files using suplemon text editor as shown.
$ suplemon topprocs.sh
Edit Files Using Suplemon
Following are a few basic Keymap Configs used by suplemon. They can be edited by running the keymapcommand. To view the default keymap file run keymap default.
Exit – Ctrl+Q
Copy line(s) to buffer – Ctrl+C
Cut line(s) to buffer – Ctrl+X
Save current file – Ctrl+S
Search for a string or regular expression (configurable) – Ctrl+F
Run commands – Ctrl+E
Note: The recommended way to edit the configuration file is to run the config command, it will automatically reload the configuration when you save the file. And you can view the default configuration and see what options are available by running config defaults command.
To get more help hit [Ctrl+H] in the editor. You can also find more information such as keymap configs, mouse shortcuts as well as commands from the Suplemon Github repository.
Suplemon is a modern, powerful, intuitive, highly extensible and customizable console text editor. Try it out and use the comment form below to share with us, your thoughts about it.
Libav is a set of cross-platform libraries and tools that are used to deal with multimedia files, streams and protocols, it was originally forked from the ffmpeg project. Libav includes many sub-tools like:
Avplay: a video & audio player.
Avconv: a multimedia converter plus a video & audio recorder from different sources.
Avprobe: a tool that connects to the multimedia file stream and returns many useful information and statistics about it.
Libavfilter: a filtering API for different Libav tools.
In this article, we’ll explain how to record the Linux desktop’s video & audio using the ‘Avconv’ program on Debian/Ubuntu/Linux Mint distributions.
Step 1: Installing Avconv Tool
1.avconv is a part from the “libav-tools” package, which is available to install from the official repositories for all Debian-based distributions like Ubuntu and Mint, using following commands.
Note: Installing packages from default repositories, might give you a little older version of ‘avconv‘ tool. Thus, we recommend you to get the latest version from the official git repository, as shown below.
$ sudo apt-get install yasm
$ git clone git://git.libav.org/libav.git
$ cd libav
$ ./configure
$ make
$ sudo make install
Note: You will have to run “./configure –help” in order to list all the available options for the configuration file and install codecs and libraries that you want, you will also need to do a lot of work in order to install the dependencies.
Also note, if you’re used the compile-from-source way, you’ll always have to use “sudo avconv” instead of “avconv” to run the tool.
Step 2: Start Video Recording of Desktop
2. You’re ready now, all what you have to do is to record your desktop video by issuing following command.
avconv -f x11grab is the default command to capture video from the X server.
-r 25 is the frame rate you want, you may change it if you like.
-s 1920×1080 is your system’s screen resolution, change it to your current system resolution, it’s very important to do this.
-i :0.0 is where we want to set our recording start point, leave it like this.
-vcodec libx264 is the video codec that we’re using to record the desktop.
-threads 4 is the number of threads, you may change it as well if you like.
$HOME/output is the destination path where you want to save the file.
.avi is the video format, you may change it to “flv”, “mp4”, “wmv”, “mov”, “mkv”.
3. After you enter the command, the recording will start automatically as a process running from the terminal, in order to stop it, hit “Ctrl + C” keys inside the terminal window.
Record Desktop Screen
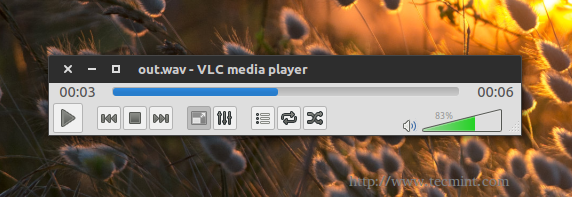
4. Now, you may run the file using VLC or any other multimedia player, or you may run it using “avplay” tool which is a multimedia player from the same Libav package.
$ avplay $HOME/output.avi
Note: Don’t forget to replace the destination file path. The recording’s quality is pretty good.
Play Recorded Video
Here’s a video that I’ve recorded using the “avconv” tool.
Step 3: Start Video & Audio Recording of Desktop
5. If you want to record the audio as well, first run this command to list all the available input sources for the audio.
$ arecord -l
It will give you some output like this.
Check Audio Input
In my case, I’ve one input source for audio only, and its number is “1”, that’s why I am going to use the following command to capture both video & microphone audio.
You see that part which is colored in yellow? It’s the only modification that I did for the command. Now let’s explain the command in short:
-f alsa is an option to capture the sound from the alsa device.
-i hw:1 is an option to take the audio input source from the “hw:1” device which is the first – and the only – input sound device in my computer.
Note: Don’t forget to replace the “1” number with the number of the input device that you want when you list the available audio input sources using the arecord -l command.
To stop the recording, you may hit the “Ctrl + C” keys again.
Step 4: Start Audio Recording of Desktop
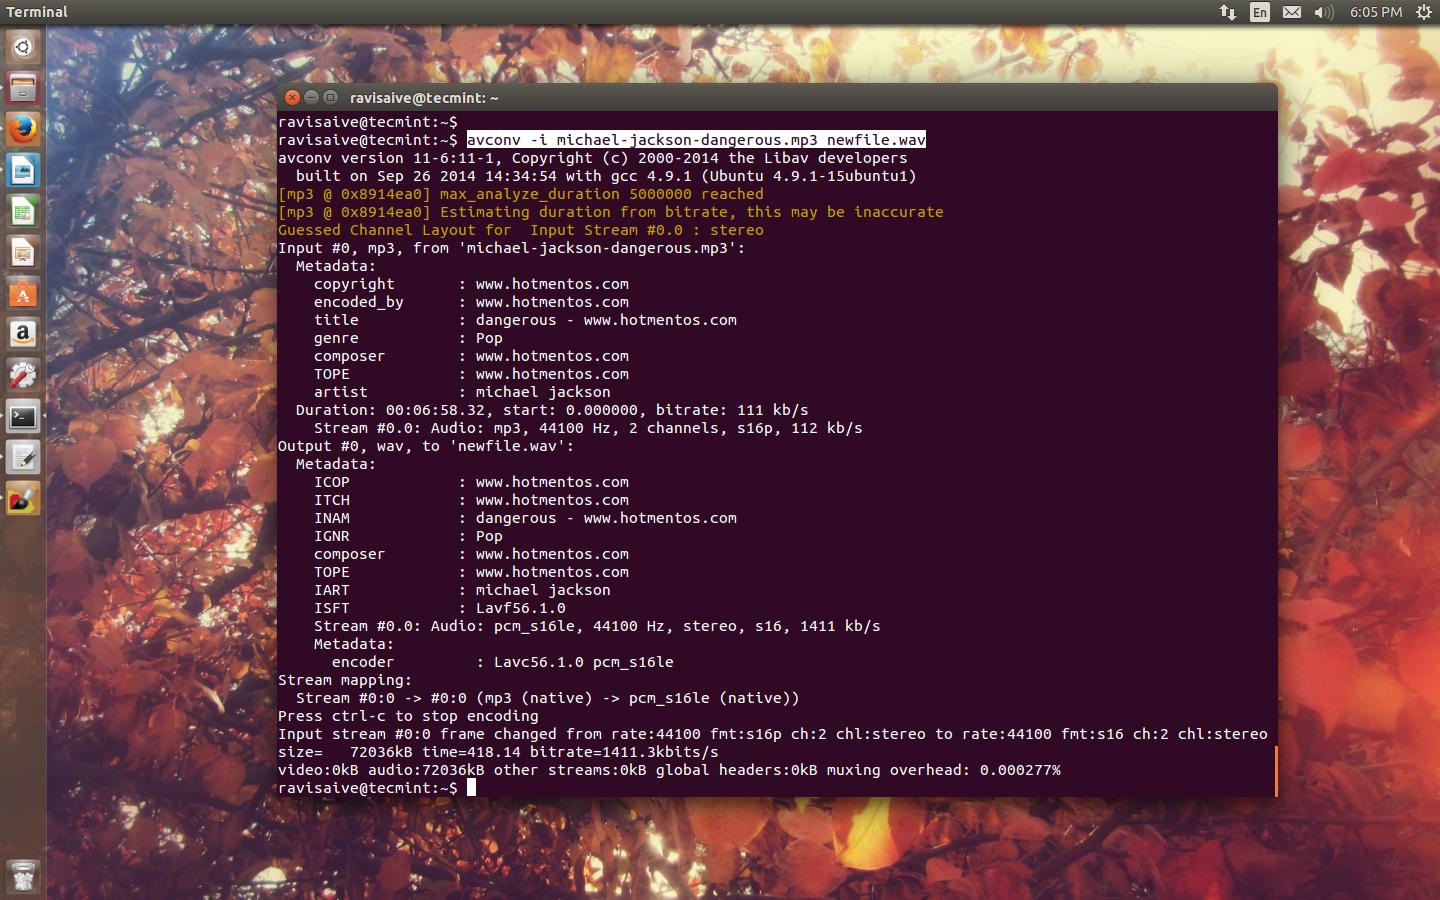
6. If you want to record the audio only, you may use the following command.
$ avconv -f alsa -i hw:1 out.wav
7. You may replace .mp3 with any supported audio format by Libav, you can now play the out.wav using any mutlimedia player like VLC.
Record Desktop Audio
Conclusion
“avconv” tool can be used to do many other things, not just to record the desktop’s video and audio. For further usage and details about the “avconv” tool, you may visit the official guide at.
Have you used the “avconv” tool before to record your desktop? What do you think about it? Is there any other tools that you use to record your desktop? Share them with us in the comments.
11 ‘Avconv’ Commands to Record, Convert and Extract Videos & Audios from Linux Terminal
In the previous article, we talked about How to Record Desktop Video & Audio Using ‘Avconv’ Tool. We mentioned that there are many other ways of usage for the “avconv” tool to deal with multimedia streams and files.
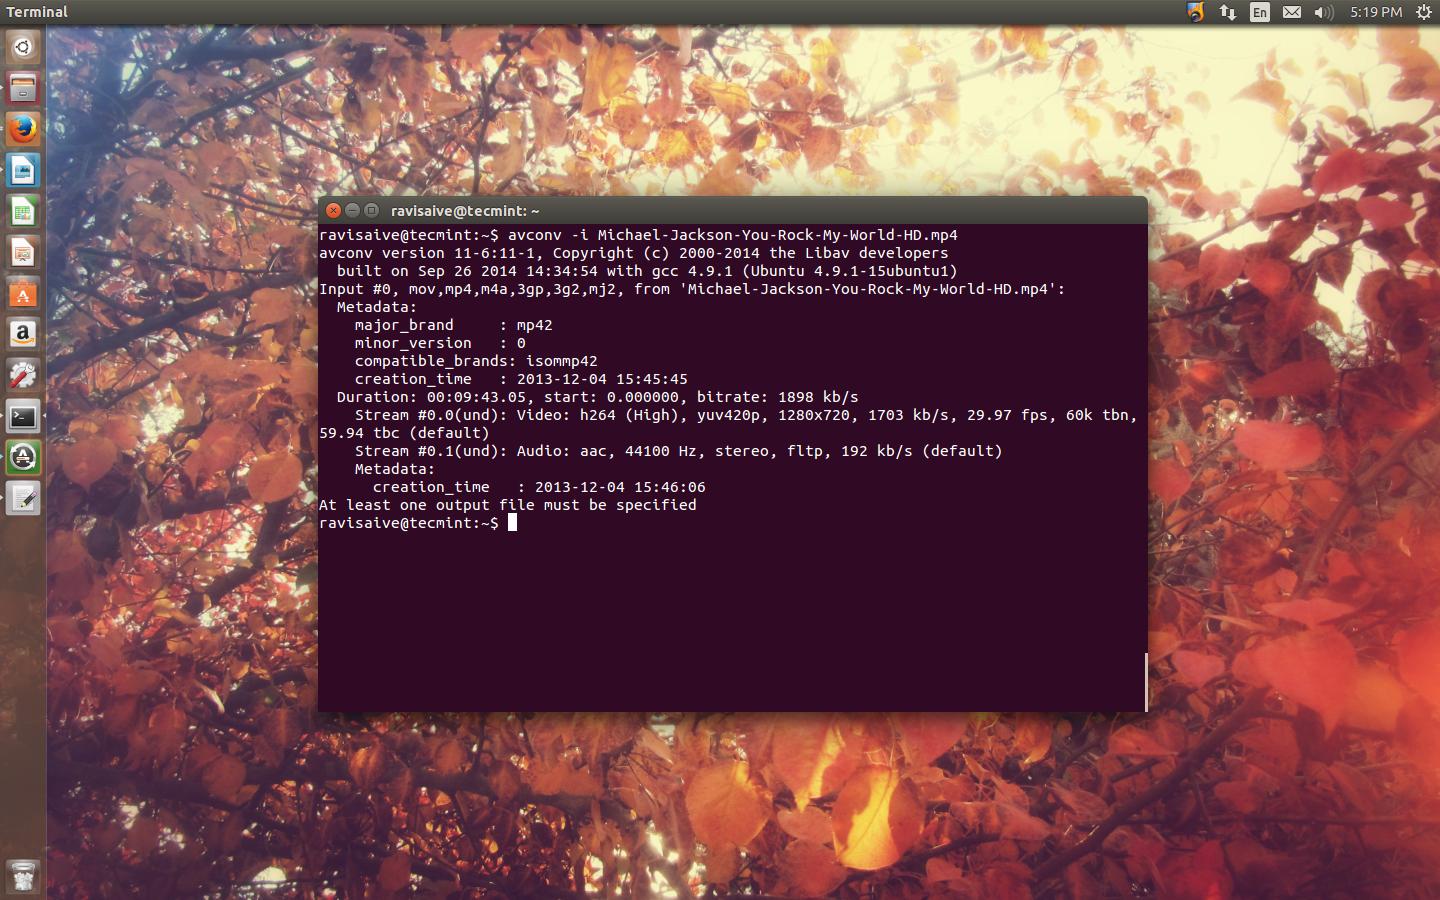
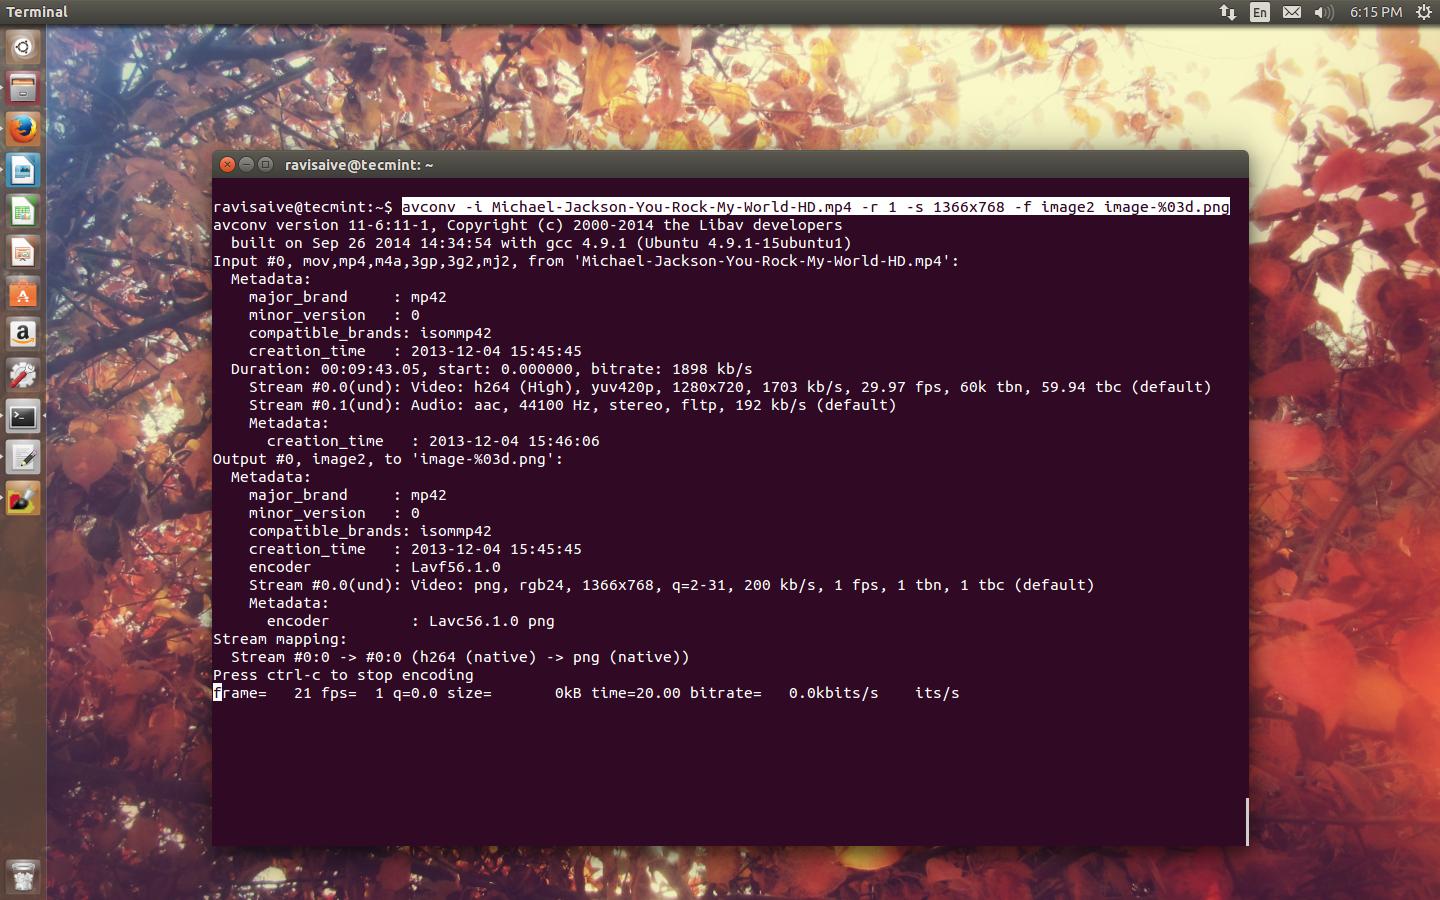
If you want to get some information about any multimedia file, run the following command using option ‘-i‘ (information) with avcon command and input your audio or video file.
$ avconv -i Michael-Jackson-You-Rock-My-World-HD.mp4

avconv version 11-6:11-1, Copyright (c) 2000-2014 the Libav developers
  built on Sep 26 2014 14:34:54 with gcc 4.9.1 (Ubuntu 4.9.1-15ubuntu1)
Input #0, mov,mp4,m4a,3gp,3g2,mj2, from 'Michael-Jackson-You-Rock-My-World-HD.mp4':
  Metadata:
    major_brand     : mp42
    minor_version   : 0
    compatible_brands: isommp42
    creation_time   : 2013-12-04 15:45:45
  Duration: 00:09:43.05, start: 0.000000, bitrate: 1898 kb/s
    Stream #0.0(und): Video: h264 (High), yuv420p, 1280x720, 1703 kb/s, 29.97 fps, 60k tbn, 59.94 tbc (default)
    Stream #0.1(und): Audio: aac, 44100 Hz, stereo, fltp, 192 kb/s (default)
    Metadata:
      creation_time   : 2013-12-04 15:46:06
At least one output file must be specified
Get Multimedia File Info
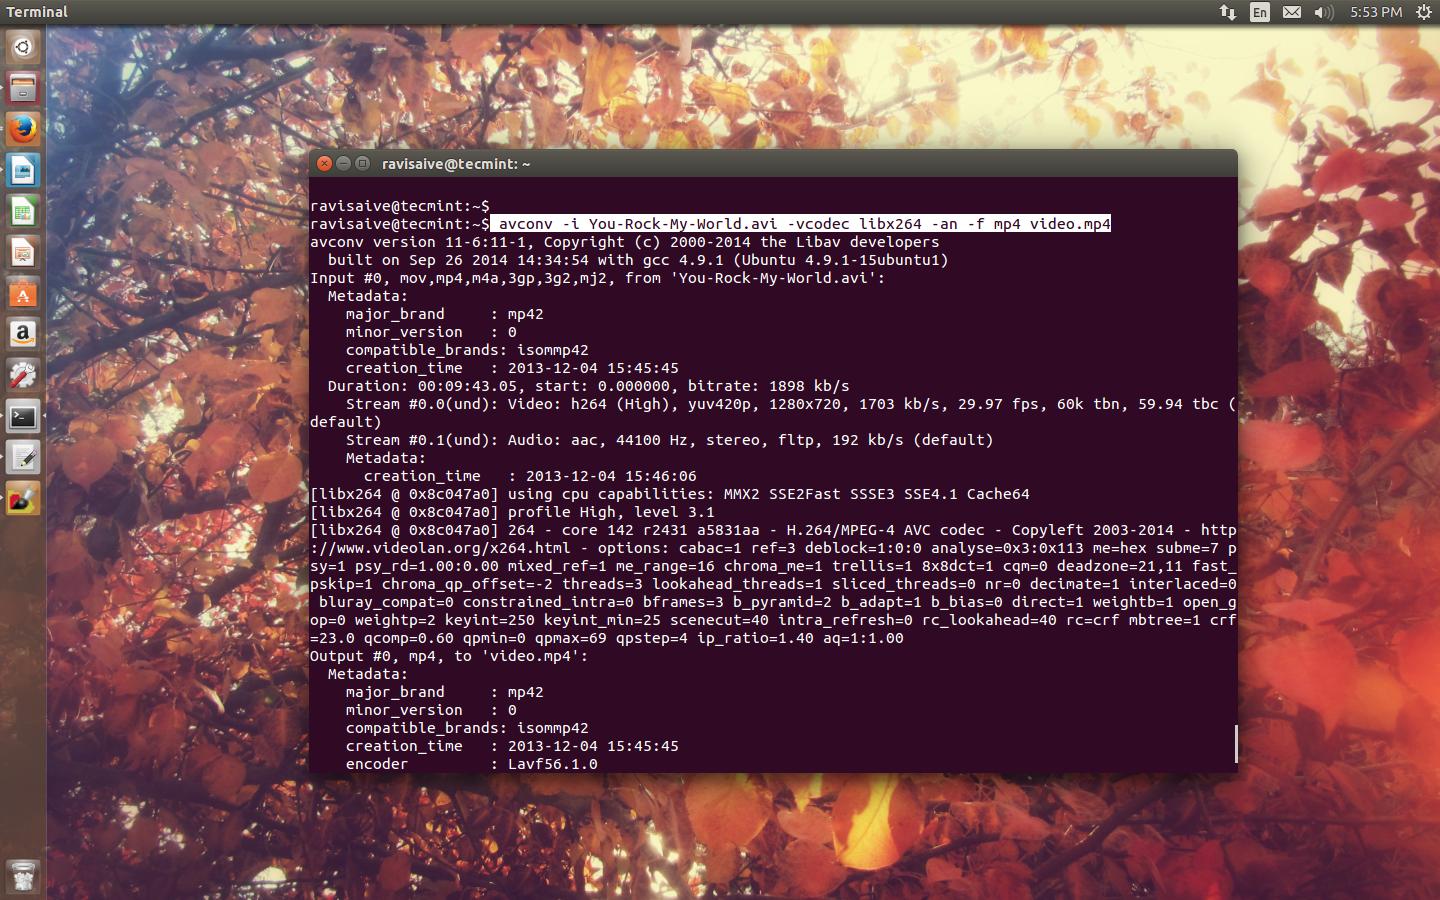
2. Extract Audio from Video File
To extract the audio only from any video file, and to output it to another file, you may run the following command.
mp4 is the format we want to use for our new file, you can change to “mkv”, “ogg”.. etc, remember, you will have to change the “video.mp4” to “video.mkv” as well.
Extract Video from Audio
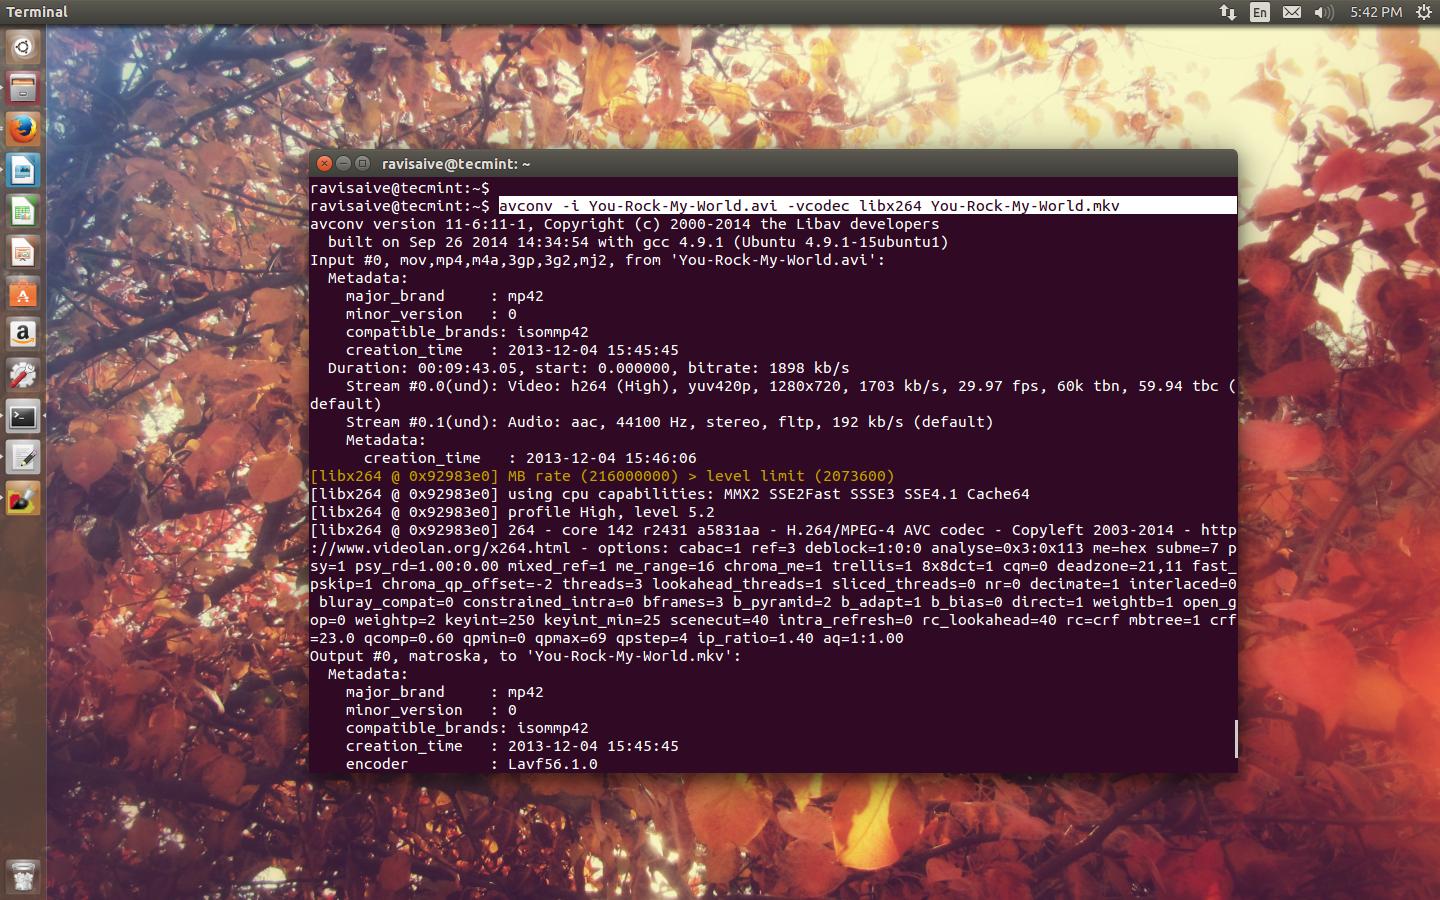
4. Convert .avi to .mkv Format
To convert an .avi file to .mkv format, use the following command.
-i source-file.avi is the file that we want to convert (-i = -input).
-vcodec is an option that we use to choose a video codec to use while processing the conversion, in our case it is “libx264”, this option is important in order to keep the video quality as it is.
newfile.mkv is the output file name.
Convert Avi to Mkv Format
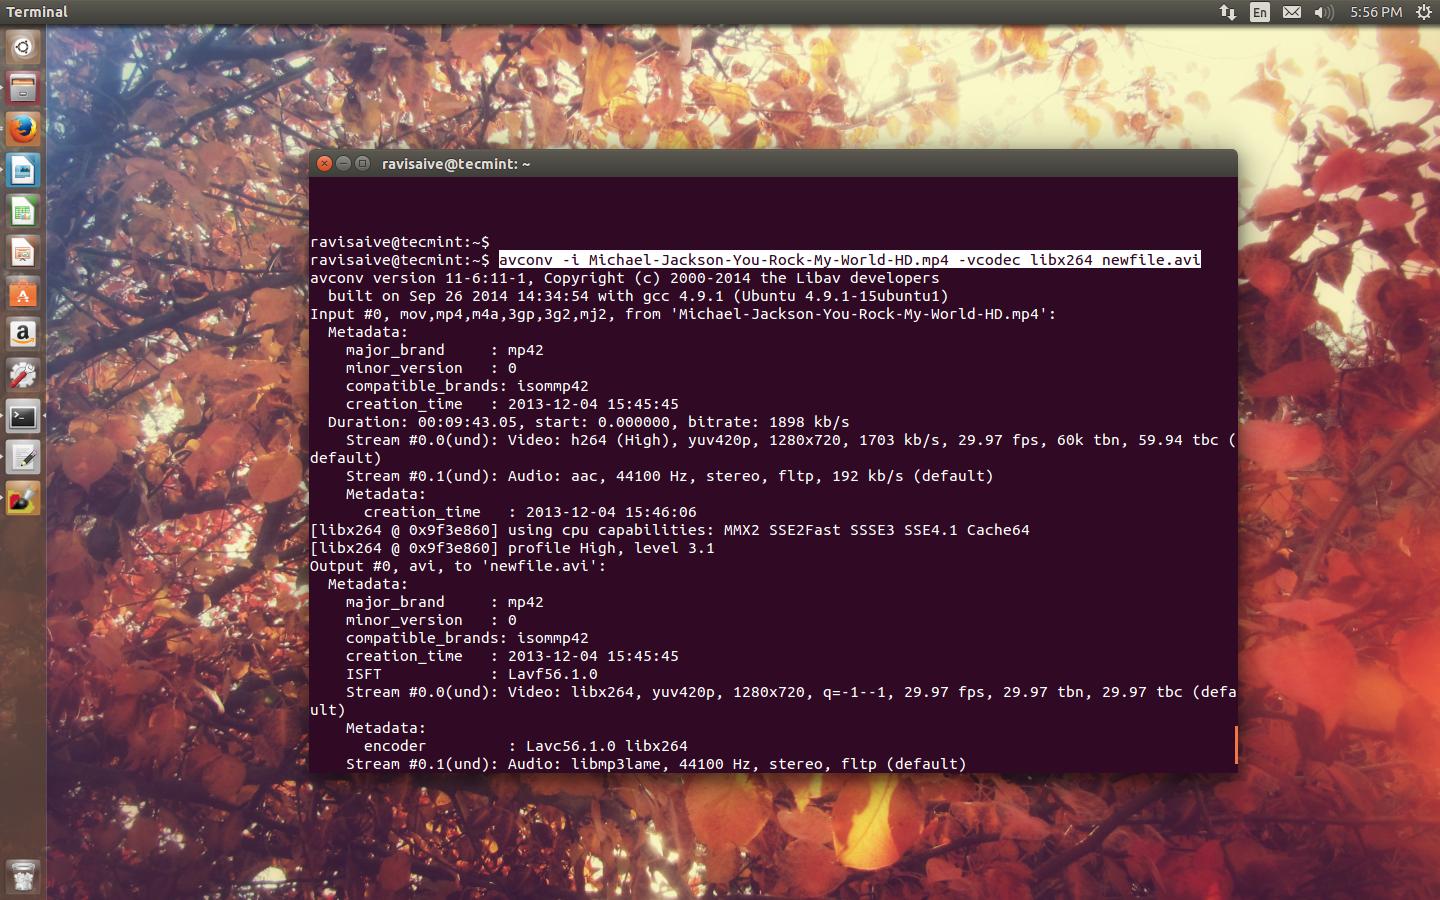
5. Convert .mp4 to avi Format
To convert n .mp4 file to .avi format, run the following command.
Nothing new here.. We inputed a file, we outputted another 🙂 Note that here, we don’t have to use the -vcodec libx264 option, because we’re converting an audio file to another audio file, there’s no video here.
You can replace “the-output-file.mkv” with “the-output-file.avi” or any other supported format by Libav (Don’t ask me about it, try them all by yourself!).
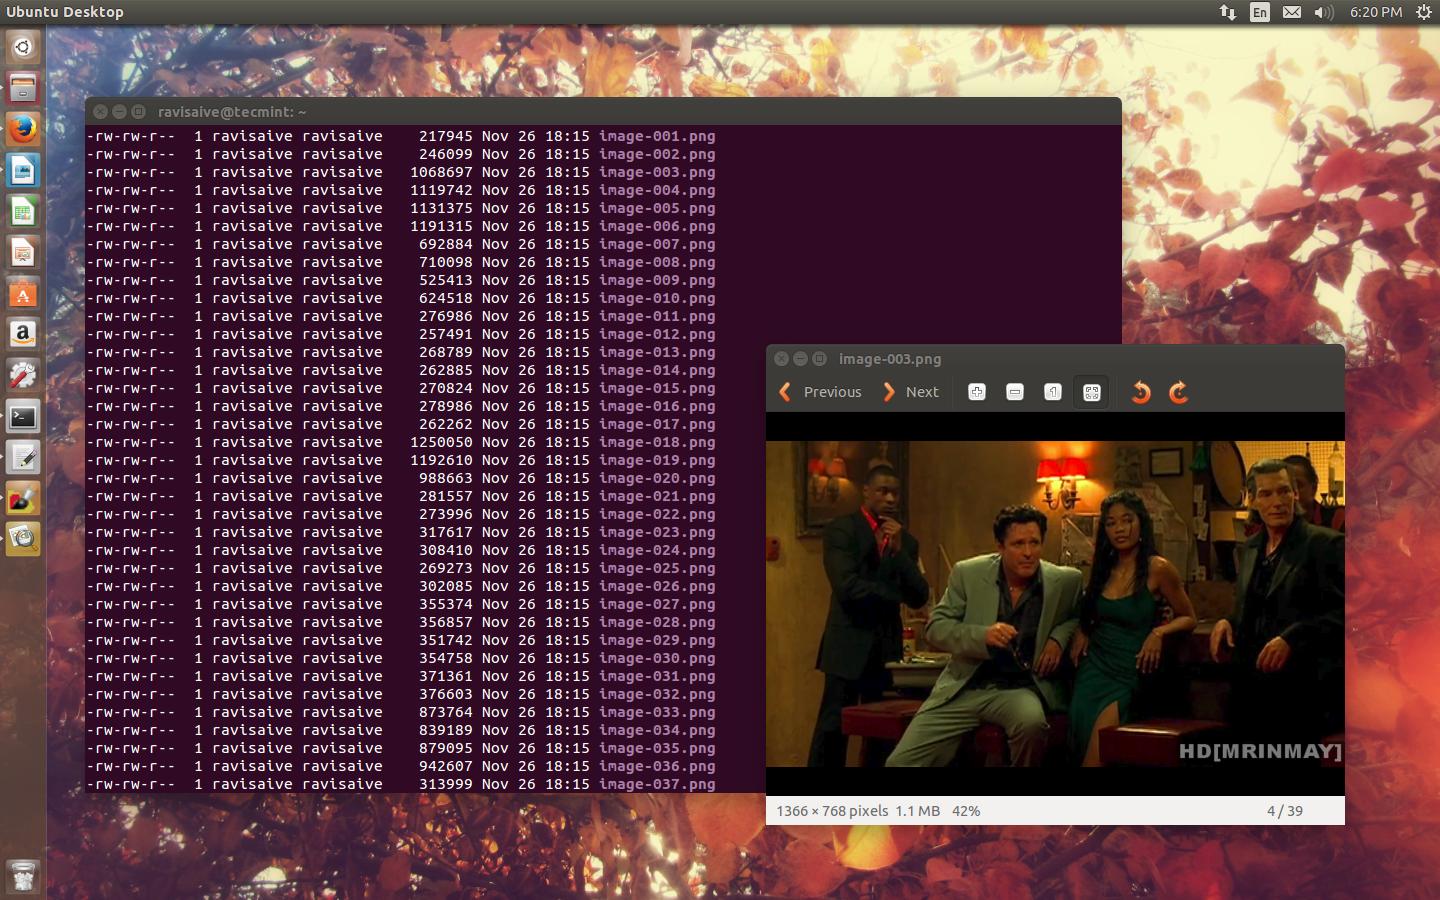
9. Convert Video into Images
To convert a video file into several different images, you may run the following command.
-r 1: is the number of frames you want per image, the more it is, the more images are created.
1366×768: is the width and height you want for the images, you may replace it with any other size you want.
image-%03d.png: is the image name format, if you tried the command, it’ll create many images like “image-001.png” , “image-002.png”.. etc, you can replace “png” with “jpg” or “jpeg” if you like.
Convert Video into Images
Capture Images from Video
10. More Options to use with Libav
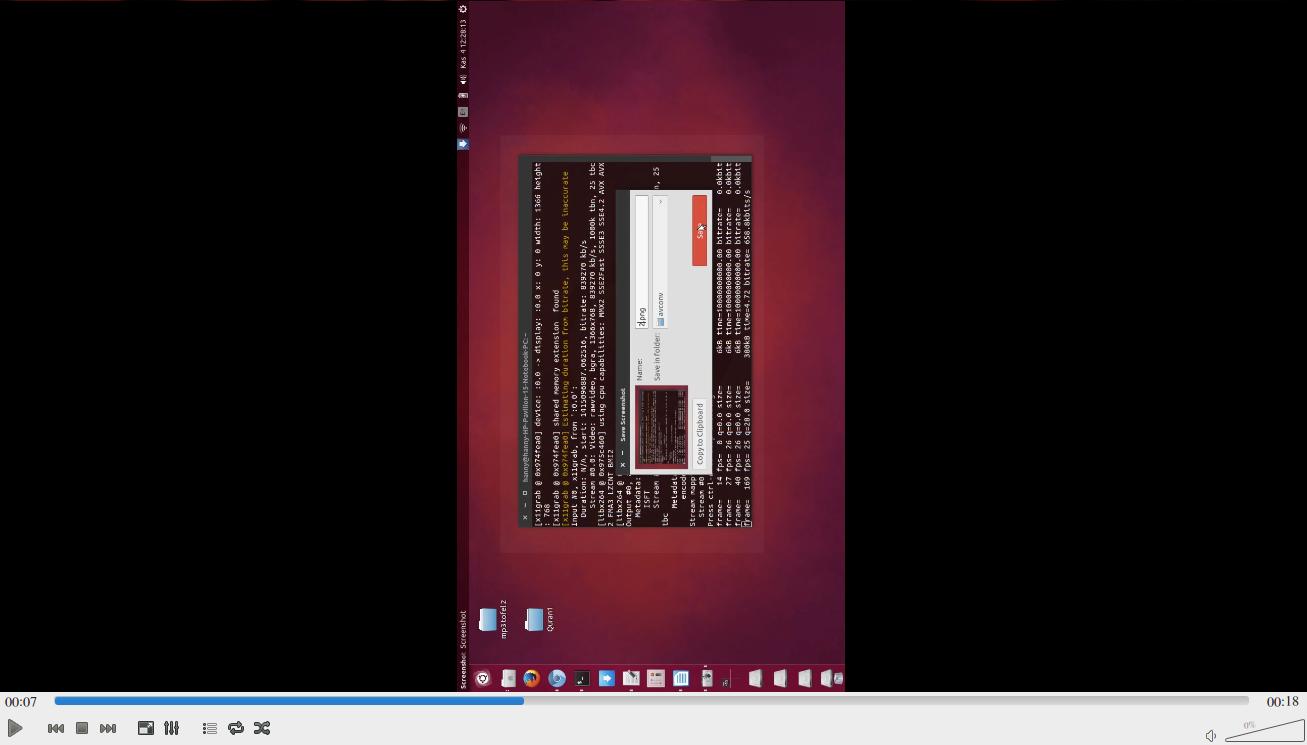
In Libav, there are an amazing things called “filters”, using filters, you can do many great things to your multimedia files. For example, take the following command.
-vf: is an option to apply a video filter (If you want to use an audio filter, replace it with -af).
drawbox=x=50:y=50:width=400:height=300:color=red@0.5: Here we applied a filter called “drawbox” which draws a red box with 400 width and 300 height at x=50 and y = 50.
transpose=cclock is a video filter that rotates the video by 90 degree clockwise.
Here’s an image for what you’ll get.
Rotate Videos
11. Record tty as a Video
This command must be used by the root user, it won’t work without sudo, because it requires access to the framebuffer device (fbdev). fbdev is the Linux framebuffer input device, this device is the responsible device for showing the graphics in the console.
$ sudo avconv -f fbdev -r 30 -i /dev/fb0 out.avi
* -r 30: is the number of frames per second.
* -i /dev/fb0: is the running file device node, by using this option, we’ll be able to capture the video from the tty.
Amazing isn’t? There are many other good filters to use with your multimedia files beside many other ways of usage for avconv, you can check them all from the official documentation at
Have you tried the advance usage for Libav before? What do you think about it? Do you have any other important commands for avconv? Share them with us in the comments!
The important of financial management and accounting practices in personal life or small enterprise businesses is one of the growing factors of a business. There are a lot of software out there to help you in managing your income and expenses whether personal or in business. One of such software is GnuCash and in this guide, I will show you how to install GnuCash on different Linux distributions.
GnuCash Linux Finance Accounting Software
GnuCash is a free and Open source, simple to use financial accounting software. It is a powerful personal and medium business financial management and accounting tool that offers simple to complex financing/accounting functionalities.
It is available on GNU/Linux, Solaris, BSD, Windows and Mas OS operating systems and supports database management systems such as MySQL/MariaDB, PostgreSQL and SQLite3.
GnuCash has the following features:
Customer and vendor tracking.
Multiple currency support.
Personal/business income and expenses tracking.
Bank account tracking with online banking support.
Transaction matching and searching.
Scheduled transactions and financial calculations.
Double entry accounting and general ledge support.
Generation of reports and graphical illustrations.
Import and export support options and many more.
How to Install GnuCash on RHEL/CentOS/Fedora and Debian/Ubuntu
Let us now look at how you can be able to get this software working on your system. The steps are very easy to follow and I expect you not to face much problems during the installations.
In most Linux distributions the version of GnuCash comes with bundled, though it’s not always the most latest version and by default it may not have been installed, but it’s still recommended that you use the GnuCashversion that comes with your respective Linux distributions.
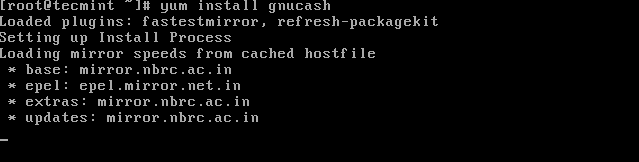
Install GnuCash on RedHat, CentOS and Fedora
First make sure to update your system and it’s repositories to get the most recent version of GnuCash.
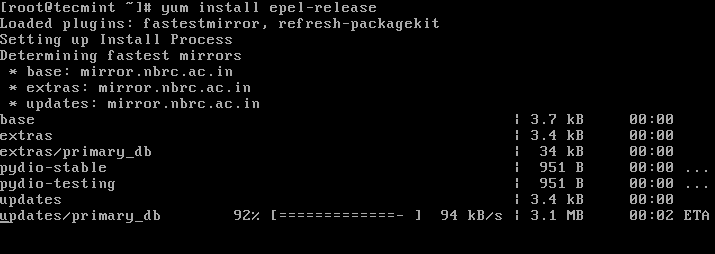
In RedHat and CentOS distributions, GnuCash haven’t included by default in system repositories. It can only be installed using third-party Epel repository. For more information on how to install and enable additional package repository for this setup, see Epel’s installation page.
Alternatively, you can also install Epel repository and GnuCash with the following series of commands.
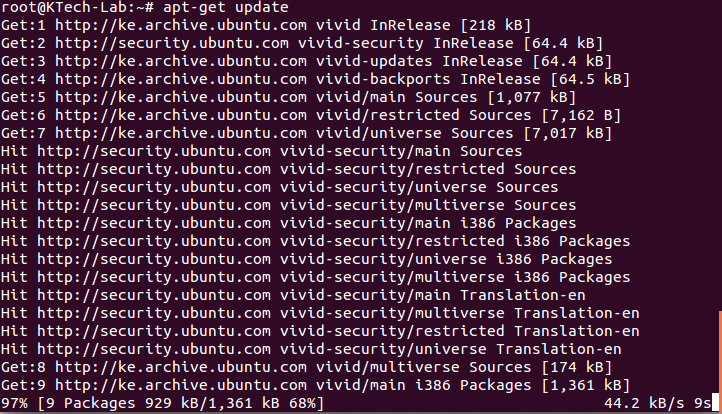
First, you will need to update your system by running the command below:
$ sudo apt-get update
Update System
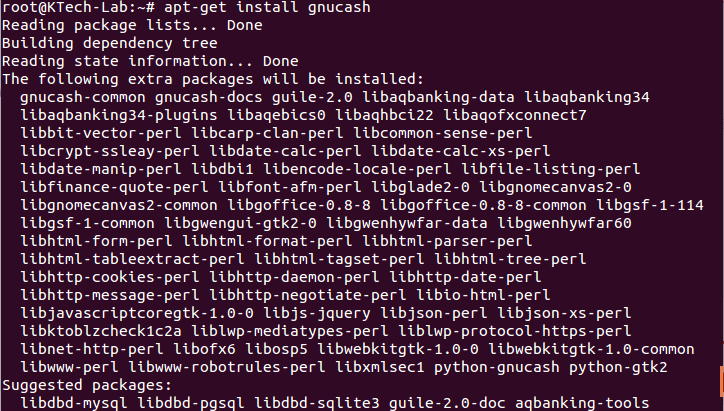
Then install it using the following command:
$ sudo apt-get install gnucash
Install GnuCash on Debian, Ubuntu and Mint
You can as well install it via “Software Center” by searching for gnucash and installing it.
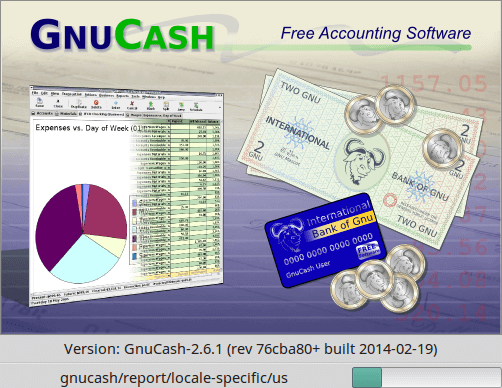
How to Use GnuCash in Linux
You can start and use GnuCash from the terminal as follows or launch from the application menu.
# gnucash
Starting GnuCash
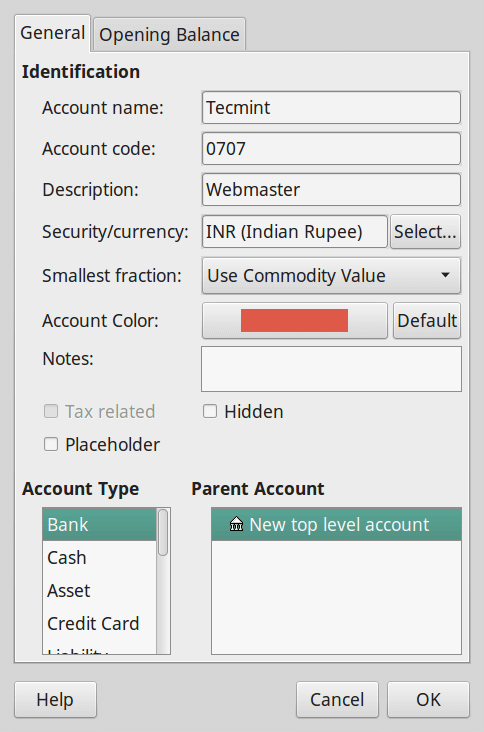
The screen shot below shows the interface for a user to add his/her bank account details for bank account tracking.
GnuCash Create New Account
To add new business customer, you can access the interface below by going to Business –> Customer –> New Customer.
GnuCash Create Business Account
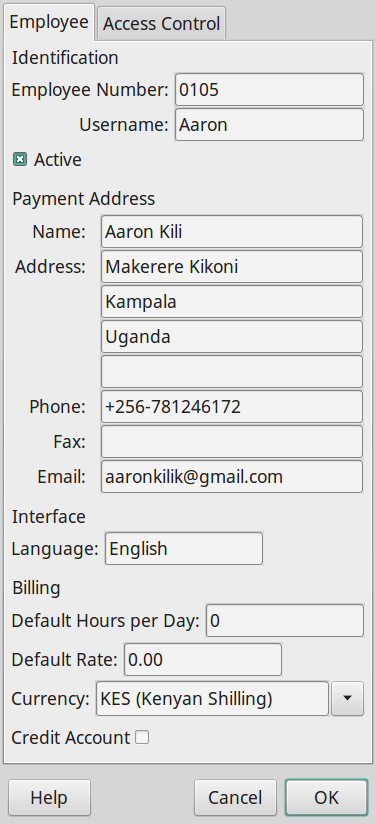
To add a new business employee. It can be accessed by going to Business –> Employee –> New New Employee.
GnuCash Add New Employee
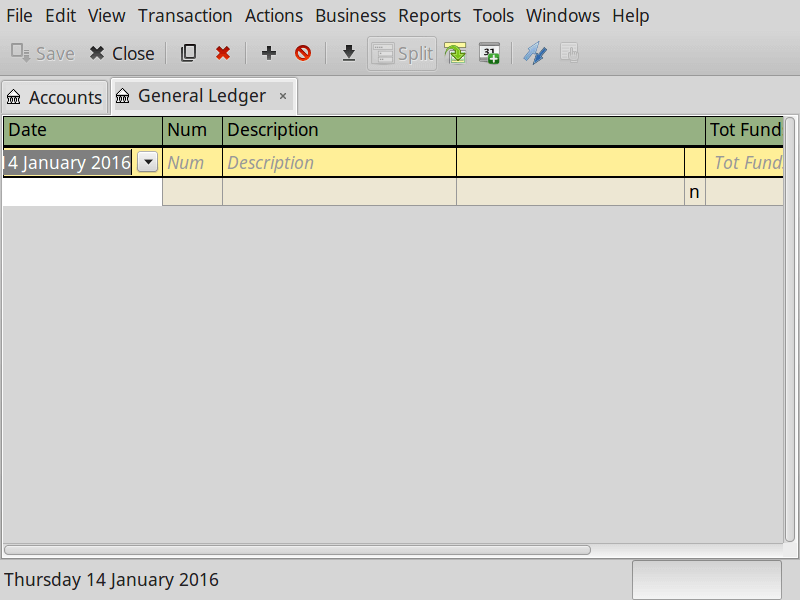
You can access the general ledger interface by going to Tools –> General Ledger.
GnuCash General Ledger
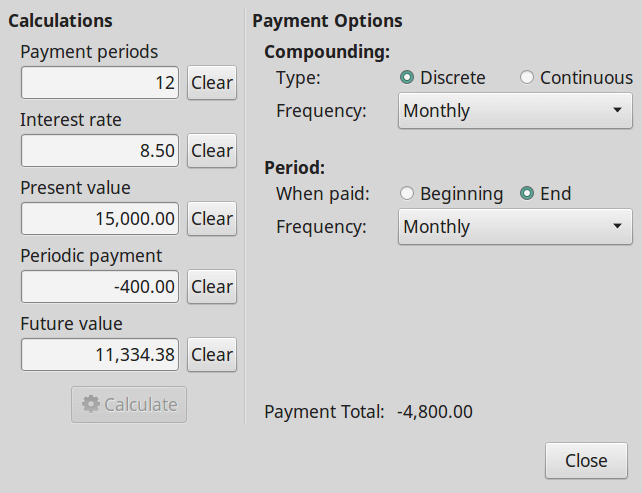
GnuCash also offers users a loan payment calculator hence no need use external calculators.
GnuCash Loan Payment Calculator
Conclusion
There are many financial management and accounting software being used out there and GnuCash just offers you similar functionalities with powerful and improved results, yet maintaining a simple usability features.
Hope you find this guide useful and please leave a comment about areas where you need more clarity or even tell us about other related software that you have used. Thanks for reading and always stay connected to Tecmint.
As you may very well know, Gitlab is among the best alternatives to Github, the first that comes to mind, from the available options. Gitlab is a scalable and efficient Git-based fully featured platform for software development: it supports a complete DevOps lifecycle.
Do you have projects on Github and want to migrate to Gitlab? In this article, we will explain how to migrate from Github to Gitlab and also we will explain how to import your open source project from Github to Gitlab in a few easy steps, using the GitHub integration feature.
Attention: The instructions below work for users on Gitlab.com, for a self-hosted Gitlab instance, you have to manually enable the GitHub integration feature to use this method.
Requirements:
Before going any further, ensure that:
Both your Github and Gitlab accounts are created using the same public email account or.
You logged into the GitLab account using the GitHub icon, meaning you use the same email address for both accounts.
The above requirements also apply to all other users who are attached to your Github project, that you want to map to Gitlab.
Migrating From Github to Gitlab
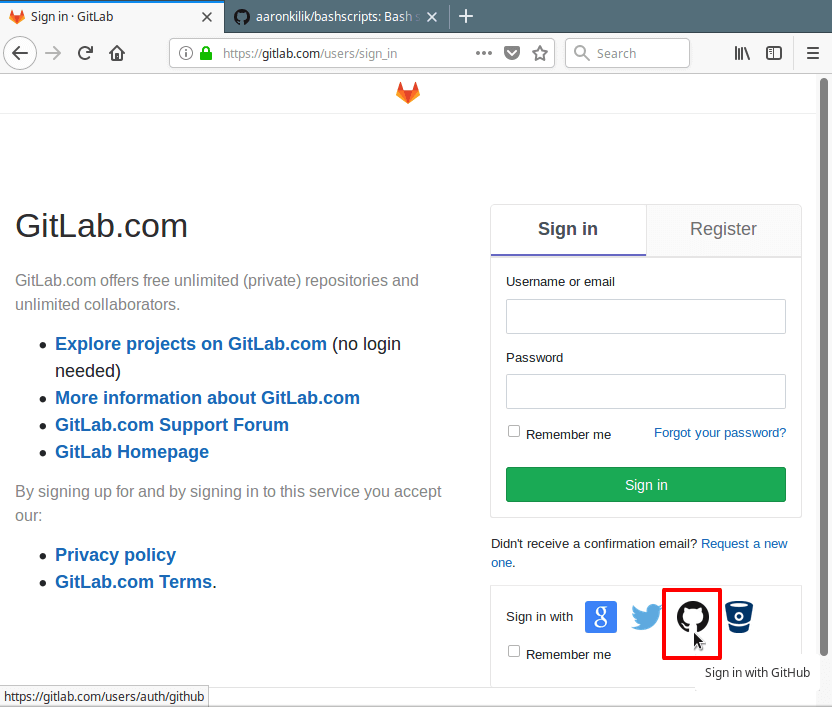
1. First go to Gitlab Sign In page and then sign in with the Github icon, or Register with the same email address you used for registering with Github.
GitLab Sign In
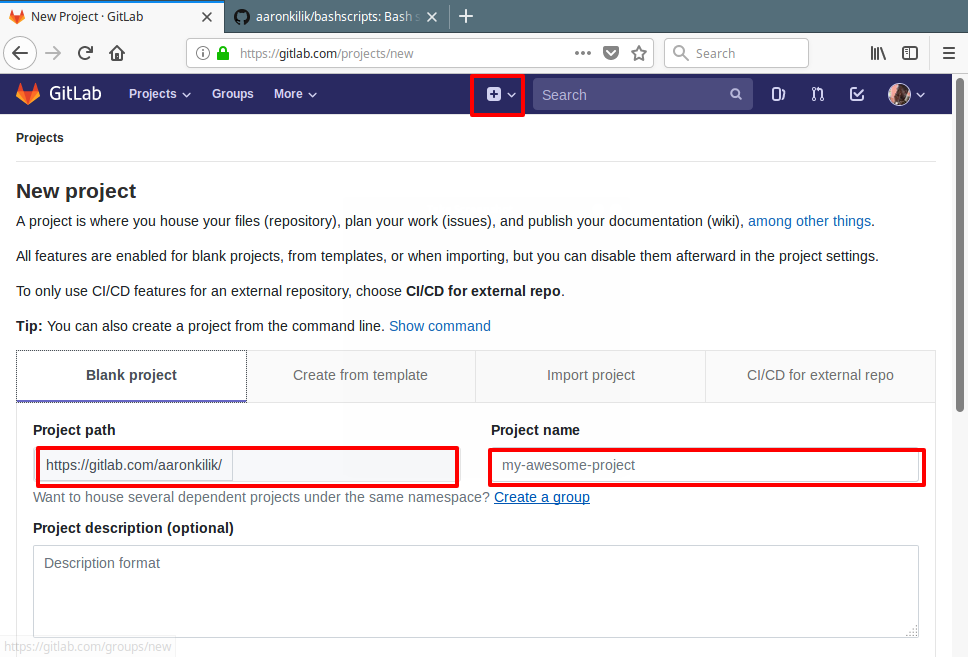
2. After successfully signing in, go to the top navigation bar, click on + and choose New project and enter path of your New Project as shown.
GitLab Create New Project
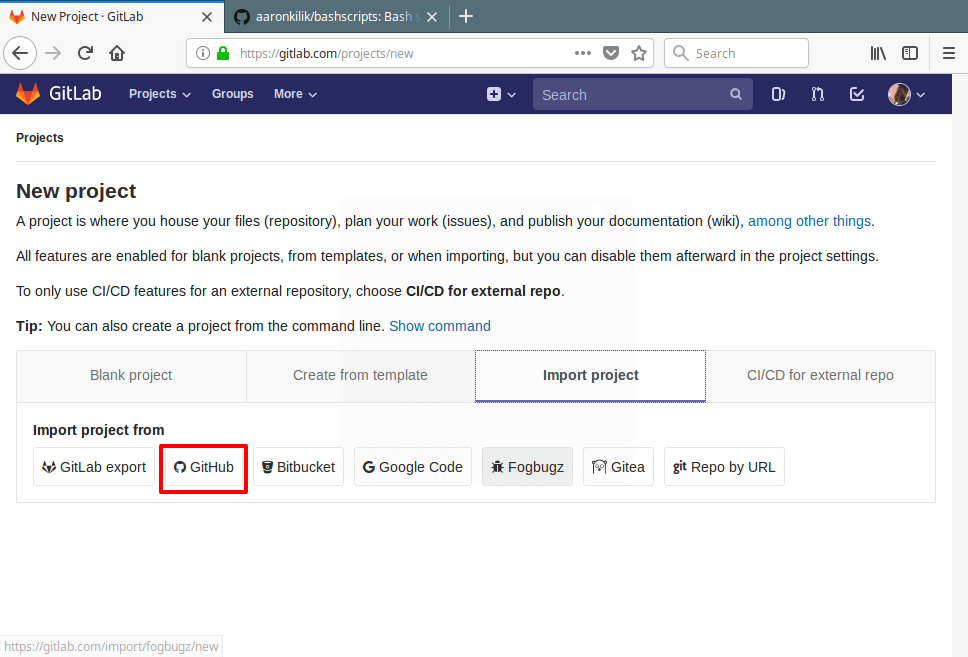
3. Next, click on the Import project tab and then choose GitHub from the available options as shown in the screenshot.
Select GitHub Repository Source
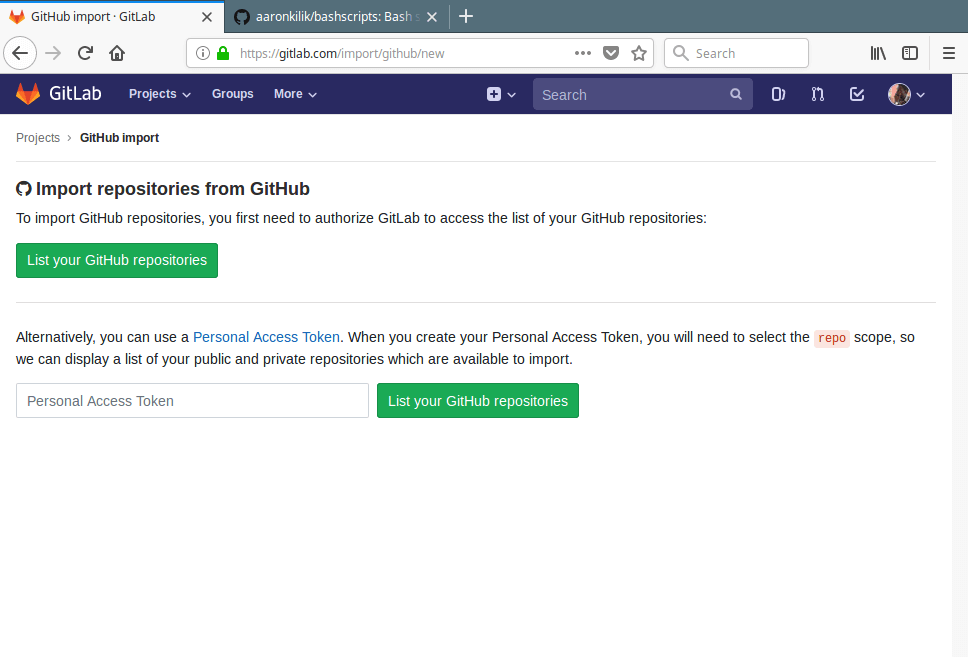
4. You will be redirected to the repository importation page, click on List your GitHub repositories.
List GitHub Repositories
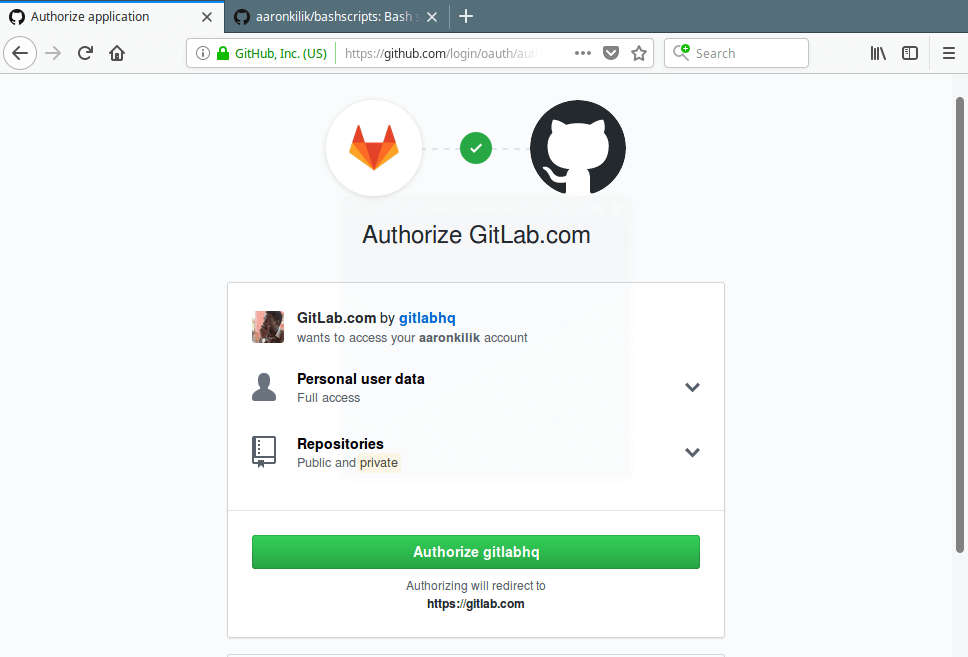
5. Then, you should be redirected to an external application authorization page on github.com to authorize the GitLab, as shown in this screenshot. Click Authorize gitlabhq.
Authorize Github to Gitlab Repository
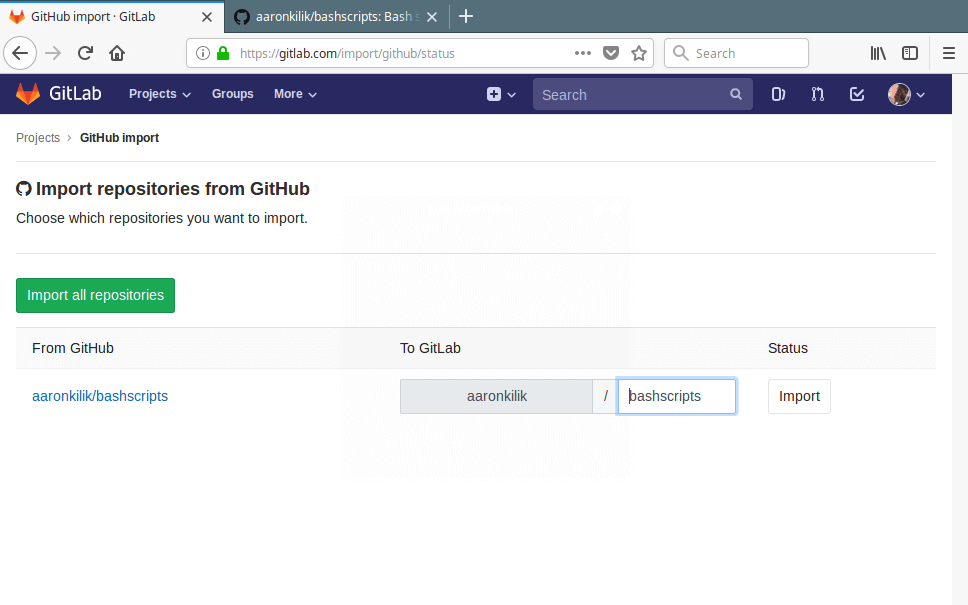
6. You will be redirected back to Gitlab’s import page where you should see a list of all your GitHub repositories. Click on Import from the status column, for each repository you want to import from Github to Gitlab.
Import Github Repositories to Gitlab
7. Once your repository is imported, its status will change to Done as shown in this screenshot.
Github Repositories Imported to Gitlab
8. Now from your Gitlab Projects list, the repository you just imported should be there.
That’s all! In this article, we have explained how to migrate from Github to Gitlab. If you have any questions, or thoughts to share, reach us via the feedback form below.
linuxmessenger app is a “Facebook-like” client for Linux desktop was written in Python language. It allows you to login to your Facebook account right from the command line without installing it on your system and have chat with your loved ones with much a like a Facebook interface. If you want, you can install it as a desktop client. This application has some built-in features like desktop notifications, pop-up alert, friends request and chat sound (with On/Off options).
Facebook Messenger for Linux
Installing Facebook Messenger
The installation is very straightforward, simply open the terminal and install python3, PyQt4 dependencies packages required by the application to run.
Next, download the linuxmessenger zip file from the github page, using wget command. Once downloaded, extract it to your desired directory or home directory. You should get the folder similar to “linuxmessenger-master”.
To verify, whether application is working, Go to the extracted folder “linuxmessenger-master” and run the “fbmessenger” script file.
# cd linuxmessenger-master/
# ./fbmessenger
A “Facebook Messenger” window opens, Enter your Facebook login credentials and chat with your friends.
Facebook Messenger in Ubuntu 13.10
If you would like to install this application as a desktop client, simply run the “setup.py” script or you just execute the “fbmessenger” from the terminal and have everything as desktop client.
# ./setup.py install
There are also builds for RPM based and Debian distributions, so you can install and build it on most distro. As I said the script written in Python language, so it should work on all Linux platforms as long as required dependencies packages are fulfilled.
I am subscribed to several mailing lists related to various Linux Distributions and Applications just to keep myself updated with what’s going on where. What are the new bugs? What are the Patches Released? What is expected in next release? and a whole lot of other stuffs. These days the mailing list is heavily populated with “Choose your side on Linux Divide”, mainly on Debian Mailing list along with a few other.
systemd replaces init
What “Choose your side on Linux Divide” is all about?
The init daemon is going to be replaced with daemon systemd on some of the Linux Distributions, while a lot of them have already implemented it. This is/will be creating a huge gap between traditional Unix/Linux Guard and New Linux Guard – programmers and System Admins.
In this article, we will discuss and solve following all queries one-by-one.
What init is?
What is systemd?
Why init needed to be replaced?
What features systemd will own.
What is init?
In Linux, init is a abbreviation for Initialization. The init is a daemon process which starts as soon as the computer starts and continue running till, it is shutdown. In-fact init is the first process that starts when a computer boots, making it the parent of all other running processes directly or indirectly and hence typically it is assigned “pid=1“.
If somehow init daemon could not start, no process will be started and the system will reach a stage called “Kernel Panic“. init is most commonly referred to as System V init. System V is the first commercial UNIX Operating System designed and usages of init on most of the Linux Distribution of today is identical with System V OS with a few exception like Slackware using BSD-style and Gentoo using custom init.
The need to replace init with something more perfect was felt from a long time and several alternatives were developed from time-to-time, some of which became distribution’s native init replacement, some of which are:
Upstart – A init replacement daemon implemented in Ubuntu GNU/Linux and designed to start process asynchronously.
Epoch – A init replacement daemon built around simplicity and service management, designed to start process single-threaded.
Mudar – A init replacement daemon written in Python, implemented on Pardus GNU/Linux and designed to start process asynchronously.
systemd – A init replacement daemon designed to start process in parallel, implemented in a number of standard distribution – Fedora, OpenSuSE, Arch, RHEL, CentOS, etc.
What is systemd?
A systemd is a System Management Daemon named with UNIX convention to add ‘d‘ at the end of daemon. So, that they can be easily recognized. Initially it was released under GNU General Public License, but now the releases are made under GNU Lesser General Public License. Similar to init, systemd is the parent of all other processes directly or indirectly and is the first process that starts at boot hence typically assigned a “pid=1“.
A systemd, may refer to all the packages, utilities and libraries around daemon. It was designed to overcome the shortcomings of init. It itself is a background processes which is designed to start processes in parallel, thus reducing the boot time and computational overhead. It has a lot other features as compared to init.
Why there was a need to replace init?
A init process starts serially i.e., one task starts only after the last task startup was successful and it was loaded in the memory. This often resulted into delayed and long booting time. However, systemd was not designed for speed but for getting the things done neatly which in turns avoid all the UN-necessary delay.
Features of systemd
Clean, stateforward and efficient design.
Simpler boot process.
Concurrent and parallel processing at boot.
Better API.
Simple Unit Syntax.
Ability to remove optional components.
Low memory footprints.
Improved technique to express dependencies.
Initialization instruction written in config file and not in shell script.
Make use of Unix Domain Socket.
Job Scheduling using systemd Calendar Timers.
Event Logging with journald.
Choice of logging System events with systemd as well as syslog.
Logs are stored in binary file.
systemd state can be preserved to be called later in future.
Track process using kernel’s cgroup and not PID.
Users login managed by systemd-logind.
Better integration with Gnome for interoperability.
Bottlenecks systemd
Everything at one place.
Not POSIX standard.
Systemd and Distro Integration
Linux Distribution
Integration
Fedora
Yes, first distro to adopt systemd
Arch
Yes
RedHat
Yes
CentOS
Yes
Debian
Yes, Debian 8 codename Jessie will have systemd by default
Gentoo
Yes, but needs to be downloaded, installed and configure side with custom init
OpenSUSE
Yes
Slack
No (Though it has not been adopted till now in slackware, Patric Volkerding has not shown any indication if it will be adopted or not)
Ubuntu
Yes, needs to be installed and configured with Upstream.
Controversy
Linus Torvalds, Chief architect of Linux kernel, feels attitude of key developer of systemd towards users and bug reports do not seems ok. It was also reported that systemd philosophy is weird and a foreign way to control system processes. The same has been recorded from Patric Volkerding and other notable Linux Users and Developers as well as over online forum, time-to-time.
systemd vs init
Features
init
systemd
DBus Dependency – Mandatory
No
Yes
Device based Activation
No
Yes
Device dependency configuration with udev
No
Yes
Timer based Activation
Cron/at
Proprietary
Quota Management
No
Yes
Automatic Service Dependency Handling
No
Yes
Kills users Process at logout
No
Yes
Swap Management
No
Yes
SELinux integration
No
Yes
Support for Encrypted HDD
No
Yes
Static kernle module loading
No
Yes
GUI
No
Yes
List all the child processes
No
Yes
Sysv compatible
Yes
Yes
Interactive booting
No
Yes
Portable to non x86
Yes
No
Adopted on
Several Distro
Several Distro
Parallel service startup
No
Yes
Resource limit per service
No
Yes
Easy extensible startup script
Yes
No
Separate Code and Configuration File
Yes
No
Automatic dependency calculation
No
Yes
Verbose debug
Yes
No
Version
N/A
V44+
Size
560 KB
N/A
Number of Files
75 files
900 files + glib + DBus
Lines of code – LOC
15000 (Approx)
224000 (Approx) (inc Codes, comments and white space) 125000 (Approx) (acctual code)
Conclusion
Anything running as pid=1 must not break, must not be mess and must be controlled by users effectively and efficiently. Many-a-user believes that replacing init for systemd is nothing more than reinventing the wheel everytime as a side effect of Linux. But this is the diverse nature of Linux. This is because Linux is that much powerful. Change is good and we must appreciate it if it is for a good reason.
That’s all for now. I’ll be here again with another Interesting article you people will love to read. Till then stay tuned and connected to Tecmint. Don’t forget to provide us with your valuable feedback in the comments below.
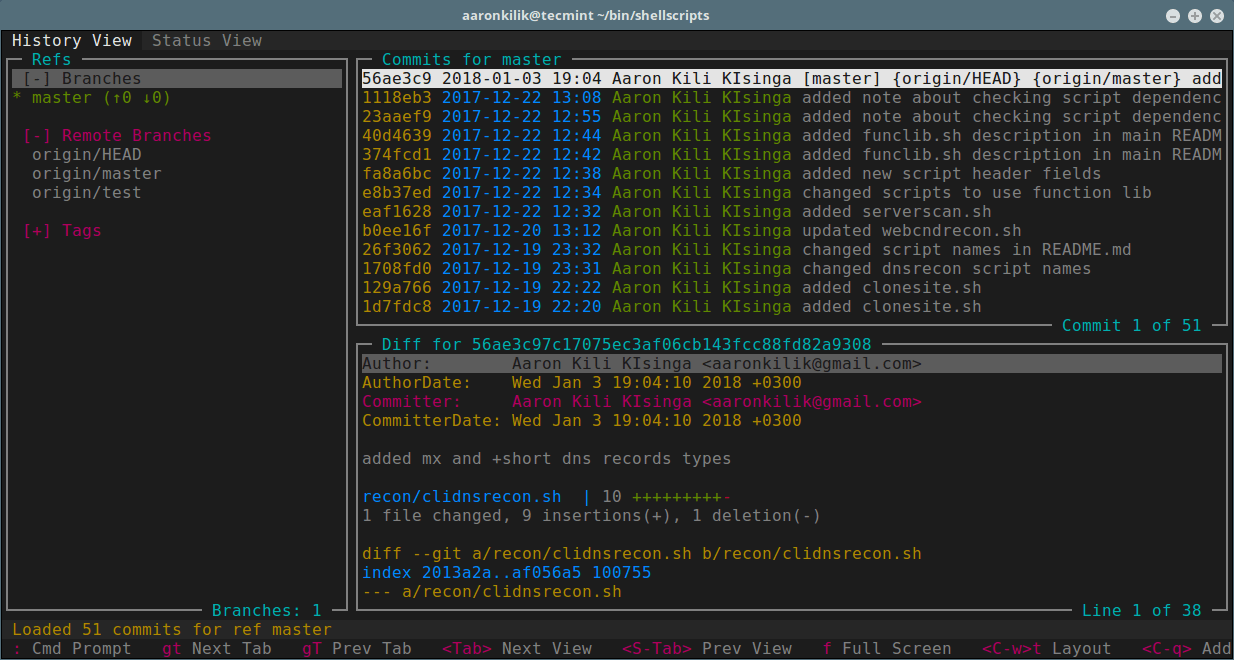
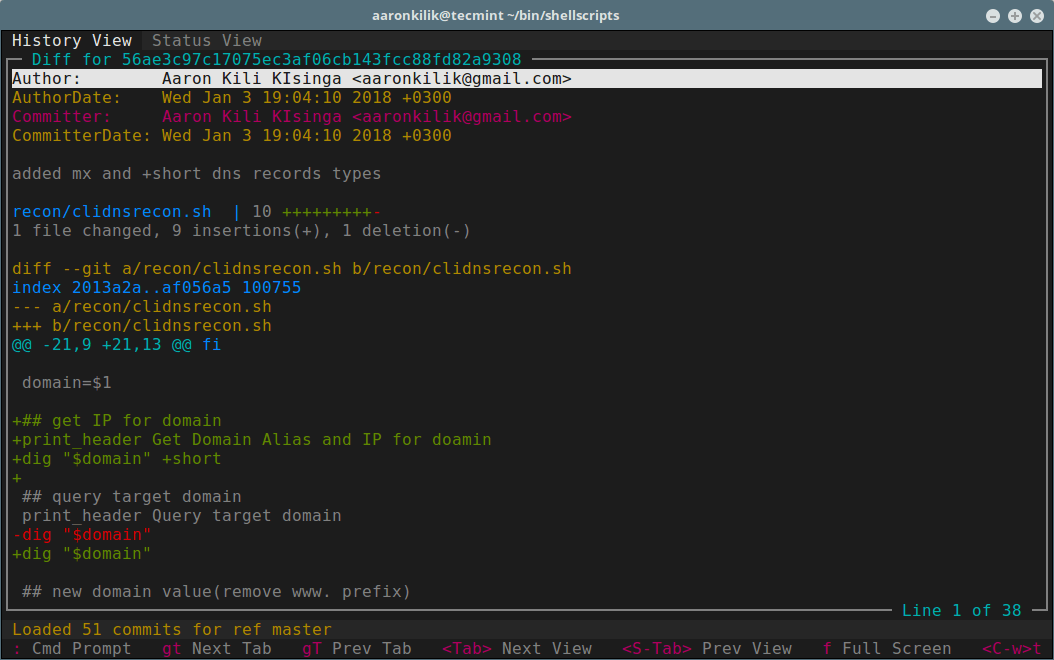
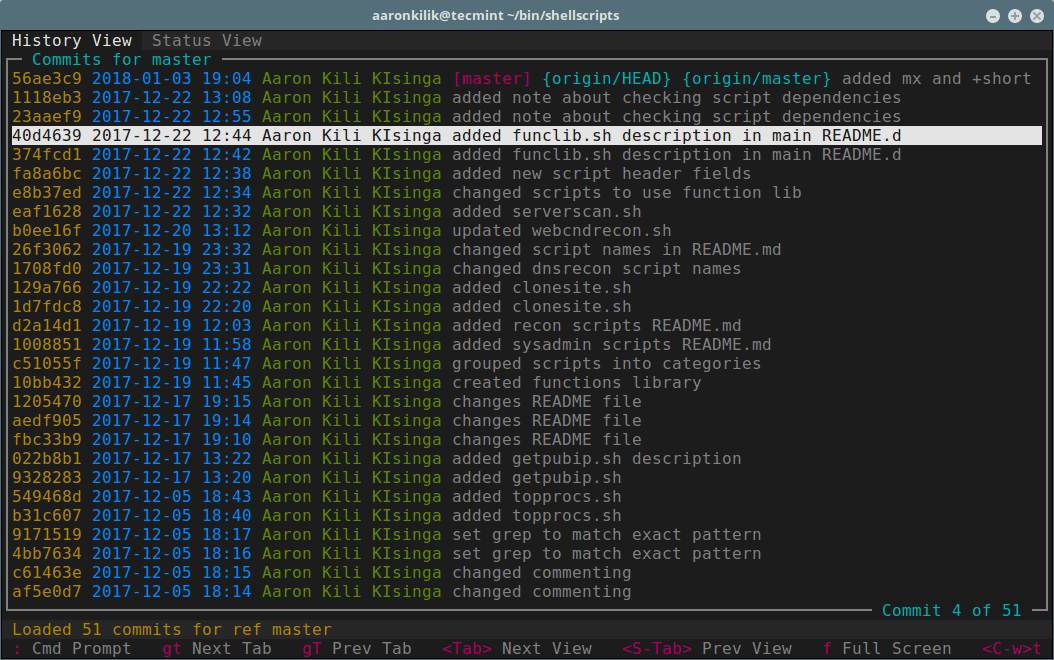
GRV (Git Repository Viewer) is a free open-source and simple terminal-based interface for viewing git repositories. It provides a way to view and search refs, commits, branches and diffs using Vi/Vim like key bindings. It’s behavior and style can be easily customized through a configuration file.
GRV Features:
Provides a query language to filter refs and commits.
Supports Vi/Vim-like key-bindings by default, and key bindings can be customized.
Captures changes to the repository by monitoring the filesystem allowing the UI to be updated automatically.
It is organized as tabs and splits; allows for creating custom tabs and splits using any combination of views.
Supports customizable themes.
Offers mouse support.
Requirements:
Go version 1.5 or later should be installed on your system.
libncursesw, libreadline and libcurl.
cmake (to build libgit2).
How to Install GRV in Linux Systems
First install required dependencies using the default package manager as shown.
In this article, we have explained how to install and use GRV, a terminal based UI for viewing git repositories. Use the feedback form below to share your thoughts about it or ask any questions.
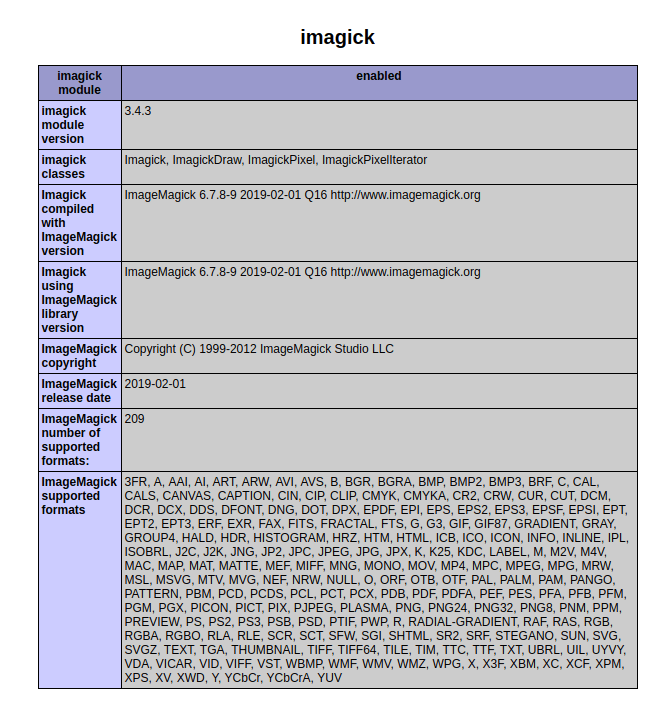
ImageMagick is a free open source simple software suite for any kind of image manipulation that is used for creating, editing, converting, displaying image files.
It can able to read and write over 200 image files such as JPEG, GIF, PNG, TIFF, and Photo CD image formats and it is also used for thumbnail or captcha generation. It also includes command line options for creating transparent or animated gif image formats and many more feature like resize, sharpen, rotate or add special effects to an image.
To use ImageMagick tool with PHP or Perl programming language, you will need to install ImageMagick with Imagick PHP extension for PHP and ImageMagick-Perl extension for Perl.
Imagick is a simple PHP extension for creating and modifying images using the ImageMagick API program. There is a confusion in name, as people think that ImageMagick and Imagick both are same, but you can use ImageMagick without Imagick extension but you need both installed on your machine to use and run it.
Installing ImageMagick from Repository
First, install following prerequisite php-pear, php-devel and gcc packages to compile imagick PHP extension.
# yum install php-pear php-devel gcc
Once you’ve installed php-pear, php-devel and gcc packages, you may now install ImageMagick software for PHP and Perl support using yum command.
To install ImageMagick from source, you need a proper development environment with a compiler and related development tools. If you don’t have the required packages on your system, install development tools as shown:
Next, compile the imagick for PHP extension. To do, simple run the following ‘pecl‘ command. It will install ImageMagick and imagick PHP extension module ‘imagick.so‘ under /usr/lib/php/modules directory. If you are using 64-bit system, the module directory path would be /usr/lib64/php/modules.
# pecl install imagick

downloading imagick-3.4.3.tgz ...
Starting to download imagick-3.4.3.tgz (245,410 bytes)
...................................................done: 245,410 bytes
19 source files, building
running: phpize
Configuring for:
PHP Api Version:         20100412
Zend Module Api No:      20100525
Zend Extension Api No:   220100525
Please provide the prefix of Imagemagick installation [autodetect] :
Note: It will ask you to provide Imagemagick installation prefix, simply hit enter to auto detect.
Now, add the ‘imagick.so‘ extension to ‘/etc/php.ini‘ file.
echo extension=imagick.so >> /etc/php.ini
Next, restart Apache web server.
# service httpd restart
Verify imagick PHP extension by running the following command. You will see imagick extension similar to below.
# php -m | grep imagick

imagick
Alternatively, you can create a file called ‘phpinfo.php‘ under website root directory (ex: /var/www/html/).
# vi /var/www/html/phpinfo.php
Add the following code.
<?php

     phpinfo ();
?>
Open your favorite web browser and type ‘http://localhost/phpinfo.php‘ or ‘http://ip-addresss/phpinfo.php‘ and verify the imagick extension.
Systemd (system daemon) is a modern system management daemon for Linux systems. Systemd is a replacement for init system manager; it controls system startup and services, and introduces the idea of units (managed via unit files) to identify different types of system resources such as services, devices, swap, automount, targets, paths, sockets and others.
It ships in with systemctl, a component for controlling systemd’s behavior and units (starting, stopping, restarting, viewing status etc) using the command line. What if you simply want to manage units using keyboard shortcuts, that is where chkservice comes in.
Chkservice is an easy-to-use, ncurses-based command line tool for managing systemd units on a terminal. It lists units alphabetically under the categories (services, targets, automounts etc), showing the their status and description, and allows you, with superuser privileges to start, stop, enable and disable units.
Install chkservice in Linux Systems
On Debian and its derivatives, chkservice can be easily installed using its own PPA as shown.
# git clone https://aur.archlinux.org/chkservice.git
# cd chkservice
# makepkg -si
On other Linux distributions, you can build the release version using following commands.
# git clone https://github.com/linuxenko/chkservice.git
# mkdir build
# cd build
# cmake ../
# make
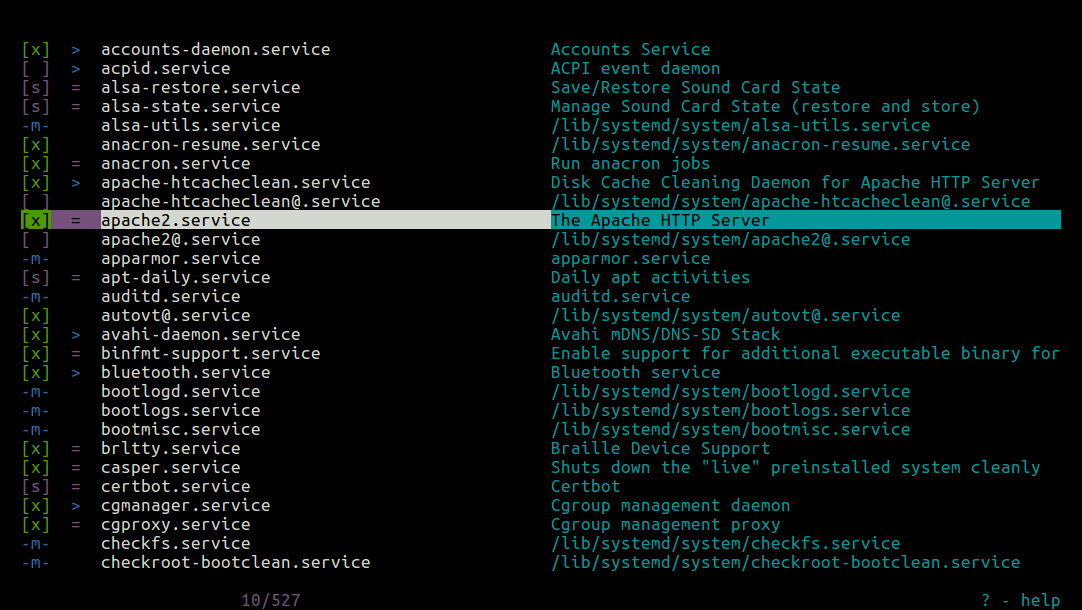
Once you have installed chkservice, launch it with root privileges using the sudo command. It’s output consists of four columns, the first showing enabled/disabled/masked status, the second showing started/stopped status, unit name/type and last column is the unit description.
$ sudo chkservice
chkservice for Managing Systemd Services
Chksericve unit status information:
[x] – shows a unit is enabled.
[ ] – shows a unit is disabled.
[s] – indicates a static unit.
-m- – shows a unit is masked.
= – indicates unit has been stopped.
> – shows unit is running.
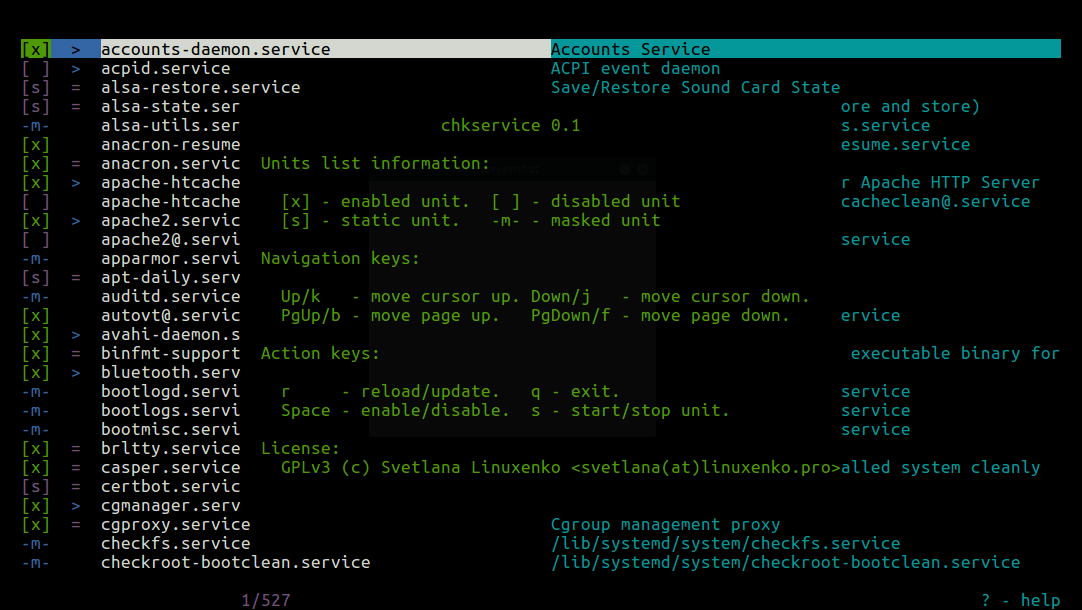
Below are the chkservice navigation keys:
Up/k – move cursor up.
Down/j – move cursor down.
PgUp/b – move page up.
PgDown/f – move page down.
The following are chkservice action keys:
r – updates or reload information.
Space bar – used to enable or disable a unit.
s – for starting or stopping a unit.
q – exit.
To view the help page as shown in the screenshot below, use ? (press [Shift + /]).
It’s mid-2016 and there are lots of methods to share files online between you and another person 12 timezones away. Some of them are convenient in that they offer a certain amount of disk space for free, and also offer commercial options if you require more storage.
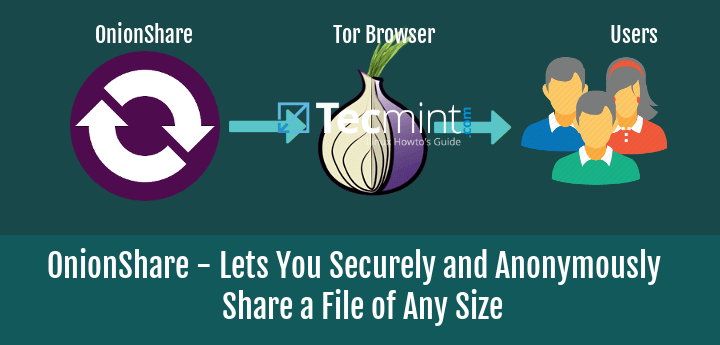
OnionShare – Share Files of Any Size Securely and Anonymously Over Tor Network
Of course, you can set up your alternative using a tool such as ownCloud, but what if all you need is a one-time-only method to share files privately and securely? On one hand, setting up your own cloud for this sounds like an overkill, and using a service offered by a third party leaves your data whether you want it or not available at that third party’s will, and possibly subject to government requests.
In this article we will explain how to use Onionshare, an open source desktop utility that allows you to share files hosted on your own computer of any size securely and anonymously using the Tor browser on the other end.
Please note that you don’t necessarily have to be distributing top secret or otherwise highly confidential data in order to be concerned with your privacy – being able to share files securely and anonymously should be something we have access to every day. Let’s see how we can do it very easily.
Installing Onionshare in Linux
As we mentioned earlier, with Onionshare you don’t have to store online the files you want to share. Onionshare will start a web server locally and use a Tor service to make those files available over the Internet through the Tor network.
Thus, only the person with the right permissions will be able to see them for as long as you allow them to. In theory, you will want to close the web server running on your local computer as soon as the remote user is done downloading files. Enough talk, let’s now install Onionshare. We will use the following environment:
Local host: Linux Mint 17.3 32 bits
Remote host: Windows 7 Professional 64 bits
To install Onionshare in Linux Mint, or another Ubuntu derivative (including Ubuntu itself), do:
$ sudo add-apt-repository ppa:micahflee/ppa
Press enter when you’re prompted to confirm whether you actually want the PPA to your software sources.
If you’re using another distribution, you may want to follow the build instructions provided by the developer in GitHub.
Once Onionshare is installed and before launching it you will also need to install and start in the background the Tor browser. This will help set up the secure channel between your computer and the remote user’s machine.
To accomplish this goal, follow these steps:
Step 1 – Head over to the Tor project’s website and download the program. At the time of this writing, the latest version of Tor is 6.0.2:
Step 2 – Untar the file, change to the directory where the files were extracted, and start Tor:
$ tar xJf tor-browser-linux32-6.0.2_en-US.tar.xz
$ cd tor-browser_en-US
$ ./start-tor-browser.desktop
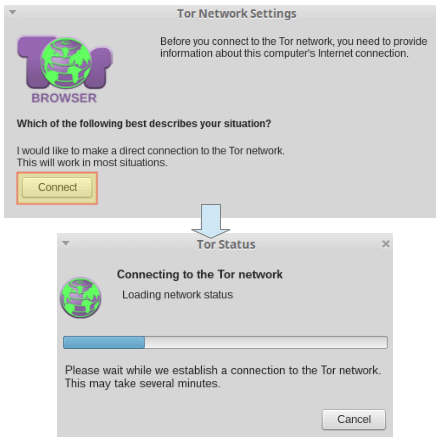
Step 3 – Connect to the Tor network. You will only need to do this once.
Start Tor Browser
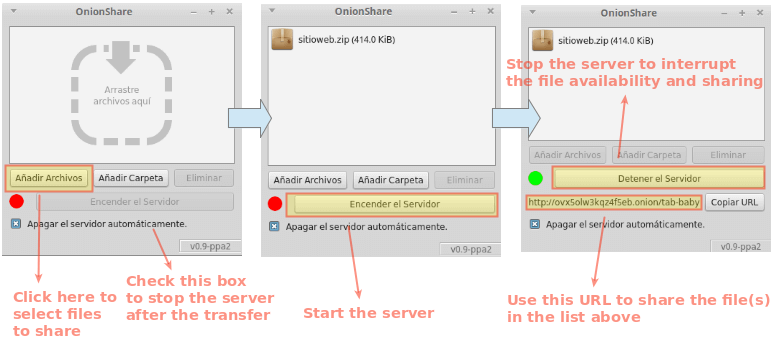
We are now ready to launch Onionshare from our list of installed programs (sorry the above image is in Spanish). You can either add files using the Add Files button or dragging and dropping them in the white area (“Drag files here”):
OnionShare Secure File Sharing
After you started Onionshare’s web server, the files in the list become available through the given URL (see highlighted in the image above). You can then copy it using the Copy URL button and send it to the person you want to share the files with. Keep in mind, however, that this URL will not be accessible by a regular web browser such as Firefox, Google Chrome, Opera, Safari, or Internet Explorer. The other person needs to be using the Tor browser (downloads for other operating systems are available in the project’s website).
It is important to note that protecting the URL is essential in this process. You don’t want to share it over an insecure channel or non-encrypted chat service. A Google search for encrypted chat services (without quotes) will return a list of options you may want to consider to share the download URLs.
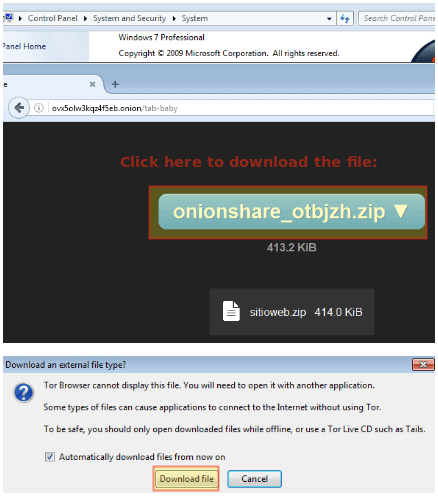
When the remote user points the Tor browser to the URL, he or she will be given the option to download the file. The blue button shows the changed name of the file, whereas the original appears right below. Tor will warn you that it can’t open the file and advise you to download it, but warning you to be aware that in order to keep your privacy- you should avoid opening files that may circumvent Tor and connect you directly to the Internet:
OnionShare File Sharing Using Tor Browser
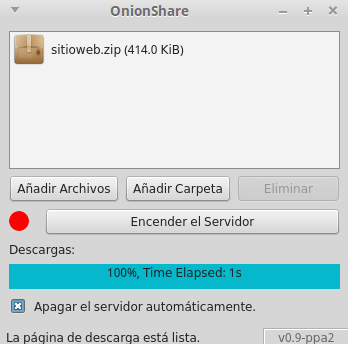
After the download is finished, the server running on your local machine will be automatically closed by Onionshare:
OnionShare File Download
Please note that even though we have illustrated the use of Onionshare with a single file, it supports the transfer of several files and folders over a single URL, and multiple persons downloading at the same time.
Summary
In this guide we have shown how to install Onionshare and use it, along with the Tor network, to share files securely and anonymously. With Onionshare you can forget about worrying about your privacy and the care given to your personal data by third party businesses. You’re now in full control of your precious, private files.
To read more about Tor, and find out suggestions to use the network more effectively, you may want to refer to the full list of warnings in the project’s website here.