Woof – Easily Exchange Files Over a Local Network in Linux

Woof (short for Web Offer One File) is a simple application for sharing files between hosts on a small local network. It consists of a tiny HTTP server that can serve a specified file for a given number of times (default is once) and then terminates.

To use woof, simply invoke it on a single file, and the recipient can access your shared file via a web browser or using a command-line web-client such as cURLHTTPiewget or kurly (a curl alternative) from the terminal.

One advantage of woof over other file sharing tools is that it shares files between a different operating system, or different devices (computers, smartphones, tablets etc.), provided the recipient has a web browser installed.

In this article, we will show how to install woof in Linux and use it to share files on a local network.

How to Install and Use Woof in Linux

On Debian and Ubuntu, you can easily install ‘woof‘ package from the distribution’s default repositories using aptor apt-get package manager as shown.

$ sudo apt install woof
OR
$ sudo apt-get install woof

On other Linux distributions, you can download the woof script using wget command and move it to a /usr/bindirectory as shown.

$ wget http://www.home.unix-ag.org/simon/woof
$ sudo cp woof /usr/bin/

To share a file, provide it as an argument as shown.

$ woof ./bin/bashscripts/getpubip.sh 

Then woof will generate a URL (http://192.168.43.31:8080/ in this case) which your partner can use to access the file.

Share File with Woof

Share File with Woof

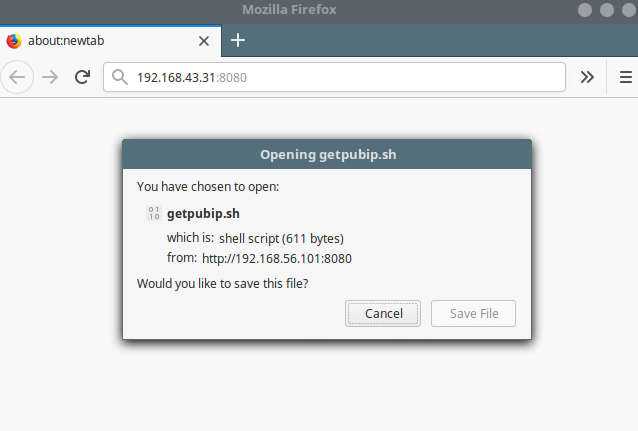
Send the URL to the recipient. Once the recipient accesses the file, woof will shutdown (see the following screenshot).

Access File Shared via Woof

Access File Shared via Woof

Note: In the above example, we have used wget command line downloader to obtain the shared file, and it automatically assigns the downloaded file a different name (for instance index.html).

To specify a custom name, use the -O option as shown.

$ wget -O  custom_name http://192.168.43.31:8080

Alternatively, you can also access the shared file from the web browser as shown (click Save File to download it).

Download Shared File from Web Browser

Download Shared File from Web Browser

By default, woof shares the file once, and after the recipient downloads it, woof terminates. You can set the number of time woof shares a file before it shuts down, using the -c option.

The following command will terminate woof after three downloads.

$ woof -c 3 ./bin/bashscripts/getpubip.sh

To share a directory, you can create a tarball and compress it by using (-z for gzip compression, or -j for bzip2 compression, or -Z for ZIP compression). For example:

$ woof -c 2 -z ./bin/

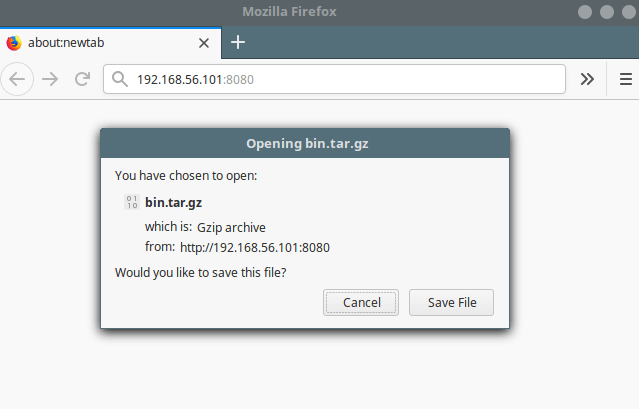
Check out the download file name, it should be a Gzip archive as shown in the following screenshot.

Download Compressed Tar Archive File

Download Compressed Tar Archive File

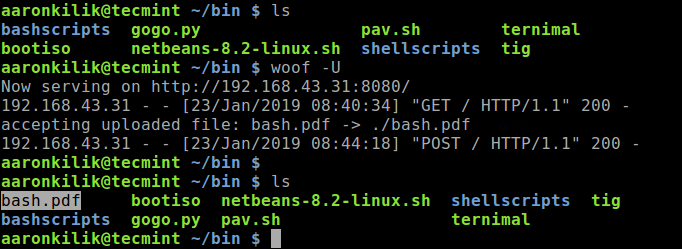
In addition, you can use the -U flag to tell woof to provide an upload form, allowing file uploads. The file will be uploaded to the current directory where woof was launched from:

$ woof -U

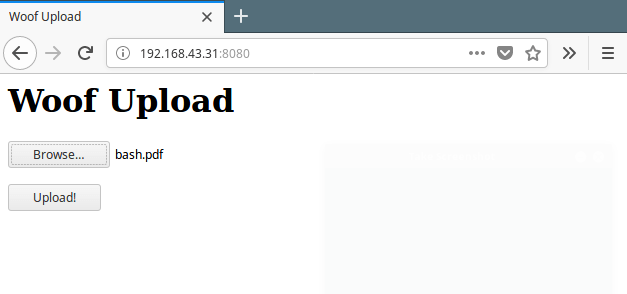
Then your partner can use the generated URL to access the upload form from a browser as shown.

Woof File Upload Form

Woof File Upload Form

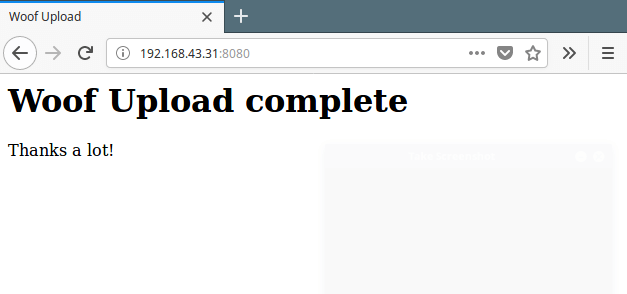
After browsing and selecting the file, click the Upload button to upload files.

Woof File Upload Complete

Woof File Upload Complete

You can verify, that the file should be uploaded to the same directory where woof was invoked.

Verify File Uploads

Verify File Uploads

You can see more usage options by running:

$ man woof 
OR
$ woof -h

Woof is a small, simple and easy-to-use HTTP server for sharing files on a local areas network. In this article, we showed how to install and use woof in Linux. Use the feedback form below to share your thoughts about this tool or ask questions.

Source

5 Command Line Ways to Find Out Linux System is 32-bit or 64-bit

This tutorial describes how to find out whether your Linux system’s OS is 32-bit or 64-bit. This will be helpful if you wanted to download or install an application in your Linux system. As we all know, we can’t install 64-bitapplications into a 32-bit OS type. That’s why knowing your Linux system’s OS type is important.

Check Linux System is 32-bit or 64-bit

Check Linux System is 32-bit or 64-bit

Here are the five easy and simple methods to verify your Linux system’s OS type. It doesn’t matter whether you’re using a GUI or CLI type systems, the following commands will work on almost all Linux operating systems such as RHEL, CentOS, Fedora, Scientific Linux, Debian, Ubuntu, Linux Mint, openSUSE etc.

1. uname Command

uname -a command will display your Linux system’s OS type. This is the universal command and it will work on almost all Linux/Unix operating systems.

To find out the system’s OS type, run:

$ uname -a

Linux tecmint.com 3.13.0-37-generic #64-Ubuntu SMP Mon Sep 22 21:28:38 UTC 2014 x86_64 x86_64 x86_64 GNU/Linux

2. dpkg Command

dpkg command will also display whether your Debian/Ubuntu operating system is 32-bit or 64-bit. This command will work only on Debian and Ubuntu based distributions and it’s derivatives.

Open your Terminal, and run:

$ dpkg --print-architecture 

If your OS is 64-bit, you’ll get the following output:

amd64

If your OS is 32-bit, then the output will be:

i386

3. getconf Command

getconf command will also display the system configuration variables. Now, let me show you how to find out the Linux system arch using getconf command.

$ getconf LONG_BIT

64

For more details refer the man pages.

$ man getconf

4. arch Command

arch command will display your OS type. This command is similar to uname -m command. If its output is x86_64 then it’s 64-bit OS. If the output is i686 or i386, then it’s 32-bit OS.

$ arch

x86_64

5. file Command

file command with with a special argument /sbin/init will display the OS type.

$ file /sbin/init

/sbin/init: ELF 64-bit LSB  shared object, x86-64, version 1 (SYSV), dynamically linked (uses shared libs), for GNU/Linux 2.6.24, BuildID[sha1]=7a4c688d009fc1f06ffc692f5f42ab09e68582b2, stripped

Conclusion

You now know the ways to find out your Linux operating system’s type. Of course, there are few other ways to find out the OS type, but these are the often and pragmatic methods so far. If you know any other commands or methods to display the OS type, feel free to let us know in the comments section below.

Source

How to Clear RAM Memory Cache, Buffer and Swap Space on Linux

Like any other operating system, GNU/Linux has implemented a memory management efficiently and even more than that. But if any process is eating away your memory and you want to clear it, Linux provides a way to flush or clear ram cache.

Clear RAM Cache and Swap in Linux

How to Clear Cache in Linux?

Every Linux System has three options to clear cache without interrupting any processes or services.

1. Clear PageCache only.

# sync; echo 1 > /proc/sys/vm/drop_caches

2. Clear dentries and inodes.

# sync; echo 2 > /proc/sys/vm/drop_caches

3. Clear PageCache, dentries and inodes.

# sync; echo 3 > /proc/sys/vm/drop_caches 

Explanation of above command.

sync will flush the file system buffer. Command Separated by “;” run sequentially. The shell wait for each command to terminate before executing the next command in the sequence. As mentioned in kernel documentation, writing to drop_cache will clean cache without killing any application/service, command echo is doing the job of writing to file.

If you have to clear the disk cache, the first command is safest in enterprise and production as “...echo 1 > ….” will clear the PageCache only. It is not recommended to use third option above “...echo 3 >” in production until you know what you are doing, as it will clear PageCachedentries and inodes.

Is it a good idea to free Buffer and Cache in Linux that might be used by Linux Kernel?

When you are applying various settings and want to check, if it is actually implemented specially on I/O-extensive benchmark, then you may need to clear buffer cache. You can drop cache as explained above without rebooting the System i.e., no downtime required.

Linux is designed in such a way that it looks into disk cache before looking onto the disk. If it finds the resource in the cache, then the request doesn’t reach the disk. If we clean the cache, the disk cache will be less useful as the OS will look for the resource on the disk.

Moreover it will also slow the system for a few seconds while the cache is cleaned and every resource required by OS is loaded again in the disk-cache.

Now we will be creating a shell script to auto clear RAM cache daily at 2am via a cron scheduler task. Create a shell script clearcache.sh and add the following lines.

#!/bin/bash
# Note, we are using "echo 3", but it is not recommended in production instead use "echo 1"
echo "echo 3 > /proc/sys/vm/drop_caches"

Set execute permission on the clearcache.sh file.

# chmod 755 clearcache.sh

Now you may call the script whenever you required to clear ram cache.

Now set a cron to clear RAM cache everyday at 2am. Open crontab for editing.

# crontab -e

Append the below line, save and exit to run it at 2am daily.

0  2  *  *  *  /path/to/clearcache.sh

For more details on how to cron a job you may like to check our article on 11 Cron Scheduling Jobs.

Is it good idea to auto clear RAM cache on production server?

No! it is not. Think of a situation when you have scheduled the script to clear ram cache everyday at 2am. Everyday at 2am the script is executed and it flushes your RAM cache. One day for whatsoever reason, may be more than expected users are online on your website and seeking resource from your server.

At the same time scheduled script run and clears everything in cache. Now all the user are fetching data from disk. It will result in server crash and corrupt the database. So clear ram-cache only when required,and known your foot steps, else you are a Cargo Cult System Administrator.

How to Clear Swap Space in Linux?

If you want to clear Swap space, you may like to run the below command.

# swapoff -a && swapon -a

Also you may add above command to a cron script above, after understanding all the associated risk.

Now we will be combining both above commands into one single command to make a proper script to clear RAM Cache and Swap Space.

# echo 3 > /proc/sys/vm/drop_caches && swapoff -a && swapon -a && printf '\n%s\n' 'Ram-cache and Swap Cleared'

OR

$ su -c "echo 3 >'/proc/sys/vm/drop_caches' && swapoff -a && swapon -a && printf '\n%s\n' 'Ram-cache and Swap Cleared'" root

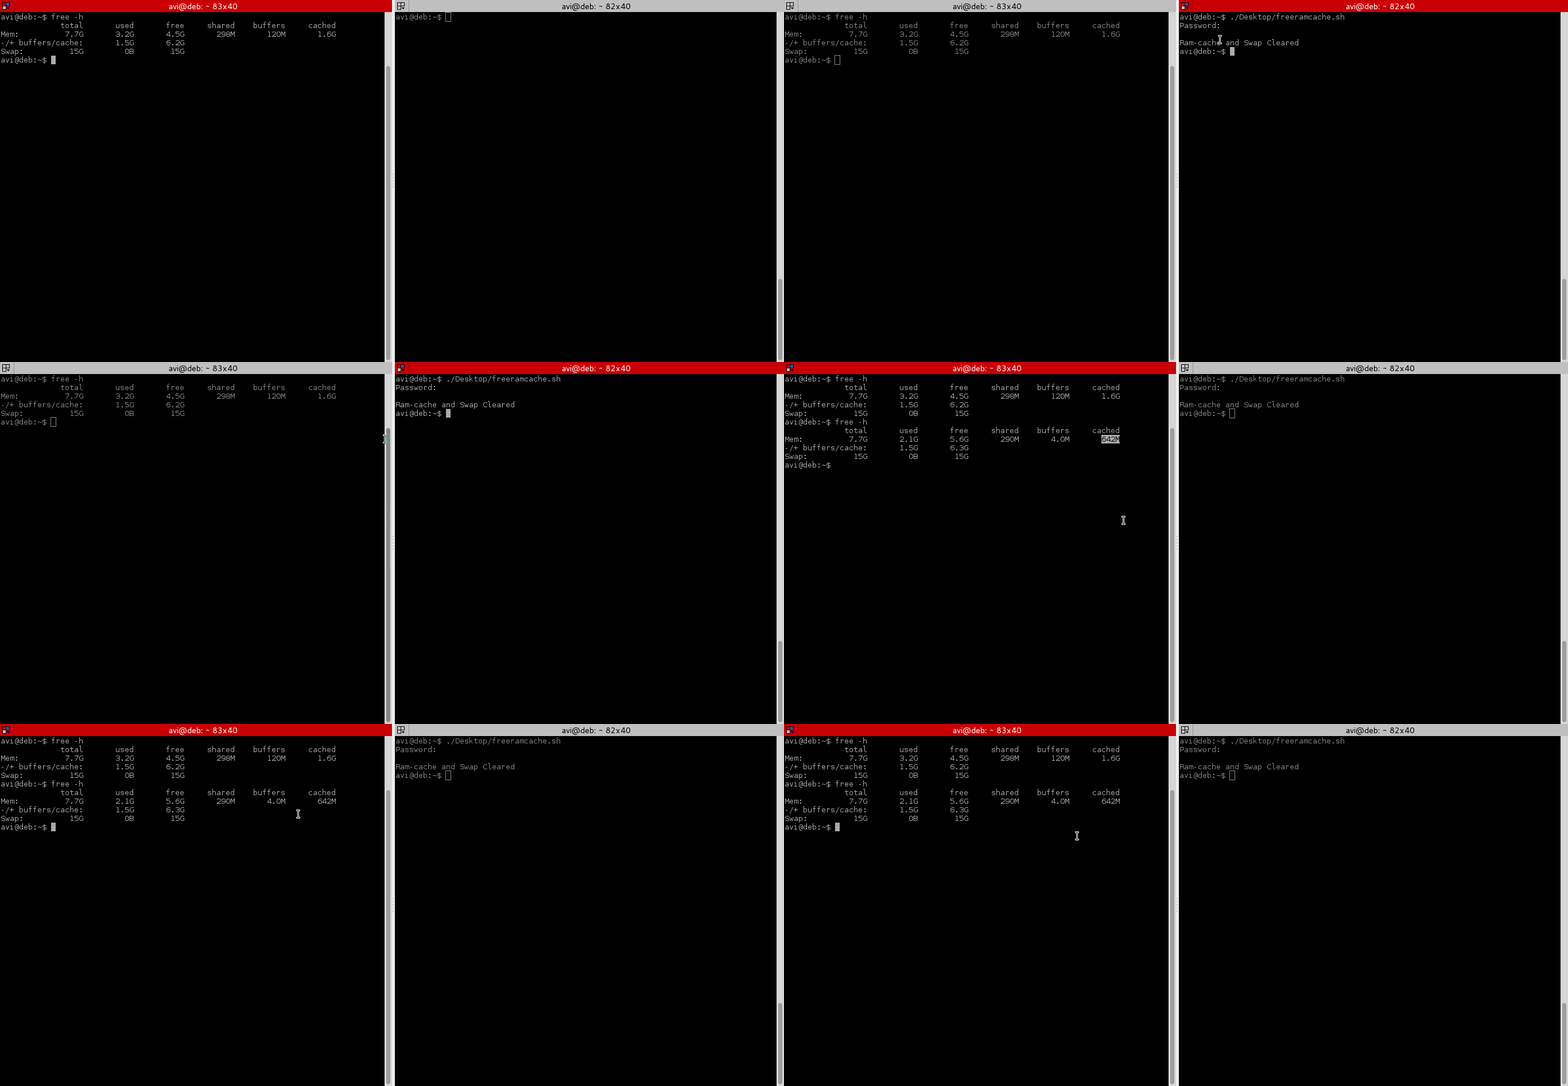
After testing both above command, we will run command “free -h” before and after running the script and will check cache.

Clear RAM Cache and Swap Space

That’s all for now, if you liked the article, don’t forget to provide us with your valuable feedback in the comments to let us know, what you think is it a good idea to clear ram cache and buffer in production and Enterprise?

Source

whowatch – Monitor Linux Users and Processes in Real Time

whowatch is a simple, easy-to-use interactive who-like command line program for monitoring processes and users on a Linux system. It shows who is logged on to your system and what they are doing, in a similar fashion as the w command in real-time.

It shows total number of users on the system and number of users per connection type (local, telnet, ssh and others). whowatch also shows system uptime and displays information such as user’s login name, tty, host, processes as well as the type of the connection.

In addition, you can select a particular user and view their processes tree. In the process tree mode, you can send the SIGINT and SIGKILL signals to selected process in a fun way.

In this brief article, we will explain how to install and use whowatch on Linux systems to monitor users and processes in real time in a machine.

How to Install whowatch in Linux

The program whowatch can be easily installed from the default repositories using package manager on your Linux distribution as shown.

$ sudo apt install whowatch  [On Ubuntu/Debian]
$ sudo yum install whowatch  [On CentOs/RHEL]
$ sudo dng install whowatch  [On Fedora 22+]

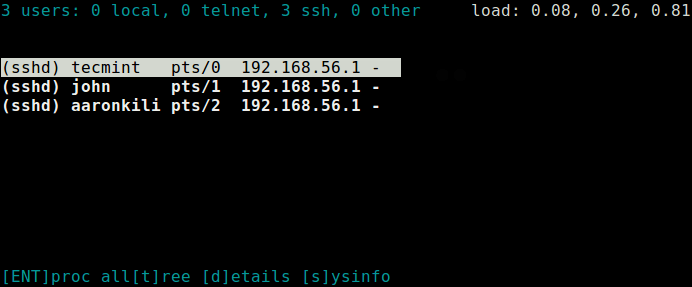
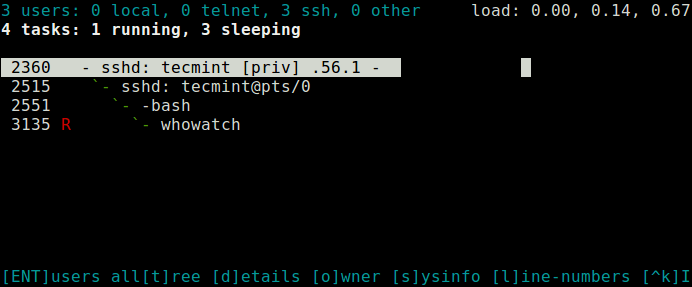
Once installed, you can simply type the whowatch in the command line, you will see the following screen.

$ whowatch

Monitor Logged in Users

Monitor Logged in Users

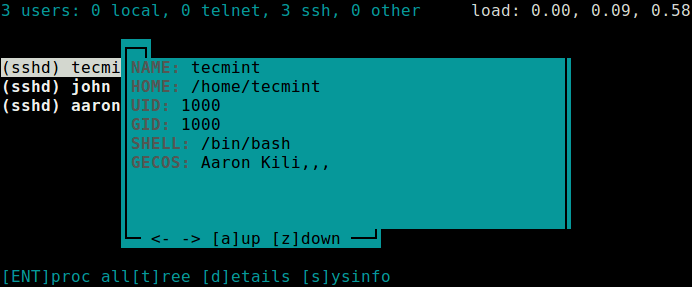
You can view a particular user’s details, simply highlight the user (use the Up and Down arrows to navigate). Then press d key to list the user information as shown in this screenshot.

Check User Information in Linux

Check User Information in Linux

To view a users process tree, press Enter after highlighting that particular user.

Monitor User Process

Monitor User Process

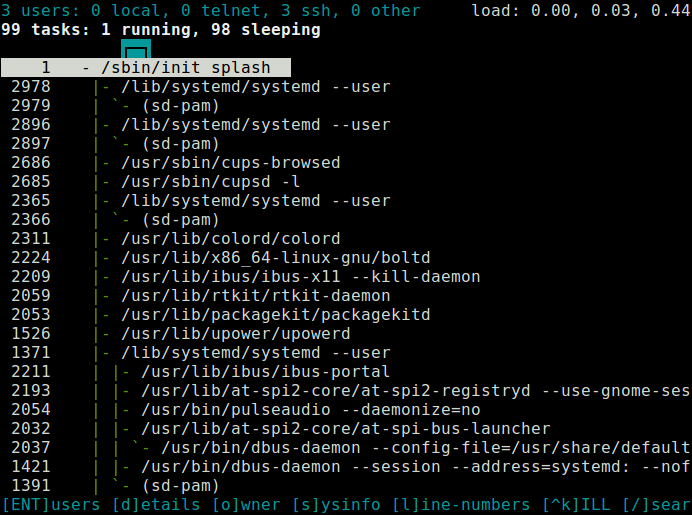
To view all Linux user processes tree, press t.

Monitor Linux User Processes

Monitor Linux User Processes

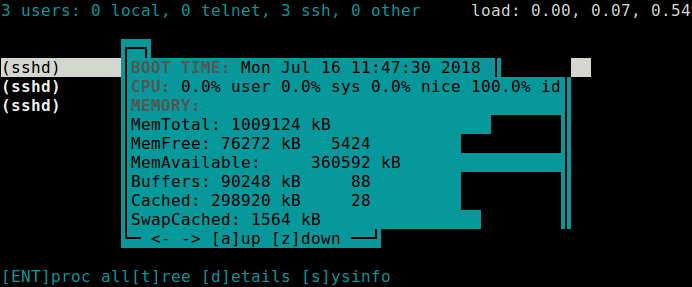
You can also view Linux system information by pressing s key.

Check Linux System Information

Check Linux System Information

For more information, see the whowatch man page as shown.

$ man whowatch

You will also find these related articles useful:

  1. How to Monitor Linux Commands Executed by System Users in Real-time
  2. How to Monitor User Activity with psacct or acct Tools

That’s all! whowatch is a simple, easy-to-use interactive command line utility for monitoring processes and users on a Linux system. In this brief guide, we have explained how to install and use whowatch. Use the feedback form below to ask any questions or share your thoughts about this utility.

Source

Rainbow Stream – An Advanced Command-line Twitter Client for Linux

For all those people who like to use Twitter in console/terminal rather than Graphical User Interface can now access their twitter account right from the Linux Console. Yes you heard it right. You can now access your Twitter account using a Linux Command-line Twitter Client called Rainbow Stream.

Command Line Twitter Client for Linux

Command Line Twitter Client for Linux

What is Rainbow Stream

Rainbow Stream is a free and open source Twitter-client for Linux command-line, released under MIT License. It is capable of showing Realtime tweetstream, compose a tweet, search, favorite,…..etc. Rainbow Stream gives a real-fun right into your Linux terminal. It is also capable of showing twitter images directly on terminal.

It is written in Python and built on top of Twitter API and Python Twitter Tool. To run this application in your console you must have installed python and pip version 2.7.x or 3.x.

Features of RainbowStream

  1. Free and open source Twitter-client for Linux command-line.
  2. Capable of rendering twitter image in Terminal.
  3. Support Proxy.
  4. Interactive Mode supported.
  5. Theme Customization well implemented.
  6. Capable of showing Real-time Twitter stream.
  7. You can tweet, search, favorite tweets right from your terminal.

Installation of Rainbow Stream Twitter Client in Linux

In most of the today’s Linux distribution, python should already be installed on your system. You may check the version of Python installed as:

$ python --version

Check Python Version

Check Python Version


Next, install python-pip package using following commands as per your Linux distributions.

# apt-get install python-pip 	[on Debian alike systems]
# yum install python-pip 	[on CentOS alike systems]

Note: Use ‘dnf‘ in place of yum, if you are on Fedora 22.

Check version of installed pip.

$ pip --version

pip 1.5.4 from /usr/lib/python2.7/dist-packages (python 2.7)

Now its time to install rainbow stream twitter client.

# pip install rainbowstream 	[For Python 2.7.x version]
# pip3 install rainbowstream	[For Python 3.x version]

After successful installation you should get the below message in your terminal.

Install Rainbow Stream Twitter Client

Rainbow Steam Installation Successful

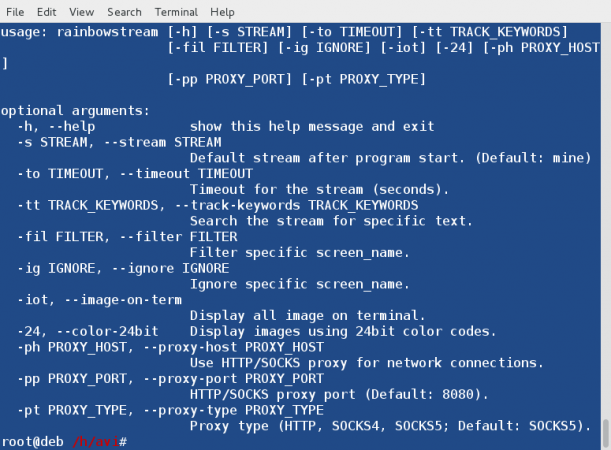
You may like to get help on rainbowstream.

$ rainbowstream -h 
OR
$ rainbowstream --h 

Rainbow Stream Help

Rainbow Stream Help

Rainbow Stream Twitter Client Usage

1. First you need to connect and authorize application on twitter site using your twitter account.

Note: You must have a twitter account, if you don’t create one.

2. Now type 'rainbowstream' in your Linux terminal, as user.

$ rainbowstream

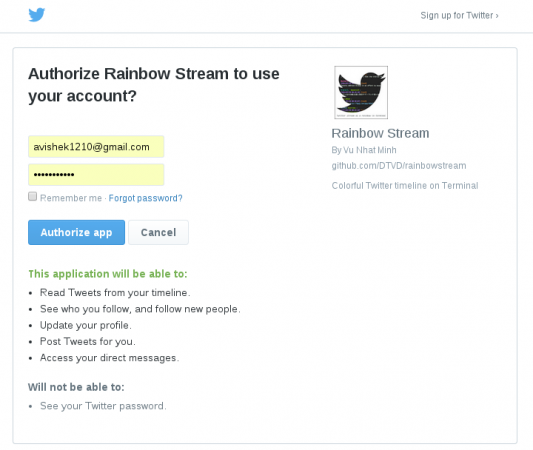
It will open a tab in your default HTTP web browser, login and you will get a pin. If you have already logged into your account the page should be showing PIN. If you have configured more than one Twitter account in your HTTP web browser, consider trying logging out of other account and login to the account you want to connect.

Authorize Rainbow Stream

Authorize Rainbow Stream

Grant Access to Rainbow Stream

Grant Access to Rainbow Stream

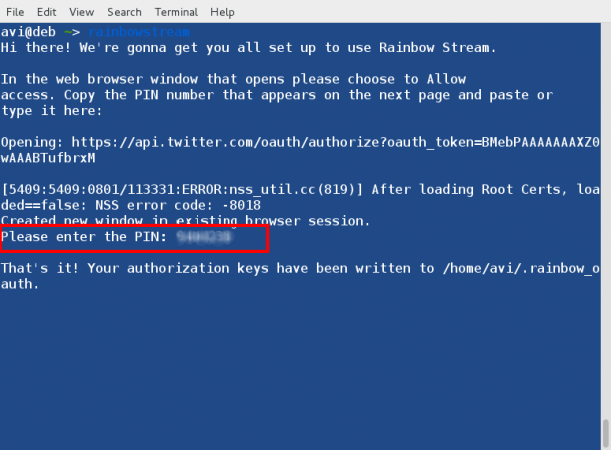
3. Copy the PIN from HTTP web Browser into your terminal and hit return key.

Twitter PIN

Twitter PIN

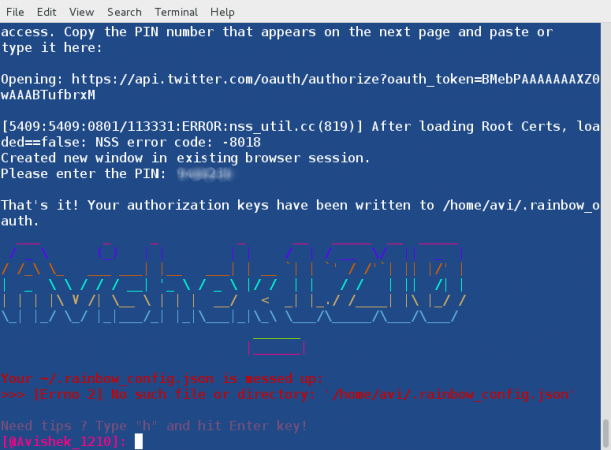
It will take a few seconds and you should get your twitter_user_name in your Linux prompt.

Twitter Username

Twitter Username

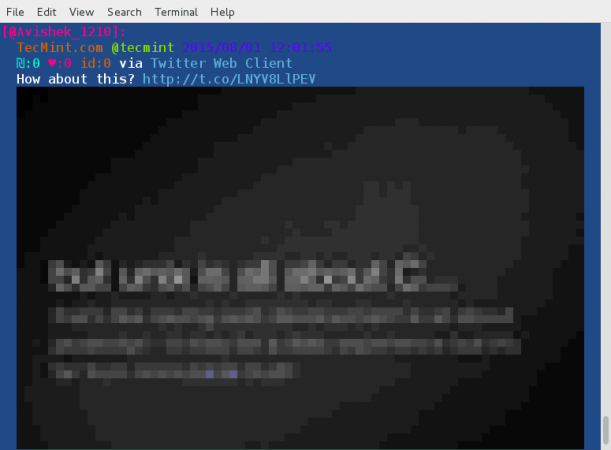
Notice your Twitter stream, you should see tweets by those whom you follow.

Twitter Tweets 1

Twitter Tweets 1

Twitter Tweets 2

Twitter Tweets 2

4. To display tweet’s images directly in your Terminal, you can do:

twitter: rainbowstream -iot

Display Twitter Images

Display Twitter Images

Twitter Image

Twitter Image

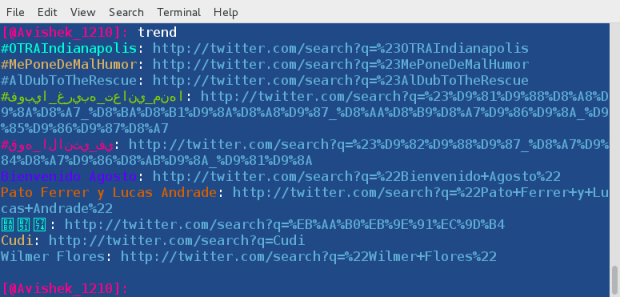
5. To display current twitter Trend.

twitter: trend

Show Twitter Trend

Show Twitter Trend

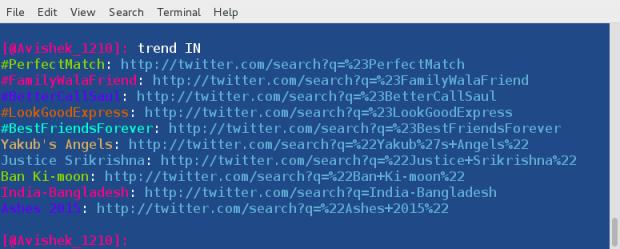
6. To see current twitter trend specifically country-wise, for example India (IN).

twitter: trend IN

See Country Wise Twitter Trends

See Country Wise Twitter Trends

Note: Here IN is for India. If you want to see Current Trend for US, or any other country, you may do so.

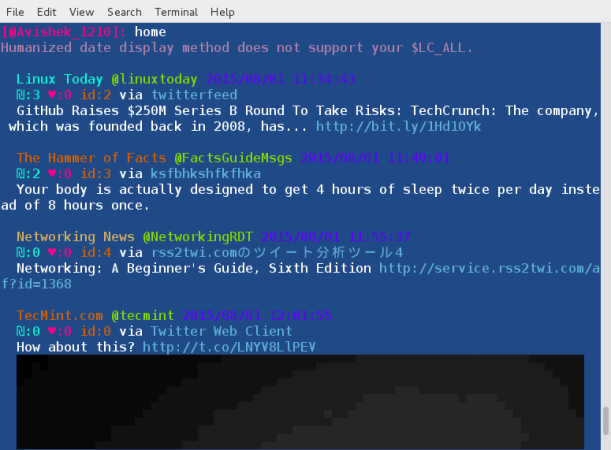
7. To see your twitter Home and Followers.

twitter: home
twitter: ls fl

See Twitter Followers

See Twitter Followers

See Twitter Followers

See Twitter Followers

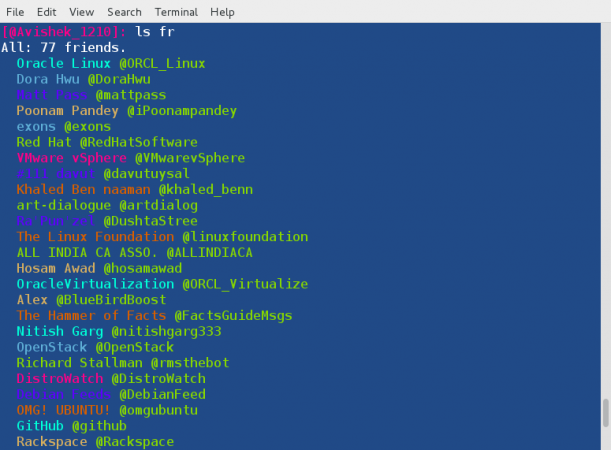
8. T see list of all your friends, people whom you are following.

twitter: ls fr

See Twitter Friends

See Twitter Friends

Here is the list of commands you can run to handle your twitter tweets and feeds from your Linux terminal.

Command What it does
h Help
p Pause Twitter Stream for the client in your Terminal
r Resume Twitter Stream, which was Paused Earlier
c Clear the Linux Console
v Version Information of Twitter Client
q Quit Rainbow Stream
theme List all the available Themes
theme Name_of_Theme Apply the Theme e.g., theme monaki will apply monaki
Theme
notification See your Twitter Notification
whois @Avishek_1210 It will show Profile of @Avishek_1210
mentions It will show mentions timeline.
view @Avishek_1210 Show timeline of @Avishek_1210
s string It will search for word ‘string’. You may use it with/without
HashTag
t I Love #Tecmint It will Print I Love #Tecmint on Twitter
inbox Show your Inbox Messages
fl @Avishek_1210 Follow @Avishek_1210
ufl @Avishek_1210 Unfollow @Avishek_1210
block @Avishek_1210 Block @Avishek_1210
unblock @Avishek_1210 Unblock @Avishek_1210
report @Avishek_1210 Report @Avishek_1210 as SPAM Account
List home Show timeline of List

You can also perform Mathematical Calculation, which is a feature of Python simply as:

[@Avishek_1210]: 2*3
6
[@Avishek_1210]: 2**3
8
[@Avishek_1210]: 2+3
5
[@Avishek_1210]: 3-2
1
[@Avishek_1210]: 4/3
1

You can use cal command simply as if you would have done in terminal.

[@Avishek_1210]: cal
    August 2015       
Su Mo Tu We Th Fr Sa  
                   1  
 2  3  4  5  6  7  8  
 9 10 11 12 13 14 15  
16 17 18 19 20 21 22  
23 24 25 26 27 28 29  
30 31                 

Want to have some fun with this application? Try and see what happens:

random_rainbow('Your Text Here')
OR
order_rainbow('Your Text Here')

Twitter Message

Twitter Message

So guys how is the application? Do you like this? If you are a Linux-er and used to Twitter, this application is for you. It is easy-to-setup and easy-to-use. Though I don’t use twitter very often but this application is really a rainbow and interesting and who knows I start using Twitter as much as Facebook, just because of interest in this command-line Twitter-client. This application is worth giving a try. Let your voice be audible. Provide us with your valuable feedback in the comments below. Like and share us and help us get spread.

Source

fswatch – Monitors Files and Directory Changes or Modifications in Linux

fswatch is a cross-platform, file change monitor that gets notification alerts when the contents of the specified files or directories are altered or modified.

It executes four types of monitors on different operating systems such as:

  1. A monitor build on the File System Events API of Apple OS X.
  2. A monitor based on kqueue, a notification interface present in FreeBSD 4.1 also supported on many *BSD systems, OS X inclusive.
  3. A monitor based on File Events Notification API of the Solaris kernel plus its spin-offs.
  4. A monitor based on inotify, a kernel subsystem that shows file system modifications to apps.
  5. A monitor based on ReadDirectoryChangesW, a Windows API that records alters to a directory.
  6. A monitor that regularly check that status of file system, keeps file modification times in memory, and manually determine file system changes (which works anywhere, where stat can be used).

Features of fswatch

  1. Supports several OS-specific APIs
  2. Allows recursive directory monitoring
  3. Performs path filtering using including and excluding regular expressions
  4. Supports customizable record format
  5. Additionally, it supports periodic idle events

How To Install fswatch in Linux Systems

Unfortunately, fswatch package is not available to install from the default system repositories in any Linux distributions. The only way to install the latest version of fswatch is to build from source tarball as show in the following installation instructions.

First grab the latest fswatch tarball using following wget command and install it as shown:

$ wget https://github.com/emcrisostomo/fswatch/releases/download/1.9.3/fswatch-1.9.3.tar.gz
$ tar -xvzf fswatch-1.9.3.tar.gz
$ cd fswatch-1.9.3
$ ./configure
$ make
$ sudo make install

Important: Make sure you’ve GNU GCC (C and C++ Compiler) and Development Tools (build-essential on Debian/Ubuntu) installed on the system, before you compile fswatch from source. If not, install it using following command on your respective Linux distributions..

# yum group install 'Development Tools'		[On CentOS/RHEL]
# dnf group install 'Development Tools'		[On Fedora 22+ Versions]
$ sudo apt-get install build-essential          [On Debian/Ubuntu Versions]

On Debian/Ubuntu distributions, you might get following error while executing fswatch command..

fswatch: error while loading shared libraries: libfswatch.so.6: cannot open shared object file: No such file or directory

To fix it, you need to execute the command below, this will help refresh the links and cache to the dynamic libraries before you can start using fswatch.

$ sudo ldconfig

How do I use fswatch on Linux?

The general syntax for running fswatch is:

$ fswatch [option] [path]

On Linux, it is recommended that you use the default inotify monitor, you can list available monitors by employing the -M or - list-monitors option:

$ fswatch -M
$ fswatch --list-monitors

fswatch - List Monitors

fswatch – List Monitors

The command below enables you to watch the changes in the current directory (/home/tecmint), with events being delivered to standard output every 4 seconds.

The -l or –-latency option allows you to set the latency in seconds, the default being 1 second.

$ fswatch -l 4 . 

fswatch - Monitor Home Directory Changes

The next command monitors changes to the /var/log/auth.log file every 5 seconds:

$ fswatch -l 5 /var/log/auth.log

Using -t or --timestamp option prints the time stamp for every event, to print the time in UTC format, employ -u or --utf-time option. You can as well format time using -f or --format-time format option:

$ fswatch --timestamp /var/log/auth.log

Next, -x or --event-flags tells fswatch to print the event flags along side the event path. You can use –event-field-seperator option to print events using the particular separator.

$ fswatch --events-flags ~ /var/log/auth.log

To print the numeric value of an event indicating changes in your home directory and /var/log/auth.log file, use -n or --numeric option as below:

$ fswatch --numeric ~ /var/log/auth.log 

Perhaps you can look through the fswatch man page for detailed usage options and information:

$ man fswatch

For more information and usage, visit fswatch Github repository: https://github.com/emcrisostomo/fswatch

In this post, we covered a simple command line utility to help Linux users get notified when the contents of specified files or directory hierarchies are modified.

I hope all went well with the installation, if that is not the case for you, make an effort to reach us via the feedback form below. In addition, in case you have used it before, you may want to offer us some thoughts about your experience with fswatch.

Source

The Power of Linux “History Command” in Bash Shell

We use history command frequently in our daily routine jobs to check history of command or to get info about command executed by user. In this post, we will see how we can use history command effectively to extract the command which was executed by users in Bash shell. This may be useful for audit purpose or to find out what command is executed at what date and time.

By default date and timestamp won’t be seen while executing history command. However, bash shell provides CLI tools for editing user’s command history. Let’s see some handy tips and tricks and power of historycommand.

linux history command

history command examples

1. List Last/All Executed Commands in Linux

Executing simple history command from terminal will show you a complete list of last executed commands with line numbers.

[narad@tecmint ~]$ history

    1  PS1='\e[1;35m[\u@\h \w]$ \e[m '
    2  PS1="\e[0;32m[\u@\h \W]$ \e[m "
    3  PS1="\u@\h:\w [\j]$ "
    4  ping google.com
    5  echo $PS1
    6   tail -f /var/log/messages
    7  tail -f /var/log/messages
    8  exit
    9  clear
   10  history
   11  clear
   12  history

2. List All Commands with Date and Timestamp

How to find date and timestamp against command? With ‘export’ command with variable will display history command with corresponding timestamp when the command was executed.

[narad@tecmint ~]$ export HISTTIMEFORMAT='%F %T  '

      1  2013-06-09 10:40:12   cat /etc/issue
      2  2013-06-09 10:40:12   clear
      3  2013-06-09 10:40:12   find /etc -name *.conf
      4  2013-06-09 10:40:12   clear
      5  2013-06-09 10:40:12   history
      6  2013-06-09 10:40:12   PS1='\e[1;35m[\u@\h \w]$ \e[m '
      7  2013-06-09 10:40:12   PS1="\e[0;32m[\u@\h \W]$ \e[m "
      8  2013-06-09 10:40:12   PS1="\u@\h:\w [\j]$ "
      9  2013-06-09 10:40:12   ping google.com
     10  2013-06-09 10:40:12   echo $PS1
Meaning of HISTTIMEFORMAT variables
%F Equivalent to %Y - %m - %d
%T Replaced by the time ( %H : %M : %S )

As we can see same command is being repeated number of times in above output. How to filter simple or non destructive commands in history?. Use the following ‘export‘ command by specifying command in HISTIGNORE=’ls -l:pwd:date:’ will not saved by system and not be shown in history command.

[narad@tecmint ~]$ export HISTIGNORE='ls -l:pwd:date:'

4. Ignore Duplicate Commands in History

With the below command will help us to ignore duplicate commands entry made by user. Only single entry will be shown in history, if a user execute a same command multiple times in a Bash Prompt.

[narad@tecmint ~]$ export HISTCONTROL=ignoredups

5. Unset export Command

Unset export command on the fly. Execute unset export command with variable one by one whatever commands have been exported by export command.

[narad@tecmint ~]$ unset export HISTCONTROL

6. Save export Command Permanently

Make an entry as follows in .bash_profile to save export command permanently.

[narad@tecmint ~]$ vi .bash_profile

# .bash_profile

# Get the aliases and functions
if [ -f ~/.bashrc ]; then
        . ~/.bashrc
fi

# User specific environment and startup programs

export HISTCONTROL=ignoredups

PATH=$PATH:$HOME/bin
export PATH

7. List Specific User’s Executed Commands

How to see command history executed by a specific user. Bash keeps records of history in a ‘~/.bash_history’file. We can view or open file to see the command history.

[narad@tecmint ~]$ vi .bash_history

cd /tmp/
cd logstalgia-1.0.3/
./configure
sudo passwd root
apt-get install libsdl1.2-dev libsdl-image1.2-dev libpcre3-dev libftgl-dev libpng12-dev libjpeg62-dev make gcc
./configure
make
apt-get install libsdl1.2-dev libsdl-image1.2-dev libpcre3-dev libftgl-dev libpng12-dev libjpeg62-dev make gcc++
apt-get install libsdl1.2-dev libsdl-image1.2-dev libpcre3-dev libftgl-dev libpng12-dev libjpeg62-dev make gcc
apt-get install make
mysql -u root -p
apt-get install grsync
apt-get install unison
unison

8. Disable Storing History of Commands

Some organization do not keep history of commands because of security policy of the organization. In this case, we can edit .bash_profile file (It’s hidden file) of user’s and make an entry as below.

[narad@tecmint ~]$ vi .bash_profile

# .bash_profile

# Get the aliases and functions
if [ -f ~/.bashrc ]; then
        . ~/.bashrc
fi

# User specific environment and startup programs

PATH=$PATH:$HOME/bin
HISTSIZE=0
export PATH
.bash_profile (END)

Save file and load changes with below command.

[narad@tecmint ~]$ source .bash_profile

Note: If you don’t want system to remember the commands that you have typed, simply execute below command which will disable or stop recording history on the fly.

[narad@tecmint ~]$ export HISTSIZE=0

Tips: Search ‘HISTSIZE‘ and edit in ‘/etc/profile’ file with superuser. The change in file will effect globally.

9. Delete or Clear History of Commands

With up and down arrow, we can see previously used command which may be helpful or may irate you. Deleting or clearing all the entries from bash history list with ‘-c‘ options.

[narad@tecmint ~]$ history -c

10. Search Commands in History Using Grep Command

Search command through ‘.bash_history‘ by piping your history file into ‘grep‘ as below. For example, the below command will search and find ‘pwd‘ command from the history list.

[narad@tecmint ~]$ history | grep pwd

  113  2013-06-09 10:40:12     pwd
  141  2013-06-09 10:40:12     pwd
  198  2013-06-09 15:46:23     history | grep pwd
  202  2013-06-09 15:47:39     history | grep pwd

11. Search Lastly Executed Command

Search previously executed command with ‘Ctrl+r’ command. Once you’ve found the command you’re looking for, press ‘Enter‘ to execute the same else press ‘esc‘ to cancel it.

(reverse-i-search)`source ': source .bash_profile

12. Recall Last Executed Command

Recall a previously used specific command. Combination of Bang and 8 (!8) command will recall number 8command which you have executed.

[narad@tecmint ~]$ !8

13. Recall Lastly Executed Specific Command

Recall previously used command (netstat -np | grep 22) with ‘!‘ and followed by some letters of that particular command.

[narad@tecmint ~]$ !net
netstat -np | grep 22
(No info could be read for "-p": geteuid()=501 but you should be root.)
tcp        0     68 192.168.50.2:22             192.168.50.1:1857           ESTABLISHED -
tcp        0      0 192.168.50.2:22             192.168.50.1:2516           ESTABLISHED -
unix  2      [ ]         DGRAM                    12284  -                   @/org/freedesktop/hal/udev_event
unix  3      [ ]         STREAM     CONNECTED     14522  -
unix  2      [ ]         DGRAM                    13622  -
unix  3      [ ]         STREAM     CONNECTED     12250  -                   @/var/run/hald/dbus-ujAjOMNa0g
unix  3      [ ]         STREAM     CONNECTED     12249  -
unix  3      [ ]         STREAM     CONNECTED     12228  -                   /var/run/dbus/system_bus_socket
unix  3      [ ]         STREAM     CONNECTED     12227  -

We have tried to highlight power of history command. However, this is not end of it. Please share your experience of history command with us through our comment box below.

Source

15 ‘pwd’ (Print Working Directory) Command Examples in Linux

For those working with Linux command Line, command ‘pwd‘ is very helpful, which tells where you are – in which directory, starting from the root (/). Specially for Linux newbies, who may get lost amidst of directories in command Line Interface while navigation, command ‘pwd‘ comes to rescue.

Linux pwd Command Examples

15 pwd Command Examples

What is pwd?

pwd‘ stands for ‘Print Working Directory‘. As the name states, command ‘pwd‘ prints the current working directory or simply the directory user is, at present. It prints the current directory name with the complete path starting from root (/). This command is built in shell command and is available on most of the shell – bash, Bourne shell, ksh,zsh, etc.

Basic syntax of pwd:
# pwd [OPTION]
Options used with pwd
 Options  Description
 -L (logical)  Use PWD from environment, even if it contains symbolic links
 -P (physical)  Avoid all symbolic links
 –help  Display this help and exit
 –version  Output version information and exit

If both ‘-L‘ and ‘-P‘ options are used, option ‘L‘ is taken into priority. If no option is specified at the prompt, pwd will avoid all symlinks, i.e., take option ‘-P‘ into account.

Exit status of command pwd:

0 Success
Non-zero Failure

This article aims at providing you a deep insight of Linux command ‘pwd‘ with practical examples.

1. Print your current working directory.
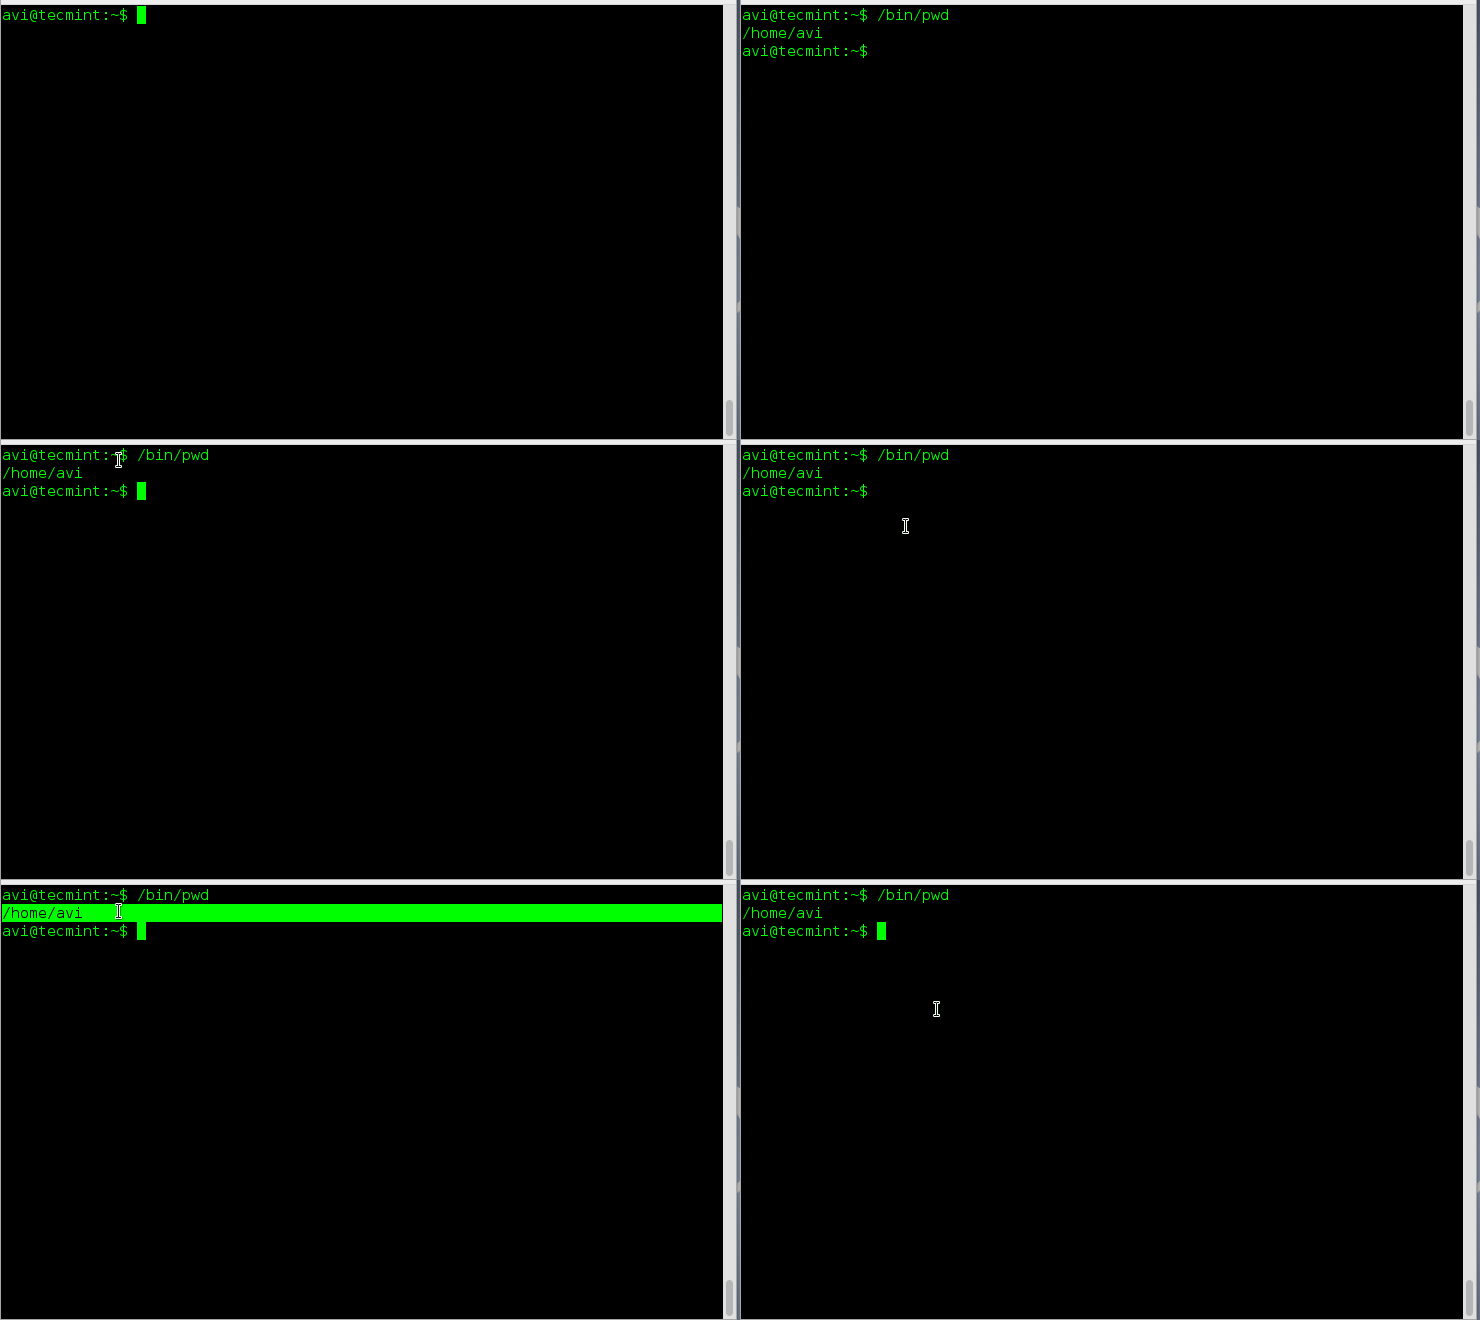
avi@tecmint:~$ /bin/pwd

/home/avi

pwd linux command

Print Working Directory

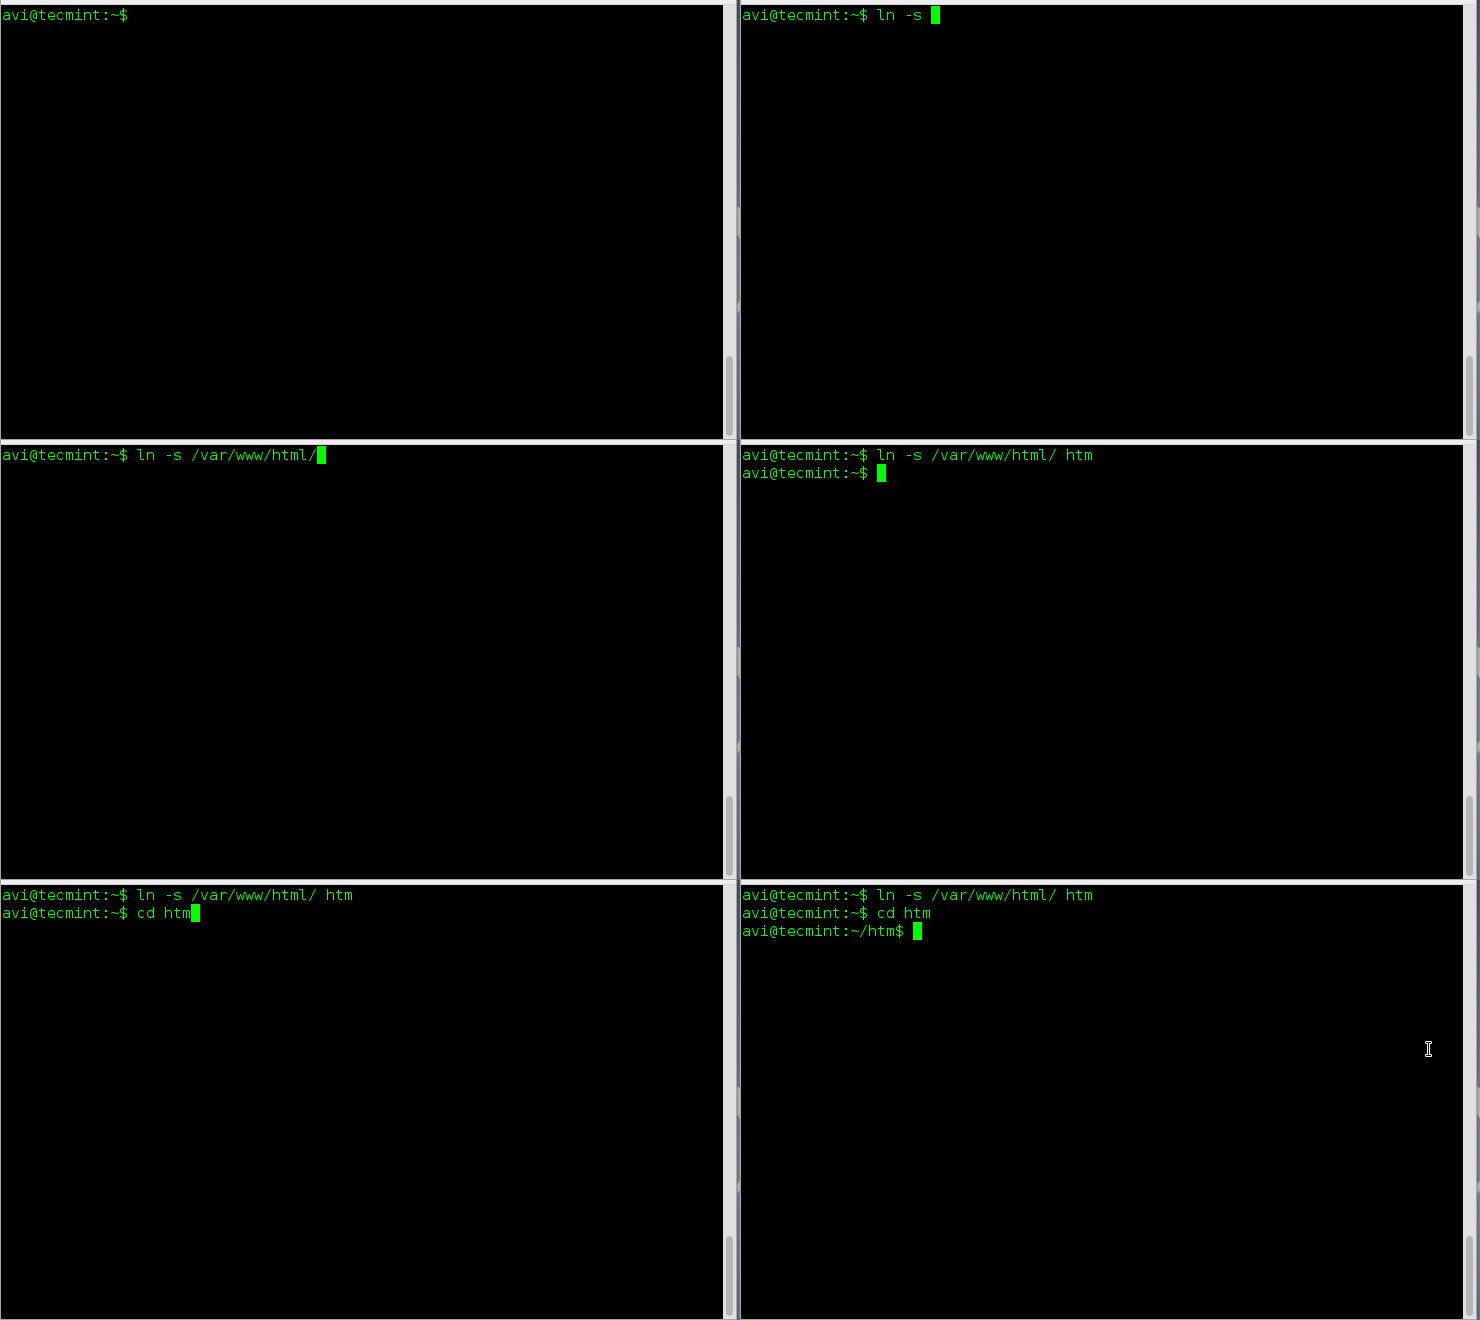
2. Create a symbolic link of a folder (say /var/www/html into your home directory as htm). Move to the newly created directory and print working directory with symbolic links and without symbolic links.

Create a symbolic link of folder /var/www/html as htm in your home directory and move to it.

avi@tecmint:~$ ln -s /var/www/html/ htm
avi@tecmint:~$ cd htm

Create Symbolic Link

Create Symbolic Link

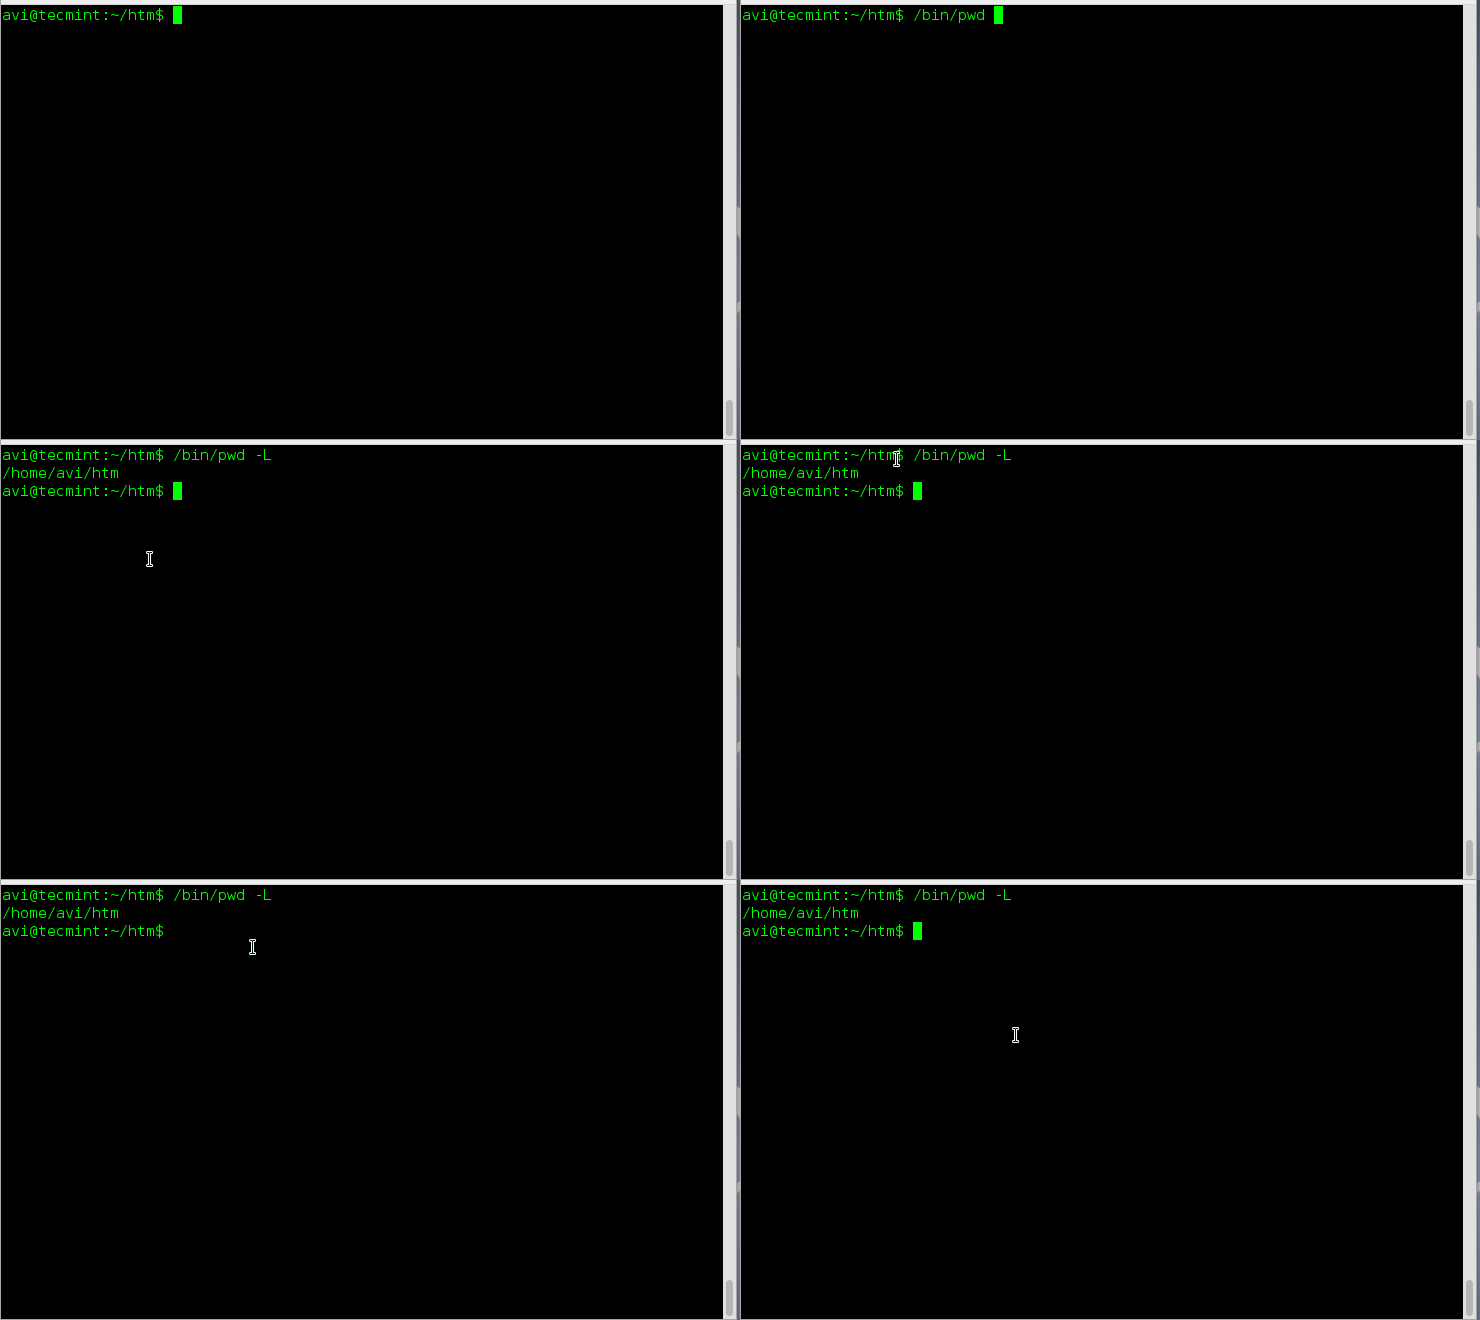
3. Print working directory from environment even if it contains symlinks.

avi@tecmint:~$ /bin/pwd -L

/home/avi/htm

Print Current Working Directory

Print Current Working Directory

4. Print actual physical current working directory by resolving all symbolic links.

avi@tecmint:~$ /bin/pwd -P

/var/www/html

Print Physical Working Directory

Print Physical Working Directory

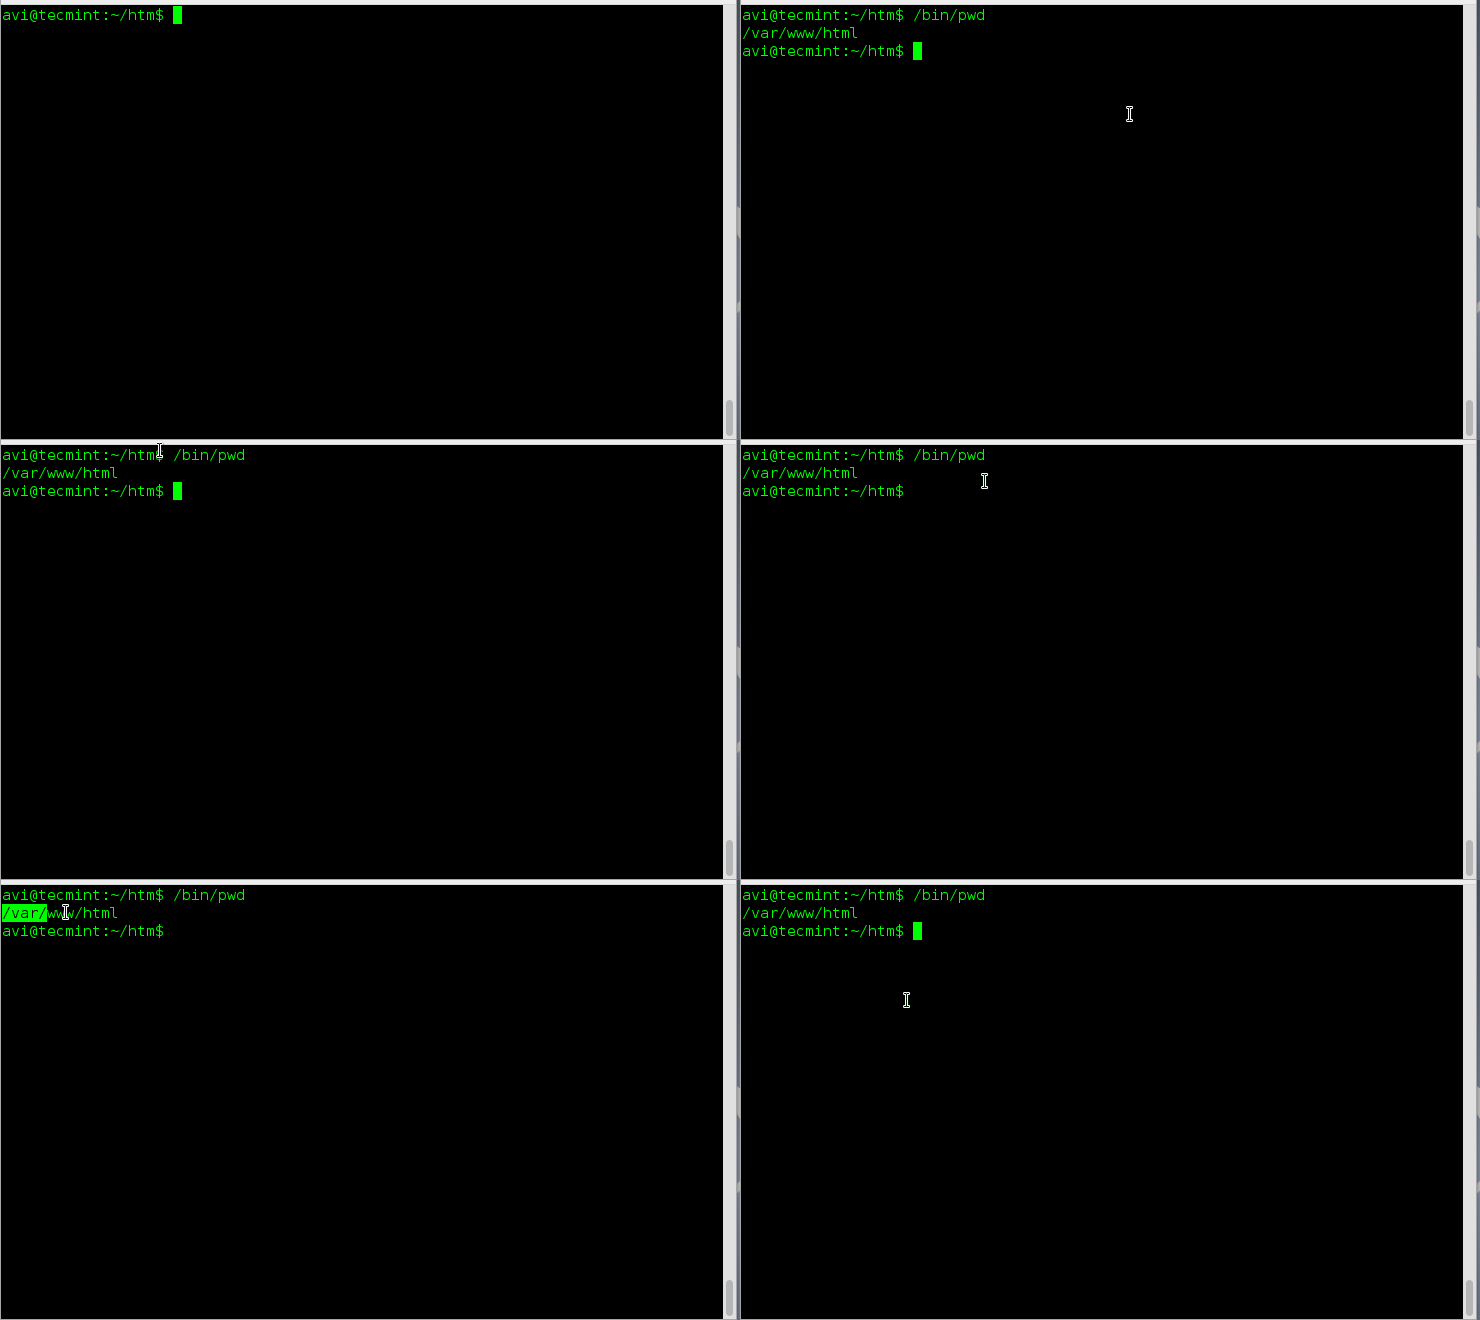
5. Check if the output of command “pwd” and “pwd -P” are same or not i.e., if no options are given at run-time does “pwd” takes option -P into account or not, automatically.

avi@tecmint:~$ /bin/pwd

/var/www/html

Check pwd Output

Check pwd Output

Result: It’s clear from the above output of example 4 and 5 (both result are same) thus, when no options are specified with command “pwd”, it automatically takes option “-P” into account.

6. Print version of your ‘pwd’ command.

avi@tecmint:~$ /bin/pwd --version

pwd (GNU coreutils) 8.23
Copyright (C) 2014 Free Software Foundation, Inc.
License GPLv3+: GNU GPL version 3 or later <http://gnu.org/licenses/gpl.html>.
This is free software: you are free to change and redistribute it.
There is NO WARRANTY, to the extent permitted by law.

Written by Jim Meyering.

Check pwd Version

Check pwd Version

Note: A ‘pwd’ command is often used without options and never used with arguments.

Important: You might have noticed that we are executing the above command as “/bin/pwd” and not “pwd”.

So what’s the difference? Well “pwd” alone means shell built-in pwd. Your shell may have different version of pwd. Please refer manual. When we are using /bin/pwd, we are calling the binary version of that command. Both the shell and the binary version of command Prints Current Working Directory, though the binary version have more options.

7. Print all the locations containing executable named pwd.

avi@tecmint:~$ type -a pwd

pwd is a shell builtin
pwd is /bin/pwd

Print Executable Locations

Print Executable Locations

8. Store the value of “pwd” command in variable (say a), and print its value from the variable (important for shell scripting perspective).

avi@tecmint:~$ a=$(pwd)
avi@tecmint:~$ echo "Current working directory is : $a"

Current working directory is : /home/avi

Store Pwd Value in Variable

Store Pwd Value in Variable

Alternatively, we can use printf, in the above example.

9. Change current working directory to anything (say /home) and display it in command line prompt. Execute a command (say ‘ls‘) to verify is everything is OK.

avi@tecmint:~$ cd /home
avi@tecmint:~$ PS1='$pwd> '		[Notice single quotes in the example]
> ls

Change Current Working Directory

Change Current Working Directory

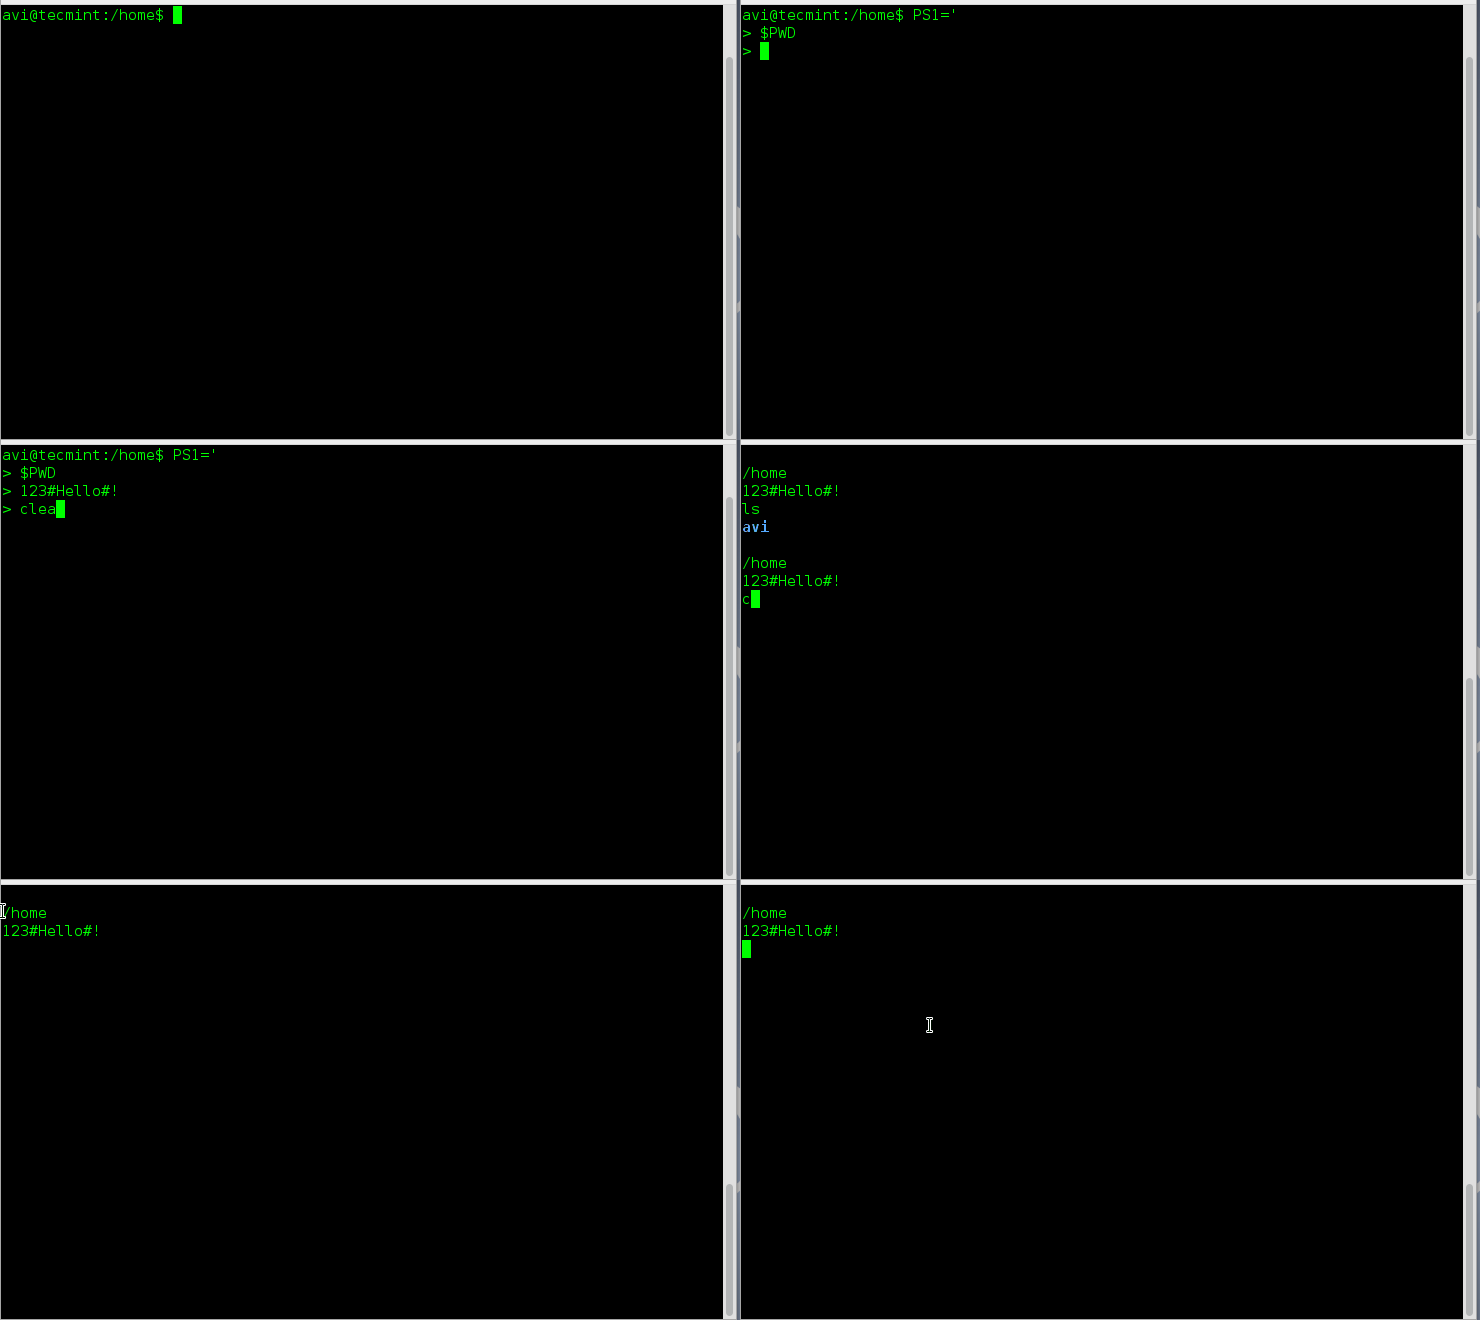
10. Set multi-line command line prompt (say something like below).

/home
123#Hello#!

And then execute a command (say ls) to check is everything is OK.

avi@tecmint:~$ PS1='
> $PWD
$ 123#Hello#!
$ '

/home
123#Hello#!

Set Multi Commandline Prompt

Set Multi Commandline Prompt

11. Check the current working directory and previous working directory in one GO!

avi@tecmint:~$ echo “$PWD $OLDPWD”

/home /home/avi

Check Present Previous Working Directory

Check Present Previous Working Directory

12. What is the absolute path (starting from /) of the pwd binary file.

/bin/pwd 

13. What is the absolute path (starting from /) of the pwd source file.

/usr/include/pwd.h 

14. Print the absolute path (starting from /) of the pwd manual pages file.

/usr/share/man/man1/pwd.1.gz

15. Write a shell script analyses current directory (say tecmint) in your home directory. If you are under directory tecmint it output “Well! You are in tecmint directory” and then print “Good Bye” else create a directory tecmintunder your home directory and ask you to cd to it.

Let’s first create a ‘tecmint’ directory, under it create a following shell script file with name ‘pwd.sh’.

avi@tecmint:~$ mkdir tecmint
avi@tecmint:~$ cd tecmint
avi@tecmint:~$ nano pwd.sh

Next, add the following script to the pwd.sh file.

#!/bin/bash

x="$(pwd)"
if [ "$x" == "/home/$USER/tecmint" ]
then
     {
      echo "Well you are in tecmint directory"
      echo "Good Bye"
     }
else
     {
      mkdir /home/$USER/tecmint
      echo "Created Directory tecmint you may now cd to it"
     }
fi

Give execute permission and run it.

avi@tecmint:~$ chmod 755 pwd.sh
avi@tecmint:~$ ./pwd.sh

Well you are in tecmint directory
Good Bye

Conclusion

pwd is one of the simplest yet most popular and most widely used command. A good command over pwd is basic to use Linux terminal. That’s all for now.

Source

5 Ways to Empty or Delete a Large File Content in Linux

Occasionally, while dealing with files in Linux terminal, you may want to clear the content of a file without necessarily opening it using any Linux command line editors. How can this be achieved? In this article, we will go through several different ways of emptying file content with the help of some useful commands.

Caution: Before we proceed to looking at the various ways, note that because in Linux everything is a file, you must always make sure that the file(s) you are emptying are not important user or system files. Clearing the content of a critical system or configuration file could lead to a fatal application/system error or failure.

With that said, below are means of clearing file content from the command line.

Important: For the purpose of this article, we’ve used file access.log in the following examples.

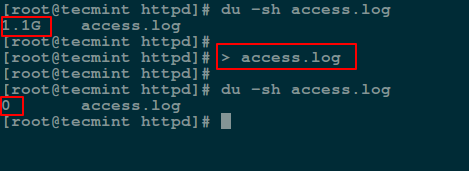
1. Empty File Content by Redirecting to Null

A easiest way to empty or blank a file content using shell redirect null (non-existent object) to the file as below:

# > access.log

Empty Large File Using Null Redirect in Linux

Empty Large File Using Null Redirect in Linux

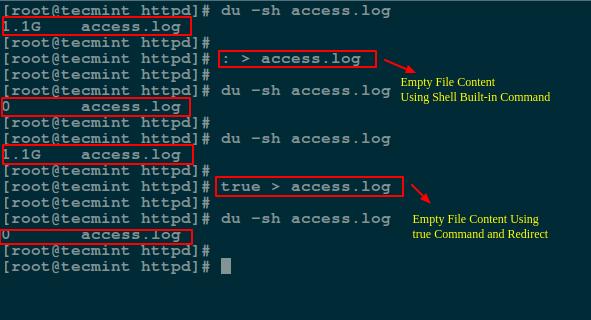
2. Empty File Using ‘true’ Command Redirection

Here we will use a symbol : is a shell built-in command that is essence equivalent to the true command and it can be used as a no-op (no operation).

Another method is to redirect the output of : or true built-in command to the file like so:

# : > access.log
OR 
# true > access.log

Empty Large File Using Linux Commands

Empty Large File Using Linux Commands

3. Empty File Using cat/cp/dd utilities with /dev/null

In Linux, the null device is basically utilized for discarding of unwanted output streams of a process, or else as a suitable empty file for input streams. This is normally done by redirection mechanism.

And the /dev/null device file is therefore a special file that writes-off (removes) any input sent to it or its output is same as that of an empty file.

Additionally, you can empty contents of a file by redirecting output of /dev/null to it (file) as input using cat command:

# cat /dev/null > access.log

Empty File Using cat Command

Empty File Using cat Command

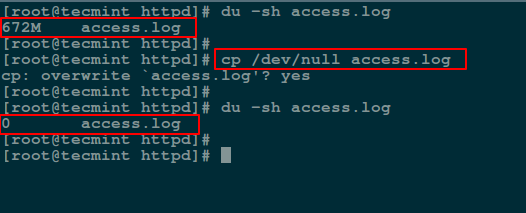
Next, we will use cp command to blank a file content as shown.

# cp /dev/null access.log

Empty File Content Using cp Command

Empty File Content Using cp Command

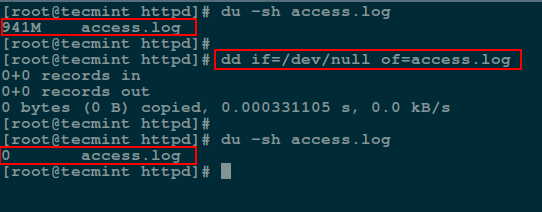
In the following command, if means the input file and of refers to the output file.

# dd if=/dev/null of=access.log

Empty File Content Using dd Command

Empty File Content Using dd Command

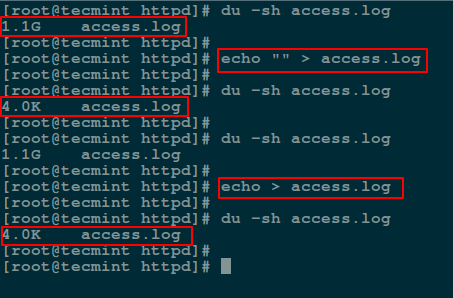
4. Empty File Using echo Command

Here, you can use an echo command with an empty string and redirect it to the file as follows:

# echo "" > access.log
OR
# echo > access.log

Empty File Using echo Command

Empty File Using echo Command

Note: You should keep in mind that an empty string is not the same as null. A string is already an object much as it may be empty while null simply means non-existence of an object.

For this reason, when you redirect the out of the echo command above into the file, and view the file contents using the cat command, is prints an empty line (empty string).

To send a null output to the file, use the flag -n which tells echo to not output the trailing newline that leads to the empty line produced in the previous command.

# echo -n "" > access.log

Empty File Using Null Redirect

Empty File Using Null Redirect

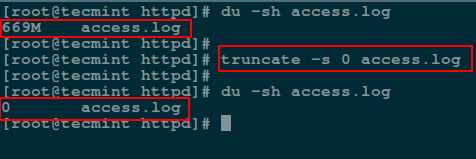
5. Empty File Using truncate Command

The truncate command helps to shrink or extend the size of a file to a defined size.

You can employ it with the -s option that specifies the file size. To empty a file content, use a size of 0 (zero) as in the next command:

# truncate -s 0 access.log

Truncate File Content in Linux

Truncate File Content in Linux

That’s it for now, in this article we have covered multiple methods of clearing or emptying file content using simple command line utilities and shell redirection mechanism.

These are not probably the only available practical ways of doing this, so you can also tell us about any other methods not mentioned in this guide via the feedback section below.

Source

Mhddfs – Combine Several Smaller Partition into One Large Virtual Storage

Let’s assume that you have 30GB of movies and you have 3 drives each 20 GB in size. So how will you store?

Obviously you can split your videos in two or three different volumes and store them on the drive manually. This certainly is not a good idea, it is an exhaustive work which requires manual intervention and a lots of your time.

Another solution is to create a RAID array of disk. The RAID has always remained notorious for loss of storage reliability and usable disk space. Another solution is mhddfs.

Combine Multiple Partitions in Linux

Mhddfs – Combine Multiple Partitions in Linux

mhddfs is a driver for Linux that combines several mount points into one virtual disk. It is a fuse based driver, which provides a easy solution for large data storage. It combines all small file systems to create a single big virtual filesystem which contains every particle of its member filesystem including files and free spaces.

Why you need Mhddfs?

All your storage devices creates a single virtual pool and it can be mounted right at the boot. This small utility takes care of, which drive is full and which is empty and to write data to what drive, intelligently. Once you create virtual drives successfully, you can share your virtual filesystem using SAMBA. Your client will always see a huge drive and lots of free space.

Features of Mhddfs

  1. Get attributes of the file system and system information.
  2. Set attributes of the file system.
  3. Create, Read, Remove and write Directories and files.
  4. Support for file locks and Hardlinks on single device.
Pros of mhddfs Cons of mhddfs
 Perfect for home users. mhddfs driver is not built in the Linux Kernel
 Simple to run.  Required lots of processing power during runtime
 No evidence of Data loss  No redundancy solution.
 Do not split the file.  Hardlinks moving not supported
 Add new files to the combined virtual filesystem.
 Manage the location where these files are saved.
  Extended file attributes

Installation of Mhddfs in Linux

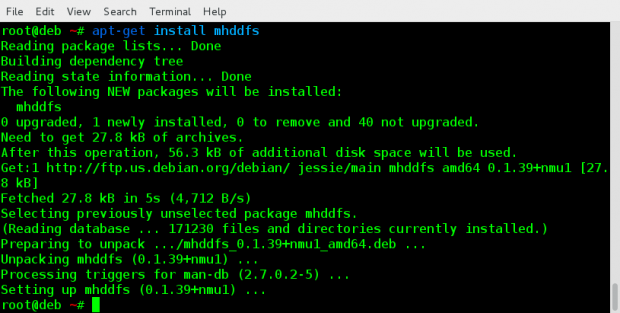
On Debian and portable to alike systems, you can install mhddfs package using following command.

# apt-get update && apt-get install mhddfs

Install Mhddfs on Debian based Systems

Install Mhddfs on Debian based Systems

On RHEL/CentOS Linux systems, you need to turn on epel-repository and then execute the below command to install mhddfs package.

# yum install mhddfs

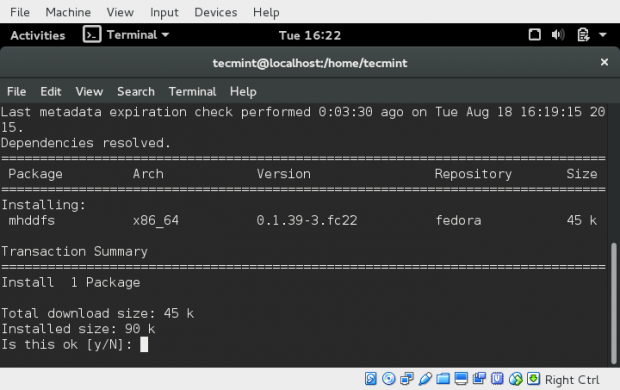
On Fedora 22+ systems, you may get it by dnf package manger as shown below.

# dnf install mhddfs

Install Mhddfs on Fedora

Install Mhddfs on Fedora

If incase, mhddfs package isn’t available from epel repository, then you need to resolve following dependencies to install and compile it from source as shown below.

  1. FUSE header files
  2. GCC
  3. libc6 header files
  4. uthash header files
  5. libattr1 header files (optional)

Next, download the latest source package simply as suggested below and compile it.

# wget http://mhddfs.uvw.ru/downloads/mhddfs_0.1.39.tar.gz
# tar -zxvf mhddfs*.tar.gz
# cd mhddfs-0.1.39/
# make

You should be able to see binary mhddfs in the current directory. Move it to /usr/bin/ and /usr/local/bin/ as root.

# cp mhddfs /usr/bin/ 
# cp mhddfs /usr/local/bin/

All set, mhddfs is ready to be used.

How do I use Mhddfs?

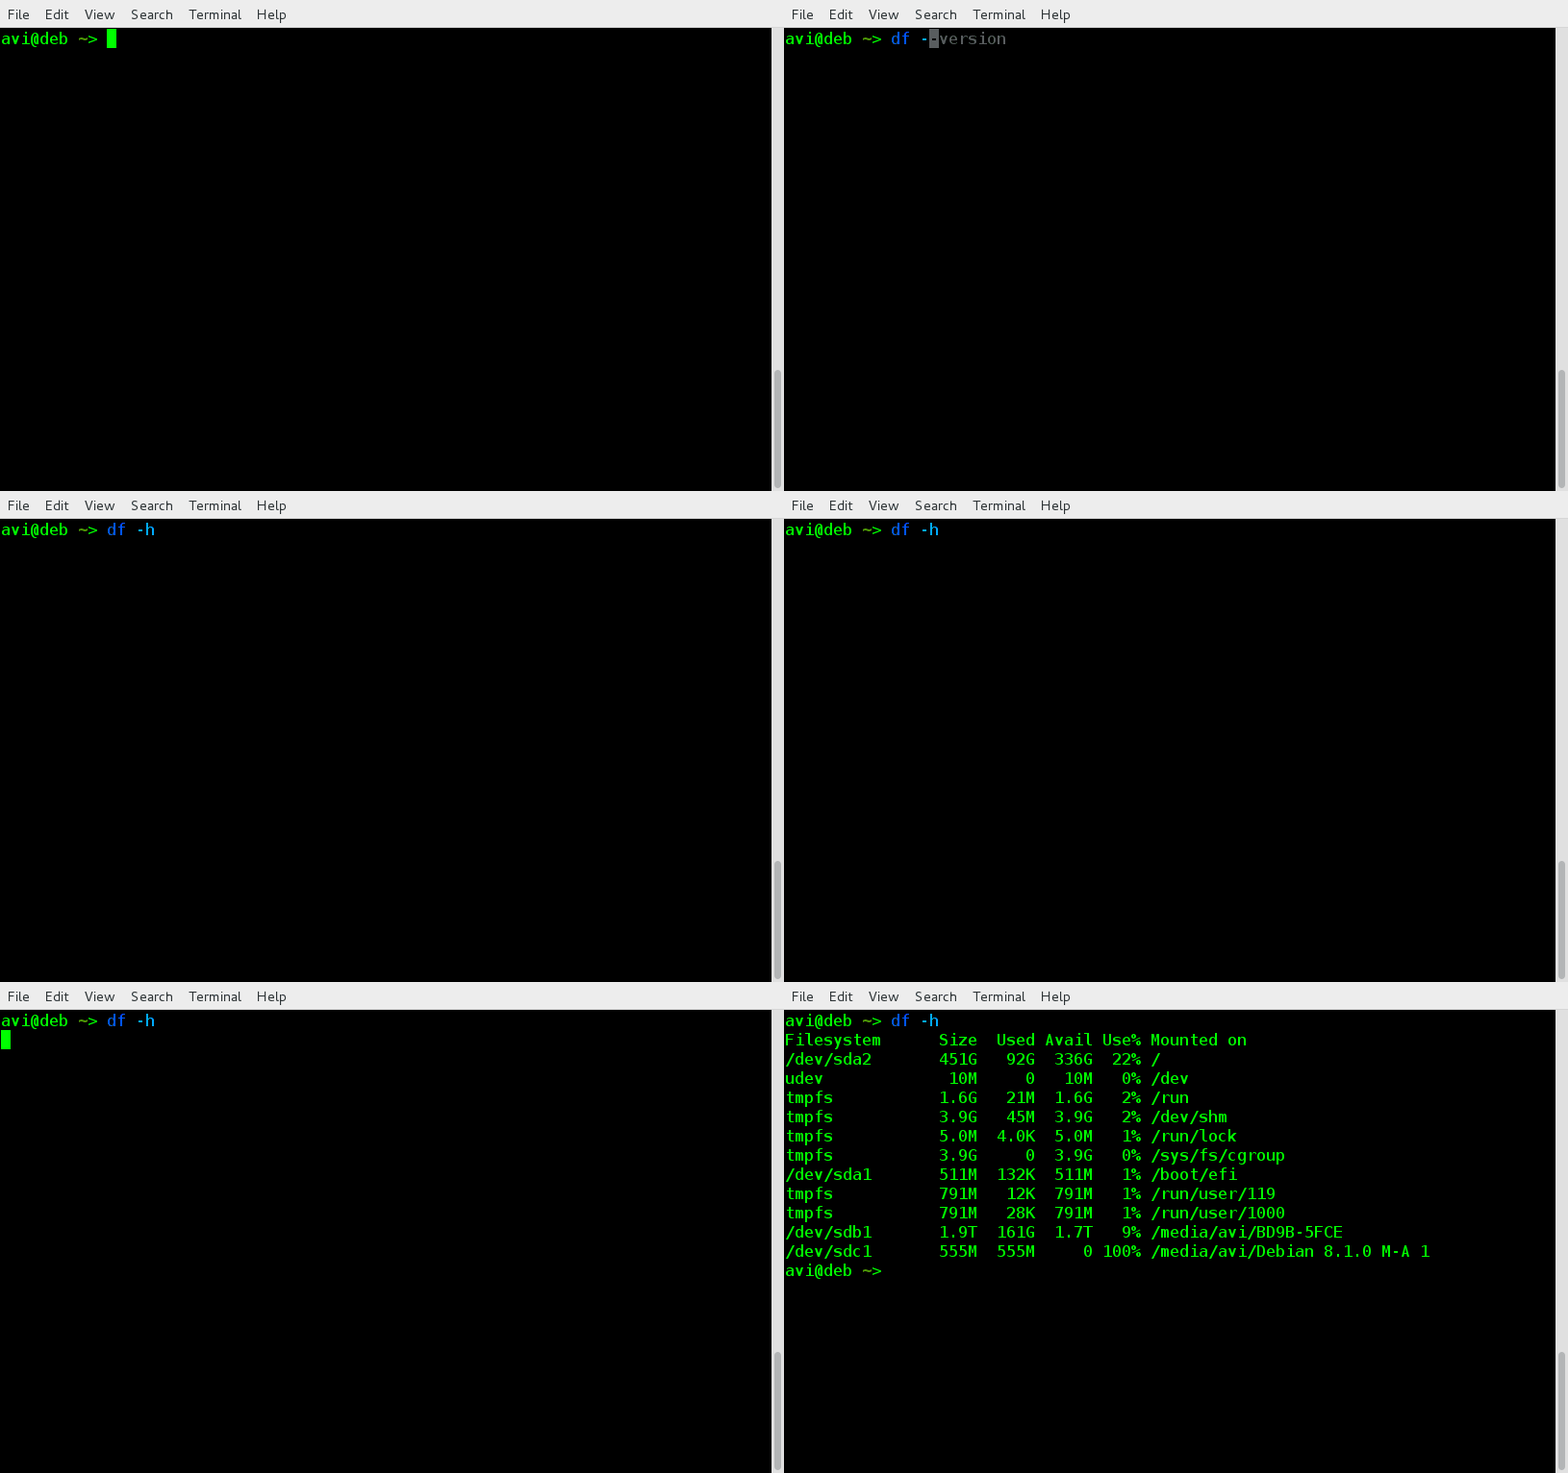
1. Lets see all the HDD mounted to my system currently.

$ df -h

Check Mounted Devices

Sample Output
Filesystem      Size  Used Avail Use% Mounted on

/dev/sda1       511M  132K  511M   1% /boot/efi
/dev/sda2       451G   92G  336G  22% /
/dev/sdb1       1.9T  161G  1.7T   9% /media/avi/BD9B-5FCE
/dev/sdc1       555M  555M     0 100% /media/avi/Debian 8.1.0 M-A 1

Notice the ‘Mount Point‘ name here, which we will be using later.

2. Create a directory /mnt/virtual_hdd where all these all file system will be grouped together as,

# mkdir /mnt/virtual_hdd

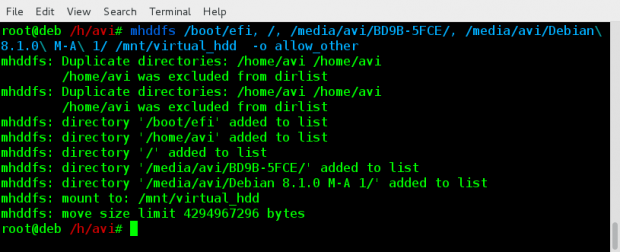
3. And then mount all the file-systems. Either as root or as a user who is a member of FUSE group.

# mhddfs /boot/efi, /, /media/avi/BD9B-5FCE/, /media/avi/Debian\ 8.1.0\ M-A\ 1/ /mnt/virtual_hdd  -o allow_other

Mount All File System in Linux

Mount All File System in Linux

Note: We are used mount Point names here of all the HDDs. Obviously the mount point in your case will be different. Also notice “-o allow_other” option makes this Virtual file system visible to all others and not only the person who created it.

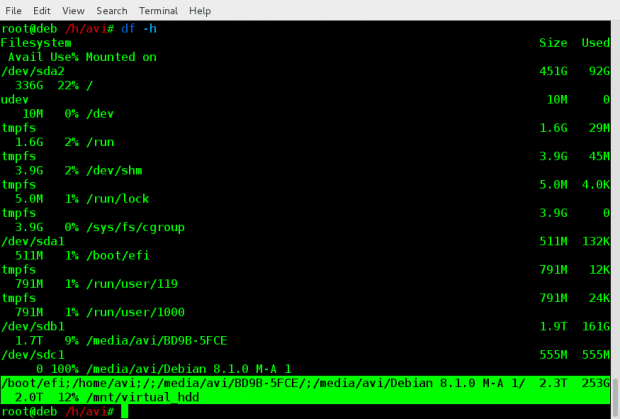
4. Now run “df -h” see all the filesystems. It should contain the one you created just now.

$ df -h

Verify Virtual File System Mount

Verify Virtual File System Mount

You can perform all the option to the Virtual File System you created as you would have done to a Mounted Drive.

5. To create this Virtual File system on every system boot, you should add the below line of code (in your case it should be different, depending upon your mount point), at the end of /etc/fstab file as root.

mhddfs# /boot/efi, /, /media/avi/BD9B-5FCE/, /media/avi/Debian\ 8.1.0\ M-A\ 1/ /mnt/virtual_hdd fuse defaults,allow_other 0 0

6. If at any point of time you want to add/remove a new drive to Virtual_hdd, you may mount a new drive, copy the contents of mount point /mnt/virtual_hddun-mount the volume, Eject the Drive you want to remove and/or mount the new drive you want to include, Mount the overall filesystem under Virtual_hdd using mhddfscommand and you should be done.

How do I Un-Mount Virtual_hdd?

Unmounting virtual_hdd is as easy as,

# umount /mnt/virtual_hdd

Unmount Virtual Filesystem

Unmount Virtual Filesystem

Notice it is umount and not unmount. A lot of user type it wrong.

That’s all for now. I am working on another post you people will love to read. Till then stay tuned and connected to Tecmint. Provide us with your valuable feedback in the comments below. Like and share us and help us get spread.

Source

WP2Social Auto Publish Powered By : XYZScripts.com