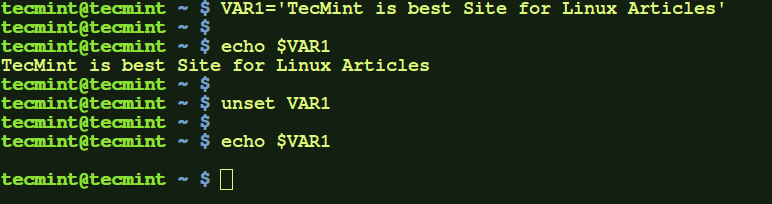
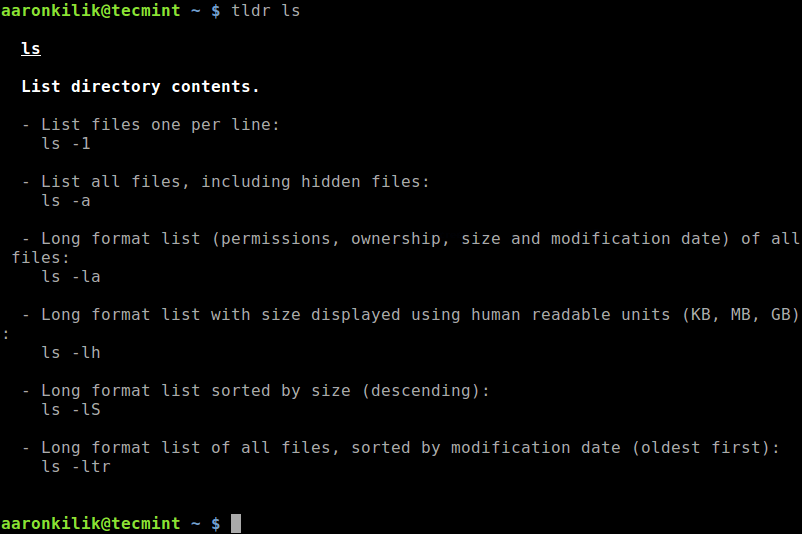
Assume you are running short on disk space and you wanted to free up, by searching something that’s a waste of space and removing it or moving it to an archive medium. How do you track down right stuff to delete, that saves maximum space?
Linux provides a standard du command, which scans entire disk and shows you which directories hold the huge amount of data. That can assist you narrow your search to the things most useful deleting.
However, that only shows you what’s huge. What you actually want to know is what’s too huge. By default, du command will not let you differentiate between data that’s huge because you are doing something that needs it to be huge, and data that’s huge because you unpacked it once and ignored about it.
Most Linux file systems, by default only shows when a file was last accessed, but not shown when it was written, modified or even read. So if you created a huge amount of data years ago, forgot to delete it and have never used it since, then it is important to use those last-access time stamps to know the difference between used and unused data.
Agedu pronounced as (age dee you) is an open source and free utility (much like du command) that helps system administrators to track down wasted disk space used by old files and delete them to free up some space.
Agedu does a complete scan and produces reports that shows how much disk space is utilized by each directory and sub directory along with the last-access times of files. In simple words, it simply helps you to free up disk space.
Agedu Features
- Creates graphical reports.
- Produces data output in HTML format.
- Generates HTML reports with hyperlinks to other directories for easy navigation to gather reports.
- Provides more configurable options.
How Does Agedu Works?
From the man page:
agedu is a program which does this. It does basically the same sort of disk scan as du, but it also records the last-access times of everything it scans. Then it builds an index that lets it efficiently generate reports giving a summary of the results for each subdirectory, and then it produces those reports on demand.
How to Install Agedu in Linux Systems
On Debian/Ubuntu, agedu is available to install from the default system repositories using following apt-get command as shown.
$ sudo apt-get install agedu
On RHEL/CentOS, you need to turn on EPEL repository to install Agedu using following yum command as shown.
# yum install epel-release
# yum install agedu
Fedora and Arch Linux users, simply type the following command to install Agedu.
$ sudo dnf install agedu  [On Fedora]
$ sudo yaourt -S agedu    [On Arch Linux]
On other Linux distributions, you can compile Agedu from source as shown.
$ wget https://www.chiark.greenend.org.uk/~sgtatham/agedu/agedu-20180329.af641e6.tar.gz
$ tar -xvf agedu-20180329.af641e6.tar.gz
$ cd agedu-20180329.af641e6
$ ./configure
$ make
$ sudo make install
How to Track Wasted Disk Space Using Agedu
The following command will do a complete scan of /home/tecmint directory and its sub-directories and creates a special index file containing its data structure.
# agedu -s /home/tecmint/
Built pathname index, 232578 entries, 22842517 bytes of index
Faking directory atimes
Building index
Final index file size = 97485984 bytes
Next, type the following command to query newly created index file.
# agedu -w
Sample Output :
Using Linux /proc/net magic authentication
URL: http://localhost:34895/
Now, type the following command to open the URL using any web browser.
# http://localhost:34895/
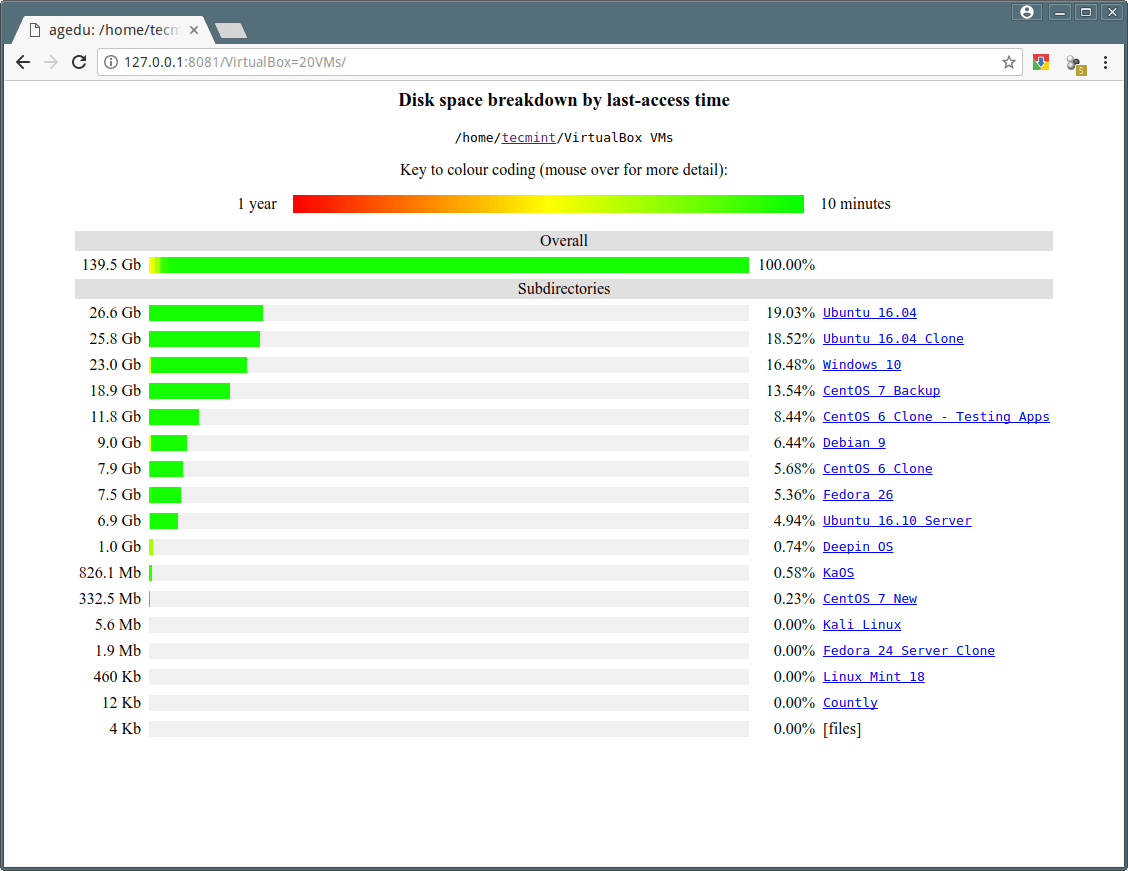
Graphical Output :
The below screen shows the graphical representation of disk usage of /home/tecmint along with its sub directories using various colors to show the difference between disused and recently accessed data.
Click on any sub directory to see the reports of its sub-directories. To terminate this mode, just press [CTRL+D] on command line.

Linux Disk Space Usage
To create and set custom port number for agedu, type the following command.
# agedu -w --address 127.0.0.1:8081
Sample Output :
Using Linux /proc/net magic authentication
URL: http://127.0.0.1:8081/
Enable password protection for Agedu using the following command.
# agedu -w --address 127.0.0.1:8081 --auth basic
Username: agedu
Password: n2tx16jejnbzmuur
URL: http://127.0.0.1:8081/
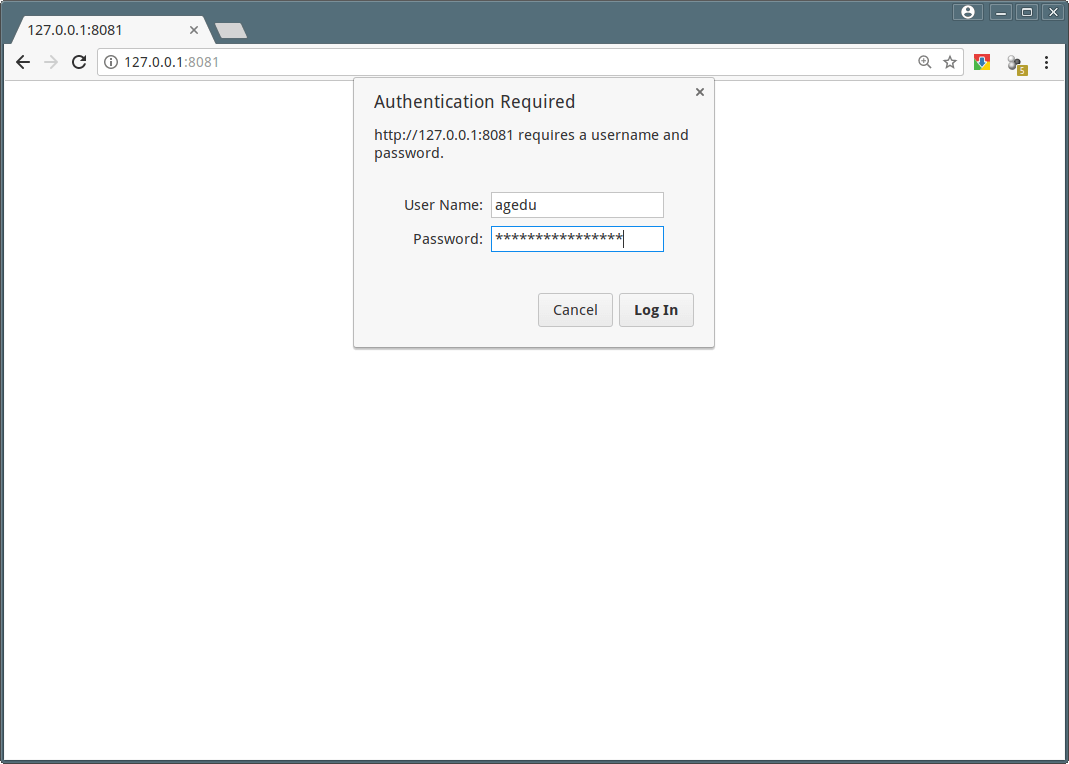
Password Protect Agedu
Linux Directory Disk Space Usage
Access Agedu reports using terminal mode.
# agedu -t /home/tecmint
8612        /home/tecmint/.AndroidStudio3.1
3684        /home/tecmint/.PlayOnLinux
604         /home/tecmint/.ScreamingFrogSEOSpider
2416        /home/tecmint/.TelegramDesktop
61960       /home/tecmint/.Write
1508        /home/tecmint/.adobe
20          /home/tecmint/.aptitude
48          /home/tecmint/.byobu
1215948     /home/tecmint/.cache
3096        /home/tecmint/.cinnamon
1421828     /home/tecmint/.config
12          /home/tecmint/.dbus
8           /home/tecmint/.emacs.d
780         /home/tecmint/.fonts
...
You see the output similar to du command. Let’s see the old files which are not accessed for long time. For example, to see only old files that are not accessed in last 12 months or more.
# agedu -t /home/tecmint -a 12m
2416        /home/tecmint/.TelegramDesktop
1500        /home/tecmint/.adobe
46776       /home/tecmint/.cache
1840        /home/tecmint/.cinnamon
142796      /home/tecmint/.config
636         /home/tecmint/.gconf
88          /home/tecmint/.gimp-2.8
12          /home/tecmint/.gnome
112         /home/tecmint/.java
108         /home/tecmint/.kde
8           /home/tecmint/.links2
16          /home/tecmint/.linuxmint
6804        /home/tecmint/.local
12          /home/tecmint/.mindterm
40920       /home/tecmint/.mozilla
4           /home/tecmint/.oracle_jre_usage
12          /home/tecmint/.parallel
24          /home/tecmint/.shutter
6840        /home/tecmint/.softmaker
336         /home/tecmint/.themes
....
Let’s find out how much disk space taken by MP3 files by using following command.
# agedu -s . --exclude '*' --include '*.mp3'
Again to see reports run the following command.
# agedu -w
To deleted files and free up disk space, use the following command.
# rm -rf /downloads/*.mp3
How to remove agedu index file? First see the size of the index file with the following command.
# ls agedu.dat -lh
Sample output :
-rw------- 1 tecmint tecmint 35M Apr 10 12:05 agedu.dat
To remove index file, just enter.
# agedu -R
For more information on agedu command options and usage, please read the man pages or visit agedu home page.
# man agedu
If you know any tool that we haven’t mentioned in this site. Please let us know about it via comment box below.