Linux command line attracts most of the Linux Enthusiastic. A normal Linux user generally posses a vocabulary of roughly 50-60 commands to carry out their day-to-day task. Linux commands and their switches remains the most valuable treasure for a Linux-user, Shell-script programmer and Administrator. There are some Linux Commands which are lesser Known, yet very useful and handy irrespective of the fact whether you are a Novice or an Advanced User.

Lesser Known Linux Commands
This very article aims at throwing light on some of the lesser known Linux commands which surely will help you to handle your Desktop/Server more efficiently.
1. sudo !! command
Running the command without specifying sudo command will give you permission denied error. So, you don’t need to rewrite the whole command again just put ‘!!‘ will grab the last command.
$ apt-get update

E: Could not open lock file /var/lib/apt/lists/lock - open (13: Permission denied)
E: Unable to lock directory /var/lib/apt/lists/
E: Could not open lock file /var/lib/dpkg/lock - open (13: Permission denied)
E: Unable to lock the administration directory (/var/lib/dpkg/), are you root?
$ sudo !!

sudo apt-get update
[sudo] password for server:
…
..
Fetched 474 kB in 16s (28.0 kB/s)
Reading package lists... Done
server@localhost:~$
2. python command
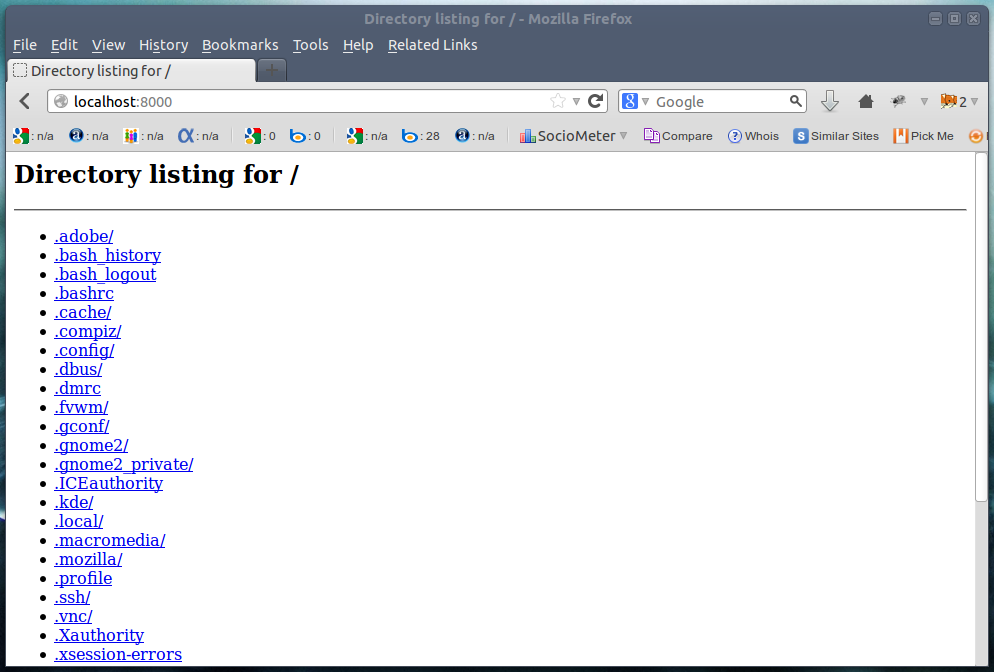
The below command generates a simple web page over HTTP for the directory structure tree and can be accessed at port 8000 in browser till interrupt signal is sent.
# python -m SimpleHTTPServer
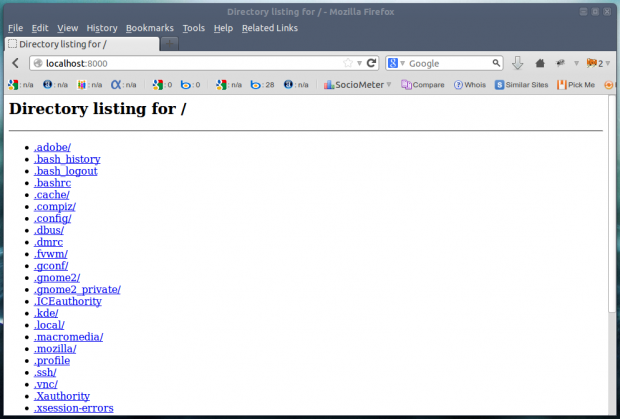
Directory Structure Tree
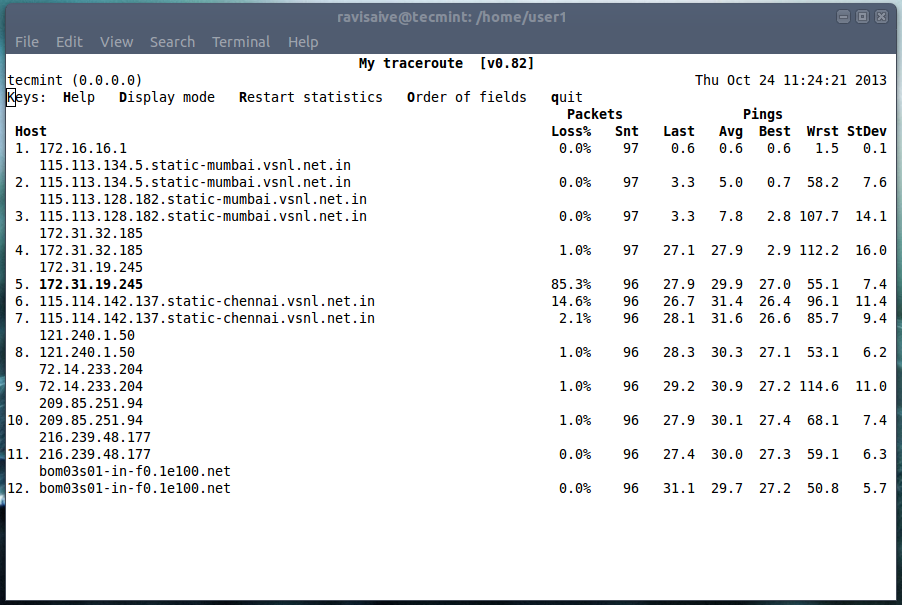
3. mtr Command
Most of us are familiar with ping and traceroute. How about combining the functionality of both the command into one with mtr command. In case mtr is not installed into your machine, apt or yum the required package.
$ sudo apt-get install mtr (On Debian based Systems)
# yum install mtr (On Red Hat based Systems)
Now run mtr command to start investigating the network connection between the host mtr runs on and google.com.
# mtr google.com
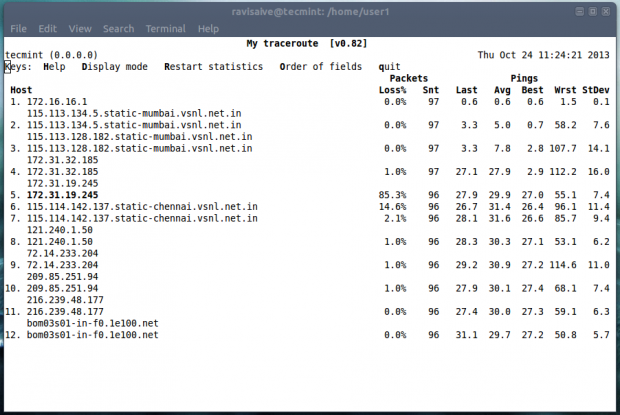
mtr command
4. Ctrl+x+e Command
This command is very much useful for administrator and developers. To Automate day-to-day task an administrator needs to open editor by typing vi, vim, nano, etc. How about firing instant editor (from terminal).
Just Press “Ctrl-x-e” from the terminal prompt and start working in editor.
Download Linux Command Line Cheat Sheet

5. nl Command
The “nl command” number the lines of a file. Number the lines of a file say ‘one.txt‘ with lines say (Fedora, Debian, Arch, Slack and Suse). First list the content of a file “one.txt” using cat command.
# cat one.txt

fedora
debian
arch
slack
suse
Now run “nl command” to list them in a numbered fashion.
# nl one.txt

1 fedora
2 debian
3 arch
4 slack
5 suse
6. shuf Command
The “shuf” command randomly select lines/files/folder from a file/folder. First list the contents of a folder using ls command.
# ls

Desktop  Documents  Downloads  Music  Pictures  Public  Templates  Videos
#  ls | shuf (shuffle Input)

Music
Documents
Templates
Pictures
Public
Desktop
Downloads
Videos
#  ls | shuf -n1 (pick on random selection)

Public
# ls | shuf -n1

Videos
# ls | shuf -n1

Templates
# ls | shuf -n1

Downloads
Note: You can always replace ‘n1‘ with ‘n2‘ to pick two random selection or any other number of random selection using n3, n4.…
7. ss Command
The “ss” stands for socket statistics. The command investigates the socket and shows information similar to netstat command. It can display more TCP and state informations than other tools.
# ss

State      Recv-Q Send-Q      Local Address:Port          Peer Address:Port
ESTAB      0      0           192.168.1.198:41250        *.*.*.*:http
CLOSE-WAIT 1      0               127.0.0.1:8000             127.0.0.1:41393
ESTAB      0      0           192.168.1.198:36239        *.*.*.*:http
ESTAB      310    0               127.0.0.1:8000             127.0.0.1:41384
ESTAB      0      0           192.168.1.198:41002       *.*.*.*:http
ESTAB      0      0               127.0.0.1:41384            127.0.0.1:8000
8. last Command
The “last” command show the history of last logged in users. This command searches through the file “/var/log/wtmp” and shows a list of logged-in and logged-out users along with tty’s.
#  last
server   pts/0        :0               Tue Oct 22 12:03   still logged in
server   tty8         :0               Tue Oct 22 12:02   still logged in
…
...
(unknown tty8         :0               Tue Oct 22 12:02 - 12:02  (00:00)
server   pts/0        :0               Tue Oct 22 10:33 - 12:02  (01:29)
server   tty7         :0               Tue Oct 22 10:05 - 12:02  (01:56)
(unknown tty7         :0               Tue Oct 22 10:04 - 10:05  (00:00)
reboot   system boot  3.2.0-4-686-pae  Tue Oct 22 10:04 - 12:44  (02:39)

wtmp begins Fri Oct  4 14:43:17 2007
9. curl ifconfig.me
So how do you obtain your External IP address? Using google?. Well the command output your external IP address right into your terminal.
# curl ifconfig.me
Note: You might don’t have curl package installed, you have to apt/yum to install package.
10. tree command
Get the current directory structure in tree like format.
# tree
.
|-- Desktop
|-- Documents
|   `-- 37.odt
|-- Downloads
|   |-- attachments.zip

|   |-- ttf-indic-fonts_0.5.11_all.deb
|   |-- ttf-indic-fonts_1.1_all.deb
|   `-- wheezy-nv-install.sh
|-- Music
|-- Pictures
|   |-- Screenshot from 2013-10-22 12:03:49.png
|   `-- Screenshot from 2013-10-22 12:12:38.png
|-- Public
|-- Templates
`-- Videos

10 directories, 23 files
11. pstree
This commands shows all the processes running currently along with associated child process, in a tree like format similar to ‘tree‘ command output.
# pstree
init─┬─NetworkManager───{NetworkManager}
     ├─accounts-daemon───{accounts-daemon}
     ├─acpi_fakekeyd
     ├─acpid
     ├─apache2───10*[apache2]
     ├─at-spi-bus-laun───2*[{at-spi-bus-laun}]
     ├─atd
     ├─avahi-daemon───avahi-daemon
     ├─bluetoothd
     ├─colord───{colord}
     ├─colord-sane───2*[{colord-sane}]
     ├─console-kit-dae───64*[{console-kit-dae}]
     ├─cron
     ├─cupsd
     ├─2*[dbus-daemon]
     ├─dbus-launch
     ├─dconf-service───2*[{dconf-service}]
     ├─dovecot─┬─anvil
     │         ├─config
     │         └─log
     ├─exim4
     ├─gconfd-2
     ├─gdm3─┬─gdm-simple-slav─┬─Xorg
     │      │                 ├─gdm-session-wor─┬─x-session-manag─┬─evolution-a+
     │      │                 │                 │                 ├─gdu-notific+
     │      │                 │                 │                 ├─gnome-scree+
     │      │                 │                 │                 ├─gnome-setti+
     │      │                 │                 │                 ├─gnome-shell+++
     │      │                 │                 │                 ├─nm-applet──+++
     │      │                 │                 │                 ├─ssh-agent
     │      │                 │                 │                 ├─tracker-min+
     │      │                 │                 │                 ├─tracker-sto+
     │      │                 │                 │                 └─3*[{x-sessi+
     │      │                 │                 └─2*[{gdm-session-wor}]
     │      │                 └─{gdm-simple-slav}
     │      └─{gdm3}
     ├─6*[getty]
     ├─gnome-keyring-d───9*[{gnome-keyring-d}]
     ├─gnome-shell-cal───2*[{gnome-shell-cal}]
     ├─goa-daemon───{goa-daemon}
     ├─gsd-printer───{gsd-printer}
     ├─gvfs-afc-volume───{gvfs-afc-volume}
That’s all for now. In the next article of mine I would cover certain other lesser known Linux commands which would be fun. Till then stay tuned and connected to Tecmint. Like and share us and help us get spread.
Read Also:
- 10 Lesser Known Linux Commands – Part 2
- 10 Lesser Known Commands for Linux – Part 3
- 10 Lesser Known Effective Linux Commands – Part IV
- 10 Lesser Known Useful Linux Commands- Part V
10 Lesser Known Linux Commands – Part 2
Continuing the last conversation from 11 Lesser Known Useful Linux Commands – Part I here in this article we will be focusing on other lesser known Linux commands, that will prove to be very much useful in managing Desktop and Server.

10 Lesser Known Linux Commands
12. <space> Command
Every piece of command you type in terminal gets recorded in the history and can be retried using historycommand.
How about cheating history command? Yeah you can do it and its very easy. Just put one or more white space before typing a command in terminal and your command wont be recorded.
Lets give it a try, we will try five common Linux commands (say ls, pwd, uname, echo “hi” and who) in terminal after one white space and check if these commands are docked in history or not.
avi@localhost:~$  ls
avi@localhost:~$  pwd
avi@localhost:~$  uname
avi@localhost:~$  echo “hi”
avi@localhost:~$  who
Now run ‘history‘ command to see whether these above executed commands are recorded or not.
avi@localhost:~$ history

   40  cd /dev/
   41  ls
   42  dd if=/dev/cdrom1 of=/home/avi/Desktop/squeeze.iso
   43  ping www.google.com
   44  su
You see our last executed commands are not logged. we can also cheat history by using an alternate command ‘cat | bash‘ of-course without quotes, in the same way as above.
13. stat Command
The stat command in Linux displays the status information of a file or filesystem. The stat shows a whole lot of information about the file which name is passed as argument. Status Information includes file Size, Blocks, Access Permission, Date-time of file last access, Modify, change, etc.
avi@localhost:~$ stat 34.odt

  File: `34.odt'
  Size: 28822     	Blocks: 64         IO Block: 4096   regular file
Device: 801h/2049d	Inode: 5030293     Links: 1
Access: (0644/-rw-r--r--)  Uid: ( 1000/     avi)   Gid: ( 1000/     avi)
Access: 2013-10-14 00:17:40.000000000 +0530
Modify: 2013-10-01 15:20:17.000000000 +0530
Change: 2013-10-01 15:20:17.000000000 +0530
14. <alt>. and <esc>.
The above key combination is not actually a command but a tweak which put the last command argument at prompt, in the order of last entered command to previous entered command. Just press and hold ‘Alt‘ or ‘Esc‘ and continue pressing ‘.‘.
Download Linux Command Line Cheat Sheet
15. pv command
You might have seen simulating text in Movies specially Hollywood Movies, where the text appears as if it is being typed in the Real time. You can echo any kind of text and output in simulating fashion using ‘pv‘ command, as pipelined above. The pv command might not be installed in your system, and you have to apt or yum the required packages to install ‘pv‘ into your box.
root@localhost:# echo "Tecmint [dot] com is the world's best website for qualitative Linux article" | pv -qL 20
Sample Outpit
Tecmint [dot] com is the world's best website for qualitative Linux article
16. mount | column -t
The above command shows the list of all the mounted filesystem in a nice formatting with specification.
avi@localhost:~$ mount | column -t
Sample Outpit
/dev/sda1    on  /                         type  ext3         (rw,errors=remount-ro)
tmpfs        on  /lib/init/rw              type  tmpfs        (rw,nosuid,mode=0755)
proc         on  /proc                     type  proc         (rw,noexec,nosuid,nodev)
sysfs        on  /sys                      type  sysfs        (rw,noexec,nosuid,nodev)
udev         on  /dev                      type  tmpfs        (rw,mode=0755)
tmpfs        on  /dev/shm                  type  tmpfs        (rw,nosuid,nodev)
devpts       on  /dev/pts                  type  devpts       (rw,noexec,nosuid,gid=5,mode=620)
fusectl      on  /sys/fs/fuse/connections  type  fusectl      (rw)
binfmt_misc  on  /proc/sys/fs/binfmt_misc  type  binfmt_misc  (rw,noexec,nosuid,nodev)
nfsd         on  /proc/fs/nfsd             type  nfsd         (rw)
17. Ctr+l command
Before going further, let me ask you how you clear your terminal. Hmmm! You type “clear” at prompt. Well the above command perform the action of cleaning your terminal all at a once. Just press “Ctr+l” and see how it clears your terminal all at once.
18. curl command
How about checking your unread mail from the command line. This command is very useful for those who work on headless server. Again it asks for password at run time and you need not hard code your password in the above line, which is otherwise a security risk.
avi@localhost:~$ curl -u avishek1210@gmail.com --silent "https://mail.google.com/mail/feed/atom" | perl -ne 'print "\t" if //; print "$2\n" if /<(title|name)>(.*)<\/>/;'
Sample Outpit
Enter host password for user 'avishek1210@gmail.com':
Gmail - Inbox for avishek1210@gmail.com
People offering cars in Delhi - Oct 26
	Quikr Alerts
another dependency question
	Chris Bannister
	Ralf Mardorf
	Reco
	Brian
	François Patte
	Curt
	Siard
	berenger.morel
Hi Avishek - Download your Free MBA Brochure Now...
	Diya
★Top Best Sellers Of The Week, Take Your Pick★
	Timesdeal
aptitude misconfigure?
	Glenn English
Choosing Debian version or derivative to run Wine when resource poor
	Chris Bannister
	Zenaan Harkness
	Curt
	Tom H
	Richard Owlett
	Ralf Mardorf
	Rob Owens
19. screen Command
The screen command makes it possible to detach a long running process from a session that can again be reattached, as and when required which provides flexibility in command execution.
To run a process (long) we generally execute as
avi@localhost:~$ ./long-unix-script.sh
Which lacks flexibility and needs the user to continue with the current session, however if we execute the above command as.
avi@localhost:~$ screen ./long-unix-script.sh
It can be de-attached or re-attached in different sessions. When a command is executing press “Ctrl + A” and then “d” to de-attach. To attach run.
avi@localhost:~$ screen -r 4980.pts-0.localhost
Note: Here, the later part of this command is screen id, which you can get using ‘screen -ls‘ command. To know more about ‘screen command‘ and their usage, please read our article that shows some useful 10 screen commands with examples.
20. file
No! the above command is not a typo. ‘file‘ is a command which gives you information about the type of file.
avi@localhost:~$ file 34.odt

34.odt: OpenDocument Text
21. id
The above command print real and effective user and group ids.
avi@localhost:~$ id
Sample Output
uid=1000(avi) gid=1000(avi)
groups=1000(avi),24(cdrom),25(floppy),29(audio),30(dip),44(video),46(plugdev),109(netdev),111(bluetooth),117(scanner)
That’s all for now. Seeing the success of last article of this series and this very article, I’ll be coming with another part of this article containing several other Lesser Known Linux commands very soon. Till then Stay Tuned and connected to Tecmint. Don’t Forget to provide us with your value-able Feedback in Comments.
Read Also
- 10 Lesser Known Commands for Linux – Part 3
- 10 Lesser Known Effective Linux Commands – Part IV
- 10 Lesser Known Useful Linux Commands- Part V
10 Lesser Known Commands for Linux – Part 3
Overwhelmed with the response of last two articles of “Lesser Known Linux Article” series namely.
- 11 Lesser Known Useful Linux Commands – Part I
- 10 Lesser Known Linux Commands – Part 2
- 10 Lesser Known Effective Linux Commands – Part IV
- 10 Lesser Known Useful Linux Commands- Part V

10 Lesser Known Linux Commands
We have come up with the third article of this series which includes few other lesser known Linux commands, worth knowing. May be you are already aware of these commands, no doubt you are an experienced Linux user and loves exploration.
22. ^foo^bar Command
Run the last command with modification, in a single instance. Suppose I need to run a command ‘ls -l‘ to long list the content of a directory say ‘Desktop’. Accidentally, you type ‘lls -l‘. So now you will have to retype the whole command or edit the previous command using navigation key. That is painful when the command is long.
avi@localhost:~/Desktop$ lls -l

bash: lls: command not found
avi@localhost:~/Desktop$ ^lls^ls

ls -l
total 7489440

drwxr-xr-x 2 avi  avi       36864 Nov 13  2012 101MSDCF
-rw-r--r-- 1 avi  avi      206833 Nov  5 15:27 1.jpg
-rw-r--r-- 1 avi  avi      158951 Nov  5 15:27 2.jpg
-rw-r--r-- 1 avi  avi       90624 Nov  5 12:59 Untitled 1.doc
Note: In the above replacement we used “^typo(to be replaced)^original_command”. This command may be very dangerous if you knowingly or unknowingly replaced the typo with system command or anything risky say rm -rf.
23. > file.txt Command
This command flush the contents of a file without the need of removing and creating the same file again. This command is very useful in scripting language when we need an output or log on the same file again and again.
I have a file say ‘test.txt’ on my ‘Desktop‘ with a lot of text.
avi@localhost:~/Desktop$ cat test.txt

Linux
GNU
Debian
Fedora
kali
ubuntu
git
Linus
Torvalds
avi@localhost:~/Desktop$ > test.txt
avi@localhost:~/Desktop$ cat test.txt
Note: Again, this command can be dangerous, don’t ever try to flush the contents of a system file or configuration file. If you do so, you will be in serious trouble.
24. at Command
The ‘at‘ command is similar to cron command and can be used for scheduling a task or command to run at specified time.
avi@localhost:~/Desktop$ echo "ls -l > /dev/pts/0" | at 14:012

OR

avi@localhost:~/Desktop$ echo "ls -l > /dev/pts/0" | at 2:12 PM
Sample Output
-rw-r--r-- 1 avi  avi      220492 Nov  1 13:49 Screenshot-1.png
-rw-r--r-- 1 root root        358 Oct 17 10:11 sources.list
-rw-r--r-- 1 avi  avi  4695982080 Oct 10 20:29 squeeze.iso
..
..
-rw-r--r-- 1 avi  avi       90624 Nov  5 12:59 Untitled 1.doc
-rw-r--r-- 1 avi  avi       96206 Nov  5 12:56 Untitled 1.odt
-rw-r--r-- 1 avi  avi        9405 Nov 12 23:22 Untitled.png
Note: echo “ls -l” : This string echo’s the command (here ls -l) on standard terminal. You can replace ‘ls -l‘ with any command of your need and choice.
> : redirects the output
The /dev/pts/0 : This is the output device and/or file, where output is sought, here the output is at terminal.
In my case, my tty is at /dev/pts/0, at that time. You can check your tty by running command tty.
avi@localhost:~/Desktop$ tty

/dev/pts/0
Note: The ‘at‘ command execute the task as soon as the system clock matches the specified time.
25. du -h –max-depth=1 Command
The below command outputs the size of sub-folders within the current directory, in human readable format.
avi@localhost:/home/avi/Desktop# du -h --max-depth=1

38M	./test
1.1G	./shivji
42M	./drupal
6.9G	./101MSDCF
16G	.
Note: The above command can be very much useful in checking system disk usage.
Download Linux Command Line Cheat Sheet
26. expr Command
The ‘expr‘ command is not that much lesser known command. This command is very much useful in carrying out simple mathematical calculation in terminal.
avi@localhost:/home/avi/Desktop# expr 2 + 3
5
avi@localhost:/home/avi/Desktop# expr 6 – 3
3
avi@localhost:/home/avi/Desktop# expr 12 / 3
4
avi@localhost:/home/avi/Desktop# expr 2 \* 9
18
27. look Command
Check for words from English dictionary in case of confusion, from the terminal itself. Viz., I am a bit confused if the spelling is carrier or carieer.
avi@localhost:/home/avi/Documents# look car

Cara
Cara's
…
...
carps
carpus
carpus's
carrel
carrel's
carrels
carriage
carriage's
carriages
carriageway
carriageway's
carried
carrier
carrier's
carriers
carries
…
...
caryatids
The above command showed all the words from dictionary starting with string ‘car’. I got what I was searching for.
28. yes Command
Another command which is not used frequently on regular basis, normally but is very useful in scripting language and for system Administrators.
This command continues to print a given string, till interrupt instruction is given by you.
avi@localhost:~/Desktop$ yes "Tecmint is one of the best site dedicated to Linux, how to"

Tecmint is one of the best site dedicated to Linux, how to
Tecmint is one of the best site dedicated to Linux, how to
Tecmint is one of the best site dedicated to Linux, how to
Tecmint is one of the best site dedicated to Linux, how to
…
…
...
Tecmint is one of the best site dedicated to Linux, how to
Tecmint is one of the best site dedicated to Linux, how to
Tecmint is one of the best site dedicated to Linux, how to
29. factor Command
The factor command is actually a command of mathematical origin. This command outputs all the factors of a given number.
avi@localhost:~/Desktop$ factor 22
22: 2 11
avi@localhost:~/Desktop$ factor 21
21: 3 7
avi@localhost:~/Desktop$ factor 11
11: 11
30. ping -i 60 -a IP_address
All of us use ping command to check is server is live or not. And I usually ping google, to check if I am connected to internet or not.
It is sometimes irritating, when you wait and keep watching your terminal to get reply of ping command or say, wait for server to get connected.
How about an audible sound as soon as the server comes live.
avi@localhost:~/Desktop$ ping -i 60 -a www.google.com

PING www.google.com (74.125.200.103) 56(84) bytes of data.
64 bytes from www.google.com (74.125.200.103): icmp_req=1 ttl=44 time=105 ms
64 bytes from 74.125.200.103: icmp_req=2 ttl=44 time=281 ms
Let me tell you one thing, before you report that the command didn’t return any audible sound. Make sure your system audio is not mute, sound theme must be enabled in ‘sound preferences‘ and make sure ‘Enable window and window sound‘ is checked.
31. tac Command
This command is very interesting which prints the content of a text file in reverse order, i.e., from last line to first line.
I have a text file 35.txt in my Documents directory, under home folder. Checking it’s content using cat command.
avi@localhost:~/Documents$ cat 35.txt
Sample Output
1. Linux is built with certain powerful tools, which are unavailable in windows.

2. One of such important tool is Shell Scripting. Windows however comes with such a tool but as usual it is much weak as compared to it's Linux Counterpart.

3.Shell scripting/programming makes it possible to execute command(s), piped to get desired output in order to automate day-to-day usages.
Now reverse the content of file using tac command.
avi@localhost:~/Documents$ tac 35.txt
Sample Output
3.Shell scripting/programming makes it possible to execute command(s), piped to get desired output in order to automate day-to-day usages.

2. One of such important tool is Shell Scripting. Windows however comes with such a tool but as usual it is much weak as compared to it's Linux Counterpart.

1. Linux is built with certain powerful tools, which are unavailable in windows.
That’s all for now. If you are aware of other lesser known Linux commands, you can put a comment, so that we can include those in our future articles.
10 Lesser Known Effective Linux Commands – Part IV
Continuing the Lesser Known series, this fourth article of the series will let you know some useful funny and animated commands. Here we go into the practical session, without much theory.

10 Lesser Known Effective Commands
- 11 Lesser Known Useful Linux Commands – Part I
- 10 Lesser Known Linux Commands – Part 2
- 10 Lesser Known Commands for Linux – Part 3
- 10 Lesser Known Useful Linux Commands- Part V
In the fourth article of this series which includes few other lesser known Linux commands, worth knowing. Might be you’re already aware of these commands, no doubt you’re an experienced Linux user and loves exploration.
32. strace Command
The strace is a debugging tool which is used primarily for troubleshooting purpose in Linux. It might not be installed by default in your system and you may need to apt or yum the required package.
Trace a command execution using strace command:
root@tecmint [~]# strace pwd
Sample Output
execve("/bin/pwd", ["pwd"], [/* 29 vars */]) = 0
brk(0)                                  = 0x728000
mmap(NULL, 4096, PROT_READ|PROT_WRITE, MAP_PRIVATE|MAP_ANONYMOUS, -1, 0) = 0x7f29b0df2000
access("/etc/ld.so.preload", R_OK)      = -1 ENOENT (No such file or directory)
open("/etc/ld.so.cache", O_RDONLY)      = 3
fstat(3, {st_mode=S_IFREG|0644, st_size=38427, ...}) = 0
mmap(NULL, 38427, PROT_READ, MAP_PRIVATE, 3, 0) = 0x7f29b0de8000
close(3)                                = 0
open("/lib64/libc.so.6", O_RDONLY)      = 3
read(3, "7ELF
execve("/bin/pwd", ["pwd"], [/* 29 vars */]) = 0
brk(0)                                  = 0x728000
mmap(NULL, 4096, PROT_READ|PROT_WRITE, MAP_PRIVATE|MAP_ANONYMOUS, -1, 0) = 0x7f29b0df2000
access("/etc/ld.so.preload", R_OK)      = -1 ENOENT (No such file or directory)
open("/etc/ld.so.cache", O_RDONLY)      = 3
fstat(3, {st_mode=S_IFREG|0644, st_size=38427, ...}) = 0
mmap(NULL, 38427, PROT_READ, MAP_PRIVATE, 3, 0) = 0x7f29b0de8000
close(3)                                = 0
open("/lib64/libc.so.6", O_RDONLY)      = 3
read(3, "\177ELF\2\1\1\3\0\0\0\0\0\0\0\0\3\0>\0\1\0\0\0\360\355\1I;\0\0\0"..., 832) = 832
fstat(3, {st_mode=S_IFREG|0755, st_size=1922152, ...}) = 0
mmap(0x3b49000000, 3745960, PROT_READ|PROT_EXEC, MAP_PRIVATE|MAP_DENYWRITE, 3, 0) = 0x3b49000000
mprotect(0x3b4918a000, 2093056, PROT_NONE) = 0
mmap(0x3b49389000, 20480, PROT_READ|PROT_WRITE, MAP_PRIVATE|MAP_FIXED|MAP_DENYWRITE, 3, 0x189000) = 0x3b49389000
mmap(0x3b4938e000, 18600, PROT_READ|PROT_WRITE, MAP_PRIVATE|MAP_FIXED|MAP_ANONYMOUS, -1, 0) = 0x3b4938e000
close(3)                                = 0
mmap(NULL, 4096, PROT_READ|PROT_WRITE, MAP_PRIVATE|MAP_ANONYMOUS, -1, 0) = 0x7f29b0de7000
mmap(NULL, 4096, PROT_READ|PROT_WRITE, MAP_PRIVATE|MAP_ANONYMOUS, -1, 0) = 0x7f29b0de6000
mmap(NULL, 4096, PROT_READ|PROT_WRITE, MAP_PRIVATE|MAP_ANONYMOUS, -1, 0) = 0x7f29b0de5000
....
>
execve("/bin/pwd", ["pwd"], [/* 29 vars */]) = 0
brk(0)                                  = 0x728000
mmap(NULL, 4096, PROT_READ|PROT_WRITE, MAP_PRIVATE|MAP_ANONYMOUS, -1, 0) = 0x7f29b0df2000
access("/etc/ld.so.preload", R_OK)      = -1 ENOENT (No such file or directory)
open("/etc/ld.so.cache", O_RDONLY)      = 3
fstat(3, {st_mode=S_IFREG|0644, st_size=38427, ...}) = 0
mmap(NULL, 38427, PROT_READ, MAP_PRIVATE, 3, 0) = 0x7f29b0de8000
close(3)                                = 0
open("/lib64/libc.so.6", O_RDONLY)      = 3
read(3, "\177ELF\2\1\1\3\0\0\0\0\0\0\0\0\3\0>\0\1\0\0\0\360\355\1I;\0\0\0"..., 832) = 832
fstat(3, {st_mode=S_IFREG|0755, st_size=1922152, ...}) = 0
mmap(0x3b49000000, 3745960, PROT_READ|PROT_EXEC, MAP_PRIVATE|MAP_DENYWRITE, 3, 0) = 0x3b49000000
mprotect(0x3b4918a000, 2093056, PROT_NONE) = 0
mmap(0x3b49389000, 20480, PROT_READ|PROT_WRITE, MAP_PRIVATE|MAP_FIXED|MAP_DENYWRITE, 3, 0x189000) = 0x3b49389000
mmap(0x3b4938e000, 18600, PROT_READ|PROT_WRITE, MAP_PRIVATE|MAP_FIXED|MAP_ANONYMOUS, -1, 0) = 0x3b4938e000
close(3)                                = 0
mmap(NULL, 4096, PROT_READ|PROT_WRITE, MAP_PRIVATE|MAP_ANONYMOUS, -1, 0) = 0x7f29b0de7000
mmap(NULL, 4096, PROT_READ|PROT_WRITE, MAP_PRIVATE|MAP_ANONYMOUS, -1, 0) = 0x7f29b0de6000
mmap(NULL, 4096, PROT_READ|PROT_WRITE, MAP_PRIVATE|MAP_ANONYMOUS, -1, 0) = 0x7f29b0de5000
....
05I;
execve("/bin/pwd", ["pwd"], [/* 29 vars */]) = 0
brk(0)                                  = 0x728000
mmap(NULL, 4096, PROT_READ|PROT_WRITE, MAP_PRIVATE|MAP_ANONYMOUS, -1, 0) = 0x7f29b0df2000
access("/etc/ld.so.preload", R_OK)      = -1 ENOENT (No such file or directory)
open("/etc/ld.so.cache", O_RDONLY)      = 3
fstat(3, {st_mode=S_IFREG|0644, st_size=38427, ...}) = 0
mmap(NULL, 38427, PROT_READ, MAP_PRIVATE, 3, 0) = 0x7f29b0de8000
close(3)                                = 0
open("/lib64/libc.so.6", O_RDONLY)      = 3
read(3, "\177ELF\2\1\1\3\0\0\0\0\0\0\0\0\3\0>\0\1\0\0\0\360\355\1I;\0\0\0"..., 832) = 832
fstat(3, {st_mode=S_IFREG|0755, st_size=1922152, ...}) = 0
mmap(0x3b49000000, 3745960, PROT_READ|PROT_EXEC, MAP_PRIVATE|MAP_DENYWRITE, 3, 0) = 0x3b49000000
mprotect(0x3b4918a000, 2093056, PROT_NONE) = 0
mmap(0x3b49389000, 20480, PROT_READ|PROT_WRITE, MAP_PRIVATE|MAP_FIXED|MAP_DENYWRITE, 3, 0x189000) = 0x3b49389000
mmap(0x3b4938e000, 18600, PROT_READ|PROT_WRITE, MAP_PRIVATE|MAP_FIXED|MAP_ANONYMOUS, -1, 0) = 0x3b4938e000
close(3)                                = 0
mmap(NULL, 4096, PROT_READ|PROT_WRITE, MAP_PRIVATE|MAP_ANONYMOUS, -1, 0) = 0x7f29b0de7000
mmap(NULL, 4096, PROT_READ|PROT_WRITE, MAP_PRIVATE|MAP_ANONYMOUS, -1, 0) = 0x7f29b0de6000
mmap(NULL, 4096, PROT_READ|PROT_WRITE, MAP_PRIVATE|MAP_ANONYMOUS, -1, 0) = 0x7f29b0de5000
....
"..., 832) = 832 fstat(3, {st_mode=S_IFREG|0755, st_size=1922152, ...}) = 0 mmap(0x3b49000000, 3745960, PROT_READ|PROT_EXEC, MAP_PRIVATE|MAP_DENYWRITE, 3, 0) = 0x3b49000000 mprotect(0x3b4918a000, 2093056, PROT_NONE) = 0 mmap(0x3b49389000, 20480, PROT_READ|PROT_WRITE, MAP_PRIVATE|MAP_FIXED|MAP_DENYWRITE, 3, 0x189000) = 0x3b49389000 mmap(0x3b4938e000, 18600, PROT_READ|PROT_WRITE, MAP_PRIVATE|MAP_FIXED|MAP_ANONYMOUS, -1, 0) = 0x3b4938e000 close(3) = 0 mmap(NULL, 4096, PROT_READ|PROT_WRITE, MAP_PRIVATE|MAP_ANONYMOUS, -1, 0) = 0x7f29b0de7000 mmap(NULL, 4096, PROT_READ|PROT_WRITE, MAP_PRIVATE|MAP_ANONYMOUS, -1, 0) = 0x7f29b0de6000 mmap(NULL, 4096, PROT_READ|PROT_WRITE, MAP_PRIVATE|MAP_ANONYMOUS, -1, 0) = 0x7f29b0de5000 ....
The strace command accepts a lot of arguments and have many options. Refer to man page for detailed information.
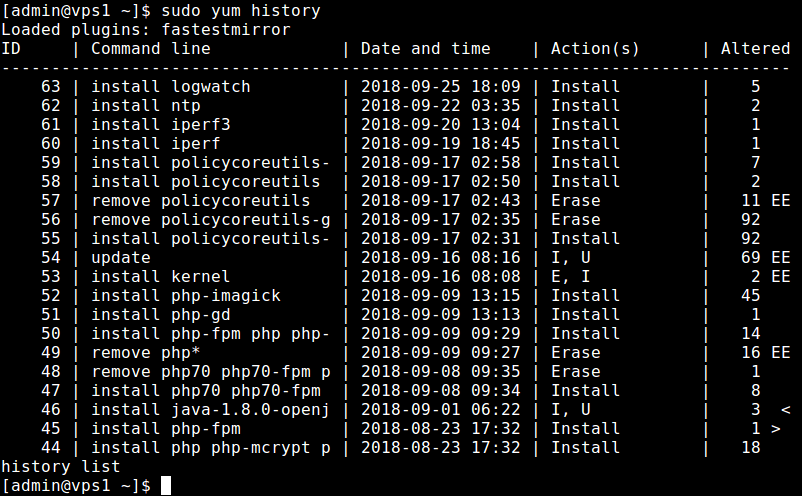
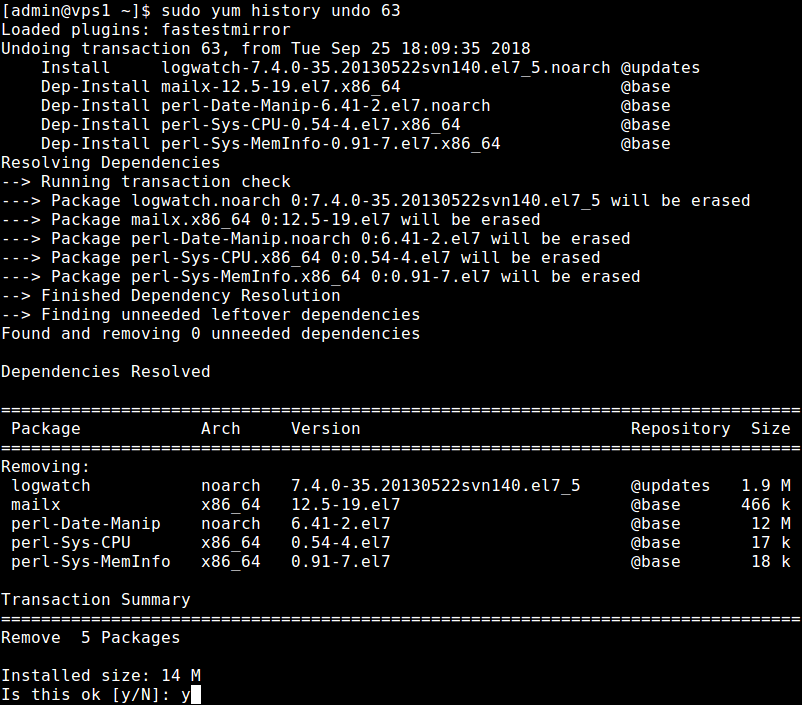
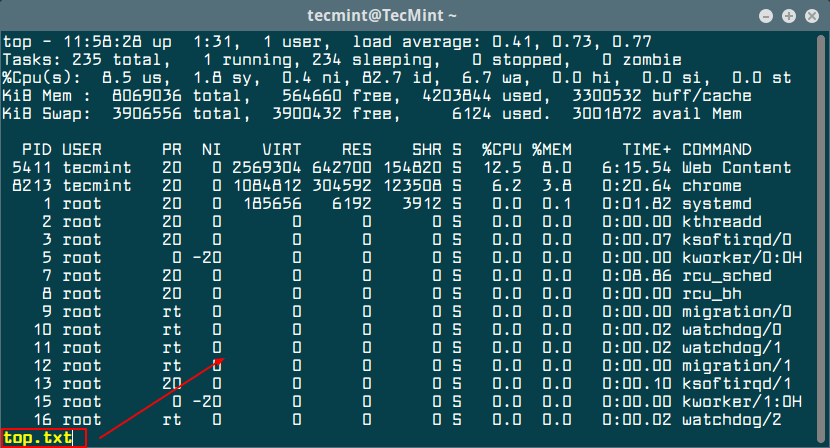
33. disown -a && exit Command
Most of the system administrators use screen command to control jobs running in the terminal background. Let’s say if you having a long running job and want to detach from the terminal, you use screen command to do it. But what if you don’t know how to use screen, here comes disown command to rescue.
The disown command is used to run the jobs continuously in the background even after you closing the terminal session. The syntax of the disown command is:
root@tecmint [~]# Command; disown -a && exit
To detach again the long running job in the terminal, use the jobs command to find the job number and then use disown %n where n is the job number. To verify actually the job is running use ps or top command. The nohupcommand is an alternative to the disown command.
34. getconf LONG_BIT Command
The above command shows your machine architecture if it is 32 bit or 64 bit?
root@tecmint [~]# getconf LONG_BIT

32
Download Linux Command Line Cheat Sheet
35. Display Date on the Terminal
The below command is a combination of several commands, better say it a script. For a person working at shell or terminal, without GUI seeing current system date is tedious job. You have to type ‘date‘ command to check today’s date.
Just execute the below command on you prompt and see the date and time on the above right corner of terminal.
root@tecmint [~]# while sleep 1;do tput sc;tput cup 0 $(($(tput cols)-29));date;tput rc;done &
Show Date in Terminal
36. convert Command
While writing tutorial, I usually need to produce output, many a times in image format. The above command combination does this for me. Say I need the output of tree command (for /etc/x11 directory) in image format. What I did at terminal was:
root@tecmint:/etc/X11# tree | convert label:@- /home/avi/tree.png
The output of the above command can be seen at the specified location (here, home directory of mine) with the file name specified as tree.png.
37. watch -t -n1 “date +%T|figlet”
Remember our description of “figlet” command in our earlier article “20 Funny Commands of Linux”. This command was very cool, this time we will be pipelining ‘figlet‘ to show animated digital clock in the terminal.
Just check-out yourself, remember you must have figlet installed on the system, do apt or yum to install the required package.
root@tecmint [~]# watch -t -n1 "date +%T|figlet"
Sample Output
 _  ___    ____   ___    _____ _  _                                                                                             Fri Nov 29 10:29:34 GMT
/ |/ _ \ _|___ \ / _ \ _|___ /| || |
| | | | (_) __) | (_) (_) |_ \| || |_
| | |_| |_ / __/ \__, |_ ___) |__   _|
|_|\___/(_)_____|  /_/(_)____/   |_|
38. host and dig Commands
Although “host” and “dig” command is not that much lesser known, still not very frequently used. The host command is DNS lookup utility.
root@tecmint [~]# host www.google.com

www.google.com has address 173.194.66.147
www.google.com has address 173.194.66.105
www.google.com has address 173.194.66.99
www.google.com has address 173.194.66.104
www.google.com has address 173.194.66.106
www.google.com has address 173.194.66.103
www.google.com has IPv6 address 2a00:1450:400c:c03::68
root@tecmint [~]# dig www.google.com

; <<>> DiG 9.8.2rc1-RedHat-9.8.2-0.17.rc1.el6_4.6 <<>> www.google.com
;; global options: +cmd
;; Got answer:
;; ->>HEADER<
39. dstat Command
The dstat is a versatile tool, that generates statistics relating to system resource. By default your system might not have ‘dstat‘ installed. Do a apt or yum to install ‘dstat‘ before using this very colorful and description system resource generator.
root@tecmint [~]# dstat
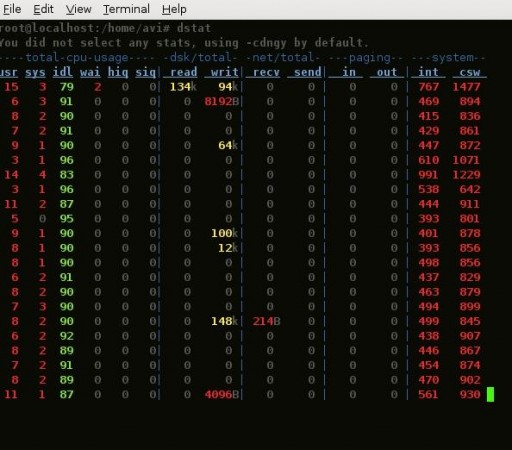
dstat command
40. bind -p Command
The ‘bind -p‘ command will show all the shortcuts available for BASH shell.
root@tecmint [~]# bind -p
Sample Output
"\C-g": abort
"\C-x\C-g": abort
"\e\C-g": abort
"\C-j": accept-line
"\C-m": accept-line
# alias-expand-line (not bound)
# arrow-key-prefix (not bound)
# backward-byte (not bound)
"\C-b": backward-char
"\eOD": backward-char
"\e[D": backward-char
"\e!": complete-command
"\e/": complete-filename
"\e@": complete-hostname
"\e{": complete-into-braces
"\e~": complete-username
"\e$": complete-variable
# copy-backward-word (not bound)
# copy-forward-word (not bound)
# copy-region-as-kill (not bound)
....
....
41. touch /forcefsck
The above command will create an empty folder ‘forcefsck‘, under root directory. This will force Linux System to check the file system on the very next boot.
root@tecmint [~]# touch /forcefsck
That’s all for Now. You People are loving these ‘Lesser Known Commands‘ and hence we are continuing the series, the next article of this series will be available very soon.
Till then stay tuned and connected to Tecmint. Don’t forget to give your valuable feedback in our comment section. Do a favor to us, Like and share us and help us spread.
10 Lesser Known Useful Linux Commands- Part V
After four highly appreciated and such a successful series of Articles on “Lesser Known Linux Commands” we are here presenting you the last article on this series, obviously not the least. The previous articles are:

Lesser Known Linux Commands
- 11 Lesser Known Useful Linux Commands – Part I
- 10 Lesser Known Linux Commands – Part II
- 10 Lesser Known Commands for Linux – Part III
- 10 Lesser Known Effective Linux Commands – Part IV
42. lsb_release
The command ‘lsb_release‘ print distribution-specific information. If lsb_release is not installed, you can apt ‘lsb-core‘ on Debian or yum ‘redhat-lsb‘ on Red Hat the package.
# lsb_release -a

LSB Version:    :base-4.0-ia32:base-4.0-noarch:core-4.0-ia32:core-4.0-noarch:graphics-4.0-ia32:
Distributor ID: CentOS
Description:    CentOS release 6.3 (Final)
Release:        6.3
Codename:       Final
Note: Option ‘-a‘, shows all the available information in respect of version, id, description, release and codename.
43. nc -zv localhost 80
Check if port 80 is open or not. We can replace ‘80‘ with any other port number to check if it is opened or closed.
$ nc -zv localhost 80

Connection to localhost 80 port [tcp/http] succeeded!
Check if port 8080 is open or not.
$ nc -zv localhost 8080

nc: connect to localhost port 8080 (tcp) failed: Connection refused
44. curl ipinfo.io
The below command will output the ‘Geographical Location‘ of the IP address, provided.
$ curl ipinfo.io

"ip": "xx.xx.xx.xx",
"hostname": "triband-del-aa.bbb.cc.ddd.bol.net.in",
"city": null,
"region": null,
"country": "IN",
"loc": "20,77",
"org": "AS17813 Mahanagar Telephone Nigam Ltd."
45. find . -user root
The below command output the files with respect of the user (root) owned files. All the files owned by user ‘root’ in the current directory.
# find . -user root

./.recently-used.xbel
./.mysql_history
./.aptitude
./.aptitude/config
./.aptitude/cache
./.bluefish
./.bluefish/session-2.0
./.bluefish/autosave
./.bash_history
All the files owned by user ‘avi‘ in the current directory.
# find . -user avi

./.cache/chromium/Cache/f_002b66
./.cache/chromium/Cache/f_001719
./.cache/chromium/Cache/f_001262
./.cache/chromium/Cache/f_000544
./.cache/chromium/Cache/f_002e40
./.cache/chromium/Cache/f_00119a
./.cache/chromium/Cache/f_0014fc
./.cache/chromium/Cache/f_001b52
./.cache/chromium/Cache/f_00198d
./.cache/chromium/Cache/f_003680
46. sudo apt-get build-dep ffmpeg
The below command will build the dependency, automatically during the corresponding package installation. Hence the process of package installation is very much fluent and easy.
# apt-get build-dep ffmpeg

libxinerama-dev libxml-namespacesupport-perl libxml-sax-expat-perl
libxml-sax-perl libxml-simple-perl libxrandr-dev libxrender-dev
x11proto-render-dev x11proto-xinerama-dev xulrunner-dev
The following packages will be upgraded:
libpixman-1-0
1 upgraded, 143 newly installed, 0 to remove and 6 not upgraded.
Need to get 205 MB of archives.
After this operation, 448 MB of additional disk space will be used.
Do you want to continue [Y/n]?
47. lsof -iTCP:80 -sTCP:LISTEN
The below command outputs, name of process/service using a specific port 80. To better understand run the following command on port 80, it will list all services/processes running on port.
root@localhost:/home/avi# lsof -iTCP:80 -sTCP:LISTEN

COMMAND PID USER FD TYPE DEVICE SIZE/OFF NODE NAME
apache2 1566 root 5u IPv6 5805 0t0 TCP *:www (LISTEN)
apache2 1664 www-data 5u IPv6 5805 0t0 TCP *:www (LISTEN)
apache2 1665 www-data 5u IPv6 5805 0t0 TCP *:www (LISTEN)
apache2 1666 www-data 5u IPv6 5805 0t0 TCP *:www (LISTEN)
apache2 1667 www-data 5u IPv6 5805 0t0 TCP *:www (LISTEN)
apache2 1668 www-data 5u IPv6 5805 0t0 TCP *:www (LISTEN)
Same way, you can also check the running services/processes of port 22.
root@localhost:/home/avi# lsof -iTCP:22 -sTCP:LISTEN

COMMAND PID USER FD TYPE DEVICE SIZE/OFF NODE NAME
sshd 2261 root 3u IPv4 8366 0t0 TCP *:ssh (LISTEN)
sshd 2261 root 4u IPv6 8369 0t0 TCP *:ssh (LISTEN)
48. find -size +100M
The find command lists all the files in the current directory above the specified size (here 100 MB), recursively.
# find -size +100M

./.local/share/Trash/files/linuxmint-15-cinnamon-dvd-32bit.iso
./Downloads/Fedora-Live-Desktop-i686-19-1.iso
./Downloads/Ant Videos/shakira 2.avi
./Downloads/Deewar.avi
./Desktop/101MSDCF/MOV02224.AVI
./Desktop/101MSDCF/MOV02020.AVI
./Desktop/101MSDCF/MOV00406.MP4
./Desktop/squeeze.iso
Listing all the files whose size if more than 1000 MB, within current directory, recursively.
root@localhost:/home/avi# find -size +1000M

./Downloads/The Dark Knight 2008 hindi BRRip 720p/The Dark Knight.mkv.part
./Downloads/Saudagar - (1991) - DVDRiP - x264 - AAC 5.1 - Chapters - Esubs - [DDR]/Saudagar
- (1991) - DVDRiP - x264 - AAC 5.1 - Chapters - Esubs - [DDR].mkv
./Downloads/Deewar.avi
./Desktop/squeeze.iso
49. pdftk
The pdftk command merges several pdf files into one. You must have installed pdftk program. If not, do apt or yum to get the required package.
$ pdftk 1.pdf 2.pdf 3.pdf …. 10.pdf cat output merged.pdf
50. ps -LF -u user_name
The below command outputs processes and threads of a user. The option “L” (list threads) and “-F” (Full Format Listing).
$ ps -LF -u avi

avi 21645 3717 21766 0 5 66168 117164 1 18:58 ? 00:00:00 /usr/
avi 21645 3717 21768 0 5 66168 117164 1 18:58 ? 00:00:00 /usr/
avi 22314 3717 22314 0 2 42797 50332 0 19:00 ? 00:00:40 /usr/
avi 22314 3717 22316 0 2 42797 50332 1 19:00 ? 00:00:00 /usr/
avi 22678 24621 22678 0 1 969 1060 1 21:05 pts/1 00:00:00 ps -L
avi 23051 3717 23051 0 2 37583 45444 1 19:03 ? 00:00:52 /usr/
avi 23051 3717 23053 0 2 37583 45444 0 19:03 ? 00:00:03 /usr/
avi 23652 1 23652 0 2 22092 12520 0 19:06 ? 00:00:22 gnome
avi 23652 1 23655 0 2 22092 12520 0 19:06 ? 00:00:00 gnome
51. Startx — :1
Sharing X session, means frequently logging in and out, this is where the Startx command comes to rescue. The command creates a new session thus no need to login and logout frequently from a session. In order to switch between the two X session, we need to switch between ‘ctrl+Alt+F7‘ and ‘ctrl+Alt+F8‘.
Note: The keys “ctrl+Alt+F1“, “ctrl+Alt+F6” is for console session, and “ctrl+Alt+F7“, “ctrl+Alt+F12” is for X session. Hence 6 console session and 6 X session, without frequent logging-in and out. The above sequence works on most of the distro, however different distro may have implemented it differently. I have checked it on Debian, and it works perfectly fine.
That’s all for now.
Source