How to Clone a Partition or Hard drive in Linux

There are many reasons why you may want to clone a Linux partition or even hard drive, most of which are related to creating backups of your data. There are multiple ways you can achieve this in Linux by using some external tools such as partimage or Clonezilla.

However in this tutorial we are going to review Linux disk cloning with tool called dd, which is most commonly used to convert or copy files and it comes pre-installed in most Linux distributions.

How to Clone Linux Partition

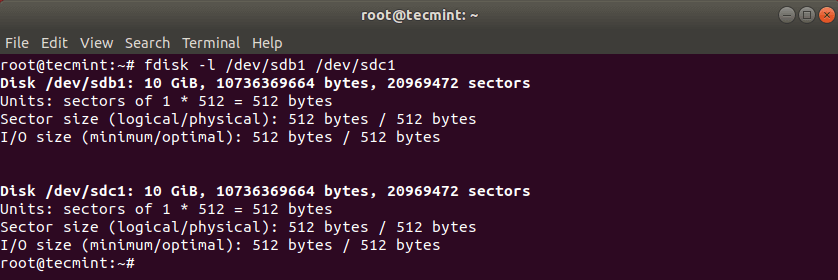
With dd command you can copy entire hard drive or just a Linux partition. Lets start with cloning one of our partitions. In my case I have the following drives: /dev/sdb/dev/sdc.. I will clone /dev/sdb1/ to /dev/sdc1.

Read AlsoHow to Clone Linux Partitions Using ‘cat’ Command

First list the these partitions using the fdisk command as shown.

# fdisk -l /dev/sdb1/ /dev/sdc1

List Linux Partitions

List Linux Partitions

Now clone a partition /dev/sdb1/ to /dev/sdc1 using the following dd command.

# dd if=/dev/sdb1  of=/dev/sdc1 

The above command tells dd to use /dev/sdb1 as input file and write it to output file /dev/sdc1.

Clone Linux Partition with dd Command

Clone Linux Partition with dd Command

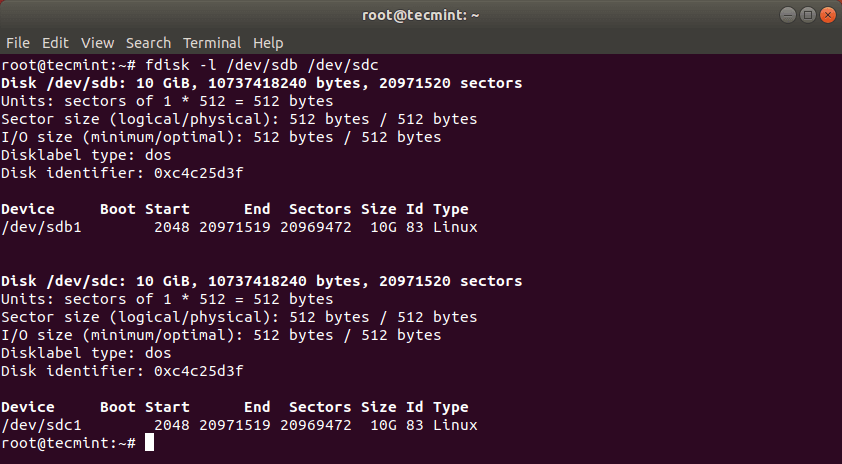
After cloning Linux partition, you can then check both partitions with:

# fdisk -l /dev/sdb1 /dev/sdc1

Verify Linux Partition Cloning

Verify Linux Partition Cloning

How to Clone Linux Hard Drive

Cloning a Linux hard drive is similar to cloning a partition. However, instead of specifying the partition, you just use the entire drive. Note that in this case it is recommended that the hard drive is same in size (or bigger) than the source drive.

# dd if=/dev/sdb of=/dev/sdc

Clone Hard Drive in Linux

Clone Hard Drive in Linux

This should have copied the drive /dev/sdb with its partitions on the target hard drive /dev/sdc. You can verify the changes by listing both drives with fdisk command.

# fdisk -l /dev/sdb /dev/sdc

Verify Linux Hard Drive Cloning

Verify Linux Hard Drive Cloning

How to Backup MBR in Linux

dd command can also be used to backup your MBR, which is located at the first sector of the device, before the first partition. So if you want to create backup of your MBR, simply run:

# dd if=/dev/sda of=/backup/mbr.img bs=512 count=1. 

The above command tells dd to copy /dev/sda to /backup/mbr.img with step of 512 bytes and the count option tells to copy only 1 block. In other words you tell dd to copy the first 512 bytes from /dev/sda to the file you have provided.

Backup MBR in Linux

Backup MBR in Linux

That’s all! dd command is a powerful Linux tool that should be used with caution when copying or cloning Linux partitions or drives.

Source

12 Practical Examples of Linux grep Command

Have you ever been confronted with the task of looking for a particular string or pattern in a file, yet have no idea where to start looking? Well then, here is grep to the rescue!

Grep Command Examples

12 Grep Command Examples

grep is a powerful file pattern searcher that comes equipped on every distribution of Linux. If, for whatever reason, it is not installed on your system, you can easily install it via your package manager (apt-get on Debian/Ubuntu and yum on RHEL/CentOS/Fedora).

$ sudo apt-get install grep         #Debian/Ubuntu
$ sudo yum install grep             #RHEL/CentOS/Fedora

I have found that the easiest way to get your feet wet with grep is to just dive right in and use some real world examples.

1. Search and Find Files

Let’s say that you have just installed a fresh copy of the new Ubuntu on your machine, and that you are going to give Python scripting a shot. You have been scouring the web looking for tutorials, but you see that there are two different versions of Python in use, and you don’t know which one was installed on your system by the Ubuntu installer, or if it installed any modules. Simply run this command:

# dpkg -l | grep -i python
Sample Output
ii  python2.7                        2.7.3-0ubuntu3.4                    Interactive high-level object-oriented language (version 2.7)
ii  python2.7-minimal                2.7.3-0ubuntu3.4                    Minimal subset of the Python language (version 2.7)
ii  python-openssl                   0.12-1ubuntu2.1                     Python wrapper around the OpenSSL library
ii  python-pam                       0.4.2-12.2ubuntu4                   A Python interface to the PAM library

First, we ran dpkg –l, which lists installed *.deb packages on your system. Second, we piped that output to grep –i python, which simple states “go to grep and filter out and return everything with ‘python’ in it.” The –i option is there to ignore-case, as grep is case-sensitive. Using the –i option is a good habit of getting into, unless of course you are trying to nail down a more specific search.

2. Search and Filter Files

The grep can also be used to search and filter within individual files or multiple files. Lets take this scenario:

You are having some trouble with your Apache Web Server, and you have reached out to one of the many awesome forums on the net asking for some help. The kind soul who replies to you has asked you to post the contents of your /etc/apache2/sites-available/default-ssl file. Wouldn’t it be easier for you, the guy helping you, and everyone reading it, if you could remove all of the commented lines? Well you can! Just run this:

# grep –v “#”  /etc/apache2/sites-available/default-ssl

The –v option tells grep to invert its output, meaning that instead of printing matching lines, do the opposite and print all of the lines that don’t match the expression, in this case, the # commented lines.

3. Find all .mp3 Files Only

The grep can be very useful for filtering from stdout. For example, let’s say that you have an entire folder full of music files in a bunch of different formats. You want to find all of the *.mp3 files from the artist JayZ, but you don’t want any of the remixed tracks. Using a find command with a couple of grep pipes will do the trick:

# find . –name “*.mp3” | grep –i JayZ | grep –vi “remix”

In this example, we are using find to print all of the files with a *.mp3 extension, piping it to grep –i to filter out and prints all files with the name “JayZ” and then another pipe to grep –vi which filters out and does not print all filenames with the string (in any case) “remix”.

Suggested Read: 35 Practical Examples of Linux Find Command

4. Display Number of Lines Before or After Search String

Another couple of options are the –A and –B switches, which displays the matched line and number of lines either that come before or after the search string. While the man page gives a more detailed explanation, I find it easiest to remember the options as –A = after, and –B = before:

# ifconfig | grep –A 4 eth0
# ifconfig | grep  -B 2 UP

5. Prints Number of Lines Around Match

The grep’s –C option is similar, but instead of printing the lines that come either before or after the string, it prints the lines in either direction:

# ifconfig | grep –C 2 lo

6. Count Number of Matches

Similar to piping a grep string to word count (wc program) grep’s built-in option can perform the same for you:

# ifconfig | grep –c inet6

7. Search Files by Given String

The –n option for grep is very useful when debugging files during compile errors. It displays the line number in the file of the given search string:

# grep –n “main” setup..py

8. Search a string Recursively in all Directories

If you would like to search for a string in the current directory along with all of the subdirectories, you can specify the –r option to search recursively:

# grep –r “function” *

9. Searches for the entire pattern

Passing the –w option to grep searches for the entire pattern that is in the string. For example, using:

# ifconfig | grep –w “RUNNING”

Will print out the line containing the pattern in quotes. On the other hand, if you try:

# ifconfig | grep –w “RUN”

Nothing will be returned as we are not searching for a pattern, but an entire word.

10. Search a string in Gzipped Files

Deserving some mention are grep’s derivatives. The first is zgrep, which, similar to zcat, is for use on gzippedfiles. It takes the same options as grep and is used in the same way:

# zgrep –i error /var/log/syslog.2.gz

11. Match Regular Expression in Files

The egrep is another derivative that stands for “Extended Global Regular Expression”. It recognizes additional expression meta-characters such at + ? | and ().

Suggested Read: What’s Difference Between Grep, Egrep and Fgrep in Linux?

egrep is very useful for searching source files, and other pieces of code, should the need arise. It can be invoked from regular grep by specifying the –E option.

# grep –E

12. Search a Fixed Pattern String

The fgrep searches a file or list of files for a fixed pattern string. It is the same as grep –F. A common way of using fgrep is to pass a file of patterns to it:

# fgrep –f file_full_of_patterns.txt file_to_search.txt

This is just a starting point with grep, but as you are probably able to see, it is invaluable for a variety of purposes. Aside from the simple one line commands we have implemented, grep can be used to write powerful cron jobs, and robust shell scripts, for a start.

Suggested Read: 11 ‘Grep’ Commands on Character Classes and Bracket Expressions

Be creative, experiment with the options in the man page, and come up with grep expressions that serve your own purposes!

Source

18 Tar Command Examples in Linux

The Linux “tar” stands for tape archive, which is used by large number of Linux/Unix system administrators to deal with tape drives backup. The tar command used to rip a collection of files and directories into highly compressed archive file commonly called tarball or targzip and bzip in Linux. The tar is most widely used command to create compressed archive files and that can be moved easily from one disk to another disk or machine to machine.

Linux Tar Command Examples

Linux Tar Command Examples

In this article we will be going to review and discuss various tar command examples including how to create archive files using (tartar.gz and tar.bz2) compression, how to extract archive file, extract a single file, view content of file, verify a file, add files or directories to archive file, estimate the size of tar archive file, etc.

The main purpose of this guide is to provide various tar command examples that might be helpful for you to understand and become expert in tar archive manipulation.

1. Create tar Archive File

The below example command will create a tar archive file tecmint-14-09-12.tar for a directory /home/tecmint in current working directory. See the example command in action.

# tar -cvf tecmint-14-09-12.tar /home/tecmint/

/home/tecmint/
/home/tecmint/cleanfiles.sh
/home/tecmint/openvpn-2.1.4.tar.gz
/home/tecmint/tecmint-14-09-12.tar
/home/tecmint/phpmyadmin-2.11.11.3-1.el5.rf.noarch.rpm
/home/tecmint/rpmforge-release-0.5.2-2.el5.rf.i386.rpm

Let’s discuss each option that we have used in the above command for creating a tar archive file.

  1. c – Creates a new .tar archive file.
  2. v – Verbosely show the .tar file progress.
  3. f – File name type of the archive file.

2. Create tar.gz Archive File

To create a compressed gzip archive file we use the option as z. For example the below command will create a compressed MyImages-14-09-12.tar.gz file for the directory /home/MyImages. (Note : tar.gz and tgz both are similar).

# tar cvzf MyImages-14-09-12.tar.gz /home/MyImages
OR
# tar cvzf MyImages-14-09-12.tgz /home/MyImages

/home/MyImages/
/home/MyImages/Sara-Khan-and-model-Priyanka-Shah.jpg
/home/MyImages/RobertKristenviolent101201.jpg
/home/MyImages/Justintimerlake101125.jpg
/home/MyImages/Mileyphoto101203.jpg
/home/MyImages/JenniferRobert101130.jpg
/home/MyImages/katrinabarbiedoll231110.jpg
/home/MyImages/the-japanese-wife-press-conference.jpg
/home/MyImages/ReesewitherspoonCIA101202.jpg
/home/MyImages/yanaguptabaresf231110.jpg

3. Create tar.bz2 Archive File

The bz2 feature compress and create archive file less than the size of the gzip. The bz2 compression takes more time to compress and decompress files as compared to gzip which takes less time. To create highly compressed tar file we use option as j. The following example command will create a Phpfiles-org.tar.bz2 file for a directory /home/php. (Note: tar.bz2 and tbz is similar as tb2).

# tar cvfj Phpfiles-org.tar.bz2 /home/php
OR
# tar cvfj Phpfiles-org.tar.tbz /home/php
OR 
# tar cvfj Phpfiles-org.tar.tb2 /home/php

/home/php/
/home/php/iframe_ew.php
/home/php/videos_all.php
/home/php/rss.php
/home/php/index.php
/home/php/vendor.php
/home/php/video_title.php
/home/php/report.php
/home/php/object.html
/home/php/video.php

4. Untar tar Archive File

To untar or extract a tar file, just issue following command using option x (extract). For example the below command will untar the file public_html-14-09-12.tar in present working directory. If you want to untar in a different directory then use option as -C (specified directory).

## Untar files in Current Directory ##
# tar -xvf public_html-14-09-12.tar

## Untar files in specified Directory ##
# tar -xvf public_html-14-09-12.tar -C /home/public_html/videos/

/home/public_html/videos/
/home/public_html/videos/views.php
/home/public_html/videos/index.php
/home/public_html/videos/logout.php
/home/public_html/videos/all_categories.php
/home/public_html/videos/feeds.xml

5. Uncompress tar.gz Archive File

To Uncompress tar.gz archive file, just run following command. If would like to untar in different directory just use option -C and the path of the directory,  like we shown in the above example.

# tar -xvf thumbnails-14-09-12.tar.gz

/home/public_html/videos/thumbnails/
/home/public_html/videos/thumbnails/katdeepika231110.jpg
/home/public_html/videos/thumbnails/katrinabarbiedoll231110.jpg
/home/public_html/videos/thumbnails/onceuponatime101125.jpg
/home/public_html/videos/thumbnails/playbutton.png
/home/public_html/videos/thumbnails/ReesewitherspoonCIA101202.jpg
/home/public_html/videos/thumbnails/snagItNarration.jpg
/home/public_html/videos/thumbnails/Minissha-Lamba.jpg
/home/public_html/videos/thumbnails/Lindsaydance101201.jpg
/home/public_html/videos/thumbnails/Mileyphoto101203.jpg

6. Uncompress tar.bz2 Archive File

To Uncompress highly compressed tar.bz2 file, just use the following command. The below example command will untar all the .flv files from the archive file.

# tar -xvf videos-14-09-12.tar.bz2

/home/public_html/videos/flv/katrinabarbiedoll231110.flv
/home/public_html/videos/flv/BrookmuellerCIA101125.flv
/home/public_html/videos/flv/dollybackinbb4101125.flv
/home/public_html/videos/flv/JenniferRobert101130.flv
/home/public_html/videos/flv/JustinAwardmovie101125.flv
/home/public_html/videos/flv/Lakme-Fashion-Week.flv
/home/public_html/videos/flv/Mileyphoto101203.flv
/home/public_html/videos/flv/Minissha-Lamba.flv

7. List Content of tar Archive File

To list the contents of tar archive file, just run the following command with option t (list content). The below command will list the content of uploadprogress.tar file.

# tar -tvf uploadprogress.tar

-rw-r--r-- chregu/staff   2276 2011-08-15 18:51:10 package2.xml
-rw-r--r-- chregu/staff   7877 2011-08-15 18:51:10 uploadprogress/examples/index.php
-rw-r--r-- chregu/staff   1685 2011-08-15 18:51:10 uploadprogress/examples/server.php
-rw-r--r-- chregu/staff   1697 2011-08-15 18:51:10 uploadprogress/examples/info.php
-rw-r--r-- chregu/staff    367 2011-08-15 18:51:10 uploadprogress/config.m4
-rw-r--r-- chregu/staff    303 2011-08-15 18:51:10 uploadprogress/config.w32
-rw-r--r-- chregu/staff   3563 2011-08-15 18:51:10 uploadprogress/php_uploadprogress.h
-rw-r--r-- chregu/staff  15433 2011-08-15 18:51:10 uploadprogress/uploadprogress.c
-rw-r--r-- chregu/staff   1433 2011-08-15 18:51:10 package.xml

8. List Content tar.gz Archive File

Use the following command to list the content of tar.gz file.

# tar -tvf staging.tecmint.com.tar.gz

-rw-r--r-- root/root         0 2012-08-30 04:03:57 staging.tecmint.com-access_log
-rw-r--r-- root/root       587 2012-08-29 18:35:12 staging.tecmint.com-access_log.1
-rw-r--r-- root/root       156 2012-01-21 07:17:56 staging.tecmint.com-access_log.2
-rw-r--r-- root/root       156 2011-12-21 11:30:56 staging.tecmint.com-access_log.3
-rw-r--r-- root/root       156 2011-11-20 17:28:24 staging.tecmint.com-access_log.4
-rw-r--r-- root/root         0 2012-08-30 04:03:57 staging.tecmint.com-error_log
-rw-r--r-- root/root      3981 2012-08-29 18:35:12 staging.tecmint.com-error_log.1
-rw-r--r-- root/root       211 2012-01-21 07:17:56 staging.tecmint.com-error_log.2
-rw-r--r-- root/root       211 2011-12-21 11:30:56 staging.tecmint.com-error_log.3
-rw-r--r-- root/root       211 2011-11-20 17:28:24 staging.tecmint.com-error_log.4

9. List Content tar.bz2 Archive File

To list the content of tar.bz2 file, issue the following command.

# tar -tvf Phpfiles-org.tar.bz2

drwxr-xr-x root/root         0 2012-09-15 03:06:08 /home/php/
-rw-r--r-- root/root      1751 2012-09-15 03:06:08 /home/php/iframe_ew.php
-rw-r--r-- root/root     11220 2012-09-15 03:06:08 /home/php/videos_all.php
-rw-r--r-- root/root      2152 2012-09-15 03:06:08 /home/php/rss.php
-rw-r--r-- root/root      3021 2012-09-15 03:06:08 /home/php/index.php
-rw-r--r-- root/root      2554 2012-09-15 03:06:08 /home/php/vendor.php
-rw-r--r-- root/root       406 2012-09-15 03:06:08 /home/php/video_title.php
-rw-r--r-- root/root      4116 2012-09-15 03:06:08 /home/php/report.php
-rw-r--r-- root/root      1273 2012-09-15 03:06:08 /home/php/object.html

10. Untar Single file from tar File

To extract a single file called cleanfiles.sh from cleanfiles.sh.tar use the following command.

# tar -xvf cleanfiles.sh.tar cleanfiles.sh
OR
# tar --extract --file=cleanfiles.sh.tar cleanfiles.sh

cleanfiles.sh

11. Untar Single file from tar.gz File

To extract a single file tecmintbackup.xml from tecmintbackup.tar.gz archive file, use the command as follows.

# tar -zxvf tecmintbackup.tar.gz tecmintbackup.xml
OR
# tar --extract --file=tecmintbackup.tar.gz tecmintbackup.xml

tecmintbackup.xml

12. Untar Single file from tar.bz2 File

To extract a single file called index.php from the file Phpfiles-org.tar.bz2 use the following option.

# tar -jxvf Phpfiles-org.tar.bz2 home/php/index.php
OR
# tar --extract --file=Phpfiles-org.tar.bz2 /home/php/index.php

/home/php/index.php

13. Untar Multiple files from tar, tar.gz and tar.bz2 File

To extract or untar multiple files from the tartar.gz and tar.bz2 archive file. For example the below command will extract “file 1” “file 2” from the archive files.

# tar -xvf tecmint-14-09-12.tar "file 1" "file 2" 

# tar -zxvf MyImages-14-09-12.tar.gz "file 1" "file 2" 

# tar -jxvf Phpfiles-org.tar.bz2 "file 1" "file 2"

14. Extract Group of Files using Wildcard

To extract a group of files we use wildcard based extracting. For example, to extract a group of all files whose pattern begins with .php from a tar, tar.gz and tar.bz2 archive file.

# tar -xvf Phpfiles-org.tar --wildcards '*.php'

# tar -zxvf Phpfiles-org.tar.gz --wildcards '*.php'

# tar -jxvf Phpfiles-org.tar.bz2 --wildcards '*.php'

/home/php/iframe_ew.php
/home/php/videos_all.php
/home/php/rss.php
/home/php/index.php
/home/php/vendor.php
/home/php/video_title.php
/home/php/report.php
/home/php/video.php

15. Add Files or Directories to tar Archive File

To add files or directories to existing tar archived file we use the option r (append). For example we add file xyz.txt and directory php to existing tecmint-14-09-12.tar archive file.

# tar -rvf tecmint-14-09-12.tar xyz.txt

# tar -rvf tecmint-14-09-12.tar php

drwxr-xr-x root/root         0 2012-09-15 02:24:21 home/tecmint/
-rw-r--r-- root/root  15740615 2012-09-15 02:23:42 home/tecmint/cleanfiles.sh
-rw-r--r-- root/root    863726 2012-09-15 02:23:41 home/tecmint/openvpn-2.1.4.tar.gz
-rw-r--r-- root/root  21063680 2012-09-15 02:24:21 home/tecmint/tecmint-14-09-12.tar
-rw-r--r-- root/root   4437600 2012-09-15 02:23:41 home/tecmint/phpmyadmin-2.11.11.3-1.el5.rf.noarch.rpm
-rw-r--r-- root/root     12680 2012-09-15 02:23:41 home/tecmint/rpmforge-release-0.5.2-2.el5.rf.i386.rpm
-rw-r--r-- root/root 0 2012-08-18 19:11:04 xyz.txt
drwxr-xr-x root/root 0 2012-09-15 03:06:08 php/ 
-rw-r--r-- root/root 1751 2012-09-15 03:06:08 php/iframe_ew.php 
-rw-r--r-- root/root 11220 2012-09-15 03:06:08 php/videos_all.php 
-rw-r--r-- root/root 2152 2012-09-15 03:06:08 php/rss.php 
-rw-r--r-- root/root 3021 2012-09-15 03:06:08 php/index.php 
-rw-r--r-- root/root 2554 2012-09-15 03:06:08 php/vendor.php 
-rw-r--r-- root/root 406 2012-09-15 03:06:08 php/video_title.php

16. Add Files or Directories to tar.gz and tar.bz2 files

The tar command don’t have a option to add files or directories to an existing compressed tar.gz and tar.bz2archive file. If we do try will get the following error.

# tar -rvf MyImages-14-09-12.tar.gz xyz.txt

# tar -rvf Phpfiles-org.tar.bz2 xyz.txt

tar: This does not look like a tar archive
tar: Skipping to next header
xyz.txt
tar: Error exit delayed from previous errors

17. How To Verify tar, tar.gz and tar.bz2 Archive File

To verfify any tar or compressed archived file we use option as W (verify). To do, just use the following examples of command. (Note : You cannot do verification on a compressed ( *.tar.gz, *.tar.bz2 ) archive file).

# tar tvfW tecmint-14-09-12.tar

tar: This does not look like a tar archive
tar: Skipping to next header
tar: Archive contains obsolescent base-64 headers
tar: VERIFY FAILURE: 30740 invalid headers detected
Verify -rw-r--r-- root/root    863726 2012-09-15 02:23:41 /home/tecmint/openvpn-2.1.4.tar.gz
Verify -rw-r--r-- root/root  21063680 2012-09-15 02:24:21 /home/tecmint/tecmint-14-09-12.tar
tar: /home/tecmint/tecmint-14-09-12.tar: Warning: Cannot stat: No such file or directory
Verify -rw-r--r-- root/root   4437600 2012-09-15 02:23:41 home/tecmint/phpmyadmin-2.11.11.3-1.el5.rf.noarch.rpm
tar: /home/tecmint/phpmyadmin-2.11.11.3-1.el5.rf.noarch.rpm: Warning: Cannot stat: No such file or directory
Verify -rw-r--r-- root/root     12680 2012-09-15 02:23:41 home/tecmint/rpmforge-release-0.5.2-2.el5.rf.i386.rpm
tar: /home/tecmint/rpmforge-release-0.5.2-2.el5.rf.i386.rpm: Warning: Cannot stat: No such file or directory
Verify -rw-r--r-- root/root         0 2012-08-18 19:11:04 xyz.txt
Verify drwxr-xr-x root/root         0 2012-09-15 03:06:08 php/

18. Check the Size of the tar, tar.gz and tar.bz2 Archive File

To check the size of any tartar.gz and tar.bz2 archive file, use the following command. For example the below command will display the size of archive file in Kilobytes (KB).

# tar -czf - tecmint-14-09-12.tar | wc -c
12820480

# tar -czf - MyImages-14-09-12.tar.gz | wc -c
112640

# tar -czf - Phpfiles-org.tar.bz2 | wc -c
20480

Tar Usage and Options

  1. c – create a archive file.
  2. x – extract a archive file.
  3. v – show the progress of archive file.
  4. f – filename of archive file.
  5. t – viewing content of archive file.
  6. j – filter archive through bzip2.
  7. z – filter archive through gzip.
  8. r – append or update files or directories to existing archive file.
  9. W – Verify a archive file.
  10. wildcards – Specify patterns in unix tar command.

That’s it for now, hope the above tar command examples are enough for you to learn and for more information please use man tar command.

If you are looking to split any large tar archive file into multiple parts or blocks, just go through this article:

Don’t Miss: Split Large ‘tar’ Archive into Multiple Files of Certain Size

If we’ve missed any example please do share with us via comment box and please don’t forget to share this article with your friends. This is the best way to say thanks…..

Source

Learn How to Use ‘dir’ Command with Different Options and Arguments in Linux

This article shows some examples of using the dir command to list the contents of a directory. The dircommand is not a commonly used command in Linux. Though it works more less like the ls command which most Linux users prefer to use. We’ll be discussing the dir command where we shall look at how to use different options and arguments.

dir Command Usage in Linux

dir Command Usage in Linux

The general syntax of the dir command is as follows.

# dir [OPTION] [FILE]

dir Command Syntax

dir Command Syntax

dir Command Usage with Examples

Simple output of the dir command

# dir /

dir Command Output

dir Command Output

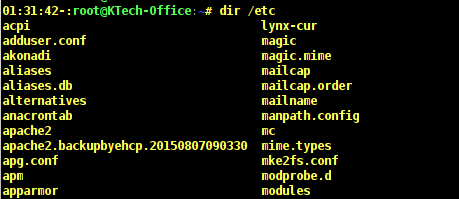
Output of the dir command with the /etc directory file is as follows. As you can see from the output not all files in the /etc directory are listed.

# dir /etc

List /etc Directory

List /etc Directory

To list one file per line use -1 option as follows.

# dir
# dir -1

List Files per Line

List Files per Line

View all files in a directory including hidden files

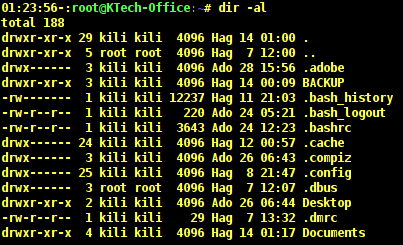
To list all files in a directory including . (hidden) files, use the -a option. You can include the -l option to format output as a list.

# dir -a
# dir -al

List Hidden Files

List Hidden Files

Long List Hidden Files

Long List Hidden Files

View directory entries instead of content

When you need to list only directory entries instead of directory content, you can use the -d option. In the output below, the option -d lists entries for the /etc directory.

When you use -dl, it shows a long listing of the directory including owner, group owner, permissions.

# dir -d /etc
# dir -dl /etc

Long List /etc Directory

Long List /etc Directory

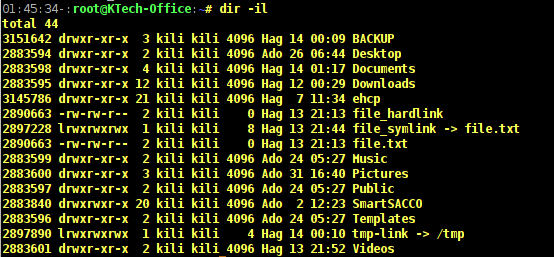
View index number of files

In case you want to view the index number of each file, use the option -i. From the output below, you can see that first column shows numbers. These numbers are called inodes which are sometimes referred to as index nodes or index numbers.

An inode in Linux systems is a data storage on a filesystem that stores information about a file except the filename and its actual data.

# dir -il

List Index Number of Files

List Index Number of Files

List files and their allocated sizes in blocks

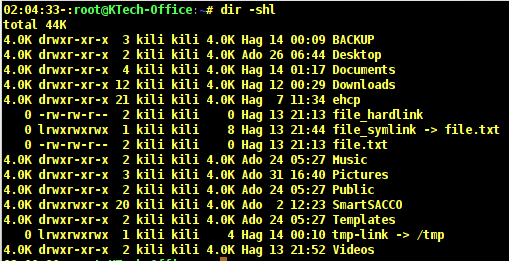
You can view files sizes using the -s option. If you need to sort the files according to size, then use the -S option.

In this case you need to also use the -h option to view the files sizes in a human-readable format.

# dir -shl

List Files with Sizes

List Files with Sizes

In the output above, the first column shows the size of files in Kilobytes. The output below shows a sorted list of files according to their sizes by using the -S option.

# dir -ashlS /home/kone

Sort Files with Sizes

Sort Files with Sizes

You can also sort by modification time, with the file that has recently been modified appearing first on the list. This can be done using the -t option.

# dir -ashlt /home/kone

Sort Files by Modification Time

Sort Files by Modification Time

List files without owner or group owner

To list files without their owners, you have to use -g option which works like the -l option only that it does not print out the file owner. And to list files without group owner use the -G option as follows.

# dir -ahgG /home/kone

List Files without Owner

List Files without Owner

As you can notice from the output above that the name of the file owner and the group owner are not printed. You can as well view the author of a file by using the –author flag as follows.

# dir -al --author /home/kone

View Author of Files

View Author of Files

In the output above, the fifth column shows the name of the author of a file. The examples.desktop files is owned by user kone, belongs to group kili and it was authored by user kone.

List directories before other files

You may wish to view directories before all other files and this can be done by using the –group-directories-firstflag as follows.

# dir -l --group-directories-first

List Group Directory Files

List Group Directory Files

When you observe the output above, you can see that all the directories are listed before the regular files. The letter d before the permissions indicates a directory and a indicates a regular file.

You can also view subdirectories recursively, meaning that you can list all other subdirectories in a directory using the -R option as follows.

# dir -R

List Directories Recursively

List Directories Recursively

In the above output, the (.) sign means the current directory and home directory of user Kone has three subdirectories that is Backupdir and Docs.

The Backup subdirectory has two other subdirectories that is mariadb and mysql which have no subdirectories.

The dir subdirectory does not have any subdirectory. And the Docs subdirectory has two subdirectories namely Books and Tuts which do not have subdirectories.

View user and group IDs instead of names

To view user and group IDs, you need to use -n option. Let us observe the difference between the next two outputs.

Output without -n option.

# dir -l --author

List Files Without ID's

List Files Without ID’s

Output with -n option.

# dir -nl --author

List Files with ID's

List Files with ID’s

View entries separated by commas

This can be archived by using -m option.

# dir -am

List Entries by Comma

List Entries by Comma

To find help in using the dir command use –help flag and to view version details of dir use –version.

Conclusion

These are just examples of basic usage of the dir command, to use many other options see the manual entry for dir command on your system.

Source

5 Interesting Command Line Tips and Tricks in Linux

Are you making most out of the Linux? There are lots of helpful features which appears to be Tips and Tricks for many of Linux Users. Sometimes Tips and Tricks become the need. It helps you get productive with the same set of commands yet with enhanced functionality.

5 Command Line Tips and Tricks

5 Command Line Tips and Tricks

Here we are starting a new series, where we will be writing some tips and tricks and will try to yield as more as we can in small time.

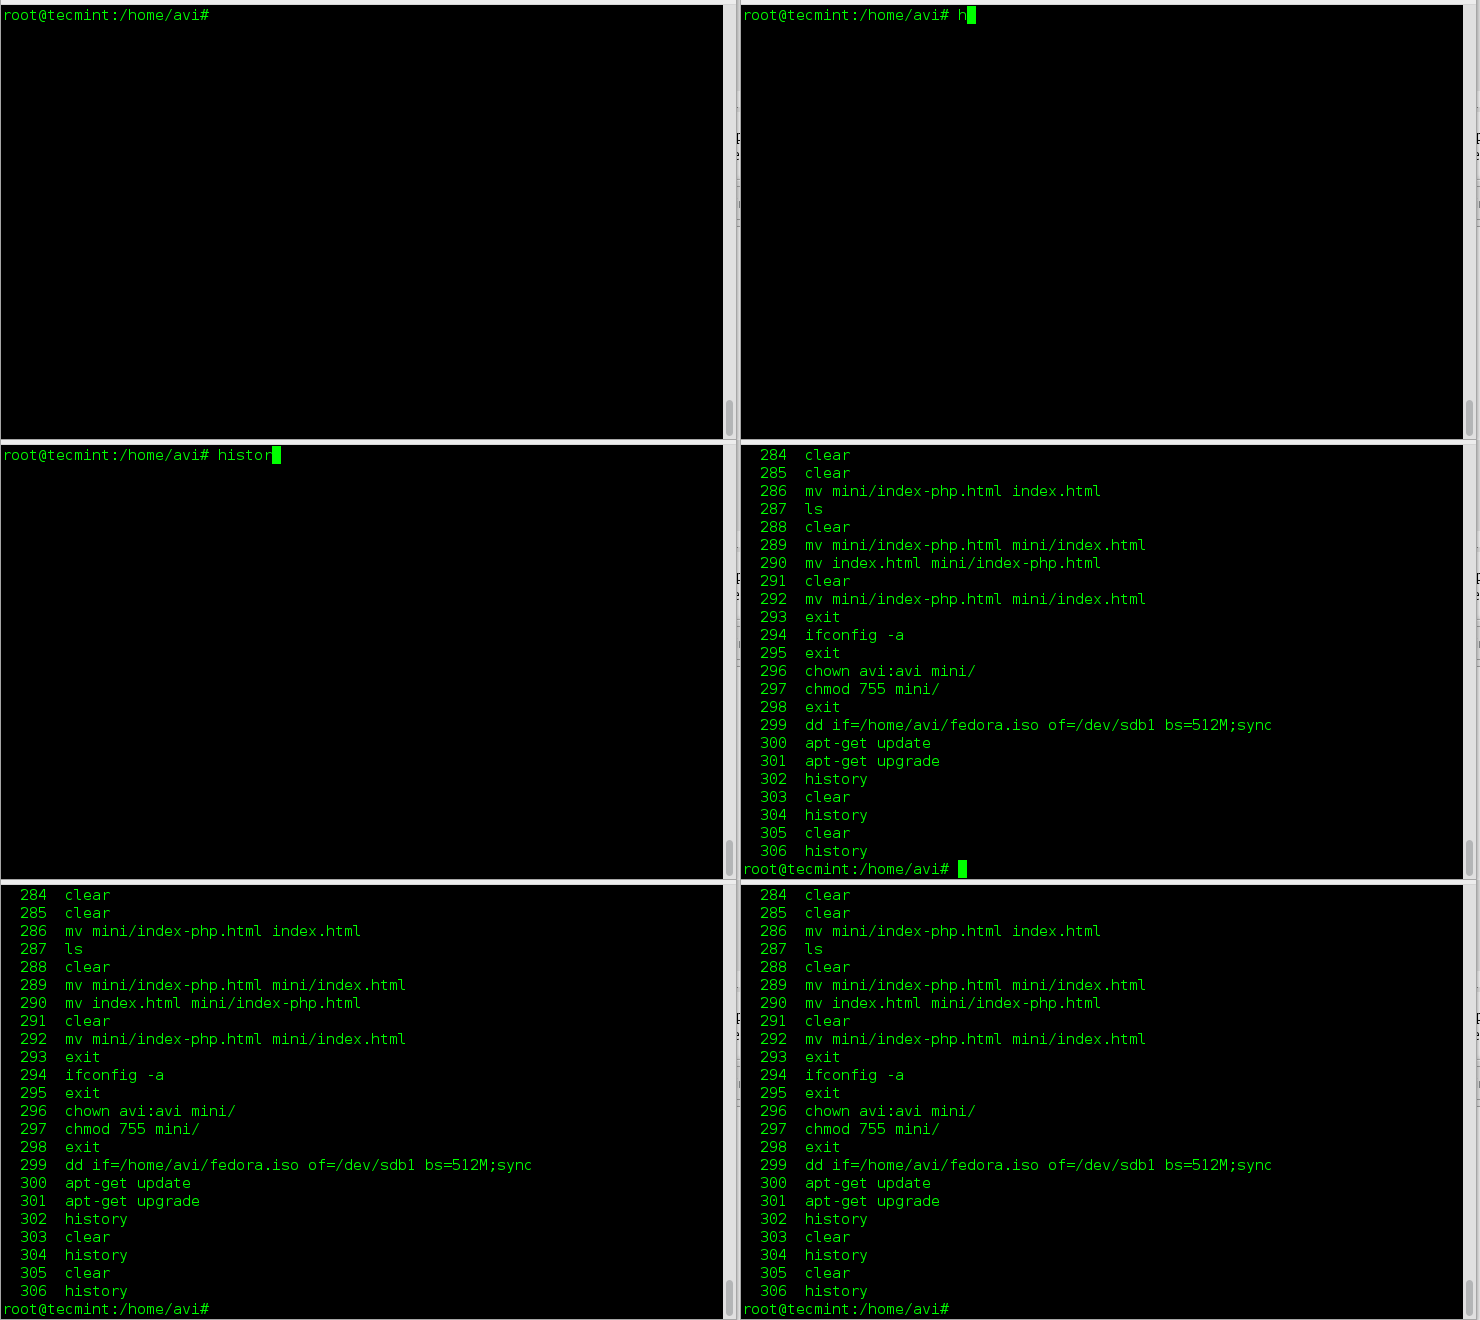
1. To audit the commands we’d run in past, we use history command. Here is a sample output of history command.

# history

Linux history Command Usage

history command example

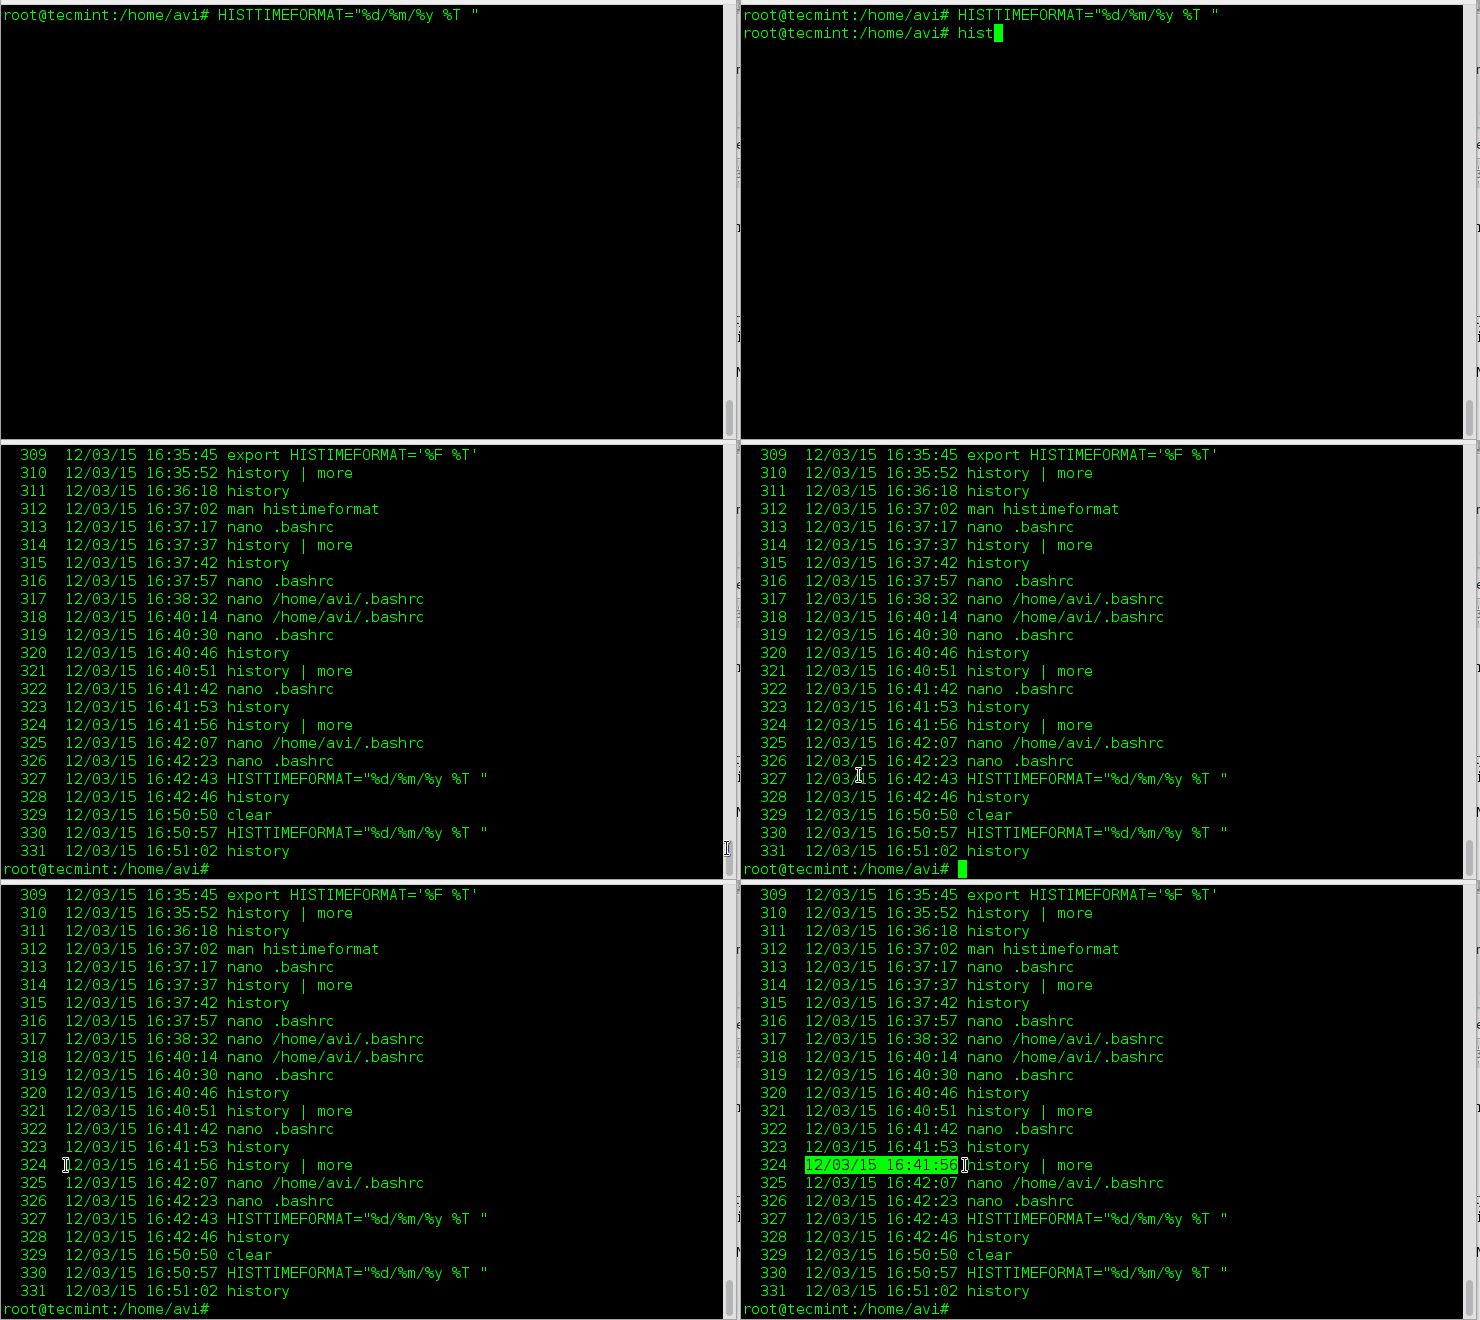
Obvious from output, the history command do not output the time stamp with the log of last executed commands. Any solution for this? Yeah! Run the below command.

# HISTTIMEFORMAT="%d/%m/%y %T "
# history

If you want to permanently append this change, add the below line to ~/.bashrc.

export HISTTIMEFORMAT="%d/%m/%y %T "

and then, from terminal run,

# source ~/.bashrc

Explanation of commands and switches.

  1. history – GNU History Library
  2. HISTIMEFORMAT – Environmental Variable
  3. %d – Day
  4. %m – Month
  5. %y – Year
  6. %T – Time Stamp
  7. source – in short send the contents of file to shell
  8. .bashrc – is a shell script that BASH runs whenever it is started interactively.

history Command Logs

history Command Logs

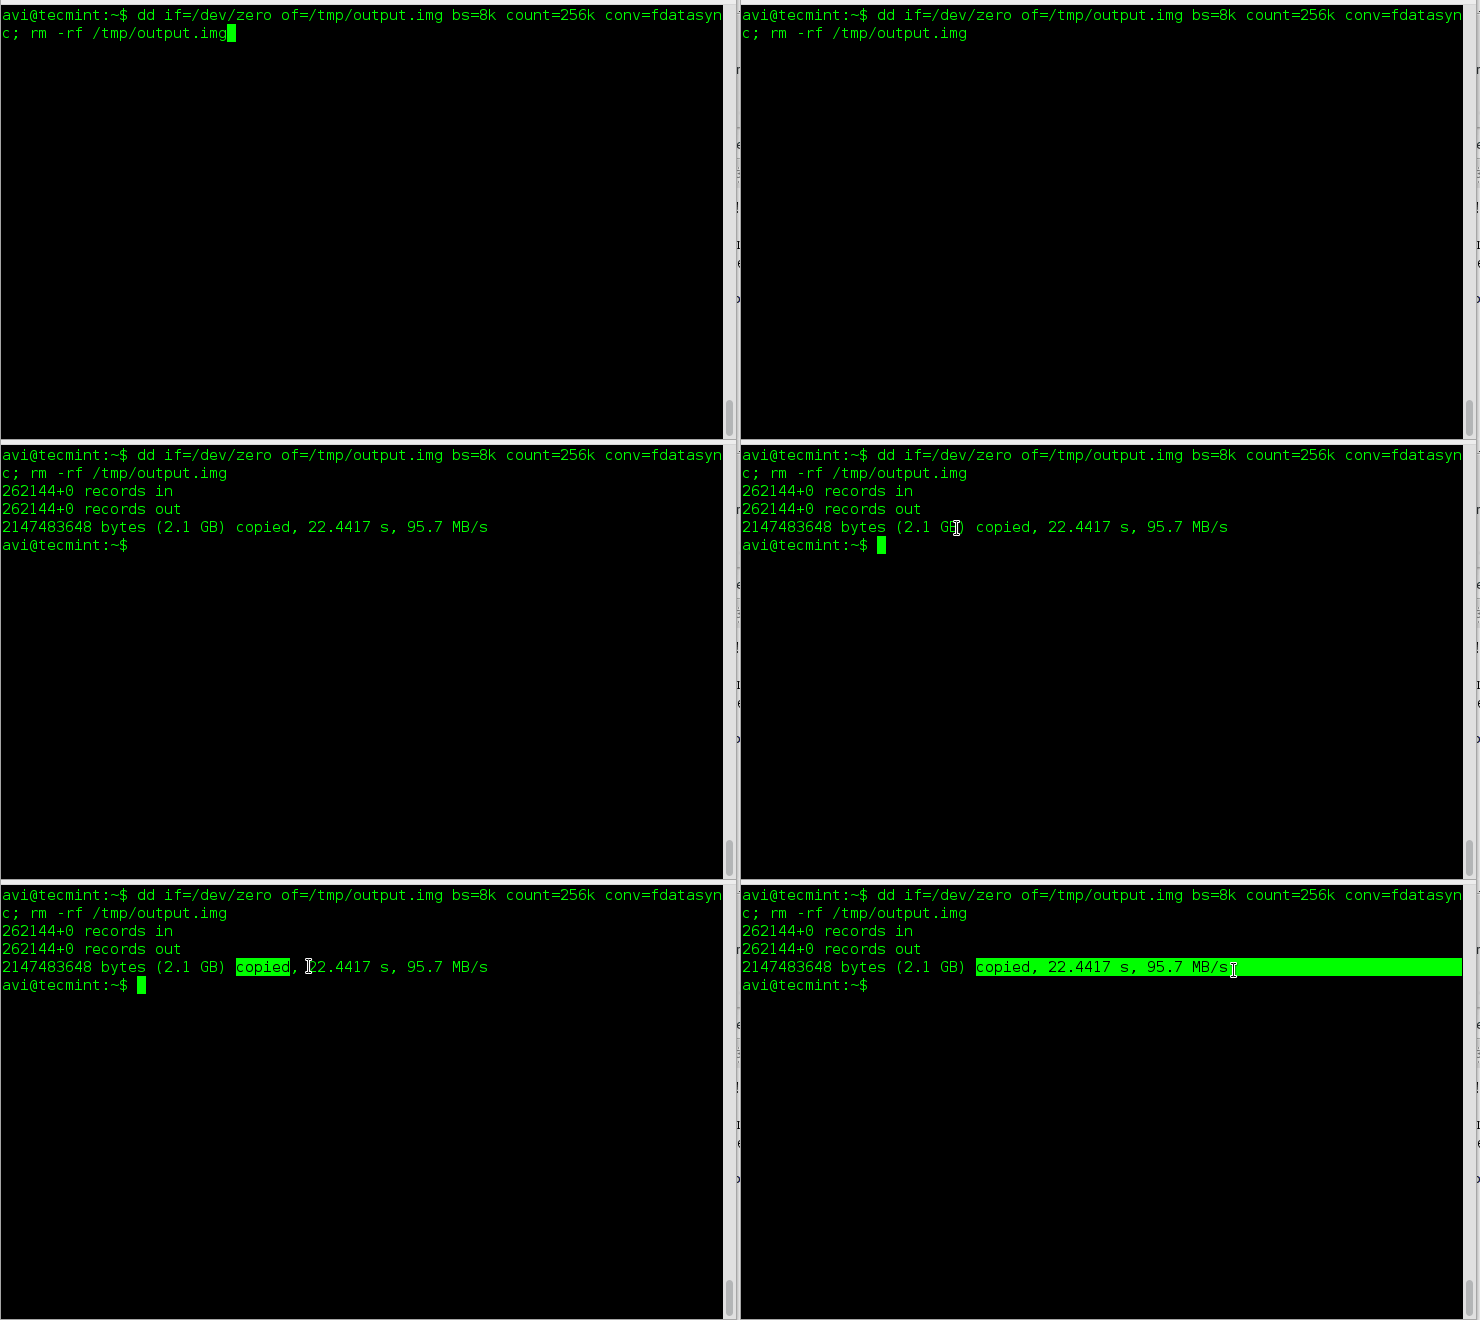
2. The next gem in the list is – how to check disk write speed? Well one liner dd command script serves the purpose.

# dd if=/dev/zero of=/tmp/output.img bs=8k count=256k conv=fdatasync; rm -rf /tmp/output.img

dd Command Example

dd Command Example

Explanation of commands and switches.

  1. dd – Convert and Copy a file
  2. if=/dev/zero – Read the file and not stdin
  3. of=/tmp/output.img – Write to file and not stdout
  4. bs – Read and Write maximum upto M bytes, at one time
  5. count – Copy N input block
  6. conv – Convert the file as per comma separated symbol list.
  7. rm – Removes files and folder
  8. -rf – (-r) removes directories and contents recursively and (-f) Force the removal without prompt.

3. How will you check the top six files that are eating out your space? A simple one liner script made from du command, which is primarily used as file space usages.

# du -hsx * | sort -rh | head -6

Check Disk Space Usage

Check Disk Space Usage

Explanation of commands and switches.

  1. du – Estimate file space usages
  2. -hsx – (-h) Human Readable Format, (-s) Summaries Output, (-x) One File Format, skip directories on other file format.
  3. sort – Sort text file lines
  4. -rh – (-r) Reverse the result of comparison, (-h) for compare human readable format.
  5. head – output first n lines of file.

4. The next step involves statistics in terminal of a file of every kind. We can output the statistics related to a file with the help of stat (output file/fileSystem status) command.

# stat filename_ext  (viz., stat abc.pdf)

Check File Statistics

Check File Statistics

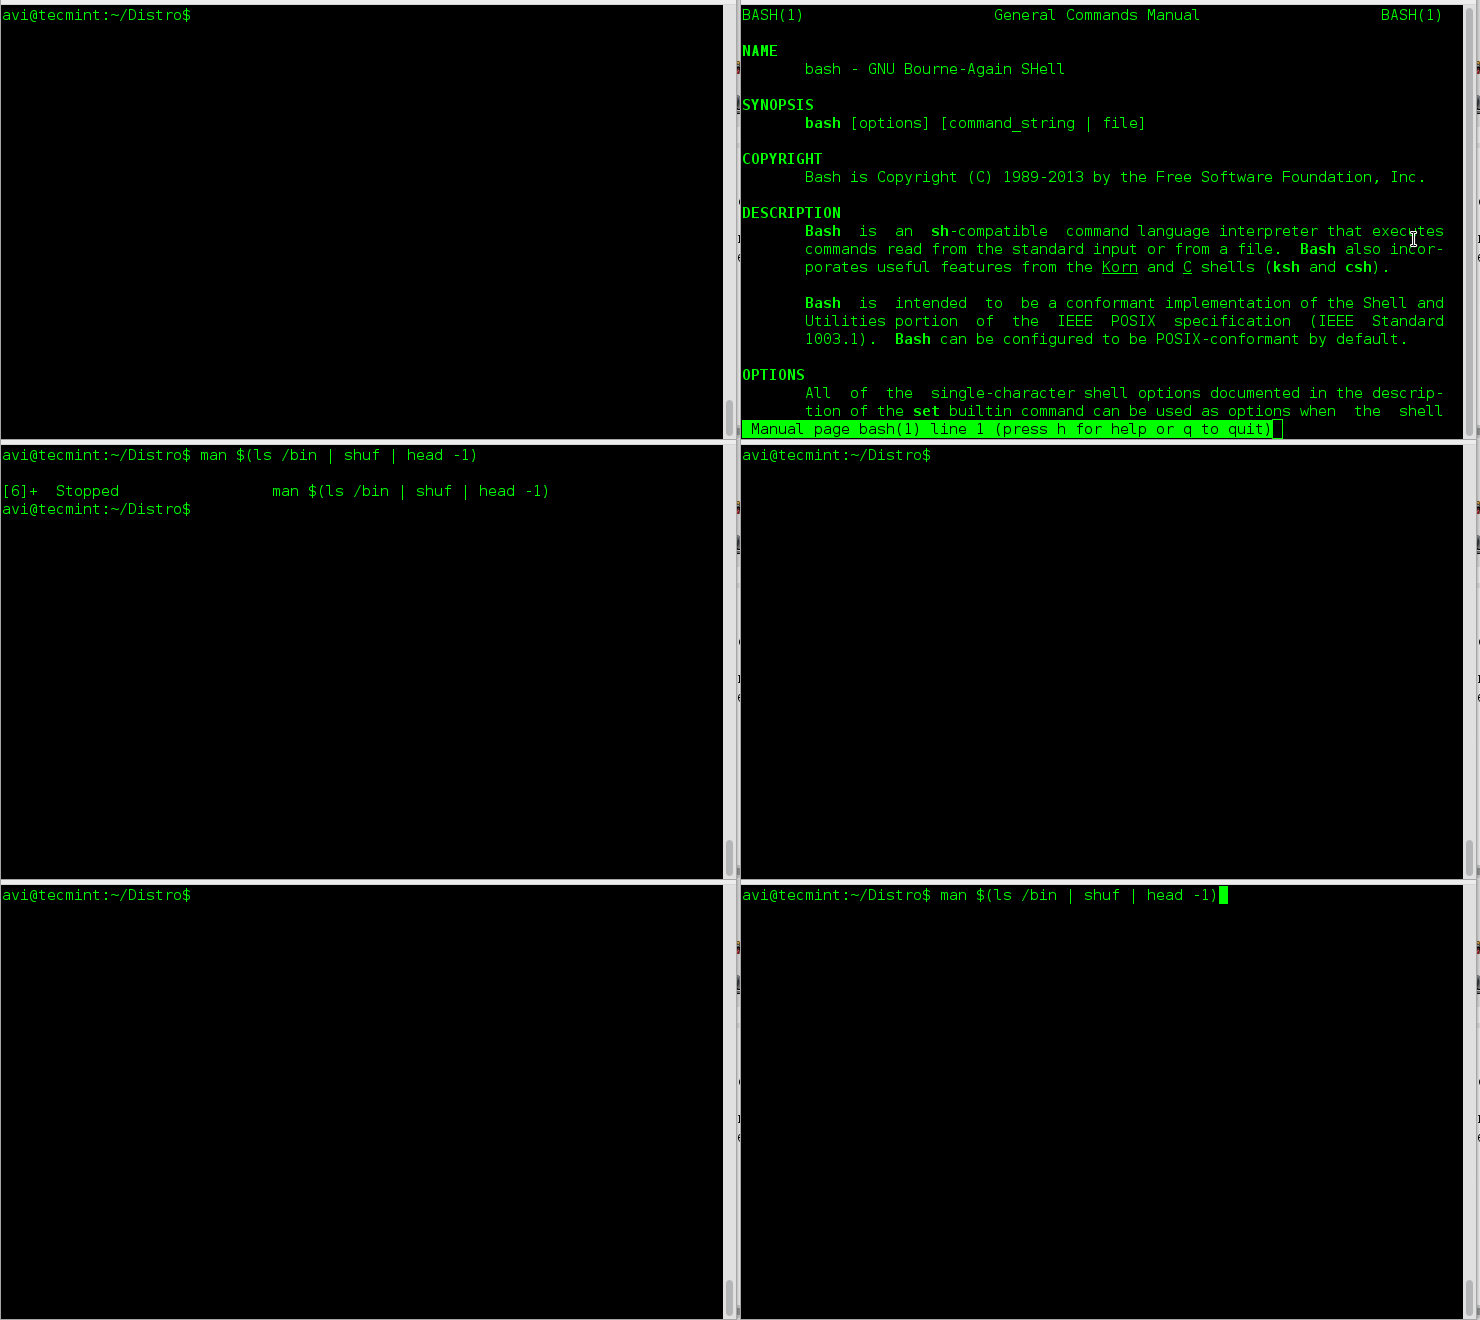
5. The next and last but not the least, this one line script is for those, who are newbies. If you are an experienced user you probably don’t need it, unless you want some fun out of it. Well newbies are Linux-command-line phobic and the below one liner will generate random man pages. The benefit is as a newbie you always get something to learn and never get bored.

# man $(ls /bin | shuf | head -1)

Generate Random Man Pages

Generate Random Man Pages

Explanation of commands and switches.

  1. man – Linux Man pages
  2. ls – Linux Listing Commands
  3. /bin – System Binary file Location
  4. shuf – Generate Random Permutation
  5. head – Output first n line of file.

That’s all for now. If you know any such tips and tricks you may share with us and we will post the same in your words on our reputed Tecmint.com website.

If you want to share any tips and tricks that you cannot make into article you may share it at tecmint[dot]com[at]gmail[dot]com and we will include it in our article. Don’t forget to provide us with your valuable feedback in the comments below. Keep connected. Like and share us and help us get spread.

Don’t Miss:

  1. 10 Useful Commandline Tricks for Newbies – Part 2
  2. 5 Useful Commands to Manage Linux File Types and System Time – Part 3

Source
How to Use Udev for Device Detection and Management in Linux

Udev (userspace /dev) is a Linux sub-system for dynamic device detection and management, since kernel version 2.6. It’s a replacement of devfs and hotplug.

It dynamically creates or removes device nodes (an interface to a device driver that appears in a file system as if it were an ordinary file, stored under the /dev directory) at boot time or if you add a device to or remove a device from the system. It then propagates information about a device or changes to its state to user space.

It’s function is to 1) supply the system applications with device events, 2) manage permissions of device nodes, and 3) may create useful symlinks in the /dev directory for accessing devices, or even renames network interfaces.

One of the pros of udev is that it can use persistent device names to guarantee consistent naming of devices across reboots, despite their order of discovery. This feature is useful because the kernel simply assigns unpredictable device names based on the order of discovery.

In this article, we will learn how to use Udev for device detection and management on Linux systems. Note that most if not all mainstream modern Linux distributions come with Udev as part of the default installation.

Learn Basics of Udev in Linux

The udev daemon, systemd-udevd (or systemd-udevd.service) communicates with the kernel and receives device uevents directly from it each time you add or remove a device from the system, or a device changes its state.

Udev is based on rules – it’s rules are flexible and very powerful. Every received device event is matched against the set of rules read from files located in /lib/udev/rules.d and /run/udev/rules.d.

You can write custom rules files in the /etc/udev/rules.d/ directory (files should end with the .rulesextension) to process a device. Note that rules files in this directory have the highest priority.

To create a device node file, udev needs to identify a device using certain attributes such as the labelserial number, its major and minor number used, bus device number and so much more. This information is exported by the sysfs file system.

Whenever you connect a device to the system, the kernel detects and initializes it, and a directory with the device name is created under /sys/ directory which stores the device attributes.

The main configuration file for udev is /etc/udev/udev.conf, and to control the runtime behavior the udev daemon, you can use the udevadm utility.

To display received kernel events (uevents) and udev events (which udev sends out after rule processing), run udevadm with the monitor command. Then connect a device to your system and watch, from the terminal, how the device event is handled.

The following screenshot shows an excerpt of an ADD event after connecting a USB flash disk to the test system:

$ udevadm monitor 

Monitor Device Events in Linux

Monitor Device Events in Linux

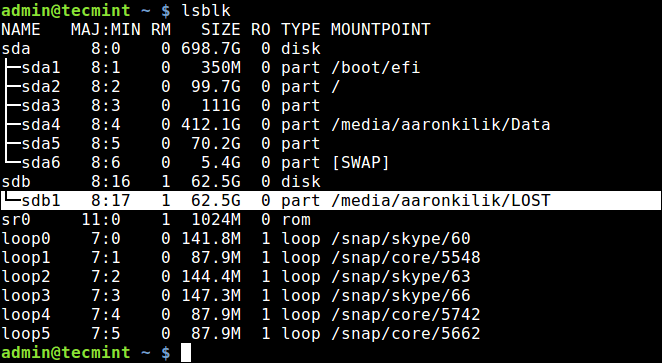
To find the name assigned to your USB disk, use the lsblk utility which reads the sysfs filesystem and udev db to gather information about processed devices.

 
$ lsblk

List Block Devices in Linux

List Block Devices in Linux

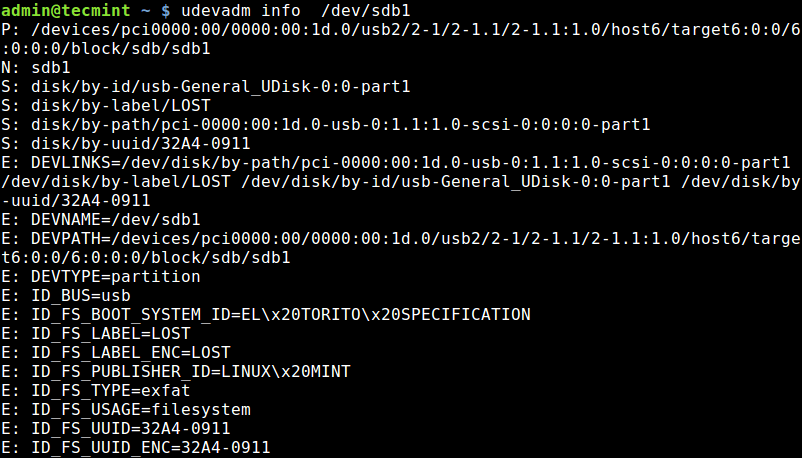
From the output of the previous command, the USB disk is named sdb1 (absolute path should be /dev/sdb1). To query the device attributes from the udev database, use the info command.

$ udevadm info /dev/sdb1

Query Device Attributes from Udev DB in Linux

Query Device Attributes from Udev DB in Linux

How to Work with Udev Rules in Linux

In this section, we will briefly discuss how to write udev rules. A rule comprises of a comma-separated list of one or more key-value pairs. Rules allow you to rename a device node from the default name, modify permissions and ownership of a device node, trigger execution of a program or script when a device node is created or deleted, among others.

We will write a simple rule to launch a script when a USB device is added and when it is removed from the running system.

Let’s start by creating the two scripts:

$ sudo vim /bin/device_added.sh

Add the following lines in the device_added.sh script.

#!/bin/bash
echo "USB device added at $(date)" >>/tmp/scripts.log

Open the second script.

$ sudo vim /bin/device_removed.sh

Then add the following lines to device_removed.sh script.

#!/bin/bash
echo "USB device removed  at $(date)" >>/tmp/scripts.log

Save the files, close and make both scripts executable.

$ sudo chmod +x /bin/device_added.sh
$ sudo chmod +x /bin/device_removed.sh

Next, let’s create a rule to trigger execution of the above scripts, called /etc/udev/rules.d/80-test.rules.

$ vim /etc/udev/rules.d/80-test.rules

Add these two following rules in it.

SUBSYSTEM=="usb", ACTION=="add", ENV{DEVTYPE}=="usb_device",  RUN+="/bin/device_added.sh"
SUBSYSTEM=="usb", ACTION=="remove", ENV{DEVTYPE}=="usb_device", RUN+="/bin/device_removed.sh"

where:

  • "==": is an operator to compare for equality.
  • "+=": is an operator to add the value to a key that holds a list of entries.
  • SUBSYSTEM: matches the subsystem of the event device.
  • ACTION: matches the name of the event action.
  • ENV{DEVTYPE}: matches against a device property value, device type in this case.
  • RUN: specifies a program or script to execute as part of the event handling.

Save the file and close it. Then as root, tell systemd-udevd to reload the rules files (this also reloads other databases such as the kernel module index), by running.

$ sudo udevadm control --reload

Now connect a USB drive into your machine and check if the device_added.sh script was executed. First of all the file scripts.log should be created under /tmp.

$ ls -l /tmp/scripts.log

Check Scripts Log After Adding USB

Check Scripts Log After Adding USB

Then the file should have an entry such as “USB device removed at date_time”, as shown in the screenshot.

$ cat /tmp/scripts.log

Check Scripts Log After Removing USB

Check Scripts Log After Removing USB

For more information on how to write udev rules and manage udev, consult the udev and udevadm manual entries respectively, by running:

$ man udev
$ man udevadm
Summary

Udev is a remarkable device manager that provides a dynamic way of setting up device nodes in the /devdirectory. It ensures that devices are configured as soon as they are plugged in and discovered. It propagates information about a processed device or changes to its state, to user space.

Source

Create Multiple IP Addresses to One Single Network Interface

The concept of creating or configuring multiple IP addresses on a single network interface is called IP aliasing. IP aliasing is very useful for setting up multiple virtual sites on Apache using one single network interface with different IP addresses on a single subnet network.

The main advantage of using this IP aliasing is, you don’t need to have a physical adapter attached to each IP, but instead you can create multiple or many virtual interfaces (aliases) to a single physical card.

Linux IP Aliasing

Create Multiple IP Addresses in One NiC

The instructions given here are applies to all major Linux distributions like Red HatFedora, and CentOS. Creating multiple interfaces and assign IP address to it manually is a daunting task. Here we’ll see how we can assign IP address to it defining a set of IP range. Also understand how we are going to create a virtual interface and assign different range of IP Address to an interface in one go. In this article we used LAN IPs, so replace those with ones you will be using.

Creating Virtual Interface and Assign Multiple IP Addresses

Here I have an interface called “ifcfg-eth0“, the default interface for the Ethernet device. If you’ve attached second Ethernet device, then there would be an “ifcfg-eth1” device and so on for each device you’ve attached. These device network files are located in “/etc/sysconfig/network-scripts/” directory. Navigate to the directory and do “ls -l” to list all devices.

# cd /etc/sysconfig/network-scripts/
# ls -l
Sample Output
ifcfg-eth0   ifdown-isdn    ifup-aliases  ifup-plusb     init.ipv6-global
ifcfg-lo     ifdown-post    ifup-bnep     ifup-post      net.hotplug
ifdown       ifdown-ppp     ifup-eth      ifup-ppp       network-functions
ifdown-bnep  ifdown-routes  ifup-ippp     ifup-routes    network-functions-ipv6
ifdown-eth   ifdown-sit     ifup-ipv6     ifup-sit
ifdown-ippp  ifdown-tunnel  ifup-isdn     ifup-tunnel
ifdown-ipv6  ifup           ifup-plip     ifup-wireless

Let’s assume that we want to create three additional virtual interfaces to bind three IP addresses (172.16.16.126172.16.16.127, and 172.16.16.128) to the NIC. So, we need to create three additional alias files, while “ifcfg-eth0” keeps the same primary IP address. This is how we moving forward to setup three aliases to bind the following IP addresses.

Adapter            IP Address                Type
-------------------------------------------------
eth0              172.16.16.125            Primary
eth0:0            172.16.16.126            Alias 1
eth0:1            172.16.16.127            Alias 2
eth0:2            172.16.16.128            Alias 3

Where “:X” is the device (interface) number to create the aliases for interface eth0. For each alias you must assign a number sequentially. For example, we copying existing parameters of interface “ifcfg-eth0” in virtual interfaces called ifcfg-eth0:0ifcfg-eth0:1 and ifcfg-eth0:2. Go into the network directory and create the files as shown below.

# cd /etc/sysconfig/network-scripts/
# cp ifcfg-eth0 ifcfg-eth0:0
# cp ifcfg-eth0 ifcfg-eth0:1
# cp ifcfg-eth0 ifcfg-eth0:2

Open a file “ifcfg-eth0” and view the contents.

[root@tecmint network-scripts]# vi ifcfg-eth0

DEVICE="eth0"
BOOTPROTO=static
ONBOOT=yes
TYPE="Ethernet"
IPADDR=172.16.16.125
NETMASK=255.255.255.224
GATEWAY=172.16.16.100
HWADDR=00:0C:29:28:FD:4C

Here we only need two parameters (DEVICE and IPADDR). So, open each file with VI editor and rename the DEVICE name to its corresponding alias and change the IPADDR address. For example, open files “ifcfg-eth0:0“, “ifcfg-eth0:1” and “ifcfg-eth0:2” using VI editor and change both the parameters. Finally it will look similar to below.

ifcfg-eth0:0
DEVICE="eth0:0"
BOOTPROTO=static
ONBOOT=yes
TYPE="Ethernet"
IPADDR=172.16.16.126
NETMASK=255.255.255.224
GATEWAY=172.16.16.100
HWADDR=00:0C:29:28:FD:4C
ifcfg-eth0:1
DEVICE="eth0:1"
BOOTPROTO=static
ONBOOT=yes
TYPE="Ethernet"
IPADDR=172.16.16.127
NETMASK=255.255.255.224
GATEWAY=172.16.16.100
HWADDR=00:0C:29:28:FD:4C
ifcfg-eth0:2
DEVICE="eth0:2"
BOOTPROTO=static
ONBOOT=yes
TYPE="Ethernet"
IPADDR=172.16.16.128
NETMASK=255.255.255.224
GATEWAY=172.16.16.100
HWADDR=00:0C:29:28:FD:4C

Once, you’ve made all changes, save all your changes and restart/start the network service for the changes to reflect.

[root@tecmint network-scripts]# /etc/init.d/network restart

To verify all the aliases (virtual interface) are up and running, you can use “ifconfig” or “ip” command.

[root@tecmint network-scripts]# ifconfig
eth0      Link encap:Ethernet  HWaddr 00:0C:29:28:FD:4C
          inet addr:172.16.16.125  Bcast:172.16.16.100  Mask:255.255.255.224
          inet6 addr: fe80::20c:29ff:fe28:fd4c/64 Scope:Link
          UP BROADCAST RUNNING MULTICAST  MTU:1500  Metric:1
          RX packets:237 errors:0 dropped:0 overruns:0 frame:0
          TX packets:198 errors:0 dropped:0 overruns:0 carrier:0
          collisions:0 txqueuelen:1000
          RX bytes:25429 (24.8 KiB)  TX bytes:26910 (26.2 KiB)
          Interrupt:18 Base address:0x2000

eth0:0    Link encap:Ethernet  HWaddr 00:0C:29:28:FD:4C
          inet addr:172.16.16.126  Bcast:172.16.16.100  Mask:255.255.255.224
          UP BROADCAST RUNNING MULTICAST  MTU:1500  Metric:1
          Interrupt:18 Base address:0x2000

eth0:1    Link encap:Ethernet  HWaddr 00:0C:29:28:FD:4C
          inet addr:172.16.16.127  Bcast:172.16.16.100  Mask:255.255.255.224
          UP BROADCAST RUNNING MULTICAST  MTU:1500  Metric:1
          Interrupt:18 Base address:0x2000

eth0:2    Link encap:Ethernet  HWaddr 00:0C:29:28:FD:4C
          inet addr:172.16.16.128  Bcast:172.16.16.100  Mask:255.255.255.224
          UP BROADCAST RUNNING MULTICAST  MTU:1500  Metric:1
          Interrupt:18 Base address:0x2000

Ping each of them from different machine. If everything setup correctly, you will get a ping response from each of them.

ping 172.16.16.126
ping 172.16.16.127
ping 172.16.16.128
Sample Output
[root@tecmint ~]# ping 172.16.16.126
PING 172.16.16.126 (172.16.16.126) 56(84) bytes of data.
64 bytes from 172.16.16.126: icmp_seq=1 ttl=64 time=1.33 ms
64 bytes from 172.16.16.126: icmp_seq=2 ttl=64 time=0.165 ms
64 bytes from 172.16.16.126: icmp_seq=3 ttl=64 time=0.159 ms

--- 172.16.16.126 ping statistics ---
3 packets transmitted, 3 received, 0% packet loss, time 2002ms
rtt min/avg/max/mdev = 0.159/0.552/1.332/0.551 ms

[root@tecmint ~]# ping 172.16.16.127
PING 172.16.16.127 (172.16.16.127) 56(84) bytes of data.
64 bytes from 172.16.16.127: icmp_seq=1 ttl=64 time=1.33 ms
64 bytes from 172.16.16.127: icmp_seq=2 ttl=64 time=0.165 ms
64 bytes from 172.16.16.127: icmp_seq=3 ttl=64 time=0.159 ms

--- 172.16.16.127 ping statistics ---
3 packets transmitted, 3 received, 0% packet loss, time 2002ms
rtt min/avg/max/mdev = 0.159/0.552/1.332/0.551 ms

[root@tecmint ~]# ping 172.16.16.128
PING 172.16.16.128 (172.16.16.128) 56(84) bytes of data.
64 bytes from 172.16.16.128: icmp_seq=1 ttl=64 time=1.33 ms
64 bytes from 172.16.16.128: icmp_seq=2 ttl=64 time=0.165 ms
64 bytes from 172.16.16.128: icmp_seq=3 ttl=64 time=0.159 ms

--- 172.16.16.128 ping statistics ---
3 packets transmitted, 3 received, 0% packet loss, time 2002ms
rtt min/avg/max/mdev = 0.159/0.552/1.332/0.551 ms

Seems everything working smoothly, With these new IPs’ you can setup virtual sites in ApacheFTP accounts and many other things.

Assign Multiple IP Address Range

If you would like to create a range of Multiple IP Addresses to a particular interface called “ifcfg-eth0“, we use “ifcfg-eth0-range0” and copy the contains of ifcfg-eth0 on it as shown below.

[root@tecmint network-scripts]# cd /etc/sysconfig/network-scripts/
[root@tecmint network-scripts]# cp -p ifcfg-eth0 ifcfg-eth0-range0

Now open “ifcfg-eth0-range0” file and add “IPADDR_START” and “IPADDR_END” IP address range as shown below.

[root@tecmint network-scripts]# vi ifcfg-eth0-range0

#DEVICE="eth0"
#BOOTPROTO=none
#NM_CONTROLLED="yes"
#ONBOOT=yes
TYPE="Ethernet"
IPADDR_START=172.16.16.126
IPADDR_END=172.16.16.130
IPV6INIT=no
#GATEWAY=172.16.16.100

Save it and restart/start network service

[root@tecmint network-scripts]# /etc/init.d/network restart

Verify that virtual interfaces are created with IP Address.

[root@tecmint network-scripts]# ifconfig
eth0      Link encap:Ethernet  HWaddr 00:0C:29:28:FD:4C
          inet addr:172.16.16.125  Bcast:172.16.16.100  Mask:255.255.255.224
          inet6 addr: fe80::20c:29ff:fe28:fd4c/64 Scope:Link
          UP BROADCAST RUNNING MULTICAST  MTU:1500  Metric:1
          RX packets:1385 errors:0 dropped:0 overruns:0 frame:0
          TX packets:1249 errors:0 dropped:0 overruns:0 carrier:0
          collisions:0 txqueuelen:1000
          RX bytes:127317 (124.3 KiB)  TX bytes:200787 (196.0 KiB)
          Interrupt:18 Base address:0x2000

eth0:0     Link encap:Ethernet  HWaddr 00:0C:29:28:FD:4C
          inet addr:172.16.16.126  Bcast:172.16.16.100  Mask:255.255.255.224
          UP BROADCAST RUNNING MULTICAST  MTU:1500  Metric:1
          Interrupt:18 Base address:0x2000

eth0:1    Link encap:Ethernet  HWaddr 00:0C:29:28:FD:4C
          inet addr:172.16.16.127  Bcast:172.16.16.100  Mask:255.255.255.224
          UP BROADCAST RUNNING MULTICAST  MTU:1500  Metric:1
          Interrupt:18 Base address:0x2000

eth0:2    Link encap:Ethernet  HWaddr 00:0C:29:28:FD:4C
          inet addr:172.16.16.128  Bcast:172.16.16.100  Mask:255.255.255.224
          UP BROADCAST RUNNING MULTICAST  MTU:1500  Metric:1
          Interrupt:18 Base address:0x2000

eth0:3    Link encap:Ethernet  HWaddr 00:0C:29:28:FD:4C
          inet addr:172.16.16.129  Bcast:172.16.16.100  Mask:255.255.255.224
          UP BROADCAST RUNNING MULTICAST  MTU:1500  Metric:1
          Interrupt:18 Base address:0x2000

eth0:4    Link encap:Ethernet  HWaddr 00:0C:29:28:FD:4C
          inet addr:172.16.16.130  Bcast:172.16.16.100  Mask:255.255.255.224
          UP BROADCAST RUNNING MULTICAST  MTU:1500  Metric:1
          Interrupt:18 Base address:0x2000

If you having any trouble in setting up, please do post your queries in the comment section.

Source
procinfo – Shows System Statistics from /proc Filesystem

The proc file system is a virtual file system that contains files that store information about processes and other system information. It is mapped to the /proc directory and mounted at boot time. A number of programs retrieve information from /proc file system, process it and provide it readily usable for various purposes.

Procinfo is a simple command line utility for viewing system information collected from /proc directory and prints it beautifully formatted on the standard output device. In this article, we will explain a number of procinfocommand examples in Linux.

In most Linux distributions, the procinfo command should come pre-installed, if you don’t have it, install it using following command.

$ sudo apt install procinfo		#Debian/Ubuntu
$ sudo yum install procinfo		#CentOS/RHEL
$ sudo dnf install procinfo		#Fedora 22+

The simplest example is to run procinfo without any arguments as shown.

$ procinfo

Memory:        Total        Used        Free     Buffers                       
RAM:         8069036     7693288      375748      301356                       
Swap:        3906556           0     3906556                                   

Bootup: Mon Jun  4 11:09:45 2018   Load average: 0.35 0.84 1.01 1/1021 15406   

user  :   01:09:12.02  13.4%  page in :          2434469                       
nice  :   00:02:12.37   0.4%  page out:          2162544                       
system:   00:15:17.34   3.0%  page act:          2395528                       
IOwait:   00:39:04.09   7.6%  page dea:             3424                       
hw irq:   00:00:00.00   0.0%  page flt:         20783328                       
sw irq:   00:00:29.07   0.1%  swap in :                0                       
idle  :   06:30:26.88  75.6%  swap out:                0                       
uptime:   02:10:11.66         context :         51698643                       

irq   0:         21  2-edge timer        irq  42:          0  466944-edge PCIe 
irq   1:       3823  1-edge i8042        irq  43:     193892  327680-edge xhci_
irq   8:          1  8-edge rtc0         irq  44:     191759  512000-edge 0000:
irq   9:       2175  9-fasteoi acpi      irq  45:    1021515  524288-edge enp1s
irq  12:       6865  12-edge i8042       irq  46:     541926  32768-edge i915  
irq  19:          0  19-fasteoi rtl_pc   irq  47:         14  360448-edge mei_m
irq  23:         33  23-fasteoi ehci_h   irq  48:        344  442368-edge snd_h
irq  40:          0  458752-edge PCIe    irq  49:        749  49152-edge snd_hd
irq  41:          0  464896-edge PCIe                                          

loop0              90r               0   loop4              14r               0
loop1             159r               0   loop5            7945r               0
loop2             214r               0   loop6             309r               0
loop3              79r               0   sda           112544r           70687w

enp1s0      TX 58.30MiB      RX 883.00MiB     vmnet8      TX 0.00B         RX 0.00B        
lo          TX 853.65KiB     RX 853.65KiB     wlp2s0      TX 0.00B         RX 0.00B        
vmnet1      TX 0.00B         RX 0.00B                                          

To print memory stats in human readable format (KiB, MiB, GiB), instead of the default Kbytes, use the -H flag.

$ procinfo -H

Memory:        Total        Used        Free     Buffers                       
RAM:         7.70GiB     7.36GiB   344.27MiB   294.38MiB                       
Swap:        3.73GiB       0.00B     3.73GiB                                   

Bootup: Mon Jun  4 11:09:45 2018   Load average: 0.61 0.84 1.00 2/1017 15439   

user  :   01:09:21.25  13.3%  page in :          2434613                       
nice  :   00:02:12.43   0.4%  page out:          2223808                       
system:   00:15:19.82   2.9%  page act:          2416184                       
IOwait:   00:39:08.21   7.5%  page dea:             3424                       
hw irq:   00:00:00.00   0.0%  page flt:         20891258                       
sw irq:   00:00:29.08   0.1%  swap in :                0                       
idle  :   06:33:48.38  75.7%  swap out:                0                       
uptime:   02:11:06.85         context :         51916194                       

irq   0:         21  2-edge timer        irq  42:          0  466944-edge PCIe 
irq   1:       3985  1-edge i8042        irq  43:     196957  327680-edge xhci_
irq   8:          1  8-edge rtc0         irq  44:     192411  512000-edge 0000:
irq   9:       2196  9-fasteoi acpi      irq  45:    1021900  524288-edge enp1s
irq  12:       6865  12-edge i8042       irq  46:     543742  32768-edge i915  
irq  19:          0  19-fasteoi rtl_pc   irq  47:         14  360448-edge mei_m
irq  23:         33  23-fasteoi ehci_h   irq  48:        344  442368-edge snd_h
irq  40:          0  458752-edge PCIe    irq  49:        749  49152-edge snd_hd
irq  41:          0  464896-edge PCIe                                          

loop0              90r               0   loop4              14r               0
loop1             159r               0   loop5            7945r               0
loop2             214r               0   loop6             309r               0
loop3              79r               0   sda           112568r           71267w

enp1s0      TX 58.33MiB      RX 883.21MiB     vmnet8      TX 0.00B         RX 0.00B        
lo          TX 854.18KiB     RX 854.18KiB     wlp2s0      TX 0.00B         RX 0.00B        
vmnet1      TX 0.00B         RX 0.00B                                        

The -d flag allows for displaying statistics on a per-seconds basis rather than as total values.

$ procinfo -d 

To display statistics as totals, use the -D flag as follows.

$ procinfo -D

You can get continues updates on the screen and pause updates for N number of second (for instance 5seconds in this command) using the -n flag and press q to quit in this mode.

$ procinfo -n5 -H

To report “real” free memory similar to that showed by the free utility, use the -r option.

$ procinfo -r 

To show numbers of bytes instead of number of I/O requests, employ the -b option.

$ procinfo -b

Procinfo works interactively too, when run fullscreen, this allows you to use the dDr and b keys whose functions correspond to their same-named command line flags explained above.

For more information, see the procinfo man page.

$ man procinfo 

In this article, we have explained a number of procinfo command examples.

Source
20 Practical Examples of RPM Commands in Linux

RPM (Red Hat Package Manager) is an default open source and most popular package management utility for Red Hat based systems like (RHELCentOS and Fedora). The tool allows system administrators and users to installupdateuninstallqueryverify and manage system software packages in Unix/Linux operating systems. The RPM formerly known as .rpm file, that includes compiled software programs and libraries needed by the packages. This utility only works with packages that built on .rpm format.

RPM Command Examples

20 Most Useful RPM Command Examples

This article provides some useful 20 RPM command examples that might be helpful to you. With the help of these rpm command you can managed to install, update, remove packages in your Linux systems.

Some Facts about RPM (RedHat Package Manager)

  1. RPM is free and released under GPL (General Public License).
  2. RPM keeps the information of all the installed packages under /var/lib/rpm database.
  3. RPM is the only way to install packages under Linux systems, if you’ve installed packages using source code, then rpm won’t manage it.
  4. RPM deals with .rpm files, which contains the actual information about the packages such as: what it isfrom where it comesdependencies infoversion info etc.

There are five basic modes for RPM command

  1. Install : It is used to install any RPM package.
  2. Remove : It is used to erase, remove or un-install any RPM package.
  3. Upgrade : It is used to update the existing RPM package.
  4. Verify : It is used to verify an RPM packages.
  5. Query : It is used query any RPM package.

Where to find RPM packages

Below is the list of rpm sites, where you can find and download all RPM packages.

  1. http://rpmfind.net
  2. http://www.redhat.com
  3. http://freshrpms.net/
  4. http://rpm.pbone.net/

Read Also :

  1. 20 YUM Command Examples in Linux
  2. 10 Wget Command Examples in Linux
  3. 30 Most Useful Linux Commands for System Administrators

Please remember you must be root user when installing packages in Linux, with the root privileges you can manage rpm commands with their appropriate options.

1. How to Check an RPM Signature Package

Always check the PGP signature of packages before installing them on your Linux systems and make sure its integrity and origin is OK. Use the following command with –checksig (check signature) option to check the signature of a package called pidgin.

[root@tecmint]# rpm --checksig pidgin-2.7.9-5.el6.2.i686.rpm

pidgin-2.7.9-5.el6.2.i686.rpm: rsa sha1 (md5) pgp md5 OK

2. How to Install an RPM Package

For installing an rpm software package, use the following command with -i option. For example, to install an rpm package called pidgin-2.7.9-5.el6.2.i686.rpm.

[root@tecmint]# rpm -ivh pidgin-2.7.9-5.el6.2.i686.rpm

Preparing...                ########################################### [100%]
   1:pidgin                 ########################################### [100%]
RPM command and options
  1. -i : install a package
  2. -v : verbose for a nicer display
  3. -h: print hash marks as the package archive is unpacked.

3. How to check dependencies of RPM Package before Installing

Let’s say you would like to do a dependency check before installing or upgrading a package. For example, use the following command to check the dependencies of BitTorrent-5.2.2-1-Python2.4.noarch.rpm package. It will display the list of dependencies of package.

[root@tecmint]# rpm -qpR BitTorrent-5.2.2-1-Python2.4.noarch.rpm

/usr/bin/python2.4
python >= 2.3
python(abi) = 2.4
python-crypto >= 2.0
python-psyco
python-twisted >= 2.0
python-zopeinterface
rpmlib(CompressedFileNames) = 2.6
RPM command and options
  1. -q : Query a package
  2. -p : List capabilities this package provides.
  3. -R: List capabilities on which this package depends..

4. How to Install a RPM Package Without Dependencies

If you know that all needed packages are already installed and RPM is just being stupid, you can ignore those dependencies by using the option –nodeps (no dependencies check) before installing the package.

[root@tecmint]# rpm -ivh --nodeps BitTorrent-5.2.2-1-Python2.4.noarch.rpm

Preparing...                ########################################### [100%]
   1:BitTorrent             ########################################### [100%]

The above command forcefully install rpm package by ignoring dependencies errors, but if those dependency files are missing, then the program will not work at all, until you install them.

5. How to check an Installed RPM Package

Using -q option with package name, will show whether an rpm installed or not.

[root@tecmint]# rpm -q BitTorrent

BitTorrent-5.2.2-1.noarch

6. How to List all files of an installed RPM package

To view all the files of an installed rpm packages, use the -ql (query list) with rpm command.

[root@tecmint]# rpm -ql BitTorrent

/usr/bin/bittorrent
/usr/bin/bittorrent-console
/usr/bin/bittorrent-curses
/usr/bin/bittorrent-tracker
/usr/bin/changetracker-console
/usr/bin/launchmany-console
/usr/bin/launchmany-curses
/usr/bin/maketorrent
/usr/bin/maketorrent-console
/usr/bin/torrentinfo-console

7. How to List Recently Installed RPM Packages

Use the following rpm command with -qa (query all) option, will list all the recently installed rpm packages.

[root@tecmint]# rpm -qa --last

BitTorrent-5.2.2-1.noarch                     Tue 04 Dec 2012 05:14:06 PM BDT
pidgin-2.7.9-5.el6.2.i686                     Tue 04 Dec 2012 05:13:51 PM BDT
cyrus-sasl-devel-2.1.23-13.el6_3.1.i686       Tue 04 Dec 2012 04:43:06 PM BDT
cyrus-sasl-2.1.23-13.el6_3.1.i686             Tue 04 Dec 2012 04:43:05 PM BDT
cyrus-sasl-md5-2.1.23-13.el6_3.1.i686         Tue 04 Dec 2012 04:43:04 PM BDT
cyrus-sasl-plain-2.1.23-13.el6_3.1.i686       Tue 04 Dec 2012 04:43:03 PM BDT

8. How to List All Installed RPM Packages

Type the following command to print the all the names of installed packages on your Linux system.

[root@tecmint]# rpm -qa

initscripts-9.03.31-2.el6.centos.i686
polkit-desktop-policy-0.96-2.el6_0.1.noarch
thunderbird-17.0-1.el6.remi.i686

9. How to Upgrade a RPM Package

If we want to upgrade any RPM package “–U” (upgrade) option will be used. One of the major advantages of using this option is that it will not only upgrade the latest version of any package, but it will also maintain the backup of the older package so that in case if the newer upgraded package does not run the previously installed package can be used again.

[root@tecmint]# rpm -Uvh nx-3.5.0-2.el6.centos.i686.rpm
Preparing...                ########################################### [100%]
   1:nx                     ########################################### [100%]

10. How to Remove a RPM Package

To un-install an RPM package, for example we use the package name nx, not the original package name nx-3.5.0-2.el6.centos.i686.rpm. The -e (erase) option is used to remove package.

[root@tecmint]# rpm -evv nx

11. How to Remove an RPM Package Without Dependencies

The –nodeps (Do not check dependencies) option forcefully remove the rpm package from the system. But keep in mind removing particular package may break other working applications.

[root@tecmint]# rpm -ev --nodeps vsftpd

12. How to Query a file that belongs which RPM Package

Let’s say, you have list of files and you would like to find out which package belongs to these files. For example, the following command with -qf (query file) option will show you a file /usr/bin/htpasswd is own by package httpd-tools-2.2.15-15.el6.centos.1.i686.

[root@tecmint]# rpm -qf /usr/bin/htpasswd

httpd-tools-2.2.15-15.el6.centos.1.i686

13. How to Query a Information of Installed RPM Package

Let’s say you have installed an rpm package and want to know the information about the package. The following -qi (query info) option will print the available information of the installed package.

[root@tecmint]# rpm -qi vsftpd

Name        : vsftpd				   Relocations: (not relocatable)
Version     : 2.2.2				   Vendor: CentOS
Release     : 11.el6				   Build Date: Fri 22 Jun 2012 01:54:24 PM BDT
Install Date: Mon 17 Sep 2012 07:55:28 PM BDT      Build Host: c6b8.bsys.dev.centos.org
Group       : System Environment/Daemons           Source RPM: vsftpd-2.2.2-11.el6.src.rpm
Size        : 351932                               License: GPLv2 with exceptions
Signature   : RSA/SHA1, Mon 25 Jun 2012 04:07:34 AM BDT, Key ID 0946fca2c105b9de
Packager    : CentOS BuildSystem <http://bugs.centos.org>
URL         : http://vsftpd.beasts.org/
Summary     : Very Secure Ftp Daemon
Description :
vsftpd is a Very Secure FTP daemon. It was written completely from
scratch.

14. Get the Information of RPM Package Before Installing

You have download a package from the internet and want to know the information of a package before installing. For example, the following option -qip (query info package) will print the information of a package sqlbuddy.

[root@tecmint]# rpm -qip sqlbuddy-1.3.3-1.noarch.rpm

Name        : sqlbuddy                     Relocations: (not relocatable)
Version     : 1.3.3                        Vendor: (none)
Release     : 1                            Build Date: Wed 02 Nov 2011 11:01:21 PM BDT
Install Date: (not installed)              Build Host: rpm.bar.baz
Group       : Applications/Internet        Source RPM: sqlbuddy-1.3.3-1.src.rpm
Size        : 1155804                      License: MIT
Signature   : (none)
Packager    : Erik M Jacobs
URL         : http://www.sqlbuddy.com/
Summary     : SQL Buddy â Web based MySQL administration
Description :
SQLBuddy is a PHP script that allows for web-based MySQL administration.

15. How to Query documentation of Installed RPM Package

To get the list of available documentation of an installed package, use the following command with option -qdf(query document file) will display the manual pages related to vmstat package.

[root@tecmint]# rpm -qdf /usr/bin/vmstat

/usr/share/doc/procps-3.2.8/BUGS
/usr/share/doc/procps-3.2.8/COPYING
/usr/share/doc/procps-3.2.8/COPYING.LIB
/usr/share/doc/procps-3.2.8/FAQ
/usr/share/doc/procps-3.2.8/NEWS
/usr/share/doc/procps-3.2.8/TODO

16. How to Verify a RPM Package

Verifying a package compares information of installed files of the package against the rpm database. The -Vp(verify package) is used to verify a package.

[root@tecmint downloads]# rpm -Vp sqlbuddy-1.3.3-1.noarch.rpm

S.5....T.  c /etc/httpd/conf.d/sqlbuddy.conf

17. How to Verify all RPM Packages

Type the following command to verify all the installed rpm packages.

[root@tecmint]# rpm -Va

S.5....T.  c /etc/rc.d/rc.local
.......T.  c /etc/dnsmasq.conf
.......T.    /etc/ld.so.conf.d/kernel-2.6.32-279.5.2.el6.i686.conf
S.5....T.  c /etc/yum.conf
S.5....T.  c /etc/yum.repos.d/epel.repo

18. How to Import an RPM GPG key

To verify RHEL/CentOS/Fedora packages, you must import the GPG key. To do so, execute the following command. It will import CentOS 6 GPG key.

[root@tecmint]# rpm --import /etc/pki/rpm-gpg/RPM-GPG-KEY-CentOS-6

19. How to List all Imported RPM GPG keys

To print all the imported GPG keys in your system, use the following command.

[root@tecmint]# rpm -qa gpg-pubkey*

gpg-pubkey-0608b895-4bd22942
gpg-pubkey-7fac5991-4615767f
gpg-pubkey-0f2672c8-4cd950ee
gpg-pubkey-c105b9de-4e0fd3a3
gpg-pubkey-00f97f56-467e318a
gpg-pubkey-6b8d79e6-3f49313d
gpg-pubkey-849c449f-4cb9df30

20. How To rebuild Corrupted RPM Database

Sometimes rpm database gets corrupted and stops all the functionality of rpm and other applications on the system. So, at the time we need to rebuild the rpm database and restore it with the help of following command.

[root@tecmint]# cd /var/lib
[root@tecmint]# rm __db*
[root@tecmint]# rpm --rebuilddb
[root@tecmint]# rpmdb_verify Packages

Source

3 of the Best System Monitor Tools for Ubuntu

As the number of devices, servers, and services you have in your business or organization grows, so does the need to monitor your systems. System monitoring, whether on premise or in the cloud, covers the capacity, activity, and health of the hosts and apps. The process is designed to cover all computing resources to root out and tackle problems in real-time before they occur.

If you’re using Ubuntu, system monitoring tools will help you spot any service failures or errors before they impact users.

The most basic tool at your disposal is the System Monitor, a built-in utility for Linux that acts like Windows’ Task Manager and offers basic activity monitoring information from running processes to what consumes the most resources.

However, you can get sophisticated system monitoring tools that show you more resource utilization information for memory, CPU, disk, and network connections.

Here are three you can use with Ubuntu.

1. Nagios

best-system-monitoring-tools-ubuntu-nagios-logo

This system monitoring tool for Ubuntu offers complete monitoring of servers and workstations – including service and process state, operating system metrics, and file system usage, plus more.

It is powerful, scalable, reliable, and customizable software, despite being complex to configure. As an enduring standard in system and network monitoring, Nagios offers immense benefits such as fast detection of protocol failures and network outages, plus increased availability of services, server, and applications.

Two solutions are available for system monitoring: Nagios Core and Nagios XI.

Nagios Core

best-system-monitoring-tools-ubuntu-nagioscore

This is the open-source free version that monitors servers, applications, and services, with features such as a basic user interface with network map, reporting by SMS and email, and basic reports.

Nagios Core monitors your critical IT infrastructure components from system metrics, servers, applications, services, and network protocols. It then sends you alerts via SMS, email, or custom script when critical components fail and recover, so your admins are always notified of important events.

Reports are available providing a historical record of events, outages, notifications and alert responses for your review later plus advanced graphs to plan for upgrades before outdated systems catch you offguard.

It is a powerful open-source option for Ubuntu system monitoring with great features like a web interface, multi-tenant capabilities, and extendable architecture through integration with in-house or third-party apps, and other community-developed add-ons.

While it may have a learning curve to begin with, an active community is available if you need assistance.

Nagios XI

best-system-monitoring-tools-ubuntu-nagiosxi

This is the commercial variant of the tool that has a richer range of features and automated configuration assistance.

Among its powerful features (over and above what Core offers) include the powerful Nagios Core 4 monitoring engine that gives you the highest degree of server performance monitoring.

Also included are configuration wizards to guide users through monitoring of devices, services and applications, and a configuration snapshot to save recent configurations and revert to them when you want.

You can customize your design, layout, and preferences on a per-user basis using the updated GUI, so your customers and teams get the flexibility they want. It also offers custom role assignment that ensures a secure environment.

What we like about Nagios

  • Easy to use
  • Offers free and premium (with 60-day trial) options
  • Comprehensive IT infrastructure monitoring as all mission-critical infrastructure components are monitored.
  • Allows multiple users to access the web interface and view the relevant infrastructure status
  • Fast configuration in a few simple clicks
  • Easy to set up and manage user accounts
  • Extendable architecture using add-ons

2. Glances

best-system-monitoring-tools-ubuntu-glances-2

This is a cross-platform, data-center monitoring tool that runs on GNU/Linux, macOS, Windows, and BSD operating systems. It is written in Python language using the psutil library from where it draws information from the system, giving you as much as you need at a glance.

You can use Glance to monitor load average, CPU, memory, disk I/O, network interfaces, mounted devices, file system space utilization, plus all active and top processes.

One of its main features is the ability to set thresholds in a configuration file with four options displayed in different colors that indicate the logjam in the system: OK (green), careful (blue), warning (violet), and critical (red).

The threshold levels are set at 50, 70, and 90 for careful, warning, and critical levels respectively. You can customize these using the “glances.conf” file found in the “/etc/glances/” directory.

best-system-monitoring-tools-ubuntu-glances

View critical information such as the average CPU load, disk I/O read/write speeds, current disk usage for mounted devices, and top processes together with their CPU/memory usage.

The downside with having all this information is that Glances tends to use a significant amount of CPU resources.

If you need help with Glances, there are wikis available on their website. You can also contact other developers and users on Twitter, Chat for developers, and user groups.

What we like about Glances

  • Easy to install as it is available on Ubuntu’s repository
  • Displays more information compared to other monitoring tools
  • Web-based GUI makes monitoring flexible
  • Can monitor remote systems

3. htop

best-system-monitoring-tools-ubuntu-htop

htop is an interactive process reviewer and text-mode application that performs system monitoring in real-time. It offers a complete view of processes that are running and their usage. This way you can free your system from any malfunctions as it serves its purpose.

The tool is based on “ncurses” and offers support for mouse operation. Like other tools, htop uses color to give visual indications of the memory, processor, and swap usage.

A flexible, clean, and easy-to-configure summary section displayed in two columns lets you view information about your system. However, some information like CPU percentages by idle, user, or system time, may not be available.

Function keys are available to configure the summary section and add data display lists to either column. There’s also a process section that sorts factors such as memory/CPU usage, PID, or user.

Note: htop is now cross-platform since version 2.0, supporting Linux, BSD, and macOS.

What we like about htop

  • Clean and easy-to-read summary section
  • Each user has a configuration file
  • Automatic save for any changes stored in configuration files

Source

WP2Social Auto Publish Powered By : XYZScripts.com