How to Find Out Top Directories and Files (Disk Space) in Linux

As a Linux administrator, you must periodically check which files and folders are consuming more disk space. It is very necessary to find the unnecessary junks and free up them from your hard disk.

This brief tutorial describes how to find the largest files and folders in the Linux file system using du and findcommand. If you want to learn more about these two commands, then head over to the following articles.

  1. Learn 10 Useful ‘du’ (Disk Usage) Commands in Linux
  2. Master the ‘Find’ Command with this 35 Practical Examples

How to Find Biggest Files and Directories in Linux

Run the following command to find out top biggest directories under /home partition.

# du -a /home | sort -n -r | head -n 5

Find Largest Directories in Linux

Find Largest Directories in Linux

The above command displays the biggest 5 directories of my /home partition.

Find Largest Directories in Linux

If you want to display the biggest directories in the current working directory, run:

# du -a | sort -n -r | head -n 5

Find Biggest Directories Only

Find Biggest Directories Only

Let us break down the command and see what says each parameter.

  1. du command: Estimate file space usage.
  2. a : Displays all files and folders.
  3. sort command : Sort lines of text files.
  4. -n : Compare according to string numerical value.
  5. -r : Reverse the result of comparisons.
  6. head : Output the first part of files.
  7. -n : Print the first ‘n’ lines. (In our case, We displayed first 5 lines).

Some of you would like to display the above result in human readable format. i.e you might want to display the largest files in KBMB, or GB.

# du -hs * | sort -rh | head -5

Find Top Directories Sizes in Linux

Find Top Directories Sizes in Linux

The above command will show the top directories, which are eating up more disk space. If you feel that some directories are not important, you can simply delete few sub-directories or delete the entire folder to free up some space.

To display the largest folders/files including the sub-directories, run:

# du -Sh | sort -rh | head -5

Find Largest Folder and Sub directories

Find Largest Folder and Sub directories

Find out the meaning of each options using in above command:

  1. du command: Estimate file space usage.
  2. -h : Print sizes in human readable format (e.g., 10MB).
  3. -S : Do not include size of subdirectories.
  4. -s : Display only a total for each argument.
  5. sort command : sort lines of text files.
  6. -r : Reverse the result of comparisons.
  7. -h : Compare human readable numbers (e.g., 2K, 1G).
  8. head : Output the first part of files.

Find Out Top File Sizes Only

If you want to display the biggest file sizes only, then run the following command:

# find -type f -exec du -Sh {} + | sort -rh | head -n 5

Find Top File Sizes in Linux

Find Top File Sizes in Linux

To find the largest files in a particular location, just include the path besides the find command:

# find /home/tecmint/Downloads/ -type f -exec du -Sh {} + | sort -rh | head -n 5
OR
# find /home/tecmint/Downloads/ -type f -printf "%s %p\n" | sort -rn | head -n 5

Find Top File Size in Specific Location

Find Top File Size in Specific Location

The above command will display the largest file from /home/tecmint/Downloads directory.

That’s all for now. Finding biggest files and folders is no big deal. Even a novice administrator can easily find them. If you find this tutorial useful, please share on your social networks and support TecMint.

Source

10 Useful ‘locate’ Command Practical Examples for Linux Newbies

One of most obnoxious experiences that most new users of the Linux platform usually face is the inability to find the simplest and yet more effective means of looking up files on their system.

Linux, like almost any other operating system, utilizes several mechanisms to answer search queries for users. Two of the most popular file searching utilities accessible to users are called find and locate.

Now, it is important to note that both search processes work extremely well but nonetheless, the center of this article will be more on the locate utility, which is the more convenient of the two as it uses more efficient ways to quickly process queries inputted by the users.

The locate utility works better and faster than it’s find counterpart because instead of searching the file system when a file search is initiated – Something find does – locate would look through a database. This database contains bits and parts of files and their corresponding paths on your system.

Here are ten simple locate commands to set you up in becoming more productive with your Linux machine.

1. Using locate Command

Firing locate command to look for a file is pretty easy and straightforward. All you need to do is type:

$ locate LAMP-Setup.odt

/home/tecmint/LAMP-Setup.odt
/home/tecmint/TecMint.com/LAMP-Setup.odt

2. Limit Search Queries to a Specific Number

You can limit your search returns to a required number to avoid redundancy with your search results using the -n command.

For example, if you want just 20 results from your queries, you can type the following command:

$ locate "*.html" -n 20

/home/tecmint/.config/google-chrome/Default/Extensions/aapocclcgogkmnckokdopfmhonfmgoek/0.9_0/main.html
/home/tecmint/.config/google-chrome/Default/Extensions/aohghmighlieiainnegkcijnfilokake/0.9_0/main.html
/home/tecmint/.config/google-chrome/Default/Extensions/felcaaldnbdncclmgdcncolpebgiejap/1.1_0/main.html
/home/tecmint/.config/google-chrome/Default/Extensions/kbfnbcaeplbcioakkpcpgfkobkghlhen/14.752.848_0/forge.html
/home/tecmint/.config/google-chrome/Default/Extensions/kbfnbcaeplbcioakkpcpgfkobkghlhen/14.752.848_0/src/popup.html
/home/tecmint/.config/google-chrome/Default/Extensions/nlipoenfbbikpbjkfpfillcgkoblgpmj/3.9.16_0/additional-feature.html
/home/tecmint/.config/google-chrome/Default/Extensions/nlipoenfbbikpbjkfpfillcgkoblgpmj/3.9.16_0/background.html
/home/tecmint/.config/google-chrome/Default/Extensions/nlipoenfbbikpbjkfpfillcgkoblgpmj/3.9.16_0/edit.html
/home/tecmint/.config/google-chrome/Default/Extensions/nlipoenfbbikpbjkfpfillcgkoblgpmj/3.9.16_0/help.html
/home/tecmint/.config/google-chrome/Default/Extensions/nlipoenfbbikpbjkfpfillcgkoblgpmj/3.9.16_0/options.html
/home/tecmint/.config/google-chrome/Default/Extensions/nlipoenfbbikpbjkfpfillcgkoblgpmj/3.9.16_0/popup.html
/home/tecmint/.config/google-chrome/Default/Extensions/nlipoenfbbikpbjkfpfillcgkoblgpmj/3.9.16_0/purchase.html
/home/tecmint/.config/google-chrome/Default/Extensions/nlipoenfbbikpbjkfpfillcgkoblgpmj/3.9.16_0/upload.html
/home/tecmint/.config/google-chrome/Default/Extensions/nlipoenfbbikpbjkfpfillcgkoblgpmj/3.9.16_0/oauth2/oauth2.html
/home/tecmint/.config/google-chrome/Default/Extensions/nmmhkkegccagdldgiimedpiccmgmieda/1.0.0.2_0/html/craw_window.html
/home/tecmint/.config/google-chrome/Default/Extensions/pkedcjkdefgpdelpbcmbmeomcjbeemfm/5516.1005.0.3_0/cast_route_details.html
/home/tecmint/.config/google-chrome/Default/Extensions/pkedcjkdefgpdelpbcmbmeomcjbeemfm/5516.1005.0.3_0/feedback.html
/home/tecmint/.config/google-chrome/Default/Extensions/pkedcjkdefgpdelpbcmbmeomcjbeemfm/5516.1005.0.3_0/cast_setup/devices.html
/home/tecmint/.config/google-chrome/Default/Extensions/pkedcjkdefgpdelpbcmbmeomcjbeemfm/5516.1005.0.3_0/cast_setup/index.html
/home/tecmint/.config/google-chrome/Default/Extensions/pkedcjkdefgpdelpbcmbmeomcjbeemfm/5516.1005.0.3_0/cast_setup/offers.html

The results will show the first 20 files that end with .html.

3. Display The Number of Matching Entries

If you want to display the count of all matching entries of file “tecmint“, use the locate -c command.

$ locate -c [tecmint]*

1550

4. Ignore Case Sensitive Locate Outputs

By default, locate is configured to process queries in a case sensitive manner meaning TEXT.TXT will point you to a different result than text.txt.

To have locate command ignore case sensitivity and show results for both uppercase and lowercase queries, input commands with the -i option.

$ locate -i *text.txt*

/home/tecmint/TEXT.txt
/home/tecmint/text.txt

5. Refresh mlocate Database

Since locate command relies on a database called mlocate. The said database needs to be updated regularly for the command utility to work
efficiently.

To update the mlocate database, you use a utility called updatedb. It should be noted that you will need superuser privileges for this to work properly, is it needs to be executed as root or sudo privileges.

$ sudo updatedb

6. Display Only Files Present in Your System

When you have an updated mlocate database**, locate command still produces results of files whose physical copies are deleted from your system.

To avoid seeing results of files not present in your machine at the time of punching in the command, you will need to use the locate-e command. The process searches your system to verify the existence of the file you’re looking for even if it is still present in your mlocate.db.

$ locate -i -e *text.txt*

/home/tecmint/text.txt

7. Separate Output Entries Without New Line

locate command’s default separator is the newline (\\n) character. But if you prefer to use a different separator like the ASCII NUL, you can do so using the -0 command line option.

$ locate -i -0 *text.txt*

/home/tecmint/TEXT.txt/home/tecmint/text.txt

8. Review Your Locate Database

If you’re in doubt as to the current status of your mlocate.db, you can easily view the locate database statistics by using the -S command.

$ locate -S

Database /var/lib/mlocate/mlocate.db:
	32,246 directories
	4,18,850 files
	2,92,36,692 bytes in file names
	1,13,64,319 bytes used to store database

9. Suppress Error Messages in Locate

Constantly trying to access your locate database does sometimes yield unnecessary error messages stating that you do not have the required privileges to have root access to the mlocate.db, because you’re only a normal user and not the required Superuser.

To completely do away with these message, use the -q command.

$ locate "\*.dat" -q*

10. Choose a Different mlocate Location

If you’re inputting queries looking for results not present in the default mlocate database and want answers from a different mlocate.db located somewhere else in your system, you can point the locate command to a different mlocate database at a different part of your system with the -d command.

$ locate -d <new db path> <filename>

locate command might seem like one of those utilities that does everything you asked it to do without much of a hustle but in truth, in order for the process to keep its efficiency, the mlocate.db needs to be fed with information every now and then. Failure to do so might render the program a bit useless.

Source

10 Interesting Linux Command Line Tricks and Tips Worth Knowing

I passionately enjoy working with commands as they offer more control over a Linux system than GUIs(Graphical User Interfaces) applications, therefore am always on the look out to discover or figure out interesting ways and ideas to make Linux so easy and fun to operate, primarily from the terminal.

It is always thrilling when we discover new tricks or tips while using Linux especially a command line geek like myself.

Suggested Read: 5 Interesting Command Line Tips and Tricks in Linux – Part 1

And the feeling of wanting to share newly learned practices or commands with millions of Linux users out there, particularly the newbies who are still getting their way around this exciting operating system normally sets in.

Suggested Read: 10 Useful Linux Command Line Tricks for Newbies – Part 2

In this article, we will review a number of useful command line tricks and tips that can significantly enhance your Linux usage skills.

1. Lock or Hide a File or Directory in Linux

The simplest way of locking a file or directory is by using Linux file permissions. In case your the owner of a file or directory, you can block (remove read, write and execute privileges) other users and groups from accessing it as follows:

$ chmod 700 tecmint.info
OR
$ chmod go-rwx tecmint.info

To know more about Linux file permissions, read this article Managing Users & Groups, File Permissions & Attributes in Linux.

To hide the file/directory from other system users, rename it with a (.) at the start of the file or directory:

$ mv filename .tecmint.info

2. Translate rwx Permissions into Octal Format in Linux

By default, when you run the ls command, it displays file permissions in rwx format, but to understand the equivalence of this format and the octal format, you can learn how to translate rwx permissions into Octal format in Linux.

3. How to Use ‘su’ When ‘sudo’ Fails

Although sudo command is used to execute commands with superuser privileges, there are moments when it fails to work as in the example below.

Here, I want to empty the contents of a large file named uptime.log but the operation has failed even when I used sudo.

$ cat /dev/null >/var/log/uptime.log 
$ sudo cat /dev/null >/var/log/uptime.log

Empty Large File Content in Linux

Empty Large File Content in Linux

In such as case, you need to switch to the root user account using su command to perform the operation like so:

$ su
$ sudo cat /dev/null >/var/log/uptime.log
$ cat /var/log/uptime.log

Switch to Super User

Switch to Super User

Try to understand the difference between su and sudo, in addition, read through their man pages for more guidelines:

$ man sudo
$ man su

4. Kill a Process in Linux

Sometimes when you want to terminate a process using kill or killall or pkill commands, it may fail to work, you realize that the process still continues to run on the system.

In order to destructively kill a process, send the -KILL siganl to it.

First determine its process ID and then kill it like so:

$ pidof vlc
$ sudo kill -KILL 10279

Find and Kill Process in Linux

Find and Kill Process in Linux

Check the kill command for additional usage options and information.

5. Delete File Permanently in Linux

Normally, we use the rm command to delete files from a Linux system, however, these files do not completely get deleted, they are simply stored and hidden on the hard disk and can still be recovered these files in Linuxand viewed by another person.

To prevent this, we can use the shred command which overwrites the file content and optionally deletes the file as well.

$ shred -zvu tecmint.pdf

The options used in the above command:

  1. -z – adds a final overwrite with zeros to hide shredding.
  2. -u – helps to truncate and remove file after overwriting.
  3. -v – shows progress.

Delete File Permanently in Linux

Delete File Permanently in Linux

Read through shred man page for additional usage instructions:

$ man shred

6. Rename Multiple Files in Linux

You can rename multiple files in Linux on the go by invoking the rename command.

It renames the filenames supplied according to a rule specified in the first argument.

The command below renames all .pdf files to .doc, here 's/\.pdf$/\.doc/' is the rule:

$ rename -v 's/\.pdf$/\.doc/' *.pdf

Rename Multiple Files in Linux

Rename Multiple Files in Linux

The next example renames all files matching "*.bak" to strip the extension, where 's/\e.bak$//' is the rule:


7. Check for Spelling of Words in Linux

The look command displays lines beginning with a given string, it can help you to check for the spelling of word from within the command line. Although it is not so effective and reliable, look is still a useful alternative to other powerful spelling-checkers:

$ look linu
$ look docum

Spell Checking in Linux

Spell Checking in Linux

8. Search for Description of Keyword in Manual Page

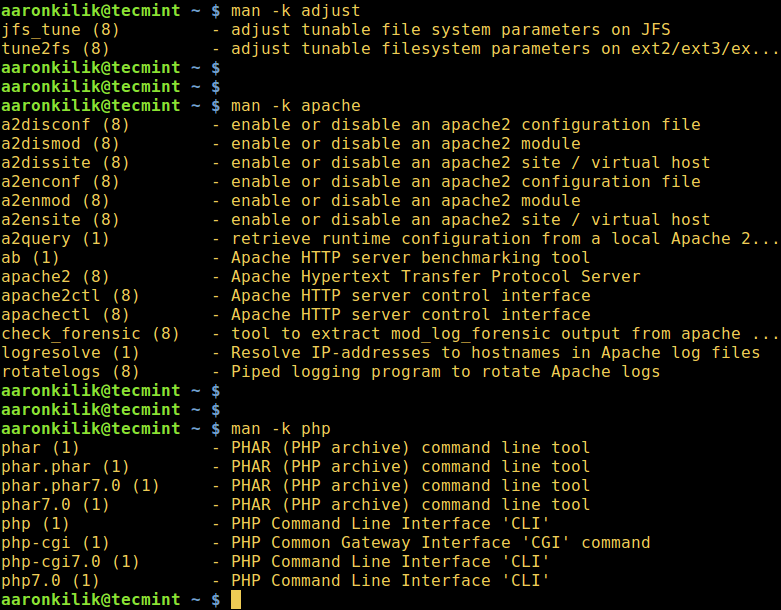
The man command is used to display manual entry pages of commands, when used with the -k switch, it searches the short descriptions and manual page names for the keyword printf (such as adjust, apache and php in the commands below) as regular expression.

$ man -k adjust
$ man -k apache
$ man -k php

Show Description of Keyword in Manual Pages

Show Description of Keyword in Manual Pages

9. Watch Logs in Real-Time in Linux

With watch command, you can run another Linux command periodically while displaying its output on fullscreen and alongside tail command which is used to view the last parts of a file, it is possible to watch the recording of log entries in a logfile.

In the example below, you will watch the system authentication logfile. Open two terminal windows, display the logfile for watching in real-time in the first window like so:

$ sudo watch tail /var/log/auth.log

You can also use tail command which shows the last parts of a file. Its -f flag enables watching changes in a file in real-time, therefore it is possible to watch the recording of log entries in a logfile.

$ sudo tail -f /var/log/auth.log

And run the commands below in the second terminal as you observe the logfile content from the first window:

$ sudo mkdir -p /etc/test
$ sudo rm -rf /etc/test

10. List All Shell builtin Commands

shell builtin is a command or a function, called from within and executed directly in the shell itself, instead of an external executable program which the shell would load from the hard disk and execute.

To list all shell builtins and their usage syntax, run:

$ help

As a concluding remark, command line tricks and tips always come in handy and make learning and using Linux easy and fun especially for newbies.

You can as well share with us other useful and interesting command line tricks or tips in Linux that you have come across via the comment form below.

Source

How to Find and Kill Running Processes in Linux

Process management is one of the important aspects of System Administration in Linux, and it includes killing of processes using the kill command.

Find and Kill Running Processes in Linux

Find and Kill Running Processes in Linux

In this how-to, we shall look at killing of less productive or unwanted processes on your Linux system.

What is a Process in Linux?

A process on a Linux system can be a running occurrence of an application or program. You can also refer to processes as tasks executing in the operating system.

When a process is running, it keeps on shifting from one state to another and a process can in one of the following states:

  1. Running: meaning the process is either executing or it is just set to be executed.
  2. Waiting: meaning that the process is waiting for an event or for a system resource to carry out a task.

There are two types of waiting process under Linux namely interruptible and uninterruptible.

A waiting process that can be interrupted by signals is called Interruptible, while a waiting process that is directly waiting on hardware conditions and cannot be interrupted under any conditions is called uninterruptible.

  1. Stopped: meaning that the process has been stopped, using a signal.
  2. Zombie: meaning the process has been stopped abruptly and is dead.

With this brief overview let us now look at ways of killing processes in a Linux system. We’ve already covered a few articles on ways to kill Linux running processes us using kill, pkill, killall and xkill, you can read them below.

  1. A Guide to Manage Linux Processes Using Kill, Pkill and Killall Commands
  2. How to Kill Unresponsive Linux Processes Using Xkill Command

When killing processes, the kill command is used to send a named signal to a named process or groups of processes. The default signal is the TERM signal.

Remember that the kill command can be a built-in function in many modern shells or external located at /bin/kill.

How to Find Process PID in Linux

In Linux every process on a system has a PID (Process Identification Number) which can be used to kill the process.

You can identify the PID of any process by using the pidof command as follows:

$ pidof firefox
$ pidof chrome
$ pidof gimp-2.8

Find Process PID in Linux

Find Process PID in Linux

How to Kill Processes in Linux

Once you find the process PID, let us now look at how to kill processes. In this first example, I am going to first get the PID of the process and then send a signal to it.

I want to kill gimp process, so I will do it as follows:

$ pidof gimp-2.8
$ kill 9378

To verify that the process has been killed, run the pidof command and you will not be able to view the PID.

$ pidof gimp-2.8

Kill Linux Process PID

Kill Linux Process PID

You can also send a named signal to the process by using the signal name or numbers as follows:

$ pidof vlc
$ kill -SIGTERM 9541
$ pidof vlc

Kill Linux Process PID by Signal

Kill Process PID by Signal

Using the signal number to kill a process:

$ pidof banshee
$ kill -9 9647
$ pidof banshee

Kill Linux Process PID by Number

Kill Process PID by Number

In the above example, the number 9 is the signal number for the SIGKILL signal.

How to Kill Multiple Process PID’s in Linux

To kill more than one process, pass the PID(s) to the kill command as follows:

$ pidof gimp-2.8
$ pidof vlc
$ pidof banshee
$ kill -9 9734 9747 9762

Kill Multiple Linux Process PID's

Kill Multiple Linux Process PID’s

Summary

There are many other ways of killing processes in Linux, these few examples just help to give you an overview of killing processes. Do let us know how you kill processes in Linux? and also tell other ways if any via comments.

Source

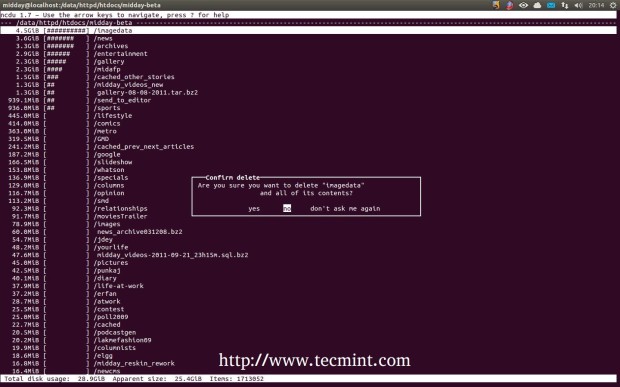
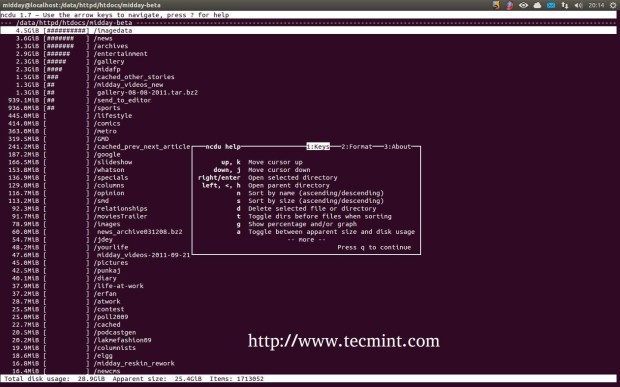
Ncdu a NCurses Based Disk Usage Analyzer and Tracker

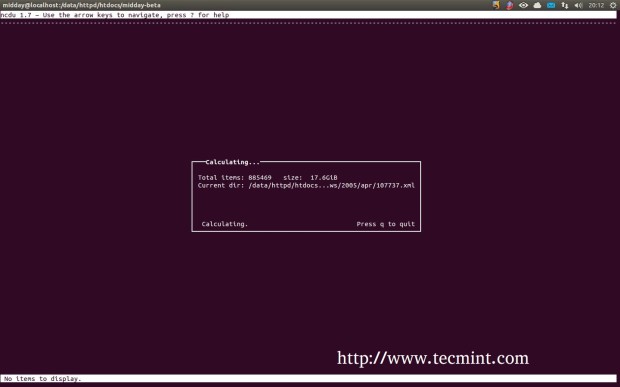
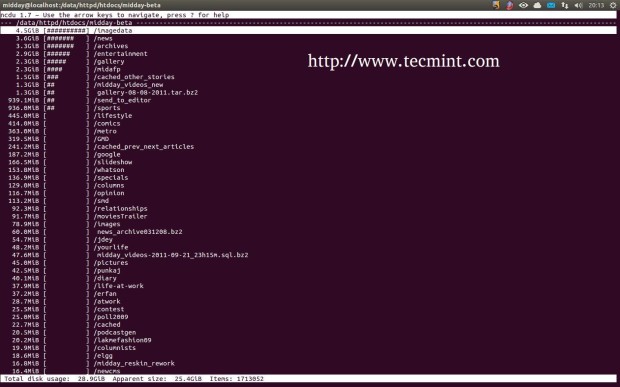
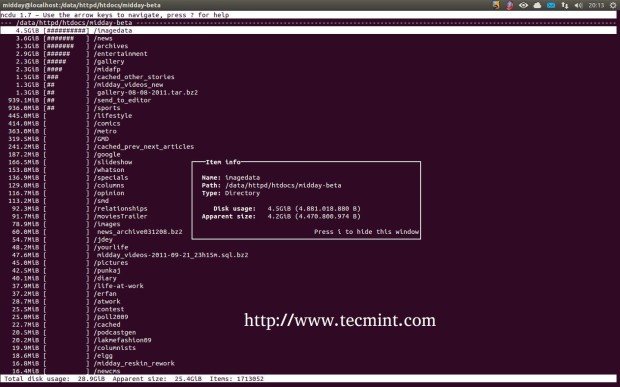
ncdu (NCurses Disk Usage) is a command line version of the most popular “du command“. It is based on ncurses and provides a fastest way to analyse and track what files and directories are using your disk space in Linux. It provides an excellent ncurses based interface to display the information in more intuitive way like columns for how much disk space used in megabytesgigabytes and graphical bar usage, file/directory namesfile deletionrefresh, etc. ncdu aims to be simple, fast and easy to use program and runs on any minimal Linux/Unix based system with ncurses installed.

ncdu commands

Install NCDU Tool

This article explains you through the process of installing and using NCDU program on a Linux system.

Installing ncdu (NCurses Disk Usage)

The “ncdu” package is not available under RHELCentOSFedoraScientific Linux distributions, you must have epel repository enabled on your system to install it using yum command.

# yum install ncdu

The “ncdu” utility is available on UbuntuLinux Mint and Debian from the package manager system, use the following apt-get command to install it.

$ sudo apt-get install ncdu

How Do I Use ncdu

Source

10 SCP Commands to Transfer Files/Folders in Linux

Linux administrator should be familiar with CLI environment. Since GUI mode in Linux servers is not a common to be installed. SSH may the most popular protocol to enable Linux administrator to manage the servers via remote in secure way. Built-in with SSH command there is SCP command. SCP is used to copy file(s) between servers in secure way.

Linux SCP Commands

10 Linux SCP Commands

The below command will read as “copy source_file_name” into “destination_folder” at “destination_host” using “username account”.

Basic syntax of SCP
scp source_file_name username@destination_host:destination_folder

There are much parameters in SCP command that you can use. Here are the parameters that may useful on daily basis usage.

Provide the detail information of SCP process using -v parameter

Basic SCP command without parameter will copy the files in background. User will see nothing unless the process is done or some error appears. You can use “-v” parameter to print debug information into the screen. It can help you debugging connection, authentication and configuration problems.

pungki@mint ~/Documents $ scp -v Label.pdf mrarianto@202.x.x.x:.
Sample Output
Executing: program /usr/bin/ssh host 202.x.x.x, user mrarianto, command scp -v -t .
OpenSSH_6.0p1 Debian-3, OpenSSL 1.0.1c 10 May 2012
debug1: Reading configuration data /etc/ssh/ssh_config
debug1: /etc/ssh/ssh_config line 19: Applying options for *
debug1: Connecting to 202.x.x.x [202.x.x.x] port 22.
debug1: Connection established.
debug1: Host '202.x.x.x' is known and matches the RSA host key.
debug1: Found key in /home/pungki/.ssh/known_hosts:1
debug1: ssh_rsa_verify: signature correct
debug1: Next authentication method: password
mrarianto@202.x.x.x's password:
debug1: Authentication succeeded (password).
Authenticated to 202.x.x.x ([202.x.x.x]:22).
Sending file modes: C0770 3760348 Label.pdf
Sink: C0770 3760348 Label.pdf
Label.pdf 100% 3672KB 136.0KB/s 00:27
Transferred: sent 3766304, received 3000 bytes, in 65.2 seconds
Bytes per second: sent 57766.4, received 46.0
debug1: Exit status 0

Provide modification times, access times, and modes from original files

The “-p” parameter will help you on this. An estimated time and the connection speed will appear on the screen.

pungki@mint ~/Documents $ scp -p Label.pdf mrarianto@202.x.x.x:.
Sample Output
mrarianto@202.x.x.x's password:
Label.pdf 100% 3672KB 126.6KB/s 00:29

Make file transfer faster using -C parameter

One of parameter that can faster your file transfer is “-C” parameter. The “-C” parameter will compress your files on the go. The unique thing is the compression is only happen in the network. When the file is arrived to the destination server, it will returning into the original size as before the compression happen.

Take a look of these commands. It is using a single file of 93 Mb.

pungki@mint ~/Documents $ scp -pv messages.log mrarianto@202.x.x.x:.
Sample Output
Executing: program /usr/bin/ssh host 202.x.x.x, user mrarianto, command scp -v -p -t .
OpenSSH_6.0p1 Debian-3, OpenSSL 1.0.1c 10 May 2012
debug1: Reading configuration data /etc/ssh/ssh_config
debug1: /etc/ssh/ssh_config line 19: Applying options for *
debug1: Connecting to 202.x.x.x [202.x.x.x] port 22.
debug1: Connection established.
debug1: identity file /home/pungki/.ssh/id_rsa type -1
debug1: Found key in /home/pungki/.ssh/known_hosts:1
debug1: ssh_rsa_verify: signature correct
debug1: Trying private key: /home/pungki/.ssh/id_rsa
debug1: Next authentication method: password
mrarianto@202.x.x.x's password:
debug1: Authentication succeeded (password).
Authenticated to 202.x.x.x ([202.x.x.x]:22).
debug1: Sending command: scp -v -p -t .
File mtime 1323853868 atime 1380425711
Sending file timestamps: T1323853868 0 1380425711 0
messages.log 100% 93MB 58.6KB/s 27:05
Transferred: sent 97614832, received 25976 bytes, in 1661.3 seconds
Bytes per second: sent 58758.4, received 15.6
debug1: Exit status 0

Copying file without “-C” parameter will result 1661.3 second. Yo may compare the result to the command below which using “-C” parameter.

pungki@mint ~/Documents $ scp -Cpv messages.log mrarianto@202.x.x.x:.
Sample Output
Executing: program /usr/bin/ssh host 202.x.x.x, user mrarianto, command scp -v -p -t .
OpenSSH_6.0p1 Debian-3, OpenSSL 1.0.1c 10 May 2012
debug1: Reading configuration data /etc/ssh/ssh_config
debug1: /etc/ssh/ssh_config line 19: Applying options for *
debug1: Connecting to 202.x.x.x [202.x.x.x] port 22.
debug1: Connection established.
debug1: identity file /home/pungki/.ssh/id_rsa type -1
debug1: Host '202.x.x.x' is known and matches the RSA host key.
debug1: Found key in /home/pungki/.ssh/known_hosts:1
debug1: ssh_rsa_verify: signature correct
debug1: Next authentication method: publickey
debug1: Trying private key: /home/pungki/.ssh/id_rsa
debug1: Next authentication method: password
mrarianto@202.x.x.x's password:
debug1: Enabling compression at level 6.
debug1: Authentication succeeded (password).
Authenticated to 202.x.x.x ([202.x.x.x]:22).
debug1: channel 0: new [client-session]
debug1: Sending command: scp -v -p -t .
File mtime 1323853868 atime 1380428748
Sending file timestamps: T1323853868 0 1380428748 0
Sink: T1323853868 0 1380428748 0
Sending file modes: C0600 97517300 messages.log
messages.log 100% 93MB 602.7KB/s 02:38
Transferred: sent 8905840, received 15768 bytes, in 162.5 seconds
Bytes per second: sent 54813.9, received 97.0
debug1: Exit status 0
debug1: compress outgoing: raw data 97571111, compressed 8806191, factor 0.09
debug1: compress incoming: raw data 7885, compressed 3821, factor 0.48

As you can see, when you are using compression, transfer process is done in 162.5 second. It is 10 times faster than not using “-C” parameter. If you are copying a lot files across the network, “-C” parameter would help you to decrease the total time you need.

The thing that we should notice that compression method will not work on any files. When the source file is already compressed, you will not find any improvement there. Files such as .zip.rarpictures, and .iso files will not affected by “-C” parameter.

Select another cipher to encrypt files

By default SCP using “AES-128” to encrypt files. If you want to change to another cipher to encrypt it, you can use “-c” parameter. Take a look of this command.

pungki@mint ~/Documents $ scp -c 3des Label.pdf mrarianto@202.x.x.x:.

mrarianto@202.x.x.x's password:
Label.pdf 100% 3672KB 282.5KB/s 00:13

Above command tell SCP to use 3des algorithm to encrypt file. Please be careful that this parameter using “-c” not “-C“.

Limiting bandwidth usage

Another parameter that may useful is “-l” parameter. The “-l” parameter will limit the bandwidth to use. It will be useful if you do an automation script to copy a lot of file, but you don’t want the bandwidth is drained by the SCPprocess.

pungki@mint ~/Documents $ scp -l 400 Label.pdf mrarianto@202.x.x.x:.

mrarianto@202.x.x.x's password:
Label.pdf 100% 3672KB 50.3KB/s 01:13

The 400 value behind “-l” parameter is mean that we limit the bandwidth for SCP process only 50 KB/sec. One thing to remember that bandwidth is specified in Kilobits/sec (kbps). It is mean that 8 bits equal with 1 byte.

While SCP counts in Kilobyte/sec (KB/s). So if you want to limit your bandwidth for SCP maximum only 50 KB/s, you need to set it into 50 x 8 = 400.

Specify specific port to use with SCP

Usually SCP is using port 22 as a default port. But for security reason, you may change the port into another port. For example, we are using port 2249. Then the command should be like this.

pungki@mint ~/Documents $ scp -P 2249 Label.pdf mrarianto@202.x.x.x:.

mrarianto@202.x.x.x's password:
Label.pdf 100% 3672KB 262.3KB/s 00:14

Make sure that it use capital “P” not “p“, since “p” is already used for preserved times and modes.

Copy files inside directory recursively

Sometimes we need to copy directory and all files / directories inside it. It will be better if we can do it in 1command. SCP support that scenario using “-r” parameter.

pungki@mint ~/Documents $ scp -r documents mrarianto@202.x.x.x:.

mrarianto@202.x.x.x's password:
Label.pdf 100% 3672KB 282.5KB/s 00:13
scp.txt 100% 10KB 9.8KB/s 00:00

When the copy process is done, at the destination server you will found a directory named “documents” with all it’s files. The folder “documents” is automatically created.

Disable progress meter and warning / diagnostic message

If you choose not to see progress meter and warning / diagnostic messages from SCP, you may disable it using “-q” parameter. Here’s the example.

pungki@mint ~/Documents $ scp -q Label.pdf mrarianto@202.x.x.x:.

mrarianto@202.x.x.x's password:
pungki@mint ~/Documents $

As you can see, after the you enter the password, there is no any information about SCP process. After the process is complete, you will be see a prompt again.

Copy files using SCP through Proxy

Proxy server is usually used in office environment. Natively, SCP is not proxy configured. When your environment using proxy, you have to “tell” SCP to communicate with the proxy.

Here’s the scenario. The proxy address is 10.0.96.6 and the proxy port is 8080. The proxy also implemented user authentication. First, you need to create “~/.ssh/config” file. Second you put this command inside it.

ProxyCommand /usr/bin/corkscrew 10.0.96.6 8080 %h %p ~/.ssh/proxyauth

Then you need to create file “~/.ssh/proxyauth” which contain.

myusername:mypassword

After that you can do SCP transparently as usual.

Please notice that corkscrew is might not installed yet on your system. On my Linux Mint, I need to install it first, using standard Linux Mint installation procedure.

$ apt-get install corkscrew

For other yum based systems, users can install corkscrew using the following yum command.

# yum install corkscrew

Another thing that since “~/.ssh/proxyauth” file contain your “username” and “password” in clear-text format, please make sure that the file can be accessed by you only.

Select different ssh_config file

For mobile user who often switch between company network and public network, it will be suffer to always change settings in SCP. It is better if we can put a different ssh_config file to match our needs.

Here’s a sample scenario

Proxy is used in company network but not in public network and you are regularly switch network.

pungki@mint ~/Documents $ scp -F /home/pungki/proxy_ssh_config Label.pdf

mrarianto@202.x.x.x:.
mrarianto@202.x.x.x's password:
Label.pdf 100% 3672KB 282.5KB/s 00:13

By default “ssh_config” file per user will be placed in “~/.ssh/config“. Creating a specific “ssh_config” file with proxy compatible, will make you easier to switch between networks.

When you are on company network, you can use “-F” parameter. When you are on public network, you can skip “-F” parameter.

That’s all about SCP. You can see man pages of SCP for more detail. Please feel free to leave comments and suggestions.

Source

10 sFTP Command Examples to Transfer Files on Remote Servers in Linux

File Transfer Protocol (FTP) was widely used protocol to transfer files or data remotely in unencrypted format which is not secure way to communicate. As we all know that File Transfer Protocol is not at all secure because all transmissions happens in clear text and the data can be readable by anyone during sniffing the packets on the network.

sftp commands

10 sftp command examples

So, basically FTP can be used in limited cases or on the networks that you trust. Over the period of time SCPand SSH addresses this security ambiguity and added an encrypted secure layer while transferring data between remote computers.

SFTP (Secure File Transfer Protocol) runs over SSH protocol on standard port 22 by default to establish a secure connection. SFTP has been integrated into many GUI tools (FileZillaWinSCPFireFTP etc.).

Security Warnings: Please don’t open SSH port (Secure SHell) globally as this would be a security breaches. You can only open for specific IP from where you are going to transfer or manage files on remote system or vice versa.

  1. 5 Best Practices to Secure and Protect SSH Server
  2. 10 Wget Command Examples in Linux

This article will guide you 10 sftp command examples to use it through interactive command-line interface.

1. How to Connect to SFTP

By default, same SSH protocol is used to authenticate and establish a SFTP connection. To start an SFTP session, enter the username and remote hostname or IP address at the command prompt. Once authentication successful, you will see a shell with an sftp> prompt.

[root@tecmint ~]# sftp tecmint@27.48.137.6

Connecting to 27.48.137.6...
tecmint@27.48.137.6's password:
sftp>

2. Getting Help

Once, you in the sftp prompt, check the available commands by typing ‘?‘ or ‘help‘ at command prompt.

sftp> ?
Available commands:
cd path                       Change remote directory to 'path'
lcd path                      Change local directory to 'path'
chgrp grp path                Change group of file 'path' to 'grp'
chmod mode path               Change permissions of file 'path' to 'mode'
chown own path                Change owner of file 'path' to 'own'
help                          Display this help text
get remote-path [local-path]  Download file
lls [ls-options [path]]       Display local directory listing
ln oldpath newpath            Symlink remote file
lmkdir path                   Create local directory
lpwd                          Print local working directory
ls [path]                     Display remote directory listing
lumask umask                  Set local umask to 'umask'
mkdir path                    Create remote directory
put local-path [remote-path]  Upload file
pwd                           Display remote working directory
exit                          Quit sftp
quit                          Quit sftp
rename oldpath newpath        Rename remote file
rmdir path                    Remove remote directory
rm path                       Delete remote file
symlink oldpath newpath       Symlink remote file
version                       Show SFTP version
!command                      Execute 'command' in local shell
!                             Escape to local shell
?                             Synonym for help

3. Check Present Working Directory

The command ‘lpwd‘ is used to check the Local present working directory, whereas ‘pwd‘ command is used to check Remote working directory.

sftp> lpwd
Local working directory: /
sftp> pwd
Remote working directory: /tecmint/
  1. lpwd – print the current directory on your system
  2. pwd – print the current directory on the ftp server

4. Listing Files

Listing files and directories in local as well as remote system.

On Remote
sftp> ls
On Local
sftp> lls

5. Upload File

Put single or multiple files in remote system.

sftp> put local.profile
Uploading local.profile to /tecmint/local.profile

6. Upload Mutiple Files

Putting multiple files on in remote system.

sftp> mput *.xls

6. Download Files

Getting single or multiple files in local system.

sftp> get SettlementReport_1-10th.xls
Fetching /tecmint/SettlementReport_1-10th.xls to SettlementReport_1-10th.xls

Get multiple files on a local system.

sftp> mget *.xls

Note: As we can see by default with get command download file in local system with same name. We can download remote file with different name specifying the name at the end. (This applies only while downloading single file).

7. Switching Directories

Switching from one directory to another directory in local and remote locations.

On Remote
sftp> cd test
sftp>
On Local
sftp> lcd Documents

8. Create Directories

Creating new directories on local and remote locations.

sftp> mkdir test
sftp> lmkdir Documents

9. Remove Directories

Remove directory or file in remote system.

sftp> rm Report.xls
sftp> rmdir sub1

Note: To remove/delete any directory from remote location, the directory must be empty.

10. Exit sFTP Shell

The ‘!‘ command drop us in local shell from where we can execute Linux commands. Type ‘exit‘ command where we can see sftp> prompt return.

sftp> !

[root@sftp ~]# exit
Shell exited with status 1
sftp>

Conclusion

The SFTP is a very useful tool for administrating servers and transferring files to and from (Local and Remote). We hope this tuts will help you to understand the usage of SFTP in some extent.

Source

How to Add a New Disk Larger Than 2TB to An Existing Linux

Have you ever tried to do the partitioning of hard disk larger than 2TB using fdisk utility and wondered why you end up getting a warning to use GPT? Yes, you got that right. We cannot partition a hard disk larger than 2TB using fdisk tool.

In such cases, we can use parted command. The major difference lies in the partitioning formats that fdiskuses DOS partitioning table format and parted uses GPT format.

TIP: You can use gdisk as well instead of parted tool.

In this article, we will show you to add a new disk larger than 2TB to an existing Linux server such as RHEL/CentOS or Debian/Ubuntu.

I am using fdisk and parted utilities to do this configuration.

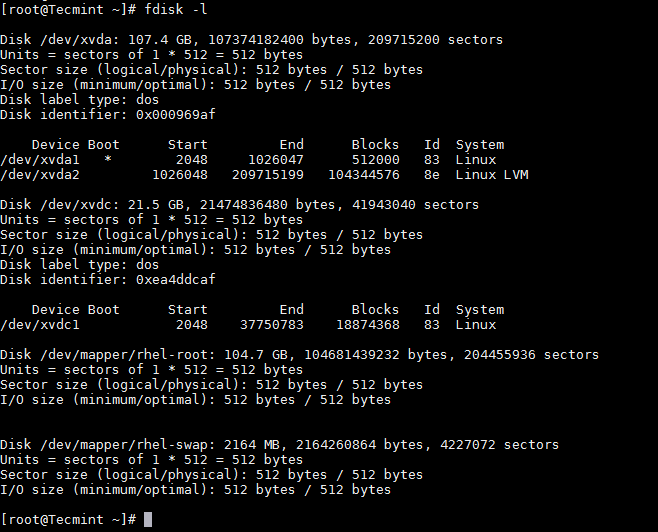
First list the current partition details using fdisk command as shown.

# fdisk -l

List Linux Partition Table

List Linux Partition Table

For the purpose of this article, I am attaching a hard disk of 20GB capacity, which can be followed for disk larger than 2TB as well. Once you added a disk, verify the partition table using same fdisk command as shown.

# fdisk -l

List New Partition Table

List New Partition Table

Tip: If you are adding a physical hard disk, you may find that partitions already created. In such cases, you can use fdsik to delete the same before using parted.

# fdisk /dev/xvdd

Use d switch for the command to delete the partition and w to write the changes and quit.

Delete Linux Partition

Delete Linux Partition

Important: You need to be careful while deleting the partition. This will erase the data on the disk.

Now its time to partition a new hard disk using parted command.

# parted /dev/xvdd

Set the partition table format to GPT

(parted) mklabel gpt

Create the Primary partition and assign the disk capacity, here I am using 20GB (in your case it would be 2TB).

(parted) mkpart primary 0GB 20GB

Create Partition using Parted

Create Partition using Parted

Just for curiosity, let’s see how this new partition is listed in fdisk.

# fdisk /dev/xvdd

Verify Partition Details

Verify Partition Details

Now format and then mount the partition and add the same in /etc/fstab which controls the file systems to be mounted when the system boots.

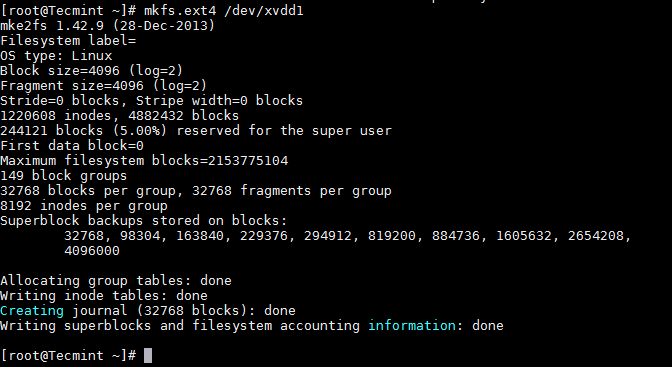
# mkfs.ext4 /dev/xvdd1

Format Linux Partition

Format Linux Partition

Once partition has been formatted, now it’s time mount the partition under /data1.

# mount /dev/xvdd1 /data1

For permanent mounting add the entry in /etc/fstab file.

/dev/xvdd1     /data1      ext4      defaults  0   0

Important: Kernel should support GPT in order to partition using GPT format. By default RHEL/CentOS have Kernel with GPT support, but for Debian/Ubuntu you need to recompile the kernel after changing the config.

That’s it! In this article, we have shown you how to use the parted command. Share your comments and feedback with us.

Source

Dtrx – An Intelligent Archive Extraction (tar, zip, cpio, rpm, deb, rar) Tool for Linux

All of us might have faced a situation at some point of time or the other while using Linux tar.gztar.bz2tbzcommands. So many archive types, so many commands to remember… Well, not any-more, thanks to dtrx tool.

Install Dtrx in Linux

Dtrx Tool for Extract Tar files

  1. 18 Tar Commands to Create and Extract Archives in Linux
  2. How to Open, Extract and Create RAR Files in Linux

What is Dtrx?

Dtrx stands for “Do The Right Extraction“, it’s an open source and very effective command-line application for *nix systems that simplify your job of archive extraction easier.

The dtrx command is an replacement of “tar -zxvf” or “tar -xjf” commands and it provides a one single command to extract archives in a number of different formats including tarziprpmdebgem7zcpiorar and many more. It can also used to decompress files compressed with bzip2gzip etc.

By default, dtrx extract contents to a dedicated directory and also fixes permission issues (like permission denied) faced by user while extracting content to ensure that the owner can read and write all those files.

Dtrx Features

  1. Handles many archive types: It provides only one simple command to extract tar, zip, rar, gz, bz2, xz, rpm, deb, gem, self-extracting zip files and many other formats of exe files.
  2. Keeps everything organized: It will extract archives into their own dedicated directories.
  3. Sane permissions: It also make sure, user can read and write all those files after extraction, keeping permission intact.
  4. Recursive extraction: It can find archives inside the archive and extract those too.

How to Install Dtrx in Linux

The dtrx tool is by default included in Ubuntu repositories, all you’ve to do is simple do a apt-get to install in on your system.

On Debian/Ubuntu/Linux Mint

$ sudo apt-get install dtrx

On RHEL/CentOS/Fedora

On Red Hat based systems, dtrx is not available via default repositories, you need to download a dtrx script and install the program system-wide using below commands as root user.

# wget http://brettcsmith.org/2007/dtrx/dtrx-7.1.tar.gz
# tar -xvf dtrx-7.1.tar.gz 
# cd dtrx-7.1
# python setup.py install --prefix=/usr/local
Sample Output
running install
running build
running build_scripts
creating build
creating build/scripts-2.6
copying and adjusting scripts/dtrx -> build/scripts-2.6
changing mode of build/scripts-2.6/dtrx from 644 to 755
running install_scripts
copying build/scripts-2.6/dtrx -> /usr/local/bin
changing mode of /usr/local/bin/dtrx to 755
running install_egg_info
Creating /usr/local/lib/python2.6/site-packages/
Writing /usr/local/lib/python2.6/site-packages/dtrx-7.1-py2.6.egg-info

How to Use dtrx Command

The dtrx command is sort of like the one ring to rule them all in the Lord of The Rings. Instead of having to remember syntax for each archive, all you have to remember is dtrx command.

1. Extracting Single Archive

For example, I want to extract a archive file called “tecmint27-12-2013.gz“, I only execute dtrx command without using any flags.

[root@tecmint]# dtrx tecmint27-12-2013.gz

Other than simplifying the extraction, it has a bunch of other options like extracting the file to a folder and recursively extracting all other archives inside a given archive.

2. Extracting Multiple Archives

Consider you’ve a file “dtrAll.zip“, consisting of dtr1.zipdtr2.zip and dtr3.zip each consisting of dtr1,dtr2 and dtr3 respectively. Instead of having to manually first extract the dtrAll zip and then extracting each one of thedtr1dtr2 and dtr3 you can directly extract it in respective folders by using dtrx and by selecting option “a“, it extracts all the zip files recursively.

[root@tecmint]# dtrx dtrAll.zip
Sample Output
dtrx: WARNING: extracting /root/dtrAll.zip to dtrAll.1
dtrAll.zip contains 3 other archive file(s), out of 3 file(s) total.
You can:
 * _A_lways extract included archives during this session
 * extract included archives this _O_nce
 * choose _N_ot to extract included archives this once
 * ne_V_er extract included archives during this session
 * _L_ist included archives
What do you want to do?  (a/o/N/v/l) a

After, extraction, the contents of the extracted directory can be verified using ls command.

[root@tecmint]# cd dtrAll
[root@tecmint]# ls 

dtr1  dtr1.zip  dtr2  dtr2.zip  dtr3  dtr3.zip

3. Extracting Specific Archive

Let’s say you want to extract the first archive and not archives inside it. By selecting N, it only extracts the given archive and not other archives inside it.

[root@tecmint]# dtrx dtrAll.zip
Sample Output
dtrx: WARNING: extracting /root/dtrAll.zip to dtrAll.1
dtrAll.zip contains 3 other archive file(s), out of 3 file(s) total.
You can:
 * _A_lways extract included archives during this session
 * extract included archives this _O_nce
 * choose _N_ot to extract included archives this once
 * ne_V_er extract included archives during this session
 * _L_ist included archives
What do you want to do?  (a/o/N/v/l) N

The contents of extracted directory can be verified using ls command as shown.

[root@tecmint]# cd dtrAll
[root@tecmint]# ls

dtr1.zip dtr2.zip dtr3.zip

4. Extract Each Layer of Archive

To extract each layer of archive inside archive on a case by case basis i.e., if you want to extract 2nd layer of archives but not the 3rd layer, you can use the “o” option.

Consider you’ve a zip file “dtrNewAll.zip“, which has “dtrAll.zip” and “dtrNew” as it’s contents. Now if you want to extract the contents of “dtrNewAll” and “dtrAll” as well but not of dtr1.zipdtr2.zip and dtr3.zip, you can use “o” and “n” options as shown below.

# dtrx dtrNewAll.zip
Sample Output
dtrNewAll.zip contains 1 other archive file(s), out of 2 file(s) total.
You can:
 * _A_lways extract included archives during this session
 * extract included archives this _O_nce
 * choose _N_ot to extract included archives this once
 * ne_V_er extract included archives during this session
 * _L_ist included archives
What do you want to do?  (a/o/N/v/l) o
dtrAll.zip contains 3 other archive file(s), out of 3 file(s) total.
You can:
 * _A_lways extract included archives during this session
 * extract included archives this _O_nce
 * choose _N_ot to extract included archives this once
 * ne_V_er extract included archives during this session
 * _L_ist included archives
What do you want to do?  (a/o/N/v/l) n

The contents of extracted directory can be verified using ls command as shown.

[root@tecmint]# cd dtrNewAll
[root@tecmint]# ls

dtrAll  dtrAll.zip  dtrNew
[root@tecmint]# cd dtrAll
[root@tecmint]# ls

dtr1.zip dtr2.zip dtr3.zip

We first select the “o” option which means that all archives inside dtrNewAll will be extracted. Later we select the “n” option for dtrAll.zip which means that the archives inside it dtr1.zip , dtr2.zip and dtr3.zip will not be extracted.

5. Extract meta-data from .deb, .rpm and .gem files

The “-m” option extract the meta-data from .deb.rpm and .gem archives, instead of their normal contents. Here is an example of the command.

[root@tecmint]# dtrx -m openfire_3.8.2_all.deb 
[root@tecmint]# dtrx -m openfire-3.8.2-1.i386.rpm
[root@tecmint]# ls

conffiles  control  md5sums  postinst  postrm  prerm

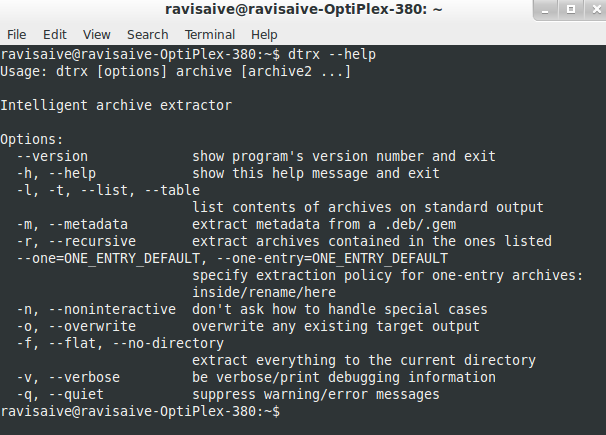
There are lot more dtrx options to explore, just run the “dtrx –help” to list the available options.

[root@tecmint]# dtrx  --help

Usage: dtrx [options] archive [archive2 ...]

Intelligent archive extractor

Options:
  --version             	show program's version number and exit
  -h, --help            	show this help message and exit
  -l, -t, --list, --table      	list contents of archives on standard output
  -m, --metadata        	extract metadata from a .deb/.gem
  -r, --recursive       	extract archives contained in the ones listed
  -n, --noninteractive  	don't ask how to handle special cases
  -o, --overwrite       	overwrite any existing target output
  -f, --flat, --no-directory    extract everything to the current directory
  -v, --verbose         	be verbose/print debugging information
  -q, --quiet           	suppress warning/error messages

Reference Links

dtrx Homepage

I think you must give a try to dtrx, because it’s the only powerful command line tool that gives a single command to decompress any format of archive files.

Source

How to Create Multiple User Accounts in Linux

The two utilities for adding or creating user accounts in Unix/Linux systems are adduser and useradd. These commands are designed to add a single user account in the system at a time. What if you have multiple users accounts to be created? That’s when you need a program such as newusers.

Newusers is a useful command line utility used to update and create new user accounts at a single time. It is intended to be used in IT environments with large systems where a system administrator needed to update or create multiple user accounts in batch. It reads information from stdin (by default) or a file to update a set of existing user accounts or to create new users.

In this article, we will explain how to create multiple user accounts in batch mode using Newusers utility in Linux systems.

To create users in a batch, you can provide their information in a file in the following format, same as the standard password file:

pw_name:pw_passwd:pw_uid:pw_gid:pw_gecos:pw_dir:pw_shell
/bash

Create Multiple User Accounts in Linux

Create Multiple User Accounts in Linux

Save the file and set the required permissions on it.

$ sudo chmod 0600 users.txt 

Now run the newusers command with the input file to add the above user accounts at once.

$ sudo newusers users.txt

First, newusers program tries to create or update the specified accounts, and then write these changes to the user or group databases. In case of any errors except in the final writes to the databases, no changes are committed to the databases. This is simply how the newusers command works.

If the previous command is successful, check the /etc/passwd and /etc/groups files to confirm that the user accounts have been added as shown.

$ cat /etc/passwd | grep -E "ravi|tecmint"

Verify User Accounts in Linux

Verify User Accounts in Linux

For more information, see the newuser man page.

$ man newuser 

You might also like to check these following related articles.

  1. 3 Ways to Change a Users Default Shell in Linux
  2. How to Create a Shared Directory for All Users in Linux
  3. Whowatch – Monitor Linux Users and Processes in Real Time
  4. How to Send a Message to Logged Users in Linux

In this article, we’ve explained how to create multiple users in Linux using newusers program. Use the feedback form below to ask any questions or share your comments with us. If you know of any similar utilities out there, let us know as well.

Source

WP2Social Auto Publish Powered By : XYZScripts.com