If you’re used to be a VMware user and try to switch to the Open-Source side of the Force by using VirtualBox, you may run into difficulties if you try to import an existing VDI file into VirtualBox. Actually it’s quite easy, if you know how.
The main difference between VMware and VirtualBox is that VMware captures a whole virtual machine in an image, whereas VirtualBox only supports images of a hard disk. So in VirtualBox’s world, you first need to create a new virtual machine, before using an existing VirtualBox image.
First copy your VDI file into VirtualBox’s virtual hard disks repository. On Mac OS X it’s $HOME/Library/VirtualBox/HardDisks/.
Start VirtualBox and create a new virtual machine (according to the OS you expect to live on the VirtualBox image):
When you’re asked for a hard disk image, select Use existing hard disk and click on the small icon on the right:
Which will brings you to the Virtual Media Manager. Click on Add and select the VDI file from step 1.
After leaving the Virtual Media Manager, you’ll be back in your virtual machine wizard. Now you can select your new VDI as existing hard disk and finalize the creation process.
Back in the main window, you’re now able to start your new virtual machine:
This article demonstrates programmatic deployment of a Shiny application with GitHub webhooks and a Jenkins Freestyle project.
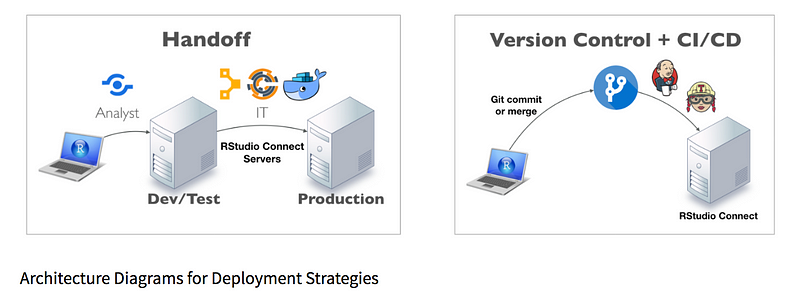
What are we trying to build?
I have a data product (in this case a shiny application) deployed to my RStudio Connect server. I also have a GitHub repository for the application where I’ve version controlled the app code. I want to link and automate the application update process with my GitHub workflow, i.e. every time I push a code change to GitHub, I’d like the deployed application on Connect to automatically be updated with those changes.
Basic Build Plan
This workflow assumes that the content has already been deployed to my Connect Server at least once. The initial deployment could be achieved programmatically or through traditional IDE push-button / rsconnect deployment methods. The content management API for RStudio Connect can be leveraged to perform the initial bundle upload programmatically.
To read more about the content management APIs and view existing recipes, please see the following resources:
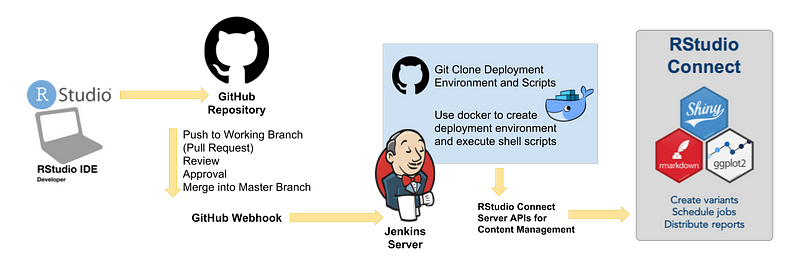
After reviewing the API documentation and example scripts, flesh out your plan to include actionable steps and tools. My updated diagram shows each process and the required resources for defining functional automation:
Actual Build Plan
Note: I started this project with a brand new, clean Jenkins Server. I use Ansible to create (and tear down) small Jenkins servers that live for the duration of my experiments. This article will not cover the basics of installing and configuring a Jenkins server.
Development and Git Branching
Application development occurs in the RStudio IDE. I plan to create a git branching strategy so that new changes can be kept separate from the master branch and reviewed before merging. The GitHub repository I created to keep the application code can be viewed here:
This repository contains a README file (not required) and a single directory with all the application code (in this case only an app.R file) as well as the manifest file which can be generated with the rsconnect package in the RStudio IDE: rsconnect::rsconnect::writeManifest()
GitHub Webhooks
The next step of GitHub set up is to create a Webhook so that the Jenkins server can be notified of all new changes to Master.
In the GitHub repository, navigate to the Settings page, then select Webhooksfrom the left sidebar. Add a new webhook to see the management form as shown here:
Create a new webhook for Jenkins
For the Payload URL field, provide the URL of your Jenkins server with /github-webhook/ appended to it. These are the selections I set for the webhook:
Now that the webhook is in place, the next step is to configure the receiving end. Jenkins needs the GitHub Integration plugin to receive POST payloads coming from GitHub every time the push event triggers.
Add the GitHub plugin to Jenkins:
Manage Jenkins > Manage Plugins
Manage Jenkins Plugins
Check the Installed tab to see if the GitHub Integration Plugin already exists. If not, search for it in the Available tab, download and install.
Docker in Jenkins
In order to streamline the deployment build process for this project, I’ve chosen to use Docker image provided in the programmatic deployment example repo provided here: rstudio/connect-api-deploy-shiny.
There are many ways to incorporate the use of Docker containers into Jenkins projects. Rather than leverage an eternal container registry and a Jenkins-Docker plugin, I’ll show quick-and-dirty way, invoking it directly with shell commands.
Note: My Jenkins server is built with the Docker service installed, so this will work for my project, but it might not work for yours. Take the time to investigate what Docker integrations exist and are considered best practices if you are working on a shared or pre-existing Jenkins installation.
In a second GitHub repository, I’ve version controlled all the pieces of the deployment environment as well as the upload-and-deploy.sh script that will be used to interact with the RStudio Connect content management API. This repository is separate from the Shiny application code repo so that I can have a singular, centralized location for keeping just these pieces of the process.
All the parts are in place, so finally it’s time to put everything together in Jenkins.
Start a New Item > Freestyle Project
Give your project a name (e.g. “basic-app-deploy”)
I plan on linking this project to only one piece of content, so the name of the Jenkins project can reference my specific Shiny application.
Start a Freestyle Project
Sidebar: Why Jenkins Freestyle?
If there were a crawl-walk-run strategy for working with Jenkins, Freestyle projects might be the crawl step. If you’re already familiar with Jenkins, you might be more interested in setting up a pipeline project or using a Jenkinsfile to structure the workflow.
Pros and Cons of Jenkins Freestyle:
Pro: New to Jenkins ?— low learning curve
Pro: Nice way to learn the Jenkins web interface
Pro: Quick way to accomplish simple jobs (this is not a complex build)
Con: Way too much clicking through web forms
Con: Job is not defined as code
Navigate the Freestyle Project Webform
Once you have a new project set up, step through the freestyle webform complete the configuration:
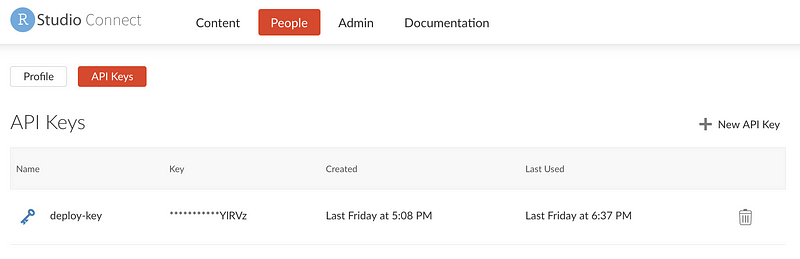
Programmatic deployment requires an RStudio Connect API key. Generate an API key through the Connect user interface:
RStudio Connect API Keys
Add Credentials: Save the API key as a Secret Text in Jenkins Credentials Provider:
You can expose secret texts to the Build Environment through the Bindings option:
Check: Use secret texts or files
Secret text:
– Variable: PUBLISHER_KEY (choose a name)
Credentials: Add > Jenkins > Add Credentials
Save the API key as a Secret Text in Jenkins Credentials Provider
Build
The build pane allows for many different types of task selections. For simplicity, I chose the Execute Shell Commands option. I created three blocks of Shell Command build tasks, but the separation was only for readability:
Execute Shell Block 1: Read in the Dockerfile and deployment shell script from GitHub
In this block, I reference the PUBLISHER_KEY credential created in the Build Environment step earlier.
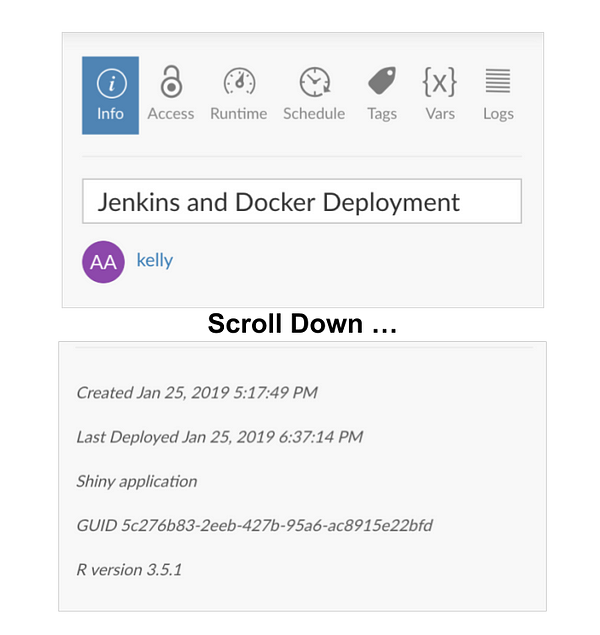
Content GUID lookup
I have also hard-coded two additional important pieces of information: the CONNECT_SERVER address, and the application GUID. You could easily create a secret text credential for the server address like we made for the the API key. The application GUID is an identifying piece of information that you’ll have to look up from the RStudio Connect User Interface.
The app GUID is listed at the bottom of the Info settings tab of the deployed content on RStudio Connect.
Project Finishing Touches:
Save your Jenkins freestyle project
Test it by pushing a change to GitHub!
Demo of a Successful Test
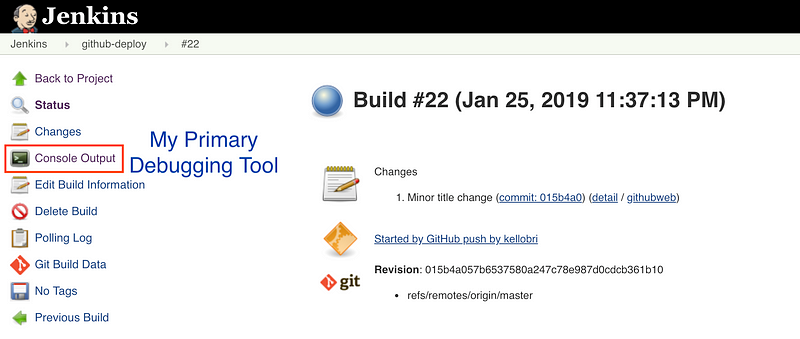
Useful Jenkins Debugging Areas
From the Jenkins dashboard, click on your project. Here you can go back to the webform and change something by clicking the ‘Configure’ link. To see details about the last build, click on that build link; from here you can access the console output for the build — this is usually the first place I go when a build fails.
Console Output for Jenkins Debugging
Also great for iteration and debugging: You can always schedule and run build tests directly from Jenkins without pushing random code changes to GitHub.
Success — What’s Next?
Congrats! Here are some places to explore next:
What if I need to do this for five more shiny apps?
Use this working freestyle project as a template for a new project!
From the Jenkins Dashboard, Select: New Item > Name the project > Then scroll to the bottom of the project type selection options and use auto-complete to find the project you’d like to copy from:
Use your first project as a template for others
Great — But what if I need to do this for 100 more shiny apps?
Remember that crawl-walk-run strategy that I mentioned earlier? If you need to put CI/CD in place for 100 shiny applications, you’re probably going to want to consider some of the other methods for interacting with Jenkins.
Freestyle projects are a great learning tool — and can be helpful for getting small projects off the ground quickly. But I wouldn’t recommend using them long term unless clicking around in webforms is your favorite thing ever.
If you’re looking to do large-scale programmatic deployments with Jenkins, I recommend moving toward a workflow structured on pipeline projects and Jenkinsfiles.
It’s been a number of months since last trying the RadeonSI NIR back-end, which is being developed as part of the OpenGL 4.6 SPIR-V bits for this AMD OpenGL driver, but eventually RadeonSI may end up switching from TGSI to NIR by default. Given the time since we last tried it out and the increasing popularity of NIR, this weekend I did some fresh tests of the NIR back-end with a Radeon Vega graphics card.
The RadeonSI NIR support isn’t enabled by default but requires setting the R600_DEBUG=nir environment variable for activating. They have been pursuing this support to re-use existing code as part of the long-awaited OpenGL 4.6 SPIR-V ingestion support, which is still ongoing.
The last time I tried out RadeonSI NIR months ago it was causing issues with a few OpenGL games, but fortunately that seems to be an issue of the past. When trying all of the frequently benchmarked OpenGL Linux games with RadeonSI NIR on Mesa 19.1-devel, I didn’t run into any game problems or any corruption problems or other nuisances to deal with… The experience was great.
This round of testing was with Mesa 19.1-devel via the Padoka PPA on Ubuntu 18.10 and using the Linux 5.0 Git kernel. The Radeon RX Vega 64 graphics card was what I used for this quick weekend comparison.
Besides being pleased with running into no visible issues when using the NIR intermediate representation by RadeonSI Gallium3D, I also ran some benchmarks comparing the stock behavior to the Linux OpenGL gaming performance when taking the NIR code-path. Benchmarks were done using the Phoronix Test Suite.
Alacritty is a free open-source, fast, cross-platform terminal emulator, that uses GPU (Graphics Processing Unit) for rendering, which implements certain optimizations that are not available in many other terminal emulators in Linux.
Alacritty is focused on two goals simplicity and performance. The performance goal means, it should be speedy than any other terminal emulator available. The simplicity goal means, it doesn’t supports features such as tabs or splits (which can be easily provided by other terminal multiplexer – tmux) in Linux.
Prerequisites
Alacritty requires the most recent stable Rust compiler to install it.
Install Required Dependency Packages
1. First install Rust programming language using an rustup installer script and follow on screen instructions.
# sudo curl https://sh.rustup.rs -sSf | sh
2. Next, you need to install a few additional libraries to build Alacritty on your Linux distributions, as shown.
--------- On Ubuntu/Debian ---------
# apt-get install cmake libfreetype6-dev libfontconfig1-dev xclip

--------- On CentOS/RHEL ---------
# yum install cmake freetype-devel fontconfig-devel xclip
# yum group install "Development Tools"

--------- On Fedora ---------
# dnf install cmake freetype-devel fontconfig-devel xclip

--------- On Arch Linux ---------
# pacman -S cmake freetype2 fontconfig pkg-config make xclip

--------- On openSUSE ---------
# zypper install cmake freetype-devel fontconfig-devel xclip
Installing Alacritty Terminal Emulator in Linux
3. Once you have installed all the required packages, next clone the Alacritty source code repository and compile it using following commands.
$ cd Downloads
$ git clone https://github.com/jwilm/alacritty.git
$ cd alacritty
$ cargo build --release
4. Once the compilation process is complete, the binary will be saved in ./target/release/alacritty directory. Copy the binary to a directory in your PATH and on a dekstop, you can add the application to your system menus, as follows.
5. Next install the manual pages using following command.
# gzip -c alacritty.man | sudo tee /usr/local/share/man/man1/alacritty.1.gz > /dev/null
6. To add shell completion settings to your Linux shell, do the following.
--------- On Bash Shell ---------
# cp alacritty-completions.bash  ~/.alacritty
# echo "source ~/.alacritty" >> ~/.bashrc

--------- On ZSH Shell ---------
# cp alacritty-completions.zsh /usr/share/zsh/functions/Completion/X/_alacritty

--------- On FISH Shell ---------
# cp alacritty-completions.fish /usr/share/fish/vendor_completions.d/alacritty.fish
7. Finally start Alacritty in your system menu and click on it; when run for the first time, a config file will be created under $HOME/.config/alacritty/alacritty.yml, you can configure it from here.
Alacritty is a cross-platform, fast, GPU accelerated terminal emulator focused on speed and performance. Although it is ready for daily usage, many features are yet to be added to it such as scroll back and more.
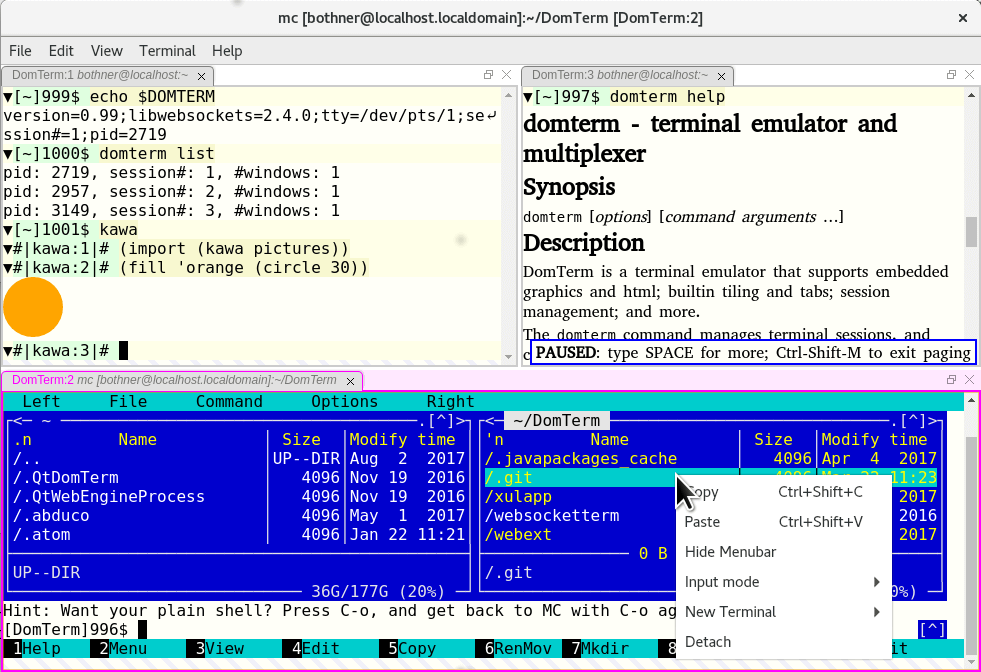
DomTerm is a free open-source feature-rich, modern terminal emulator and screen multiplexer (like tmux or GNU screen), which is based on web technologies and a rich-text console written mostly in JavaScript.
It uses libwebsockets as a backend and a byte-protocol to communicate with the back-end, this implies that you can invoke it in a browser using web sockets; embed it in a third-party application; or simply run it as a generic terminal emulator program.
DomTerm Terminal Emulator for Linux
DomTerm Features:
It is xterm-compatible and supports multiple sub-commands.
It comes with multiple applications which include a: xterm-compatible terminal emulator, command console, chat/talk window and a read-eval-print-loop for an interactive scripting language.
Supports multiplexing and sessions.
Its back-end allows for printing images, graphics as well as rich text.
Supports controlling of user preferences via a CSS file.
Supports keyboard shortcuts with smart line-wrapping.<./li>
Optionally allows for input editing and movement of cursor using mouse.
Supports preserving of TAB characters with automatic pagination.
Support draggable tabs and panes.
Automatically turn URLs and mail addresses in output into links and much more.
An experimental package atom-domterm for the Atom editor.
How to Install DomTerm Terminal Emulator in Linux
There are no pre-built DomTerm packages available, therefore you need to install it from source, but before downloading the source code and compiling it. First you need to install following dependencies on your respective Linux distributions using package manager as shown.
DomTerm also requires libwebsockets version 2.2 or later. Therefore, you need to build and install the latest version from source as shown.
$ cd ~/Downloads
$ git clone https://github.com/warmcat/libwebsockets
$ cd libwebsockets
$ mkdir build
$ cd build
$ cmake -DLWS_WITH_SSL=0 -DLWS_WITH_ZIP_FOPS=1 . .
$ make
Next clone the DomTerm source repository, build and install it using the following commands.
$ cd ~/Downloads/
$ git clone https://github.com/PerBothner/DomTerm
$ cd DomTerm
$ autoreconf
$ ./configure --with-qtwebengine --with-libwebsockets=$HOME/Downloads/libwebsockets/build
$ make
$ sudo make install
Once you have successfully installed DomTerm on your Linux distribution, you can search for it from your system menu or run the following command to launch it.
Linux commandline is the best and most powerful thing that fascinates a new user and provides extreme power to experienced users and geeks. For those who work on Server and Production, they are already aware of this fact. It would be interesting to know that Linux console was one of those first features of the kernel that was written by Linus Torvalds way back in the year 1991.
Terminal is a powerful tool that is very reliable as it does not have any movable part. Terminal serves as an intermediate between console and GUI environment. Terminal themselves are GUI application that run on top of a desktop environment. There are a lot of terminal application some of which are Desktop Environment specific and rest are universal. Terminator, Konsole, Gnome-Terminal, Terminology, XFCE terminal, xterm are a few terminal emulators to name.
Last day while surfing web, I came across a terminal namely ‘guake‘ which is a terminal for gnome. Though this is not the first time I have learned about Guake. I’d known this application nearly one year ago but somehow I could not write on this and later it was out of my mind until I heard it again. So finally the article is here. We will be taking you to Guake features, installation on Debian, Ubuntu and Fedora followed by quick testing.
What is Guake?
Guake is a Drop Down Terminal for Gnome Environment. Written from scratch mostly in Python and a little in C this application is released under GPLv2+ and is available for Linux and alike systems. Guake is inspired by a console in computer game Quake which slides down from the top by pressing a specially Key (Default is F12) and then slides-up when the same key is pressed.
Important to mention that Guake is not the first of this kind. Yakuake which stands for Yet Another Kuake, a terminal emulator for KDE Desktop Environment and Tilda which is a GTK+ terminal Emulator are also inspired by the same slide up/down console of computer game Quake.
Features of Guake
Lightweight
Simple Easy and Elegant
Functional
Powerful
Good Looking
Smooth integration of terminal into GUI
Appears when you call and disappear once you are done by pressing a predefined hot key
Support for hotkeys, tabs, background transparency makes it a brilliant application, must for every Gnome User.
Extremely configurable
Plenty of color palette included, fixed and recognized
Shortcut for transparency level
Run a script when Guake starts via Guake Preferences.
Able to run on more than one monitor
Guake 0.7.0 was released recently, which brings numerous fixes as well as some new features as discussed above. For complete Guake 0.7.0 changelog and source tarball packages can be found Here.
Installing Guake Terminal in Linux
If you are interested in compiling Guake from source you may download the source from the link above, build it yourself before installing.
However Guake is available to be installed on most of the distributions from repository or by adding an additional repository. Here, we will be installing Guake on Debian, Ubuntu, Linux Mint and Fedora systems.
First get the latest software package list from the repository and then install Guake from the default repository as shown below.
---------------- On Debian, Ubuntu and Linux Mint ----------------
$ sudo apt-get update
$ apt-get install guake
After installation, start the Guake from another terminal as:
$ guake
After starting it, use F12 (Default) to roll down and roll up the terminal on your Gnome Desktop.
Seems very beautiful specially the transparent background. Roll down… Roll up… Roll down… Roll up…. run command. Open another tab run command… Roll up… Roll down…
Guake Terminal in Action
If your wallpaper or working windows color don’t match you may like to change your wallpaper or reduce the transparency of the Guake terminal color.
Next is to look into Guake Properties to edit settings as per requirements. Run Guake Preferences either by running it from Application Menu or by running the below command.
$ guake --preferences
Guake Terminal Properties
Scrolling Properties..
Guake Scrolling Settings
Appearance Properties – Here you can modify text and background color as well as tune transparency.
Appearance Properties
Keyboard Shortcuts – Here you may edit and Modify Toggle key for Guage Visibility (default is F12).
Keyboard Shortcuts
Compatibility Setting – Perhaps you won’t need to edit it.
Compatibility Setting
Conclusion
This Project is not too young and not too old, hence has reached certain level of maturity and is quiet solid and works out of the box. For someone like me who need to switch between GUI and Console very often Guake is a boon. I don’t need to manage an extra window, open and close frequently, use tab among a huge pool of opened applications to find terminal or switch to different workspace to manage terminal now all I need is F12.
I think this is a must tool for any Linux user who makes use of GUI and Console at the same time, equally. I am going to recommend it to anyone who want to work on a system where interaction between GUI and Console is smooth and hassle free.
Terminal is one of the most important application in Linux which makes it possible for the end user to communicate to the Linux shell and pass instructions. There are several Terminal-like Application, available either in repository or by third party for most of the Standard Linux Distribution. But this time it is a bit different.
Yeah! We are going to test “Nautilus Terminal”. The name itself tells a lot about itself. The Nautilus is default file browser for GNOME Desktop Environment. Nautilus Terminal is an embedded terminal into the nautilus file browser.
What is Nautilus Terminal?
Nautilus Terminal is a Nautilus file browser embedded terminal, which follows your movement and automatically cd to your current directory. Nautilus Terminal makes it possible to work in command line while navigating in Real GUI.
Features of Nautilus Terminal
Completely compatible with Nautilus File Browser.
Designed to follow your movement and Instructions within directories.
Feature of Hide/Show Terminal in file browser, as required makes it very much useful.
Supports Copy and Paste in Terminal.
Supports Drag and Drop of files/folders in Terminal.
The Embedded Terminal is re-sizeable, as per need.
Install Nautilus Terminal in Linux
Nautilus can be downloaded from the link below. Download the correct package, according to your System architecture.
After Downloading the package which is in the form of *.tar.gz from its official website, as pointed out above, we need to do rest of it, as described below.
$ cd Downloads/
$ tar -zxvf nautilus-terminal_1.0_src.tar.gz
$ cd nautilus-terminal_1.0_src
# ./install.sh -i
Sample Output
:: Checking the Runtime Dependencies...

  > Python (>= 2.6)                                                      [ OK ]
  > PyGObject                                                            [ OK ]
  > GObject Introspection (and Gtk)                                      [MISS]
  > VTE                                                                  [MISS]
  > Nautilus Python (>= 1.0)                                             [MISS]
  > Nautilus (>= 3.0)                                                    [ OK ]
E: Some dependencies are missing.
We need to resolve dependencies manually. These dependencies were required to be fixed on my Debian 6.0.9 (Squeeze). This may not be the case with you.
On Ubuntu/Debian/Linux Mint
On an Debian based systems, you can use the official PPA to install nautilus from repository as shown below.
After successful installation of Nautilus Terminal, we are ready to test it but before that it is necessary to restart nautilus as.
$ nautilus -q
Next, start the nautilus terminal using the following command.
$ nautilus
Nautilus Terminal
Conclusion
Nautilus Terminal is a wonderful tool, which lets your execution in GUI to be visible in embedded command line and Vice-versa. It is a very nice tool for those newbies who are afraid of Linux command Line and/or Newbie.
There are multiple terminal emulators you can find on the Linux platform today, with each of them offering users some remarkable features.
But sometimes, we find it difficult to choose which terminal emulator to work with, depending on our preferences. In this overview, we shall cover one exciting terminal emulator for Linux called Tilix.
Tlix (previously called Terminix – name changed due to a trademark issue) is a tiling terminal emulator that uses GTK+ 3 widget called VTE (Virtual Terminal Emulator). It is developed using GTK 3 with aims of conforming to GNOME HIG (Human Interface Guidelines).
Additionally, this application has been tested on GNOME and Unity desktops, although users have also tested it successfully on various other Linux desktops environments.
Just like the rest of Linux terminal emulators, Tilix comes with some illustrious features and these include:
Enables users to layout terminals in any style by splitting them vertically or horizontally
Supports drag and drop functionality to re-arrange terminals
Supports detaching of terminals from windows using drag and drop
Supports input synchronization between terminals, therefore commands typed in one terminal can be reproduced in another
Terminal grouping can be saved and loaded from disk
Supports transparent backgrounds
Allows use of background images
Supports automatic profile switches based on hostname and directory
Also supports notification for out of view process completion
Color schemes stored in files and new files can be created for custom color schemes
How to Install Tilix on Linux Systems
Let us now uncover the steps you can follow to install Tilix on the various Linux distributions, but before we move any further, we have to list the various requirements for Tilix to work on Linux.
Dependencies
To work very well, the application requires the following libraries:
GTK 3.14 and above
GTK VTE 0.42 and above
Dconf
GSettings
Nautilus-Python for Nautilus integration
If you have all the above requirements on your system, then proceed to install Tilix as follows.
On RHEL/CentOS 7 and Fedora 22-27
First, you need to add the package repository by creating a file /etc/yum.repos.d/tilix.repo using your favorite text editor as follows.
# vi /etc/yum.repos.d/tilix.repo
Then copy and paste the text below into the file above:
[ivoarch-Tilix]
name=Copr repo for Tilix owned by ivoarch
baseurl=https://copr-be.cloud.fedoraproject.org/results/ivoarch/Tilix/epel-7-$basearch/
type=rpm-md
skip_if_unavailable=True
gpgcheck=1
gpgkey=https://copr-be.cloud.fedoraproject.org/results/ivoarch/Tilix/pubkey.gpg
repo_gpgcheck=0
enabled=1
enabled_metadata=1
Save the file and exit.
Then update your system and install Tilix as shown:
OpenSUSE users can install tilix from the default repository and Arch Linux users can install the AUR Tilix package.
# pacman -S tilix
Tilix Screenshot Tour
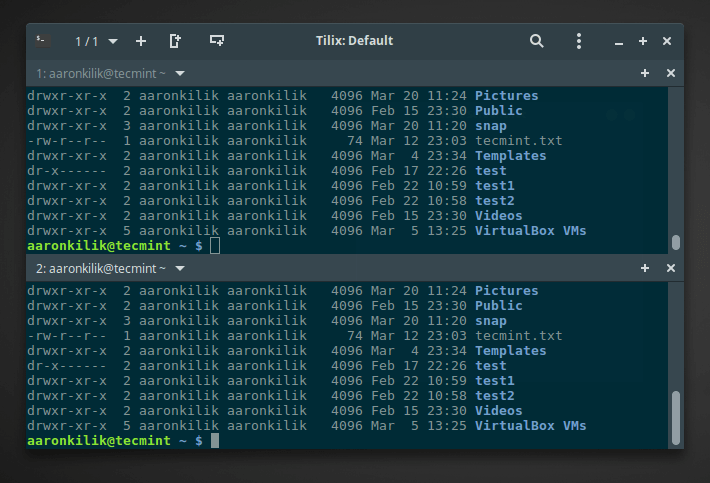
Tilix with Two Horizontal Linux Terminal Windows
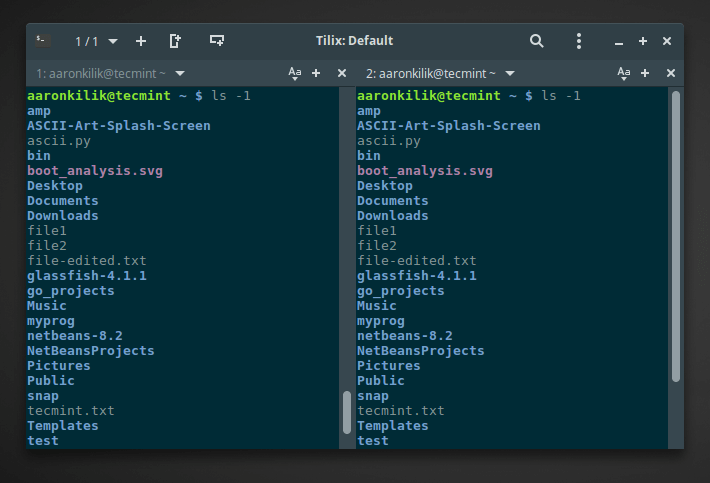
Tilix with Two Vertical Linux Terminal Windows
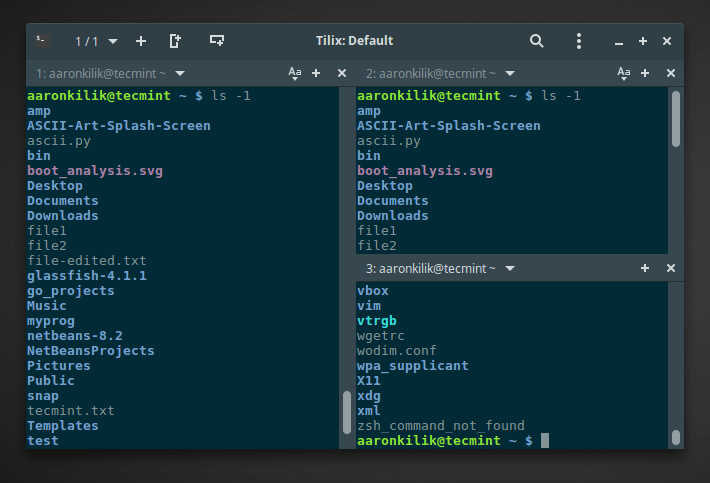
Tilix with One Vertical and Two Horizontal Linux Terminals
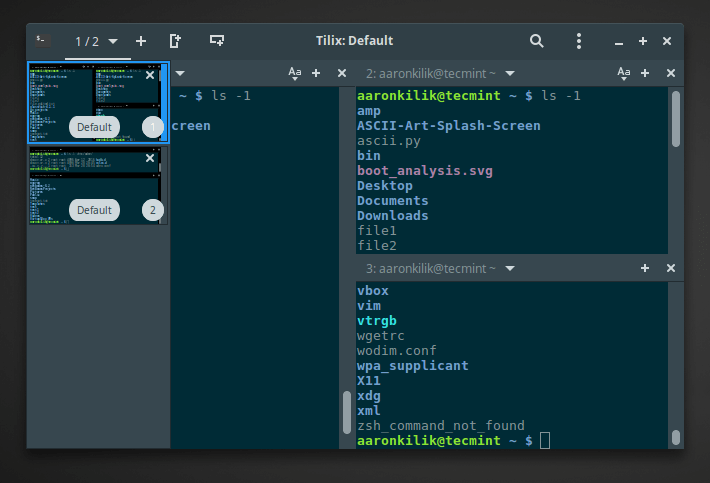
Tilix with Multiple Linux Terminal Windows
How to Uninstall or Remove Tilix Terminal
In case you installed it manually and want to remove it, then you can follow the steps below to uninstall it. Download the uninstall.sh from Github repository, make it executable and then run it:
In this overview, we have looked at an important Linux terminal emulator that is just an alternative to the multiple terminal emulators out there. Having installed it you can try out the different features and also compare it with the rest that you have probably used.
Importantly, for any questions or extra information that you have about Tilix, please use the comment section below and do not forget to also give us feedback about your experience with it.
A Terminal emulator is a computer program that reproduces a video terminal within some other display structure. In other words the Terminal emulator has an ability to make a dumb machine appear like a client computer networked to the server. The terminal emulator allows an end user to access console as well as its applications such as text user interface and command line interface.
20 Linux Terminal Emulators
You may find huge number of terminal emulators to choose from this open source world. Some of them offers large range of features while others offers less features. To give a better understanding to the quality of software that are available, we have gathered a list of marvelous terminal emulator for Linux. Each title provides its description and feature along with screenshot of the software with relevant download link.
1. Terminator
Terminator is an advanced and powerful terminal emulator which supports multiple terminals windows. This emulator is fully customizable. You can change the size, colour, give different shapes to the terminal. Its very user friendly and fun to use.
Features of Terminator
Customize your profiles and colour schemes, set the size to fit your needs.
Use plugins to get even more functionality.
Several key-shortcuts are available to speed up common activities.
Split the terminal window into several virtual terminals and re-size them as needed.
Tilda is a stylish drop-down terminal based on GTK+. With the help of a single key press you can launch a new or hide Tilda window. However, you can add colors of your choice to change the look of the text and Terminal background.
Features of Tilda
Interface with Highly customization option.
You can set the transparency level for Tilda window.
Guake is a python based drop-down terminal created for the GNOME Desktop Environment. It is invoked by pressing a single keystroke, and can make it hidden by pressing same keystroke again. Its design was determined from FPS (First Person Shooter) games such as Quake and one of its main target is be easy to reach.
Guake is very much similar to Yakuaka and Tilda, but it’s an experiment to mix the best of them into a single GTK-based program. Guake has been written in python from scratch using a little piece in C (global hotkeys stuff).
Yakuake (Yet Another Kuake) is a KDE based drop-down terminal emulator very much similar to Guake terminal emulator in functionality. It’s design was inspired from fps consoles games such as Quake.
Yakuake is basically a KDE application, which can be easily installed on KDE desktop, but if you try to install Yakuake in GNOME desktop, it will prompt you to install huge number of dependency packages.
ROXterm is yet another lightweight terminal emulator designed to provide similar features to gnome-terminal. It was originally constructed to have lesser footprints and faster start-up time by not using the Gnome libraries and by using a independent applet to bring the configuration interface (GUI), but over the time it’s role has shifted to bringing a higher range of features for power users.
However, it is more customizable than gnome-terminal and anticipated more at “power” users who make excessive use of terminals. It is easily integrated with GNOME desktop environment and provides features like drag & drop of items into terminal.
Eterm is a lightest color terminal emulator designed as a replacement for xterm. It is developed with a Freedom of Choice ideology, leaving as much power, flexibility, and freedom as workable in the hands of the user.
Rxvt stands for extended virtual terminal is a color terminal emulator application for Linux intended as an xterm replacement for power users who don’t need to have a feature such as Tektronix 4014 emulation and toolkit-style configurability.
Wterm is a another light weight color terminal emulator based on rxvt project. It includes features such as background images, transparency, reverse transparency and an considerable set or runtime options are accessible resulting in a very high customizable terminal emulator.
LXTerminal is a default VTE-based terminal emulator for LXDE (Lightweight X Desktop Environment) without any unnecessary dependency. The terminal has got some nice features such as.
LXTerminal Features
Multiple tabs support
Supports common commands like cp, cd, dir, mkdir, mvdir.
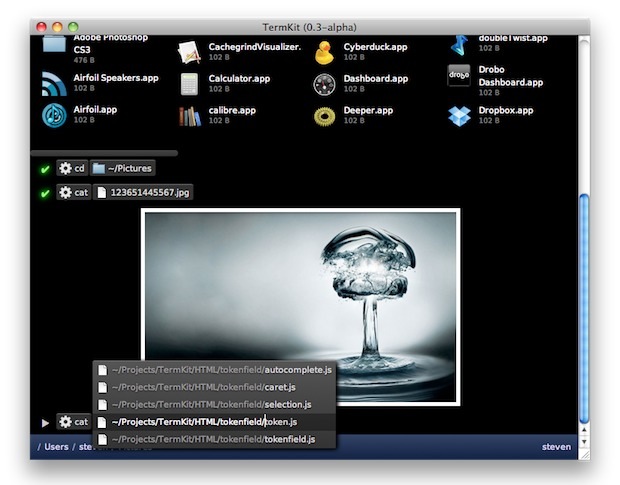
TermKit is a elegant terminal that aims to construct aspects of the GUI with the command line based application using WebKit rendering engine mostly used in web browsers like Google Chrome and Chromium. TermKit is originally designed for Mac and Windows, but due to TermKit fork by Floby which you can now able to install it under Linux based distributions and experience the power of TermKit.
GNOME terminal is a built-in terminal emulator for GNOME desktop environment developed by Havoc Pennington and others. It allow users to run commands using a real Linux shell while remaining on the on the GNOME environment. GNOME Terminal emulates the xterm terminal emulator and brings a few similar features.
The Gnome terminal supports multiple profiles, where users can able to create multiple profiles for his/her account and can customize configuration options such as fonts, colors, background image, behavior, etc. per account and define a name to each profile. It also supports mouse events, url detection, multiple tabs, etc.
Final Term is a open source stylish terminal emulator that has some exciting capabilities and handy features into one single beautiful interface. It is still under development, but provides significant features such as Semantic text menus, Smart command completion, GUI terminal controls, Omnipotent keybindings, Color support and many more. The following animated screen grab demonstrates some of their features. Please click on image to view demo.
Terminology is yet another new modern terminal emulator created for the Enlightenment desktop, but also can be used in different desktop environments. It has some awesome unique features, which do not have in any other terminal emulator.
Apart features, terminology offers even more things that you wouldn’t assume from a other terminal emulators, like preview thumbnails of images, videos and documents, it also allows you to see those files directly from Terminology.
You can watch a following demonstrations video created by the Terminology developer (the video quality isn’t clear, but still it’s enough to get the idea about Terminology).
Xfce terminal is a lightweight modern and easy to use terminal emulator specially designed for Xfce desktop environment. The latest release of xfce terminal has some new cool features such as search dialog, tab color changer, drop-down console like Guake or Yakuake and many more.
The xterm application is a standard terminal emulator for the X Window System. It maintain DEC VT102 and Tektronix 4014 compatible terminals for applications that can’t use the window system directly.
The LilyTerm is a another less known open source terminal emulator based off of libvte that desire to be fast and lightweight. LilyTerm also include some key features such as:
Support for tabbing, coloring and reordering tabs
Ability to manage tabs through keybindings
Support for background transparency and saturation.
The sakura is a another less known Unix style terminal emulator developed for command line purpose as well as text-based terminal programs. Sakura is based on GTK and livte and provides not more advanced features but some customization options such as multiple tab support, custom text color, font and background images, speedy command processing and few more.
The rxvt-unicode (also known as urxvt) is a yet another highly customizable, lightweight and fast terminal emulator with xft and unicode support was developed by Marc Lehmann. It got some outstanding features such as support for international language via Unicode, the ability to display multiple font types and support for Perl extensions.
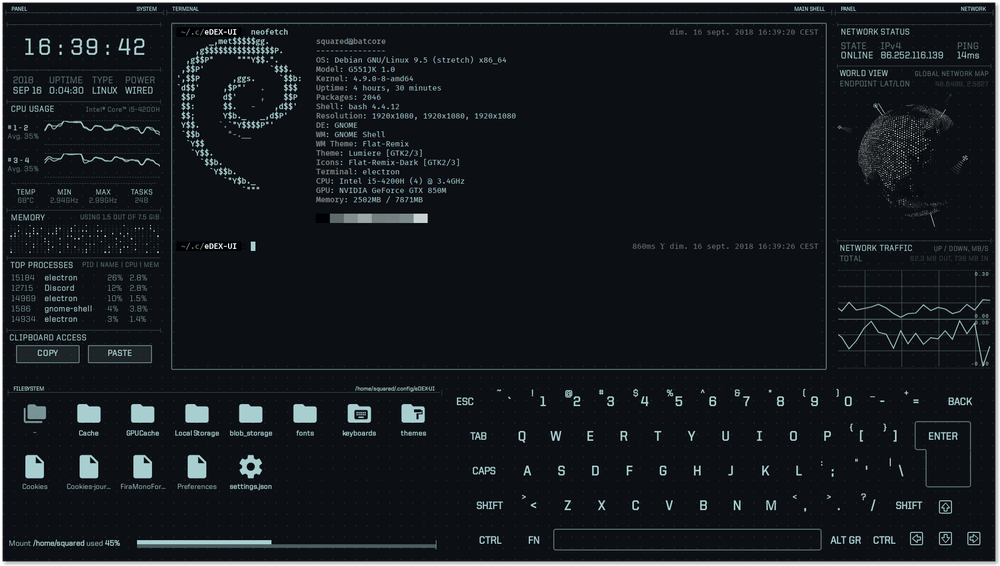
eDEX-UI is a geeky, fullscreen, highly configurable and cross-platform desktop application resembling a movie-like futuristic computer interface, that runs on Linux, Windows and MacOS. It creates the illusion of a desktop environment without windows.
It is heavily inspired from DEX-UI and the TRON Legacy movie effects. It uses a number of open-source libraries, frameworks and tools. It was designed and intended to be used on devices with large touchscreens, but it works well on a regular desktop computer or perhaps a tablet PC or laptops with touchscreens.
eDEX-UI runs the shell of your choice in a real terminal, and displays live system information about the CPU, memory, temperature, top processes, and network. By default, eDEX runs bash on Linux, but this is configurable. It also has a file manager, and an onscreen keyboard. It comes with various customization options, including multiple themes that you can load from the interface itself.
eDEX-UI – Linux Terminal Emulator
This application is not built for doing any practical work on your system; it just makes your device or computer feel insanely geeky. You can use it to impress your friends or colleagues at work or any one around you.
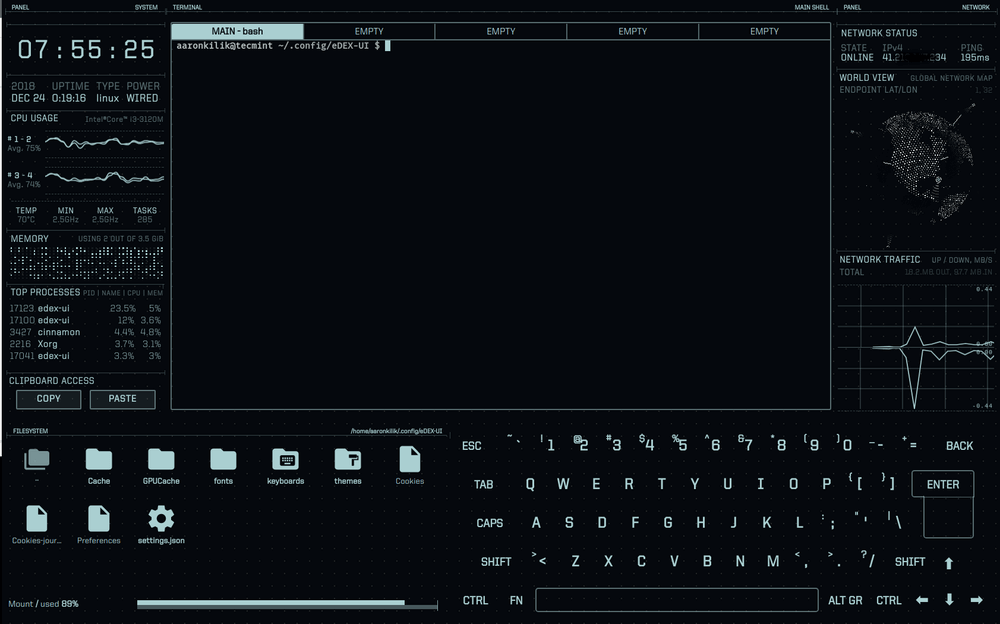
How to Install eDEX-UI Terminal Emulator in Linux
To install eDEX-UI, download the pre-compiled binaries available on the release page using following wget utility from the command line as shown.
You will be asked “Would you like to integrate eDEX-UI.Linux.x86_64.AppImage with your system?”, click on Yesto continue.
The application with boot up, once the process is complete, you will be connected to the eDEX-UI frontend, with the default theme.
eDEX-UI Terminal Emulator
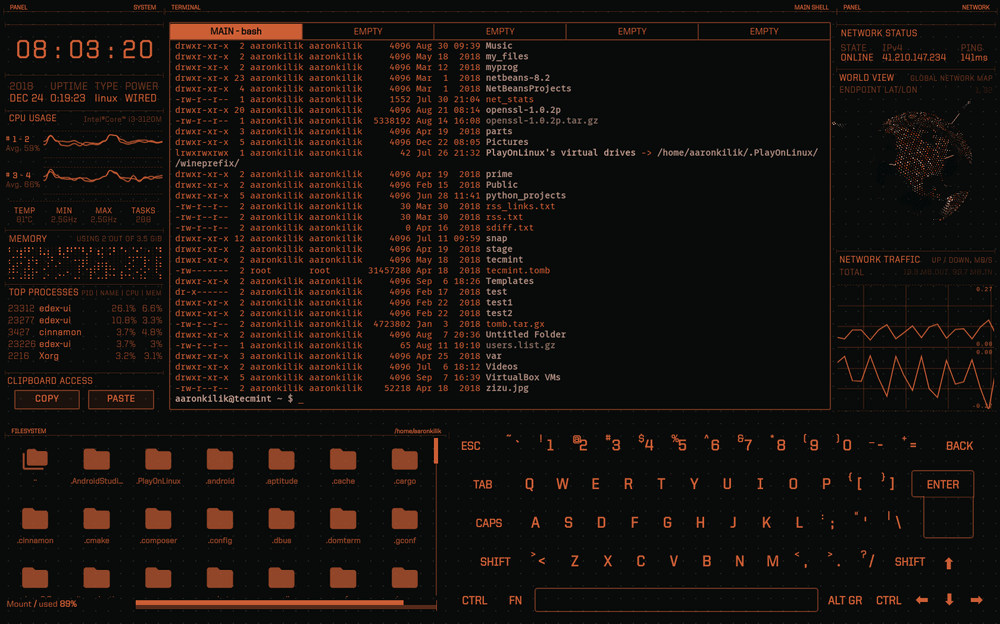
To change the theme, under FILESYSTEM, click on themes directory, then click on the .json file for the theme you want to use (you can do the same to change the fonts or keyboard settings).
The following screenshot shows the blade theme.
eDEX-UI Blade Theme
To exit the application, type “exit” in the terminal embedded in its interface, or simply press Alt + F4.
Attention: The onscreen keyboard displays each key you press on the keyboard (it shows what you are typing), so you probably shouldn’t type passwords while using this application. Secondly, if you observe carefully from the list of top processes, eDEX-UI consumes a lot of CPU and RAM. These are some of its downsides.
That’s all! eDEX-UI is a geeky, fullscreen and cross-platform desktop application resembling a sci-fi futuristic computer interface. Its not built for doing any practical work your system, but to make your device or computer feel insanely geeky.