How to Install MariaDB on CentOS – LinuxCloudVPS Blog

On a fresh Linux installation, you may have MySQL already installed on your system. While that might be enough for most users, sometimes the newest version of the query language is necessary for some software to work. This tutorial will show you how to install MariaDB as a drop-in replacement for MySQL for all versions of CentOS, and all versions of MariaDB.

What is MariaDB?

When Oracle took over the development of MySQL in 2008, it switched to a slower release cycle, and the development became a lot more opaque. One of the lead developers of MySQL decided to fork the project, and MariaDB is the result. The idea was to continue the development of the database in a community-driven manner and to provide a “drop-in” replacement for MySQL.

What is a “Drop-in” Replacement?

It simply means that you don’t have to change any other configuration on systems that rely on MySQL. Once you install and activate MariaDB, all other programs that used to work with MySQL will now work seamlessly on MariaDB.

In other words, if you’re running WordPress, you don’t need to change any scripts or your wp-config.php file when you migrate to MariaDB.

Here’s how to install MariaDB on a CentOS VPS.

Step 1: Get the MariaDB and CentOS Version

The URL from which we get the MariaDB packages depends on the OS version, as well as the version of MariaDB we want to install. To get your OS version, type the following command:

cat /etc/redhat-release

This will tell you which version of CentOS you’re running. In this example, we’re going to use CentOS version 6.10. As of this writing, the stable version of MariaDB is sitting on 10.3, so that’s what we’re going to install right now.

Step 2: Get the Script for the MariaDB Repository

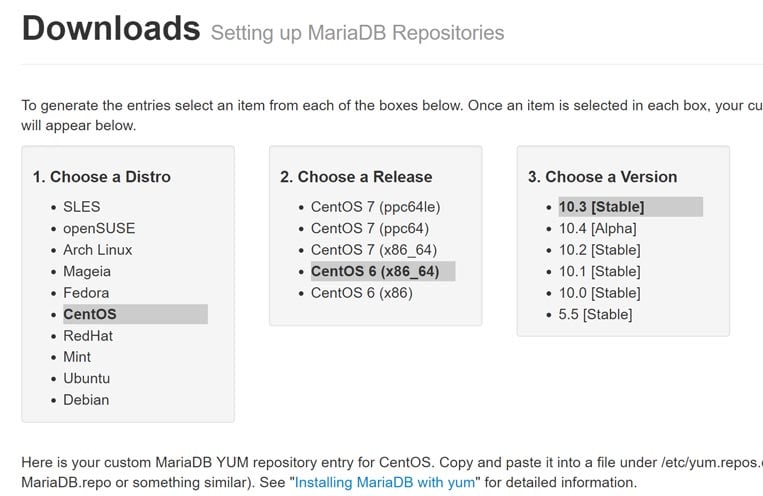
The official website makes it easy to configure the repository script. Visit the interactive tool and choose your OS, as well as the OS version and the MariaDB package that you want to install, based on what you decided in Step 1. Here’s a screenshot of our configuration:

Generate the Repository

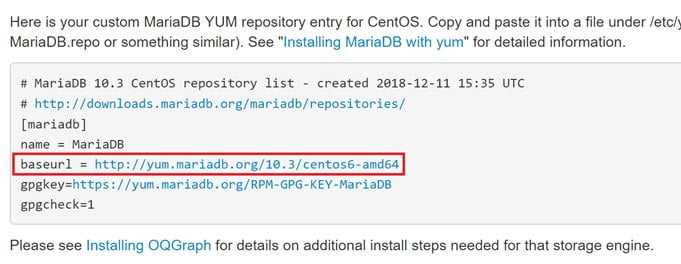
Once you make these selections, it’ll display a snippet of text on the bottom of the page. Like this:

Entry for Yum Repository

The important part is the “baseurl” parameter as shown above. This is what varies between various installations.

Step 3: Create the Repo File in CentOS

The next step is to create a file in the following directory:

/etc/yum.repos.d/

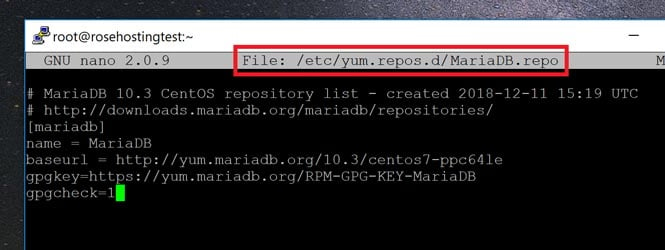
We’re going to name it “MariaDB.repo” for easy reference later on. Use a text editor like nano or vi to paste the code you got in Step 2 into the file like this:

Create the Yum Repository File

Save your changes, and you’re done with adding the repository file. Make sure to have yum recognize the changes by running this command:

sudo yum update

Step 4: Installing MariaDB

Now that the repo is configured, we can install MariaDB by typing in the following:

sudo yum install MariaDB-server MariaDB-client

Note that if you had a previous MariaDB repo, or accidentally used the wrong one, you would have gotten a message saying:

“No package MariaDB-server available”

Unfortunately, the configurations are saved, so before you run the “yum” command with a new repo, you must remember to flush it with the command:

yum clean metadata

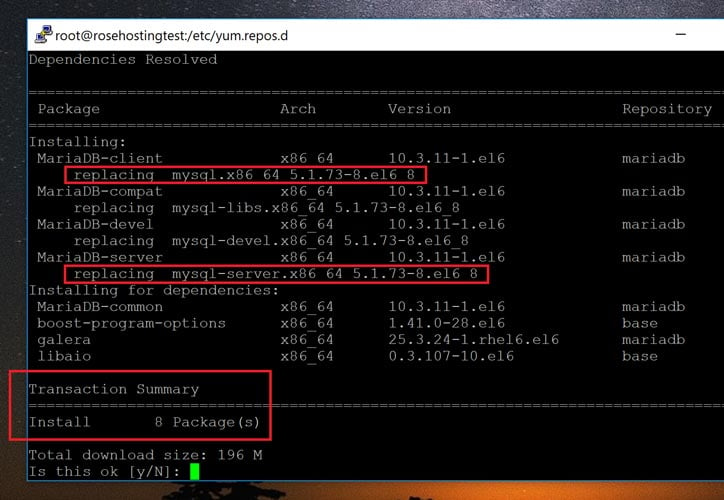
But if everything goes well, you should now be able to install the MariaDB packages like this:

Replace MySQL

Note how it says “replacing mysql”. This means that the new database system will response to the “mysql” command from now on.

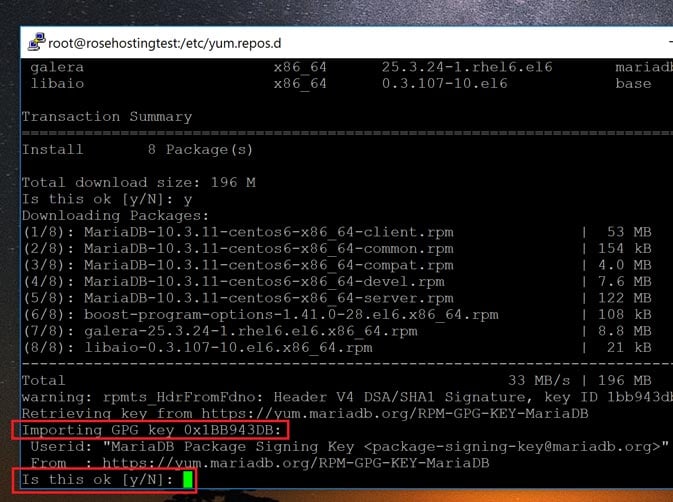
If this is the first time you’re installing MariaDB, you’ll also be asked to confirm the import of the GPG key as shown here:

Import GPG Key

After the installation is complete, you will have MariaDB on your system!

Step 5: Verifying the Installation

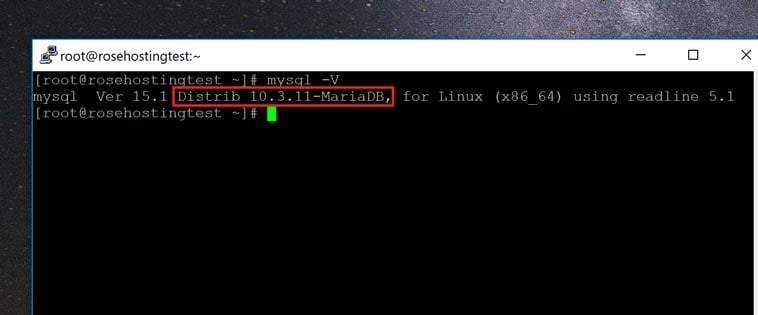
MariaDB is such a perfect replacement for mysql, that it can be difficult to tell whether the current software running is MySQL or MariaDB! However, if you type the following command:

mysql -V

It will give you the version information, as well as the database system that’s driving it:

Check MariaDB Version

If you followed the tutorial step by step, then congratulations, you’ve replaced MySQL with MariaDB!

Of course, you don’t need to install MariaDB yourself if you have a CentOS VPS hosted with us, in which case our expert sysadmins will install MariaDB for you. They are available 24×7 and can help you with any questions or issues that you may have.

PS. If you enjoyed reading this blog post on how to install MariaDB on CentOS, feel free to share it on social networks using the share shortcuts.

Source

Linux Today – Introductory Go Programming Tutorial

Introductory Go Programming Tutorial

How to get started with this useful new programming language.

You’ve probably heard of Go. Like any new programming language, it took a while to mature and stabilize to the point where it became useful for production applications. Nowadays, Go is a well established language that is used in web development, writing DevOps tools, network programming and databases. It was used to write Docker, Kubernetes, Terraform and Ethereum. Go is accelerating in popularity, with adoption increasing by 76% in 2017, and there now are Go user groups and Go conferences. Whether you want to add to your professional skills or are just interested in learning a new programming language, you should check it out.

Go History

A team of three programmers at Google created Go: Robert Griesemer, Rob Pike and Ken Thompson. The team decided to create Go because they were frustrated with C++ and Java, which through the years have become cumbersome and clumsy to work with. They wanted to bring enjoyment and productivity back to programming.

The three have impressive accomplishments. Griesemer worked on Google’s ultra-fast V8 JavaScript engine used in the Chrome web browser, Node.js JavaScript runtime environment and elsewhere. Pike and Thompson were part of the original Bell Labs team that created UNIX, the C language and UNIX utilities, which led to the development of the GNU utilities and Linux. Thompson wrote the very first version of UNIX and created the B programming language, upon which C was based. Later, Thompson and Pike worked on the Plan 9 operating system team, and they also worked together to define the UTF-8 character encoding.

Why Go?

Go has the safety of static typing and garbage collection along with the speed of a compiled language. With other languages, “compiled” and “garbage collection” are associated with waiting around for the compiler to finish and then getting programs that run slowly. But Go has a lightning-fast compiler that makes compile times barely noticeable and a modern, ultra-efficient garbage collector. You get fast compile times along with fast programs. Go has concise syntax and grammar with few keywords, giving Go the simplicity and fun of dynamically typed interpreted languages like Python, Ruby and JavaScript.

The idea of Go’s design is to have the best parts of many languages. At first, Go looks a lot like a hybrid of C and Pascal (both of which are successors to Algol 60), but looking closer, you will find ideas taken from many other languages as well.

Go is designed to be a simple compiled language that is easy to use, while allowing concisely written programs that run efficiently. Go lacks extraneous features, so it’s easy to program fluently, without needing to refer to language documentation while programming. Programming in Go is fast, fun and productive.

Let’s Go

First, let’s make sure you have Go installed. You probably can use your distribution’s package management system. To find the Go package, try looking for “golang”, which is a synonym for Go. If you can’t install it that way, or if you want a more recent version, get a tarball from https://golang.org/dl and follow the directions on that page to install it.

When you have Go installed, try this command:


$ go version
go version go1.10 linux/amd64

The output shows that I have Go version 1.10 installed on my 64-bit Linux machine.

Hopefully, by now you’ve become interested and want to see what a complete Go program looks like. Here’s a very simple program in Go that prints “hello, world”:


package main

import "fmt"

func main() {
    fmt.Printf("hello, world\n")
}

The line package main defines the package that this file is part of. Naming main as the name of the package and the function tells Go that this is where the program’s execution should start. You need to define a main package and main function even when there is only one package with one function in the entire program.

At the top level, Go source code is organized into packages. Every source file is part of a package. Importing packages and exporting functions are child’s play.

The next line, import "fmt" imports the fmt package. It is part of the Go standard library and contains the Printf() function. Often you’ll need to import more than one package. To import the fmtos and strings packages, you can type either this:


import "fmt"
import "os"
import "strings"

or this:


import (
    "fmt"
    "os"
    "strings"
    )

Using parentheses, import is applied to everything listed inside the parentheses, which saves some typing. You’ll see parentheses used like this again elsewhere in Go, and Go has other kinds of typing shortcuts too.

Packages can export constants, types, variables and functions. To export something, just capitalize the name of the constant, type, variable or function you want to export. It’s that simple.

Notice that there are no semicolons in the “hello, world” program. Semicolons at the ends of lines are optional. Although this is convenient, it leads to something to be careful about when you are first learning Go. This part of Go’s syntax is implemented using a method taken from the BCPL language. The compiler uses a simple set of rules to “guess” when there should be a semicolon at the end of the line, and it inserts one automatically. In this case, if the right parenthesis in main() were at the end of the line, it would trigger the rule, so it’s necessary to place the open curly bracket after main() on the same line.

This formatting is a common practice that’s allowed in other languages, but in Go, it’s required. If you put the open curly bracket on the next line, you’ll get an error message.

Go is unusual in that it either requires or favors a specific style of whitespace formatting. Rather than allowing all sorts of formatting styles, the language comes with a single formatting style as part of its design. The programmer has a lot of freedom to violate it, but only up to a point. This is either a straitjacket or godsend, depending on your preferences! Free-form formatting, allowed by many other languages, can lead to a mini Tower of Babel, making code difficult to read by other programmers. Go avoids that by making a single formatting style the preferred one. Since it’s fairly easy to adopt a standard formatting style and get used to using it habitually, that’s all you have to do to be writing universally readable code. Fair enough? Go even comes with a tool for reformatting your code to make it fit the standard:


$ go fmt hello.go

Just two caveats: your code must be free of syntax errors for it to work, so it won’t fix the kind of problem I just described. Also, it overwrites the original file, so if you want to keep the original, make a backup before running go fmt.

The main() function has just one line of code to print the message. In this example, the Printf()function from the fmt package was used to make it similar to writing a “hello, world” program in C. If you prefer, you can also use this:


fmt.Println("hello, world")

to save typing the \n newline character at the end of the string.

Now let’s compile and run the program. First, copy the “hello, world” source code to a file named hello.go. Then compile it using this command:


$ go build hello.go

And to run it, use the resulting executable, named hello, as a command:


$ hello
hello, world

As a shortcut, you can do both steps in just one command:


$ go run hello.go
hello, world

That will compile and run the program without creating an executable file. It’s great for when you are actively developing a project and are just checking for errors before doing more edits.

Next, let’s look at a few of Go’s main features.

Concurrency

Go’s built-in support for concurrency, in the form of goroutines, is one of the language’s best features. A goroutine is like a process or thread, but it’s much more lightweight. It’s normal for a Go program to have thousands of active goroutines. Starting up a goroutine is as simple as:


go f()

The function f() then will run concurrently with the main program and other goroutines. Go has a means of allowing the concurrent pieces of the program to synchronize and communicate using channels. A channel is somewhat like a UNIX pipe; it can be written to at one end and read from at the other. A common use of channels is for goroutines to indicate when they have finished.

The goroutines and their resources are managed automatically by the Go runtime system. With Go’s concurrency support, it’s easy to get all of the cores and threads of a multicore CPU working efficiently.

Types, Methods and Interfaces

You might wonder why types and methods are together in the same heading. It’s because Go has a simplified object-oriented programming model that works along with its expressive, lightweight type system. It completely avoids classes and type hierarchies, so it’s possible to do complicated things with datatypes without creating a mess. In Go, methods are attached to user-defined types, not to classes, objects or other data structures. Here’s a simple example:


// make a new type MyInt that is an integer

type MyInt int

// attach a method to MyInt to square a number

func (n MyInt) sqr() MyInt {
    return n*n
}

// make a new MyInt-type variable
// called "number" and set it to 5

var number MyInt = 5

// and now the sqr() method can be used

var square = number.sqr()

// the value of square is now 25

Along with this, Go has a facility called interfaces that allows mixing of types. Operations can be performed on mixed types as long as each has the method or methods attached to it, specified in the definition of the interface, that are needed for the operations.

Suppose you’ve created types called catdog and bird, and each has a method called age() that returns the age of the animal. If you want to add the ages of all animals in one operation, you can define an interface like this:


type animal interface {
    age() int
}

The animal interface then can be used like a type, allowing the catdog and bird types all to be handled collectively when calculating ages.

Unicode Support

Considering that Ken Thompson and Rob Pike defined the Unicode UTF-8 encoding that is now dominant worldwide, it may not surprise you that Go has good support for UTF-8. If you’ve never used Unicode and don’t want to bother with it, don’t worry; UTF-8 is a superset of ASCII. That means you can continue programming in ASCII and ignore Go’s Unicode support, and everything will work nicely.

In reality, all source code is treated as UTF-8 by the Go compiler and tools. If your system is properly configured to allow you to enter and display UTF-8 characters, you can use them in Go source filenames, command-line arguments and in Go source code for literal strings and names of variables, functions, types and constants.

In Figure 1, you can see a “hello, world” program in Portuguese, as it might be written by a Brazilian programmer.

""Figure 1. Go “Hello, World” Program in Portuguese

In addition to supporting Unicode in these ways, Go has three packages in its standard library for handling more complicated issues involving Unicode.

By now, maybe you understand why Go programmers are enthusiastic about the language. It’s not just that Go has so many good features, but that they are all included in one language that was designed to avoid over-complication. It’s a really good example of the whole being greater than the sum of its parts.

Resources

Source

How To Install And Use PuTTY On Linux

PuTTY is a free and open source GUI client that supports wide range of protocols including SSH, Telnet, Rlogin and serial for Windows and Unix-like operating systems. Generally, Windows admins use PuTTY as a SSH and telnet client to access the remote Linux servers from their local Windows systems. However, PuTTY is not limited to Windows. It is also popular among Linux users as well.  This guide explains how to install PuTTY on Linux and how to access and manage the remote Linux servers using PuTTY.

Install PuTTY on Linux

PuTTY is available in the official repositories of most Linux distributions. For instance, you can install PuTTY on Arch Linux and its variants using the following command:

$ sudo pacman -S putty

On Debian, Ubuntu, Linux Mint:

$ sudo apt install putty

How to use PuTTY to access remote Linux systems

Once PuTTY is installed, launch it from the menu or from your application launcher. Alternatively, you can launch it from the Terminal by running the following command:

$ putty

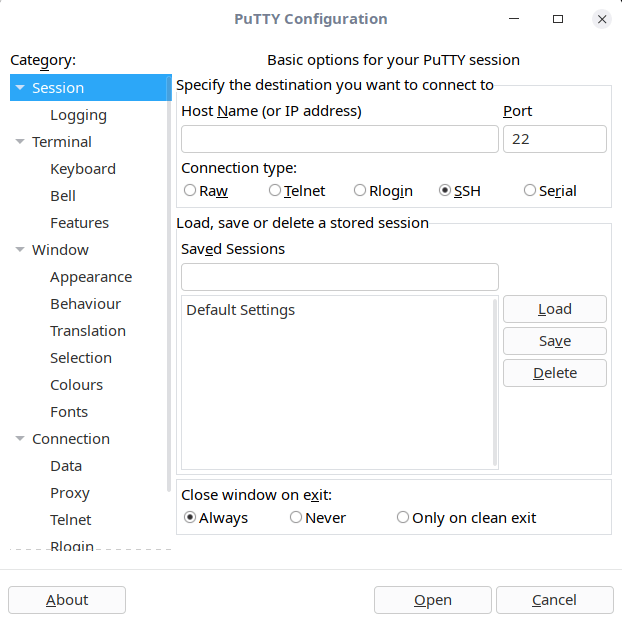
This is how PuTTY default interface looks like.

putty default interface

putty default interface

As you can see, most of the options are self-explanatory. On the left pane of the PuTTY interface, you can do/edit/modify various configurations such as,

  1. PuTTY session logging,
  2. Options for controlling the terminal emulation, control and change effects of keys,
  3. Control terminal bell sounds,
  4. Enable/disable Terminal advanced features,
  5. Set the size of PuTTY window,
  6. Control the scrollback in PuTTY window (Default is 2000 lines),
  7. Change appearance of PuTTY window and cursor,
  8. Adjust windows border,
  9. Change fonts for texts in PuTTY window,
  10. Save login details,
  11. Set proxy details,
  12. Options to control various protocols such as SSH, Telnet, Rlogin, Serial etc.
  13. And more.

All options are categorized under a distinct name for ease of understanding.

Access a remote Linux server using PuTTY

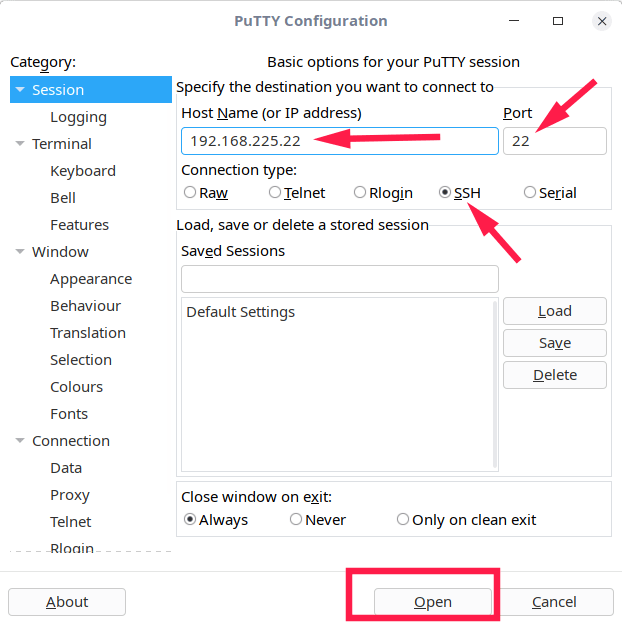
Click on the Session tab on the left pane. Enter the hostname (or IP address) of your remote system you want to connect to. Next choose the connection type, for example Telnet, Rlogin, SSH etc. The default port number will be automatically selected depending upon the connection type you choose. For example if you choose SSH, port number 22 will be selected. For Telnet, port number 23 will be selected and so on. If you have changed the default port number, don’t forget to mention it in the Port section. I am going to access my remote via SSH, hence I choose SSH connection type. After entering the Hostname or IP address of the system, click Open.

putty 1

Connect to remote system using putty

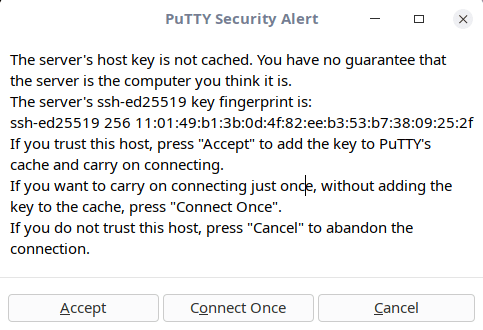
If this is the first time you have connected to this remote system, PuTTY will display a security alert dialog box that asks whether you trust the host you are connecting to.  Click Accept to add the remote system’s host key to the PuTTY’s cache:

putty 2

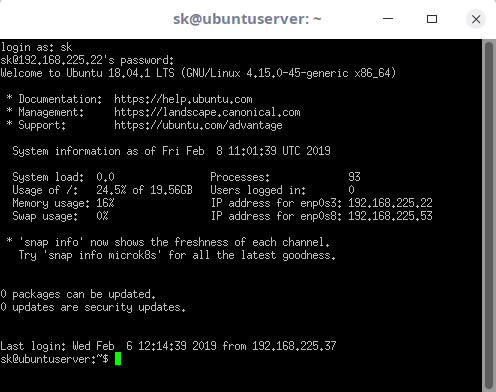
Next enter your remote system’s user name and password. Congratulations! You’ve successfully connected to your remote system via SSH using PuTTY.

putty 3

SSH to remote system using putty

Access remote systems configured with key-based authentication

Some Linux administrators might have configured their remote servers with key-based authentication. For example, when accessing AMS instances from PuTTY, you need to specify the key file’s location. PuTTY supports public key authentication and uses its own key format (.ppk files).

Enter the hostname or IP address in the Session section. Next, In the Category pane, expand Connection, expand SSH, and then choose Auth. Browse the location of the .ppk key file and click Open.

putty 4

Click Accept to add the host key if it is the first time you are connecting to the remote system. Finally, enter the remote system’s passphrase (if the key is protected with a passphrase while generating it) to connect.

Save PuTTY sessions

Sometimes, you want to connect to the remote system multiple times. If so, you can save the session and load it whenever you want without having to type the hostname or ip address, port number every time.

Enter the hostname (or IP address) and provide a session name and click Save. If you have key file, make sure you have already given the location before hitting the Save button.

putty 5

Now, choose session name under the Saved sessions tab and click Load and click Open to launch it.

Transferring files to remote systems using the PuTTY Secure Copy Client (pscp)

Usually, the Linux users and admins use ‘scp’ command line tool to transfer files from local Linux system to the remote Linux servers. PuTTY does have a dedicated client named PuTTY Secure Copy Clinet (PSCP in short) to do this job. If you’re using windows os in your local system, you may need this tool to transfer files from local system to remote systems. PSCP can be used in both Linux and Windows systems.

The following command will copy file.txt to my remote Ubuntu system from Arch Linux.

$ pscp -i test.ppk file.txt sk@192.168.225.22:/home/sk/

Here,

  • -i test.ppk : Key file to access remote system,
  • file.txt : file to be copied to remote system,
  • sk@192.168.225.22 : username and ip address of remote system,
  • /home/sk/ : Destination path.

To copy a directory. use -r (recursive) option like below:

$ pscp -i test.ppk -r dir/ sk@192.168.225.22:/home/sk/

To transfer files from Windows to remote Linux server using pscp, run the following command from command prompt:

pscp -i test.ppk c:\documents\file.txt.txt sk@192.168.225.22:/home/sk/

You know now what is PuTTY, how to install and use it to access remote systems. Also, you have learned how to transfer files to the remote systems from the local system using pscp program.

And, that’s all for now. Hope this was useful. More good stuffs to come. Stay tuned!

Cheers!

Resource:

Source

3 Ways to Install Deb Files on Ubuntu & Remove Them Later

This beginner article explains how to install deb packages in Ubuntu. It also shows you how to remove those deb packages afterwards.

This is another article in the Ubuntu beginner series. If you are absolutely new to Ubuntu, you might wonder about how to install applications.

The easiest way is to use the Ubuntu Software Center. Search for an application by its name and install it from there.

Life would be too simple if you could find all the applications in the Software Center. But that does not happen, unfortunately.

Some software are available via DEB packages. These are archived files that end with .deb extension.

You can think of .deb files as the .exe files in Windows. You double click on the .exe file and it starts the installation procedure in Windows. DEB packages are pretty much the same.

You can find these DEB packages from the download section of the software provider’s website. For example, if you want to install Google Chrome on Ubuntu, you can download the DEB package of Chrome from its website.

Now the question arises, how do you install deb files? There are multiple ways of installing DEB packages in Ubuntu. I’ll show them to you one by one in this tutorial.

Install deb files in Ubuntu

Installing .deb files in Ubuntu and Debian-based Linux Distributions

You can choose a GUI tool or a command line tool for installing a deb package. The choice is yours.

Let’s go on and see how to install deb files.

Method 1: Use the default Software Center

The simplest method is to use the default software center in Ubuntu. You have to do nothing special here. Simply go to the folder where you have downloaded the .deb file (it should be the Downloads folder) and double click on this file.

Google Chrome deb file on UbuntuDouble click on the downloaded .deb file to start installation

It will open the software center and you should see the option to install the software. All you have to do is to hit the install button and enter your login password.

Install Google Chrome in Ubuntu Software CenterThe installation of deb file will be carried out via Software Center

See, it’s even simple than installing from a .exe files on Windows, isn’t it?

Method 2: Use Gdebi application for installing deb packages with dependencies

Again, life would be a lot simpler if things always go smooth. But that’s not life as we know it.

Now that you know that .deb files can be easily installed via Software Center, let me tell you about the dependency error that you may encounter with some packages.

What happens is that a program may be dependent on another piece of software (libraries). When the developer is preparing the DEB package for you, he/she may assume that your system already has that piece of software on your system.

But if that’s not the case and your system doesn’t have those required pieces of software, you’ll encounter the infamous ‘dependency error’.

The Software Center cannot handle such errors on its own so you have to use another tool called gdebi.

gdebi is a lightweight GUI application that has the sole purpose of installing deb packages.

It identifies the dependencies and tries to install these dependencies along with installing the .deb files.

Personally, I prefer gdebi over software center for installing deb files. It is a lightweight application so the installation seems quicker. You can read in detail about using gDebi and making it the default for installing DEB packages.

You can install gdebi from the software center or using the command below:

sudo apt install gdebi

Method 3: Install .deb files in command line using dpkg

If you want to install deb packages in command lime, you can use either apt command or dpkg command. Apt command actually uses dpkg command underneath it but apt is more popular and easy to use.

If you want to use the apt command for deb files, use it like this:

sudo apt install path_to_deb_file

If you want to use dpkg command for installing deb packages, here’s how to do it:

sudo dpkg -i path_to_deb_file

In both commands, you should replace the path_to_deb_file with the path and name of the deb file you have downloaded.

Install deb files using dpkg command in UbuntuInstalling deb files using dpkg command in Ubuntu

If you get a dependency error while installing the deb packages, you may use the following command to fix the dependency issues:

sudo apt install -f

How to remove deb packages

Removing a deb package is not a big deal as well. And no, you don’t need the original deb file that you had used for installing the program.

Method 1: Remove deb packages using apt commands

All you need is the name of the program that you have installed and then you can use apt or dpkg to remove that program.

sudo apt remove program_name

Now the question comes, how do you find the exact program name that you need to use in the remove command? The apt command has a solution for that as well.

You can find the list of all installed files with apt command but manually going through this will be a pain. So you can use the grep command to search for your package.

For example, I installed AppGrid application in the previous section but if I want to know the exact program name, I can use something like this:

sudo apt list –installed | grep grid

This will give me all the packages that have grid in their name and from there, I can get the exact program name.

apt list –installed | grep grid
WARNING: apt does not have a stable CLI interface. Use with caution in scripts.
appgrid/now 0.298 all [installed,local]

As you can see, a program called appgrid has been installed. Now you can use this program name with the apt remove command.

Method 2: Remove deb packages using dpkg commands

You can use dpkg to find the installed program’s name:

dpkg -l | grep grid

The output will give all the packages installed that has grid in its name.

dpkg -l | grep grid
ii appgrid 0.298 all Discover and install apps for Ubuntu

ii in the above command output means package has been correctly installed.

Now that you have the program name, you can use dpkg command to remove it:

dpkg -r program_name

Tip: Updating deb packages
Some deb packages (like Chrome) provide updates through system updates but for most other programs, you’ll have to remove the existing program and install the newer version.

I hope this beginner guide helped you to install deb packages on Ubuntu. I added the remove part so that you’ll have better control over the programs you installed.

Source

Learn to Use curl Command with Examples | Linux.com

Curl command is used to transfer files to and from a server, it supports a number of protocols like HTTP, HTTPS, FTP, FTPS, IMAP, IMAPS, DICT, FILE, GOPHER, LDAP, LDAPS, POP3, POP3S, RTMP, RTSP, SCP, SFTP, SMB, SMBS, SMTP, SMTPS, TELNET and TFTP etc.

Curl also supports a lot of features like proxy support, user authentication, FTP upload, HTTP post, SSL connections, cookies, file transfer pause & resume, etc. There are around 120 different options that can be used with curl & in this tutorial, we are going to discuss some important Curl commands with examples.

Curl command with examples

Download or visit a single URL

To download a file using CURL from http or ftp or any other protocol, use the following command

$ curl https://linuxtechlab.com

If curl can’t identify the protocol being used, it will switch to http. We can also store the output of the command to a file with ‘-o’ option or can also redirect using ‘>’,

$ curl https://linuxtechlab.com -o test.html , or,

$ curl https://linuxtechlab.com > test.html


Download multiple files

To download two or more files with curl in a single command, we will use ‘-O’ option. Complete command is,

$ curl -O https://linuxtechlab.com/test1.tar.gz -O https://linuxtechlab.com/test2.tar.gz


Using ftp with curl

To browse a ftp server, use the following command,

$ curl ftp://test.linuxtechlab.com –user username:password

To download a file from the ftp server, use the following command,

$ curl ftp://test.linuxtechlab.com/test.tar.gz –user username:password -o test.tar.gz

To upload a file to the ftp server using th curl command, use the following,

$ curl -T test.zip ftp:/test.linuxtechlab.com/test_directory/ –user username:password


Resume a paused download

We can also pause and resume a download with curl command. To do this, we will first start the download ,

$ curl -O https://linuxtechlab.com/test1.tar.gz

than pause the download using ‘ctrl+C’ & to resume the download, use the following command,

$ curl -C – -O https://linuxtechlab.com/test1.tar.gz

here, ‘-C’ option is used to resume the download.


Sending an email

Though you might not be using it any time soon, but none the less we can use curl command to send email. Complete command for sending an email is,

$ curl –url “smtps://smtp.linuxtechlab.com:465” –ssl-reqd –mail-from “dan@linuxtechlab.com” –mail-rcpt “susan@readlinux.com” –upload-file mailcontent.txt –user “dan@linuxtechlab.com:password” –insecure


Limit download rate

To limit the rate at which a file is downloaded, in order to avoid network choking or for some other reason, use the curl command with ‘–limit-rate’ option,

$ curl –limit-rate 200k -O https://linuxtechlab.com/test.tar.gz


Show response headers

To only see the response header of a URL & not the complete content , we can use option ‘-I’ with curl command,

$ curl -I https://linuxtechlab.com/

This will only show the headers like http protocol, Cache-contorol headers, content-type etc of the mentioned url.


Using http authentication

We can also use curl to open a web url that has http authentication enabled with curl using ‘-u ‘ option. Complete command is,

$ curl -u user:passwd https://linuxtechlab.com

Using a proxy

To use a proxy server when visiting an URL or downloading, use ‘-x’ option with curl,

$ curl -x squid.proxy.com:3128 https://linuxtechlab.com


Verifying Ssl certificate

To verify a SSL certificate of an URL, use the following command,

$ curl –cacert ltchlb.crt https://linuxtechlab.com


Ignoring SSL certificate

To ignore the SSL certificate for an URL, we can use ‘-k’ option with curl command,

$ curl -k https://linuxtechlab.com

With this we end our tutorial on learning CURL command with examples. Please leave your valuable feedback & questions in the comment box below.

Source

Linux Today – 62 Benchmarks, 12 Systems, 4 Compilers: Our Most Extensive Benchmarks Yet Of GCC vs. Clang Performance

After nearly two weeks of benchmarking, here is a look at our most extensive Linux x86_64 compiler comparison yet between the latest stable and development releases of the GCC and LLVM Clang C/C++ compilers. Tested with GCC 8, GCC 9.0.1 development, LLVM Clang 7.0.1, and LLVM Clang 8.0 SVN were tests on 12 distinct 64-bit systems and a total of 62 benchmarks run on each system with each of the four compilers… Here’s a look at this massive data set for seeing the current GCC vs. Clang performance.

With the GCC 9 and Clang 8 releases coming up soon, I’ve spent the past two weeks running this plethora of compiler benchmarks on a range of new and old, low and high-end systems within the labs. The 12 chosen systems aren’t meant for trying to compare the performance between processors but rather a diverse look at how Clang and GCC perform on varying Intel/AMD microarchitectures. For those curious about AArch64 and POWER9 compiler performance, that will come in a separate article with this testing just looking at the Linux x86_64 compiler performance.

The 13 systems tested featured the following processors:

– AMD FX-8370E (Bulldozer)
– AMD A10-7870K (Godavari)
– AMD Ryzen 7 2700X (Zen)
– AMD Ryzen Threadripper 2950X (Zen)
– AMD Ryzen Threadripper 2990WX (Zen)
– AMD EPYC 7601 (Zen)
– Intel Core i5 2500K (Sandy Bridge)
– Intel Core i7 4960X (Ivy Bridge)
– Intel Core i9 7980XE (Skylake X)
– Intel Core i7 8700K (Coffeelake)
– Intel Xeon E5-2687Wv3 (Haswell)
– Intel Xeon Silver 4108 (SP Skylake)

The selection was chosen based upon systems in the server room that weren’t pre-occupied with other tests, of interest for a diverse look across several generations of Intel/AMD processors, and obviously based upon the hardware I have available. The storage and RAM varied between the systems, but again the focus isn’t for comparing these CPUs rather seeing how GCC 8, GCC 9, Clang 7, and Clang 8 compare. Ubuntu 18.10 was running on these systems with the Linux 4.18 kernel. All of the compiler releases were built in their release/optimized (non-debug) builds. During the benchmarking process on all of the systems, the CFLAGS/CXXFLAGS were maintained of “-O3 -march=native” throughout.

These compiler benchmarks are mostly focused on the raw performance of the resulting binaries but also included a few tests looking at the compile time performance too. For those short on time and wanting a comparison at the macro level, here is an immediate look at the four-way compiler performance across the dozen systems and looking at the geometric mean of all 62 compiler benchmarks carried out in each configuration:

On the AMD side, the Clang vs. GCC performance has reached the stage that in many instances they now deliver similar performance… But in select instances, GCC still was faster: GCC was about 2% faster on the FX-8370E system and just a hair faster on the Threadripper 2990WX but with Clang 8.0 and GCC 9.0 coming just shy of their stable predecessors. These new compiler releases didn’t offer any breakthrough performance changes overall for the AMD Bulldozer to Zen processors benchmarked.

On the Intel side, the Core i5 2500K interestingly had slightly better performance on Clang over GCC. With Haswell and Ivy Bridge era systems the GCC vs. Clang performance was the same. With the newer Intel CPUs like the Xeon Silver 4108, Core i7 8700K, and Core i9 7980XE, these newer Intel CPUs were siding with the GCC 8/9 compilers over Clang for a few percent better performance.

Now onward to the interesting individual data points… But before getting to that, if you appreciate all of the Linux benchmarking done day in and day out at Phoronix, consider joining Phoronix Premium to make this testing possible. Phoronix relies primarily on (pay per impression) advertisements to continue publishing content as well as premium subscriptions for those who prefer not seeing ads. Premium gets you ad-free access to the site as well as multi-page articles (like this!) all on a single page, among other benefits. Thanks for your support and at the very least to not be utilizing any ad-blocker on this web-site. Now here is the rest of these 2019 compiler benchmark results.

With the PolyBench-C polyhedral benchmark, what was interesting to note is that for the most part the Clang and GCC performance across this diverse range of systems was almost identical… But the interesting bit is the Intel Xeon Silver 4108 and Core i9 7980XE CPUs both performing noticeably better with GCC over Clang. Potentially explaining this is those two CPUs have AVX-512 and perhaps better utilized currently on the GCC side.

Of interest with the FFTW benchmark was seeing GCC 8.2 doing much better on the 2700X / 2990WX / EPYC 7601 Zen systems but the performance dropping back with GCC 9.0. On the Intel side, both AVX-512 Core i9 / Xeon Scalable systems saw nice performance improvements over Clang with GCC 8.2 and now moreso with the upcoming GCC 9.1.

The HMMer molecular biology benchmark was interesting in that with a number of systems the Clang performance was better than GCC, but for the older AMD systems and select Intel systems, GCC was still faster. So this case was a mixed bag between the compilers.

MAFFT is bringing better performance on the range of systems tested with GCC 9 compared to the current GCC 8 release, but that largely makes its performance in line with Clang.

The BLAKE2 crypto benchmark was one of the cases where Clang was easily beating out GCC on nearly all of the configurations.

The SciMark2 benchmarks always tend to be quite susceptible to compiler changes and in some cases like Jacobi, GCC is performing much faster than Clang.

Clang was generating faster code over GCC on the twelve systems with the TSCP chess benchmark.

On the AMD Zen systems, the Clang-generated binary for VP9 vpxenc video encoding was slightly faster while the Intel performance was close between these compilers. The exception on the Intel side was the Intel Core i9 7980XE with seeing measurably better performance using GCC.

With the H.264/H.265 video encode tests among other video coding benchmarks there isn’t too much change with most of the programs/libraries relying upon hand-tuned Assembly code already. But in the case of the x265 benchmark, the AVX512-enabled Xeon Silver and Core i9 Skylake-X processors were yielding better performance on GCC.

The OpenMP performance in LLVM Clang has come a long way in recent years and for many situations yields performance comparable to the GCC OpenMP implementation. In the case of GraphicsMagick that makes use of OpenMP, it depended upon the operations being carried out whether GCC still carried a lofty lead or was a neck-and-neck race.

With the Himeno pressure solver, on the AMD side GCC performed noticeably better than Clang with the old Bulldozer era FX-8370E. On the Intel side, GCC tended to outperform Clang particularly with the newer generations of processors.

As for compiler performance in building out some sample projects, compiling Apache was quite close between GCC and Clang but sided in favor of the LLVM-based compiler. When it came to building the ImageMagick program, using Clang led to much quicker build times than GCC. GCC 9 is building slower than GCC 8, which isn’t to much surprise considering the newer compilers tend to tack on additional optimization passes and other work in trying to yield faster binaries at the cost of slower build times.

When it came to the time needed to build LLVM, the Clang compiler was still faster though on the newer Intel CPUs was quite a tight race.

There were also cases where GCC did compile faster than Clang: building out PHP was quicker on GCC than Clang across all of the systems tested.

The C-Ray multi-threaded ray-tracer remains much faster with GCC over Clang on all of the systems tested.

The AOBench ambient occlusion renderer was also faster with GCC.

The dav1d AV1 video decoder was quicker with Clang on the older AMD systems as well as the older Intel (Sandy Bridge / Ivy Bridge) systems while on the newer CPUs the performance between the compilers yielded similar video decode speed.

LAME MP3 audio encoding was faster when built under GCC.

In very common workloads like OpenSSL, its performance has already been studied and well-tuned by all of the compilers for the past number of years.

Redis was faster on the newer (AVX-512) CPUs with GCC where as on the other systems the performance was similar.

Interestingly in the case of Sysbench, the AMD performance was faster when built by the GCC compiler while the Intel systems performed much better with the Clang compiler.

Broadly, it’s a very competitive race these days between GCC and Clang on Linux x86_64. As shown by the geometric means for all these tests, the race is neck-and-neck with GCC in some cases just having a ~2% advantage. Depending upon the particular code-base, in some cases the differences were more pronounced. One area where GCC seemed to do better on average than Clang was with the newer Core i9 7980XE and Xeon Silver systems that have AVX-512 and there the GNU Compiler Collection most often outperformed Clang. In the tests looking at the compile times, Clang still had some cases of beating out GCC but with some of the build tests the performance was close and in the case of compiling PHP it was actually faster to build on GCC.

Those wishing to dig through the 62 benchmarks across the dozen systems and the four compilers can find all of the raw performance data via this OpenBenchmarking.org result file. And if you appreciate all of our benchmarking, consider going premium.

Source

Amazon Elasticsearch Service now supports three Availability Zone deployments

Posted On: Feb 7, 2019

Amazon Elasticsearch Service now enables you to deploy your instances across three Availability Zones (AZs) providing better availability for your domains. If you enable replicas for your Elasticsearch indices, Amazon Elasticsearch Service distributes the primary and replica shards across nodes in different AZs to maximize availability. If you have configured dedicated master nodes while using multi-AZ deployment, they are automatically placed into three AZs to ensure that your cluster can elect a new master even in the rare event of an AZ disruption.

If you have already launched domains with “Zone Awareness” turned on (two AZ configuration), you can now easily reconfigure them to leverage three AZs. You can enable three AZ deployments for both existing and new domains at no extra cost using the AWS console, CLI or SDKs. Three AZs are supported in the following regions: US East (N. Virginia, Ohio), US West (Oregon), EU (Ireland, Frankfurt, London, Paris), Asia Pacific (Sydney, Tokyo, Seoul), and AWS China (Ningxia) region, operated by NWCD.

To learn more, read our documentation.

Source

Pine64 previews open source phone, laptop, tablet, camera, and SBCs

Pine64’s 2019 line-up of Linux-driven, open-spec products will include Rock64, Pine H64, and Pinebook upgrades plus a PinePhone, PineTab, CUBE camera, and Retro-Gaming case.

At FOSDEM last weekend, California-based Linux hacker board vendor Pine64 previewed an extensive lineup of open source hardware it intends to release in 2019. Surprisingly, only two of the products are single board computers.

The Linux-driven products will include a PinePhone Development Kit based on the Allwinner A64. There will be second, more consumer focused Pinebook laptop — a Rockchip RK3399 based, 14-inch Pinebook Pro — and an Allwinner A64-based, 10.1-inch PineTab tablet. Pine64 also plans to release an Allwinner S3L-driven IP camera system called the CUBE and a Roshambo Retro-Gaming case that supports Pine64’s Rock64 and RockPro64, as well as the Raspberry Pi.

PinePhone Development Kit (left) and PineTab with optional keyboard
(click images to enlarge)


The SBC entries are a Pine H64 Model B that will be replace the larger, but similarly Allwinner H6 based, Model A version and will add WiFi/Bluetooth. There will also be a third rev of the popular, RK3399 based Rock64 board that adds Power-over-Ethernet support. (See farther below for more details.)

Pine H64 Model B (left) and earlier Pine H64 Model A
(click images to enlarge)

The launch of the phone, laptop, tablet, and camera represents the most ambitious expansion to date by an SBC vendor to new open source hardware form factors. As we noted last month in our hacker board analysis piece, community-based SBC projects are increasingly specializing to survive in today’s Raspberry Pi dominated market. In a Feb. 1 Tom’s Hardware story, RPi Trading CEO Eben Upton confirmed our speculation that a next generation Raspberry Pi 4 that moves beyond 40nm fabrication will not likely ship until 2020. That offers a window of opportunity for other SBC vendors to innovate.

It’s a relatively short technical leap to move from a specialized SBC to a finished consumer electronics or industrial device, but it’s a larger marketing hurdle, especially with consumer electronics. Still, we can expect a few more vendors to follow Pine64’s lead in building on their SBCs, Linux board support packages, and hacker communities to launch more purpose-built consumer electronics and industrial gear.

Already, community projects have begun offering a more diverse set of enclosures and other accessories to turn their boards into mini-PCs, IoT gateways, routers, and signage systems. Meanwhile, established embedded board vendors are using their community-backed SBC platforms as a foundation for end-user products. Acer subsidiary Aaeon, for example, has spun off its UP boards into a variety of signage systems, automation controllers, and AI edge computing systems.

So far, most open source, Linux phone and tablet alternatives have emerged from open source software projects, such as Mozilla’s Firefox OS, the Ubuntu project’s Ubuntu Phone, and the Jolla phone. Most of these alternative mobile Linux projects have either failed, faded, or never took off.


PiTalk

Some of the more recent Linux phone projectss, such as the PiTalk and ZeroPhone, have been built around the Raspberry Pi platform. The PinePhone and PineTab would be even more open source given that the mainboards ship with full schematics.

Unlike many hacker board projects, the Pine64 products offer software tied to mainline Linux. This is easier to do with the Rockchip designs, but it’s been a slower road to mainline for Allwinner. Work by Armbian and others have now brought several Allwinner SoCs up to speed.

Working from established hardware and software platforms may offer a stronger foundation for launching mobile Android alternatives than a software-only project. “The idea, in principle, is to build convergent device-ecosystems (SBC, Module, Laptop/Tablet/ Phone / Other Devices) based on SOCs that we’ve already have developers engaged with and invested in,” says the Pine64 blog announcement.

PinePhone (left) and demo running Unity 8 and KDE
(click images to enlarge)


Here’s a closer look at Pine64’s open hardware products for 2019:

  • PinePhone Development Kit — Based on the quad -A53 Allwinner A64 driven SoPine A64 module, the PinePhone will run mainline Linux and support alternative mobile platforms such as UBPorts, Maemo Leste, PostmarketOS, and Plasma Mobile. It can also run Unity 8 and KDE Plasma with Lima. This upgradable, modular phone kit will be available soon in limited quantity and will be spun off later this year or in 2020 into an end-user phone with a target price of $149.The PinePhone kit includes 2GB LPDDR3, 32GB eMMC, and a small 1440 x 720-pixel LCD screen. There’s a 4G LTE module with Cat 4 150Mb downlink, a battery, and 2- and 5MP cameras. Other features include WiFi/BT, microSD, HDMI, MIPI I/O, sensors, and privacy hardware switches.

    Pinebook Pro (left) and earlier 14-inch Pinebook
    (click images to enlarge)


  • Pinebook Pro — Like many of the upcoming Pine64 products, the original Pinebooks are limited edition developer systems. The Pinebook Pro, however, is aimed at a broader audience that might be considering a Chromebook. This second-gen Pro laptop will not replace the $99 and up 11.6-inch version of the Pinebook. The original 14-inch version may receive an upgrade to make it more like the Pro.The $199 Pinebook Pro advances from the quad-core, Cortex-A53 Allwinner H64 to a hexa-core -A53 and -A72 Rockchip RK3399. It supports mainline Linux and BSD.

    SoPine A64

    The more advanced features include a higher-res 14-inch, 1080p screen, now with IPS, as well as twice the RAM (4GB LPDDR4). It also offers four times the storage at 64GB, with a 128GB option for registered developers. Other highlights include USB 3.0 and 2.0 ports, a USB Type-C port that supports DP-like [email protected] video, a 10,000 mAh battery, and an improved 2-megapixel camera. There’s also an option for an M.2 slot that supports NVMe storage.

  • PineTab — The PineTab is like a slightly smaller, touchscreen-enabled version of the first-gen Pinebook, but with the keyboard optional instead of built-in. The magnetically attached keyboard has a trackpad and can fold up to act as a screen cover.
    Like the original Pinebooks, the PineTab runs Linux or BSD on an Allwinner A64 with 2GB of LPDDR3 and 16GB eMMC. The 10-inch IPS touchscreen is limited to 720p resolution. Other features include WiFi/BT, USB, micro-USB, microSD, speaker, mic, and dual cameras.
    Pine64 notes that touchscreen-ready Linux apps are currently in short supply. The PineTab will soon be available for $79, or $99 with the keyboard.
  • The CUBE — This “early concept” IP camera runs on the Allwinner S3L — a single-core, Cortex-A7 camera SoC. It ships with a MIPI-CSI connected, 8MP Sony iMX179 CMOS camera with an m12 mount for adding different lenses.The CUBE offers 64MB or 128MB RAM, a WiFi/BT module, plus a 10/100 Ethernet port with Power-over-Ethernet (PoE) support. Other features include USB, microSD, and 32-pin GPIO. Target price: about $20.

    The CUBE camera (left) and Roshambo Retro-Gaming case and controller
    (click images to enlarge)


  • Roshambo Retro-Gaming — This retro gaming case and accessory set from Pine64’s Chinese partner Roshambo will work with Pine64’s Rock64 SBC, which is based on the quad -A53 Rockchip RK3328, or its RK3399 based RockPro64. It can also accommodate a Raspberry Pi. The $30 Super Famicom inspired case will ship with an optional $13 gaming controller set. Other features include buttons, switches, a SATA slot, and cartridge-shaped 128GB ($25) or 256GB ($40) SSDs.

    Rock64 Rev 1
  • Rock64 Rev 3 — Pine64 says it will continue to focus primarily on SBCs, although the only 2019 products it is disclosing are updates to existing designs. The Rock64 Rev 3 improves upon Pine64’s RK3399-based RPi lookalike, which it says has been its most successful board yet. New features include PoE, RTC, improved RPi 2 GPIO compatibility, and support for high-speed microSD cards. Pricing stays the same.
  • Pine H64 Model B — The Pine H64 Model B will replace the currently unavailable Pine H64 Model A, which shipped in limited quantities. The board trims down to a Rock64 (and Raspberry Pi) footprint, enabling use of existing cases, and adds WiFi/BT. It sells for $25 (1GB LPDDR3 RAM), $35 (2GB), and $45 (3GB).This article is copyright © 2019 Linux.com and was originally published here. It has been reproduced by this site with the permission of its owner. Please visit Linux.com for up-to-date news and articles about Linux and open source.

Source

SUSE releases enterprise Linux for all major ARM processors

SUSE Linux Enterprise Server has been around a while, but this is the first official release.

SUSE releases enterprise Linux for all major ARM processors

SUSE has released its enterprise Linux distribution, SUSE Linux Enterprise Server (SLES), for all major ARM server processors. It also announced the general availability of SUSE Manager Lifecycle.

SUSE is on par with the other major enterprise Linux distributions — Red Hat and Ubuntu — in the x86 space, but it has lagged in its ARM support. It’s not like SLES for ARM is only now coming to market for the first time, either. It has been available for several years, but on a limited basis.

“Previously, SUSE subscriptions for the ARM hardware platforms were only available to SUSE Partners due to the relative immaturity of the ARM server platform,” Jay Kruemcke, a senior product manager at SUSE, wrote in a blog post announcing the availability.

“Now that we have delivered four releases of SUSE Linux Enterprise Server for ARM and have customers running SUSE Linux on ARM servers as diverse as the tiny Raspberry Pi and the high-performance HPE Apollo 70 servers, we are now ready to sell subscriptions directly to customers,” he added.

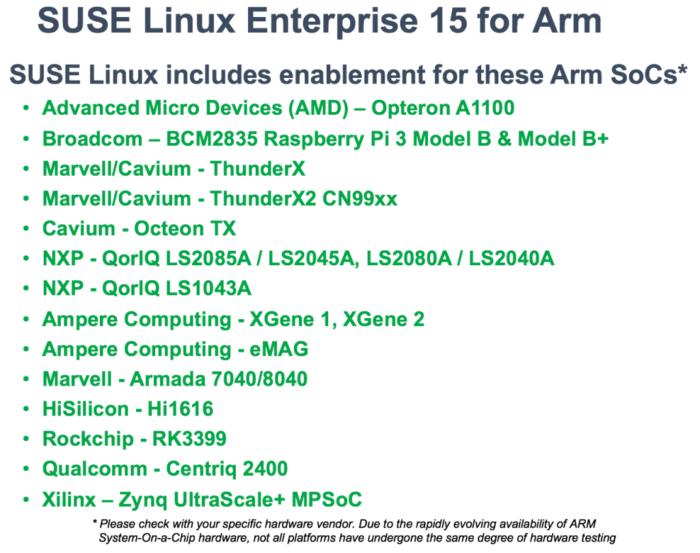
SLES is available for a variety of ARM server processors, including chips from Cavium, Broadcom, Marvell, NXP, Ampere, and… Qualcomm Centriq. Well, who can blame them for taking Qualcomm seriously?

sles15 arm enablement 1024x809

Because it covers such a wide range of processors, the company has come up with a rather complex approach to pricing — and Kruemcke spent a lot of time on the subject. So much so he didn’t get into technical details. Kruemcke said the company is using a model that has “core-based pricing for lower-end ARM hardware and socket-based pricing for everything else.”

Servers with fewer than 16 cores are priced based on the number of groups of four processor cores. Each group of four cores, up to 15 cores, requires a four-core group subscription that is stackable to a maximum four subscriptions. The number of cores is rounded up to the nearest group of four cores; therefore, a server with 10 cores would require three four-core group subscriptions.

Servers with 16 or more cores use the traditional 1-2 socket-based pricing.

Subscriptions for SUSE Linux Enterprise Server for Arm and SUSE Manager Lifecycle for ARM are now available directly to customers through the corporate price list or through the SUSE Shop.

Source

Download Lights Off Linux 3.30.0

Lights Off is an open source piece of software that provides users with a really beautiful and fun puzzle game, specifically designed for the GNOME desktop environment. It is distributed as part of the GNOME Games initiative.

It’s a very popular and fun puzzle/board game where the main objective is to turn off all of the tiles on the board. With each click, the player will toggle the state of the clicked tiles, as well as their non-diagonal neighbors.

Features hundreds of levels

The game is played on a 5×5 grid and features hundreds of levels. To start a new game, players will have to go to Game -> New Game or access the “New Game” entry from the GNOME panel if running the program under the controversial desktop environment.

It can be played using either the keyboard or the mouse, simply by selecting or clicking on a single tile. On the first level, if you click the right tile, it will complete the level and automatically display the next one.

Players can navigate between levels without restrictions

The game has been designed in such a way that it allows users to navigate between levels without restrictions, by using the back and next button provided under the main board. The big blue digital display will show the current level.

Advanced levels are very difficult and it will require a lot of time to complete them. It’s a memory game, so you’ll have to remember the clicked tiles and what non-diagonal neighbors it triggers when clicked, with the ultimate goal to turn them all off.

Designed for GNOME

It is possible to click on both blank and occupied tiles, but you will have to read its manual for detailed strategies and examples. The game integrates well with the GNOME desktop environment, but it can also be used on other open source graphical interfaces.

Puzzle game Board game GNOME game LightsOff Puzzle Board Tile

Source

WP2Social Auto Publish Powered By : XYZScripts.com