The Linux Command-Line Cheat Sheet

This select set of Linux commands can help you master the command line and speed up your use of the operating system.

The Linux command-line cheat sheet

When coming up to speed as a Linux user, it helps to have a cheat sheet that can help introduce you to some of the more useful commands.

In the tables below, you’ll find sets of commands with simple explanations and usage examples that might help you or Linux users you support become more productive on the command line.

Getting familiar with your account

These commands will help new Linux users become familiar with their Linux accounts.

Command Function Example
pwd Displays your current location in the file system pwd
whoami Displays your username – most useful if you switch users with su and need to be reminded what account you’re using currently whoami
ls Provides a file listing. With -a, it also displays files with names starting with a period (e.g., .bashrc). With -l, it also displays file permissions, sizes and last updated date/time. ls
ls -a
ls -l
env Displays your user environment settings (e.g., search path, history size, home directory, etc.) env
echo Repeats the text you provide or displays the value of some variable echo hello
echo $PATH
history Lists previously issued commands history
history | tail -5
passwd Changes your password. Note that complexity requirements may be enforced. passwd
history | tail -5

Examining files

Linux provides several commands for looking at the content and nature of files. These are some of the most useful commands.

Command Function Example
cat Displays the entire contents of a text file. cat .bashrc
more Displays the contents of a text file one screenful at a time. Hit the spacebar to move to each additional chunk. more .bash_history
less Displays the contents of a text file one screenful at a time, but in a manner that allows you to back up using the up arrow key. less .bash_history
file Identifies files by type (e.g., ASCII text, executable, image, directory) file myfile
file ~/.bashrc
file /bin/echo

Managing files

These are some Linux commands for changing file attributes as well as renaming, moving and removing files.

Command Function Example
chmod Changes file permissions (who can read it, whether it can be executed, etc.) chmod a+x myscript
chmod 755 myscript
chown Changes file owner sudo chown jdoe myfile
cp Makes a copy of a file. cp origfile copyfile
mv Moves or renames a file – or does both mv oldname newname
mv file /new/location
mv file /newloc/newname
rm Deletes a file or group of files rm file
rm *.jpg
rm -r directory

Creating and editing files

Linux systems provide commands for creating files and directories. Users can choose the text editor they are comfortable using. Some require quite a bit of familiarity before they’ll be easy to use while others are fairly self-explanatory.

Command Function Example
nano An easy-to-use text editor that requires you to move around in the file using your arrow keys and provides control sequences to locate text, save your changes, etc. nano myfile
vi A more sophisticated editor that allows you to enter commands to find and change text, make global changes, etc. vi myfile
ex A text editor designed for programmers and has both a line-oriented and visual mode ex myfile
touch Creates a file if it doesn’t exist or updates its timestamp if it does touch newfile
touch updatedfile
> Creates files by directing output to them. A single > creates a file while >> appends to an existing file. cal > calendar
ps > myprocs
date >> date.log
mkdir Creates a directory mkdir mydir
mkdir ~/mydir
mkdir /tmp/backup

Moving around the file system

The command for moving around the Linux file system is ls, but there are many variations.

Command Function Example
cd With no arguments, takes you to your home directory. The same thing would happen if you typed cd $HOMEor cd ~ cd
cd .. Moves up (toward /) one directory from your current location cd ..
cd <location> Takes you to the specified location. If the location begins with a /, it is taken to be relative to the root directory; otherwise it is taken as being relative to your current location. The ~ character represents your home directory. cd /tmp
cd Documents
cd ~/Documents

Learning about and identifying commands

There are a number of Linux commands that can help you learn about other commands, the options they offer and where these commands are are located in the file system. Linux systems also provide a command that can help you to learn what commands are available related to some subject – for example, commands that deal with user accounts.

Command Function Example
man Displays the manual (help) page for a specified command and (with -k) provides a list of commands related to a specified keyword man cd
man -k account
which Displays the location of the executable that represents the particular command which cd
apropos Lists commands associated with a particular topic or keyword apropos user
apropos account

Finding files

There are two commands that can help you find files on Linux, but they work very differently. One searches the file system while the other looks through a previously built database.

Command Function Example
find Locates files based on criteria provided (file name, type, owner, permissions, size, etc.). Unless provided with a location from which to start the search, find only looks in the current directory. find . -name myfile
find /tmp -type d
locate Locates files using the contents of the /var/lib/mlocate/mlocate.db which is updated by the updatedb command usually run through cron. No starting location is required. locate somefile
locate “*.html” -n 20

Viewing running processes

You can easily view processes that are running on the system – yours, another user’s or all of them.

Command Function Example
ps Shows processes that you are running in your current login session ps
ps -ef Shows all processes that are currently running on the system ps -ef
ps -ef | more
pstree Shows running processes in a hierarchical (tree-like) display that demonstrates the relationships between processes (-h highlights current process) pstree
pstree username
pstree -h

Starting, stopping and listing services

These commands allow you to display services as well as start and stop them.

Command Function Example
systemctl The systemctl command can start, stop, restart and reload services. Privileged access is required. sudo systemctl stop apache2.service
sudo systemctl restart apache2.service
sudo systemctl reload apache2.service
service Lists services and indicates whether they are running service –status-all

Killing processes

Linux offers a few commands for terminating processes. Privileged access is needed if you did not start the process in question.

Command Function Example
kill Terminates a running process provided you have the authority to do so kill 8765
sudo kill 1234
kill -9 3456
killall Terminates all processes with the provided name killall badproc
pkill Terminates a process based on its name pkill myproc

Identifying your OS release

The table below lists commands that will display details about the Linux OS that is running on a system.

Command Function Example
uname Displays information on OS release in a single line of text uname -a
uname -r
lsb_release On Debian-based systems, this command displays information on the OS release including its codename and distributor ID lsb_release -a
hostnamectl Displays information on the system including hostname, chassis type, OS, kernel and architecture hostnamectl

Gauging system performance

These are some of the more useful tools for examining system performance.

Command Function Example
top Shows running processes along with resource utilization and system performance data. Can show processes for one selected user or all users. Processes can be ordered by various criteria (CPU usage by default) top
top jdoe
atop Similar to top command but more oriented toward system performance than individual processes atop
free Shows memory and swap usage – total, used and free free
df Display file system disk space usage df
df -h

Managing users and groups

Commands for creating and removing user accounts and groups are fairly straightforward.

Command Function Example
useradd Adds a new user account to the system. A username is mandatory. Other fields (user description, shell, initial password, etc.) can be specified. Home directory will default to /home/username. useradd -c “John Doe” jdoe
useradd -c “Jane Doe” -g admin -s /bin/bash jbdoe
userdel Removes a user account from the system. The -foption runs a more forceful removal, deleting the home and other user files even if the user is still logged in. userdel jbdoe
userdel -f jbdoe
groupadd Adds a new user group to the system, updating the /etc/group. groupadd developers
groupdel Removes a user group from the system groupdel developers

Examining network connections

The commands below help you view network interfaces and connections.

Command Function Example
ip Displays information on network interfaces ip a
ss Displays information on sockets. The -s option provides summary stats. The -l option shows listening sockets. The -4 or -6 options restrict output to IPv4 or IPv6 connections. ss -s
ss -l
ss -4 state listening
ping Check connectivity to another system ping remhost
ping 192.168.0.11

Managing security

There are many aspects to managing security on a Linux system, but there are also a lot of commands that can help. The commands below are some that will get you started. Click on this link to see these and other commands on 22 essential Linux security commands.

Command Function Example
visudo The visudo command allows you to configure privileges that will allow select individuals to run certain commands with superuser authority. The command does this by making changes to the /etc/sudoers file. visudo
sudo The sudo command is used by privileged users (as defined in the /etc/sudoers file to run commands as root. sudo useradd jdoe
su Switches to another account. This requires that you know the user’s password or can use sudo and provide your own password. Using the  means that you also pick up the user’s environment settings. su (switch to root)
su – jdoe
sudo su – jdoe
who Shows who is logged into the system who
last Lists last logins for specified user using records from the /var/log/wtmp file. last jdoe
ufw Manages the firewall on Debian-based systems. sudo ufw status
sudo ufs allow ssh
ufw show
firewall-cmd Manages the firewall (firewalld) on RHEL and related systems. firewall-cmd –list-services
firewall-cmd –get-zones
iptables Displays firewall rules. sudo iptables -vL -t security

Setting up and running scheduled processes

Tasks can be scheduled to run periodically using the command listed below.

Command Function Example
crontab Sets up and manages scheduled processes. With the -l option, cron jobs are listed. With the -eoption, cron jobs can be set up to run at selected intervals. crontab -l
crontab -l -u username
crontab -e
anacron Allows you to run scheduled jobs on a daily basis only. If the system is powered off when a job is supposed to run, it will run when the system boots. sudo vi /etc/anacrontab

Updating, installing and listing applications

The commands for installing and updating applications depend on what version of Linux you are using, specifically whether it’s Debian- or RPM-based.

Command Function Example
apt update On Debian-based systems, updates the list of available packages and their versions, but does not install or upgrade any packages sudo apt update
apt upgrade On Debian-based systems, installs newer versions of installed packages sudo apt upgrade
apt list Lists all packages installed on Debian-basedsystem. With –upgradable option, it shows only those packages for which upgrades are available. apt list
apt list –installed
apt list –upgradable
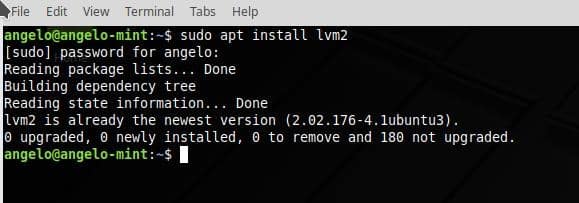
apt install On Debian-based systems, installs requested package sudo apt install apache2
yum update On RPM-cased systems, updates all or specified packages sudo yum update
yum update mysql
yum list On RPM-based systems, lists package sudo yum update mysql
yum install On RPM-based systems, installs requested package sudo yum -y install firefox
yum list On RPM-based systems, lists known and installed packages sudo yum list
sudo yum list –installed

Shutting down and rebooting

Commands for shutting down and rebooting Linux systems require privileged access. Options such as +15 refer to the number of minutes that the command will wait before doing the requested shutdown.

Command Function Example
shutdown Shuts down the system at the requested time. The -H option halts the system while the -P powers it down as well. sudo shutdown -H now
shutdown -H +15
shutdown -P +5
halt Shuts down the system at the requested time. sudo halt
sudo halt -p
sudo halt –reboot
poweroff Powers down the system at the requested time. sudo shutdown -H now
sudo shutdown -H +15
sudo shutdown -P +5

Wait, wait, there’s more!

Remember to consult the man pages for more details on these commands. A cheat sheet provides only a quick explanation and a handful of command examples to help you get started.

Source

Configure LVM on Linux Mint – Linux Hint

Imagine that you have a Hard Disk that requires you to resize a chosen partition. This is possible on Linux thanks to LVM. With this in mind, this article will teach you how to Configure LVM on Linux Mint. However, you can apply this tutorial to any Linux distribution.

What is LVM?

LVM is a logical volume manager developed for the Linux Kernel. Currently, there are 2 versions of LVM. LVM1 is practically out of support while LVM version 2 commonly called LVM2 is used.

LVM includes many of the features that are expected of a volume manager, including:

  • Resizing logical groups.
  • Resizing logical volumes.
  • Read-only snapshots (LVM2 offers read and write).

To give you an idea of the power and usefulness of LVM, I will give you the following example: Suppose we have a small hard drive, for example, 80Gb. The way the disk is distributed would be something like that:

  • The 400Mb /boot partition
  • For root partition / 6Gb
  • In the case of the home partition /home 32Gb
  • And the swap partition is 1Gb.

This distribution could be correct and useful but imagine that we install many programs and the root partition fills up, but in personal files, there is practically no data and the /home partition has 20 Gb available. This is a bad use of the hard disk. With LVM, the solution to this problem is simple, since you could simply reduce the partition containing /home and then increase the space allocated to the root directory.

LVM vocabulary

In order to make this post as simple as possible for the reader, it is necessary to take into account some concepts intimately related to LVM. Knowing these concepts effectively will make better understand the full potential of this tool:

So, let us start:

  • Physical Volume (PV): A PV is a physical volume, a hard drive, or a particular partition.
  • Logical Volume (LV): an LV is a logical volume, it is the equivalent of a traditional partition in a system other than LVM.
  • Volume Group (VG): a VG is a group of volumes, it can gather one or more PV.
  • Physical Extent (PE): a PE is a part of each physical volume, of a fixed size. A physical volume is divided into multiple PEs of the same size.
  • Logical extent (LE): an LE is a part of each fixed-size logical volume. A logical volume is divided into multiple LEs of the same size.
  • Device mapper: is a generic Linux kernel framework that allows mapping one device from blocks to another.

Configure LVM on Linux Mint

First of all, you must install the lvm2 package in your system. To do this, open a terminal emulator and write. Note that to execute this command you need super user privileges.

sudo apt install lvm2

Next, I am going to use fdisk to verify which partitions I have. Of course, you must also do this to ensure which are your partitions as well.

sudo -i
fdisk -l

As you can see, I have a second hard drive. In order for LVM to do its job, it is necessary to prepare the disk or partitions to be of the LVM type. Therefore, I have to do some work on the second hard disk called sdb.

So, type this command:

fdisk /dev/sdb

Next, press “n” key to create a new partition. Then, Press enter. Next, press “p” key to set the partition as a primary. Then, Press enter. Now, you have to press 1 to create it as the first partition of the disk. Then, Press enter.

So, the next step is press “t” key to change the system identifier of a partition. Then, Press enter. And select LVM partition. To do it, type “8e”. Then, Press enter. So, type “w” key to write all the changes.

Finally, check the partition.

fdisk -l /dev/sdb

NOTE: If you are going to work with several partitions, you must repeat this process with each of them.

Now, we are ready to continue.

Create the Physical Volume (PV)

To work with LVM we must first define the Physical Volumes (PV), for this we will use the pvcreate command. So, let us go.

pvcreate /dev/sdb1

Check the changes.

pvdisplay

NOTE: If we had more than one partition, we would have to add them all to the PV.

Create the Volume Group (VG)

Once you have the partitions ready, you have to add them to a volume group. So, type this command:

vgcreate volumegroup /dev/sdb1

Replace “volumegroup” by the name you want. If you had more partitions you would only have to add them to the command. For example:

vgcreate volumegroup /dev/sdb1

You can write the name what you want for the VG. So, check the volume group with this command:

vgdisplay

Create the logical volumes (LV)

This is the central moment of the post because in this part we will create the logical volumes that will be like a normal partition.

So, run this command:

lvcreate -L 4G -n  volume volumegroup

This command creates a logical volume of 4G of space over the previously created group.

With lvdisplay you can check the LV.

lvdisplay

The next step is to format and mount the VL.

mkfs.ext4 /dev/volumegroup/volume

Now, create a temporal folder and mount the VL on it.

mkdir /temporal/
mount /dev/volumegroup/volume /temporal/

Now, check the VL.

df -h | grep termporal

Increase or decrease the size of the logical volume

One of the most phenomenal possibilities of LVM is the possibility to increase the size of a logical volume in a very simple way. To do this, type the following command.

lvextend -L +2G /dev/volumegroup/volume

Finally, it is necessary to reflect the same change in the file system, for this, run this command.

resize2fs /dev/volumegroup/volume

Check the new size:

df -h | grep temporal

Final thoughts

Learning to configure LVM in Linux Mint is a simple process that can save many problems when working with partitions. To do this, I invite you to read more about the subject since here I have shown you practical and simple examples on how to configure it.

Source

Red Hat introduces first Kubernetes-native IDE

These days we often package our new programs in containers, and we then manage those containers with Kubernetes. That’s great as far as it goes, but if you’re a programmer, it’s still missing a vital part: An integrated development environment (IDE). Now, Red Hat is filling this hole with Red Hat CodeReady Workspaces, a Kubernetes-native, browser-based IDE.

Also: Why IBM bought Red Hat: It’s all open source cloud, all the time

CodeReady is based on the open-source Eclipse Che IDE. It also includes formerly proprietary features from Red Hat’s Codenvy acquisition.

This new IDE is optimized for Red Hat OpenShift, Red Hat’s Docker/Kubernetes platform and Red Hat Enterprise Linux (RHEL). Red Hat claims CodeReady Workspaces is the first IDE, which runs inside a Kubernetes cluster. There’s been other IDEs, which can work with Kubernetes — notably JetBrain’s IntelliJ IDEA with a plugin — but CodeReady appears to be the first native Kubernetes IDE.

With CodeReady Workspaces, you can manage your code, its dependencies and artifacts inside OpenShift Kubernetes pods, and containers. By contrast, with older IDEs, you can only take advantage of Kubernetes during the final phase of testing and deployment. CodeReady Workspaces lets you develop in OpenShift from the start. Thus, you don’t have to deal with the hassle of moving applications from your development platforms to production systems.

Another CodeReady plus is you don’t need to be a Kubernetes or OpenShift expert to use it. CodeReady handles Kubernetes’ complexities behind the scenes, so you can focus on developing your containerized applications instead of wrestling with Kubernetes. In short, CodeReady includes the tools and dependencies you’ll need to code, build, test, run, and debug container-based applications without requiring you to be a container expert.

Must read

CodeReady also includes a new sharing feature: Factories. A Factory is a template containing the source-code location, runtime and tooling configuration, and commands needed for a project. Factories enable development teams to get up and running with a Kubernetes-native developer environment in a couple of minutes. Team members can use any device with a browser, any operating system, and any IDE — not just CodeReady — to work on their own or shared workspaces. You can also bring other programmers into your CodeReady projects by simply sending them a shareable link.

In a statement, Brad Micklea, Red Hat’s senior director for developer experience and programs, said:

“The rise of cloud-native applications and Kubernetes as the platform for modern workloads requires a change in how developers approach building, testing and deploying their critical applications. Existing developer tooling does not adequately address the evolving needs of containerized development, a challenge that we’re pleased to answer with Red Hat CodeReady Workspaces.”

With CodeReady, developer teams can:

  • Integrate with your preferred version control system with both public and private repositories
  • Control workspace permissions and resourcing
  • Better protect intellectual property by keeping source code off hard-to-secure laptops and mobile devices
  • Use Lightweight Directory Access Protocol (LDAP) or Active Directory (AD) authentication for single sign-on

All-in-all, this is a no brainer. If you’re developing with Kubernetes and containers on OpenShift, get CodeReady. Period. End of statement. Better still, CodeReady is available without charge to anyone with an OpenShift subscription. Just join the Red Hat Developer Program, download, and get to work.

Related Stories:

Source

WLinux & WLinux Enterprise Benchmarks, The Linux Distributions Built For Windows 10 WSL


Making the news rounds a few months back was “WLinux”, which was the first Linux distribution designed for Microsoft’s Windows Subsystem for Linux (WSL) on Windows 10. But is this pay-to-play Linux distribution any faster than the likes of Ubuntu, openSUSE, and Debian already available from the Microsoft Store? Here are some benchmarks of these different Linux distribution options with WSL.


WLinux is a Linux distribution derived from Debian that is focused on offering an optimal WSL experience. This distribution isn’t spun by Microsoft but a startup called Whitewater Foundry. WLinux focuses on providing good defaults for WSL with the catering of its default package set while the Debian archive via APT is still accessible. There is also support for graphical applications when paired with a Windows-based X client. For this easy-setup, quick-to-get-going Linux distribution on WSL, it retails for $19.99 USD from the Microsoft Store though often sells for $9.99 USD.


Whitewater Foundry also offers WLinux Enterprise. Rather than being a Debian-based WSL operating system, WLinux Enterprise is derived from the EL7 / Scientific Linux 7 package set. WLinux Enterprise is also available from the Microsoft Store where it has a listed retail price of $99.99 USD though is on sale for $5.99.


Whitewater Foundry had sent over some review keys for WLinux a while back so I decided to do some WSL options currently on Windows 10: Ubuntu 18.04 LTS, openSUSE Leap 42.3, and Debian Stretch. There has been indications of Intel engineers exploring WSL support for Clear Linux, which would be quite interesting given its performance focus, but so far we haven’t seen that offering premiere yet via the Microsoft Store.


The same system was used for all of this benchmarking, which consisted of an Intel Core i9 7980XE, ASUS PRIME X299-A motherboard, 4 x 4GB DDR4-3200MHz memory, Samsung 970 EVO NVMe SSD, and GeForce GTX TITAN X. Windows 10 Pro x64 was running on the system with all available system updates as of Build 17763. For supported tests, besides the WSL Linux distributions tested there are also results from the bare metal Windows 10 installation. All of these Linux and Windows benchmarks were carried out using the Phoronix Test Suite.


Source

Linux Task Apps: Plenty of Goodies in These Oldies | Reviews

Feb 7, 2019 12:45 PM PT

If you need a task manager application to run on your Linux operating system, tap into a software category filled with options that go far beyond the to-do list app you have stuffed into your smartphone.

Keeping up to date with multiple daily activity calendars, tons of information, and never-ending must-do lists can become a never-ending challenge. This week’s Linux Picks and Pans reviews the top open source task management and to-do apps that will serve you well on most Linux distributions.

Over the years, I have used these task management/to-do list applications on my own Linux computers. Few of them were capable of easily syncing their information to my tablet and my smartphone. The number of project management and to-do list tools have proliferated for Android devices in the last few years, but that is not the case with similar apps for Linux.

In fact, several of the better-known Linux apps in this category that I previously used or reviewed have disappeared. Most of the others have not had a feature update in years.

Task management and to-do list apps for Linux are a mixed bag. This category reflects an overlapping of features and functions. These standalone solutions go beyond the integration in Google Calendar provided by
Google Tasks.

Several of the products in this roundup offer complex interfaces that let you take the information with you on other devices. Some of the applications have sparser features and show signs of aging.

The applications included in this roundup are not presented in any ranked order. Some are readily available in distro repositories. Other packages require manual installation.

Task Coach Masters Details

How a task manager app handles details determines its real usefulness.
Task Coach goes out of its way to help you keep track of the details. Version 1.4.4, released on Dec. 2, 2018, is simply the latest example of this app’s ability to keep you on target and in control of your projects.

TaskCoach is actually two tools in one. It is both a personal task tracker and a to-do manager. It does both routines well. Other apps in this category usually excel at doing one or the other.

It is a master in combining composite functions with a basic task list. Its features include tracking time on task, categorizing activities, and keeping tabs on subevents aligned with larger projects.

Task Coach screenshot

Task Coach lacks an inviting or intuitive user interface, but it is still very functional.

If Task Coach did just those things, it would be a nearly perfect solution. Its additional two tricks put this app over the top in usability. You can add notes to each task and include attachments.

Task Coach makes it easy to maintain a variety of task lists on multiple computers, mobile devices and operating systems. Versions exist for Windows, OS X, Linux, BSD, iPhone, iPod touch and Android.

Task Coach lacks an inviting or intuitive user interface, but it is still very functional. Its detailed configuration panel gives you numerous choices to fine-tune the way it works.

For example, you get about nine tabs with multiple choices on each to set up the application’s general look and feel. These tabs include Window behavior, Files, Language, Task Dates, Task Reminders, Task Appearance, Features and Font Editor options.

The window display shows existing tasks on the left side of the application window. Next to the task name are the planned start and due dates for each task. Right-click the task name line to access available actions. Click the desired action or use that option’s keyboard shortcut.

You can double-click the task name line to access subcategories for entering additional sub-levels of information about the task. These categories contain the most important detail controls for getting Task Coach to manage and organize your tasks’ activities.

The right side of the application window shows categories and sub-categories you create for a task. This is where you can search for specifics in all of your tasks using filters.

Use Task Coach’s progress slider to track your ongoing completion stages. Double-click on a category to provide a detailed description, add notes about each task, and attach supporting documents to the file package.

The crowning glory of the Task Coach tracking system is the Budget tab. It lets you assign the maximum amount of time you allot for a task. It displays a bar showing the time spent on a task and the time remaining to complete it on schedule.

The Revenue option lets you calculate your billing or earning amounts. This budget feature can eliminate the need for any separate billing calculation tool.

Task Coach is a very useful application to help you drill deep down into sub-tasks and multiple categories. It becomes even more valuable if you work on different computers and need an app that lets you store its data file on a portable drive or in the cloud.

GNOME ToDo: Listicles and More

Gnome ToDo version 3.28 is a task management application that is designed to integrate with the GNOME desktop. Fear not if you run something else. It fits in perfectly with many Linux distros without regard to desktop flavor.

It is a simple app that in many ways mimics the look and feel of Google’s Notes app, but it is not embedded into the Chrome browser. gToDo creates multiple lists, sets alarm notifications when tasks are due, automatically purges completed tasks if you desire, exports tasks to HTML format, and sorts them according to priority.

This app also shows the upcoming due date or status of tasks, and can highlight or hide your tasks until their due time is reached.

Gnome ToDo interface

Gnome ToDo has a simple interface showing little more than a single pane with tasks and related information.

This app’s real beauty lies in its simple interface. It has little more than a single pane that shows tasks and related information.

The interface also shows add/remove buttons and a category filter dropdown box. Otherwise, it is devoid of overlapping right-click menus.

Everything you need is found in a few dropdown menus. The design is simple with high functionality.

gToDo automatically purges old tasks. It also highlights past due items and upcoming tasks.

Hovering over the tray icon displays scheduled tasks and provides for quick updates. It is easy to set up several different categories within a list.

If you prefer to keep separate lists for different activities, you can — and it is just as easy to set alarms and priority notifications, regardless of how you configure one or more lists.

AKIEE: Abandoned Potential

The game plan that drives most ToDo lists and task manager apps is a two-part thought process. Either you have a task to do or you are done with it.
Akiee adds a third part to that plan: doing It.

Akiee has a few other things going for it as well. It makes it easier to stay focused on your next task. Its unique algorithm-based ranking system helps you decide what to do next.

It avoids letting you waste time pondering inconclusive priorities. This approach to ordering your tasks makes it easy to decide what to do next. This, in turn, makes it a reliable tool to build your projects one step at a time.

Akiee screenshot

Akiee adds an in-progress element (Doing) as part of its simple-to-use user interface.

One of Akiee’s best features is its universal access. Akiee does not hide your to-do list in a database. You can store your Akiee task file in your cloud account — think Google or Dropbox — to access it over the Web.

Rather than impose its own platform, Akiee stores your task lists in a Markdown file that is readable in any text editor you use. This gives you access to your tasks on all of your computers and on your smartphone as well. You can arrange the order of your tasks easily, instead of just changing priorities and due dates of your tasks.

It is built with Node-Webkit, Clojurescript and React. It is available for Linux, Mac and Windows.

Akiee’s tasks have three states: To-do, Doing and Done. This way you can focus on the tasks you are currently working on.

Akiee has one major drawback, however. Its developer has not updated the application in more than four years. It is barely into beta phase and may not be compatible with every Linux distro.

To use it, download from here, Unpack the binaries files, and then click on the Akiee file to run it.

Remember the Milk: Forgets Nothing

Remember the Milk used to be one of my favorite to-do apps — but until recently, it was not an app, at least not for Linux users. It was a nifty smartphone and tablet tool. I had to piggyback the RTM service in my browser when I ran my Linux-powered desktop or laptop computers.

Now RTM is available for Linux as a standalone app. However, it is available only in 32-bit and 64-bit versions for Fedora and Ubuntu so far.

The app lets you see your tasks with one click of the cow launcher icon. You also can keep a thin version of the app on your screen at all times. Plus, desktop notifications appear in the notification center to make sure that you do not forget what you need to do.

Remember the Milk to-do app

Remember the Milk sports a somewhat cluttered user interface. Tasks and other features are accessible with a single click in most cases.

The Smart Add feature makes it fast and easy to add your tasks. Enter in a single line the task and its due date, priority, repeat reminder and tags. The app sorts the details and displays them in the appropriate locations within the window display.

The RTM app sends you reminders as you direct by email, text, IM, Twitter and mobile devices. Track your to-do items your way. You can create multiple lists and even organize them with colors and tags.

RTM’s project management feature lets you set subtasks to break down tasks into segments to give you a step-by-step description of what the task entails. Create any number of subtasks for a task, and even add subtasks to your subtasks.

The app makes it easy to track tasks in a project involving a team of collaborators. You easily can send entire task lists or delegated subtasks to your cohorts.

Easily plan and track multipart projects by attaching files to your tasks. The RTM app connects to Google Drive or Dropbox to keep all related information in one place. The supporting data can be documents, spreadsheets, presentations or photos.

RTM’s search wizard lets you search your tasks easily to find what you assigned to a particular person, or subtasks due by a certain date. You can search for tasks by the priority number or tag you assigned.

Two other features make Remember the Milk a top-notch task management tool. One is Smart Lists. These are special lists based on search criteria. Keeping on task is close to foolproof with some 50 different search operators. The other is the ability to synchronize with other tools you use.

For instance, you can integrate your lists with Gmail, Google Calendar, Twitter, Evernote, If This Than That (IFTTT), and more.

If the app is not compatible with your Linux distro, go to the
Remember the Milk website and sign up for the free Web-based service. You will have access to most of the same features as the RTM app

GnoTime: Not Just a Tracking Tool

The GnoTime Tracking Tool, formerly known as “GTT,” comes close to doing it all: keep to-do lists on target, organize your ideas, and track your projects.

GnoTime also can serve as your diary or work journal. Even better, it can track how much time you spend on projects, and generate reports and invoices based on that time log.

The graphical user interface in GnoTime takes some getting used to, however. This is especially the case if you keep a lot of open panels. The top row of the main application window is typical of a traditional GUI design.

GnoTime's user interface

GnoTime’s user interface is a familiar sight with clickable icons for the app’s features.

The similarity ends there, however. Access to all program features is available from the top row of dropdown menus. A limited toolbar provides quick access to some of the same functions. The categories make a lot of sense.

A limited toolbar row is located below the dropdown menus. You can click icons to open a New Entry, Activity Journal, Timer Stop and Start, Help and Quit. These serve as default shortcuts to the most essential menu options.

The app suffers from a busy interface. Tracking several projects fills in a lot of data in the various display panels of the main application window. For instance, the currently active projects display in a large window under the toolbar row. It shows details that include importance, urgency, status, total time spent, current working time, project title, description, and new diary entry.

Each line contains the summary data for a particular project. Click on a project line to see more specific data in two resizable panels under the project summary window. The Properties menu opens a tabbed panel that lists Projects, Rates, Intervals and Planning. Each tab has even more precise billing and time tracking options to regulate calculations for billing and reporting.

The Journal panel is a dizzying array of links to other panels and windows in the tracking system. The Journal panel presents a series of diary entries. Each one can be a short or long note about a project, a to-do list entry, or any comment you want to add to the mix.

The Journal lists each entry as a hot link that shows in blue the date of the entry and the starting and stopping time of the item. Elapsed time is shown but is not a link. Clicking on any of the linked elements opens a larger window with the related details.

Select Reports/Query to open the Custom Report Generator for the active project. Then select from the dropdown menu the custom report you want to generate. The options are Journal, Big Journal, Invoice, Daily, Status and ToDo. You can refine the date range for the compiled data. Or you can select a Daily, Monthly or Custom activity report. When you have completed all selections, click the Generate Report button. The results display in an XML file format in yet another window that pops open.

More cool features include the ability to maintain multiple to-do lists. This is a huge advantage over having tasks for different activities scrunched together in one list manager.

The Running Timer tallies time totals for each project or task viewable by day, week, month or year. It measures the amount of time that I sit at the computer actually working. When the keyboard or mouse is idle, the clock stops. If it stays stopped for too long, the program nags me to start it up again.

The Gnome Time Tracker is a very flexible and comprehensive tracking toolbox that auto-saves as I work. Despite GnoTime’s propensity for desktop clutter, its interface is simple to use.

GnoTime comes in pre-compiled binaries/packages for Debian, Ubuntu, RedHat/Fedora, Suse and Gentoo Linux families. Check your distro’s package manager tool. Otherwise, you will have to download a tarball file and manually compile from source. That is the only way to get the latest version, which was last updated on April 17, 2017. In that case,
go here.

Toodledo: Cloud-based Organizer Extraordinaire

One of the more modern and highly advanced options for managing your projects and keeping your task lists on schedule is
Toodledo. This highly customizable service lives in the clouds and syncs to all of your devices. It is platform-agnostic and connects from your browser to apps on your other supported devices.

Toodledo's user interface

Toodledo’s expansive user interface shows a highlighted view of all data for each module. Each component is a click away in the left panel.

Toodledo is a detailed solution that you might find more of an overkill approach. The interface provides labels, infinite lists that you can subdivide into categories, and much more.

Toodledo combines to-do lists with project management features with an added ability to tack on notes and attach files. Among this solution’s many talents is the ability to make custom to-do lists, create structured outlines, track your habits, write long notes, and comment on goals and projects.

One of its unique features is the Schedule module. It helps you to make the most of your free time and create repeating tasks. It can send you reminders based on your current location and let you view tasks on a calendar.

It is a great digital assistant for your personal needs. It is a superior method to stay connected and scheduled with your collaborators. You can assign tasks to your associates and track time spent on a project.

You can use Toodledo to record your ideas in the notes section. You can set and track goals. The entire system is based on the Get Things Done (GTD) method developed by David Allen. This approach organizes tasks to focus your energy and creativity on completing those tasks in a stress-free manner.

The basic version is free. It provides most of the core features but places a limitation of 30 items per list or outline. Other limitations also exist when using the basic version. Standard tier (US$2.99/month and Plus tier ($4.99/month) are also available.

Bottom Line

Task management applications for Linux offer an overlapping range of features and user interfaces. I deliberately avoided ranking these Linux products. I also suspended the usual star rating for each one in this roundup.

Task management and to-do List software for Linux is a software category being overshadowed by cloud services and dedicated apps on portable devices. That is one reason open source applications available for the Linux platform lack many new contenders.

The titles in this roundup offer a variety of options. They have a range of functionality that may take time to learn and use effectively. Compare the features and find the best choice for your needs.

Source

Linux Today – Ubuntu 14.04 LTS (Trusty Tahr) Reaches End of Life on April 30, 2019

Feb 06, 2019, 19:00

Released on April 17, 2014, the Ubuntu 14.04 LTS (Trusty Tahr) operating system series will reach its end of life in about three months from the moment of writing, on April 30, 2019. Ubuntu 14.04 was an LTS (Long Term Support) release, which means that it received software and security updates for five years. Last year on September 19, Canonical informed Ubuntu 14.04 LTS (Trusty Tahr) users that they would be able to purchase additional support for the operating system through its commercial offering called Extended Security Maintenance (ESM), which proved to be a huge success among Ubuntu 12.04 LTS (Precise Pangolin) users.

Source

A new bottle has been opened with the release of Wine 4.1

The first Wine development build of this year, as well as being the first build towards Wine 5.0 is now out.

Announcing the release last night, Wine’s Alexandre Julliard noted these improvements coming with Wine 4.1:

  • Support for NT kernel spinlocks.
  • Better glyph positioning in DirectWrite.
  • More accurate reporting of CPU information.
  • Context handle fixes in the IDL compiler.
  • Preloader fixes on macOS.
  • Various bug fixes.

With the bug fixes, they noted 30 in total being squashed. These include issues solved with GOG Galaxy, Gas Guzzlers Combat Carnage, Empire Earth and more. As usual though, some bugs were fixed previously and only seeing a status update now.

What are you hoping to see working in Wine during this cycle? What are you excited about? Do let us know in the comments.

Source

Download File Roller Linux 3.30.1

File Roller is an open source archive manager application for the GNOME desktop environment. As a matter of fact, the software is simply called Archive Manager and it is a GUI (Graphical User Interface) front-end to various command-line archiving utilities.

Designed for GNOME

Because it integrates well with the GNOME desktop environment, the application allows Linux users to effortlessly extract archives, as well as to view the contents of an archive or add/remove files to/from an existing archive.

In addition, users are able to view and modify a certain file contained in an archive, open, create and archives in various formats. The familiar user interface of the application can be used by novice and experienced users alike.

Features at a glance

The application supports numerous archive types, including gzip (tar.gz, tar.xz, tgz), bzip (tar.bz, tbz), bzip2 (tar.bz2, tbz2), Z (tar.Z, taz), lzop (tar.lzo, tzo), zip, jar (jar, ear, war), lha, lzh, rar, ace, 7z, alz, ar, and arj.

In addition, it supports the cab, cpio, deb, iso, cbr, rpm, bin, sit, tar.7z, cbz, and zoo archive types, as well as single files that are compressed with the xz, gzip, bzip, bzip2, lzop, lzip, z or rzip compression algorithms.

It’s compatible with other desktop environments

While File Roller is the default archive manager of the GNOME desktop environment, it can also be used on any other open source desktop environment, such as Xfce, MATE, Cinnamon, LXDE, Openbox or Fluxbox.

When used under GNOME, the application provides some unique functionality integrated into the panel entry, such as the ability to create a new archive, view all files from an archive, view the archive as a folder, as well as to enable the folders view mode.

Bottom line

All in all, the application provides GNOME users with a capable archive manager, crafted to perfection and engineered to extract almost all archive types, as long as the respective command-line programs are installed.

Source

15 Docker Commands You Should Know | Linux.com

In this article we’ll look at 15 Docker CLI commands you should know. If you haven’t yet, check out the rest of this series on Docker conceptsthe ecosystemDockerfiles, and keeping your images slim. In Part 6 we’ll explore data with Docker. I’ve got a series on Kubernetes in the works too, so follow me to make sure you don’t miss the fun!

There are about a billion Docker commands (give or take a billion). The Docker docs are extensive, but overwhelming when you’re just getting started. In this article I’ll highlight the key commands for running vanilla Docker.

At risk of taking the food metaphor thread running through these articles too far, let’s use a fruit theme. Veggies provided sustenance in the article on slimming down our images. Now tasty fruits will give us nutrients as we learn our key Docker commands.

Overview

Recall that a Docker image is made of a Dockerfile + any necessary dependencies. Also recall that a Docker container is a Docker image brought to life. To work with Docker commands, you first need to know whether you’re dealing with an image or a container.

  • A Docker image either exists or it doesn’t.
  • A Docker container either exists or it doesn’t.
  • A Docker container that exists is either running or it isn’t.

Once you know what you’re working with you can find the right command for the job.

Commmand Commonalities

Here are a few things to know about Docker commands:

  • Docker CLI management commands start with docker, then a space, then the management category, then a space, and then the command. For example, docker container stop stops a container.
  • A command referring to a specific container or image requires the name or id of that container or image.

For example, docker container run my_app is the command to build and run the container named my_app. I’ll use the name my_container to refer to a generic container throughout the examples. Same goes for my_imagemy_tag, etc.

I’ll provide the command alone and then with common flags, if applicable. A flag with two dashes in front is the full name of the flag. A flag with one dash is a shortcut for the full flag name. For example, -p is short for the --portflag.

Flags provide options to commands

The goal is to help these commands and flags stick in your memory and for this guide to serve as a reference. This guide is current for Linux and Docker Engine Version 18.09.1 and API version 1.39.

First, we’ll look at commands for containers and then we’ll look at commands for images. Volumes will be covered in the next article. Here’s the list of 15 commands to know — plus 3 bonus commands!

Containers

Use docker container my_command

create — Create a container from an image.
start — Start an existing container.
run — Create a new container and start it.
ls — List running containers.
inspect — See lots of info about a container.
logs — Print logs.
stop — Gracefully stop running container.
kill —Stop main process in container abruptly.
rm— Delete a stopped container.

Images

Use docker image my_command

build — Build an image.
push — Push an image to a remote registry.
ls — List images.
history — See intermediate image info.
inspect — See lots of info about an image, including the layers.
rm — Delete an image.

Misc

docker version — List info about your Docker Client and Server versions.
docker login — Log in to a Docker registry.
docker system prune — Delete all unused containers, unused networks, and dangling images.

Containers

Container Beginnings

The terms create, start, and run all have similar semantics in everyday life. But each is a separate Docker command that creates and/or starts a container. Let’s look at creating a container first.

docker container create my_repo/my_image:my_tag — Create a container from an image.

I’ll shorten my_repo/my_image:my_tag to my_image for the rest of the article.

There are a lot of possible flags you could pass to create.

docker container create -a STDIN my_image

-a is short for --attach. Attach the container to STDIN, STDOUT or STDERR.

Now that we’ve created a container let’s start it.

docker container start my_container — Start an existing container.

Note that the container can be referred to by either the container’s ID or the container’s name.

docker container start my_container

Start

Now that you know how to create and start a container, let’s turn to what’s probably the most common Docker command. It combines both create and start into one command: run.

docker container run my_imageCreate a new container and start it. It also has a lot of options. Let’s look at a few.

docker container run -i -t -p 1000:8000 --rm my_image

-i is short for --interactive. Keep STDIN open even if unattached.

-tis short for--tty. Allocates a pseudo terminal that connects your terminal with the container’s STDIN and STDOUT.

You need to specify both -i and -t to then interact with the container through your terminal shell.

-p is short for --port. The port is the interface with the outside world.1000:8000 maps the Docker port 8000 to port 1000 on your machine. If you had an app that output something to the browser you could then navigate your browser to localhost:1000 and see it.

--rm Automatically delete the container when it stops running.

Let’s look at some more examples of run.

docker container run -it my_image my_command

sh is a command you could specify at run time.sh will start a shell session inside your container that you can interact with through your terminal. sh is preferable to bash for Alpine images because Alpine images don’t come with bash installed. Type exit to end the interactive shell session.

Notice that we combined -i and -t into -it.

docker container run -d my_image

-d is short for --detach. Run the container in the background. Allows you to use the terminal for other commands while your container runs.

Checking Container Status

If you have running Docker containers and want to find out which one to interact with, then you need to list them.

docker container ls — List running containers. Also provides useful information about the containers.

docker container ls -a -s

-a is short for -all. List all containers (not just running ones).

-s is short for --size. List the size for each container.

docker container inspect my_container — See lots of info about a container.

docker container logs my_container — Print a container’s logs.

Logs. Not sure how virtual logs are related. Maybe via reams of paper?

Container Endings

Sometimes you need to stop a running container.

docker container stop my_container — Stop one or more running containers gracefully. Gives a default of 10 seconds before container shutdown to finish any processes.

Or if you are impatient:

docker container kill my_container — Stop one or more running containers abruptly. It’s like pulling the plug on the TV. Prefer stop in most situations.

docker container kill $(docker ps -q) — Kill all running containers.

docker kill cockroach

Then you delete the container with:

docker container rm my_container — Delete one or more containers.

docker container rm $(docker ps -a -q) — Delete all containers that are not running.

Those are the eight essential commands for Docker containers.

To recap, you first create a container. Then, you start the container. Or combine those steps with docker run my_container. Then, your app runs. Yippee!

Then, you stop a container with docker stop my_container. Eventually you delete the container with docker rm my_container.

Now, let’s turn to the magical container-producing molds called images.

Images

Here are seven commands for working with Docker images.

Developing Images

docker image build -t my_repo/my_image:my_tag . — Build a Docker image named my_image from the Dockerfile located at the specified path or URL.

-t is short for tag. Tells docker to tag the image with the provided tag. In this case my_tag .

The . (period) at the end of the command tells Docker to build the image according to the Dockerfile in the current working directory.

Build it

Once you have an image built you want to push it to a remote registry so it can be shared and pulled down as needed. Assuming you want to use Docker Hub, go there in your browser and create an account. It’s free. 😄

This next command isn’t an image command, but it’s useful to see here, so I’ll mention it.

docker login — Log in to a Docker registry. Enter your username and password when prompted.

Push

docker image push my_repo/my_image:my_tag — Push an image to a registry.

Once you have some images you might want to inspect them.

Inspecting Images

Inspection time

docker image ls — List your images. Shows you the size of each image, too.

docker image history my_image — Display an image’s intermediate images with sizes and how they were created.

docker image inspect my_image — Show lots of details about your image, including the layers that make up the image.

Sometimes you’ll need to clean up your images.

Removing Images

docker image rm my_image — Delete the specified image. If the image is stored in a remote repository, the image will still be available there.

docker image rm $(docker images -a -q) — Delete all images. Careful with this one! Note that images that have been pushed to a remote registry will be preserved — that’s one of the benefits of registries. 😃

Now you know most essential Docker image-related commands. We’ll cover data-related commands in the next article.

Misc

docker version — List info about your Docker Client and Server versions.

docker login— Log in to a Docker registry. Enter your username and password when prompted.

docker system prune makes an appearance in the next article. Readers on Twitter and Reddit suggested that it would be good to add to this list. I agree, so I’m adding it.

docker system prune —Delete all unused containers, unused networks, and dangling images.

docker system prune -a --volumes

-a is short for --all. Delete unused images, not just dangling ones.

--volumes Remove unused volumes. We’ll talk more about volumes in the next article.

UPDATE Feb. 7, 2019: Management Commands

In CLI 1.13 Docker introduced management command names that are logically grouped and consistently named. The old commands still work, but the new ones make it easier to get started with Docker. The original version of this article listed the old names. I’ve updated the article to use the management command names based on reader suggestions. Note that this change only introduces two command name changes — in most cases it just means adding container or image to the command. A mapping of the commands is here.

Wrap

If you are just getting started with Docker, these are the three most important commands:

docker container run my_image — Create a new container and start it. You’ll probably want some flags here.

docker image build -t my_repo/my_image:my_tag . — Build an image.

docker image push my_repo/my_image:my_tag — Push an image to a remote registry.

Here’s the larger list of essential Docker commands:

Containers

Use docker container my_command

create — Create a container from an image.
start — Start an existing container.
run — Create a new container and start it.
ls — List running containers.
inspect — See lots of info about a container.
logs — Print logs.
stop — Gracefully stop running container.
kill —Stop main process in container abruptly.
rm— Delete a stopped container.

Images

Use docker image my_command

build — Build an image.
push — Push an image to a remote registry.
ls — List images.
history — See intermediate image info.
inspect — See lots of info about an image, including the layers.
rm — Delete an image.

Misc

docker version — List info about your Docker Client and Server versions.
docker login — Log in to a Docker registry.
docker system prune — Delete all unused containers, unused networks, and dangling images.

To view the CLI reference when using Docker just enter the command dockerin the command line. You can see the Docker docs here.

Now you can really build things with Docker! As my daughter might say in emoji: 🍒 🥝 🍊 🍋 🍉 🍏 🍎 🍇. Which I think translates to “Cool!” So go forth and play with Docker!

If you missed the earlier articles in this series, check them out. Here’s the first one:

In the final article in this series we’ll spice things up with a discussion of data in Docker. Follow me to make sure you don’t miss it!

I hope you found this article helpful. If you did, please give it some love on your favorite social media channels. Docker on! 👏

Source

Red Hat Extends Datacenter Infrastructure Control, Automation with Latest Version of Red Hat CloudForms

RALEIGH, N.C.

February 7, 2019

Red Hat, Inc. (NYSE: RHT), the world’s leading provider of open source solutions, today announced the general availability of Red Hat Cloudforms 4.7, the latest version of its highly-scalable infrastructure management tool. Red Hat CloudForms 4.7 includes deeper integration with Red Hat Ansible Automation and new infrastructure integrations designed to help streamline and simplify IT management across hybrid cloud infrastructure.

“While migrating applications to hybrid cloud infrastructure has become a priority for many enterprise IT organizations, effective management across physical, virtual and private cloud infrastructure remains a key building block to fully adopting hybrid cloud. Red Hat CloudForms 4.7 provides a necessary stepping stone for organizations seeking to harness public cloud services in tandem with on-premises infrastructure, enabling users to gain increased control over datacenter environments while providing a unified and consistent set of management capabilities for disparate on-premises resources.”

/>

According to Gartner, “the landscape of cloud adoption is one of hybrid clouds and multiclouds. By 2020, 75% of organizations will have deployed a multicloud or hybrid cloud model.”1 Red Hat believes that to embrace hybrid cloud infrastructure, organizations first need foundational management capabilities and oversight across physical, virtual and private cloud environments. The latest version of Red Hat CloudForms helps to enable unified and consistent management across on-premises and virtual resources through policy controlled self-service for consumers of IT services.

Red Hat CloudForms provides the on-premises component of Red Hat’s robust hybrid cloud management portfolio, with Red Hat Ansible Tower offering automation capabilities for public cloud services. Combined, the two products drive a single pane for managing across enterprise IT’s footprints, delivering the capabilities to automate workflows, standardize system configurations and better maintain system stability and reliability across the IT estate.

Enhanced automation

Red Hat CloudForms 4.7 drives additional integration with Red Hat Ansible Automation by making more Ansible capabilities available natively within CloudForms. Users can now execute Red Hat Ansible Tower workflows directly from the CloudForms interface, helping users to more simply implement sophisticated automation. By further fusing the two solutions, Red Hat CloudForms 4.7 can help organizations to speed IT deployments while maintaining improved service stability and performance.

New infrastructure integrations

Red Hat CloudForms 4.7 provides new and enhanced integrations with physical infrastructure and networking providers, including Nuage Networks Virtualized Services Platform (VSP) and Lenovo XClarity, helping enable users to better manage physical and network compute infrastructure alongside virtual and multi-cloud through a single solution. The integration helps users provision physical infrastructure the same way they would virtual – improving performance and simplifying day 1 and day 2 operations.

Supporting Quote

Joe Fitzgerald, vice president, Management, Red Hat
“While migrating applications to hybrid cloud infrastructure has become a priority for many enterprise IT organizations, effective management across physical, virtual and private cloud infrastructure remains a key building block to fully adopting hybrid cloud. Red Hat CloudForms 4.7 provides a necessary stepping stone for organizations seeking to harness public cloud services in tandem with on-premises infrastructure, enabling users to gain increased control over datacenter environments while providing a unified and consistent set of management capabilities for disparate on-premises resources.”

1Source, Gartner, Inc., Market Insight: Making Lots of Money in the New World of Hybrid Cloud and Multicloud, Sid Nag and David Ackerman, September 7, 2018

About Red Hat

Red Hat is the world’s leading provider of enterprise open source software solutions, using a community-powered approach to deliver reliable and high-performing Linux, hybrid cloud, container, and Kubernetes technologies. Red Hat helps customers integrate new and existing IT applications, develop cloud-native applications, standardize on our industry-leading operating system, and automate, secure, and manage complex environments. Award-winning support, training, and consulting services make Red Hat a trusted adviser to the Fortune 500. As a strategic partner to cloud providers, system integrators, application vendors, customers, and open source communities, Red Hat can help organizations prepare for the digital future.

Forward-looking statements

Certain statements contained in this press release may constitute “forward-looking statements” within the meaning of the Private Securities Litigation Reform Act of 1995. Forward-looking statements provide current expectations of future events based on certain assumptions and include any statement that does not directly relate to any historical or current fact. Actual results may differ materially from those indicated by such forward-looking statements as a result of various important factors, including: risks related to our pending merger with International Business Machines Corporation, the ability of the Company to compete effectively; the ability to deliver and stimulate demand for new products and technological innovations on a timely basis; delays or reductions in information technology spending; the integration of acquisitions and the ability to market successfully acquired technologies and products; risks related to errors or defects in our offerings and third-party products upon which our offerings depend; risks related to the security of our offerings and other data security vulnerabilities; fluctuations in exchange rates; changes in and a dependence on key personnel; the effects of industry consolidation; uncertainty and adverse results in litigation and related settlements; the inability to adequately protect Company intellectual property and the potential for infringement or breach of license claims of or relating to third party intellectual property; the ability to meet financial and operational challenges encountered in our international operations; and ineffective management of, and control over, the Company’s growth and international operations, as well as other factors contained in our most recent Quarterly Report on Form 10-Q (copies of which may be accessed through the Securities and Exchange Commission’s website at http://www.sec.gov), including those found therein under the captions “Risk Factors” and “Management’s Discussion and Analysis of Financial Condition and Results of Operations”. In addition to these factors, actual future performance, outcomes, and results may differ materially because of more general factors including (without limitation) general industry and market conditions and growth rates, economic and political conditions, governmental and public policy changes and the impact of natural disasters such as earthquakes and floods. The forward-looking statements included in this press release represent the Company’s views as of the date of this press release and these views could change. However, while the Company may elect to update these forward-looking statements at some point in the future, the Company specifically disclaims any obligation to do so. These forward-looking statements should not be relied upon as representing the Company’s views as of any date subsequent to the date of this press release.

Source

WP2Social Auto Publish Powered By : XYZScripts.com