Top 5 open source network monitoring tools

Maintaining a live network is one of a system administrator’s most essential tasks, and keeping a watchful eye over connected systems is essential to keeping a network functioning at its best.

There are many different ways to keep tabs on a modern network. Network monitoring tools are designed for the specific purpose of monitoring network traffic and response times, while application performance management solutions use agents to pull performance data from the application stack. If you have a live network, you need network monitoring to make sure you aren’t vulnerable to an attacker. Likewise, if you rely on lots of different applications to run your daily operations, you will need an application performance management solution as well.

This article will focus on open source network monitoring tools. These tools help monitor individual nodes and applications for signs of poor performance. Through one window, you can view the performance of an entire network and even get alerts to keep you in the loop if you’re away from your desk.

Before we get into the top five network monitoring tools, let’s look more closely at the reasons you need to use one.

Network monitoring tools are vital to maintaining networks because they allow you to keep an eye on devices connected to the network from a central location. These tools help flag devices with subpar performance so you can step in and run troubleshooting to get to the root of the problem.

Running in-depth troubleshooting can minimize performance problems and prevent security breaches. In practical terms, this keeps the network online and eliminates the risk of falling victim to unnecessary downtime. Regular network maintenance can also help prevent outages that could take thousands of users offline.

A network monitoring tool enables you to:

  • Autodiscover devices connected to your network
  • View live and historic performance data for a range of devices and applications
  • Configure alerts to notify you of unusual activity
  • Generate graphs and reports to analyze network activity in greater depth

The top 5 open source network monitoring tools

Now, that you know why you need a network monitoring tool, take a look at the top 5 open source tools to see which might best meet your needs.

Cacti

If you know anything about open source network monitoring tools, you’ve probably heard of Cacti. It’s a graphing solution that acts as an addition to RRDTool and is used by many network administrators to collect performance data in LANs. Cacti comes with Simple Network Management Protocol (SNMP) support on Windows and Linux to create graphs of traffic data.

Cacti typically works by using data sourced from user-created scripts that ping hosts on a network. The values returned by the scripts are stored in a MySQL database, and this data is used to generate graphs.

This sounds complicated, but Cacti has templates to help speed the process along. You can also create a graph or data source template that can be used for future monitoring activity. If you’d like to try it out, download Cacti for free on Linux and Windows.

Nagios Core

Nagios Core is one of the most well-known open source monitoring tools. It provides a network monitoring experience that combines open source extensibility with a top-of-the-line user interface. With Nagios Core, you can auto-discover devices, monitor connected systems, and generate sophisticated performance graphs.

Support for customization is one of the main reasons Nagios Core has become so popular. For example, Nagios V-Shell was added as a PHP web interface built in AngularJS, searchable tables and a RESTful API designed with CodeIgniter.

If you need more versatility, you can check the Nagios Exchange, which features a range of add-ons that can incorporate additional features into your network monitoring. These range from the strictly cosmetic to monitoring enhancements like nagiosgraph. You can try it out by downloading Nagios Core for free.

Icinga 2

Icinga 2 is another widely used open source network monitoring tool. It builds on the groundwork laid by Nagios Core. It has a flexible RESTful API that allows you to enter your own configurations and view live performance data through the dashboard. Dashboards are customizable, so you can choose exactly what information you want to monitor in your network.

Visualization is an area where Icinga 2 performs particularly well. It has native support for Graphite and InfluxDB, which can turn performance data into full-featured graphs for deeper performance analysis.

Icinga2 also allows you to monitor both live and historical performance data. It offers excellent alerts capabilities for live monitoring, and you can configure it to send notifications of performance problems by email or text. You can download Icinga 2 for free for Windows, Debian, DHEL, SLES, Ubuntu, Fedora, and OpenSUSE.

Zabbix

Zabbix is another industry-leading open source network monitoring tool, used by companies from Dell to Salesforce on account of its malleable network monitoring experience. Zabbix does network, server, cloud, application, and services monitoring very well.

You can track network information such as network bandwidth usage, network health, and configuration changes, and weed out problems that need to be addressed. Performance data in Zabbix is connected through SNMP, Intelligent Platform Management Interface (IPMI), and IPv6.

Zabbix offers a high level of convenience compared to other open source monitoring tools. For instance, you can automatically detect devices connected to your network before using an out-of-the-box template to begin monitoring your network. You can download Zabbix for free for CentOS, Debian, Oracle Linux, Red Hat Enterprise Linux, Ubuntu, and Raspbian.

Prometheus

Prometheus is an open source network monitoring tool with a large community following. It was built specifically for monitoring time-series data. You can identify time-series data by metric name or key-value pairs. Time-series data is stored on local disks so that it’s easy to access in an emergency.

Prometheus’ Alertmanager allows you to view notifications every time it raises an event. Alertmanager can send notifications via email, PagerDuty, or OpsGenie, and you can silence alerts if necessary.

Prometheus’ visual elements are excellent and allow you to switch from the browser to the template language and Grafana integration. You can also integrate various third-party data sources into Prometheus from Docker, StatsD, and JMX to customize your Prometheus experience.

As a network monitoring tool, Prometheus is suitable for organizations of all sizes. The onboard integrations and the easy-to-use Alertmanager make it capable of handling any workload, regardless of its size. You can download Prometheus for free.

Which are best?

No matter what industry you’re working in, if you rely on a network to do business, you need to implement some form of network monitoring. Network monitoring tools are an invaluable resource that help provide you with the visibility to keep your systems online. Monitoring your systems will give you the best chance to keep your equipment in working order.

As the tools on this list show, you don’t need to spend an exorbitant amount of money to reap the rewards of network monitoring. Of the five, I believe Icinga 2 and Zabbix are the best options for providing you with everything you need to start monitoring your network to keep it online. Staying vigilant will help to minimize the change of being caught off-guard by performance issues.

Source

Getting started with acme.sh Let’s Encrypt SSL client

Acme.sh is a simple, powerful and easy to use ACME protocol client written purely in Shell (Unix shell) language, compatible with bash, dash, and sh shells. It helps manage installation, renewal, revocation of SSL certificates. It supports ACME version 1 and ACME version 2 protocols, as well as ACME v2 wildcard certificates. Being a zero dependencies ACME client makes it even better. You don’t need to download and install the whole internet to make it running. The tool does not require root or sudo access, but it’s recommended to use root.

Acme.sh supports the following validation methods that you can use to confirm domain ownership:

  • Webroot mode
  • Standalone mode
  • Standalone tls-alpn mode
  • Apache mode
  • Nginx mode
  • DNS mode
  • DNS alias mode
  • Stateless mode

What is Let’s Encrypt

Let’s Encrypt (LE) is a certificate authority (CA) and project that offers free and automated SSL/TLS certificates, with the goal of encrypting the entire web. If you own a domain name and have shell access to your server you can utilize Let’s Encrypt to obtain a trusted certificate at no cost. Let’s Encrypt can issue SAN certs for up to 100 hostnames and wildcard certificates. All certs are valid for the period of 90 days.

Acme.sh usage and basic commands

In this section, I will show some of the most common acme.sh commands and options.

Acme.sh installation

You have a few options to install acme.sh.

Install from web via curl or wget:

curl https://get.acme.sh | sh
source ~/.bashrc

or

wget -O - https://get.acme.sh | sh
source ~/.bashrc

Install from GitHub:

curl https://raw.githubusercontent.com/Neilpang/acme.sh/master/acme.sh | INSTALLONLINE=1 sh

or

wget -O - https://raw.githubusercontent.com/Neilpang/acme.sh/master/acme.sh | INSTALLONLINE=1 sh

Git clone and install:

git clone https://github.com/Neilpang/acme.sh.git
cd ./acme.sh
./acme.sh --install
source ~/.bashrc

The installer will perform 3 actions:

  1. Create and copy acme.sh to your home dir ($HOME): ~/.acme.sh/. All certs will be placed in this folder too.
  2. Create alias for: acme.sh=~/.acme.sh/acme.sh.
  3. Create daily cron job to check and renew the certs if needed.

Advanced installation:

git clone https://github.com/Neilpang/acme.sh.git
cd acme.sh
./acme.sh --install \
          --home ~/myacme \
          --config-home ~/myacme/data \
          --cert-home ~/mycerts \
          --accountemail "hi@acme.sh" \
          --accountkey ~/myaccount.key \
          --accountconf ~/myaccount.conf \
          --useragent "this is my client."

You don’t need to set all options, just set those ones you care about.

Options explained:

  • --home is a customized directory to install acme.sh in. By default, it installs into ~/.acme.sh.
  • --config-home is a writable folder, acme.sh will write all the files(including cert/keys, configs) there. By default, it’s in --home.
  • --cert-home is a customized dir to save the certs you issue. By default, it’s saved in --config-home.
  • --accountemail is the email used to register account to Let’s Encrypt, you will receive renewal notice email here. Default is empty.
  • --accountkey is the file saving your account private key. By default it’s saved in --config-home.
  • --useragent is the user-agent header value used to send to Let’s Encrypt.

After installation is complete, you can verify it by checking acme.sh version:

acme.sh --version
# v2.8.1

The program has a lot of commands and parameters that can be used. To get help you can run:

acme.sh --help

Issue an SSL cert

If you already have a web server running, you should use webroot mode. You will need write access to the web root folder. Here are some example commands that can be used to obtain cert via webroot mode:

Single domain + Webroot mode:

acme.sh --issue -d example.com --webroot /var/www/example.com

Multiple domains in the same cert + Webroot mode:

acme.sh --issue -d example.com -d www.example.com -d mail.example.com --webroot /var/www/example.com

Single domain ECC/ECDSA cert + Webroot mode:

acme.sh --issue -d example.com --webroot /var/www/example.com --keylength ec-256

Multiple domains in the same ECC/ECDSA cert + Webroot mode:

acme.sh --issue -d example.com -d www.example.com -d mail.example.com --webroot /var/www/example.com --keylength ec-256

Valid values for --keylength are: 2048 (default), 3072, 4096, 8192 or ec-256, ec-384.

If you don’t have a web server, maybe you are on a SMTP or FTP server, the 80 port is free, then you can use standalone mode. If you want to use this mode, you’ll need to install socat tools first.

Single domain + Standalone mode:

acme.sh --issue -d example.com --standalone

Multiple domains in the same cert + Standalone mode:

acme.sh --issue -d example.com -d www.example.com -d mail.example.com --standalone

If you don’t have a web server, maybe you are on a SMTP or FTP server, the 443 port is free. You can use standalone TLS ALPN mode. Acme.sh has a builtin standalone TLS web server, it can listen at 443 port to issue the cert.

Single domain + Standalone TLS ALPN mode:

acme.sh --issue -d example.com --alpn

Multiple domains in the same cert + Standalone TLS ALPN mode:

acme.sh --issue -d example.com -d www.example.com --alpn

Automatic DNS API integration

If your DNS provider has an API, acme.sh can use the API to automatically add the DNS TXT record for you. Your cert will be automatically issued and renewed. No manually work is required. Before requesting the certs configure your API keys and Email. Currently acme.sh has automatic DNS integration with around 60 DNS providers natively and can utilize Lexicon tool for those that are not supported natively.

Single domain + CloudFlare DNS API mode:

export CF_Key="sdfsdfsdfljlbjkljlkjsdfoiwje"
export CF_Email="xxxx@sss.com"
acme.sh --issue -d example.com --dns dns_cf

Wildcard cert + CloudFlare DNS API mode:

export CF_Key="sdfsdfsdfljlbjkljlkjsdfoiwje"
export CF_Email="xxxx@sss.com"
acme.sh --issue -d example.com -d '*.example.com' --dns dns_cf

If your DNS provider doesn’t support any API access, you can add the TXT record manually.

acme.sh --issue --dns -d example.com -d www.example.com -d cp.example.com

You should get an output like below:

Add the following txt record:
Domain:_acme-challenge.example.com
Txt value:9ihDbjYfTExAYeDs4DBUeuTo18KBzwvTEjUnSwd32-c

Add the following txt record:
Domain:_acme-challenge.www.example.com
Txt value:9ihDbjxxxxxxxxxxxxxxxxxxxxxxxxxxxxxxxxxxxxx

Please add those txt records to the domains. Waiting for the dns to take effect.

Then just rerun with renew argument:

acme.sh --renew -d example.com

Keep in mind that this is DNS manual mode and you can’t auto renew your certs. You will have to add a new TXT record to your domain by your hand when it’s time to renew certs. So use DNS API mode instead, because it can be automated.

Install Let’s encrypt SSL cert

After cert(s) are generated, you probably want to install/copy issued certificate(s) to the correct location on the disk. You must use this command to copy the certs to the target files, don’t use the certs files in ~/.acme.sh/ folder, they are for internal use only, the folder structure may change in the future. Before installation, create a sensible directory to store your certificates. That can be /etc/letsencrypt/etc/nginx/ssl or /etc/apache2/ssl for example, depending on your web server software and your own preferences to store SSL related stuff.

Apache example:

acme.sh --install-cert \
        --domain example.com \ 
        --cert-file /path/to/cert/cert.pem \
        --key-file /path/to/keyfile/key.pem \
        --fullchain-file /path/to/fullchain/fullchain.pem \
        --reloadcmd "sudo systemctl reload apache2.service"

Nginx example:

acme.sh --install-cert \
        --domain example.com \ 
        --cert-file /path/to/cert/cert.pem \
        --key-file /path/to/keyfile/key.pem \
        --fullchain-file /path/to/fullchain/fullchain.pem \
        --reloadcmd "sudo systemctl reload nginx.service"

The parameters are stored in the .acme.sh configuration file, so you need to get it right for your system as this file is read when the cron job runs renewal. “reloadcmd” is dependent on your operating system and init system.

Renew the Let’s Encrypt SSL certs

You don’t need to renew the certs manually. All the certs will be renewed automatically every 60 days.

However, you can also force to renew a cert:

acme.sh --renew -d example.com --force

or, for ECC cert:

acme.sh --renew -d example.com --force --ecc

How to upgrade acme.sh

You can update acme.sh to the latest code with:

acme.sh --upgrade

You can also enable auto upgrade:

acme.sh --upgrade --auto-upgrade

Then acme.sh will be kept up to date automatically.

That’s it. If you get stuck on anything visit acme.sh wiki page at https://github.com/Neilpang/acme.sh/wiki.

Source

Disk Encryption for Low-End Hardware

Eric Biggers and Paul Crowley were unhappy with the disk encryption
options available for Android on low-end phones and watches. For
them, it was an ethical issue. Eric said:

We believe encryption is
for everyone, not just those who can afford it. And while it’s
unknown how long CPUs without AES support will be around, there
will likely always be a “low end”; and in any case, it’s immensely
valuable to provide a software-optimized cipher that doesn’t depend
on hardware support. Lack of hardware support should not be an
excuse for no encryption.

Unfortunately, they were not able to find any existing encryption
algorithm that was both fast and secure, and that would work with existing
Linux kernel infrastructure. They, therefore, designed the Adiantum
encryption mode, which they described in a light, easy-to-read and
completely non-mathematical way
.

Essentially, Adiantum is not a new form of encryption; it relies
on the ChaCha stream cipher developed by D. J. Bernstein in 2008.
As Eric put it, “Adiantum is a construction, not a primitive. Its
security is reducible to that of XChaCha12 and AES-256, subject to
a security bound; the proof is in Section 5 of our paper. Therefore,
one need not ‘trust’ Adiantum; they only need trust XChaCha12 and
AES-256.”

Eric reported that Adiantum offered a 20% speed improvement over
his and Paul’s earlier HPolyC encryption mode, and it offered a very
slight improvement in actual security.

Eric posted some patches, adding Adiantum to the Linux kernel’s
crypto API. He remarked, “Some of these patches conflict with the
new ‘Zinc’ crypto library. But I don’t know when Zinc will be
merged, so for now, I’ve continued to base this patchset on the
current ‘cryptodev’.”

Jason A. Donenfeld’s Zinc (“Zinc Is Not crypto/”) is a front-runner
to replace the existing kernel crypto API, and it’s more simple and
low-level than that API, offering a less terrifying coding experience.

Jason replied to Eric’s initial announcement. He was very happy to
see such a good disk encryption alternative for low-end hardware,
but he asked Eric and Paul to hold off on trying to merge their
patches until they could rework them to use the new Zinc security
infrastructure. He said, “In fact, if you already want to build it
on top of Zinc, I’m happy to work with you on that in a shared repo
or similar.”

He also suggested that Eric and Paul send their paper through various
academic circles to catch any unanticipated problems with their
encryption system.

But Paul replied:

Unlike a new primitive whose strength can only
be known through attempts at cryptanalysis, Adiantum is a construction
based on well-understood and trusted primitives; it is secure if
the proof accompanying it is correct. Given that (outside competitions
or standardization efforts) no-one ever issues public statements
that they think algorithms or proofs are good, what I’m expecting
from academia is silence 🙂 The most we could hope for would be
getting the paper accepted at a conference, and we’re pursuing that
but there’s a good chance that won’t happen simply because it’s not
very novel. It basically takes existing ideas and applies them using
a stream cipher instead of a block cipher, and a faster hashing
mode; it’s also a small update from HPolyC. I’ve had some private
feedback that the proof seems correct, and that’s all I’m expecting
to get.

Eric also replied, regarding Zinc integration:

For now
I’m hesitant to completely abandon the current approach and bet the
farm on Zinc. Zinc has a large scope and various controversies
that haven’t yet been fully resolved to everyone’s satisfaction,
including unclear licenses on some of the essential assembly files.
It’s not appropriate to grind kernel crypto development to a halt
while everyone waits for Zinc.

He added that if Zinc is ready, he’d be happy to use it. He just
wasn’t sure whether it was.

However, in spite of the uncertainty, Eric later said, “I started
a branch based on Zinc:
https://git.kernel.org/pub/scm/linux/kernel/git/ebiggers/linux.git, branch
‘adiantum-zinc’.”

He listed the work he’d done so far and the work that remained to
be done. But regarding Zinc’s remaining non-technical issues, he said:

Both
myself and others have expressed concerns about these issues
previously too, yet they remain unaddressed nor is there a documentation
file explaining things. So please understand that until it’s clear
that Zinc is ready, I still have to have Adiantum ready to go without
Zinc, just in case.

Jason was happy to see the Zinc-based repository and promised to
look it over. He also promised to add a documentation file covering
many of Eric’s concerns before posting another series of Zinc
patches. And as far as Eric and Paul being ready to go without Zinc
integration, he added, “I do really appreciate you taking the time,
though, to try this out with Zinc as well. Thanks for that.”

Meanwhile, Herbert Xu accepted Eric and Paul’s original patch-set,
so there may be a bit of friendly shuffling as both Zinc and Adiantum
progress.

It’s nice to see this sort of attention being given to low-end
hardware. But, it’s nothing new. The entire Linux kernel is supposed
to be able to run on absolutely everything—or at least everything
that’s still in use in the world. I don’t think there are too many
actual 386 systems in use anymore, but for real hardware in the
real world, pretty much all of it should be able to run a fully
featured Linux OS.

Note: if you’re mentioned above and want to post a response above the comment section, send a message with your response text to ljeditor@linuxjournal.com.

Source

it – Bash Framework to Control Your Scripts and Aliases

Bash-it is a bundle of community Bash commands and scripts for Bash 3.2+, which comes with autocompletion, themes, aliases, custom functions, and more. It offers a useful framework for developing, maintaining and using shell scripts and custom commands for your daily work.

If you are using the Bash shell on a daily basis and looking for an easy way to keep track of all your scripts, aliases and functions, then Bash-it is for you! Stop polluting your ~/bin directory and .bashrc file, fork/clone Bash-it and begin hacking away.

How to Install Bash-it in Linux

To install Bash-it, first you need to clone the following repository to a location of your choice, for example:

$ git clone --depth=1 https://github.com/Bash-it/bash-it.git ~/.bash_it

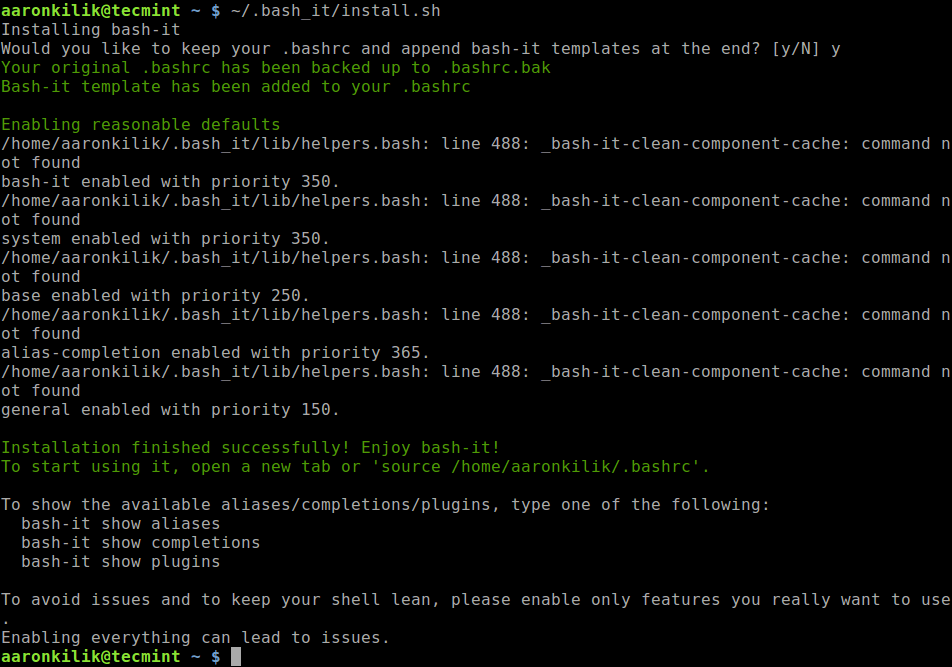
Then run the following command to install Bash-it (it automatically backup your ~/.bash_profile or ~/.bashrc, depending on your OS). You will be asked “Would you like to keep your .bashrc and append bash-it templates at the end? [y/N]”, answer according to your preference.

$ ~/.bash_it/install.sh 
Install Bash-It in Linux

Install Bash-It in Linux

After installation, you can use ls command to verify the bash-it installation files and directories as shown.

$ ls .bash_it/
Verify Bash-It Installation

Verify Bash-It Installation

To start using Bash-it, open a new tab or run:

$ source $HOME/.bashrc

How to Customize Bash-it in Linux

To customize Bash-it, you need to edit your modified ~/.bashrc shell startup file. To list all installed and available aliases, completions, and plugins run the following commands, which should also shows you how to enable or disable them:

  
$ bash-it show aliases        	
$ bash-it show completions  
$ bash-it show plugins        	

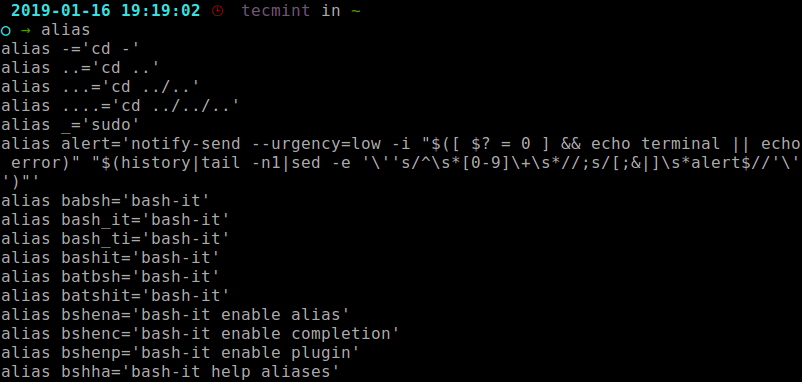
Next, we will demonstrate how to enable aliases, but before that, first list the current aliases with the following command.

$ alias 
View Current Aliases in Linux

View Current Aliases in Linux

All the aliases are located in the $HOME/.bash_it/aliases/ directory. Now let’s enable the apt aliases as shown.

$ bash-it enable alias apt
Enable Alias in Linux

Enable Alias in Linux

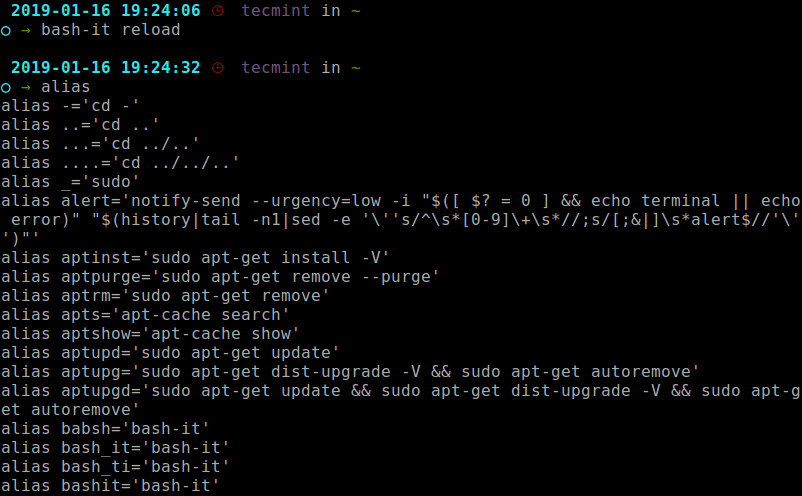
Then reload bash-it configs and check the current aliases once more.

$ bash-it reload	
$ alias

From the output of the alias command, the apt aliases are now enabled.

Check Current Aliases in Linux

Check Current Aliases in Linux

You can disable newly enabled alias with the following commands.

$ bash-it disable alias apt
$ bash-it reload
Disable Aliases in Linux

Disable Aliases in Linux

In the next section, we will use similar steps to enable or disable completions ($HOME/.bash_it/completion/) and plugins ($HOME/..bash_it/plugins/). All enabled features are located in the $HOME/.bash_it/enableddirectory.

How to Manage Bash-it Theme

The default theme for bash-it is bobby; you can check this using the BASH_IT_THEME env variable as shown.

echo $BASH_IT_THEME
Check Bash-it Theme

Check Bash-it Theme

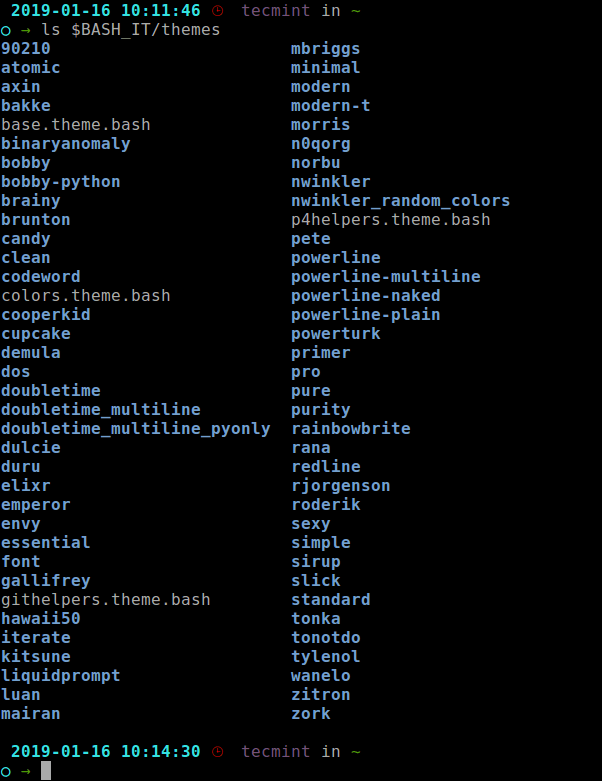
You can find over 50+ Bash-it themes in the $BASH_IT/themes directory.

$ ls $BASH_IT/themes
View Bash-It Themes

View Bash-It Themes

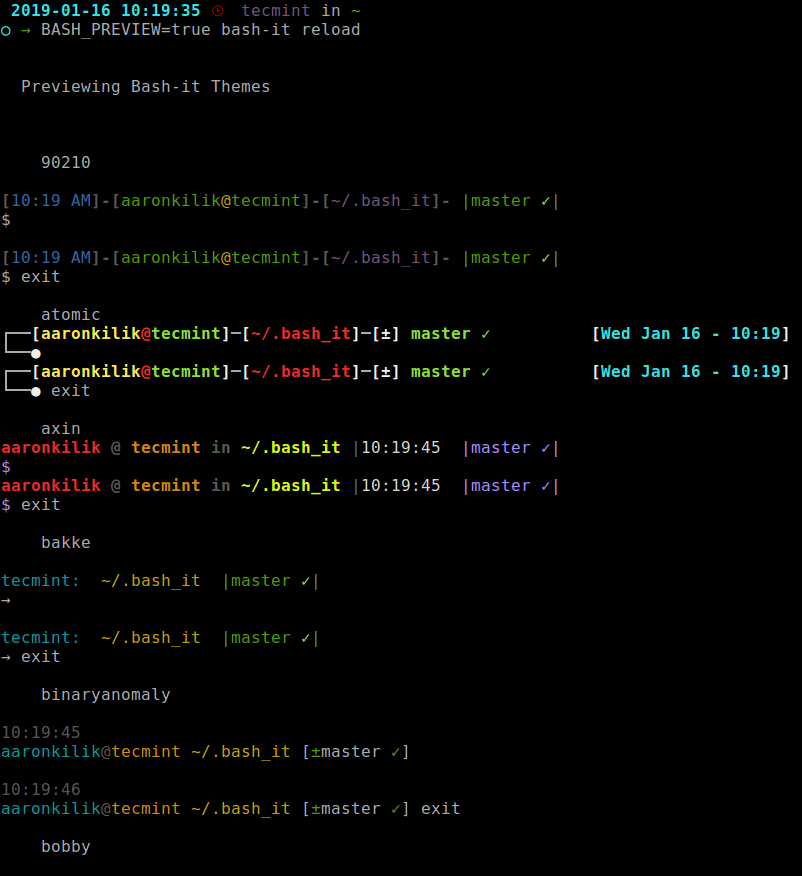
To preview all the themes in your shell before using any, run the following command.

$ BASH_PREVIEW=true bash-it reload
Preview All Bash-It Themes

Preview All Bash-It Themes

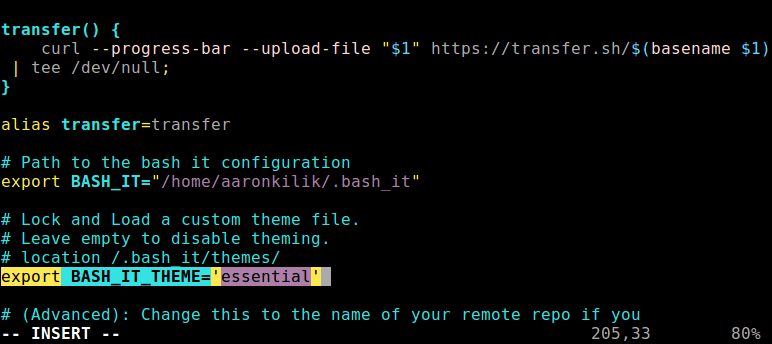
Once you have identified a theme to use, open your .bashrc file and find the following line in it and change it value to the name of the theme you want, for example:

$ export BASH_IT_THEME='essential'
Change Bash-It Theme

Change Bash-It Theme

Save the file and close, and source it as shown before.

$ source $HOME/.bashrc

Note: In case you have built a your own custom themes outside of $BASH_IT/themes directory, point the BASH_IT_THEME variable directly to the theme file:

export BASH_IT_THEME='/path/to/your/custom/theme/'

And to disable theming, leave the above env variable empty.

export BASH_IT_THEME=''

How to Search Plugins, Aliases or Completions

You can easily check out which of the plugins, aliases or completions are available for a specific programming language, framework or an environment.

The trick is simple: just search for multiple terms related to some of the commands you use frequently, for example:

$ bash-it search python pip pip3 pipenv
$ bash-it search git
Search in Bash-It

Search in Bash-It

To view help messages for the aliases, completions and plugins, run:

$ bash-it help aliases        	
$ bash-it help completions
$ bash-it help plugins

You can create you own custom scripts, and aliases, in the following files in the respective directories:

aliases/custom.aliases.bash 
completion/custom.completion.bash 
lib/custom.bash 
plugins/custom.plugins.bash 
custom/themes//<custom theme name>.theme.bash 

Updating and Uninstalling Bash-It

To update Bash-it to the latest version, simply run:

$ bash-it update

If you don’t like Bash-it anymore, you can uninstall it by running the following commands.

$ cd $BASH_IT
$ ./uninstall.sh

The uninstall.sh script will restore your previous Bash startup file. Once it has completed the operation, you need to remove the Bash-it directory from your machine by running.

$ rm -rf $BASH_IT  

And remember to start a new shell for the recent changes to work or source it again as shown.

$ source $HOME/.bashrc

You can see all usage options by running:

$ bash-it help

Finally, Bash-it comes with a number of cool features related to Git.

For more information, see the Bash-it Github repository: https://github.com/Bash-it/bash-it.

That’s all! Bash-it is an easy and productive way to keep all your bash scripts and aliases under control.

Source

How to Install TeamViewer on Linux Mint – Linux Hint

Remote desktop – does the term sound familiar? Generally, the term “remote desktop” indicates the process of using someone else’s computer from another distant system connected via the internet or in any way. This can be a very interesting thing for lots of reasons. Sometimes, it can be life-saving and sometimes, it can be disastrous. For the enterprise level, the remote desktop connection is more necessary than anywhere.

So, why do we need to have the facility of remote desktop control?

  • Unattained access

In some cases, there may not be anyone nearby available for fixing a PC problem. Now, let’s say you have a friend or a support technician on the line for solving the issue.

There can be numerous other scenarios like above that may require unattained access to your system. In this case, the friend/technician or others gain access of the system for a certain amount of time. After doing the job, it’s complete!

It’s more important for the enterprise and technical level where things can get pretty messy quite easily.

  • Multi-session handling

In the professional workspace, you may need to work on several sessions that, if effectively managed, will offer a HUGE boost in productivity and performance.

With a remote desktop at hand, you can seamlessly switch from one system to another. With each instance at hand, you can directly perform different tasks on each of them.

  • Cutting down costs

In the remote desktop, it’s possible to reduce the costing DRAMATICALLY. The same machine can be used among a number of users; no need to get individual software and machinery.

For example, take Microsoft Office Suite into account. With remote desktop, multiple people can work on the same machine, using the same software! No need to purchase for individual MS Office Suite while enjoying the full features completely LEGALLY!

  • Freedom

This is the aspect I prefer the most. Using a remote desktop connection, you can directly access your workstation from anywhere, anytime. All you need is just allowing remote desktop connection with suitable software and an internet connection.

Cautions

The remote desktop connection is, undoubtedly, a powerful tool that’s really valuable in tons of situations. However, it’s never without issues and because of its nature, the remote desktop connection can be pretty dangerous.

The first and foremost important thing is security. You’re allowing someone else into your system. In fact, you’re giving the power of even the most critical abilities. A crook with such ability can easily perform illegal actions on your system. So, make sure that you’re allowing someone who’s trustworthy.

You also need a safe internet connection for the purpose. If there’s someone snooping on you via the network, it’s possible to modify the network data and result in a real mess.

Moreover, the network shouldn’t become a bottleneck for the remote desktop connection. If the network is a bottleneck, then the overall experience and performance will be lowered to the worst.

TeamViewer for remote desktop

Now, whenever we’re talking about the remote desktop, the first thing that crosses our mind is the TeamViewer. It’s a powerful and popular software that allows secure remote desktop connection in an easy manner for all types of purposes – personal, professional and business.

In the case of TeamViewer, it’s free for personal usage. For the paid plans, the price is also extremely affordable and cheap despite providing so much feature. It’s safe, fast and above all, reliable. TeamViewer has earned its name in the sector as one of the finest remote desktop services of all.

Let’s check out TeamViewer Linux Mint – one of the most popular Linux distros of all time.

Getting TeamViewer

Get TeamViewer from the official site.

Start downloading the DEB package of TeamViewer.

Once the download is complete, run the following commands –

cd ~/Downloads/
sudo apt install ./teamviewer_14.1.9025_amd64.deb

Did you notice that I’m using APT for doing the installation job? It takes care of the dependencies during the installation.

Using TeamViewer

Once the installation is complete, start TeamViewer –

Accept the license agreement –

Voila! TeamViewer is ready to use!

If you want someone else to connect to your system, then you have to provide him the ID and password.

For example, I’m on my Windows system and I wish to connect to my Linux machine.

Voila! I’m accessing my Linux machine directly from my Windows machine!

Now, follow the same steps on your Linux system –

So, a new lesson for me – NEVER access the host system via TeamViewer while you’re using VirtualBox! Learn how to install Linux Mint on VirtualBox.

Enjoy!

Source

Curl in Bash Scripts by Example – Linux Hint

If you’ve ever sat in front of a terminal, typed ‘curl’, pasted the URL of something you want to download, and hit enter, cool! You’re going to be killing it with curl in bash scripts in no time. Here you will learn how to use curl in bash scripts and important tips and tricks for automation.

Great! Now what? Before you kill anything in bash it is dire to know where to get help if in trouble. Here is what the man page for curl or curl help command looks like. Copy and paste. Try not to be overwhelmed by appearances. There are a lot of options that you only need later in life. More importantly, it serves as a quick reference to lookup options as you need.
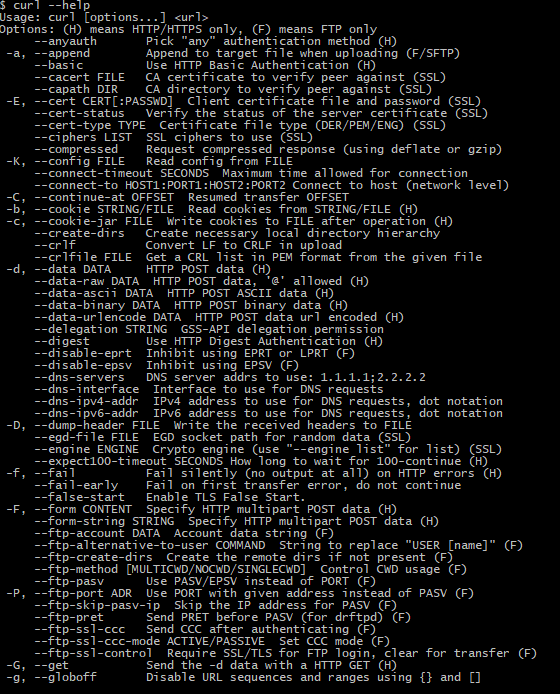
Here are some commands to get help within your terminal and other browser-friendly  resources.

Help commands for curl in bash

Consult these resources anytime you need. In addition to this piece, they will serve as companions on your journey towards killing it with curl in bash scripts.

Now that getting help and listing command line options is out of the picture, let’s move on to the three ways.

The three ways to curl in bash by example

You may argue that there are more than three ways to curl in bash. However, for simplicity purposes, let’s just say that there are. Also note that in practice, usage of each way is not mutually exclusive. In fact, you will find that ways may be intertwined depending on the intent of your bash script. Let’s begin.

The first way: Downloading files

All options aside curl downloads files by default. In bash, we curl to download a file as follows.

curl ${url}
# download file

This sends the content of the file we are downloading to standard output; that is, the your screen. If the file is a video or an image don’t be surprised if you hear a few beeps. We need to save to a file. Here’s how it looks.

curl ${url} > outfile
# download file saving as outfile

curl ${url} -o outfile
# download file save as option

curl ${url} -O
# download file inherit filename

## expect file saved as $( basename ${url} )

Note that the download file save as option inheriting file name is particularly useful when using URL globbing, which is covered in the bash curl loop section.

Now let’s move on to how to check headers prior to downloading a file with curl in bash.

The second way: Checking headers

There will come a time when you wish to get information about a file before downloading. To do this, we add the -I option to the curl command as follows.

curl -I ${url}
# download headers

Note that there are other ways to dump headers from curl requests, which is left for homework.

Here is a quick example to show how the second way works in bash scripts that can be used to serve as a part of a web page health checker.

Example) bash curl get response code

Often, we want to get the response code for a curl request in bash. To do this, we would need to first request the headers of a response and then extract the response code. Here is what it would look like.

url=https://temptemp3.github.io
# just some url

curl ${url} -I -o headers -s
# download file

cat  headers
# response headers
## expect
#HTTP/2 200
#server: GitHub.com
#content-type: text/html; charset=utf-8
#strict-transport-security: max-age=31557600
#last-modified: Thu, 03 May 2018 02:30:03 GMT
#etag: “5aea742b-e12”
#access-control-allow-origin: *
#expires: Fri, 25 Jan 2019 23:07:17 GMT
#cache-control: max-age=600
#x-github-request-id: 8808:5B91:2A4802:2F2ADE:5C4B944C
#accept-ranges: bytes
#date: Fri, 25 Jan 2019 23:12:37 GMT
#via: 1.1 varnish
#age: 198
#x-served-by: cache-nrt6148-NRT
#x-cache: HIT
#x-cache-hits: 1
#x-timer: S1548457958.868588,VS0,VE0
#vary: Accept-Encoding
#x-fastly-request-id: b78ff4a19fdf621917cb6160b422d6a7155693a9
#content-length: 3602

cat headers | head -n 1 | cut ‘-d ‘ ‘-f2’
# get response code
## expect
#200

My site is up. Great!

Now let’s move on to making posts with curl in bash scripts.

The third way: Making posts

There will come a time when you need to make posts with curl in bash to authenticate to access or modification of private content. Such is the case working with APIs and html forms. It may require multiple curl requests. The placeholder curl command line for this way is as follows.

curl -u -H –data ${url}
# send crafted request

Making posts involves adding corresponding headers and data to allow for authentication.  I’ve prepared some examples of making posts with curl in bash.

Example) Basic authentication

Here is an example of using curl in bash scripts to download a file requiring basic authentication. Note that credentials are stored in a separate file called bash-curl-basic-auth-example-config.sh, which is also included below.

curl-basic-auth.sh

#!/bin/bash
## curl-basic-auth
## – http basic authenication example using
##   curl in bash
## version 0.0.1
##################################################
${SH2}/cecho.sh        # colored echo
curl-basic-auth() {
cecho yellow url: ${url}
local username
local passwd
${FUNCNAME}-config.sh # ${username}, ${passwd}
curl -v -u ${username}:${password} ${url} –location
}
##################################################
if [ ${#} -eq 1 ]
then
url=${1}
else
exit 1 # wrong args
fi
##################################################
curl-basic-auth
##################################################
## generated by create-stub2.sh v0.1.1
## on Sun, 27 Jan 2019 14:04:18 +0900
## see <https://github.com/temptemp3/sh2>
##################################################

Source: curl-basic-auth.sh

curl-basic-auth-config.sh

#!/bin/bash

## curl-basic-auth-config
## version 0.0.1 – initial

##################################################

username=“username”
password=“passwd”

##################################################

## generated by create-stub2.sh v0.1.1
## on Sun, 27 Jan 2019 14:08:17 +0900
## see <https://github.com/temptemp3/sh2>

##################################################

Source: curl-basic-auth-config.sh

Here’s what it looks like in the command line.

bash bash-curl-basic-auth-example.sh URL
## expect response for url after basic authentication

Here you see how writing a bash script allows you to avoid having to include your secrets in the command line.

Note that the –location option was added to handle requests that are redirected.

Now that we have basic authentication is out of the picture, let’s step up the difficuly a bit.

Example) Submitting html form with csrf protection

The magic of bash is that you can do just about anything you have an intent to do. Jumping through the hoops of csrf protection is one way to kill it with curl in bash scripts.

In modern web applications there is a security feature called csrf protection to prevent posts requests from anywhere without established access to the site in question.

Basically, there is a security token included in the response of a page.

Here what your bash script may look like to gain authorized access to a page content with csrf protection.

curl-example.sh

#!/bin/bash
## curl-example
## – submits form with csrf protection
## version 0.0.1 – initial
##################################################
${SH2}/aliases/commands.sh    # subcommands
## specially crafted bash curl boilerplate for this example
template-command-curl() { { local method ; method=${1} ; }
{
command curl ${url} \
if-headers \
if-data \
if-options
} | tee ${method}-response
}
curl-head() { { local url ; url=${url} ; }
template-command-curl \
head
}
curl-get() { { local url ; url=${url} ; }
template-command-curl \
get
}
## setup curl
if-headers() { true ; }
if-data() { true ; }
if-options() { true ; }
curl-post() { { local url ; url=${url} ; }
template-command-curl \
post
}
curl() { # entry point for curl-head, curl-get, curl-post
commands
}
main() {
## rewrite url if needed etc
( # curl head request
if-options() {
cat << EOF
–location
EOF

}
curl head ${url} > head-response
)
test $( cat head-response | grep -e ‘Location:’ ) || {
## block reassigning url base on head response location
url=…
}
reset-curl
## setup curl …
curl get ${url} # > get-response
extract-info-for-post-request # < get-reponse, extracts token and other info for post
## reset curl and setup if needed …
curl post ${url} # > post-response
}
curl-example() {
true
}
##################################################
if [ ${#} -eq 0 ]
then
true
else
exit 1 # wrong args
fi
##################################################
curl-example
##################################################
## generated by create-stub2.sh v0.1.1
## on Sun, 27 Jan 2019 16:36:17 +0900
## see <https://github.com/temptemp3/sh2>
##################################################

Source: curl-example.sh

Notes on script
It uses a alias called commands that I mentioned in a previous post about the bash declare command, which makes it possible to declare subcommands implicitly by way of convention.

Here you see that bash can be used to string curl request together with logic to carry out the intent of your script.
So that some of the bash usage above using subshells to limit function redeclaration scope doesn’t appear so magical, I’ve prepared a follow-up example.

subshell-functions.sh

#!/bin/bash
## subshell-functions
## version 0.0.1 – initial
##################################################
d() { true ; }
c() { true ; }
b() { true ; }
a() {
{ b ; c ; d ; }
(
b() {
cat << EOF
I am b
EOF

}
{ b ; c ; d ; }
)
{ b ; c ; d ; }
}
##################################################
if [ ${#} -eq 0 ]
then
true
else
exit 1 # wrong args
fi
##################################################
a
##################################################
## generated by create-stub2.sh v0.1.1
## on Sun, 27 Jan 2019 13:43:50 +0900
## see <https://github.com/temptemp3/sh2>
##################################################

Source: subshell-functions.sh

Here is the correspondence command line example.

bash a.sh
## expect
I am b

Example) Wonderlist API call

Here is curl request command line in a bash script that I wrote in late 2017 back before switching over to Trello.

curl \
${X} \
${url} \
-H “X-Access-Token: ${WL_AT} \
-H “X-Client-ID: ${WL_CID} \
–silent

Source: wonderlist.sh/main.sh: Line 40

Notes on script

${X} contains an -X option that can be passed in by caller functions. If you are not familiar with the option, it is set the request command to use. That is, GET, POST, HEAD, etc. according to to api documentation.

It contains multiple -H options for authenication.

The –silent option is used because in some cases showing progress in the terminal would be overkill for background requests.

Surely, you are now killing it with curl in bash scripts. Next, we move on to special topics to bring it all together.

Looping through urls with curl in bash

Suppose that we have a list of URLs which we would like to loop over and curl. That is, we want download using curl for each URL in our list. Here is how we would go about accomplishing this task on the command line.

## method (1)

curl() { echo “dummy response for ${@} ; }       # fake curl for testing purposes

urls() { cat /dev/clipboard ; }                   # returns list of urls

for url in $( urls )do curl ${url}done        # curl loop

## expect
#dummy response for whatever is in your
#dummy response for clipboard
#dummy response for …

If you don’t have a list of urls to copy on hand, here is a list of 100 URLs most likely respond to HTTP request using curl.

gist of Craft Popular URLs based on list of the most popular websites worldwide

Often, we do not only wish to curl a list of urls in bash. We may want to generate urls to curl as we progress through the loop. To accomplish this task, we need to introduce variables into the URL as follows.

## method (2)

curl() { echo “dummy response for ${@} ; }        # fake curl for testing purposes
url() { echo ${url_base}/${i} ; }                  # url template
urls() {                                            # generate all urls
local i
for i in ${range}
do
url
done
}

url_base=“https://temptemp3.github.io”                # just some base
range=$( echo {1..9} )                                # just some range
for url in $( urls )do curl ${url}done            # curl loop

## expect
#dummy response for https://temptemp3.github.io/1
#dummy response for https://temptemp3.github.io/2
#dummy response for https://temptemp3.github.io/3
#dummy response for https://temptemp3.github.io/4
#dummy response for https://temptemp3.github.io/5
#dummy response for https://temptemp3.github.io/6
#dummy response for https://temptemp3.github.io/7
#dummy response for https://temptemp3.github.io/8
#dummy response for https://temptemp3.github.io/9

It turns out that loops may be avoided in some cases by taking advantage of a curl feature only available in command line called URL globbing. Here’s how it works.

# method (3)

unset -f curl
# included just in case
curl https://temptemp3.github.io/[09]
# curl loop using URL globbing

## expect
#response for https://temptemp3.github.io/1
#response for https://temptemp3.github.io/2
#response for https://temptemp3.github.io/3
#response for https://temptemp3.github.io/4
#response for https://temptemp3.github.io/5
#response for https://temptemp3.github.io/6
#response for https://temptemp3.github.io/7
#response for https://temptemp3.github.io/8
#response for https://temptemp3.github.io/9

Here we see that any of the methods above may be used to implement a curl loop in bash Depending on the use case and desired level of control, a method may be preferred over another.

Handling curl errors in bash

One thing that is absent from curl is the ability to handle errors. That is where bash  comes in handly.

Curl has an–retry NUM option that as you may have guess tells curl to retry a specific number of times. However, what if we want to have curl effectively retry indefinitely until succeeding?

curl-bashh-retry.sh

#!/bin/bash
## curl-retry
## – retries curl indefinitely
## version 0.0.1
##################################################
car() {
echo ${1}
}
curl-error-code() {
test ! -f “curl-error” || {
car $(
cat curl-error \
| sed \
-e ‘s/[^0-9 ]//g’
)
}
}
curl-retry() {
while [ ! ]
do
curl temptemp3.sh 2>curl-error || {
case $( curl-error-code ) in
6) {
### handle error code 6
echo curl unable to resolve host
} ;;
*) {
# <https://curl.haxx.se/libcurl/c/libcurl-errors.html>
true # not yet implemented
} ;;
esac
sleep 1
continue
}
break
done
}
##################################################
if [ ${#} -eq 0 ]
then
true
else
exit 1 # wrong args
fi
##################################################
curl-retry
##################################################
## generated by create-stub2.sh v0.1.1
## on Sun, 27 Jan 2019 15:58:51 +0900
## see <https://github.com/temptemp3/sh2>
##################################################

Source: curl-retry.sh
Here is what we see in command line.

bash curl-bash-retry.sh
## expect
#curl unable to resolve host
#…

The hope is that eventually someone will create temptemp3.io and our script will exit with an exit status of zero.

Last but not least I would like to end with an example of how to set up concurrent curls in bash to act as a download accelerator.

Downldr.sh

Sometimes it is helpful to download large files in parts. Here is a snippet from a bash script that I wrote recently using curl.

curl \
${src} \
-r $(( ${i}*${chunk_size} ))-$(( ( (${i}+1)*${chunk_size} ) – 1 )) \
-o ${src_base}-part${i}

Source: downldr.sh/downldr.sh: Line 11

Notes on script

The -r option is used to specifiy the range in bytes to download if the host accepts ranges.

Conclusion

By this time you are killing it with curl in bash scripts. In many cases you may take advantage of curl functionality through the horde of options it provides. However, you may opt out and achieve the same functionality outside of curl in bash for the level of control that fits your needs.

Source

An Introduction to the ss Command | Linux.com

An Introduction to the ss Command

ss command

Learn how to use the ss command to gain information about your Linux machine and see what’s going on with network connections.

Learn how to get network information using the ss command in this tutorial from the archives.

Linux includes a fairly massive array of tools available to meet almost every need. From development to security to productivity to administration…if you have to get it done, Linux is there to serve. One of the many tools that admins frequently turned to was netstat. However, the netstat command has been deprecated in favor of the faster, more human-readable ss command.

The ss command is a tool used to dump socket statistics and displays information in similar fashion (although simpler and faster) to netstat. The ss command can also display even more TCP and state information than most other tools. Because ss is the new netstat, we’re going to take a look at how to make use of this tool so that you can more easily gain information about your Linux machine and what’s going on with network connections.

The ss command-line utility can display stats for the likes of PACKET, TCP, UDP, DCCP, RAW, and Unix domain sockets. The replacement for netstat is easier to use (compare the man pages to get an immediate idea of how much easier ss is). With ss, you get very detailed information about how your Linux machine is communicating with other machines, networks, and services; details about network connections, networking protocol statistics, and Linux socket connections. With this information in hand, you can much more easily troubleshoot various networking issues.

Let’s get up to speed with ss, so you can consider it a new tool in your administrator kit.

Basic usage

The ss command works like any command on the Linux platform: Issue the command executable and follow it with any combination of the available options. If you glance at the ss man page (issue the command man ss), you will notice there aren’t nearly the options found for the netstat command; however, that doesn’t equate to a lack of functionality. In fact, ss is quite powerful.

If you issue the ss command without any arguments or options, it will return a complete list of TCP sockets with established connections (Figure 1).

list of connections

Figure 1: A complete listing of all established TCP connections.

Because the ss command (without options) will display a significant amount of information (all tcp, udp, and unix socket connection details), you could also send that command output to a file for later viewing like so:

ss > ss_output

Of course, a very basic command isn’t all that useful for every situation. What if we only want to view current listening sockets? Simple, tack on the -l option like so:

ss -l

The above command will only output a list of current listening sockets.

To make it a bit more specific, think of it this way: ss can be used to view TCP connections by using the -t option, UDP connections by using the -u option, or UNIX connections by using the -x option; so ss -t,  ss -u, or ss -x. Running any of those commands will list out plenty of information for you to comb through (Figure 2).

UDP connections

Figure 2: Running ss -u on Elementary OS offers a quick display of UDP connections.

By default, using either the -t, the -u, or the -x options alone will only list out those connections that are established (or connected). If we want to pick up connections that are listening, we have to add the -a option like:

ss -t -a

The output of the above command will include all TCP sockets (Figure 3).

ssh listening

Figure 3: Notice the last socket is ssh listening on the device.

In the above example, you can see that UDP connections (in varying states) are being made from the IP address of my machine, from various ports, to various IP addresses, through various ports. Unlike the netstat version of this command, ss doesn’t display PID and command name responsible for these connections. Even so, you still have plenty of information to begin troubleshooting. Should any of those ports or URLs be suspect, you now know what IP address/Port is making the connection. With this, you now have the information that can help you in the early stages of troubleshooting an issue.

Filtering ss with TCP States

One very handy option available to the ss command is the ability to filter using TCP states (the the “life stages” of a connection). With states, you can more easily filter your ss command results. The ss tool can be used in conjunction with all standard TCP states:

  • established
  • syn-sent
  • syn-recv
  • fin-wait-1
  • fin-wait-2
  • time-wait
  • closed
  • close-wait
  • last-ack
  • listening
  • closing

Other available state identifiers ss recognizes are:

  • all (all of the above states)
  • connected (all the states with the exception of listen and closed)
  • synchronized (all of the connected states with the exception of syn-sent)
  • bucket (states which are maintained as minisockets, for example time-wait and
  • syn-recv)
  • big (Opposite to bucket state)

The syntax for working with states is simple.

For tcp ipv4:
ss -4 state FILTER
For tcp ipv6:

ss -6 state FILTER

Where FILTER is the name of the state you want to use.

Say you want to view all listening IPv4 sockets on your machine. For this, the command would be:

ss -4 state listening

The results of that command would look similar to Figure 4.

state filter

Figure 4: Using ss with a listening state filter.

Show connected sockets from specific address

One handy task you can assign to ss is to have it report connections made by another IP address. Say you want to find out if/how a machine at IP address 192.168.1.139 has connected to your server. For this, you could issue the command:

ss dst 192.168.1.139

The resulting information (Figure 5) will inform you the Netid, the state, the local IP:port, and the remote IP:port of the socket.

ssh connection

Figure 5: A remote machine has established an ssh connection to our local machine.

Make it work for you

The ss command can do quite a bit to help you troubleshoot issues with your Linux server or your network. It would behoove you to take the time to read through the ss man page (issue the command man ss). But, at this point, you should at least have a fundamental understanding of how to make use of this must-know command.

Source

MellowPlayer – multi-platform cloud music integration

MellowPlayer

With my CD collection spiraling out of control, I’m spending more time listening to music with a number of popular streaming services.

Linux offers a great range of excellent open source music players. But I’m always on the look out for fresh and innovative streaming players. Step forward MellowPlayer.

MellowPlayer offers a web view of various music streaming services with integration with your desktop. It was developed to provide a Qt alternative to Nuvola Player.

The software is written in C++ and QML.

Installation

MellowPlayer is released under an open source license, so you can download the source code and compile it. But there’s convenient packages available for Ubuntu, Arch Linux, openSUSE, Fedora, and other popular Linux distributions.

The developer also provides an AppImage which makes it easy to run the software (but only some of the streaming services are supported). AppImage is a format for distributing portable software on Linux without needing superuser permissions to install the application. All that’s required is to download the AppImage, and make the file executable by typing:

$ chmod u+x ./MellowPlayer-x86_64.AppImage

In operation

Here’s an image of MellowPlayer in action.

MellowPlayer

I’m not a fan of the presentation of the streaming services. Too spartan for my liking. There’s definitely room for improvement here.

Let’s have a look at the interface when you’re playing a streaming service. Here’s YouTube Music in action.

MellowPlayer-YouTube

From left to right, there’s a button to select another streaming service, followed by back/forward buttons, reload page, go to home page, and a button to add the current song to your favorites. There’s a playback slider, skip/pause/forward buttons, the option to disable/enable notifications, and a button to open your listening history (if you’ve enabled this in Settings).

MellowPlayer supports the following web-based music streaming services in its latest version:

  • Spotify – a hugely popular digital music service that gives you access to millions of songs.
  • YouTube Music – music streaming service developed by YouTube.
  • Google Play Music – music and podcast streaming service and online music locker operated by Google.
  • Deezer – explore over 53 million tracks.
  • Tidal – high fidelity music streaming service.
  • TuneIn – free internet radio.
  • 8tracks – an internet radio and social networking website streaming user-curated playlists consisting of at least 8 tracks.
  • Anghami – discover, play and download from a library of millions of Arabic and International songs.
  • Bandcamp – a platform for independent musicians.
  • HearThisAt – listen to DJ Sets, Mixes, Tracks and Sounds.
  • HypeMachine – a music blog aggregator.
  • Jamendo – discover free music downloads & streaming from thousands of independent artists.
  • Player FM – a multi-platform podcast service.
  • Radionomy – an online platform that provides tools for operating online radio stations.
  • Mixcloud – listen to radio shows, DJ mixes and podcasts.
  • SoundCloud – online audio distribution platform and music sharing website.
  • Netflix – subscription-based streaming of films and TV programs.
  • Plex – media server streaming.
  • Yandex Music – music streaming service with smart playlists.
  • Pocket Casts – listen to podcasts.
  • ympd – MPD GUI.
  • YouTube – video-sharing website.
  • Wynk – Indian and international tracks.

Some services don’t work with the AppImage.

Other Features

Besides the wide range of streaming services, what else does the player offer?

Let’s take a look at some of the other features of MellowPlayer.

There’s a good range of configuration options to customize the software.

These include:

  • Rearrangement of the streaming service by dragging and dropping, as well as the ability to disable one or more of the services. However, the rearrangement didn’t save when switching streaming services.
  • Customize the main toolbar content.
  • Confirm application exit (on or off).
  • Close MellowPlayer to the system tray.
  • Turn on/off web page scrollbars.
  • Automatic HiDPI scaling or apply your own scaling factor.
  • Turn on/off the main tool bar.
  • Native desktop notifications:
    • Enable notifications.
    • Display a notification when a new song starts.
    • Display a notification when playback is paused.
    • Display a notification when playback is resumed.
  • Choice of themes.
  • Keyboard shortcuts: Play/Pause, Next, Previous, Add to favorites, Restore window, Reload page, Select service, and Next service.
  • Privacy – enable listening history (turned off by default).
    • Configurable listening history limit. Choose from: Last month, Last week, Last year, Never, Today, or Yesterday.
    • You can also define the user agent.
  • Implements the DBUS MPRIS 2 interface.
  • Network proxy support – this is accessed from Settings / Streaming Services.
  • Extend functionality by writing your own JavaScript plugins.
  • User Scripts let you customize the appearance and feel of streaming services.
  • Internationalization support – there are translations for Catalan, Finnish, French, German, Greek, Portuguese (Brazilian), Russian, and Spanish.
  • Cross-platform support – the software runs under Linux, FreeBSD, and Windows (although the latter doesn’t offer MPRIS2 support).

Let’s now have a look at memory usage. Given that the software uses components of an integrated web browser, I wasn’t expecting lightweight memory usage.

Here’s the memory usage of MellowPlayer after listening to a few of the services for an hour.

MellowPlayer-memory

Woah! MellowPlayer is consuming more than 1.4GB of RAM. A real memory hog! Of course, closing some of the services (thereby reducing the number of QtWebEngineProcess processes) helps reclaim some of the memory. But even with after closing the streaming services, the software was still consuming about 800MB of RAM.

Summary

MellowPlayer offers all the web-based music streaming I currently use and a lot more besides. While there are other apps that offer a wider range, there’s more than enough here for me. The implementation is pretty good although not spectacular. Network proxy support is appreciated!

There’s some glaring bugs in the software, such as the listening history being continually populated by the same track, rearranging streaming services don’t stick, and switching services often doesn’t stop the playback of the previous stream.

Given the software simply embeds websites into the player, there’s lots of standard functionality you’d expect from a good music player that’s likely never to be added to MellowPlayer. Gapless playback is an obvious example.

I’m not keen on some of the defaults such as the application keeps running in the background when you close the application, which is annoying depending on what desktop environment you use.

Note that the AppImage doesn’t let you play all of the music streaming services (specifically Spotify, Mixcloud, SoundCloud, Anghami, Pocket Casts, and Wynk). This is because they require proprietary audio codecs which are not included with the AppImage. It’s best to use a package provided by your distribution, rather than the AppImage, so that you have access to all the services.

Website: colinduquesnoy.gitlab.io/MellowPlayer
Support: Documentation
Developer: Colin Duquesnoy and contributors
License: The project’s GitLab page says the GNU General Public License applies, whereas the software implies GNU Lesser General Public License version 2.1 or later.

Source

Command-Line Tip: Put Down the Pipe

""

Learn a few techniques for avoiding the pipe and making your command-line commands more efficient.

Anyone who uses the command line would acknowledge how powerful the pipe is. Because of the pipe, you can take the output from one command and feed it to another command as input. What’s more, you can chain one command after another until you have exactly the output you want.

Pipes are powerful, but people also tend to overuse them. Although it’s not necessarily wrong to do so, and it may not even be less efficient, it does make your commands more complicated. More important though, it also wastes keystrokes! Here I highlight a few examples where pipes are commonly used but aren’t necessary.

Stop Putting Your Cat in Your Pipe

One of the most common overuses of the pipe is in conjunction with cat. The cat command concatenates multiple files from input into a single output, but it has become the overworked workhorse for piped commands. You often will find people using cat just to output the contents of a single file so they can feed it into a pipe. Here’s the most common example:


cat file | grep "foo"

Far too often, if people want to find out whether a file contains a particular pattern, they’ll cat the file piped into a grep command. This works, but grep can take a filename as an argument directly, so you can replace the above command with:


grep "foo" file

The next most common overuse of cat is when you want to sort the output from one or more files:


cat file1 file2 | sort | uniq

Like with grepsort supports multiple files as arguments, so you can replace the above with:


sort file1 file2 | uniq

In general, every time you find yourself catting a file into a pipe, re-examine the piped command and see whether it can accept files directly as input first either as direct arguments or as STDIN redirection. For instance, both sort and grep can accept files as arguments as you saw earlier, but if they couldn’t, you could achieve the same thing with redirection:


sort < file1 file2 | uniq
grep "foo" < file

Remove Files without xargs

The xargs command is very powerful on the command line—in particular, when piped to from the findcommand. Often you’ll use the find command to pick out files that have a certain criteria. Once you have identified those files, you naturally want to pipe that output to some command to operate on them. What you’ll eventually discover is that commands often have upper limits on the number of arguments they can accept.

So for instance, if you wanted to perform the somewhat dangerous operation of finding and removing all of the files under a directory that match a certain pattern (say, all mp3s), you might be tempted to do something like this:


find ./ -name "*.mp3" -type f -print0 | rm -f

Of course, you should never directly pipe a find command to remove. First, you should always pipe to echo to ensure that the files you are about to delete are the ones you want to delete:


find ./ -name "*.mp3" -type f -print0 | echo

If you have a lot of files that match the pattern, you’ll probably get an error about the number of arguments on the command line, and this is where xargs normally comes in:


find ./ -name "*.mp3" -type f -print0 | xargs echo
find ./ -name "*.mp3" -type f -print0 | xargs rm -f

This is better, but if you want to delete files, you don’t need to use a pipe at all. Instead, first just use the find command without a piped command to see what files would be deleted:


find ./ -name '*.mp3" -type f

Then take advantage of find‘s -delete argument to delete them without piping to another command:


find ./ -name '*.mp3" -type f -delete

So next time you find your pinky finger stretching for the pipe key, pause for a second and think about whether you can combine two commands into one. Your efficiency and poor overworked pinky finger (whoever thought it made sense for the pinky to have the heaviest workload on a keyboard?) will thank you.

Source

How to Install the GUI/Desktop on Ubuntu Server

How to install gui on ubuntu server

Usually, it’s not advised to run a GUI (Graphical User Interface) on a server system. Operation on any server should be done on the CLI (Command Line Interface). The primary reason for this is that GUI exerts a lot of demand on hardware resources such as RAM and CPU. However, if you are a little curious and want to try out different light-weight Desktop managers on one of your servers, follow this guide.

In this tutorial, I am going to cover the installation of 7 desktop environments on Ubuntu.

  • MATE core
  • Lubuntu core
  • Kubuntu core
  • XFCE
  • LXDE
  • GNOME
  • Budgie Desktop

Prerequisites

Before getting started, ensure that you update & upgrade your system

$ sudo apt update && sudo apt upgrade

Next, install tasksel manager.

$sudo apt install tasksel

Now we can begin installing the various Desktop environments.

1) Mate Core Server Desktop

Installing the MATE desktop use the following command

$ sudo tasksel install ubuntu-mate-core

Once the GUI is up and running launch it using the following option

$ sudo service lightdm start

install mate-core desktop server

install mate-core desktop on ubuntu 18.04

2) Lubuntu Core Server Desktop

This is considered to be the most lightweight and resource friendly GUI for Ubuntu 18.04 server
It is based on the LXDE desktop environment. To install Lubuntu execute

$ sudo tasksel install lubuntu-core

Once the Lubuntu-core GUI is successfully installed, launch the display manager by running the command below or simply by rebooting your system

$ sudo service lightdm start

Thereafter, Log out and click on the button as shown to select the GUI manager of your choice

In the drop-down list, click on Lubuntu

Log in and Lubuntu will be launched as shown

install lubuntu on Ubuntu server 18.04

3) Kubuntu Core Server Desktop

Xubuntu is yet another light-weight desktop environment that borrows a lot from Xfce desktop environment.

To get started with the installation of Xubuntu run the command below

$ sudo tasksel install kubuntu-desktop

Once it is successfully installed, start the display manager by running the command below or simply restart your server

$ sudo service lightdm start

Once again, log out or restart your machine and from drop the drop-down list, select Kubuntu

install kubuntu on Ubuntu server 18.04

4) XFCE

Xubuntu borrows a leaf from the Xfce4 environment. To install it use the following command

# sudo tasksel install xfce4-slim

After the GUI installation, use the command to activate it

# sudo service slim start

This will prompt you to select the default manager. Select slim and hit ENTER.

install xfce on Ubuntu 18.04

Log out or reboot and select ‘Xfce’ option from the drop-down list and login using your credentials.

Shortly, the Xfce display manager will come to life.

install xfce4-slim on ubuntu server 18.04

5) LXDE

This desktop is considered the most economical to system resources. Lubuntu is based on LXDE desktop environment. Use the following command

$ sudo apt-get install lxde

To start LXDE, log out or reboot and select ‘LXDE’ from the drop-down list of display managers on log on.

install lxde on ubuntu 18.04 server

6) GNOME

Gnome will take typically 5 to 10 minutes to install depending on the hardware and software requirements your server has. Run the following command to install Gnome

$ sudo apt-get install ubuntu-gnome-desktop

or

$sudo tasksel ubuntu-desktop

To activate Gnome, restart the server or use the following command

$ sudo service lightdm start

install gnome on ubuntu server 18.04

7) Budgie Desktop

Finally, let us install Budgie Desktop environment. To accomplish this, execute the following command

$ sudo apt install ubuntu-budgie-desktop

After successful installation, log out and select the Budgie desktop option. Log in with your username and password and enjoy the beauty of budgie!

installed budgie desktop on ubuntu

fresh install budgie desktop on ubuntu

Sometimes you need the GUI on your Ubuntu server to handle simple day-to-day tasks that need quick interaction without going deep into the server settings. Feel free to try out the various display managers and let us know your thoughts.

Source

WP2Social Auto Publish Powered By : XYZScripts.com