How to Manage User Password Expiration and Aging in Linux

System administration involves numerous tasks including managing users/groups and under user management, some of the minor tasks involved are adding, modifying, suspending, or deactivating user accounts, and many more.

This article will explain one of the critical user account management functions, how to set or change user password expiration and aging in Linux using the chage command.

Read AlsoHow to Manage Users and Groups in Linux

The chage command is used to modify user password expiry information. It enables you to view user account aging information, change the number of days between password changes and the date of the last password change.

Once you have set password expiry and aging information, this information is used by the system to determine when a user must change his/her password. Normally, companies or organizations have certain security polices that demand users to change passwords regularly: this can be a simple way to enforce such policies as we explained below.

To view a user account aging information, use the -l flag as shwon.

# chage -l ravi

View User Password Aging Information

View User Password Aging Information

To set the date or number of days (since January 1, 1970) when the password was last changed, use the -dflag as follows.

# chage -d 2018-02-11 ravi

Next, you can also set the date or number of days (since January 1, 1970) on which the user’s account will no longer be accessible by using the -E switch as shown in the following command.

In this case, once a user’s account is locked, he/she is required to contact the system administrator before being able to use the system again.

# chage -E 2018-02-16 ravi

Then, the -W option allows you to set the number of days of warning before a password change is required. Considering the command below, the user ravi will be warned 10 days prior to his password expiring.

# chage -W 10 ravi

In addition, you can set the number of days of inactivity after a password has expired before the account is locked. This example means that after user ravi’s password expires, his account will be inactive for 2 days before it is locked.

When the account becomes inactive, he must contact the system administrator before being able to use the system again.

# chage -I 2 ravi

For more information, refer to the chage man page.

# man chage

Note that you can also change a user’s password expiration and aging information using the usermod command, which is actually intended for modifying a user account.

Also check out:

  1. Managing Users & Groups, File Permissions & Attributes on User Accounts
  2. 11 Ways to Find User Account Info and Login Details in Linux

That’s it for now. Hoping you find this article informative and useful, if you have any questions to ask, use the feedback form below.

Source

12 Useful “df” Commands to Check Disk Space in Linux

On the internet you will find plenty of tools for checking disk space utilization in Linux. However, Linux has a strong built in utility called ‘df‘. The ‘df‘ command stand for “disk filesystem“, it is used to get full summary of available and used disk space usage of file system on Linux system.

Using ‘-h‘ parameter with (df -h) will shows the file system disk space statistics in “human readable” format, means it gives the details in bytes, mega bytes and gigabyte.

How to Check Disk Space in Linux

Useful df Command Examples

This article explain a way to get the full information of Linux disk space usage with the help of ‘df‘ command with their practical examples. So, you could better understand the usage of df command in Linux.

1. Check File System Disk Space Usage

The “df” command displays the information of device name, total blocks, total disk space, used disk space, available disk space and mount points on a file system.

[root@tecmint ~]# df

Filesystem           1K-blocks      Used Available Use% Mounted on
/dev/cciss/c0d0p2     78361192  23185840  51130588  32% /
/dev/cciss/c0d0p5     24797380  22273432   1243972  95% /home
/dev/cciss/c0d0p3     29753588  25503792   2713984  91% /data
/dev/cciss/c0d0p1       295561     21531    258770   8% /boot
tmpfs                   257476         0    257476   0% /dev/shm

2. Display Information of all File System Disk Space Usage

The same as above, but it also displays information of dummy file systems along with all the file system disk usage and their memory utilization.

[root@tecmint ~]# df -a

Filesystem           1K-blocks      Used Available Use% Mounted on
/dev/cciss/c0d0p2     78361192  23186116  51130312  32% /
proc                         0         0         0   -  /proc
sysfs                        0         0         0   -  /sys
devpts                       0         0         0   -  /dev/pts
/dev/cciss/c0d0p5     24797380  22273432   1243972  95% /home
/dev/cciss/c0d0p3     29753588  25503792   2713984  91% /data
/dev/cciss/c0d0p1       295561     21531    258770   8% /boot
tmpfs                   257476         0    257476   0% /dev/shm
none                         0         0         0   -  /proc/sys/fs/binfmt_misc
sunrpc                       0         0         0   -  /var/lib/nfs/rpc_pipefs

3. Show Disk Space Usage in Human Readable Format

Have you noticed that above commands displays information in bytes, which is not readable yet all, because we are in a habit of reading the sizes in megabytes, gigabytes etc. as it makes very easy to understand and remember.

The df command provides an option to display sizes in Human Readable formats by using ‘-h’ (prints the results in human readable format (e.g., 1K 2M 3G)).

[root@tecmint ~]# df -h

Filesystem            Size  Used Avail Use% Mounted on
/dev/cciss/c0d0p2      75G   23G   49G  32% /
/dev/cciss/c0d0p5      24G   22G  1.2G  95% /home
/dev/cciss/c0d0p3      29G   25G  2.6G  91% /data
/dev/cciss/c0d0p1     289M   22M  253M   8% /boot
tmpfs                 252M     0  252M   0% /dev/shm

4. Display Information of /home File System

To see the information of only device /home file system in human readable format use the following command.

[root@tecmint ~]# df -hT /home

Filesystem		Type    Size  Used Avail Use% Mounted on
/dev/cciss/c0d0p5	ext3     24G   22G  1.2G  95% /home

5. Display Information of File System in Bytes

To display all file system information and usage in 1024-byte blocks, use the option ‘-k‘ (e.g. –block-size=1K) as follows.

[root@tecmint ~]# df -k

Filesystem           1K-blocks      Used Available Use% Mounted on
/dev/cciss/c0d0p2     78361192  23187212  51129216  32% /
/dev/cciss/c0d0p5     24797380  22273432   1243972  95% /home
/dev/cciss/c0d0p3     29753588  25503792   2713984  91% /data
/dev/cciss/c0d0p1       295561     21531    258770   8% /boot
tmpfs                   257476         0    257476   0% /dev/shm

6. Display Information of File System in MB

To display information of all file system usage in MB (Mega Byte) use the option as ‘-m‘.

[root@tecmint ~]# df -m

Filesystem           1M-blocks      Used Available Use% Mounted on
/dev/cciss/c0d0p2        76525     22644     49931  32% /
/dev/cciss/c0d0p5        24217     21752      1215  95% /home
/dev/cciss/c0d0p3        29057     24907      2651  91% /data
/dev/cciss/c0d0p1          289        22       253   8% /boot
tmpfs                      252         0       252   0% /dev/shm

7. Display Information of File System in GB

To display information of all file system statistics in GB (Gigabyte) use the option as ‘df -h‘.

[root@tecmint ~]# df -h

Filesystem            Size  Used Avail Use% Mounted on
/dev/cciss/c0d0p2      75G   23G   49G  32% /
/dev/cciss/c0d0p5      24G   22G  1.2G  95% /home
/dev/cciss/c0d0p3      29G   25G  2.6G  91% /data
/dev/cciss/c0d0p1     289M   22M  253M   8% /boot
tmpfs                 252M     0  252M   0% /dev/shm

8. Display File System Inodes

Using ‘-i‘ switch will display the information of number of used inodes and their percentage for the file system.

[root@tecmint ~]# df -i

Filesystem            Inodes   IUsed   IFree IUse% Mounted on
/dev/cciss/c0d0p2    20230848  133143 20097705    1% /
/dev/cciss/c0d0p5    6403712  798613 5605099   13% /home
/dev/cciss/c0d0p3    7685440 1388241 6297199   19% /data
/dev/cciss/c0d0p1      76304      40   76264    1% /boot
tmpfs                  64369       1   64368    1% /dev/shm

9. Display File System Type

If you notice all the above commands output, you will see there is no file system type mentioned in the results. To check the file system type of your system use the option ‘T‘. It will display file system type along with other information.

[root@tecmint ~]# df -T

Filesystem		Type   1K-blocks  Used      Available Use% Mounted on
/dev/cciss/c0d0p2	ext3    78361192  23188812  51127616  32%   /
/dev/cciss/c0d0p5	ext3    24797380  22273432  1243972   95%   /home
/dev/cciss/c0d0p3	ext3    29753588  25503792  2713984   91%   /data
/dev/cciss/c0d0p1	ext3    295561     21531    258770    8%    /boot
tmpfs			tmpfs   257476         0    257476    0%   /dev/shm

10. Include Certain File System Type

If you want to display certain file system type use the ‘-t‘ option. For example, the following command will only display ext3 file system.

[root@tecmint ~]# df -t ext3

Filesystem           1K-blocks      Used Available Use% Mounted on
/dev/cciss/c0d0p2     78361192  23190072  51126356  32% /
/dev/cciss/c0d0p5     24797380  22273432   1243972  95% /home
/dev/cciss/c0d0p3     29753588  25503792   2713984  91% /data
/dev/cciss/c0d0p1       295561     21531    258770   8% /boot

11. Exclude Certain File System Type

If you want to display file system type that doesn’t belongs to ext3 type use the option as ‘-x‘. For example, the following command will only display other file systems types other than ext3.

[root@tecmint ~]# df -x ext3

Filesystem           1K-blocks      Used Available Use% Mounted on
tmpfs                   257476         0    257476   0% /dev/shm

12. Display Information of df Command.

Using ‘–help‘ switch will display a list of available option that are used with df command.

[root@tecmint ~]# df --help

Usage: df [OPTION]... [FILE]...
Show information about the file system on which each FILE resides,
or all file systems by default.

Mandatory arguments to long options are mandatory for short options too.
  -a, --all             include dummy file systems
  -B, --block-size=SIZE use SIZE-byte blocks
  -h, --human-readable  print sizes in human readable format (e.g., 1K 234M 2G)
  -H, --si              likewise, but use powers of 1000 not 1024
  -i, --inodes          list inode information instead of block usage
  -k                    like --block-size=1K
  -l, --local           limit listing to local file systems
      --no-sync         do not invoke sync before getting usage info (default)
  -P, --portability     use the POSIX output format
      --sync            invoke sync before getting usage info
  -t, --type=TYPE       limit listing to file systems of type TYPE
  -T, --print-type      print file system type
  -x, --exclude-type=TYPE   limit listing to file systems not of type TYPE
  -v                    (ignored)
      --help     display this help and exit
      --version  output version information and exit

SIZE may be (or may be an integer optionally followed by) one of following:
kB 1000, K 1024, MB 1000*1000, M 1024*1024, and so on for G, T, P, E, Z, Y.

Report bugs to <bug-coreutils@gnu.org>.

Read Also :

  1. 10 fdisk Commands to Manage Linux Disk Partitions
  2. 10 Useful “du” Commands to Find Disk Usage of Files and Directories

Source

Discus – Show Colourised Disk Space Usage in Linux

In our last article, we have explained how to use df (disk filesystem) utility to report file system disk space usage in Linux. We have discovered yet a another great utility for the same purpose but with a prettier output, called discus.

Discus is a df-like, highly configurable utility for checking disk space utilization in Linux, intended to make dfprettier with fancy features such as colored output, bar graphs, and smart formatting of numbers. To configure it, you may copy its main configuration file /etc/discusrc to ~/.discusrc and do your customization in there.

Read AlsoPydf an Alternative “df” Command to Check Disk Usage in Different Colours

The package discus is available to install from the default system repositories using package manager on Linux distribution as shown.

$ sudo apt install discus	#Debian/UBuntu
$ sudo yum install discus	#RHEL/CentOS
$ sudo dnf install discus	#Fedora 22+

After installing discus, learn how to use discus with the following examples.

Discus Command Examples

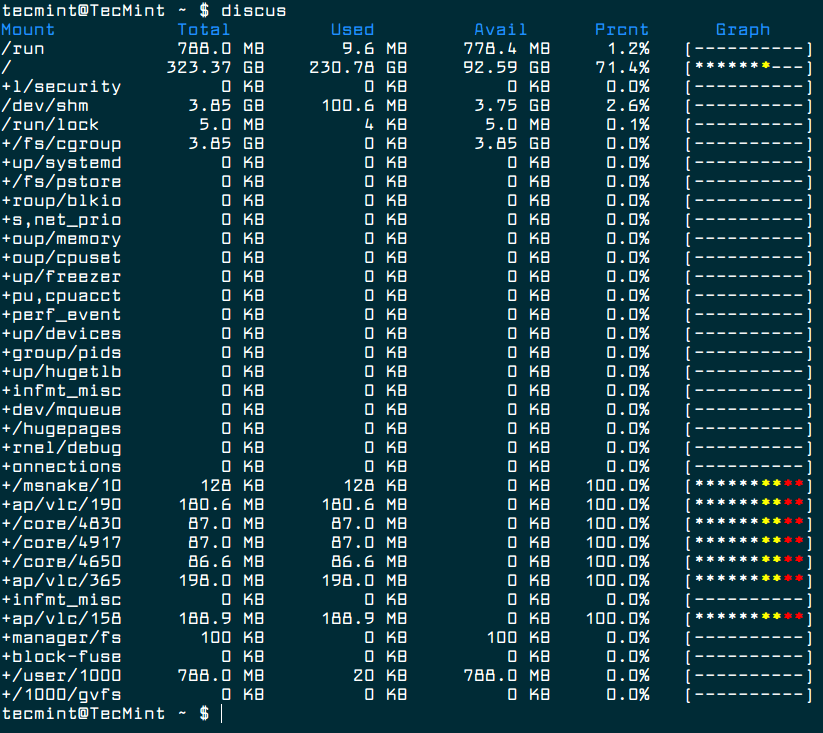
Run the discus command with the default settings.

$ discus

Check Linux Filesystem Disk Space

Check Linux Filesystem Disk Space

To disable the color, use the -c flag.

$ discus -c

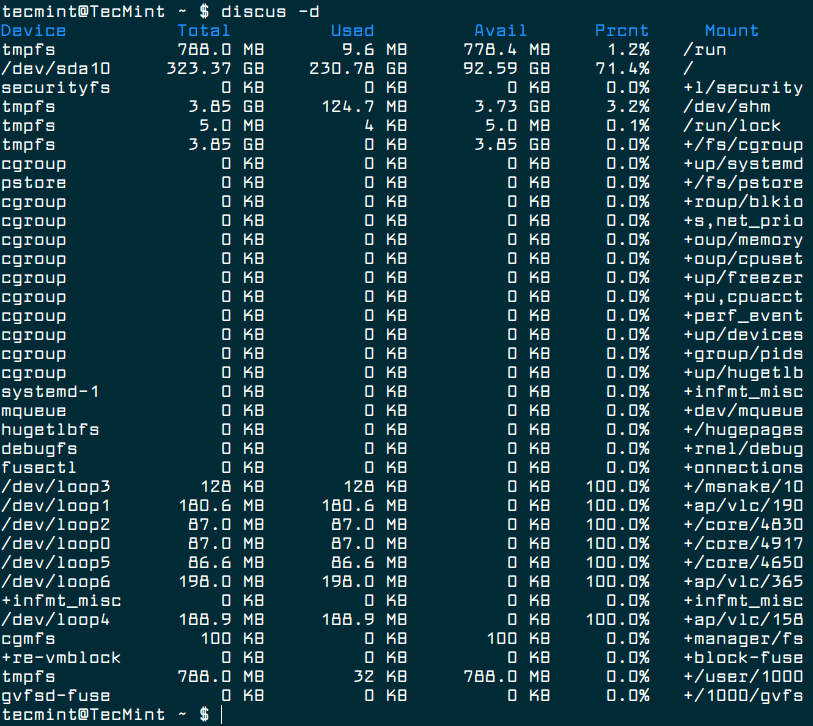
To display device names instead of graphs, use the -d flag:.

$ discus -d

Check Disk Space Usage By Devices

Check Disk Space Usage By Devices

If do not want to use smart formatting, you can disable it using the -s switch as shown.

$ discus -s

You can specify the number of digits to right of decimal place using the -p flag.

$ discus -p 3

To display sizes in kilobytes, gigabytes, megabytes, or terabytes use the -k-g-m, or -t flags respectively. For example.

$ discus -m

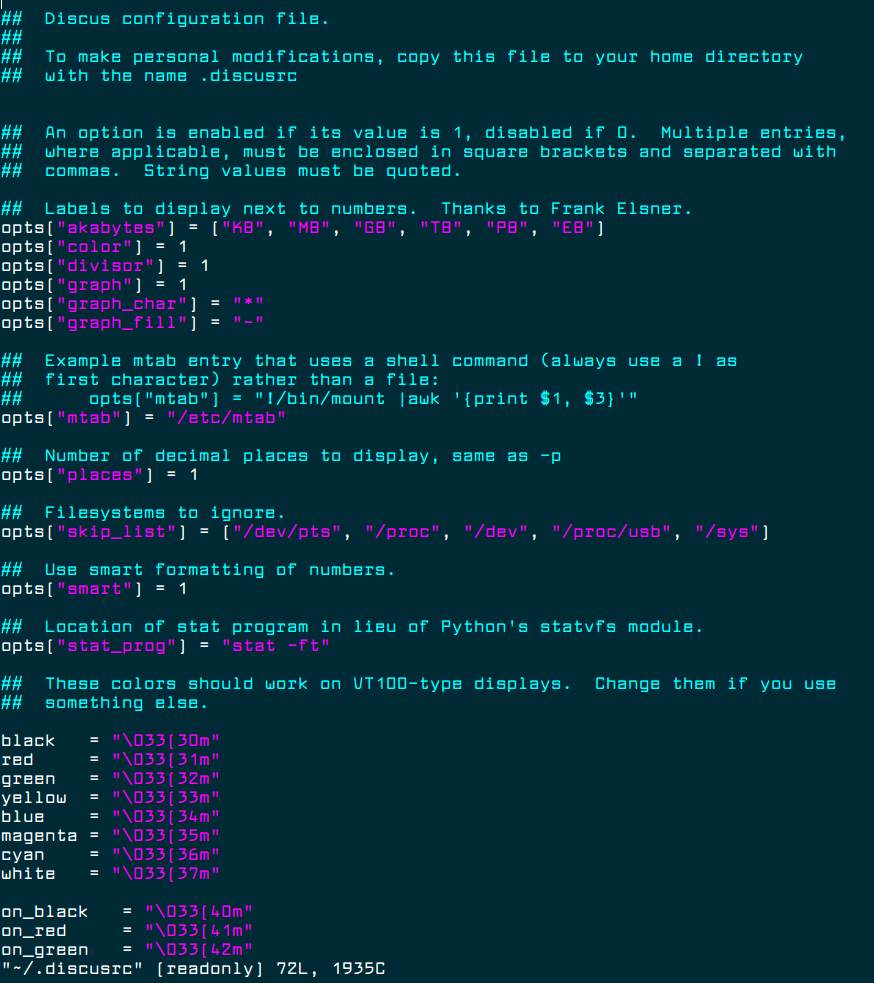
Last but not least, if you want to configure it to your preference, copy its main configuration file /etc/discusrc to ~/.discusrc as shown.

$ sudo cp /etc/discusrc ~/.discusrc

Then open the newly created file and perform your customization.

$ vim ~/.discusrc

Discus Configuration Customization

Discus Configuration Customization

For more information, see the discus man page.

$ man discus 

You may also like to read these following useful articles on Linux disk space usage.

  1. 10 Useful du (Disk Usage) Commands to Find Disk Usage of Files and Directories
  2. How to Find Out Top Directories and Files (Disk Space) in Linux

That’s all! Discus is a simple utility intended to make df command prettier. Try it out and let us know of thoughts in the comments section below.

Source

How to Count Number of Files and Subdirectories inside a Given Directory

The easiest way to count number of files and subdirectories in a directory using a tree command, which is best known for displaying files and directories in tree-like form.

Although you can always enable quotas to restrict disk space and inode usage to avoid user abuse, this command may be useful anyway. By default, the current working directory is assumed if no arguments are given:

$ tree -iLf 1
Sample Output
.
./10-Top-Linux-Distributions-of-2015.png
./adobe-flash-player-alternative.jpg
./CentOS-7-Security-Hardening-Guide.png
./coding.png
./d-logo-sketch.png
./Experts-Share-Thoughts-on-25th-Anniversary-of-the-World-Wide-Web-431806-2.jpg
./Get-Default-OS-Logo.png
./InstallCinnamonDesktoponUbuntuandFedora720x345.png
./Install-Nagios-in-CentOS.jpg
./Install-Vmware-Workstation-12-in-Linux.png
./Install-WordPress-on-CentOS-Fedora.png
./Linux-Essentials-Bundle-Course.png
./Linux-Online-Training-Courses.png
./Linux-PDF-Readers-Viewers-Tools.png
./linux-play-game.jpg
./logo.png
./nrpe-3.0.tar.gz
./Python-and-Linux-Administration-Course.png
./Ravi
./teamviewer 11 0 57095 i386
./Telegram
./tsetup.0.10.1.tar.xz
./VBoxGuestAdditions_5.0.0.iso
./Vivaldi-About.png
./VMware-Workstation-Full-12.1.1-3770994.x86_64.bundle

3 directories, 22 files

If you want to view the same information for /var/log, do:

$ tree -iLf 1 /var/log
Sample Output
/var/log
/var/log/alternatives.log
/var/log/apt
/var/log/aptitude
/var/log/auth.log
/var/log/boot.log
/var/log/bootstrap.log
/var/log/btmp
/var/log/btmp.1
/var/log/ConsoleKit
/var/log/cups
/var/log/dmesg
/var/log/dpkg.log
/var/log/faillog
/var/log/fontconfig.log
/var/log/fsck
/var/log/gpu-manager.log
/var/log/hp
/var/log/installer
/var/log/kern.log
/var/log/lastlog
/var/log/mdm
/var/log/mintsystem.log
/var/log/mintsystem.timestamps
/var/log/ntpstats
/var/log/samba
/var/log/speech-dispatcher
/var/log/syslog
/var/log/syslog.1
/var/log/teamviewer11
/var/log/unattended-upgrades
/var/log/upstart
/var/log/vbox-install.log
/var/log/wtmp
/var/log/wtmp.1
/var/log/Xorg.0.log
/var/log/Xorg.0.log.old

13 directories, 23 files

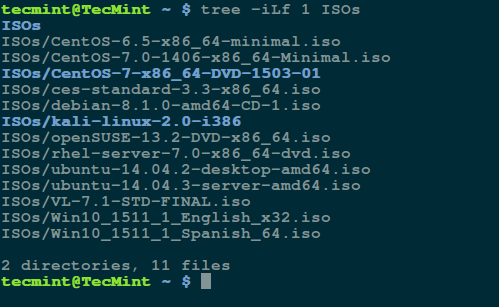
Type the command below to view information about files and subdirectories in the directory ISOs.

$ tree -iLf 1 ISOs 
Sample Output
ISOs
ISOs/CentOS-6.5-x86_64-minimal.iso
ISOs/CentOS-7.0-1406-x86_64-Minimal.iso
ISOs/CentOS-7-x86_64-DVD-1503-01
ISOs/ces-standard-3.3-x86_64.iso
ISOs/debian-8.1.0-amd64-CD-1.iso
ISOs/kali-linux-2.0-i386
ISOs/openSUSE-13.2-DVD-x86_64.iso
ISOs/rhel-server-7.0-x86_64-dvd.iso
ISOs/ubuntu-14.04.2-desktop-amd64.iso
ISOs/ubuntu-14.04.3-server-amd64.iso
ISOs/VL-7.1-STD-FINAL.iso
ISOs/Win10_1511_1_English_x32.iso
ISOs/Win10_1511_1_Spanish_64.iso

2 directories, 11 files

Count Files and Subdirectories in a Directory

Count Files and Subdirectories in a Directory

Explaining tree options used in the command above:

  1. -i – its a graphical option that enables tree to print out indentation lines
  2. -L – specifies the level of depth of the directory tree to be displayed, which in the case above is 1
  3. -f – makes tree print the full path prefix for every file

As you can view from the image above, after listing all the files and subdirectories, tree shows you the total number of directories and files in the directory you specified.

Suggested Read: Encrypt and Decrypt Files and Directories Using Tar and OpenSSL

You can refer to the tree man page to discover more useful options, some configuration files and environment variables to better understand how it works.

Conclusion

Here, we covered an important tip that can help you use the tree utility in a different way as compared to its traditional use, for displaying files and directories in a tree-like form.

You can can build new tips by using the numerous tree options from the man page. Do you have any useful tip concerning the use of tree? Then share it with millions of Linux users around the world through the feedback form below.

Source

Find Top 15 Processes by Memory Usage with ‘top’ in Batch Mode

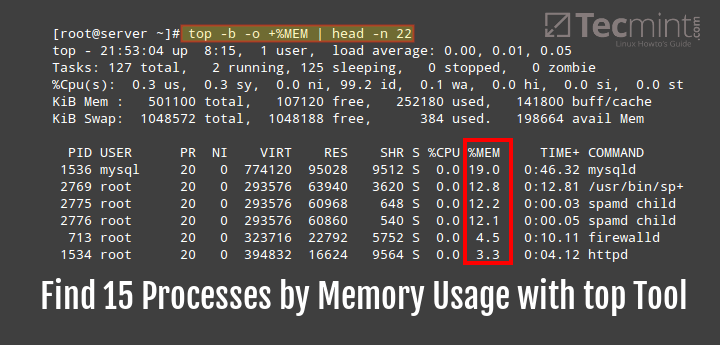
Similarly to the previous tip about find out top processes by RAM and CPU usage, you can also use top command to view the same information. Perhaps there’s an extra advantage of this approach when compared to the previous one: the “header” of top provides extra information about the current status and usage of the system: the uptime, load average, and total number of processes, to name a few examples.

Find Processes By Memory Usage with top

Find Processes By Memory Usage with top

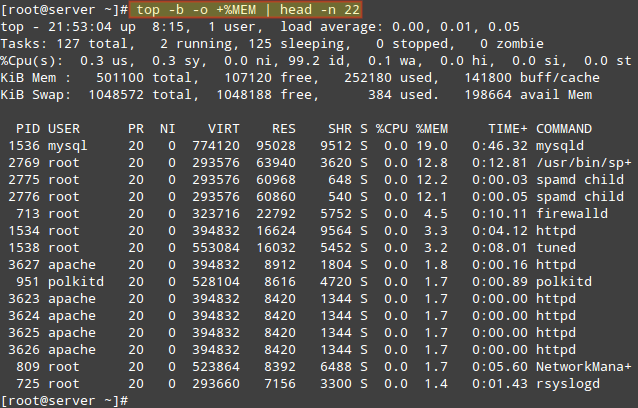
To display the top 15 processes sorted by memory use in descending order, do:

# top -b -o +%MEM | head -n 22

As opposed to the previous tip, here you have to use +%MEM (note the plus sign) to sort the output in descending order:

List Top 15 Processes By Memory Usage

List Top 15 Processes By Memory Usage

From the command above, the option:

  1. -b : runs top in batch mode
  2. -o : used to specify fields for sorting processes
  3. head utility displays the first few lines of a file and
  4. the -n option is used to specify the number of lines to be displayed.

Note that head utility, by default displays the first ten lines of a file, that is when you do not specify the number of lines to be displayed. Therefore, in the example above, we displayed the first 22 lines of top command output in batch mode.

Redirect or Save ‘top’ Output to File in Linux

Additionally, using top in batch mode allows you to redirect the output to a file for later inspection:

# top -b -o +%MEM | head -n 22 > topreport.txt

As we have seen, the top utility offers us more dynamic information while listing processes on a Linux system, therefore, this approach has an extra advantage compared to using ps utility which we covered in tip one.

But most importantly, you must always run top in batch mode to redirect its output to a file or another process. Additionally, if you have any tips regarding use of top, you can also share them with us via the feedback form below.

Source

15 Practical Examples of ‘echo’ command in Linux

echo is one of the most commonly and widely used built-in command for Linux bash and C shells, that typically used in scripting language and batch files to display a line of text/string on standard output or a file.

echo command

echo command examples

The syntax for echo is:

echo [option(s)] [string(s)]

1. Input a line of text and display on standard output

$ echo Tecmint is a community of Linux Nerds 

Outputs the following text:

Tecmint is a community of Linux Nerds 

2. Declare a variable and echo its value. For example, Declare a variable of x and assign its value=10.

$ x=10

echo its value:

$ echo The value of variable x = $x 

The value of variable x = 10 

Note: The ‘-e‘ option in Linux acts as interpretation of escaped characters that are backslashed.

3. Using option ‘\b‘ – backspace with backslash interpretor ‘-e‘ which removes all the spaces in between.

$ echo -e "Tecmint \bis \ba \bcommunity \bof \bLinux \bNerds" 

TecmintisacommunityofLinuxNerds 

4. Using option ‘\n‘ – New line with backspace interpretor ‘-e‘ treats new line from where it is used.

$ echo -e "Tecmint \nis \na \ncommunity \nof \nLinux \nNerds" 

Tecmint 
is 
a 
community 
of 
Linux 
Nerds 

5. Using option ‘\t‘ – horizontal tab with backspace interpretor ‘-e‘ to have horizontal tab spaces.

$ echo -e "Tecmint \tis \ta \tcommunity \tof \tLinux \tNerds" 

Tecmint 	is 	a 	community 	of 	Linux 	Nerds 

6. How about using option new Line ‘\n‘ and horizontal tab ‘\t‘ simultaneously.

$ echo -e "\n\tTecmint \n\tis \n\ta \n\tcommunity \n\tof \n\tLinux \n\tNerds" 

	Tecmint 
	is 
	a 
	community 
	of 
	Linux 
	Nerds 

7. Using option ‘\v‘ – vertical tab with backspace interpretor ‘-e‘ to have vertical tab spaces.

$ echo -e "\vTecmint \vis \va \vcommunity \vof \vLinux \vNerds" 

Tecmint 
        is 
           a 
             community 
                       of 
                          Linux 
                                Nerds 

8. How about using option new Line ‘\n‘ and vertical tab ‘\v‘ simultaneously.

$ echo -e "\n\vTecmint \n\vis \n\va \n\vcommunity \n\vof \n\vLinux \n\vNerds" 


Tecmint 

is 

a 

community 

of 

Linux 

Nerds 

Note: We can double the vertical tab, horizontal tab and new line spacing using the option two times or as many times as required.

9. Using option ‘\r‘ – carriage return with backspace interpretor ‘-e‘ to have specified carriage return in output.

$ echo -e "Tecmint \ris a community of Linux Nerds" 

is a community of Linux Nerds 

10. Using option ‘\c‘ – suppress trailing new line with backspace interpretor ‘-e‘ to continue without emitting new line.

$ echo -e "Tecmint is a community \cof Linux Nerds" 

Tecmint is a community avi@tecmint:~$ 

11. Omit echoing trailing new line using option ‘-n‘.

$ echo -n "Tecmint is a community of Linux Nerds" 
Tecmint is a community of Linux Nerdsavi@tecmint:~/Documents$ 

12. Using option ‘\a‘ – alert return with backspace interpretor ‘-e‘ to have sound alert.

$ echo -e "Tecmint is a community of \aLinux Nerds" 
Tecmint is a community of Linux Nerds

Note: Make sure to check Volume key, before firing.

13. Print all the files/folder using echo command (ls command alternative).

$ echo * 

103.odt 103.pdf 104.odt 104.pdf 105.odt 105.pdf 106.odt 106.pdf 107.odt 107.pdf 108a.odt 108.odt 108.pdf 109.odt 109.pdf 110b.odt 110.odt 110.pdf 111.odt 111.pdf 112.odt 112.pdf 113.odt linux-headers-3.16.0-customkernel_1_amd64.deb linux-image-3.16.0-customkernel_1_amd64.deb network.jpeg 

14. Print files of a specific kind. For example, let’s assume you want to print all ‘.jpeg‘ files, use the following command.

$ echo *.jpeg 

network.jpeg 

15. The echo can be used with redirect operator to output to a file and not standard output.

$ echo "Test Page" > testpage 

## Check Content
avi@tecmint:~$ cat testpage 
Test Page 
echo Options
 Options  Description
 -n  do not print the trailing newline.
 -e  enable interpretation of backslash escapes.
 \b  backspace
 \\  backslash
 \n  new line
 \r  carriage return
 \t  horizontal tab
 \v  vertical tab

That’s all for now and don’t forget to provide us with your valuable feedback in the comments below.

Source

29 Practical Examples of Nmap Commands for Linux System/Network Administrators

The Nmap aka Network Mapper is an open source and a very versatile tool for Linux system/network administrators. Nmap is used for exploring networksperform security scansnetwork audit and finding open ports on remote machine. It scans for Live hosts, Operating systems, packet filters and open ports running on remote hosts.

Nmap Commands

Nmap Commands and Examples

I’ll be covering most of NMAP usage in two different parts and this is the first part of nmap serious. Here in this setup, I have used two servers without firewall to test the working of the Nmap command.

  1. 192.168.0.100 – server1.tecmint.com
  2. 192.168.0.101 – server2.tecmint.com
Nmap command usage
# nmap [Scan Type(s)] [Options] {target specification}

How to Install NMAP in Linux

Most of the today’s Linux distributions like Red HatCentOSFedoroDebian and Ubuntu have included Nmap in their default package management repositories called Yum and APT. The both tools are used to install and manage software packages and updates. To install Nmap on distribution specific use the following command.

# yum install nmap		[on Red Hat based systems]

$ sudo apt-get install nmap	[on Debian based systems]

Once you’ve install latest nmap application, you can follow the example instructions provided in this article.

1. Scan a System with Hostname and IP Address

The Nmap tool offers various methods to scan a system. In this example, I am performing a scan using hostname as server2.tecmint.com to find out all open ports, services and MAC address on the system.

Scan using Hostname
[root@server1 ~]# nmap server2.tecmint.com

Starting Nmap 4.11 ( http://www.insecure.org/nmap/ ) at 2013-11-11 15:42 EST
Interesting ports on server2.tecmint.com (192.168.0.101):
Not shown: 1674 closed ports
PORT     STATE SERVICE
22/tcp   open  ssh
80/tcp   open  http
111/tcp  open  rpcbind
957/tcp  open  unknown
3306/tcp open  mysql
8888/tcp open  sun-answerbook
MAC Address: 08:00:27:D9:8E:D7 (Cadmus Computer Systems)

Nmap finished: 1 IP address (1 host up) scanned in 0.415 seconds
You have new mail in /var/spool/mail/root
Scan using IP Address
[root@server1 ~]# nmap 192.168.0.101

Starting Nmap 4.11 ( http://www.insecure.org/nmap/ ) at 2013-11-18 11:04 EST
Interesting ports on server2.tecmint.com (192.168.0.101):
Not shown: 1674 closed ports
PORT     STATE SERVICE
22/tcp   open  ssh
80/tcp   open  http
111/tcp  open  rpcbind
958/tcp  open  unknown
3306/tcp open  mysql
8888/tcp open  sun-answerbook
MAC Address: 08:00:27:D9:8E:D7 (Cadmus Computer Systems)

Nmap finished: 1 IP address (1 host up) scanned in 0.465 seconds
You have new mail in /var/spool/mail/root

2. Scan using “-v” option

You can see that the below command with “-v” option is giving more detailed information about the remote machine.

[root@server1 ~]# nmap -v server2.tecmint.com

Starting Nmap 4.11 ( http://www.insecure.org/nmap/ ) at 2013-11-11 15:43 EST
Initiating ARP Ping Scan against 192.168.0.101 [1 port] at 15:43
The ARP Ping Scan took 0.01s to scan 1 total hosts.
Initiating SYN Stealth Scan against server2.tecmint.com (192.168.0.101) [1680 ports] at 15:43
Discovered open port 22/tcp on 192.168.0.101
Discovered open port 80/tcp on 192.168.0.101
Discovered open port 8888/tcp on 192.168.0.101
Discovered open port 111/tcp on 192.168.0.101
Discovered open port 3306/tcp on 192.168.0.101
Discovered open port 957/tcp on 192.168.0.101
The SYN Stealth Scan took 0.30s to scan 1680 total ports.
Host server2.tecmint.com (192.168.0.101) appears to be up ... good.
Interesting ports on server2.tecmint.com (192.168.0.101):
Not shown: 1674 closed ports
PORT     STATE SERVICE
22/tcp   open  ssh
80/tcp   open  http
111/tcp  open  rpcbind
957/tcp  open  unknown
3306/tcp open  mysql
8888/tcp open  sun-answerbook
MAC Address: 08:00:27:D9:8E:D7 (Cadmus Computer Systems)

Nmap finished: 1 IP address (1 host up) scanned in 0.485 seconds
               Raw packets sent: 1681 (73.962KB) | Rcvd: 1681 (77.322KB)

Scan Multiple Hosts

You can scan multiple hosts by simply writing their IP addresses or hostnames with Nmap.

[root@server1 ~]# nmap 192.168.0.101 192.168.0.102 192.168.0.103

Starting Nmap 4.11 ( http://www.insecure.org/nmap/ ) at 2013-11-11 16:06 EST
Interesting ports on server2.tecmint.com (192.168.0.101):
Not shown: 1674 closed ports
PORT     STATE SERVICE
22/tcp   open  ssh
80/tcp   open  http
111/tcp  open  rpcbind
957/tcp  open  unknown
3306/tcp open  mysql
8888/tcp open  sun-answerbook
MAC Address: 08:00:27:D9:8E:D7 (Cadmus Computer Systems)
Nmap finished: 3 IP addresses (1 host up) scanned in 0.580 seconds

4. Scan a whole Subnet

You can scan a whole subnet or IP range with Nmap by providing * wildcard with it.

[root@server1 ~]# nmap 192.168.0.*

Starting Nmap 4.11 ( http://www.insecure.org/nmap/ ) at 2013-11-11 16:11 EST
Interesting ports on server1.tecmint.com (192.168.0.100):
Not shown: 1677 closed ports
PORT    STATE SERVICE
22/tcp  open  ssh
111/tcp open  rpcbind
851/tcp open  unknown

Interesting ports on server2.tecmint.com (192.168.0.101):
Not shown: 1674 closed ports
PORT     STATE SERVICE
22/tcp   open  ssh
80/tcp   open  http
111/tcp  open  rpcbind
957/tcp  open  unknown
3306/tcp open  mysql
8888/tcp open  sun-answerbook
MAC Address: 08:00:27:D9:8E:D7 (Cadmus Computer Systems)

Nmap finished: 256 IP addresses (2 hosts up) scanned in 5.550 seconds
You have new mail in /var/spool/mail/root

On above output you can see that nmap scanned a whole subnet and gave the information about those hosts which are Up in the Network.

5. Scan Multiple Servers using last octet of IP address

You can perform scans on multiple IP address by simple specifying last octet of IP address. For example, here I performing a scan on IP addresses 192.168.0.101, 192.168.0.102 and 192.168.0.103.

[root@server1 ~]# nmap 192.168.0.101,102,103

Starting Nmap 4.11 ( http://www.insecure.org/nmap/ ) at 2013-11-11 16:09 EST
Interesting ports on server2.tecmint.com (192.168.0.101):
Not shown: 1674 closed ports
PORT     STATE SERVICE
22/tcp   open  ssh
80/tcp   open  http
111/tcp  open  rpcbind
957/tcp  open  unknown
3306/tcp open  mysql
8888/tcp open  sun-answerbook
MAC Address: 08:00:27:D9:8E:D7 (Cadmus Computer Systems)

Nmap finished: 3 IP addresses (1 host up) scanned in 0.552 seconds
You have new mail in /var/spool/mail/root

6. Scan list of Hosts from a File

If you have more hosts to scan and all host details are written in a file , you can directly ask nmap to read that file and perform scans. Let’s see how to do that.

Create a text file called “nmaptest.txt” and define all the IP addresses or hostname of the server that you want to do a scan.

[root@server1 ~]# cat > nmaptest.txt

localhost
server2.tecmint.com
192.168.0.101

Next, run the following command with “iL” option with nmap command to scan all listed IP address in the file.

[root@server1 ~]# nmap -iL nmaptest.txt

Starting Nmap 4.11 ( http://www.insecure.org/nmap/ ) at 2013-11-18 10:58 EST
Interesting ports on localhost.localdomain (127.0.0.1):
Not shown: 1675 closed ports
PORT    STATE SERVICE
22/tcp  open  ssh
25/tcp  open  smtp
111/tcp open  rpcbind
631/tcp open  ipp
857/tcp open  unknown

Interesting ports on server2.tecmint.com (192.168.0.101):
Not shown: 1674 closed ports
PORT     STATE SERVICE
22/tcp   open  ssh
80/tcp   open  http
111/tcp  open  rpcbind
958/tcp  open  unknown
3306/tcp open  mysql
8888/tcp open  sun-answerbook
MAC Address: 08:00:27:D9:8E:D7 (Cadmus Computer Systems)

Nmap finished: 3 IP addresses (3 hosts up) scanned in 2.047 seconds

7. Scan an IP Address Range

You can specify an IP range while performing scan with Nmap.

[root@server1 ~]# nmap 192.168.0.101-110

Starting Nmap 4.11 ( http://www.insecure.org/nmap/ ) at 2013-11-11 16:09 EST
Interesting ports on server2.tecmint.com (192.168.0.101):
Not shown: 1674 closed ports
PORT     STATE SERVICE
22/tcp   open  ssh
80/tcp   open  http
111/tcp  open  rpcbind
957/tcp  open  unknown
3306/tcp open  mysql
8888/tcp open  sun-answerbook
MAC Address: 08:00:27:D9:8E:D7 (Cadmus Computer Systems)

Nmap finished: 10 IP addresses (1 host up) scanned in 0.542 seconds

8. Scan Network Excluding Remote Hosts

You can exclude some hosts while performing a full network scan or when you are scanning with wildcards with “–exclude” option.

[root@server1 ~]# nmap 192.168.0.* --exclude 192.168.0.100

Starting Nmap 4.11 ( http://www.insecure.org/nmap/ ) at 2013-11-11 16:16 EST
Interesting ports on server2.tecmint.com (192.168.0.101):
Not shown: 1674 closed ports
PORT     STATE SERVICE
22/tcp   open  ssh
80/tcp   open  http
111/tcp  open  rpcbind
957/tcp  open  unknown
3306/tcp open  mysql
8888/tcp open  sun-answerbook
MAC Address: 08:00:27:D9:8E:D7 (Cadmus Computer Systems)

Nmap finished: 255 IP addresses (1 host up) scanned in 5.313 seconds
You have new mail in /var/spool/mail/root

9. Scan OS information and Traceroute

With Nmap, you can detect which OS and version is running on the remote host. To enable OS & version detection, script scanning and traceroute, we can use “-A” option with NMAP.

[root@server1 ~]# nmap -A 192.168.0.101

Starting Nmap 4.11 ( http://www.insecure.org/nmap/ ) at 2013-11-11 16:25 EST
Interesting ports on server2.tecmint.com (192.168.0.101):
Not shown: 1674 closed ports
PORT     STATE SERVICE VERSION
22/tcp   open  ssh     OpenSSH 4.3 (protocol 2.0)
80/tcp   open  http    Apache httpd 2.2.3 ((CentOS))
111/tcp  open  rpcbind  2 (rpc #100000)
957/tcp  open  status   1 (rpc #100024)
3306/tcp open  mysql   MySQL (unauthorized)
8888/tcp open  http    lighttpd 1.4.32
MAC Address: 08:00:27:D9:8E:D7 (Cadmus Computer Systems)
No exact OS matches for host (If you know what OS is running on it, see http://www.insecure.org/cgi-bin/nmap-submit.cgi).
TCP/IP fingerprint:
SInfo(V=4.11%P=i686-redhat-linux-gnu%D=11/11%Tm=52814B66%O=22%C=1%M=080027)
TSeq(Class=TR%IPID=Z%TS=1000HZ)
T1(Resp=Y%DF=Y%W=16A0%ACK=S++%Flags=AS%Ops=MNNTNW)
T2(Resp=N)
T3(Resp=Y%DF=Y%W=16A0%ACK=S++%Flags=AS%Ops=MNNTNW)
T4(Resp=Y%DF=Y%W=0%ACK=O%Flags=R%Ops=)
T5(Resp=Y%DF=Y%W=0%ACK=S++%Flags=AR%Ops=)
T6(Resp=Y%DF=Y%W=0%ACK=O%Flags=R%Ops=)
T7(Resp=Y%DF=Y%W=0%ACK=S++%Flags=AR%Ops=)
PU(Resp=Y%DF=N%TOS=C0%IPLEN=164%RIPTL=148%RID=E%RIPCK=E%UCK=E%ULEN=134%DAT=E)

Uptime 0.169 days (since Mon Nov 11 12:22:15 2013)

Nmap finished: 1 IP address (1 host up) scanned in 22.271 seconds
You have new mail in /var/spool/mail/root

In above Output, you can see that nmap is came up with TCP/IP fingerprint of the OS running on remote hosts and being more specific about the port and services running on the remote hosts.

10. Enable OS Detection with Nmap

Use the option “-O” and “-osscan-guess” also helps to discover OS information.

[root@server1 ~]# nmap -O server2.tecmint.com

Starting Nmap 4.11 ( http://www.insecure.org/nmap/ ) at 2013-11-11 17:40 EST
Interesting ports on server2.tecmint.com (192.168.0.101):
Not shown: 1674 closed ports
PORT     STATE SERVICE
22/tcp   open  ssh
80/tcp   open  http
111/tcp  open  rpcbind
957/tcp  open  unknown
3306/tcp open  mysql
8888/tcp open  sun-answerbook
MAC Address: 08:00:27:D9:8E:D7 (Cadmus Computer Systems)
No exact OS matches for host (If you know what OS is running on it, see http://www.insecure.org/cgi-bin/nmap-submit.cgi).
TCP/IP fingerprint:
SInfo(V=4.11%P=i686-redhat-linux-gnu%D=11/11%Tm=52815CF4%O=22%C=1%M=080027)
TSeq(Class=TR%IPID=Z%TS=1000HZ)
T1(Resp=Y%DF=Y%W=16A0%ACK=S++%Flags=AS%Ops=MNNTNW)
T2(Resp=N)
T3(Resp=Y%DF=Y%W=16A0%ACK=S++%Flags=AS%Ops=MNNTNW)
T4(Resp=Y%DF=Y%W=0%ACK=O%Flags=Option -O and -osscan-guess also helps to discover OS
R%Ops=)
T5(Resp=Y%DF=Y%W=0%ACK=S++%Flags=AR%Ops=)
T6(Resp=Y%DF=Y%W=0%ACK=O%Flags=R%Ops=)
T7(Resp=Y%DF=Y%W=0%ACK=S++%Flags=AR%Ops=)
PU(Resp=Y%DF=N%TOS=C0%IPLEN=164%RIPTL=148%RID=E%RIPCK=E%UCK=E%ULEN=134%DAT=E)

Uptime 0.221 days (since Mon Nov 11 12:22:16 2013)

Nmap finished: 1 IP address (1 host up) scanned in 11.064 seconds
You have new mail in /var/spool/mail/root

11. Scan a Host to Detect Firewall

The below command will perform a scan on a remote host to detect if any packet filters or Firewall is used by host.

[root@server1 ~]# nmap -sA 192.168.0.101

Starting Nmap 4.11 ( http://www.insecure.org/nmap/ ) at 2013-11-11 16:27 EST
All 1680 scanned ports on server2.tecmint.com (192.168.0.101) are UNfiltered
MAC Address: 08:00:27:D9:8E:D7 (Cadmus Computer Systems)

Nmap finished: 1 IP address (1 host up) scanned in 0.382 seconds
You have new mail in /var/spool/mail/root

12. Scan a Host to check its protected by Firewall

To scan a host if it is protected by any packet filtering software or Firewalls.

[root@server1 ~]# nmap -PN 192.168.0.101

Starting Nmap 4.11 ( http://www.insecure.org/nmap/ ) at 2013-11-11 16:30 EST
Interesting ports on server2.tecmint.com (192.168.0.101):
Not shown: 1674 closed ports
PORT     STATE SERVICE
22/tcp   open  ssh
80/tcp   open  http
111/tcp  open  rpcbind
957/tcp  open  unknown
3306/tcp open  mysql
8888/tcp open  sun-answerbook
MAC Address: 08:00:27:D9:8E:D7 (Cadmus Computer Systems)

Nmap finished: 1 IP address (1 host up) scanned in 0.399 seconds

13. Find out Live hosts in a Network

With the help of “-sP” option we can simply check which hosts are live and up in Network, with this option nmap skips port detection and other things.

[root@server1 ~]# nmap -sP 192.168.0.*

Starting Nmap 4.11 ( http://www.insecure.org/nmap/ ) at 2013-11-18 11:01 EST
Host server1.tecmint.com (192.168.0.100) appears to be up.
Host server2.tecmint.com (192.168.0.101) appears to be up.
MAC Address: 08:00:27:D9:8E:D7 (Cadmus Computer Systems)
Nmap finished: 256 IP addresses (2 hosts up) scanned in 5.109 seconds

14. Perform a Fast Scan

You can perform a fast scan with “-F” option to scans for the ports listed in the nmap-services files and leaves all other ports.

[root@server1 ~]# nmap -F 192.168.0.101

Starting Nmap 4.11 ( http://www.insecure.org/nmap/ ) at 2013-11-11 16:47 EST
Interesting ports on server2.tecmint.com (192.168.0.101):
Not shown: 1234 closed ports
PORT     STATE SERVICE
22/tcp   open  ssh
80/tcp   open  http
111/tcp  open  rpcbind
3306/tcp open  mysql
8888/tcp open  sun-answerbook
MAC Address: 08:00:27:D9:8E:D7 (Cadmus Computer Systems)

Nmap finished: 1 IP address (1 host up) scanned in 0.322 seconds

15. Find Nmap version

You can find out Nmap version you are running on your machine with “-V” option.

[root@server1 ~]# nmap -V

Nmap version 4.11 ( http://www.insecure.org/nmap/ )
You have new mail in /var/spool/mail/root

16. Scan Ports Consecutively

Use the “-r” flag to don’t randomize.

[root@server1 ~]# nmap -r 192.168.0.101

Starting Nmap 4.11 ( http://www.insecure.org/nmap/ ) at 2013-11-11 16:52 EST
Interesting ports on server2.tecmint.com (192.168.0.101):
Not shown: 1674 closed ports
PORT     STATE SERVICE
22/tcp   open  ssh
80/tcp   open  http
111/tcp  open  rpcbind
957/tcp  open  unknown
3306/tcp open  mysql
8888/tcp open  sun-answerbook
MAC Address: 08:00:27:D9:8E:D7 (Cadmus Computer Systems)

Nmap finished: 1 IP address (1 host up) scanned in 0.363 seconds

17. Print Host interfaces and Routes

You can find out host interface and route information with nmap by using “–iflist” option.

[root@server1 ~]# nmap --iflist

Starting Nmap 4.11 ( http://www.insecure.org/nmap/ ) at 2013-11-11 17:07 EST
************************INTERFACES************************
DEV  (SHORT) IP/MASK          TYPE     UP MAC
lo   (lo)    127.0.0.1/8      loopback up
eth0 (eth0)  192.168.0.100/24 ethernet up 08:00:27:11:C7:89

**************************ROUTES**************************
DST/MASK      DEV  GATEWAY
192.168.0.0/0 eth0
169.254.0.0/0 eth0

In above output, you can see that map is listing interfaces attached to your system and their respective routes.

18. Scan for specific Port

There are various options to discover ports on remote machine with Nmap. You can specify the port you want nmap to scan with “-p” option, by default nmap scans only TCP ports.

[root@server1 ~]# nmap -p 80 server2.tecmint.com

Starting Nmap 4.11 ( http://www.insecure.org/nmap/ ) at 2013-11-11 17:12 EST
Interesting ports on server2.tecmint.com (192.168.0.101):
PORT   STATE SERVICE
80/tcp open  http
MAC Address: 08:00:27:D9:8E:D7 (Cadmus Computer Systems)

Nmap finished: 1 IP address (1 host up) sca

19. Scan a TCP Port

You can also specify specific port types and numbers with nmap to scan.

[root@server1 ~]# nmap -p T:8888,80 server2.tecmint.com

Starting Nmap 4.11 ( http://www.insecure.org/nmap/ ) at 2013-11-11 17:15 EST
Interesting ports on server2.tecmint.com (192.168.0.101):
PORT     STATE SERVICE
80/tcp   open  http
8888/tcp open  sun-answerbook
MAC Address: 08:00:27:D9:8E:D7 (Cadmus Computer Systems)

Nmap finished: 1 IP address (1 host up) scanned in 0.157 seconds

20. Scan a UDP Port

[root@server1 ~]# nmap -sU 53 server2.tecmint.com

Starting Nmap 4.11 ( http://www.insecure.org/nmap/ ) at 2013-11-11 17:15 EST
Interesting ports on server2.tecmint.com (192.168.0.101):
PORT     STATE SERVICE
53/udp   open  http
8888/udp open  sun-answerbook
MAC Address: 08:00:27:D9:8E:D7 (Cadmus Computer Systems)

Nmap finished: 1 IP address (1 host up) scanned in 0.157 seconds

21. Scan Multiple Ports

You can also scan multiple ports using option “-p“.

[root@server1 ~]# nmap -p 80,443 192.168.0.101

Starting Nmap 4.11 ( http://www.insecure.org/nmap/ ) at 2013-11-18 10:56 EST
Interesting ports on server2.tecmint.com (192.168.0.101):
PORT    STATE  SERVICE
80/tcp  open   http
443/tcp closed https
MAC Address: 08:00:27:D9:8E:D7 (Cadmus Computer Systems)

Nmap finished: 1 IP address (1 host up) scanned in 0.190 seconds

22. Scan Ports by Network Range

You can scan ports with ranges using expressions.

[root@server1 ~]#  nmap -p 80-160 192.168.0.101

23. Find Host Services version Numbers

We can find out service’s versions which are running on remote hosts with “-sV” option.

[root@server1 ~]# nmap -sV 192.168.0.101

Starting Nmap 4.11 ( http://www.insecure.org/nmap/ ) at 2013-11-11 17:48 EST
Interesting ports on server2.tecmint.com (192.168.0.101):
Not shown: 1674 closed ports
PORT     STATE SERVICE VERSION
22/tcp   open  ssh     OpenSSH 4.3 (protocol 2.0)
80/tcp   open  http    Apache httpd 2.2.3 ((CentOS))
111/tcp  open  rpcbind  2 (rpc #100000)
957/tcp  open  status   1 (rpc #100024)
3306/tcp open  mysql   MySQL (unauthorized)
8888/tcp open  http    lighttpd 1.4.32
MAC Address: 08:00:27:D9:8E:D7 (Cadmus Computer Systems)

Nmap finished: 1 IP address (1 host up) scanned in 12.624 seconds

24. Scan remote hosts using TCP ACK (PA) and TCP Syn (PS)

Sometimes packet filtering firewalls blocks standard ICMP ping requests, in that case, we can use TCP ACK and TCP Syn methods to scan remote hosts.

[root@server1 ~]# nmap -PS 192.168.0.101

Starting Nmap 4.11 ( http://www.insecure.org/nmap/ ) at 2013-11-11 17:51 EST
Interesting ports on server2.tecmint.com (192.168.0.101):
Not shown: 1674 closed ports
PORT     STATE SERVICE
22/tcp   open  ssh
80/tcp   open  http
111/tcp  open  rpcbind
957/tcp  open  unknown
3306/tcp open  mysql
8888/tcp open  sun-answerbook
MAC Address: 08:00:27:D9:8E:D7 (Cadmus Computer Systems)

Nmap finished: 1 IP address (1 host up) scanned in 0.360 seconds
You have new mail in /var/spool/mail/root

25. Scan Remote host for specific ports with TCP ACK

[root@server1 ~]# nmap -PA -p 22,80 192.168.0.101

Starting Nmap 4.11 ( http://www.insecure.org/nmap/ ) at 2013-11-11 18:02 EST
Interesting ports on server2.tecmint.com (192.168.0.101):
PORT   STATE SERVICE
22/tcp open  ssh
80/tcp open  http
MAC Address: 08:00:27:D9:8E:D7 (Cadmus Computer Systems)

Nmap finished: 1 IP address (1 host up) scanned in 0.166 seconds
You have new mail in /var/spool/mail/root

26. Scan Remote host for specific ports with TCP Syn

[root@server1 ~]# nmap -PS -p 22,80 192.168.0.101

Starting Nmap 4.11 ( http://www.insecure.org/nmap/ ) at 2013-11-11 18:08 EST
Interesting ports on server2.tecmint.com (192.168.0.101):
PORT   STATE SERVICE
22/tcp open  ssh
80/tcp open  http
MAC Address: 08:00:27:D9:8E:D7 (Cadmus Computer Systems)

Nmap finished: 1 IP address (1 host up) scanned in 0.165 seconds
You have new mail in /var/spool/mail/root

27. Perform a stealthy Scan

[root@server1 ~]# nmap -sS 192.168.0.101

Starting Nmap 4.11 ( http://www.insecure.org/nmap/ ) at 2013-11-11 18:10 EST
Interesting ports on server2.tecmint.com (192.168.0.101):
Not shown: 1674 closed ports
PORT     STATE SERVICE
22/tcp   open  ssh
80/tcp   open  http
111/tcp  open  rpcbind
957/tcp  open  unknown
3306/tcp open  mysql
8888/tcp open  sun-answerbook
MAC Address: 08:00:27:D9:8E:D7 (Cadmus Computer Systems)

Nmap finished: 1 IP address (1 host up) scanned in 0.383 seconds
You have new mail in /var/spool/mail/root

28. Check most commonly used Ports with TCP Syn

[root@server1 ~]# nmap -sT 192.168.0.101

Starting Nmap 4.11 ( http://www.insecure.org/nmap/ ) at 2013-11-11 18:12 EST
Interesting ports on server2.tecmint.com (192.168.0.101):
Not shown: 1674 closed ports
PORT     STATE SERVICE
22/tcp   open  ssh
80/tcp   open  http
111/tcp  open  rpcbind
957/tcp  open  unknown
3306/tcp open  mysql
8888/tcp open  sun-answerbook
MAC Address: 08:00:27:D9:8E:D7 (Cadmus Computer Systems)

Nmap finished: 1 IP address (1 host up) scanned in 0.406 seconds
You have new mail in /var/spool/mail/root

29. Perform a tcp null scan to fool a firewall

[root@server1 ~]# nmap -sN 192.168.0.101

Starting Nmap 4.11 ( http://www.insecure.org/nmap/ ) at 2013-11-11 19:01 EST
Interesting ports on server2.tecmint.com (192.168.0.101):
Not shown: 1674 closed ports
PORT     STATE         SERVICE
22/tcp   open|filtered ssh
80/tcp   open|filtered http
111/tcp  open|filtered rpcbind
957/tcp  open|filtered unknown
3306/tcp open|filtered mysql
8888/tcp open|filtered sun-answerbook
MAC Address: 08:00:27:D9:8E:D7 (Cadmus Computer Systems)

Nmap finished: 1 IP address (1 host up) scanned in 1.584 seconds
You have new mail in /var/spool/mail/root

That’s it with NMAP for now,

Source

30 Useful Linux Commands for System Administrators

In this article we are going to review some of the useful and frequently used Linux or Unix commands for Linux System Administrators that are used in their daily life. This is not a complete but it’s a compact list of commands to refer when needed. Let us start one by one how we can use those commands with examples.

Linux System Administration Commands

30 Useful Linux System Administration Commands

1. Uptime Command

In Linux uptime command shows since how long your system is running and the number of users are currently logged in and also displays load average for 1,5 and 15 minutes intervals.

# uptime

08:16:26 up 22 min,  1 user,  load average: 0.00, 0.03, 0.22

Check Uptime Version

Uptime command don’t have other options other than uptime and version. It gives information only in hours:mins if it less than 1 day.

[tecmint@tecmint ~]$ uptime -V
procps version 3.2.8

2. W Command

It will displays users currently logged in and their process along-with shows load averages. also shows the login nametty nameremote hostlogin timeidle timeJCPUPCPU, command and processes.

# w

08:27:44 up 34 min,  1 user,  load average: 0.00, 0.00, 0.08
USER     TTY      FROM              LOGIN@   IDLE   JCPU   PCPU WHAT
tecmint  pts/0    192.168.50.1     07:59    0.00s  0.29s  0.09s w

Available options

  1. -h : displays no header entries.
  2. -s : without JCPU and PCPU.
  3. -f : Removes from field.
  4. -V : (upper letter) – Shows versions.

3. Users Command

Users command displays currently logged in users. This command don’t have other parameters other than help and version.

# users

tecmint

4. Who Command

who command simply return user namedatetime and host information. who command is similar to wcommand. Unlike w command who doesn’t print what users are doing. Lets illustrate and see the different between who and w commands.

# who

tecmint  pts/0        2012-09-18 07:59 (192.168.50.1)
# w

08:43:58 up 50 min,  1 user,  load average: 0.64, 0.18, 0.06
USER     TTY      FROM              LOGIN@   IDLE   JCPU   PCPU WHAT
tecmint  pts/0    192.168.50.1     07:59    0.00s  0.43s  0.10s w

Who command Options

  1. -b : Displays last system reboot date and time.
  2. -r : Shows current runlet.
  3. -a, –all : Displays all information in cumulatively.

5. Whoami Command

whoami command print the name of current user. You can also use “who am i” command to display the current user. If you are logged in as a root using sudo command “whoami” command return root as current user. Use “who am i” command if you want to know the exact user logged in.

# whoami

tecmint

6. ls Command

ls command display list of files in human readable format.

# ls -l

total 114
dr-xr-xr-x.   2 root root  4096 Sep 18 08:46 bin
dr-xr-xr-x.   5 root root  1024 Sep  8 15:49 boot

Sort file as per last modified time.

# ls -ltr

total 40
-rw-r--r--. 1 root root  6546 Sep 17 18:42 install.log.syslog
-rw-r--r--. 1 root root 22435 Sep 17 18:45 install.log
-rw-------. 1 root root  1003 Sep 17 18:45 anaconda-ks.cfg

For more examples of ls command, please check out our article on 15 Basic ‘ls’ Command Examples in Linux.

7. Crontab Command

List schedule jobs for current user with crontab command and -l option.

# crontab -l

00 10 * * * /bin/ls >/ls.txt

Edit your crontab with -e option. In the below example will open schedule jobs in VI editor. Make a necessary changes and quit pressing :wq keys which saves the setting automatically.

# crontab -e

For more examples of Linux Cron Command, please read our earlier article on 11 Cron Scheduling Task Examples in Linux.

8. Less Command

less command allows quickly view file. You can page up and down. Press ‘q‘ to quit from less window.

# less install.log

Installing setup-2.8.14-10.el6.noarch
warning: setup-2.8.14-10.el6.noarch: Header V3 RSA/SHA256 Signature, key ID c105b9de: NOKEY
Installing filesystem-2.4.30-2.1.el6.i686
Installing ca-certificates-2010.63-3.el6.noarch
Installing xml-common-0.6.3-32.el6.noarch
Installing tzdata-2010l-1.el6.noarch
Installing iso-codes-3.16-2.el6.noarch

9. More Command

more command allows quickly view file and shows details in percentage. You can page up and down. Press ‘q‘ to quit out from more window.

# more install.log

Installing setup-2.8.14-10.el6.noarch
warning: setup-2.8.14-10.el6.noarch: Header V3 RSA/SHA256 Signature, key ID c105b9de: NOKEY
Installing filesystem-2.4.30-2.1.el6.i686
Installing ca-certificates-2010.63-3.el6.noarch
Installing xml-common-0.6.3-32.el6.noarch
Installing tzdata-2010l-1.el6.noarch
Installing iso-codes-3.16-2.el6.noarch
--More--(10%)

10. CP Command

Copy file from source to destination preserving same mode.

# cp -p fileA fileB

You will be prompted before overwrite to file.

# cp -i fileA fileB

11. MV Command

Rename fileA to fileB-i options prompt before overwrite. Ask for confirmation if exist already.

# mv -i fileA fileB

12. Cat Command

cat command used to view multiple file at the same time.

# cat fileA fileB

You combine more and less command with cat command to view file contain if that doesn’t fit in single screen / page.

# cat install.log | less

# cat install.log | more

For more examples of Linux cat command read our article on 13 Basic Cat Command Examples in Linux.

13. Cd command (change directory)

with cd command (change directory) it will goes to fileA directory.

# cd /fileA

14. pwd command (print working directory)

pwd command return with present working directory.

# pwd

/root

15. Sort command

Sorting lines of text files in ascending order. with -r options will sort in descending order.

#sort fileA.txt

#sort -r fileA.txt

16. VI Command

Vi is a most popular text editor available most of the UNIX-like OS. Below examples open file in read only with -Roption. Press ‘:q‘ to quit from vi window.

# vi -R /etc/shadows

17. SSH Command (Secure Shell)

SSH command is used to login into remote host. For example the below ssh command will connect to remote host (192.168.50.2) using user as narad.

# ssh narad@192.168.50.2

To check the version of ssh use option -V (uppercase) shows version of ssh.

# ssh -V

OpenSSH_5.3p1, OpenSSL 1.0.0-fips 29 Mar 2010

18. Ftp or sftp Command

ftp or sftp command is used to connect to remote ftp host. ftp is (file transfer protocol) and sftp is (secure file transfer protocol). For example the below commands will connect to ftp host (192.168.50.2).

# ftp 192.168.50.2

# sftp 192.168.50.2

Putting multiple files in remote host with mput similarly we can do mget to download multiple files from remote host.

# ftp > mput *.txt

# ftp > mget *.txt

19. Service Command

Service command call script located at /etc/init.d/ directory and execute the script. There are two ways to start the any service. For example we start the service called httpd with service command.

# service httpd start
OR
# /etc/init.d/httpd start

20. Free command

Free command shows freetotal and swap memory information in bytes.

# free
             total       used       free     shared    buffers     cached
Mem:       1030800     735944     294856          0      51648     547696
-/+ buffers/cache:     136600     894200
Swap:      2064376          0    2064376

Free with -t options shows total memory used and available to use in bytes.

# free -t
             total       used       free     shared    buffers     cached
Mem:       1030800     736096     294704          0      51720     547704
-/+ buffers/cache:     136672     894128
Swap:      2064376          0    2064376
Total:     3095176     736096    2359080

21. Top Command

top command displays processor activity of your system and also displays tasks managed by kernel in real-time. It’ll show processor and memory are being used. Use top command with ‘u‘ option this will display specific User process details as shown below. Press ‘O‘ (uppercase letter) to sort as per desired by you. Press ‘q‘ to quit from top screen.

# top -u tecmint

top - 11:13:11 up  3:19,  2 users,  load average: 0.00, 0.00, 0.00
Tasks: 116 total,   1 running, 115 sleeping,   0 stopped,   0 zombie
Cpu(s):  0.0%us,  0.3%sy,  0.0%ni, 99.7%id,  0.0%wa,  0.0%hi,  0.0%si,  0.0%st
Mem:   1030800k total,   736188k used,   294612k free,    51760k buffers
Swap:  2064376k total,        0k used,  2064376k free,   547704k cached

PID USER      PR  NI  VIRT  RES  SHR S %CPU %MEM    TIME+  COMMAND
1889 tecmint   20   0 11468 1648  920 S  0.0  0.2   0:00.59 sshd
1890 tecmint   20   0  5124 1668 1416 S  0.0  0.2   0:00.44 bash
6698 tecmint   20   0 11600 1668  924 S  0.0  0.2   0:01.19 sshd
6699 tecmint   20   0  5124 1596 1352 S  0.0  0.2   0:00.11 bash

For more about top command we’ve already compiled a list of 12 TOP Command Examples in Linux.

22. Tar Command

tar command is used to compress files and folders in Linux. For example the below command will create a archive for /home directory with file name as archive-name.tar.

# tar -cvf archive-name.tar /home

To extract tar archive file use the option as follows.

# tar -xvf archive-name.tar

To understand more about tar command we’ve created a complete how-to guide on tar command at 18 Tar Command Examples in Linux.

23. Grep Command

grep search for a given string in a file. Only tecmint user displays from /etc/passwd file. we can use -i option for ignoring case sensitive.

# grep tecmint /etc/passwd

tecmint:x:500:500::/home/tecmint:/bin/bash

24. Find Command

Find command used to search filesstrings and directories. The below example of find command search tecmint word in ‘/‘ partition and return the output.

# find / -name tecmint

/var/spool/mail/tecmint
/home/tecmint
/root/home/tecmint

For complete guide on Linux find command examples fount at 35 Practical Examples of Linux Find Command.

25. lsof Command

lsof mean List of all open files. Below lsof command list of all opened files by user tecmint.

# lsof -u tecmint

COMMAND  PID    USER   FD   TYPE     DEVICE SIZE/OFF   NODE NAME
sshd    1889 tecmint  cwd    DIR      253,0     4096      2 /
sshd    1889 tecmint  txt    REG      253,0   532336 298069 /usr/sbin/sshd
sshd    1889 tecmint  DEL    REG      253,0          412940 /lib/libcom_err.so.2.1
sshd    1889 tecmint  DEL    REG      253,0          393156 /lib/ld-2.12.so
sshd    1889 tecmint  DEL    REG      253,0          298643 /usr/lib/libcrypto.so.1.0.0
sshd    1889 tecmint  DEL    REG      253,0          393173 /lib/libnsl-2.12.so
sshd    1889 tecmint  DEL    REG      253,0          412937 /lib/libkrb5support.so.0.1
sshd    1889 tecmint  DEL    REG      253,0          412961 /lib/libplc4.so

For more lsof command examples visit 10 lsof Command Examples in Linux.

26. last command

With last command we can watch user’s activity in the system. This command can execute normal user also. It will display complete user’s info like terminaltimedatesystem reboot or boot and kernel version. Useful command to troubleshoot.

# last

tecmint  pts/1        192.168.50.1     Tue Sep 18 08:50   still logged in
tecmint  pts/0        192.168.50.1     Tue Sep 18 07:59   still logged in
reboot   system boot  2.6.32-279.el6.i Tue Sep 18 07:54 - 11:38  (03:43)
root     pts/1        192.168.50.1     Sun Sep 16 10:40 - down   (03:53)
root     pts/0        :0.0             Sun Sep 16 10:36 - 13:09  (02:32)
root     tty1         :0               Sun Sep 16 10:07 - down   (04:26)
reboot   system boot  2.6.32-279.el6.i Sun Sep 16 09:57 - 14:33  (04:35)
narad    pts/2        192.168.50.1     Thu Sep 13 08:07 - down   (01:15)

You can use last with username to know for specific user’s activity as shown below.

# last tecmint

tecmint  pts/1        192.168.50.1     Tue Sep 18 08:50   still logged in
tecmint  pts/0        192.168.50.1     Tue Sep 18 07:59   still logged in
tecmint  pts/1        192.168.50.1     Thu Sep 13 08:07 - down   (01:15)
tecmint  pts/4        192.168.50.1     Wed Sep 12 10:12 - 12:29  (02:17)

27. ps command

ps command displays about processes running in the system. Below example show init process only.

# ps -ef | grep init

root         1     0  0 07:53 ?        00:00:04 /sbin/init
root      7508  6825  0 11:48 pts/1    00:00:00 grep init

28. kill command

Use kill command to terminate process. First find process id with ps command as shown below and kill process with kill -9 command.

# ps -ef | grep init
root         1     0  0 07:53 ?        00:00:04 /sbin/init
root      7508  6825  0 11:48 pts/1    00:00:00 grep init

# kill- 9 7508

29. rm command

rm command used to remove or delete a file without prompting for confirmation.

# rm filename

Using -i option to get confirmation before removing it. Using options ‘-r‘ and ‘-f‘ will remove the file forcefully without confirmation.

# rm -i test.txt

rm: remove regular file `test.txt'?

30. mkdir command example.

mkdir command is used to create directories under Linux.

# mkdir directoryname

This is a handy day to day useable basic commands in Linux / Unix-like operating system. Kindly share through our comment box if we missed out.

Source

5 Useful Commands to Manage File Types and System Time in Linux – Part 3

Adapting to using the command line or terminal can be very hard for beginners who want to learn Linux. Because the terminal gives more control over a Linux system than GUIs programs, one has to get a used to running commands on the terminal. Therefore to memorize different commands in Linux, you should use the terminal on a daily basis to understand how commands are used with different options and arguments.

Manage File Types and Set Time in Linux

Manage File Types and Set Time in Linux – Part 3

Please go through our previous parts of this Linux Tricks series.

  1. 5 Interesting Command Line Tips and Tricks in Linux – Part 1
  2. 10 Useful Commandline Tricks for Newbies – Part 2

In this article, we are going to look at some tips and tricks of using 10 commands to work with files and time on the terminal.

File Types in Linux

In Linux, everything is considered as a file, your devices, directories and regular files are all considered as files.

There are different types of files in a Linux system:

  1. Regular files which may include commands, documents, music files, movies, images, archives and so on.
  2. Device files: which are used by the system to access your hardware components.

There are two types of device files block files that represent storage devices such as harddisks, they read data in blocks and character files read data in a character by character manner.

  1. Hardlinks and softlinks: they are used to access files from any where on a Linux filesystem.
  2. Named pipes and sockets: allow different processes to communicate with each other.

1. Determining the type of a file using ‘file’ command

You can determine the type of a file by using the file command as follows. The screenshot below shows different examples of using the file command to determine the types of different files.

tecmint@tecmint ~/Linux-Tricks $ dir
BACKUP				      master.zip
crossroads-stable.tar.gz	      num.txt
EDWARD-MAYA-2011-2012-NEW-REMIX.mp3   reggea.xspf
Linux-Security-Optimization-Book.gif  tmp-link

tecmint@tecmint ~/Linux-Tricks $ file BACKUP/
BACKUP/: directory 

tecmint@tecmint ~/Linux-Tricks $ file master.zip 
master.zip: Zip archive data, at least v1.0 to extract

tecmint@tecmint ~/Linux-Tricks $ file crossroads-stable.tar.gz
crossroads-stable.tar.gz: gzip compressed data, from Unix, last modified: Tue Apr  5 15:15:20 2011

tecmint@tecmint ~/Linux-Tricks $ file Linux-Security-Optimization-Book.gif 
Linux-Security-Optimization-Book.gif: GIF image data, version 89a, 200 x 259

tecmint@tecmint ~/Linux-Tricks $ file EDWARD-MAYA-2011-2012-NEW-REMIX.mp3 
EDWARD-MAYA-2011-2012-NEW-REMIX.mp3: Audio file with ID3 version 2.3.0, contains: MPEG ADTS, layer III, v1, 192 kbps, 44.1 kHz, JntStereo

tecmint@tecmint ~/Linux-Tricks $ file /dev/sda1
/dev/sda1: block special 

tecmint@tecmint ~/Linux-Tricks $ file /dev/tty1
/dev/tty1: character special 

2. Determining the file type using ‘ls’ and ‘dir’ commands

Another way of determining the type of a file is by performing a long listing using the ls and dir commands.

Using ls -l to determine the type of a file.

When you view the file permissions, the first character shows the file type and the other charcters show the file permissions.

tecmint@tecmint ~/Linux-Tricks $ ls -l
total 6908
drwxr-xr-x 2 tecmint tecmint    4096 Sep  9 11:46 BACKUP
-rw-r--r-- 1 tecmint tecmint 1075620 Sep  9 11:47 crossroads-stable.tar.gz
-rwxr----- 1 tecmint tecmint 5916085 Sep  9 11:49 EDWARD-MAYA-2011-2012-NEW-REMIX.mp3
-rw-r--r-- 1 tecmint tecmint   42122 Sep  9 11:49 Linux-Security-Optimization-Book.gif
-rw-r--r-- 1 tecmint tecmint   17627 Sep  9 11:46 master.zip
-rw-r--r-- 1 tecmint tecmint       5 Sep  9 11:48 num.txt
-rw-r--r-- 1 tecmint tecmint       0 Sep  9 11:46 reggea.xspf
-rw-r--r-- 1 tecmint tecmint       5 Sep  9 11:47 tmp-link

Using ls -l to determine block and character files.

tecmint@tecmint ~/Linux-Tricks $ ls -l /dev/sda1
brw-rw---- 1 root disk 8, 1 Sep  9 10:53 /dev/sda1

tecmint@tecmint ~/Linux-Tricks $ ls -l /dev/tty1
crw-rw---- 1 root tty 4, 1 Sep  9 10:54 /dev/tty1

Using dir -l to determine the type of a file.

tecmint@tecmint ~/Linux-Tricks $ dir -l
total 6908
drwxr-xr-x 2 tecmint tecmint    4096 Sep  9 11:46 BACKUP
-rw-r--r-- 1 tecmint tecmint 1075620 Sep  9 11:47 crossroads-stable.tar.gz
-rwxr----- 1 tecmint tecmint 5916085 Sep  9 11:49 EDWARD-MAYA-2011-2012-NEW-REMIX.mp3
-rw-r--r-- 1 tecmint tecmint   42122 Sep  9 11:49 Linux-Security-Optimization-Book.gif
-rw-r--r-- 1 tecmint tecmint   17627 Sep  9 11:46 master.zip
-rw-r--r-- 1 tecmint tecmint       5 Sep  9 11:48 num.txt
-rw-r--r-- 1 tecmint tecmint       0 Sep  9 11:46 reggea.xspf
-rw-r--r-- 1 tecmint tecmint       5 Sep  9 11:47 tmp-link

3. Counting number of files of a specific type

Next we shall look at tips on counting number of files of a specific type in a given directory using the lsgrep and wc commands. Communication between the commands is achieved through named piping.

  1. grep – command to search according to a given pattern or regular expression.
  2. wc – command to count lines, words and characters.
Counting number of regular files

In Linux, regular files are represented by the  symbol.

tecmint@tecmint ~/Linux-Tricks $ ls -l | grep ^- | wc -l
7
Counting number of directories

In Linux, directories are represented by the d symbol.

tecmint@tecmint ~/Linux-Tricks $ ls -l | grep ^d | wc -l
1
Counting number of symbolic and hard links

In Linux, symblic and hard links are represented by the l symbol.

tecmint@tecmint ~/Linux-Tricks $ ls -l | grep ^l | wc -l
0
Counting number of block and character files

In Linux, block and character files are represented by the b and c symbols respectively.

tecmint@tecmint ~/Linux-Tricks $ ls -l /dev | grep ^b | wc -l
37
tecmint@tecmint ~/Linux-Tricks $ ls -l /dev | grep ^c | wc -l
159

4. Finding files on a Linux system

Next we shall look at some commands one can use to find files on a Linux system, these include the locatefindwhatis and which commands.

Using the locate command to find files

In the output below, I am trying to locate the Samba server configuration for my system.

tecmint@tecmint ~/Linux-Tricks $ locate samba.conf
/usr/lib/tmpfiles.d/samba.conf
/var/lib/dpkg/info/samba.conffiles
Using the find command to find files

To learn how to use the find command in Linux, you can read our following article that shows more than 30+practical examples and usage of find command in Linux.

  1. 35 Examples of ‘find’ Command in Linux
Using the whatis command to locate commands

The whatis command is mostly used to locate commands and it is special because it gives information about a command, it also finds configurations files and manual entries for a command.

tecmint@tecmint ~/Linux-Tricks $ whatis bash
bash (1)             - GNU Bourne-Again SHell

tecmint@tecmint ~/Linux-Tricks $ whatis find
find (1)             - search for files in a directory hierarchy

tecmint@tecmint ~/Linux-Tricks $ whatis ls
ls (1)               - list directory contents
Using which command to locate commands

The which command is used to locate commands on the filesystem.

tecmint@tecmint ~/Linux-Tricks $ which mkdir
/bin/mkdir

tecmint@tecmint ~/Linux-Tricks $ which bash
/bin/bash

tecmint@tecmint ~/Linux-Tricks $ which find
/usr/bin/find

tecmint@tecmint ~/Linux-Tricks $ $ which ls
/bin/ls

5. Working with time on your Linux system

When working in a networked environment, it is a good practice to keep the correct time on your Linux system. There are certain services on Linux systems that require correct time to work efficiently on a network.

We shall look at commands you can use to manage time on your machine. In Linux, time is managed in two ways: system time and hardware time.

The system time is managed by a system clock and the hardware time is managed by a hardware clock.

To view your system time, date and timezone, use the date command as follows.

tecmint@tecmint ~/Linux-Tricks $ date
Wed Sep  9 12:25:40 IST 2015

Set your system time using date -s or date –set=”STRING” as follows.

tecmint@tecmint ~/Linux-Tricks $ sudo date -s "12:27:00"
Wed Sep  9 12:27:00 IST 2015

tecmint@tecmint ~/Linux-Tricks $ sudo date --set="12:27:00"
Wed Sep  9 12:27:00 IST 2015

You can also set time and date as follows.

tecmint@tecmint ~/Linux-Tricks $ sudo date 090912302015
Wed Sep  9 12:30:00 IST 2015

Viewing current date from a calendar using cal command.

tecmint@tecmint ~/Linux-Tricks $ cal
   September 2015     
Su Mo Tu We Th Fr Sa  
       1  2  3  4  5  
 6  7  8  9 10 11 12  
13 14 15 16 17 18 19  
20 21 22 23 24 25 26  
27 28 29 30      

View hardware clock time using the hwclock command.

tecmint@tecmint ~/Linux-Tricks $ sudo hwclock
Wednesday 09 September 2015 06:02:58 PM IST  -0.200081 seconds

To set the hardware clock time, use hwclock –set –date=”STRING” as follows.

tecmint@tecmint ~/Linux-Tricks $ sudo hwclock --set --date="09/09/2015 12:33:00"

tecmint@tecmint ~/Linux-Tricks $ sudo hwclock
Wednesday 09 September 2015 12:33:11 PM IST  -0.891163 seconds

The system time is set by the hardware clock during booting and when the system is shutting down, the hardware time is reset to the system time.

Therefore when you view system time and hardware time, they are the same unless when you change the system time. Your hardware time may be incorrect when the CMOS battery is weak.

You can also set your system time using time from the hardware clock as follows.

$ sudo hwclock --hctosys

It is also possible to set hardware clock time using the system clock time as follows.

$ sudo hwclock --systohc

To view how long your Linux system has been running, use the uptime command.

tecmint@tecmint ~/Linux-Tricks $ uptime
12:36:27 up  1:43,  2 users,  load average: 1.39, 1.34, 1.45

tecmint@tecmint ~/Linux-Tricks $ uptime -p
up 1 hour, 43 minutes

tecmint@tecmint ~/Linux-Tricks $ uptime -s
2015-09-09 10:52:47

Summary

Understanding file types is Linux is a good practice for begginers, and also managing time is critical especially on servers to manage services reliably and efficiently. Hope you find this guide helpful. If you have any additional information, do not forget to post a comment.

Source

5 Interesting Command Line Tips and Tricks in Linux – Part 1

Are you making most out of the Linux? There are lots of helpful features which appears to be Tips and Tricks for many of Linux Users. Sometimes Tips and Tricks become the need. It helps you get productive with the same set of commands yet with enhanced functionality.

5 Command Line Tips and Tricks

5 Command Line Tips and Tricks

Here we are starting a new series, where we will be writing some tips and tricks and will try to yield as more as we can in small time.

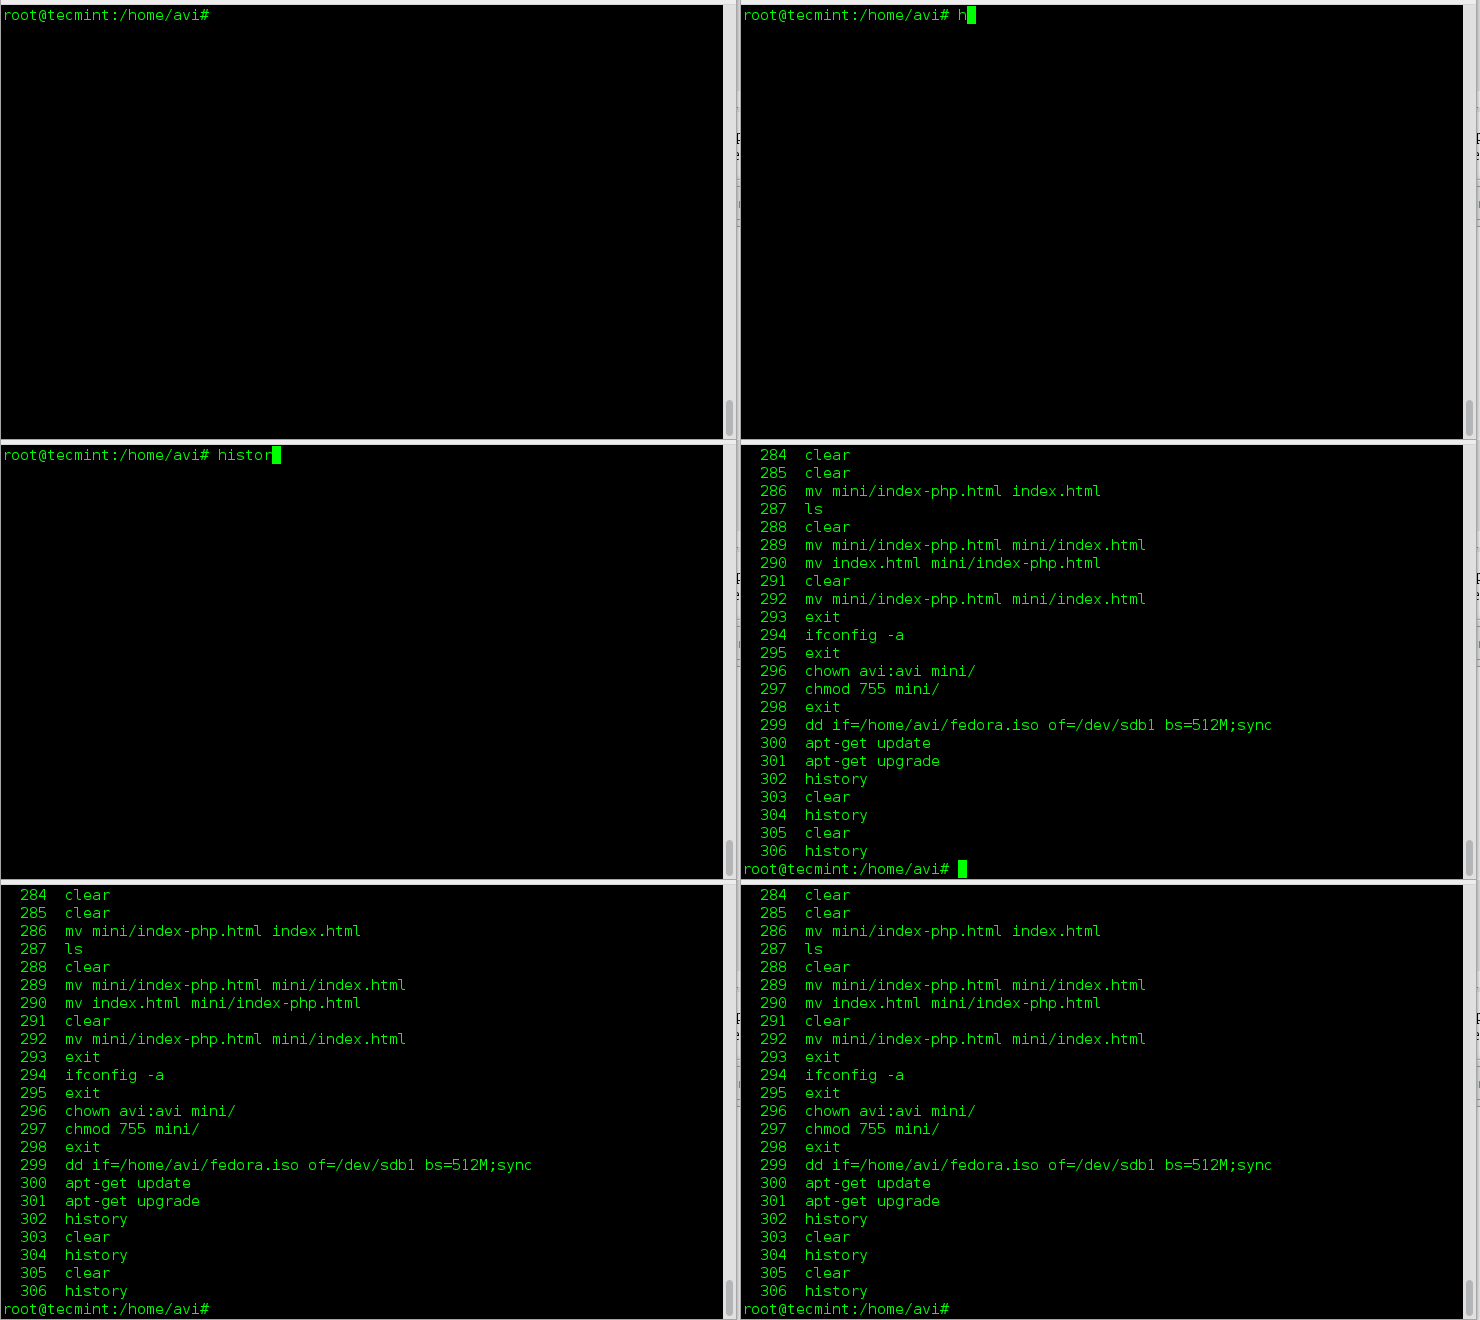
1. To audit the commands we’d run in past, we use history command. Here is a sample output of history command.

# history

Linux history Command Usage

history command example

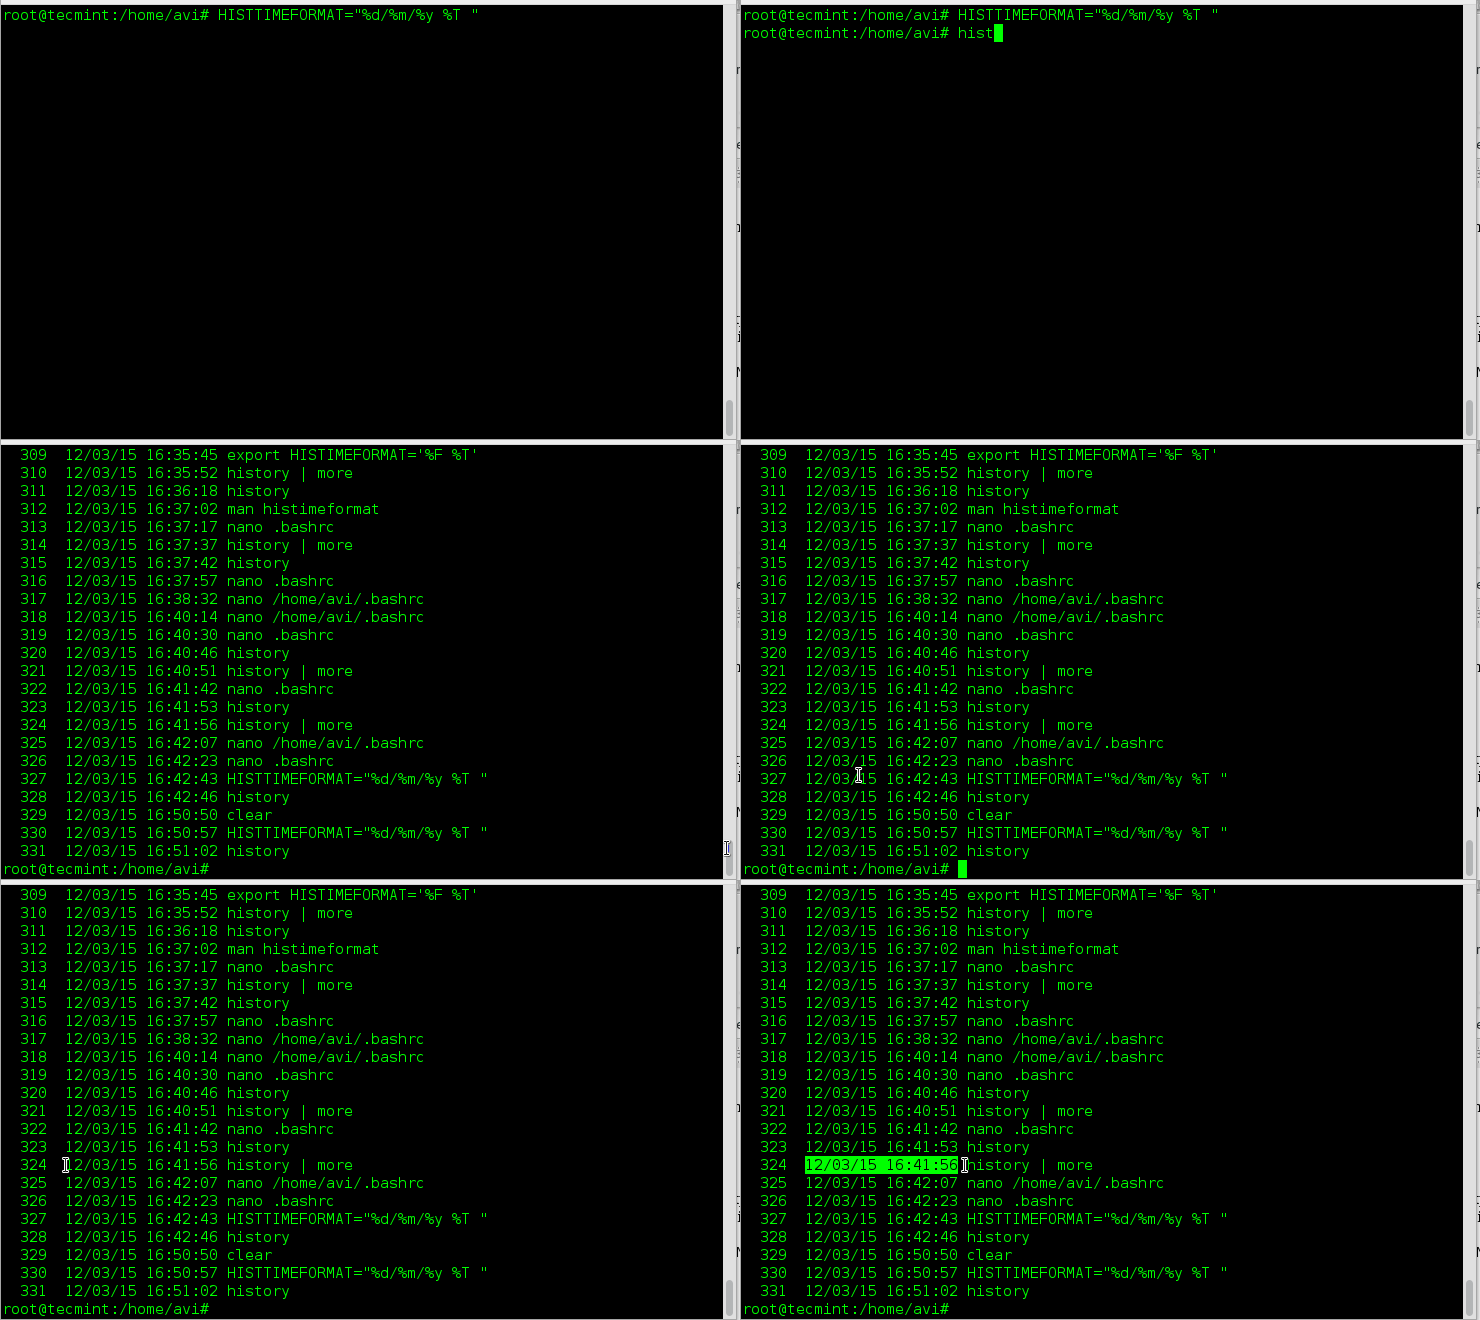
Obvious from output, the history command do not output the time stamp with the log of last executed commands. Any solution for this? Yeah! Run the below command.

# HISTTIMEFORMAT="%d/%m/%y %T "
# history

If you want to permanently append this change, add the below line to ~/.bashrc.

export HISTTIMEFORMAT="%d/%m/%y %T "

and then, from terminal run,

# source ~/.bashrc

Explanation of commands and switches.

  1. history – GNU History Library
  2. HISTIMEFORMAT – Environmental Variable
  3. %d – Day
  4. %m – Month
  5. %y – Year
  6. %T – Time Stamp
  7. source – in short send the contents of file to shell
  8. .bashrc – is a shell script that BASH runs whenever it is started interactively.

history Command Logs

history Command Logs

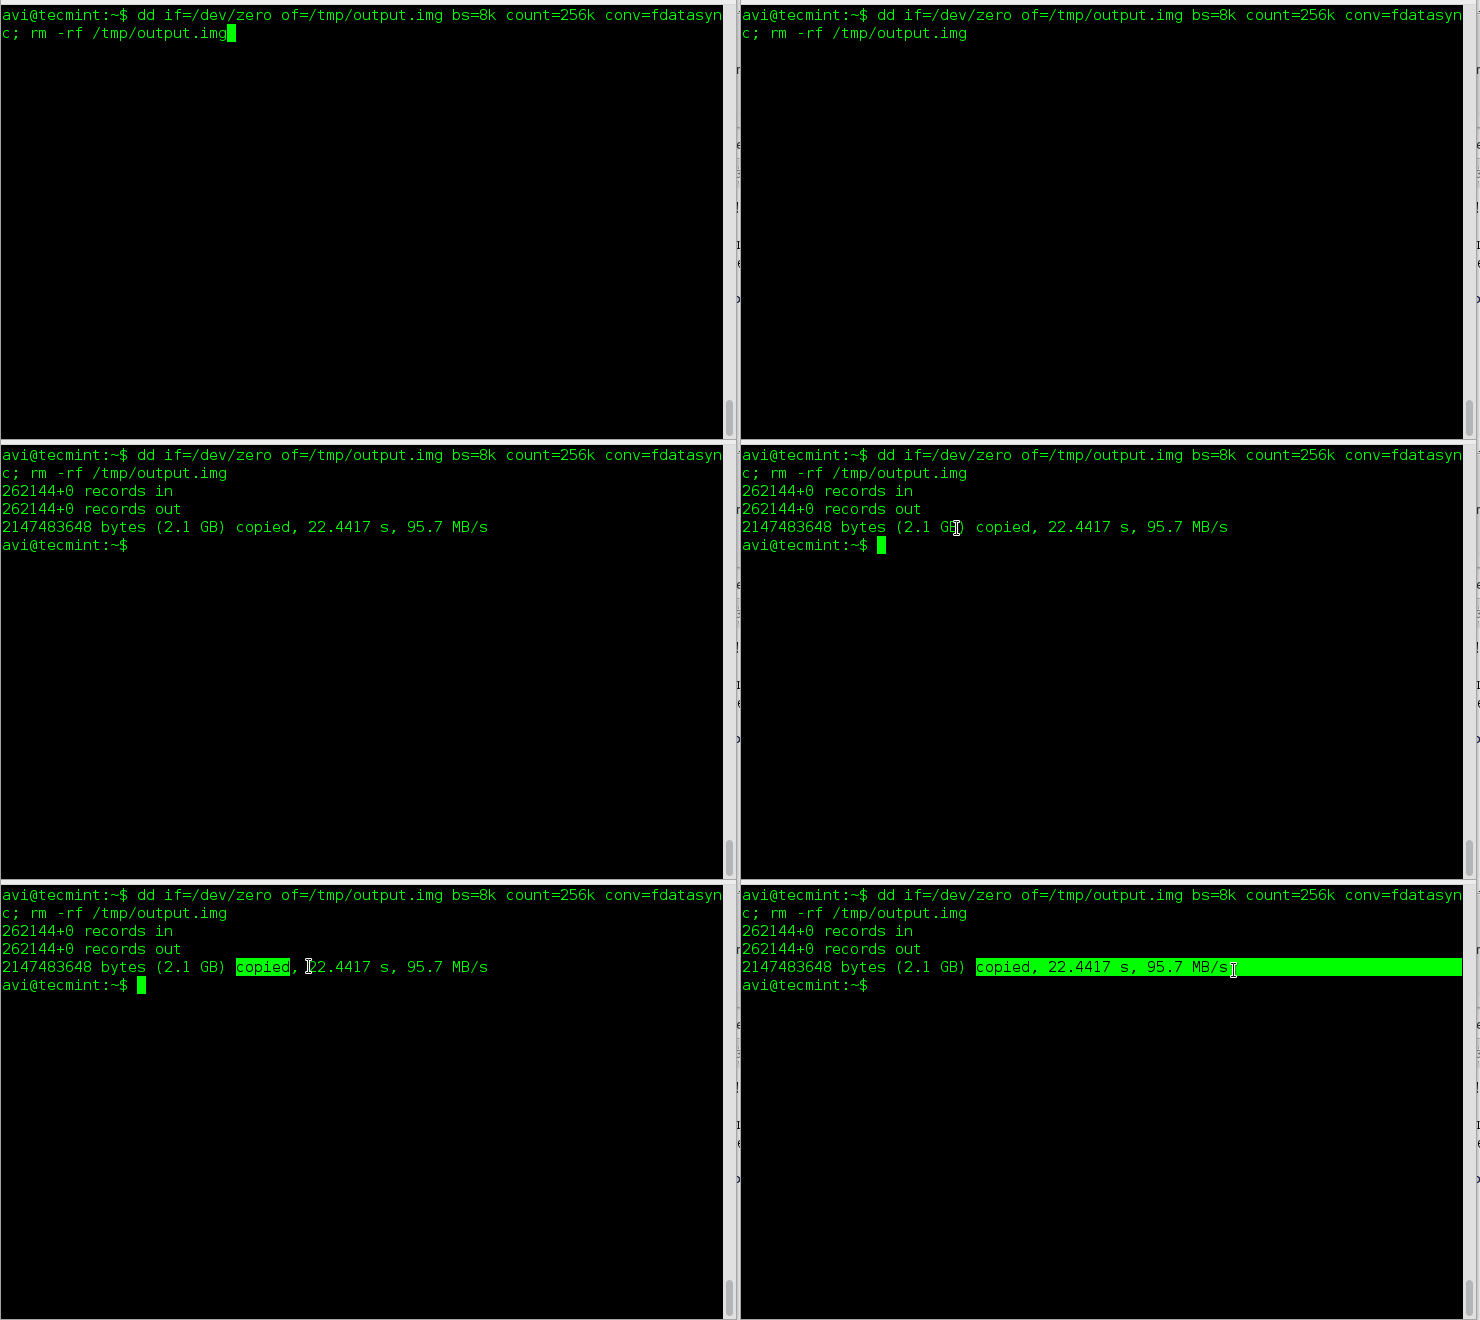
2. The next gem in the list is – how to check disk write speed? Well one liner dd command script serves the purpose.

# dd if=/dev/zero of=/tmp/output.img bs=8k count=256k conv=fdatasync; rm -rf /tmp/output.img

dd Command Example

dd Command Example

Explanation of commands and switches.

  1. dd – Convert and Copy a file
  2. if=/dev/zero – Read the file and not stdin
  3. of=/tmp/output.img – Write to file and not stdout
  4. bs – Read and Write maximum upto M bytes, at one time
  5. count – Copy N input block
  6. conv – Convert the file as per comma separated symbol list.
  7. rm – Removes files and folder
  8. -rf – (-r) removes directories and contents recursively and (-f) Force the removal without prompt.

3. How will you check the top six files that are eating out your space? A simple one liner script made from du command, which is primarily used as file space usages.

# du -hsx * | sort -rh | head -6

Check Disk Space Usage

Check Disk Space Usage

Explanation of commands and switches.

  1. du – Estimate file space usages
  2. -hsx – (-h) Human Readable Format, (-s) Summaries Output, (-x) One File Format, skip directories on other file format.
  3. sort – Sort text file lines
  4. -rh – (-r) Reverse the result of comparison, (-h) for compare human readable format.
  5. head – output first n lines of file.

4. The next step involves statistics in terminal of a file of every kind. We can output the statistics related to a file with the help of stat (output file/fileSystem status) command.

# stat filename_ext  (viz., stat abc.pdf)

Check File Statistics

Check File Statistics

5. The next and last but not the least, this one line script is for those, who are newbies. If you are an experienced user you probably don’t need it, unless you want some fun out of it. Well newbies are Linux-command-line phobic and the below one liner will generate random man pages. The benefit is as a newbie you always get something to learn and never get bored.

# man $(ls /bin | shuf | head -1)

Generate Random Man Pages

Generate Random Man Pages

Explanation of commands and switches.

  1. man – Linux Man pages
  2. ls – Linux Listing Commands
  3. /bin – System Binary file Location
  4. shuf – Generate Random Permutation
  5. head – Output first n line of file.

That’s all for now. If you know any such tips and tricks you may share with us and we will post the same in your words on our reputed Tecmint.com website.

If you want to share any tips and tricks that you cannot make into article you may share it at tecmint[dot]com[at]gmail[dot]com and we will include it in our article. Don’t forget to provide us with your valuable feedback in the comments below. Keep connected. Like and share us and help us get spread.

Don’t Miss:

  1. 10 Useful Commandline Tricks for Newbies – Part 2
  2. 5 Useful Commands to Manage Linux File Types and System Time – Part 3

Source

WP2Social Auto Publish Powered By : XYZScripts.com