Basic Emacs Command Explained in Detail

Brief: This detailed guide will give you enough information to start using Emacs, and enough extra to make you want more.

There are many text-based editors in Linux. Some come with most distros, others you have to install after the fact. Text-based editors are an important tool for any Linux user or admins. Servers often don’t have a GUI, and while Linux in itself is very stable, I have seen GUI crash many times. When you lose your GUI, having a set of text-based tools that you are comfortable with is a must.

Before I get started on the basics of operating GNU Emacs, I want to clarify something first. You are probably aware of the “Emacs Vs Vim” war that is responsible for many over-heated discussions. I love Vim, used it for over a decade. But here is the thing about Emacs, it is not just a text editor.

In its core, Emacs could simply be described as a framework of buffers and frames. Frames are how you split your windows, you can have as many frames as you want. In GUI mode, you can have multiple Emacs window, each containing one or more frames. Then you have the buffers, buffers are filled with contents being fed from somewhere. When you feed a buffer with a file, then Emacs plays the role of a text editor. You can even use Emacs as your window manager.

Get familiar with Emacs layout

Getting started with Emacs

First, let’s focus on the basics. Here you will learn the basics of operating Emacs.

Emacs can be installed directly through your distribution’s package management. After installation, starting Emacs will start the GUI mode. This mode can be useful when you start, as it provide a menu bar access. It is important to remember that every menu entry simply execute an Emacs command and this can all be done in text mode. To force text mode while in a GUI environment, run emacs –nw in a terminal.

When you first start Emacs, you will be presented with a welcome screen. This screen already displays more of Emacs features. The underlined text are links, they can be activated with a mouse click or press enter with the cursor on one. Some are links to a webpage, which would more than likely open eww (Emacs built-in web browser). There is also a built-in tutorial on that page.

Your initial layout will consist of a single frame, more than likely containing the content of about Emacs. Below the frame, you have the status bar and what appears to be an empty space below the status bar. This empty space is actually a mini-buffer that Emacs uses to interact with you. In the image, the mini-buffer has the text <Print> is undefined.

Understand the basic layout of Emacs

The essential concept of key bindings in Emacs

Key binding (or keyboard shortcuts) is how you command Emacs. It always starts with a key binding.

Emacs uses modifier keys as the key binding prefix. Most important modifiers are C (Ctrl), M (Meta), S (Shift). M (Meta, usually assigned to ALT).

To summarize, the key convention is:

  • C = Ctrl
  • M = Meta = Alt
  • S = Shift

I honestly think that the key binding is one of the main reason people move away from learning Emacs. There are over 1300 key bindings in a default Emacs setup. But don’t forget, Emacs is only a text editor when editing files, those 1300+ key bindings do a lot more than edit files.

So how does one start learning Emacs and its obsession with key bindings? It is fairly simple, the basic idea is to practice a few key binding at a time, they will become muscle memory very quickly. When I record video lessons about Emacs, I say the key binding as I press them, well at least I try. The truth is that the keystroke are long done and processed while I am still trying to figure out which ones they were. The biggest and hardest part is this document.

Let’s get started and remember to practice the key binding a lot!

The best way to explain how we write key binding is with a few example. Not all the examples are functional key binding though:

  • C-x = CTRL+x
  • C-x 2 = Press CTRL and x then press 2 (CTRL key has to be released before pressing 2)
  • C-x C-2 = Press CTRL and x then CTRL and 2. Or CTRL-x-2 (Don’t release CTRL)
  • M-x command <RET> = Press META+x

You will also regularly see in documentation the key binding written with text in ().

C-x C-f (find-file)

The text inside () represent the Emacs function that will be executed with this key binding. It will become clear why this is important soon.

Emacs favorite key are CTRL and ALT. While the ALT key does not pose a problem, extensive use of the Left CTRL key is very well known to cause pinky finger problems. You can easily use xmodmap to swap CTRL and CAPSLOCK key or any other key you prefer.

Using Emacs with key bindings aka Emacs Commands

As previously mentioned, focus on learning a few key binding at a time, they will become muscle memory. The first set is the hardest part but will be enough for you to start working with Emacs as a text editor.

Manipulating Frames
C-x 2 split-window-below
C-x 3 split-window-right
C-x o other-window
C-x 1 delete-other-window
C-x 0 delete-window
Manipulating buffers
C-x b switch-to-buffer
C-x C-B list-buffers
C-x k kill-buffer
Open and save files
C-x C-f find-file
C-x C-s save-buffer
Search & replace
C-s search-forward
C-r search-backward
Select, cut, copy & paste
C-<SPACE> set-mark-command
C-w kill-region
M-w kill-ring-save
C-y yank
Executing commands
M-x execute-extended-command

Let’s talk about these in details.

Manipulating Frames in Emacs

As previously mentioned, frames are how Emacs splits its window. Before learning about buffer let look at how we split our screen.

  • C-x 2 will split the current frame horizontally.
  • C-x 3 will split the current frame vertically.
  • C-x o will move focus to the next frame. If the mini-buffer is active, it will be part of the cycle.
  • C-x 1 will close all other frame, leaving only the current frame. It does not close buffers.
  • C-x 0 close the current frame.

The image below displays many frames, some displaying the same buffer but with a cursor at different location.

Splitting frames in Emacs editorMultiple frames in Emacs

Manipulating Buffers in Emacs

  • C-x b (switch-to-buffer)
  • C-x C-B (list-buffers)
  • C-x k (kill-buffer)

Buffers are what you work with, buffers contain data, mostly text. When you open a file, the content of that file is placed in a buffer. This buffer will be named after the filename. You then work within the buffer. Changes are applied to the source (file) when saving is requested. By default Emacs has autosave. It does not save every x minutes, but every x modifications done to the buffer. An open buffer with no modification will not trigger the autosave.

To switch to a different buffer, press C-x b, the minibuffer will activate and is ready to receive the buffer name. Autocompletion is bound to <TAB> key. If multiple matches are possible, press <TAB> a second time will create a temporary buffer with all possible match. Should you provide a nonexisting buffer name, a new buffer will be created. This does NOT create a new file. I often use this to create temp buffer.

It takes no time to have many buffers, and you may not remember all of them. To list all the currently opened buffers, press C-x C-b. A new buffer will open in a split frame with the full list of buffers. You can maneuver within that buffer with the arrow key and switch to buffer at point with <RET>.

From within the buffer list, you can flag the entry at point for:

  • saving by pressing s
  • Deletion (Kill the buffer, does not delete the file) by press d or k
  • Remove flags by pressing u
  • Execute all marked flags by pressing x

To kill any buffer, press C-x k the mini buffer will activate and wait for a buffer name, you can enter any existing buffer name and press <RET>. Should you not provide a name and press <RET>, Emacs will close the current buffer.

The following image display the buffer list with buffers flagged for saving or deletion.

Buffer list in EmacsBuffer list

Open and save files in Emacs

  • C-x C-f (find-file)
  • C-x C-s (save-buffer)

Most of the time you need to work with files. Start by opening a file by pressing C-x C-f. The mini buffer present you with a path and is ready for you to enter the path for the file you want to open. Auto-completion works here too, <TAB> will autocomplete directory and file names. Once you are satisfied with the file path, press <RET>. A new buffer will open with the content of the file. The buffer will be named after the file. Once a buffer has modification, 2 stars will appear on the left side of the status bar. To save your modification: C-x C-s

If you provide a path to a nonexisting file after pressing C-x C-f, a new buffer will be created but the file will be created only when you save the buffer.

Should you provide a directory path after C-x C-f, a new buffer will be open with the content of the directory. This new buffer will be in DIRED mode. While in DIRED mode you can maneuver with the arrow keys. When on the desired file, press <RET> and it will be open in a new buffer. Should you again choose to press <RET> on a directory, once again a new buffer will be open in DIRED mode.

Many operations can be done to the filesystem while in DIRED mode, but as previously explained, let’s focus on the basics first.

When you work on a Linux system you often have to work on files that require root access. Emacs handles this very well. Do not close Emacs and run it as root, this is not a good idea.

Press C-x C-f then proceed to erase the given path in the minibuffer and replace it with /sudo::/path/to/file <RET>. Emacs will attempt to open the file with the sudo command and if required you will be prompt for your password.

Should you attempt to use auto-completion <TAB>, your password will be requested if needed and auto-completion will work. DIRED mode can be opened as root. Note that a new buffer named *tramp/sudo …. will be created. This is a buffer needed by Emacs to handle sudo.

Should you remove it, although not recommended, you will more than likely be asked for your password when attempting to save and the tramp buffer will be back. Opening multiple buffers as root will result in multiple tramp buffers.

It is as easy to open a file on a remote computer using ssh from within Emacs:

C-x C-f /ssh:user@host:/path/to/file

Should you be wondering about opening a file on a remote system as root? Yes, but I will keep this one for another time.

This image show on the left frame DIRED mode of my home directory and on the right my .emacs file.

Opening a remote file in EmacsOpening a remote file in Emacs

Search & Replace in Emacs

  • C-s (isearch-forward)
  • C-r (isearch-backward)
  • M-% (query-replace)

To perform a forward search, press C-s this will activate the minibuffer for you to enter the text to search. The search happens as you type. To move to the next match, press C-s again. The search will wrap around but after warning you once. Note that pressing backspace will first go back in the previous match before deleting a character.

To search backwards, press C-r

To replace, press M-% and you will then have the minibuffer ready to take the search parameter. Enter it and press <RET>, then proceed to provide the replacement string and press <RET>.

The search & replace will execute from cursor to end of buffer.

Select, cut, copy and paste in Emacs

  • C-<SPACE> (set-mark-command)
  • C-w (kill-region)
  • M-w (kill-ring-save)
  • C-y (yank)
  • M-y (yank-pop)

Emacs has a whole different concept of select, cut, copy & paste. First, let’s look at selecting. While the mouse works very well in GUI mode, learning to not use it will pay off when GUI is gone. What you call a selected area, Emacs called an active region. To make a selection or activate a region, place your cursor at the beginning of the desired area, then press C-<SPACE> move your cursor 1 character passed the end of the desired area. This region is automatically activated. While this active region concept may seem pointless now, it is important to understand it for when you start making function to automate repetitive tasks.

Emacs does not cut, it kills. When you kill an active region with C-w, Emacs will “cut” it out of the buffer and save it in a kill ring. The kill ring keeps multiple entries either killed C-w or copied M-w. You can then yank (paste) those entries out of the kill ring and into the current buffer at the point with C-y. If right after pressing C-y you proceed with M-y, the entry that was paste into the buffer from the kill ring will be replaced with the previous one. Yanking an entry from the kill ring does NOT remove it from the kill ring and can be yanked again later.

Execute extended command in Emacs

  • M-x (execute-extended-command)

Meta-x is a unique key binding. After pressing the key binding, look at the mini buffer. Your cursor will automatically be placed there and Emacs and is ready to receive a command.

The commands for the key bindings are written in parentheses. Do not type the parentheses when typing the command. After writing your command, press <RET>.

It is common to see M-x command written in the following format:

M-x find-file <RET> ~/path/to/file <RET>

Note that auto-completion is supported with the key <TAB>

Why learn about the command when I can use key binding? First, even with over 1300 key bindings, not every command has one. Commands also this gives you the power to write functions to perform the desired modifications to a selected area (active region) or entire buffer. Those functions can then be called with M-x functionName and if needed bound to a key combination of your choice.

One command worth showing to a new user is M-x shell <RET>. Remember as I said Emacs is not just a text editor. The above command will open a new buffer with a shell prompt. This is not a full terminal emulator, for example, it does not handle curl based application very well. The display is not refreshed properly. But it has other advantages. This shell buffer is a read/write text buffer. When you place your cursor at the end and type a command then press <RET>, the command is sent to a subshell and the output is added to the buffer. This allows you to easily search back and forth, copy and paste, select an entire region and even save the buffer content to a file.

The second most important command to learn is M-x ren-buf <RET> NewBufferName <RET>. This command allows you to rename the current buffer. If the buffer contains the content of a file, this will not rename the file. This is useful when you need more than one shell. If you type M-x shell <RET> and you have one open, it will bring forth the existing one. Rename the *shell* buffer to open more shell. Emacs also has eshell and term, but this is beyond our current scope.

Conclusion

This article represents a very short and quick introduction to Emacs. You learned the basic Emacs commands/key bindings and some basic concept about editing with Emacs.

There is a lot more it can do for you. With over 4000 packages available for installation with Emacs integrated package management system. The flexibility it offers is astonishing. Emacs will grow and evolve with you.

Source

Linux Today – Get started with Wekan, an open source kanban board

In the article in our series on open source tools that will make you more productive in 2019, check out Wekan.

There seems to be a mad rush at the beginning of every year to find ways to be more productive. New Year’s resolutions, the itch to start the year off right, and of course, an “out with the old, in with the new” attitude all contribute to this. And the usual round of recommendations is heavily biased towards closed source and proprietary software. It doesn’t have to be that way.

Here’s the second of my picks for 19 new (or new-to-you) open source tools to help you be more productive in 2019.

Wekan

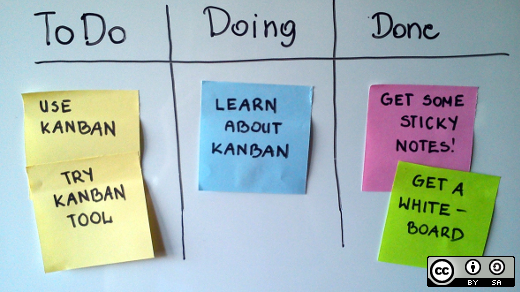
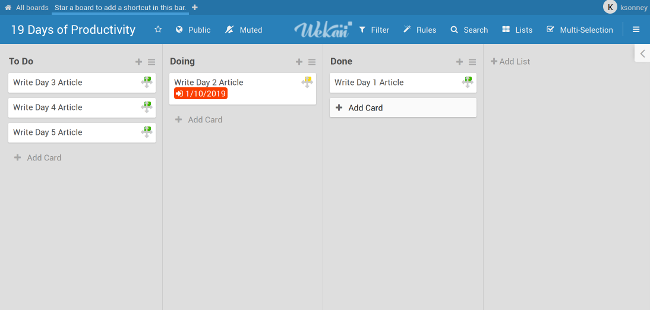
Kanban boards are a mainstay of today’s agile processes. And many of us (myself included) use them to organize not just our work but also our personal lives. I know several artists who use apps like Trello to keep track of their commision lists as well as what’s in progress and what’s complete.

But these apps are often linked to a work account or a commercial service. Enter Wekan, an open source kanban board you can run locally or on the service of your choice. Wekan offers much of the same functionality as other Kanban apps, such as creating boards, lists, swimlanes, and cards, dragging and dropping between lists, assigning to users, labeling cards, and doing pretty much everything else you’d expect in a modern kanban board.

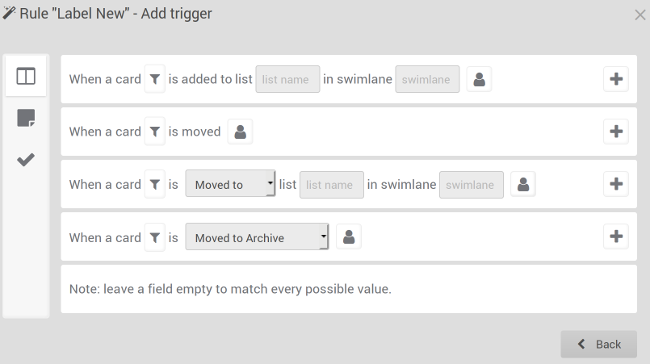
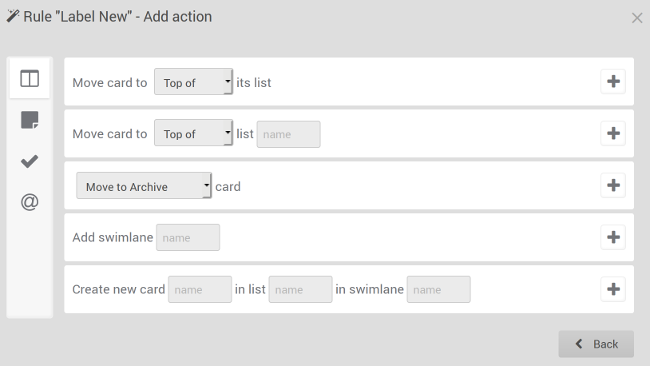
The thing that distinguishes Wekan from most other kanban boards is the built-in rules. While most other boards support emailing updates, Wekan allows you to set up triggers when taking actions on cards, checklists, and labels.

Wekan can then take actions like moving cards, updating labels, adding checklists, and sending emails.

Setting up Wekan locally is a snap—literally. If your desktop supports Snapcraft applications, installing is as easy as:

sudo snap install wekan

It also supports Docker, which means installing on a server is reasonably straightforward on most servers and desktops.

Overall, if you want a nice kanban board that you can run yourself, Wekan has you covered.

Related Stories:

Source

Beta: mod_lsapi updated – CloudLinux OS Blog

New updated mod_lsapi packages for CloudLinux 6 and 7 as well as for Apache 2.4 (CloudLinux 6 and CloudLinux 7) and EasyApache 4 (CloudLinux 6 and 7) are now available for download from our updates-testing repository.

Changelog:

liblsapi-1.1-35

mod_lsapi-1.1-35

ea-apache24-mod_lsapi-1.1-35

httpd24-mod_lsapi-1.1-35

  • Fixed statistics exceptions flow;
  • MODLS-615: increased epoch for ea-apache24-mod_lsapi due to conflict with package from EasyApache 4 repository;
  • MODLS-615: added liblsapi conflict with ea-liblsapi.

To update:

cPanel & RPM Based:

$ yum update liblsapi liblsapi-devel –enablerepo=cloudlinux-updates-testing
$ yum update mod_lsapi –enablerepo=cloudlinux-updates-testing
$ service httpd restart

DirectAdmin:

$ yum update liblsapi liblsapi-devel –enablerepo=cloudlinux-updates-testing
$ cd /usr/local/directadmin/custombuild
$ ./build set cloudlinux_beta yes
$ ./build update
$ ./build mod_lsapi

To install, follow the instructions in the documentation.

EasyApache 4:

$ yum update liblsapi liblsapi-devel ea-apache24-mod_lsapi –enablerepo=cl-ea4-testing –enablerepo=cloudlinux-updates-testing
$ service httpd restart

To install:

$ yum-config-manager –enable cl-ea4-testing
$ yum update liblsapi liblsapi-devel –enablerepo=cloudlinux-updates-testing

Read documentation cPanel EasyApache 4 documentation.

$ yum-config-manager –disable cl-ea4-testing

Go to MultiPHP Manager and enable mod_lsapi on your domains through lsapi handler.

http24 for CloudLinux 6 and CloudLinux 7

$ yum update liblsapi liblsapi-devel –enablerepo=cloudlinux-updates-testing
$ yum update httpd24-mod_lsapi –enablerepo=cloudlinux-updates-testing

Source

Why Linux Binaries are not as Easy to Handle? – OSnews

Have you ever wondered why in other Operating Systems such as Windows, MacOS or even BeOS installing software is so easy compared to Linux? In such OSes you can simply download and decompress a file or run an installer process which will easily walk you through the process.

This doesn’t happen in Linux, as there are only two standard ways to install software: compiling and installing packages. Such methods can be inconsistent and complicated for new users, but I am not going to write about them, as it has been done in countless previous articles. Instead i am going to focus in writing about why it is difficult for developers to provide a simpler way.

So, why can’t we install and distribute programs in Linux with the same ease as we do in other operating systems? The answer lies in the Unix filesystem layout, which Linux distros follow so strictly for the sake of compatibility. This layout is and was always aimed at multi-user environments, and to save and distribute resources evenly across the system (or even shared across a LAN). But with today’s technology and with the arrival of desktop computers, many of these ideas dont make much sense in that context.

There are four fundamental aspects that, I think, make distributing binaries on linux so hard. I am not a native english speaker, so i am sorry about possible mistakes.

1-Distribution by physical place
2-“Global installs”, or “Dependency Hell vs Dll hell”
3-Current DIR is not in PATH.
4-No file metadata.

1-Distribution by physical place

Often, directories contain the following subdirectories:

lib/ – containing shared libraries
bin/ – containing binary/scripted executables
sbin/ -containing executables only meant for the superuser

If you search around the filesystem, you will find several places where this pattern repeats, for example:
/
/usr
/usr/local
/usr/X11R6

You might wonder why files are distributed like this. This is mainly for historical reasons, like “/” being in a startup disk or rom, “/usr” was a mount point for the global extras, originally loaded from tape, shared disk or even from network, /usr/local for local installed software, I dont know about X11R6, but probably has its own directory because it’s too big.

It should be noted that until very recently, unixes were deployed for very specific tasks, and never meant to be loaded with as many programs as a desktop computer is. This is why we don’t see directories organized by usage as we do in other unix-like OSes (mainly BeOS and OSX), and instead we see them organized by physical place (Something desktop computers no longer care about, since nearly all of them are self contained).

Many years ago, big unix vendors such as SGI and Sun decided to address this problem by creating the /opt directory. The opt directory was supposed to contain the actual programs with their data, and shared data (such as libs or binaries) were exported to the root filesystem (in /usr) by creating symlinks.
This also made the task of removing a program easier, since you simply had to remove the program dir, and then run a script to remove the invalid symlinks. This approach never was popular enough in in Linux distributions,
and it still doesn’t adress the problems of bundled libraries.

Because of this, all installs need to be global, which takes us to the next issue.

2-“Global installs”, or “Dependency Hell vs Dll hell”

Because of the previous issue, all popular distribution methods (both binary packages and source) force the users to install the software globally in the system, available for all accounts. With this approach, all binaries go to common places (/usr/bin, /usr/lib, etc). At first this may look reasonable and the right approach with advantages, such as maximized usage of shared libraries, and simplicity in organization. But then we realize its limits. This way, all programs are forced to use the same exact set of libraries.

Because of this, also, it becomes impossible for developers to just bundle some libraries needed with a binary release, so we are forced to ask the users to install the missing libraries themselves. This is called dependency hell, and it happens when some user downloads a program (either source, package or shared binary) and is told that more libraries are needed for the program to run.

Although the shared library system in Linux is even more complete than the Windows one (with multiple library versions supported, pre-caching on load, and binaries unprotected when run), the OS filesystem layout is not letting us to distribute binaries with bundled libraries we used for developing it that the user probably won’t have.

A dirty trick is to bundle the libraries inside the executable — this is called “static linking” — but this approach has several drawbacks, such as increased memory usage per program instance, more complex error tracing, and even license limitations in many cases, so this method is usually not encouraged.

To conclude with this item, it has to be said that it becomes hard for developers to ship binary bundles with specific versions of a library. Remember that not all libraries need to be bundled, but only the rare ones that an user is not expected to have. Most widely used libraries such as libc, libz or even gtk or QT can remain system-wide.

Many would point out that this approach leads to the so called DLL hell, very usual in Windows. But DLL hell actually happened because programs that bundled core system-wide windows libraries overwrote the installed ones with older versions. This in part happened because Windows not only doesn’t support multiple versions of a library in the way unix does, but also because at boot time the kernel can only load libraries in the 8.3 file format (you can’t really have one called libgtk-1.2.so.0.9.1 ). As a sidenote, and because of that, since Windows 2000, Microsoft keeps a directory with copies of the newest versions available of the libraries in case that any program overwrites them. In short, DLL hell can be simply attributed to the lack of a proper library versioning system.

3-Current DIR is not in PATH

This is quite simple, but it has to be said. By default in Unixes, the current path is not recognized as a library or binary path. Because of this, you cant just unzip a program and run the binary inside. Most shared binaries distributed do a dirty trick and create a shell script containing the following.

#!/bin/sh

export LD_LIBRARY_PATH=$LD_LIBRARY_PATH:.
./mybinary

This can be simply solved by adding “.” to the library and binary path, but no distro does it, because it’s not standard in Unixes. Of course, from inside a program it is perfectly normal to access the data from relative paths, so you can still have subdirs with data.

4-No file metadata

Ever wondered why Windows binaries have their own icons and in Linux binaries look all the same? This is because there is not a standard way to define metadata on the files. This means we cant bundle a small pixmap inside the file. Because of this we cant easily hint the user on the proper binary, or even file, to be run. I cant say this is an ELF limitation, since such format will let you add your own sections to the binary, but I think it’s more like a lack-of-a-standard to define how to do it.

Proposed solutions

In short, I think Linux needs to be less standard and more tolerant in the previous aspects if it aims to achieve the same level of user-friendlyness as the ruling desktop operating systems. Otherwise, not only users, but developers become frustrated with this.

For the most important issue, which is libraries, I’d like to propose the following, as a spinoff, but still compatible for Unix desktop distros.

Desktop distros should add “./” to the PATH and LIBRARY_PATH by default, this will make the task of bundling certain “not so common”, or simply modified libraries with a program, and save us the task of writing
scripts called “runme”. This way we could be closer to doing simple “in a directory” installs. I know alternatives exist, but this has been proven to be simple and it works.

Linux’s library versioning system is great already, so why should installing binaries of a library be complicated? A “library installer” job would be to take some libraries, copy them to the library dir, and then update the lib symlink to the newer one.

Agree on a standard way of adding file metadata to the ELF binaries. This way, binaries distributed can be more descriptive to the user. I know I am leaving script based programs out, but those can even add something ala “magic string”.

And the most important thing, understand that the changes are meant to make Linux not only more user-friendly, but also more popular. There are still a lot of Linux users and developers that think the OS is only meant as a server, many users that consider aiming at desktop is too dreamy or too “Microsoft”, and many that think that Linux should remain “true as a Unix”. Because of this, focus should be put so ideas can coexist, and everyone gets what they want.

Source

Best Audio Editors For Linux

You’ve got a lot of choices when it comes to audio editors for Linux. No matter whether you are a professional music producer or just learning to create awesome music, the audio editors will always come in handy.

Well, for professional-grade usage, a DAW (Digital Audio Workstation) is always recommended. However, not everyone needs all the functionalities, so you should know about some of the most simple audio editors as well.

In this article, we will talk about a couple of DAWs and basic audio editors which are available as free and open source solutions for Linux and (probably) for other operating systems.

Top Audio Editors for Linux

Best audio editors and DAW for Linux

We will not be focusing on all the functionalities that DAWs offer – but the basic audio editing capabilities. You may still consider this as the list of best DAW for Linux.

Installation instruction: You will find all the mentioned audio editors or DAWs in your AppCenter or Software center. In case, you do not find them listed, please head to their official website for more information.

1. Audacity

audacity audio editor

Audacity is one of the most basic yet a capable audio editor available for Linux. It is a free and open-source cross-platform tool. A lot of you must be already knowing about it.

It has improved a lot when compared to the time when it started trending. I do recall that I utilized it to “try” making karaokes by removing the voice from an audio file. Well, you can still do it – but it depends.

Features:

It also supports plug-ins that include VST effects. Of course, you should not expect it to support VST Instruments.

  • Live audio recording through a microphone or a mixer
  • Export/Import capability supporting multiple formats and multiple files at the same time
  • Plugin support: LADSPA, LV2, Nyquist, VST and Audio Unit effect plug-ins
  • Easy editing with cut, paste, delete and copy functions.
  • Spectogram view mode for analyzing frequencies

2. LMMS

LMMS is a free and open source (cross-platform) digital audio workstation. It includes all the basic audio editing functionalities along with a lot of advanced features.

You can mix sounds, arrange them, or create them using VST instruments. It does support them. Also, it comes baked in with some samples, presets, VST Instruments, and effects to get started. In addition, you also get a spectrum analyzer for some advanced audio editing.

Features:

  • Note playback via MIDI
  • VST Instrument support
  • Native multi-sample support
  • Built-in compressor, limiter, delay, reverb, distortion and bass enhancer

3. Ardour

Ardour audio editor

Ardour is yet another free and open source digital audio workstation. If you have an audio interface, Ardour will support it. Of course, you can add unlimited multichannel tracks. The multichannel tracks can also be routed to different mixer tapes for the ease of editing and recording.

You can also import a video to it and edit the audio to export the whole thing. It comes with a lot of built-in plugins and supports VST plugins as well.

Features:

  • Non-linear editing
  • Vertical window stacking for easy navigation
  • Strip silence, push-pull trimming, Rhythm Ferret for transient and note onset-based editing

4. Cecilia

cecilia audio editor

Cecilia is not an ordinary audio editor application. It is meant to be used by sound designers or if you are just in the process of becoming one. It is technically an audio signal processing environment. It lets you create ear-bending sound out of them.

You get in-build modules and plugins for sound effects and synthesis. It is tailored for a specific use – if that is what you were looking for – look no further!

Features:

  • Modules to achieve more (UltimateGrainer – A state-of-the-art granulation processing, RandomAccumulator – Variable speed recording accumulator,
    UpDistoRes – Distortion with upsampling and resonant lowpass filter)
  • Automatic Saving of modulations

5. Mixxx

Mixxx audio DJ

If you want to mix and record something while being able to have a virtual DJ tool, Mixxx would be a perfect tool. You get to know the BPM, key, and utilize the master sync feature to match the tempo and beats of a song. Also, do not forget that it is yet another free and open source application for Linux!

It supports custom DJ equipment as well. So, if you have one or a MIDI – you can record your live mixes using this tool.

Features

  • Broadcast and record DJ Mixes of your song
  • Ability to connect your equipment and perform live
  • Key detection and BPM detection

6. Rosegarden

rosegarden audio editor

Rosegarden is yet another impressive audio editor for Linux which is free and open source. It is neither a fully featured DAW nor a basic audio editing tool. It is a mixture of both with some scaled down functionalities.

I wouldn’t recommend this for professionals but if you have a home studio or just want to experiment, this would be one of the best audio editors for Linux to have installed.

Features:

  • Music notation editing
  • Recording, Mixing, and samples

Wrapping Up

These are some of the best audio editors you could find out there for Linux. No matter whether you need a DAW, a cut-paste editing tool, or a basic mixing/recording audio editor, the above-mentioned tools should help you out.

Did we miss any of your favorite? Let us know about it in the comments below.

Source

Community collaboration makes for some great OpenStack solutions

Share with friends and colleagues on social media

If you follow the evolution of OpenStack, you know how it’s finding its way into all sorts of workloads, from high-level research to car manufacturing to all-new 5G networks. Organizations are using it for everything from the mundane to the sublime and sharing what they’re learning with the OpenStack community.

Some of the examples offered up at the recent OpenStack Summit Berlin showed that OpenStack is a full-fledged part of the IT mainstream, which means there are a wealth of ideas out there for your own implementation.

OpenStack In many cases, the advances of others – including Adobe, AT&T, NASA, Oerlikon, SBAB Bank, Volkswagen, Workday and many other companies and organizations, big and small – are being contributed back to the community for you and others to use. This is a critical part of OpenStack and SUSE OpenStack Cloud, which take the best the community has to offer to improve the platform and how organizations solve problems.

Take Workday, the human resources software-as-a-service vendor, which in 2019 expects to have half of all its production workloads living on the 45 OpenStack private-cloud clusters it’s running in its global data centers. That represents about 4,600 servers, up from just 600 in 2016.

To manage the growing demand for its products, Workday created and now manages about 4,000 immutable VM images that are updated on their own cycles, with new versions of Workday deployed every weekend. That means the company needs to regularly tear down and replace thousands of VMs in a very short time and do it without any downtime.

That scale required automation, and the growing complexity required a new effort to gather data about their clusters and OpenStack controllers. They used Big Panda for incident management and Wavefront for monitoring and analytics, looking for anomalies and problems.

As it turns out, they uncovered some real issues with how they deployed images, and solved those problems by extending the OpenStack Nova API to leverage its caching capability to pre-load big images – what they call image pre-fetching. This enabled them to speed up the image deployments so instead of big images slowing down the restart of thousands of VMs, they could pre-load them and relaunch new VM instances quickly.

They did some ingenious stuff, like enabling Glance to serve up images directly to remote OpenStack controllers, and got help from the community for figuring it out. With OpenStack’s complexity, that openness made their work doable, and in the end, they offered their Nova API work back to the community.

Workday is just one example of the companies taking advantage of the power of OpenStack and the open source community to solve real problems. Check out these and other OpenStack successes – including these 51 things you need to know – from the OpenStack Summit Berlin.

Share with friends and colleagues on social media

Source

Bash’s Built-in printf Function | Linux Journal

Even if you’re already familiar with the printf command, if you got your information via “man printf” you may be missing a couple of useful features that are provided by bash’s built-in version of the standard printf(1) command.

If you didn’t know bash had its own version of printf, then you didn’t heed the note in the man page for the printf(1) command:

NOTE: your shell may have its own version of printf, which usually supersedes the version described here. Please refer to your shell’s documentation for details about the options it supports.

You did read the man page, didn’t you? I must confess, I’d used printf for quite a while before I realized bash had its own.

To find the documentation for the built-in version of printf, just search for “printf” in the bash man page.

In case you’re completely unfamiliar with the printf command, and similar functions in other languages, a couple quick examples should get you up to speed:

$ printf “Hello worldn”
Hello world

$ printf “2 + 2 is %dn” $((2+2))
2 + 2 is 4

$ printf “%s: %dn” “a string” 12
a string: 12

You provide printf with a format string and a list of values. It then replaces the %… sequences in the string with the values from the list formatted according to the format specification (the part following the percent sign). There are a dozen or more format specifier characters, but 99% of the time, the only ones you’ll need are the following:

  • d – Format a value as a signed decimal number.
  • u – Format a value as an unsigned decimal number.
  • x – Format a value as a hexadecimal number with lower case a-f.
  • X – Format a value as a hexadecimal number with upper case A-F.
  • s – Format a value as a number.

Format specifiers can be preceded by a field width to specify the minimum number of characters to print. A positive width causes the value to be right-justified; a negative width causes the value to be left-justiifed. A width with a leading zero causes numeric fields to be zero-filled. Usually, you want to use negative widths for strings and positive widths for numbers.

Probably not what you want:

$ printf “%20s: %4dn” “string 1” 12 “string 2” 122
string 1: 12
string 2: 122

Still probably not not what you want:

$ printf “%-20s: %-4dn” “string 1” 12 “string 2” 122
string 1 : 12
string 2 : 122

Probably this is what you want:

$ printf “%-20s: %4dn” “string 1” 12 “string 2” 122
string 1 : 12
string 2 : 122

Note that printf reuses the format if it runs out of format specifiers, which in the examples above allows you to print two lines (four values) with only two format specifiers.

If you specify the width as an asterisk, then the width is taken from the next value in the list:

$ printf “%*s: %*dn” -20 “a string” 4 12
a string : 12

Note that if you want to zero-fill a field and specify the width with an asterisk, put the zero before the asterisk:

$ printf “%*s: %0*dn” -20 “a string” 4 12
a string : 0012

So now to the features that bash’s built-in version of printf provides. The first is the -v option, which allows you to put the formatted result into a variable rather than print it out. So instead of:

$ hw=$(printf “Hello world”)
echo $hw
Hello world

You can do this:

$ printf -v hw “Hello world”
echo $hw
Hello world

The second option is for formatting times (and dates):

$ printf “%(%m-%d-%Y %H:%M:%S)Tn” $(date +%s)
01-10-2019 09:11:44

The format specifier here is %(datefmt)T and the value is a system time in seconds from the epoch. The nested datefmt supports the same format options that are supported by strftime(3). You can get a system time value by specifying the +%s format option to the date command.

A couple special arguments are supported by the %(datefmt)T format. From the bash man page:

Two special argument values may be used: -1 represents the current time, and -2 represents the time the shell was invoked. If no argument is specified, conversion behaves as if -1 had been given.

There are a couple of additional features supported by bash’s built-in version of printf, but none that you are likely to need on a regular basis. See the man page for more information.

Source

Easy to Understand Man Pages for Every Linux User

One of the most commonly used and reliable ways of getting help under Unix-like systems is via man pages. Man pages are the standard documentation for every Unix-like system and they correspond to online manuals for programs, functions, libraries, system calls, formal standards and conventions, file formats and so on. However, man pages suffer from many failings one of which is they are too long and some people just don’t like to read too much text on the screen.

The TLDR (stands for “Too Long; Didn’t Read“. ) pages are summarized practical usage examples of commands on different operating systems including Linux. They simplify man pages by offering practical examples.

TLDR is an Internet slang, meaning a post, article, comment or anything such as a manual page was too long, and whoever used the phrase didn’t read it for that reason. The content of TLDR pages is openly available under the permissive MIT License.

In this short article, we will show how to install and use TLDR pages in Linux.

Requirements

  1. Install Latest Nodejs and NPM Version in Linux Systems

Before installing, you can try the live demo of TLDR.

How to Install TLDR Pages in Linux Systems

To conveniently access TLDR pages, you need to install one of the supported clients called Node.js, which is the original client for the tldr-pages project. We can install it from NPM by running.

$ sudo npm install -g tldr

TLDR also available as a Snap package, to install it, run.

$ sudo snap install tldr

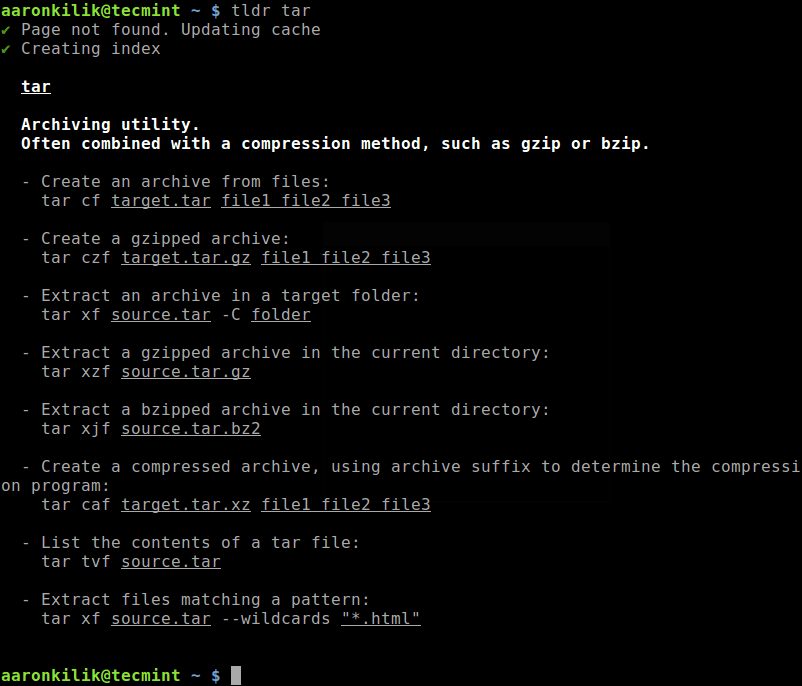
After installing the TLDR client, you can view man pages of any command, for example tar command here (you can use any other command here):

$ tldr tar
View Tar Command Man Page

View Tar Command Man Page

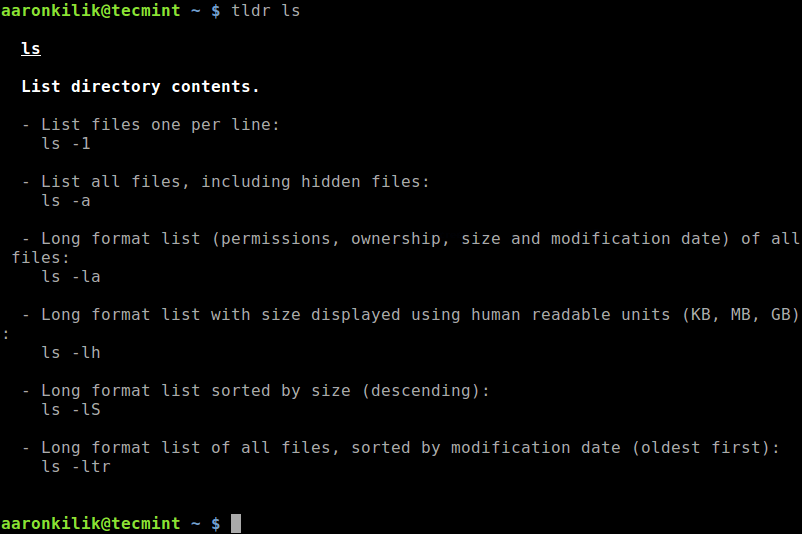
Here is another example of accessing the summarized man page for ls command.

$ tldr ls
View ls Command Man Page

View ls Command Man Page

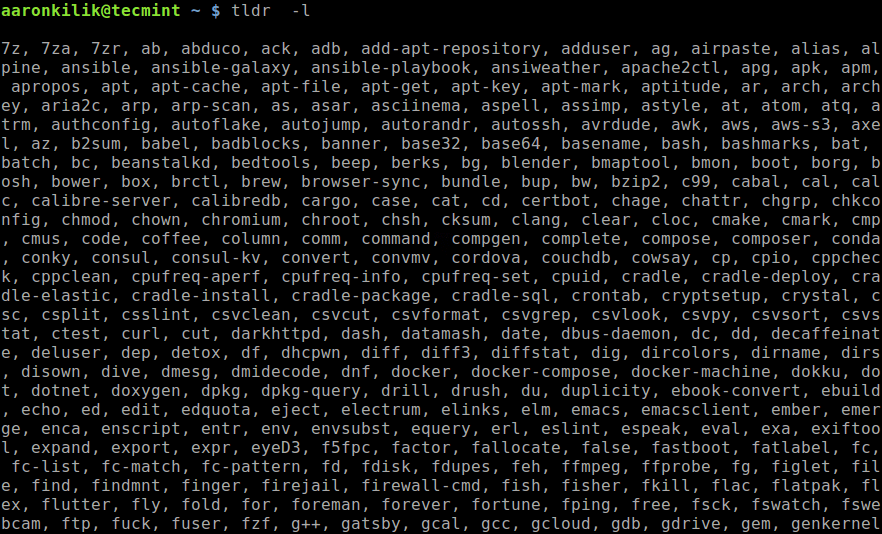
To list all commands for the chosen platform in the cache, use the -l flag.

$ tldr -l 
List All Linux Commands

List All Linux Commands

To list all supported commands in the cache, use the -a flag.

$ tldr -a

You can update or clear the local cache by running.

$ tldr -u	#update local cache 
OR
$ tldr -c 	#clear local cache 

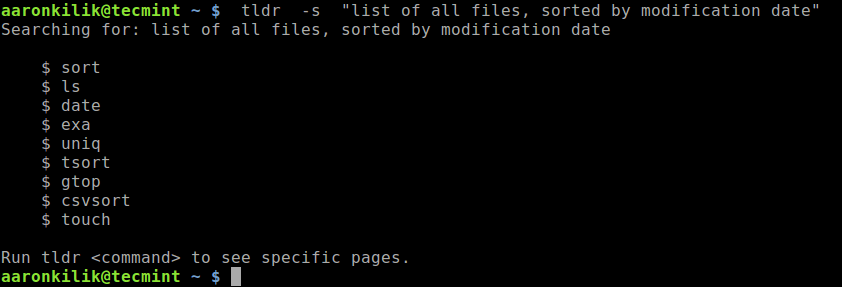
To search pages using keywords, use the -s options, for example.

$ tldr -s  "list of all files, sorted by modification date"
Search Linux Commands Using Keyword

Search Linux Commands Using Keyword

To change the color theme (simple, base16, ocean), use the -t flag.

$ tldr -t ocean

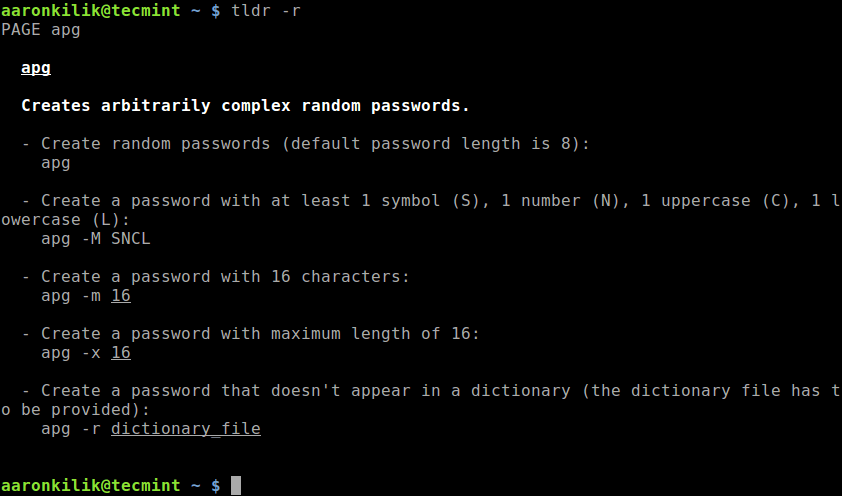
You can also show a random command, with the -r flag.

$ tldr -r   
View Man Page for Random Linux Command

View Man Page for Random Linux Command

You can see a complete list of supported options by running.

$ tldr -h

Note: You can find a list of all supported and dedicated client applications for different platforms, in the TLDR clients wiki page.

TLDR Project Homepagehttps://tldr.sh/

That’s all for now! The TLDR pages are summarized practical examples of commands provided by the community. In this short article, we’ve showed how to install and use TLDR pages in Linux. Use the feedback form to share your thoughts about TLDR or share with us any similar programs out there.

Source

Top 5 Best Ubuntu Alternatives – Linux Hint

If you asked younger Linux users to tell you what their first Linux distribution was, we bet that Ubuntu would be the most common answer. First released in 2004, Ubuntu has helped establish Linux as a viable alternative to Windows and macOS and convinced millions that not all good things in life cost money.

But we’re now in 2019, and there are many excellent desktop Linux distributions that are not based on Ubuntu, and we’ve selected five of them for this article and sorted them by their popularity.

Manjaro is based on Arch Linux, a rolling-release distribution for computers based on x86-64 architectures that follows the KISS principle (“keep it simple, stupid”), emphasizing elegance, code correctness, minimalism, and simplicity. Manjaro sticks to the KISS principle as closely as possible, but it also focuses on user-friendliness and accessibility to make the distribution suitable for Linux newbies and veterans alike.

One of the most praise-worthy features of Manjaro is pacman, a versatile package manager borrowed from Arch Linux. To make pacman more user-friendly, Manjaro includes front-end GUI package manager tools called Pamac and Octopi. Three flagship editions of Manjaro are available— XFCE, KDE, and GNOME—but users can also choose from several community editions, including OpenBox, Cinnamon, i3, Awesome, Budgie, MATE, and Deepin. All editions of Manjaro come with a GUI installer and embrace the rolling release model.

By combining the user-friendliness of Ubuntu with the customizability of Arch Linux, Manjaro developers have created a Linux distribution that allows beginners to learn and grow with it and experienced users to get done more in less time. Because Manjaro boots into a live system, you can easily try it either using a virtual machine or by running it from a DVD or USB flash drive.

Solus

Unlike most popular Linux distributions that you come across these days, Solus is a completely independent desktop operating system built from scratch. Its main goal is to offer a cohesive desktop computing experience, which is something many Linux distributions have been trying to do, with mixed results.

Solus is built around Budgie, a desktop environment that uses various GNOME technologies and is developed by the Solus project, but other desktop environments are available as well, including MATE, and GNOME. Budgie shares many design principles with Windows, but it’s far more customizable and flexible.

Solus ships with a whole host of useful software applications to take care of all your computing needs right out of the box. Content creators can animate in Synfig Studio, produce music in Musescore or Mixxx, design and illustrate in GIMP and Inkscape, and edit video in Avidemux or Shotcut. All applications and system components are continuously updated, so there are no large OS updates to worry about.

Fedora

Fedora would never be the Linux distribution of choice of Linus Torvalds, the creator of the Linux kernel, if it didn’t do something right. First released in 2003, Fedora is known for focusing on innovation and offering cutting-edge features that take months to appear in other Linux distributions. The development of this Linux distribution is sponsored by Red Hat, who uses it as the upstream source of the commercial Red Hat Enterprise Linux distribution.

Thanks to built-in Docker support, you can containerize your own apps or deploy containerized apps out of the box on Fedora. The default desktop environment in Fedora is GNOME 3, which was chosen for its user-friendliness and complete support for open source development tools. That said, several other desktop environments, including XFCE, KDE, MATE, and Cinnamon, are available as well.

Just like Ubuntu, Fedora is also great as a server operating system. It features an enterprise-class, scalable database server powered by the open-source PostgreSQL project, brings a new Modular repository that provides additional versions of software on independent lifecycles, and comes with powerful administration tools to help you monitor your system’s performance and status.

openSUSE

Once known as SUSE Linux and SuSE Linux Professional, openSUSE is a popular Linux distribution that offers two distinct release models: rolling release and 2/3–3/4 years per fixed release. openSUSE Tumbleweed provides the rolling release model, while openSUSE Leap provides the traditional release model.

Regardless of which release model you choose, you can always access all openSUSE tools, including the comprehensive Linux system configuration and installation tool YaST, the open and complete distribution development platform Open Build Service, or the powerful Linux software management engine ZYpp, which provides the backend for the default command line package management tool for openSUSE, zypper.

OpenSUSE has been around since 2005, and it’s now in the hands of Swedish private equity group EQT Partners, which purchased it for $2.5 billion in July 2018. The acquisition didn’t affect the distribution’s development in any way, and SUSE developers expect the partnership with EQT to help it exploit the excellent market opportunity both in the Linux operating system area and in emerging product groups in the open source space, according to its official press release.

Debian

You probably know that Ubuntu is a Debian-based Linux distribution, but you may not know that Debian is actually a great alternative to Ubuntu. Not only is Debian one of the earliest Linux distributions in the world, but it’s also one of the most active, with over 51,000 packages and translations in 75 languages.

Since its beginning in 1993, Debian has been firmly committed to free software. The famous Debian Social Contract states that the distribution will always remain 100 percent free and will never require the use of a non-free component. It also states that Debian developers will always give back to the free software community by communicating things such as bug fixes to upstream authors.

Before you download and install Debian, you should familiarize yourself with its three main branches. The Stable branch targets stable and well-tested software to provide maximum stability. The Testing branch includes software that has received some testing but is not ready to be included in the Stable branch just yet. Finally, the Unstable branch includes bleeding-edge software that is likely to have some bugs.

Source

Linux Today – Linux 5.0 rc2

Jan 13, 2019, 22:00 (0 Talkback[s])

(Other stories by Linus Torvalds)

So the merge window had somewhat unusual timing with the holidays, and
I was afraid that would affect stragglers in rc2, but honestly, that
doesn’t seem to have happened much. rc2 looks pretty normal.

Were there some missing commits that missed the merge window? Yes. But

no more than usual. Things look pretty normal.

What’s a bit abnormal is that I’m traveling again, and so for me it’s

a Monday release, but it’s (intentionally) the usual “Sunday
afternoon” release schedule back home. I’m trying to not surprise
people too much.

As to actual changes: all looks fairly normal. Yes, there’s a fair

number of perf tooling updates, so that certainly stands out in the
diffstat, but if you ignore the tooling and just look at the kernel,
it’s about two thirds drivers (networking, gpu, block, scsi..), with
the rest being the usual mix of arch updates (ARM, RISC-V, x86, csky),
with some filesystem (btrfs, cifs) and vm fixes.

Go test,

Linus

Complete Story

Related Stories:

Source

WP2Social Auto Publish Powered By : XYZScripts.com