Weekend Reading: All Things Bash

Bash is a shell and command language. It is distributed widely as the default login shell for most Linux distributions. We’ve rounded up some of the most popular Bash-related articles for your weekend reading.

Writing More Compact Bash Code

By Mitch Frazier

In most programming languages, non-scripting ones at least, you want to avoid uninitialized variables. In bash, using uninitialized variables can often simplify your code.

Normalizing Filenames and Data with Bash

By Dave Taylor

URLify: convert letter sequences into safe URLs with hex equivalents.

Roman Numerals and Bash

By Dave Taylor

Fun with retro-coding a Roman numeral converter—Dave heads back to his college years and solves homework anew!

Also read Dave’s followup article, More Roman Numerals and Bash.

Create Dynamic Wallpaper with a Bash Script

By Patrick Wheelan

Harness the power of bash and learn how to scrape websites for exciting new images every morning.

Developing Console Applications with Bash

By Andy Carlson

Bring the power of the Linux command line into your application development process.

Parsing an RSS News Feed with a Bash Script

By Jim Hall

I can automate an hourly job to retrieve a copy of an RSS feed, parse it, and save the news items to a local file that the website can incorporate. That reduces complexity on the website, with only a little extra work by parsing the RSS news feed with a Bash script.

Hacking a Safe with Bash

By Adam Kosmin

Being a minimalist, I have little interest in dealing with GUI applications that slow down my work flow or application-specific solutions (such as browser password vaults) that are applicable only toward a subset of my sensitive data. Working with text files affords greater flexibility over how my data is structured and provides the ability to leverage standard tools I can expect to find most anywhere.

Graph Any Data with Cacti!

By Shawn Powers

Cacti is not a new program. It’s been around for a long time, and in its own way, it’s a complicated beast itself. I finally really took the time to figure it out, however, and I realized that it’s not too difficult to use. The cool part is that Cacti makes RRDtool manipulation incredibly convenient. It did take me the better part of a day to understand Cacti fully, so hopefully this article will save you some time.

Reading Web Comics via Bash Script

By Jim Hall

I follow several Web comics. I used to open my Web browser and check out each comic’s Web site. That method was fine when I read only a few Web comics, but it became a pain to stay current when I followed more than about ten comics. These days, I read around 20 Web comics. It takes a lot of time to open each Web site separately just to read a Web comic. I could bookmark the Web comics, but I figured there had to be a better way—a simpler way for me to read all of my Web comics at once.

My Favorite bash Tips and Tricks

By Prentice Bisbal

Save a lot of typing with these handy bash features you won’t find in an old-fashioned UNIX shell.

Note: This article was originally published March 2018 and updated with additional and more current articles January 2019.

Source

Hacking math education with Python

Mathematics instruction has a bad reputation, especially with people (like me) who’ve had trouble with the traditional approach, which emphasizes rote memorization and theory that seems far removed from students’ real world.

While teaching a student who was baffled by his math lessons, Peter Farrell, a Python developer and mathematics teacher, decided to try using Python to teach the boy the math concepts he was having trouble learning.

Peter was inspired by the work of Seymour Papert, the father of the Logo programming language, which lives on in Python’s Turtle module. The Turtle metaphor hooked Peter on Python and using it to teach math, much like I was drawn to Python.

Peter shares his approach in his new book, Math Adventures with Python: An Illustrated Guide to Exploring Math with Code. And, I recently interviewed him to learn more about it.

Don Watkins: What is your background?

Peter Farrell: I was a math teacher for eight years, and I tutored math for 10 years after that. When I was a teacher, I read Papert’s Mindstorms and was inspired to introduce all my math classes to Logo and Turtles.

DW: Why did you start using Python?

PF: I was working with a homeschooled boy on a very dry, textbook-driven math curriculum, which at the time seemed like a curse to me. But I found ways to sneak in the Logo Turtles, and he was a programming fan, so he liked that. Once we got into functions and real programming, he asked if we could continue in Python. I didn’t know any Python but it didn’t seem that different from Logo, so I agreed. And I never looked back!

I was also looking for a 3D graphics package I could use to model a solar system and lead students through making planets move and get pulled by the force of attraction between the bodies, according to Newton’s formula. Many graphics packages required programming in C or something hard, but I found an excellent package called Visual Python that was very easy to use. I used VPython for years after that.

So, I was introduced to Python in the context of working with a student on math. For some time after that, he was my programming tutor while I was his math tutor!

DW: What got you interested in math?

PF: I learned it the old-fashioned way: by hand, on paper and blackboards. I was good at manipulating symbols, so algebra was never a problem, and I liked drawing and graphing, so geometry and trig could be fun, too. I did some programming in BASIC and Fortran in college, but it never inspired me. Later on, programming inspired me greatly! I’m still tickled by the way programming makes easy work of the laborious stuff you have to do in math class, freeing you up to do the more fun of exploring, graphing, tweaking, and discovering.

DW: What inspired you to consider your Python approach to math?

PF: When I was teaching the homeschooled student, I was amazed at what we could do by writing a simple function and then calling it a bunch of times with different values using a loop. That would take a half an hour by hand, but the computer spit it out instantly! Then we could look for patterns (which is what a math student should be doing), express the pattern as a function, and extend it further.

DW: How does your approach to teaching help students—especially those who struggle with math? How does it make math more relevant?

PF: Students, especially high-schoolers, question the need to be doing all this calculating, graphing, and solving by hand in the 21st century, and I don’t disagree with them. Learning to use Excel, for example, to crunch numbers should be seen as a basic necessity to work in an office. Learning to code, in any language, is becoming a very valuable skill to companies. So, there’s a real-world appeal to me.

But the idea of making art with code can revolutionize math class. Just putting a shape on a screen requires math—the position (x-y coordinates), the dimensions, and even the color are all numbers. If you want something to move or change, you’ll need to use variables, and not the “guess what x equals” kind of variable. You’ll vary the position using a variable or, more efficiently, using a vector. [This makes] math topics like vectors and matrices seen as helpful tools you can use, rather than required information you’ll never use.

Students who struggle with math might just be turned off to “school math,” which is heavy on memorization and following rules and light on creativity and real applications. They might find they’re actually good at math, just not the way it was taught in school. I’ve had parents see the cool graphics their kids have created with code and say, “I never knew that’s what sines and cosines were used for!”

DW: How do you see your approach to math and programming encouraging STEM in schools?

PF: I love the idea of combining previously separated topics into an idea like STEM or STEAM! Unfortunately for us math folks, the “M” is very often neglected. I see lots of fun projects being done in STEM labs, even by very young children, and they’re obviously getting an education in technology, engineering, and science. But I see precious little math material in the projects. STEM/mechatronics teacher extraordinaire Ken Hawthorn and I are creating projects to try to remedy that.

Hopefully, my book helps encourage students, girls and boys, to get creative with technology, real and virtual. There are a lot of beautiful graphics in the book, which I hope will inspire people to go through the coding adventure and make them. All the software I use (Python Processing) is available for free and can be easily installed, or is already installed, on the Raspberry Pi. Entry into the STEM world should not be cost-prohibitive to schools or individuals.

DW: What would you like to share with other math teachers?

PF: If the math establishment is really serious about teaching students the standards they have agreed upon, like numerical reasoning, logic, analysis, modeling, geometry, interpreting data, and so on, they’re going to have to admit that coding can help with every single one of those goals. My approach was born, as I said before, from just trying to enrich a dry, traditional approach, and I think any teacher can do that. They just need somebody who can show them how to do everything they’re already doing, just using code to automate the laborious stuff.

My graphics-heavy approach is made possible by the availability of free graphics software. Folks might need to be shown where to find these packages and how to get started. But a math teacher can soon be leading students through solving problems using 21st-century technology and visualizing progress or results and finding more patterns to pursue.

Source

CentOS Reboot – Linux Hint

For every system, rebooting is an essential part. Reboot is essentially turning off the computer completely and then, starting the system from scratch. In certain situations, rebooting is a must. For example, on the Linux system, the kernel update or other critical updates/patches. In short, rebooting is a very important thing to do in today’s modern computing age.

Are you on CentOS? CentOS is the playground for new RHEL users as it offers the same experience and feel of the enterprise environment where there are lots of works ongoing every single second. For such a busy system, sometimes, rebooting becomes a must. In this tutorial, we’ll be checking out the reboot methods for your CentOS.

  • Reboot

The simplest thing to do is fire up the terminal and run the following command –

This command will reboot the entire system. It can take some time for rebooting as there might be other users and processes running and the system will wait for them to terminate.

If you’re in need of a forced reboot, then add the “-f” flag.

  • Shutdown

Rebooting is also possible using the “shutdown” command. For that purpose, use the “-r” flag with “shutdown” –

sudo shutdown -r +10 “Restart in 10 minutes”

Note – the command requires “root” privilege to run.

Here, you’ll notice a couple additional parts in the command. Let’s discuss them.

  • +10 : Gives the system users 10 min time for performing all the pending actions as the system is going to restart itself after 10 minutes starting the count from running the command.
  • “<string” : This part is for showing a warning message to all the users.

Source

Excuse me, sir. You can’t store your things there. Those 7 gigabytes are reserved for Windows 10 • The Register

Buying a new PC in 2019? You may have a bit less disk space than you were expecting

Restaurant table reserved

Microsoft has announced that it is formalising the arrangement whereby Windows 10 inexplicably swipes a chunk of disk space for its own purposes in the form of Reserved Storage.

The theory goes like this – temporary files get generated all the time in Windows, either by the OS or apps running on the thing. As a user’s disk fills up, things start getting sticky as space for this flighty data becomes short and reliability suffers.

Microsoft has tried a few ways over the years to help users manage disk space – Windows will start to whinge as disks reach capacity and built-in tools exist to clear unwanted files. The latest, Storage Sense, will quietly “dehydrate” OneDrive files to free up space.

It appears that such tools aren’t enough.

In 2019, Microsoft is throwing in the towel. New installs of Windows 10 1903 (currently with Windows Insiders in the form of 19H1 and expected in the hands of users sometime in April) will feature “Reserved Storage”.

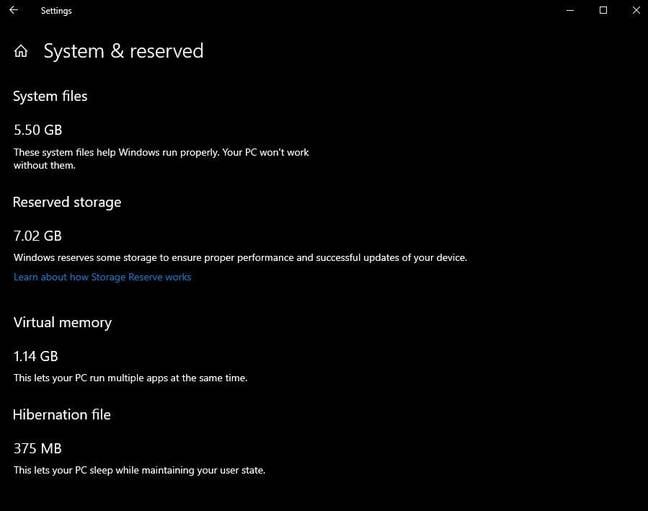
Reserved Storage effectively blocks out a chunk of disk for temporary files generated by the likes of apps or OS updates. The gang at Redmond reckons that 7GB of sacrificial space will be a good starting point, but the total might vary over time. You can also shrink the reservation, but never remove it from the OS entirely.

Reserved Storage (credit: Microsoft)

Never mind the Reserved Storage, how has Microsoft got system files down to 5.5GB? Pic: Microsoft

Users can then cheerfully use their PCs without worrying about their free space suddenly disappearing as a colossal Windows update gets silently downloaded in the background. That space has been pre-nabbed ready for all those temporary(ish) files.

Unless, of course, the Reserved Storage fills up. In which case it will be business as normal as Windows temporarily consumes space outside the reservation, thus somewhat defeating the point of the thing.

Slightly ominously, Microsoft also said: “We may adjust the size of reserved storage in the future based on diagnostic data or feedback.”

Windows Insiders will be able to experience the functionality for themselves if they are willing to fiddle with a Registry setting before the next build drops.

So, if you’re buying a PC in 2019 and considering disk space, remember that as well as all the recovery and system partitions which will adorn your system, Windows 10 will want its own piece of the action as well. ®

Source

Linux Today – How to manage your media with Kodi

Get control over your home media content with Kodi media player software.

video editing dashboard

If you, like me, like to own your own data, chances are you also like to purchase movies and TV shows on Blu-Ray or DVD discs. And you may also like to make ISOs of the videos to keep exact digital copies, as I do.

For a little while, it might be manageable to have a bunch of files stored in some sort of directory structure. However, as your collection grows, you may want features like resuming from a specific spot; keeping track of where you left off watching a video (i.e., its watched status); storing episode or movie summaries and movie trailers; buying media in multiple languages; or just having a sane way to play all those ISOs you ripped. This is where Kodi comes in.

What is Kodi?

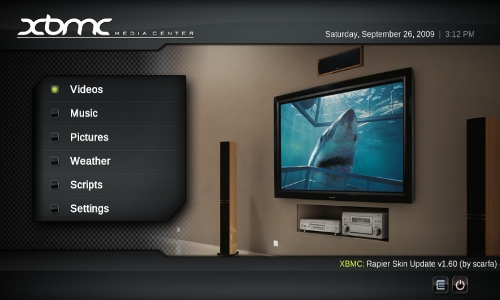
Modern Kodi is the successor to Xbox Media Player, which was discontinued way back in 2003. In June 2004, Xbox Media Center (XBMC) was born. For over three years, XBMC remained on the Xbox. Then in 2007, work began in earnest to port the media player over to Linux.

XBMC home screen

Aside from some uninteresting technical history, things remained fairly stable, and XBMC grew in prominence. By 2014, XBMC had a thriving community, and its core functionality grew to include playing games, streaming content from the web, and connecting to mobile devices. This, combined with legal issues involving Xbox in the name, lead the team behind XBMC to rename it Kodi. Kodi is now branded as an “entertainment hub that brings all your digital media together into a beautiful and user-friendly package.”

Today, Kodi has an extensible interface that has allowed the open source community to build new functionality using plugins. Note that, as with all open source software, Kodi’s developers are not responsible for the ecosystem’s plugins.

How do I start?

For Ubuntu-based distributions, Kodi is just a few short commands away:

sudo apt install software-properties-common
sudo add-apt-repository ppa:team-xbmc/ppa
sudo apt update
sudo apt install kodi

In Arch Linux, you can install the latest version from the community repo:

sudo pacman -S kodi

Packages were maintained for Fedora 26 by RPM Fusion (referenced in the Kodi documentation). I tried it on Fedora 29, and it was quite unstable. I’m sure that this will improve over time, but my experience is that Fedora 29 is not the ideal platform for Kodi.

OK, it’s installed… now what?

Before we proceed, note that I am making two assumptions about your media content:

  1. You have your own local, legally attained content.
  2. You have already transferred this content from your DVDs, Blu-Rays, or another digital distribution source to your local directory or network.

Kodi uses a scraping service to pull down TV and movie metadata. For Kodi to match things appropriately, I recommend adopting a directory and file-naming structure similar to this:

Utopia
├── Utopia.S01.dvd_rip.x264
│   ├── Utopia.S01E01.dvd_rip.x264.mkv
│   ├── Utopia.S01E02.dvd_rip.x264.mkv
│   ├── Utopia.S01E03.dvd_rip.x264.mkv
│   ├── Utopia.S01E04.dvd_rip.x264.mkv
│   ├── Utopia.S01E05.dvd_rip.x264.mkv
│   ├── Utopia.S01E06.dvd_rip.x264.mkv
└── Utopia.S02.dvd_rip.x264
├── Utopia.S02E01.dvd_rip.x264.mkv
├── Utopia.S02E02.dvd_rip.x264.mkv
├── Utopia.S02E03.dvd_rip.x264.mkv
├── Utopia.S02E04.dvd_rip.x264.mkv
├── Utopia.S02E05.dvd_rip.x264.mkv
└── Utopia.S02E06.dvd_rip.x264.mkv

I put the source (my DVD) and the codec (x264) in the title, but these are optional. For a TV series, you can include the episode title in the filename if you like. The important part is SxxExx, which stands for Season and Episode. This is how Kodi (and by extension the scrapers) can identify your media.

Assuming you have organized your media like this, let’s do some basic Kodi configuration.

Add video sources

Adding video sources is a simple, six-step process:

  1. Enter the files section
  2. Select Files
  3. Click Add source
  4. Browse to your source
  5. Define the video content type
  6. Refresh the metadata

If you’re impatient, feel free to navigate these steps on your own. But if you want details, keep reading.

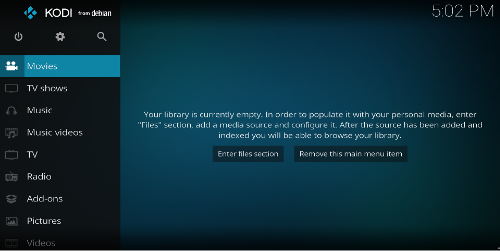
When you first launch Kodi, you’ll see the home screen below. Click Enter files section. It doesn’t matter whether you do this under Movies (as shown here) or TV shows.

Kodi home screen

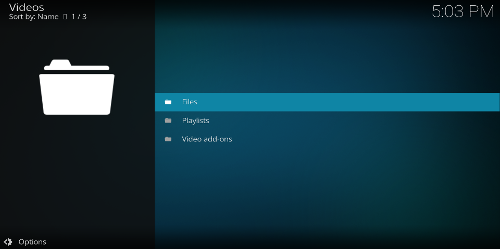
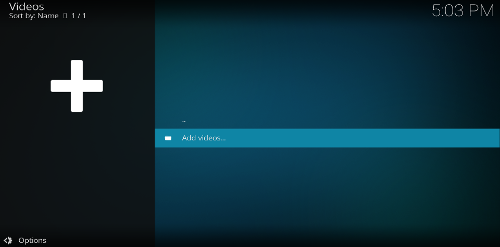
Next, select the Videos folder, click Files, and choose Add videos.

Kodi videos folder

Add videos in Kodi

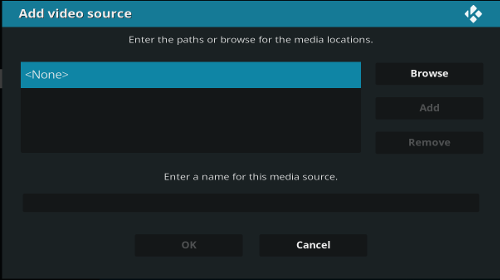
Either click on None and start typing the path to your files or click Browse and use the file navigation.

Browse Kodi video source

Add Kodi video source

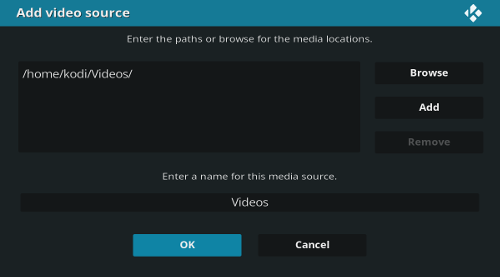
As you can see in this screenshot, I added my local Videos directory. You can set some default options through Browse, such as specifying your home folder and any drives you have mounted—maybe on a network file system (NFS), universal plug and play (UPnP) device, Windows Network (SMB/CIFS), or zeroconf. I won’t cover most of these, as they are outside the scope of this article, but we will use NFS later for one of Kodi’s advanced features.

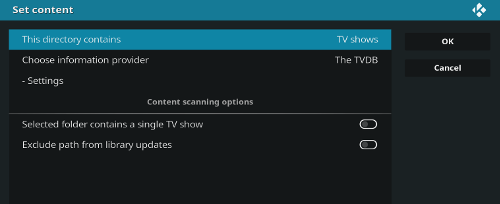
After you select your path and click OK, identify the type of content you’re working with.

Defining video content in Kodi

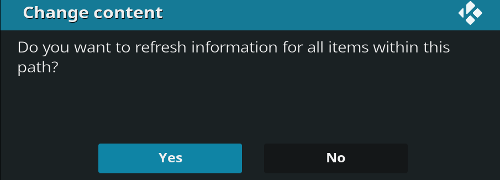
Next, Kodi prompts you to refresh the metadata for the content in the selected directory. This is how Kodi knows what videos you have and their synopsis, cast information, thumbnails, fan art, etc. Select Yes, and you can watch the video-scanning progress in the top right-hand corner.

Refreshing metadata in Kodi

Kodi metadata scan

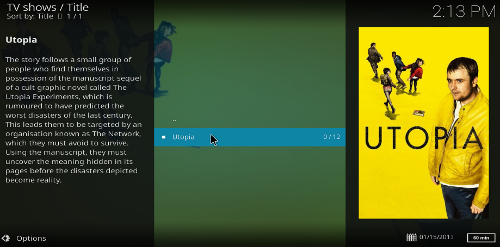
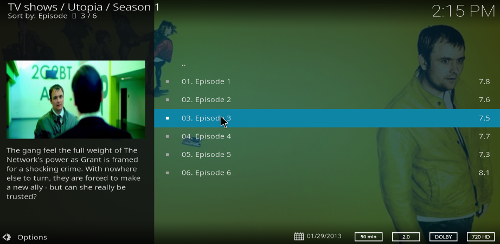
When the scan completes, you’ll see lots of useful information, such as video overviews and season and episode descriptions for TV shows.

Kodi metadata scan result

Kodi show description metadata

You can use the same process for other types of content, such as music or music videos.

Increase functionality with add-ons

One of the most interesting things about open source projects is that the community often extends them well beyond their initial scope. Kodi has a very robust add-on infrastructure. Most of them are produced by Kodi fans who want to extend its default functionality, and sometimes companies (such as the Plexcontent streaming service) release official plugins. Be very careful about adding plugins from untrusted sources. Just because you find an add-on on the internet does not mean it is safe!

Be warned: Add-ons are not supported by Kodi’s core team!

Having said that, there are many useful add-ons that are worth your consideration. In my house, we use Kodi for local playback and Plex when we want to access our content outside the house—with one exception. One of our rooms has a poor WiFi signal. I rip my Blu-Rays to very large MKV files (usually 20–40GB each), and the WiFi (and therefore Kodi) can’t handle the files without stuttering. Although you can (and we have) dug into some of the advanced buffering options, even those tweaks have proved insufficient with very large files. Since we already have a Plex server that can transcode content, we solved our problem with a Kodi add-on.

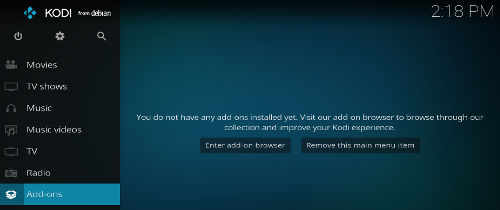
To show how to install an add-on, I’ll use Plex as an example. First, click on Add-ons in the side panel and select Enter add-on browser. Either use the search function or scroll down until you find Plex.

Kodi add-ons

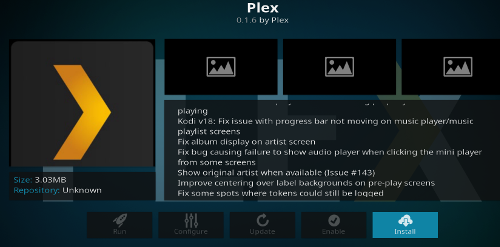
Select the Plex add-on and click the Install button in the lower right-hand corner.

Plex add-on in Kodi

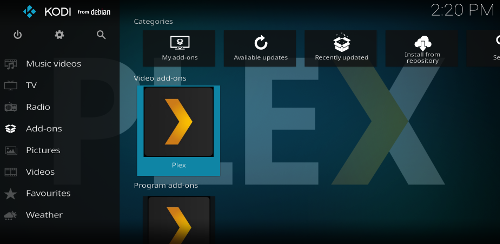
Once the download completes, you can access Plex on the main Kodi screen under Add-ons.

Accessing Plex in Kodi

There are several ways to configure an add-on. Some add-ons, such as NHL TV, are configured via a menu accessed by right-clicking the add-on and selecting Configure. Others, such as Plex, display a configuration walk-through when they launch. If an add-on doesn’t seem to be configured when you first launch it, try right-clicking its menu and see if a settings option is available there.

Coordinating metadata across Kodi devices

In our house, we have multiple machines that run Kodi. By default, Kodi tracks metadata, such as a video’s watched status and show information, locally. Therefore, content updates on one machine won’t appear on any other machine—unless you configure all your Kodi devices to store metadata inside an SQL database (which is a feature Kodi supports). This technique is not particularly difficult, but it is more advanced. If you’re willing to put in the effort, here’s how to do it.

Before you begin

There are a few things you need to know before configuring shared status for Kodi.

  1. All content must be on a network share (Samba, NFS, etc.).
  2. All content must be mounted via the network protocol, even if the disks are local to the machine. That means that no matter where the content is physically located, each client must be configured to use a network fileshare source.
  3. You need to be running an SQL-style database. Kodi’s official guide walks through MySQL, but I chose MariaDB.
  4. All clients need to have the database port open (port 3306 in the case of MySQL/MariaDB) or the firewalls disabled.
  5. All clients must be running the same version of Kodi

Install and configure the database

If you’re running Ubuntu, you can install MariaDB with the following commands:

sudo apt update
sudo apt install mariadb-server -y

I am running MariaDB on an Arch Linux machine. The Arch Wiki documents the initial setup process well, but I’ll summarize it here.

To install, issue the following command:

sudo pacman -S mariadb

Most distributions of MariaDB will have the same setup commands. I recommend that you understand what the commands do, but you can safely take the defaults if you’re in a home environment.

sudo systemctl start mariadb
sudo mysql_install_db –user=mysql –basedir=/usr –datadir=/var/lib/mysql
sudo mysql_secure_installation

Next, edit the MariaDB config file. This file is different depending on your distribution. On Ubuntu, you want to edit /etc/mysql/mariadb.conf.d/50-server.cnf. On Arch, the file is either /etc/my.cnf or /etc/mysql/my.cnf. Locate the line that says bind-address = 127.0.0.1 and change it to your desired Ethernet port’s IP address or to bind-address = 0.0.0.0 if you want it to listen on all interfaces.

Restart the service so the change will take effect:

sudo systemctl restart mariadb

Configure Kodi and MariaDB/MySQL

To enable Kodi to write to the database, one of two things needs to happen: You can create the database yourself, or you can let Kodi do it for you. In this case, since the only database on this system is for Kodi, I’ll create a user with the rights to create any databases that Kodi requires. Do NOT do this if the machine runs more than one database.

mysql -u root -p
CREATE USER ‘kodi’ IDENTIFIED BY ‘kodi’;
GRANT ALL ON *.* TO ‘kodi’;
flush privileges;
\q

This grants the user all rights—essentially enabling it to act as a root user. For my purposes, this is fine.

Next, on each Kodi device where you want to share metadata, create the following file: /home/<USER>/.kodi/userdata/advancedsettings.xml. This file can contain a lot of very advanced, tweakable settings. My devices have these settings:

<advancedsettings>
<videodatabase>
<type>mysql</type>
<host>mysql-arch.example.com</host>
<port>3306</port>
<user>kodi</user>
<pass>kodi</pass>
</videodatabase>
<videolibrary>
<importwatchedstate>true</importwatchedstate>
<importresumepoint>true</importresumepoint>
</videolibrary>
<cache>
<!— The three settings will go in this space, between the two network tags. —>
<buffermode>1</buffermode>
<memorysize>322122547</memorysize>
<readfactor>20</readfactor>
</cache>
</advancedsettings>

The <cache> section—which sets how much of a file Kodi will buffer over the network— is optional in this scenario. See the Kodi wiki for a full breakdown of this file and its options.

Once the configuration is complete, it’s a good idea to close and reopen Kodi to make sure the settings are applied.

The final step is configuring all the Kodi clients to use the same network share for all their content. Only one client needs to scrap/refresh the metadata if everything is created successfully. When data is collected, you should see that Kodi creates a new database on your SQL server:

[kodi@kodi-mysql ~]$ mysql -u root -p
Enter password:
Welcome to the MariaDB monitor.  Commands end with ; or \g.
Your MariaDB connection id is 180
Server version: 10.1.37-MariaDB MariaDB Server

Copyright (c) 2000, 2018, Oracle, MariaDB Corporation Ab and others.

Type ‘help;’ or ‘\h’ for help. Type ‘\c’ to clear the current input statement.

MariaDB [(none)]> show databases;
+——————–+
| Database           |
+——————–+
| MyVideos107        |
| information_schema |
| mysql              |
| performance_schema |
+——————–+
4 rows in set (0.00 sec)

Wrapping up

This article walked through how to get up and running with the basic functionality of Kodi. You should be able to add content and pull down metadata to make browsing your media more convenient.

You also know how to search for, install, and potentially configure add-ons for additional features. Be extra careful when downloading add-ons, as they are provided by the community at large and not the core developers. It’s best to use add-ons only from organizations or companies you trust.

And you know a bit about sharing metadata across multiple devices. You’ve been introduced to advancedsettings.xml; hopefully it has piqued your interest. Kodi has a lot of dials and knobs to turn, and you can squeeze a lot of performance and functionality out of the platform with enough experimentation.

Source

Bash declare command – Linux Hint

Bash doesn’t have a strong type system. To allow type-like behavior, it uses attributes that can be set by a command.

‘declare’

is a bash built-in command that allows you to update attributes applied to variables within the scope of your shell. In addition, it can be used to declare a variable in longhand. Lastly, it allows you to peek into variables.

Here you will find out that you are blind or using the bash declare command.

At this point you are thinking, what do I need to know to use the declare command in bash? At the time like these, the man command comes in handy. I’m just going to paste the part about declare in bash builtins here.

Here are some help commands to see what it looks like in your terminal. Note that the last one is a failsafe for our friends running Git Bash in Windows.

Help commands for bash declare

  • man bash (and find the section about declare
  • or bash help declare

Now that you have read the primer, man page for declare in bash, it is time to get our hands dirty with some examples of bash declare in the wild. Note that as you scroll down deep into the jungle of bash declare examples, your pay grade and level of understanding of declare will improve.

First let’s start out by seeing if anyone declared a variable called bar. If no one has yet, dibs!

If you see the error bash: declare: bar: not found, then no one has yet. Let’s just echo $? to be sure.

1, okay good. Otherwise, you should see something like declare — bar=””. If you haven’t yet, go ahead and declare bar as something, bar= or declare bar= should do the trick. Note that the latter of the two is the longhand for variables in bash. If you are wondering what the — in declare output is, that is where variable attributes go, and there are none.

Now that assigning variables using declare is out of the picture, let’s start giving them attributes.

If you are running bash v4.3-alpha or later, this section on the -n option. If you are not sure, check using the bash –version command. Otherwise, don’t try this at home.

Look at that. We just asigned a variable to another by name. Look what happens here.

bar=x
declare -n foo=bar
echo $ $ # x x
foo=y
echo $ $ # y y
true

Now look what happens when when we don’t use declare with the -n option.

bar=x
declare foo=bar
echo $ $ # x x
foo=y
echo $ $ # y x
true

Exports

Now suppose that we tried to do something odd like this:

echo{,} $ > echo-bar.sh
bash echo-bar.sh

As you may suspect, nothing happened in standard output. Don’t worry about the voodoo in the first line. Programmers are lazy. The declare command can make names export!

declare -x bar # export bar

Now give it a try.

Note that using the –x option for declare can also be done through the export command as follows. Be sure to open up a new shell or remove the attribute using the +x option before trying out the following example.

bar=x
echo{,} $ > echo-bar.sh
bash echo-bar.sh #
export bar
bash echo-bar.sh # x

Integers

In bash, variables may have the integer attribute and the only way to accomplish this is through declare command.

Suppose that we are dealing with integers and want to make our variables behavior more responsible. We could give such variables the integer attribute using the –i option for declare.

declare –i bar # don’t know what’s in bar anymore but now it’s an integer
echo $ # x (maybe)
bar=x
echo $ # 0
bar=1
echo $ # 1
bar=3.14 # ouch
true

Note that now when we try to assign a new value to our variable 3 things happen: 1) The value is interpreted as 0; 2) The value is interpreted as an integer; 3) Error.

In addition to modifying the value assignment behavior, variables now behavior differently in arithmetic expressions as follows.

declare -i bar=1
declare car=1
echo $ # 1
echo $ # 1
bar=bar+1
car=car+1
echo $ # 2
echo $ # car+1
true

Note that you can still get away with using a variable to store an integer and carry out arithmetic without setting the integer attribute for a variable but it is there just in case.

Cases

In bash, variables may have case attributes applied on assignment. Declare allows conversion to cases lower or upper if –l or –u options are set, respectfully.

declare -u uppers=
declare -l lowers=
uppers=uppercase
lowers=LOWERCASE
echo $ # UPPERCASE
echo $ # lowercase
echo $ # uppercase
echo $ # LOWERCASE
true

These attributes may come in handy if you require single case without having to do the conversion yourself.

Readonly

In bash, variable may be readonly. To accomplish this there is the -r option for declare.

declare –r lowers # try to make lowers final
lowers=”Yet another lowers”
echo $ # yet another lowers
declare -rl final_lowers=”Yet another lowers”
echo $ # yet another lowers
final_lowers=”Yet again another lowers” # assignment block
true

This attribute could come in handy if you know that a variable has no business being changed after assignment. Note that the +r option does not work; that is stripping a variable of its readonly attribute is not allowed in bash.

Arrays

In bash, variables may be arrays. To make a variable an associative or indexed array, the –A and –a options for declare are used, respectfully.

declare -a indexed_array
declare -A associative_array
indexed_array[0]=1
associative_array[0]=1
indexed_array[one]=2 # ?
associative_array[one]=2
echo $ # 2
echo $ # 1
echo $ # 2
echo $ # 2
declare -p indexed_array
declare -p associative_array
echo $ # ouch
true

In most programming languages having the ability to use arrays is a powerful construct. Bash is no exception. It allows this through array attributes which could come in handy if requiring hash lookup or in implementing object-like behavior. Note that the index of indexed arrays behaviors like a variable with the integer attribute, thus is expected to break in the same manner, hence the last line before true.

Trace

In bash, variable may have the trace attribute applied via the -t option in declare. Trace variables unlike variables with other attributes applied depend heavily on the environment of the calling shell.

I have found mixed results using the trace attribute which have led to a review on traps and applications of trapping the DEBUG and RETURN signal. For those that tinker, finding a use for declaring a variable with the -t option is extra credit.

Functions

In bash, one of the most useful uses for the declare command is being able to display functions. The -f and -F options for declare display definition and just function names if available, respectfully.

Suppose that you want to have a fallback in case a function is not defined in your shell. We can use declare to accomplish this task as follows. For simplicity sakes, let’s use a function called foo.

# if foo is not declared

# declare it# else use available footest ! “$( declare -F foo )” || {
foo() { true ; }
}

For those that tinker, there is an alias using called commands that I cooked up a while back that uses declare to check if functions are available.

Conclusion

Although most programmers can get away with not having to use it at all, like most builtins, the declare command in bash is an essential command to really know your way around the bash shell.

Source

Compact, rugged industrial AI computer runs Linux on TX2

Jan 11, 2019 — by Eric Brown

Aaeon’s compact, fanless “Boxer-8110AI” embedded computer runs Ubuntu 16.04 on an Nvidia Jetson TX2 module and offers GbE, HDMI, CAN, serial, and 3x USB ports, plus anti-vibration and -20 to 50°C support.

Like the Boxer-8120A from last May, Aaeon’s Boxer-8110AI runs Ubuntu 16.04 on Nvidia’s Jetson TX2 module. It similarly offers 8GB of LPDDR4 RAM, 32GB eMMC 5.1, and a microSD slot, and offers -20 to 50°C tolerance. The more compact, 110 x 65 x 40mm Boxer-8110AI has a reduced feature set, yet at $1,033, it’s only $34 cheaper.

Boxer-8110AI, front and back

Nvidia’s Jetson TX2 is equipped with an Arm-based Tegra-family SoC with dual Cortex-A72-like “Denver” cores and 4x -A57 cores. The SoC incorporates 256-core Pascal graphics, supported with CUDA libraries for AI, vision processing, GPU-accelerated parallel processing, and deep/machine learning.

Boxer-8110AI front and back detail views

The Boxer-8110AI is limited to a single GbE port instead of four on the Boxer-8120A. Other features include HDMI, RS-232, micro-USB OTG, and 2x USB 3.0 host ports. The system provides a dual-channel CANBus port and an antenna hole.

Boxer-8110AI side detail view (left) and front view

The Boxer-8110AI has a 12V DC input via a terminal block and ships with a wallmount kit. In addition to extended temperature support, it provides 3 Grms/ 5 ~ 500Hz/ anti-vibration resistance.

Further information

The Boxer-8110AI is available for $1,033. More information may be found on Aaeon’s Boxer-8110AI product and shopping pages.

Source

5 Open Source Tools to Upgrade your Next Kubernetes Project

Kubernetes is one of the most popular technologies around today. So, it’s no surprise that there are an awful lot of open source libraries, tools, and other assorted goodies out there on GitHub.

We like to keep an eye on what’s fresh for developers, so today we’re taking a look at five different Kubernetes tools for developers. From serverless functions to local development, GitHub has thousands of open source tools to enjoy. Here are five interesting ones we want to take a closer look at!

As always, this list is subjective and is based off our own experiences. If you think we’ve totally missed out on a crucial Kubernetes tool that you use every day, let us know in the comments below!

Minikube

Improve your local cluster experience with Minikube! Minikube is a tool that makes it easy to run Kubernetes locally. Minikube is often suggested to beginners, since it allows users to run a single-node Kubernetes cluster inside a VM on their laptop. That way, they can try the Kubernetes experience without needing to get everything set up. Minikube is also great for developers who are just dabbling and want a day-to-day developing setup.

New users can run a Kubernetes cluster and work with curated examples without needing extensive knowledge. Minikube does this by only using kubectl and a reduced number of Kubernetes functions. Minikube works with macOS, Linux, Windows, and other OSes. It’s got a simple command setup (and teardown), with minimal dependencies and resource overhead.

If you’re looking to try out Kubernetes or develop locally, why not try Minikube? More information is available here.

Tilt

Tilt promises a stress-free experience for local Kubernetes microservice development. Developing microservices is easier than ever, since Tilt lets developers edit in their own IDEs and save to their own file systems. Now, developers can work on their microservices in an environment perfectly configured for their team.

This tool wrangles your microservices for you, by collecting problems from across tools and services into one UI. Tilt also neatly jumps around the dependency problem by running everything in containers. You won’t have to say, “well, it worked on my machine”; the right dependencies will be there! Complex projects are optimized for a minimal footprint and speedy upload.

Setup is easy if you already have a Dockerfile and a Kubernetes configuration. More information about Tilt is available here!

Rook

Storage solutions usually involve going to IKEA and looking at plastic containers. But for Kubernetes, there’s Rook! Rook is a cloud-native storage orchestrator for Kubernetes that is still incubating with the Cloud Native Computing Foundation. It provides support for a wide set of storage solutions for native integration cloud environments.

Basically, Rook takes ordinary storage software and has it manage itself. By using the underlying tools and facilities of Kubernetes, Rook makes it possible for storage services to automate deployment, bootstrap, configure, provision, scale, upgrade, and migrate on their own. Right now, Rook has a limited number of supported storage providers, but that list is growing by the day!

More information about Rook is available here!

Rancher

Looking to scale up your Kubernetes clusters? Now you can manage hundreds of clusters from the same interface! Rancher provides a container management platform designed to deploy lots of containers in production. Following the DevOps ethos, Rancher gives developers the ability to run Kubernetes everywhere on any provider.

This is primarily a management tool, bringing extra, unified control to your clusters. Rancher centrally manages an astonishing number of clusters, even giving global admins the ability to control cluster access from one location if needed. This platform has detailed monitoring and alerting, ships logs, and can even integrate directly with Helm. There’s even a pipeline engine to automatically deploy and upgrade workloads if you don’t have your own external CI/CD system. More information about Rancher is available here!

Fission

Serverless, with Kubernetes? I know it seems counter-intuitive, but thanks to Fission, developers can enjoy fast serverless functions for their Kubernetes implementations. Fission provides a serverless framework for Kubernetes with a focus on high performance and developer productivity, with a speedy 100ms start time.

Fission brings serverless functions to microservices by using Kubernetes as a foundation. Plus, this means that regular Kubernetes operations like monitoring or log aggregation can be brought to your Fission deployment.

Extensible to any language, Fission just operates on the code. While the core of Fission is written in Go, Kubernetes and Docker are abstracted away under normal operations. Plus, Fission suppers a number of other languages like Python, Node.js, PHP, and more.

More information about Fission is available here.

Source

How to install Git on Ubuntu 18.04

How to install Git on Ubuntu 18.04

Installing Git on Ubuntu

Git is the most popular version control system nowadays. It helps to share and collaborate on software development projects. It is mainly used for source code management. In this tutorial, you are going to learn how to install Git on Ubuntu 18.04.

Prerequisites

Before you start installing Git on Ubuntu 18.04. You must have the non-root user account on your Server or Desktop with sudo privileges.

1. Install Git on Ubuntu

To install Git in Ubuntu you need to update the apt package manager index then you will install it in Ubuntu. After that, you will confirm installation.

To update apt package manager index type following in the terminal

sudo apt update

Now install Git in Ubuntu by typing

sudo apt install git

Confirm the installation and check the version executing the following command

git --version

The output should be:

Output:
    git version 2.17.1

2. Setting Up Git

To prevent warning every time you should configure it perfectly by using your Git information

First set the global username for Git

git config --global user.name "User Name"

Secondly set global email for Git

git config --global user.email "username@domain.com"

You can also change above configuration by editing .gitconfig file. To edit gitconfig file type

nano ~/.gitconfig

Editing Git Configuration File

Edit above file by setting Name and Email.

Conclusion

Here we have successfully learned how to install Git on Ubuntu 18.04 and you have also learned setting up Git to start working on the system.

5 Ways to open the Ubuntu Terminal application

Although Ubuntu users these days get to perform various operations through programs having high-end GUIs, there are multiple reasons to use the Linux command line called the Terminal.

  • Through Terminal, you can access many powerful native Linux commands as well as the empowering command-line features of many desktop applications.
  • You can install software to Ubuntu much more easier through the Command Line, than the graphical installation alternative.
  • You might have seen that many online-help guides will tell you how to resolve a problem through the Command Line. No matter which desktop environment you are using or which version of Linux you are on, the Terminal commands are usually the same.

This article explains five simple ways that you can use through your keyboard, mouse control. or both, in order to open the Ubuntu Terminal application.

We have run the commands and procedures mentioned in this article on a Ubuntu 18.04 LTS system.

Method 1: Through the Default Keyboard shortcut

The quickest method to open the Terminal application that does not require the use of mouse pointer is to use the Ctrl+Alt+t shortcut.

Use the default keyboard shortcut to open Ubuntu Terminal

You can also set a custom keyboard shortcut for Ubuntu in order to open the Terminal.

You can quit the Terminal by entering the exit command as follows:

$ exit

Method 2: Using the Run command window

The Run command window can be used to directly run commands that you would otherwise run by opening the command line. You can use the Run command window in order to open the Gnome Terminal as follows:

Use the Alt+F2 shortcut in order to open the Run command window. Then enter the following command and hit the Enter key:

gnome-terminal

Use the run command window to start gnome-terminal

You can even use this command in the Terminal window itself to open another Terminal session.

Method 3: Search and Open through the Ubuntu Dash

The Ubuntu Dash helps you in searching for installed applications and system utilities and also helps you in finding the ones you can download through Ubuntu Software Manager. Since the Terminal comes by default with Ubuntu, when you search for it through the Dash you will see the search result as follows:

Search Terminal on Ubuntu Dash

Simply click the search result and your Terminal application will open.

Method 4: From the Applications list

The Terminal application is also available in your Ubuntu’s list of applications. As you might know, you can view the installed UI applications through the Applications button. This button is located in the down left corner of your Ubuntu desktop.

Start Ubuntu Terminal from Application List

Click the Applications button and look up for the Terminal application icon and click it in order to open the Ubuntu Terminal.

Method 5: From the Desktop right-click menu

Last but not least, the only mouse click method to open the Terminal is to use the right-click menu from your desktop.

Start Terminal from Desktop by using right-click menu

When you right-click on the desktop view itself, you will be able to see the Open Terminal option in the menu. Simply select this option in order to open the Ubuntu command line, the Terminal.

Now you are equipped with not one, but five ways to open the Terminal application.

Source

WP2Social Auto Publish Powered By : XYZScripts.com