A Bash Script to Create a Bootable USB from ISO in Linux

Bootiso is a powerful Bash script to easily and securely create a bootable USB device from one ISO file. It helps you create a bootable USB from an ISO with a single command from the terminal. It is a well tailored script that carefully organized and validated using shellcheck.

It has to be run with root authority, and if external programs it requires are not available on your system, it will ask you to install them and exits. Bootiso checks that the selected ISO has the correct mime-type, otherwise it exits. To prevent system damages, it ensures that the selected device is connected only via USB.

Read Also3 Ways to Extract and Copy Files from ISO Image in Linux

Before formating and partitioning your USB device, it prompts you to accept execution of the actions to prevent any data loss. Importantly, it manages any failure from an internal command appropriately exits. In addition, it performs a cleanup of any temporary files on exit by employing the trap utility.

Install Bootiso Script in Linux

The easy way to install bootiso from sources is to clone the git repository and set execute permission as shown.

$ git clone https://github.com/jsamr/bootiso.git
$ cd bootiso/
$ chmod +x bootiso

Next, move the script to a bin path (for example ~/bin/ or /usr/local/bin/) to run it like any other Linux commands on your system.

$ mv bootiso ~/bin/

Once installed, the syntax for running bootiso is to provide the ISO as first argument.

$ bootiso myfile.iso

To create a bootable USB device from ISO file, first you need to list all available USB drives attached to your system using the -l flag as shown.

$ bootiso -l

Listing USB drives available in your system:
NAME    HOTPLUG   SIZE STATE   TYPE
sdb           1   14.9G running disk

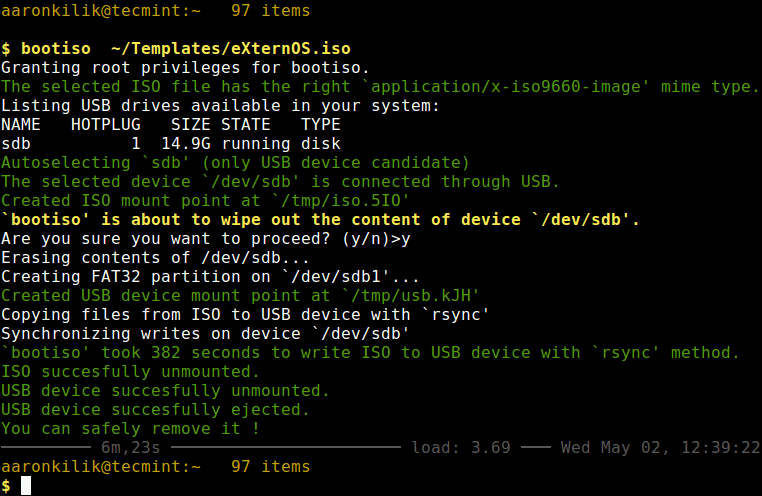
Next, to make the device (/dev/sdb) as a bootable device, simply provide the ISO as the first argument. Note that if there is only one USB device attached to the system (as in the case above), the script will automatically select it, otherwise, it will ask you to select from an auto-generated list of all attached USB drives.

$ sudo bootiso ~/Templates/eXternOS.iso 

Create Bootable USB in Linux Terminal

Create Bootable USB in Linux Terminal

You may also use the -a flag to enable autoselecting USB drives in conjunction with -y (disables prompting user before formating USB drive) option as shown.

$ sudo bootiso -a -y ~/Templates/eXternOS.iso

If you have multiple USB devices connected to the system, you can use the -d flag to explicitly specify the USB device you want to make bootable from the command line as shown.

$ sudo bootiso -d /dev/sdb ~/Templates/eXternOS.iso  

By default, bootiso uses mount + rsync to employ dd command instead, add the --dd flag as shown.

$ sudo bootiso --dd -d ~/Templates/eXternOS.iso      

In addition, for non-hybrid ISOs, you can install a bootloader with syslinux with the -b option, as follows. This option however does not support the dd command.

$ sudo bootiso -b /ptah/to/non-hybrid/file.iso
OR
$ sudo bootiso -bd /usb/device /ptah/to/non-hybrid/file.iso

For more information on other bootiso capabilities and options, see the help message.

$ bootiso -h  

Bootiso Github repositoryhttps://github.com/jsamr/bootiso

That’s It! Bootiso is a powerful Bash script to easily and securely create a bootable USB device from one ISO file, with a single command on the terminal. Use the comment form below to share your thoughts about it or ask questions.

Source

How to Determine and Fix Boot Issues in Linux

The Linux system boots so fast that most of the output scrolls by too quickly to read the text (showing services being started) sent to the console. Therefore observing boot issues/errors becomes a little of a challenge for us.

In this article, we will briefly explain the different stages in a Linux system boot process, then learn how to establish and get to the bottom of boot issues: in terms files to look into or commands to view system boot messages.

Summary Of Linux Boot Process

In summary, once we press the Power On button, the BIOS (Basic Input Output System) a program integrated in a motherboard performs a POST (Power on Self Test) – where hardware such as disks, RAM (Random Access Memory), keyboard, etc are scanned. In case of an error (missing/malfunctioning hardware), it is reported on the screen.

During POST, the BIOS also looks for the boot device, the disk to stat up from (usually the first hard disk, however we may configure it to be a DVD, USB, Network Card etc instead).

Then the system will connect to the disk and search for the Master Boot Record (512 bytes in size) which stores the boot loader (446 bytes in size) and the rest of the space stores info about disk partitions (four maximum) and the MBR itself.

Suggested Read: 4 Best Linux Boot Loaders

The boot loader will identify and point to, as well as load the Kernel and the initrd file (initialization ram disk – provides the kernel access to the mounted root filesystem and modules/drivers stored in /lib directory), which are generally stored in the /boot directory of the filesystem.

After the kernel is loaded, it executes init (or systemd on newer Linux distros), the first process with PID 1, which in turn starts all other processes on the system. It is also the last process to be executed on system shutdown.

How to Find Out Linux Boot Issues or Error Messages

As we mentioned before, the Linux boot processes happens rapidly that we can’t even clearly read most of the output sent to the console.

So taking note of boot issues/errors calls for a system administrator to look into certain important files in conjunction with particular commands. And these include:

/var/log/boot.log – Logs System Boot Messages

This is probably the first file you want to look into, to view all that unfolded during the system boot.

Rather than trying so hard to follow the output on the screen during boot, we can view this file after the boot process has completed to assist us in determining and resolving boot issues/errors.

We use the cat command for that purpose as follows (below is a sample of this file):

# cat /var/log/boot.log
View Linux Boot Logs
[  OK  ] Started Load/Save RF Kill Switch Status.
[ TIME ] Timed out waiting for device dev-disk-by\x2duuid-53e41ce9\x2ddc18\x2d458c\x2dbc08\x2d584c208ed615.device.
[DEPEND] Dependency failed for /dev/disk/by-uuid/53e41ce9-dc18-458c-bc08-584c208ed615.
[DEPEND] Dependency failed for Swap.
[  OK  ] Reached target System Initialization.
[  OK  ] Listening on UUID daemon activation socket.
[  OK  ] Started Daily Cleanup of Temporary Directories.
[  OK  ] Listening on CUPS Scheduler.
[  OK  ] Started Daily apt activities.
[  OK  ] Reached target Timers.
[  OK  ] Listening on Avahi mDNS/DNS-SD Stack Activation Socket.
[  OK  ] Started ACPI Events Check.
[  OK  ] Started Trigger resolvconf update for networkd DNS.
[  OK  ] Started CUPS Scheduler.
[  OK  ] Reached target Paths.
[  OK  ] Listening on D-Bus System Message Bus Socket.
[  OK  ] Listening on ACPID Listen Socket.
         Starting Console System Startup Logging...
[  OK  ] Listening on Cockpit Web Service Socket.
[  OK  ] Reached target Sockets.
[  OK  ] Reached target Basic System.
         Starting LSB: Set the CPU Frequency Scaling governor to "ondemand"...
[  OK  ] Started ACPI event daemon.
[  OK  ] Started mintsystem.service.
         Starting Detect the available GPUs and deal with any system changes...
         Starting LSB: daemon to balance interrupts for SMP systems...
         Starting Bluetooth service...
[  OK  ] Started ClamAV virus database updater.
         Starting LSB: Starts syslogd...
[  OK  ] Started Regular background program processing daemon.
         Starting Modem Manager...
         Starting Accounts Service...
......

From the output above, we can see that there is a boot issues indicated by the lines below.

[DEPEND] Dependency failed for /dev/disk/by-uuid/53e41ce9-dc18-458c-bc08-584c208ed615.
[DEPEND] Dependency failed for Swap.

Issue: Problem with the swap partition; the system either failed to read the swap file/device/partition or it’s not present.

Let’s check if the system is using swap space with free command.

# free

total        used        free      shared  buff/cache   available
Mem:        3742792     2421060      433696      287376      888036      967000
Swap:             0           0           0

Alternatively, we may run the swapon command to view the system swap space usage summary (we’ll not get any output).

# swapon -s

We can resolve this issue, by creating a swap space in Linux.

Note: The content of this file is cleared at system shutdown: new data is stored in it on a new boot.

/var/log/messages – General System Logs

This file stores general system messages, including the messages that are logged during system boot.

To view it, type:

# cat /var/log/messages
View System Log Messages
Jun  4 13:04:44 tecmint syslogd (GNU inetutils 1.9.4): restart
Jun  4 13:19:55 tecmint -- MARK --
Jun  4 13:39:55 tecmint -- MARK --
Jun  4 13:59:55 tecmint -- MARK --
Jun  4 14:19:55 tecmint -- MARK --
Jun  4 14:20:17 tecmint vmunix: [ 4945.388740] i915 0000:00:02.0: BAR 6: [??? 0x00000000 flags 0x2] has bogus alignment
Jun  4 14:20:17 tecmint vmunix: [ 4945.388837] i915 0000:00:02.0: BAR 6: [??? 0x00000000 flags 0x2] has bogus alignment
Jun  4 14:20:17 tecmint vmunix: [ 4945.388903] i915 0000:00:02.0: BAR 6: [??? 0x00000000 flags 0x2] has bogus alignment
Jun  4 14:20:17 tecmint vmunix: [ 4945.388930] i915 0000:00:02.0: BAR 6: [??? 0x00000000 flags 0x2] has bogus alignment
Jun  4 14:20:17 tecmint vmunix: [ 4945.389334] i915 0000:00:02.0: BAR 6: [??? 0x00000000 flags 0x2] has bogus alignment
Jun  4 14:20:17 tecmint vmunix: [ 4945.389402] pcieport 0000:00:1c.0: BAR 15: assigned [mem 0xdfa00000-0xdfbfffff 64bit pref]
.....

Because this file may be relatively lengthy, we can view it in pages use the more command (which even shows a percentage) like this.

# more /var/log/messages

The contents of /var/log/messages unlike the previous file is not cleared shutdown because it does not only contain boot messages but messages concerning other system activities as well. So older files are compressed and kept on the system for later inspection as shown below.

# ls -l message*

-rw-r--r-- 1 root root 1206127 Jun 10 14:20 messages
-rw-r--r-- 1 root root 1419494 Jun  4 13:00 messages.1
-rw-r--r-- 1 root root  153011 May 28 09:30 messages.2.gz

dmesg – Shows Kernel Messages

The dmesg command can show operations once the boot process has completed, such as command line options passed to the kernel; hardware components detected, events when a new USB device is added, or errors like NIC (Network Interface Card) failure and the drivers report no link activity detected on the network and so much more.

# dmesg
Show Kernel Messages
[    0.000000] Initializing cgroup subsys cpuset
[    0.000000] Initializing cgroup subsys cpu
[    0.000000] Initializing cgroup subsys cpuacct
[    0.000000] Linux version 4.4.0-21-generic (buildd@lgw01-21) (gcc version 5.3.1 20160413 (Ubuntu 5.3.1-14ubuntu2) ) #37-Ubuntu SMP Mon Apr 18 18:33:37 UTC 2016 (Ubuntu 4.4.0-21.37-generic 4.4.6)
[    0.000000] Command line: BOOT_IMAGE=/boot/vmlinuz-4.4.0-21-generic root=UUID=57b36d48-1938-43c2-bf85-e97bc9f423ea ro quiet splash
[    0.000000] KERNEL supported cpus:
[    0.000000]   Intel GenuineIntel
[    0.000000]   AMD AuthenticAMD
[    0.000000]   Centaur CentaurHauls
[    0.000000] x86/fpu: xstate_offset[2]:  576, xstate_sizes[2]:  256
[    0.000000] x86/fpu: Supporting XSAVE feature 0x01: 'x87 floating point registers'
[    0.000000] x86/fpu: Supporting XSAVE feature 0x02: 'SSE registers'
[    0.000000] x86/fpu: Supporting XSAVE feature 0x04: 'AVX registers'
[    0.000000] x86/fpu: Enabled xstate features 0x7, context size is 832 bytes, using 'standard' format.
[    0.000000] x86/fpu: Using 'eager' FPU context switches.
[    0.000000] e820: BIOS-provided physical RAM map:
[    0.000000] BIOS-e820: [mem 0x0000000000000000-0x000000000008ffff] usable
[    0.000000] BIOS-e820: [mem 0x0000000000090000-0x00000000000bffff] reserved
[    0.000000] BIOS-e820: [mem 0x0000000000100000-0x000000001fffffff] usable
[    0.000000] BIOS-e820: [mem 0x0000000020000000-0x00000000201fffff] reserved
[    0.000000] BIOS-e820: [mem 0x0000000020200000-0x0000000040003fff] usable
[    0.000000] BIOS-e820: [mem 0x0000000040004000-0x0000000040004fff] reserved
[    0.000000] BIOS-e820: [mem 0x0000000040005000-0x0000000080b2ffff] usable
[    0.000000] BIOS-e820: [mem 0x0000000080b30000-0x0000000080d31fff] reserved
[    0.000000] BIOS-e820: [mem 0x0000000080d32000-0x00000000ce3eefff] usable
[    0.000000] BIOS-e820: [mem 0x00000000ce3ef000-0x00000000ce5eefff] type 20
[    0.000000] BIOS-e820: [mem 0x00000000ce5ef000-0x00000000daeeefff] reserved
[    0.000000] BIOS-e820: [mem 0x00000000daeef000-0x00000000daf9efff] ACPI NVS
....

journalctl – Query Contents of Systemd Journal

This is useful in most current Linux distros using systemd: the newest system and service manager. Under it, system logging is done via the journal component – a centralized location for all messages logged by different components.

These messages include kernel and boot messages; messages from syslog or various services. We can use it to review boot messages and establish boot issues by reading through the output and identifying lines of interest (errors pointed out by red lines depending on terminal text color settings).

# journalctl
Show Contents of SystemD
Jun 13 16:35:32 tecmint mtp-probe[963]: checking bus 2, device 5: "/sys/devices/pci0000:00/0000:00:1d.0/u
Jun 13 16:35:32 tecmint mtp-probe[963]: bus: 2, device: 5 was not an MTP device
Jun 13 16:35:54 tecmint systemd[1]: dev-disk-by\x2duuid-53e41ce9\x2ddc18\x2d458c\x2dbc08\x2d584c208ed615.
Jun 13 16:35:54 tecmint systemd[1]: Timed out waiting for device dev-disk-by\x2duuid-53e41ce9\x2ddc18\x2d
Jun 13 16:35:54 tecmint systemd[1]: Dependency failed for /dev/disk/by-uuid/53e41ce9-dc18-458c-bc08-584c2
Jun 13 16:35:54 tecmint systemd[1]: Dependency failed for Swap.
Jun 13 16:35:54 tecmint systemd[1]: swap.target: Job swap.target/start failed with result 'dependency'.
Jun 13 16:35:54 tecmint systemd[1]: dev-disk-by\x2duuid-53e41ce9\x2ddc18\x2d458c\x2dbc08\x2d584c208ed615.
Jun 13 16:35:54 tecmint systemd[1]: Reached target System Initialization.
Jun 13 16:35:54 tecmint systemd[1]: Started ACPI Events Check.
Jun 13 16:35:54 tecmint systemd[1]: Listening on CUPS Scheduler.
Jun 13 16:35:54 tecmint systemd[1]: Starting Console System Startup Logging...
Jun 13 16:35:54 tecmint systemd[1]: Started Daily Cleanup of Temporary Directories.

The above is a sample of the command output showing an error we already identified by viewing /var/log/boot.log: the swap partition error. To view more output lines, simply press [Enter] button.

Also check out these useful guides about Linux system boot and service management in relation to common system and service managers:

  1. Process Management in RHEL 7: Boot, Shutdown, and Everything in Between
  2. Managing System Startup Process and Services (SysVinit, Systemd and Upstart)
  3. The Story Behind ‘init’ and ‘systemd’: Why ‘init’ Needed to be Replaced with ‘systemd’

In this article, we explained in short the different stages in the Linux system boot process as well as learned how to establish and possibly resolve boot issues. To add any thought to this guide, use the comment form below.

Source

How to Create a Password Protected ZIP File in Linux

ZIP is a very popular compression and file packaging utility for Unix-like operating systems as well as Windows. While perusing through the zip man page, I discovered some useful options for protecting zip archives.

Read AlsoHow to Password Protect a Vim File in Linux

In this post, I will show you how to create a password protected zip file on the terminal in Linux. This will help you learn a practical way of encrypting and decrypting contents of zip archive files.

First install zip utility in your Linux distribution using the package manger as shown.

$ sudo yum install zip    [On CentOS/RHEL]
$ sudo dnf install zip    [On Fedora 22+]
$ sudo apt install zip    [On Debian/Ubuntu]

How to Create Password Protected ZIP in Linux

Once installed, you can use the zip command with -p flag to create a password protected zip archive called ccat-command.zip from the directory of files called ccat-1.1.0 as follows.

$ zip -p pass123 ccat-command.zip ccat-1.1.0/

Create Password Protected Zip File

Create Password Protected Zip File

However, the above method is absolutely insecure, because here the password is provided as clear-text on the command line. Secondly, it will also be stored in the history file (e.g ~.bash_history for bash), meaning another user with access to your account (more especially root user) will easily see the password.

Therefore, try to always use the -e flag, it shows a prompt allowing you to enter a hidden password as shown.

$ zip -e ccat-command.zip ccat-1.1.0/

Create Password Protect Zip Archive

Create Password Protect Zip Archive

How to Unzip Password Protected ZIP in Linux

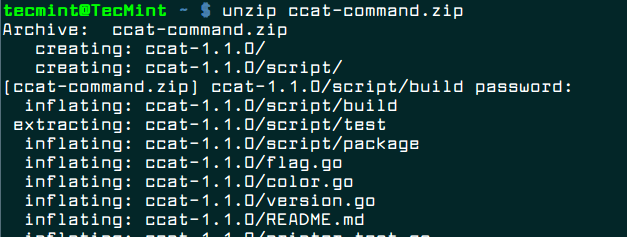
To unzip and decrypt the content of the archive file called ccat-command.zip, use the unzip program and provide the password you entered above.

$ unzip ccat-command.zip

Decrypt ZIP Archive

Decrypt ZIP Archive

That’s It! In this post, I described how to create a password protected zip file on the terminal in Linux. If you have any queries, or other useful related tip/tricks to share, use the comment form below ping us.

Source

How to Fix “failed to mount /etc/fstab” Error in Linux

In this article, i will explain how to solve “failed to mount /etc/fstab” boot error in Linux. The file in question contains descriptive information concerning the filesystems the system can mount automatically at boot time.

This information is static and is read by other programs on the system such as mount, umount, dump and fsck. It has six important filesystem mount specification fields: the first field describes the block special device or remote filesystem to be mounted, the second field defines the mount point for the filesystem and the third specifies the filesystem type.

The fourth field defines the mount options associated with the filesystem, and the fifth field is read by dump tool. The last field is used by fsck tool to establish the order of filesystem-checks.

Suggested Read: How to Determine and Fix Boot Issues in Linux

After editing the /etc/fstab to create an automount and rebooting my system; it booted into emergency mode showing the error message below.

Linux Emergency Mode

Linux Emergency Mode

I logged in as root from the interface above, and typed the following command to look through the systemd journal; then I saw the errors shown in the screen shot (indicated using red).

As you can see, the main error (failure of etc-fstab.mount unit) lead to several other errors (systemd unit dependency issues) such as failure of local-fs.target, rhel-autorelabel-mark.service etc.

# journalctl -xb

Boot Error Messages

Boot Error Messages

Causes of “failed to mount /etc/fstab” Error in Linux

The error above may result from any of the issues below, in the /etc/fstab file:

  • missing /etc/fstab file
  • wrong specification of filesystem mount options,
  • failing mount points or
  • unrecognized characters in the file.

To solve it, you can use the original file if you created a backup, otherwise comment out any changes you made using the “#” character (and also ensure that all the uncommented lines are filesystem mount lines).

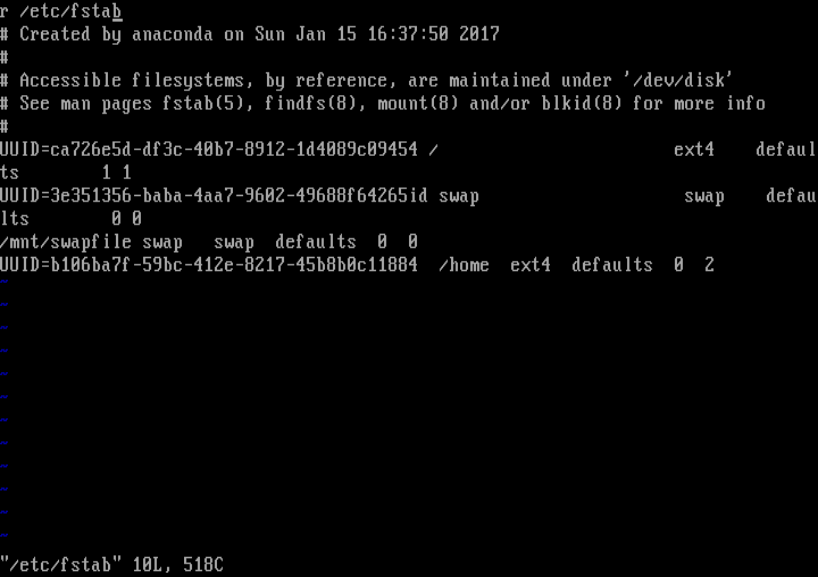
So I opened the /etc/fstab using vi/m text editor to check for any errors.

# vi /etc/fstab

Linux /etc/fstab File

Linux /etc/fstab File

I realized I had typed an “r” letter at the beginning of the file as shown in the screen shot above – this was recognized by the system as a special device which did not actually exist in the filesystem, thus resulting to the sequential errors shown above.

This took me several hours before noticing and fixing it. So I had to remove the letter, commented out the first line in the file, closed and saved it. After running a reboot, the system booted well again.

How to Avoid Such Issues in the Future

To avoid encountering such issues on your system, take note of the following:

Always create a backup of your config files before editing them. In case of any errors in your configs, you can revert to the default/working file.

For instance:

# cp /etc/fstab /etc/fstab.orig

Secondly, check config files for any errors before saving them, certain applications offer utilities to check syntax of config files before running the application. Use these utilities where possible.

However, if you happen to get any system errors messages:

First look through the systemd journal using the journalctl utility to determine what exactly caused them:

# journal -xb

If you can’t resolve the errors in one way or the other, run to any of the millions of Linux forums on the web and post the issue there.

Do check out some useful related articles.

  1. A Basic Guide to Linux Boot Process
  2. 4 Best Linux Boot Loaders
  3. Manage Log Messages Under Systemd Using Journalctl [Comprehensive Guide]
  4. Managing System Startup Process and Services (SysVinit, Systemd and Upstart)
  5. Process Management in RHEL 7: Boot, Shutdown, and Everything in Between

That’s it for now. In this article, I explained how to solve the “failed to mount /etc/fstab” boot error in Linux. Once again, to avoid such issues (or if you encounter any boot issues), remember to follow the guidelines offered above. Lastly, you can add your thoughts to this guide via the feedback form below.

Source

How to Create Hard and Symbolic Links in Linux

In Unix-like operating systems such as Linux, “everything is a file” and a file is fundamentally a link to an inode (a data structure that stores everything about a file apart from its name and actual content).

A hard link is a file that points to the same underlying inode, as another file. In case you delete one file, it removes one link to the underlying inode. Whereas a symbolic link (also known as soft link) is a link to another filename in the filesystem.

Read AlsoHow to Perform File and Directory Management

Another important difference between the two types of links is that hard links can only work within the same filesystem while symbolic links can go across different filesystems.

How to Create Hard Links in Linux

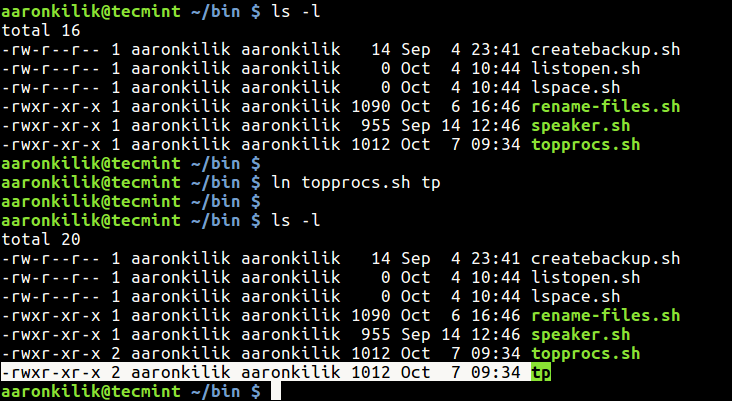
To create a hard links in Linux, we will use ln utility. For example, the following command creates a hard link named tp to the file topprocs.sh.

$ ls -l
$ ln topprocs.sh tp
$ ls -l

Create a Hard Link to File

Create a Hard Link to File

Looking at the output above, using ls command, the new file is not indicated as a link, it is shown as a regular file. This implies that tp is just another regular executable file that points to the same underlying inode as topprocs.sh.

To make a hard link directly into a soft link, use the -P flag like this.

$ ln -P topprocs.sh tp

How to Create Symbolic Links in Linux

To create a symbolic links in Linux, we will use same ln utility with -s switch. For example, the following command creates a symbolic link named topps.sh to the file topprocs.sh.

$ ln -s ~/bin/topprocs.sh topps.sh
$ ls -l topps.sh

Create a Symbolic Link to File

Create a Symbolic Link to File

From the above output, you can see from the file permissions section that topps.sh is a link indicated by l:meaning it is a link to another filename.

If the symbolic link already exist, you may get an error, to force the operation (remove exiting symbolic link), use the -f option.

$ ln -s ~/bin/topprocs.sh topps.sh
$ ln -sf ~/bin/topprocs.sh topps.sh

Forcefully Create Symbolic Link

Forcefully Create Symbolic Link

To enable verbose mode, add the -v flag to prints the name of each linked file in the output.

$ ln -sfv ~/bin/topprocs.sh topps.sh
$ $ls -l topps.sh

Enable Verbose in Command Output

Enable Verbose in Command Output

That’s It! Do check out these following related articles.

  1. fdupes – A Command Line Tool to Find and Delete Duplicate Files in Linux
  2. 5 Useful Commands to Manage File Types and System Time in Linux

In this article, we’ve learned how to create hard and symbolic links in Linux. You can ask any question(s) or share your thoughts about this guide via the feedback form below.

Source

A Complete Guide to Usage of ‘usermod’ command – 15 Practical Examples with Screenshots

In Unix/Linux distributions, the command ‘usermod‘ is used to modify or change any attributes of a already created user account via command line. The command ‘usermod‘ is similar to that ‘useradd‘ or ‘adduser‘ but the login granted to an existing user.

usermod Command Examples

15 usermod Command Examples

The command ‘useradd‘ or ‘adduser‘ is used for creating user accounts in Linux systems. To know more about on how to create system users, read our complete guide at:

  1. A Complete Guide to “useradd” Command in Linux

After creating user accounts, in some scenarios where we need to change the attributes of an existing user such as, change user’s home directory, login name, login shell, password expiry date, etc, where in such case ‘usermod’ command is used.

When we execute ‘usermod‘ command in terminal, the following files are used and affected.

  1. /etc/passwd – User account information.
  2. /etc/shadow – Secure account information.
  3. /etc/group – Group account information.
  4. /etc/gshadow – Secure group account information.
  5. /etc/login.defs – Shadow password suite configuration..

Basic syntax of command is:

usermod [options] username

Requirements

  1. We must have existing user accounts to execute usermod command.
  2. Only superuser (root) is allowed to execute usermod command.
  3. The usermod command can be executed on any Linux distribution.
  4. Must have basic knowledge of usermod command with options

Options of Usermod

The ‘usermod‘ command is simple to use with lots of options to make changes to an existing user. Let us see how to use usermod command by modifying some existing users in Linux box with the help of following options.

  1. -c = We can add comment field for the useraccount.
  2. -d = To modify the directory for any existing user account.
  3. -e = Using this option we can make the account expiry in specific period.
  4. -g = Change the primary group for a User.
  5. -G = To add a supplementary groups.
  6. -a = To add anyone of the group to a secondary group.
  7. -l = To change the login name from tecmint to tecmint_admin.
  8. -L = To lock the user account. This will lock the password so we can’t use the account.
  9. -m = moving the contents of the home directory from existing home dir to new dir.
  10. -p = To Use un-encrypted password for the new password. (NOT Secured).
  11. -s = Create a Specified shell for new accounts.
  12. -u = Used to Assigned UID for the user account between 0 to 999.
  13. -U = To unlock the user accounts. This will remove the password lock and allow us to use the user account.

In this article we will see ‘15 usermod commands‘ with their practical examples and usage in Linux, which will help you to learn and enhance your command-line skills using these options.

1. Adding Information to User Account

The ‘-c‘ option is used to set a brief comment (information) about the user account. For example, let’s add information on ‘tecmint‘ user, using the following command.

# usermod -c "This is Tecmint" tecmint

After adding information on user, the same comment can be viewed in /etc/passwd file.

# grep -E --color 'tecmint' /etc/passwd

tecmint:x:500:500:This is Tecmint:/home/tecmint:/bin/sh

Add User Information in Linux

Add Information to User

2. Change User Home Directory

In the above step we can see that our home directory is under /home/tecmint/, If we need to change it to some other directory we can change it using -d option with usermod command.

For example, I want to change our home directory to /var/www/, but before changing, let’s check the current home directory of a user, using the following command.

# grep -E --color '/home/tecmint' /etc/passwd

tecmint:x:500:500:This is Tecmint:/home/tecmint:/bin/sh

Now, change home directory from /home/tecmint to /var/www/ and confirm the home director after changing.

# usermod -d /var/www/ tecmint
# grep -E --color '/var/www/' /etc/passwd

tecmint:x:500:500:This is Tecmint:/var/www:/bin/sh
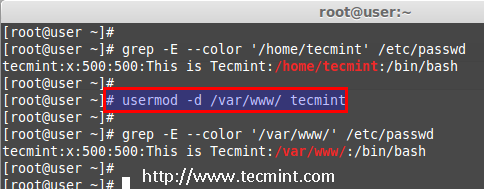
Change User Home Directory

Change User Home Directory

3. Set User Account Expiry Date

The option ‘-e‘ is used to set expiry date on a user account with the date format YYYY-MM-DD. Before, setting up an expiry date on a user, let’s first check the current account expiry status using the ‘chage‘ (change user password expiry information) command.

# chage -l tecmint

Last password change					: Nov 02, 2014
Password expires					: never
Password inactive					: never
Account expires						: Dec 01, 2014
Minimum number of days between password change		: 0
Maximum number of days between password change		: 99999
Number of days of warning before password expires	: 7
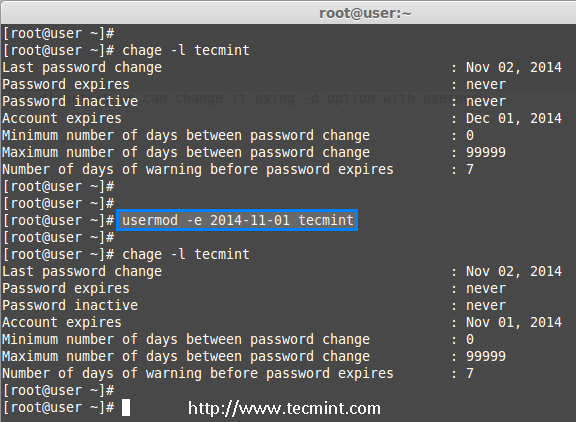
The expiry status of a ‘tecmint‘ user is Dec 1 2014, let’s change it to Nov 1 2014 using ‘usermod -e‘ option and confirm the expiry date with ‘chage‘ command.

# usermod -e 2014-11-01 tecmint
# chage -l tecmint

Last password change					: Nov 02, 2014
Password expires					: never
Password inactive					: never
Account expires						: Nov 01, 2014
Minimum number of days between password change		: 0
Maximum number of days between password change		: 99999
Number of days of warning before password expires	: 7

Add User Expiry Date in Linux

Set User Account Expiry Date

4. Change User Primary Group

To set or change a user primary group, we use option ‘-g‘ with usermod command. Before, changing user primary group, first make sure to check the current group for the user tecmint_test.

# id tecmint_test

uid=501(tecmint_test) gid=502(tecmint_test) groups=502(tecmint_test)

Now, set the babin group as a primary group to user tecmint_test and confirm the changes.

# usermod -g babin tecmint_test
# id tecmint_test

uid=501(tecmint_test) gid=502(babin) groups=502(tecmint_test)
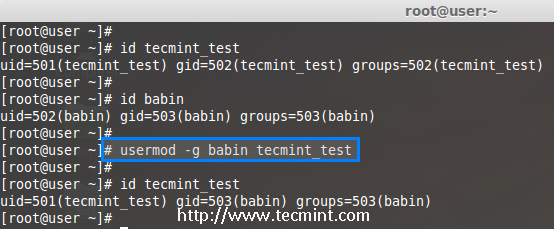
Change User Group in Linux

Change User Primary Group

5. Adding Group to an Existing User

If you want to add a new group called ‘tecmint_test0‘ to ‘tecmint‘ user, you can use option ‘-G‘ with usermod command as shown below.

# usermod -G tecmint_test0 tecmint
# id tecmint

Add Group to User in Linux

Add Group to User

Note: Be careful, while adding a new groups to an existing user with ‘-G’ option alone, will remove all existing groups that user belongs. So, always add the ‘-a‘ (append) with ‘-G‘ option to add or append new groups.

6. Adding Supplementary and Primary Group to User

If you need to add a user to any one of the supplementary group, you can use the options ‘-a‘ and ‘-G‘. For example, here we going to add a user account tecmint_test0 with the wheel user.

# usermod -a -G wheel tecmint_test0
# id tecmint_test0

So, user tecmint_test0 remains in its primary group and also in secondary group (wheel). This will make my normal user account to execute any root privileged commands in Linux box.

eg : sudo service httpd restart

Add Multiple Groups to User

Add Multiple Groups to User

7. Change User Login Name

To change any existing user login name, we can use ‘-l‘ (new login) option. In the example below, we changing login name tecmint to tecmint_admin. So the username tecmint has been renamed with the new name tecmint_admin.

# usermod -l tecmint_admin tecmint

Now check for the tecmint user, It will not be present because we have changed it to tecmint_admin.

# id tecmint

Check for the tecmint_admin account it will be there with same UID and with existing group what we have added before.

# id tecmint_admin
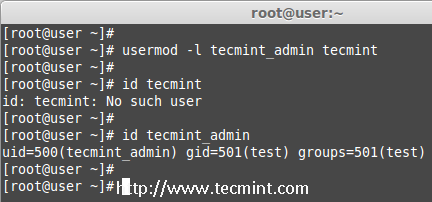
Change User Login Name in Linux

Change User Login Name

8. Lock User Account

To Lock any system user account, we can use ‘-L‘ (lock) option, After the account is locked we can’t login by using the password and you will see a ! added before the encrypted password in /etc/shadow file, means password disabled.

# usermod -L babin

Check for the locked account.

# grep -E --color 'babin' cat /etc/shadow
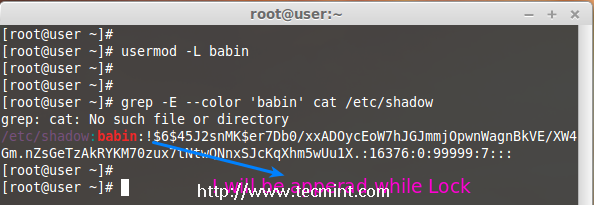
Lock User Account in Linux

Lock User Account

9. Unlock User Account

The ‘-U‘ option is used to unlock any locked user, this will remove the ! before the encrypted password.

# grep -E --color 'babin' /etc/shadow
# usermod -U babin

Verify the user after unlock.

# grep -E --color 'babin' /etc/shadow
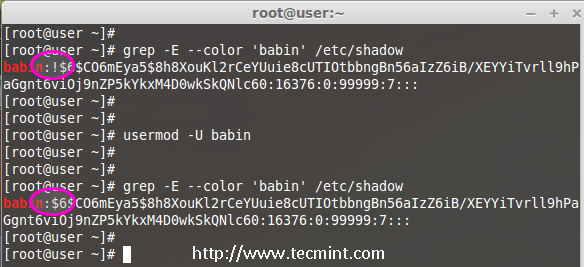
Unlock User Account in Linux

Unlock User Account

10. Move User Home Directory to New location

Let’s say you’ve a user account as ‘pinky‘ with home directory ‘/home/pinky‘, you want to move to new location say ‘/var/pinky‘. You can use the options ‘-d‘ and ‘-m‘ to move the existing user files from current home directory to a new home directory.

Check for the account and it’s current home directory.

# grep -E --color 'pinky' /etc/passwd

Then list the files which is owned by user pinky.

# ls -l /home/pinky/

Now we have to move the home directory from /home/pinky to /var/pinky.

# usermod -d /var/pinky/ -m pinky

Next, verify the directory change.

# grep -E --color 'pinky' /etc/passwd

Check for the files under ‘/home/pinky‘. Here we have moved the files using -m option so there will be no files. The pinky user files will be now under /var/pinky.

# ls -l /home/pinky/
# ls -l /var/pinky/
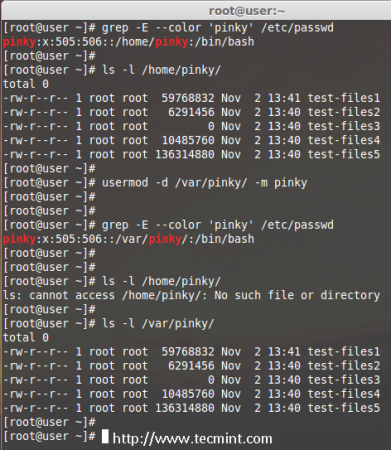
Move User Home Directory in Linux

Move User Home Directory

11. Create Un-encrypted Password for User

To create an un-encrypted password, we use option ‘-p‘ (password). For demonstration purpose, I’m setting a new password say ‘redhat’ on a user pinky.

# usermod -p redhat pinky

After setting password, now check the shadow file to see whether its in encrypted format or un-encrypted.

# grep -E --color 'pinky' /etc/shadow
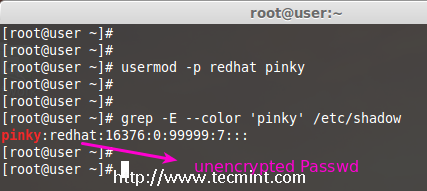
Create Unencrypted User Password in Linux

Create Unencrypted User Password

Note: Did you see in the above image, the password is clearly visible to everyone. So, this option is not recommended to use, because the password will be visible to all users.

12. Change User Shell

The user login shell can be changed or defined during user creation with useradd command or changed with ‘usermod‘ command using option ‘-s‘ (shell). For example, the user ‘babin‘ has the /bin/bash shell by default, now I want to change it to /bin/sh.

# grep -E --color 'babin' /etc/passwd
# usermod -s /bin/sh babin

After changing user shell, verify the user shell using the following command.

# grep -E --color 'babin' /etc/passwd
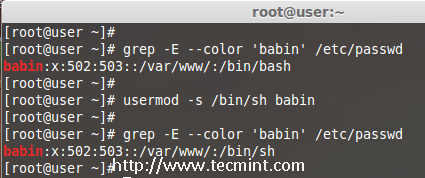
Change User Login Shell in Linux

Change User Login Shell

13. Change User ID (UID)

In the example below, you can see that my user account ‘babin‘ holds the UID of 502, now I want to change it to 888 as my UID. We can assign UID between 0 to 999.

# grep -E --color 'babin' /etc/passwd
OR
# id babin

Now, let’s change the UID for user babin using ‘-u‘ (uid) option and verify the changes.

# usermod -u 888 babin
# id babin
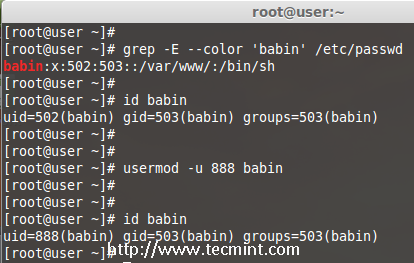
Change User UID in Linux

Change User UID

14. Modifying User Account with Multiple Options

Here we have a user jack and now I want to modify his home directory, shell, expiry date, label, UID and group at once using one single command with all options as we discussed above.

The user Jack has the default home directory /home/jack, Now I want to change it to /var/www/html and assign his shell as bash, set expiry date as December 10th 2014, add new label as This is jack, change UID to 555 and he will be member of apple group.

Let we see how to modify the jack account using multiple option now.

# usermod -d /var/www/html/ -s /bin/bash -e 2014-12-10 -c "This is Jack" -u 555 -aG apple jack

Then check for the UID & home directory changes.

# grep -E --color 'jack' /etc/passwd

Account expire check.

# chage -l jack

Check for the group which all jack have been member.

# grep -E --color 'jack' /etc/group
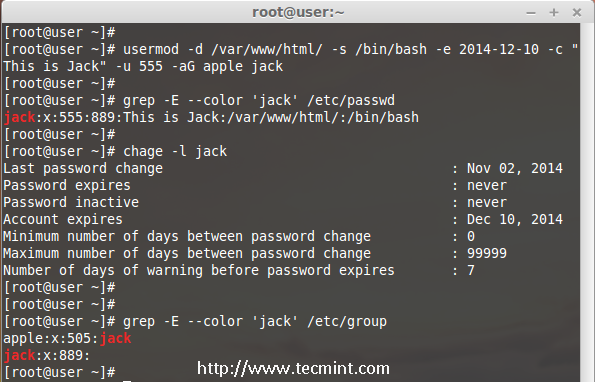
Using Multiple Options with usermod

Using Multiple Options with usermod

15. Change UID and GID of a User

We can change UID and GID of a current user. For changing to a New GID we need an existing group. Here already there is an account named as orange with GID of 777.

Now my jack user account want to be assigned with UID of 666 and GID of Orange (777).

Check for the current UID and GID before modifying.

# id jack

Modify the UID and GID.

# usermod -u 666 -g 777 jack

Check for the changes.

# id jack
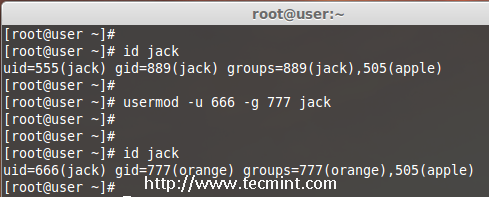
Change User GID

Change User UID and GID

Conclusion

Here we have seen how to use usermod command with its options in very detailed fashion, Before knowing about usermod command, one should must know ‘useradd’ command and its options to use the usermod. If I’ve missed any point in the article do let me know via comments and don’t forget to add your valuable comments.

Source

3 Ways to Find Out Which Process Listening on a Particular Port

A port is a logical entity which represents an endpoint of communication and is associated with a given process or service in an operating system. In previous articles, we explained how to find out list of all open ports in Linux and how to check if remote ports are reachable using ‘nc’ command.

In this short guide, we will show different ways of finding the process/service listening on a particular port in Linux.

1. Using netstat Command

netstat (network statistics) command is used to display information concerning network connections, routing tables, interface stats and beyond. It is available on all Unix-like operating systems including Linux and also on Windows OS.

In case you do not have it installed by default, use the following command to install it.

$ sudo yum install net-tools	#RHEL/CentOS 
$ sudo apt install net-tools	#Debian/Ubuntu
$ sudo dnf install net-tools	#Fedora 22+

Once installed, you can use it with grep command to find the process or service listening on a particular port in Linux as follows (specify the port).

$ netstat -ltnp | grep -w ':80' 

Check Port Using netstat Command

Check Port Using netstat Command

In the above command, the flags.

  • l – tells netstat to only show listening sockets.
  • t – tells it to display tcp connections.
  • n – instructs it show numerical addresses.
  • p – enables showing of the process ID and the process name.
  • grep -w – shows matching of exact string (:80).

2. Using lsof Command

lsof command (LiSt Open Files) is used to list all open files on a Linux system. To install it on your system, type the command below.

$ sudo yum install lsof	        #RHEL/CentOS 
$ sudo apt install lsof		#Debian/Ubuntu
$ sudo dnf install lsof		#Fedora 22+

To find the process/service listening on a particular port, type (specify the port).

$ lsof -i :80

Find Port Using lsof Command

Find Port Using lsof Command

3. Using fuser Command

fuser command shows the PIDs of processes using the specified files or file systems in Linux.

You can install it as follows:

$ sudo yum install psmisc	#RHEL/CentOS 
$ sudo apt install psmisc	#Debian/Ubuntu
$ sudo dnf install psmisc	#Fedora 22+

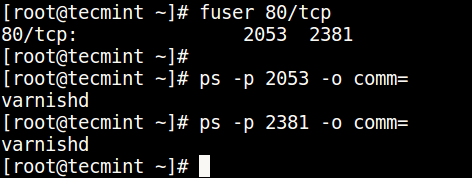
You can find the process/service listening on a particular port by running the command below (specify the port).

$ fuser 80/tcp

Then find the process name using PID number with the ps command like so.

$ ps -p 2053 -o comm=
$ ps -p 2381 -o comm=

Find Port and Process ID in Linux

Find Port and Process ID in Linux

You can also check out these useful guides about processes in Linux.

  1. All You Need To Know About Processes in Linux [Comprehensive Guide]
  2. Limit CPU Usage of a Process in Linux with CPULimit Tool
  3. How to Find and Kill Running Processes in Linux
  4. Find Top Running Processes by Highest Memory and CPU Usage in Linux

That’s all! Do you know of any other ways of finding the process/service listening on a particular port in Linux, let us know via the comment form below.

Source
How to Find Out What Version of Linux You Are Running

There are several ways of knowing the version of Linux you are running on your machine as well as your distribution name and kernel version plus some extra information that you may probably want to have in mind or at your fingertips.

Therefore, in this simple yet important guide for new Linux users, I will show you how to do just that. Doing this may seem to be relatively easy task, however, having a good knowledge of your system is always a recommended practice for a good number of reasons including installing and running the appropriate packages for your Linux version, for easy reporting of bugs coupled with many more.

Suggested Read: 5 Ways to Find Out Linux System is 32-bit or 64-bit

With that said, let us proceed to how you can figure out information about your Linux distribution.

Find Out Linux Kernel Version

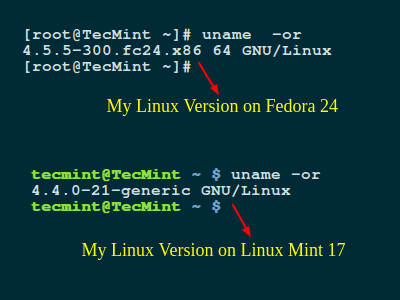
We will use uname command, which is used to print your Linux system information such as kernel version and release name, network hostname, machine hardware name, processor architecture, hardware platform and the operating system.

To find out which version of Linux kernel you are running, type:

$ uname -or

Shows Current Linux Kernel Version Running on System

Shows Current Linux Kernel Version Running on System

In the preceding command, the option -o prints operating system name and -r prints the kernel release version.

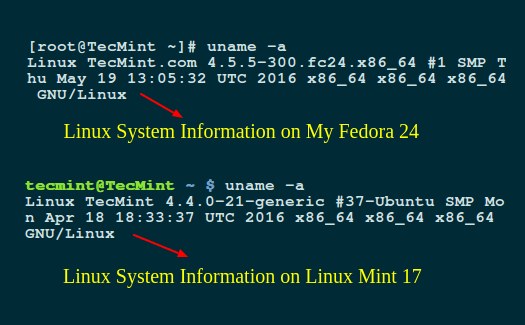
You can also use -a option with uname command to print all system information as shown:

$ uname -a

Shows Linux System Information

Shows Linux System Information

Next, we will use /proc file system, that stores information about processes and other system information, it’s mapped to /proc and mounted at boot time.

Simply type the command below to display some of your system information including the Linux kernel version:

$ cat /proc/version

Shows Linux System Information

Shows Linux System Information

From the image above, you have the following information:

  1. Version of the Linux (kernel) you are running: Linux version 4.5.5-300.fc24.x86_64
  2. Name of the user who compiled your kernel: mockbuild@bkernel01.phx2.fedoraproject.org
  3. Version of the GCC compiler used for building the kernel: gcc version 6.1.1 20160510
  4. Type of the kernel: #1 SMP (Symmetric MultiProcessing kernel) it supports systems with multiple CPUs or multiple CPU cores.
  5. Date and time when the kernel was built: Thu May 19 13:05:32 UTC 2016

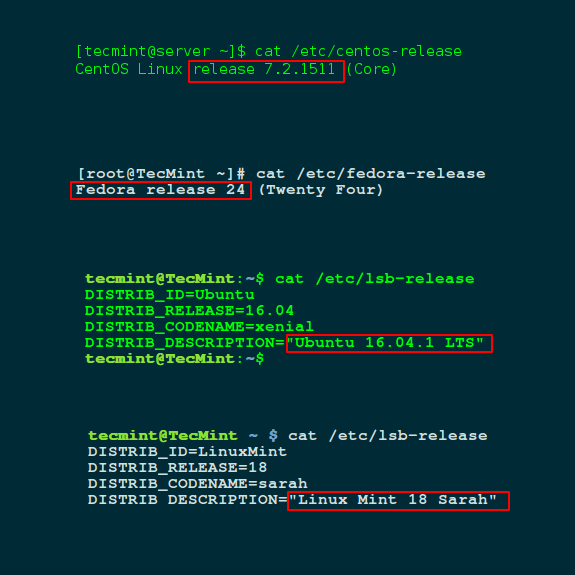
Find Out Linux Distribution Name and Release Version

The best way to determine a Linux distribution name and release version information is using cat /etc/os-release command, which works on almost all Linux system.

---------- On Red Hat Linux ---------- 
$ cat /etc/redhat-release

---------- On CentOS Linux ---------- 
$ cat /etc/centos-release

---------- On Fedora Linux ---------- 
$ cat /etc/fedora-release

---------- On Debian Linux ---------- 
$ cat /etc/debian_version

---------- On Ubuntu and Linux Mint ---------- 
$ cat /etc/lsb-release

---------- On Gentoo Linux ---------- 
$ cat /etc/gentoo-release

---------- On SuSE Linux ---------- 
$ cat /etc/SuSE-release

Find Linux Distribution Name and Release Version

Find Linux Distribution Name and Release Version

In this article, we walked through a brief and simple guide intended to help new Linux user find out the Linux version they are running and also get to know their Linux distribution name and version from the shell prompt.

Perhaps it can also be useful to advanced users on one or two occasions. Lastly, to reach us for any assistance or suggestions you wish to offer, make use of the feedback form below.

Source
20 Linux YUM (Yellowdog Updater, Modified) Commands for Package Management

In this article, we will learn how to install, update, remove, find packages, manage packages and repositories on Linux systems using YUM (Yellowdog Updater Modified) tool developed by RedHat. The example commands shown in this article are practically tested on our CentOS 6.3 server, you can use these material for study purpose, certifications or just to explore ways to install new packages and keep your system up-to-date. The basic requirement of this article is, you must have a basic understanding of commands and a working Linux operating system, where you can explore and practice all the commands listed below.

20 Linux Yum Commands

20 Linux Yum Commands

What is YUM?

YUM (Yellowdog Updater Modified) is an open source command-line as well as graphical based package management tool for RPM (RedHat Package Manager) based Linux systems. It allows users and system administrator to easily install, update, remove or search software packages on a systems. It was developed and released by Seth Vidal under GPL (General Public License) as an open source, means anyone can allowed to download and access the code to fix bugs and develop customized packages. YUM uses numerous third party repositories to install packages automatically by resolving their dependencies issues.

1. Install a Package with YUM

To install a package called Firefox 14, just run the below command it will automatically find and install all required dependencies for Firefox.

# yum install firefox
Loaded plugins: fastestmirror
Dependencies Resolved

================================================================================================
 Package                    Arch        Version                    Repository            Size        
================================================================================================
Updating:
firefox                        i686        10.0.6-1.el6.centos     updates             20 M
Updating for dependencies:
 xulrunner                     i686        10.0.6-1.el6.centos     updates             12 M

Transaction Summary
================================================================================================
Install       0 Package(s)
Upgrade       2 Package(s)

Total download size: 32 M
Is this ok [y/N]: y
Downloading Packages:
(1/2): firefox-10.0.6-1.el6.centos.i686.rpm                                |  20 MB   01:10
(2/2): xulrunner-10.0.6-1.el6.centos.i686.rpm                              |  12 MB   00:52
------------------------------------------------------------------------------------------------
Total                                                           63 kB/s |  32 MB   02:04

Updated:
  firefox.i686 0:10.0.6-1.el6.centos

Dependency Updated:
  xulrunner.i686 0:10.0.6-1.el6.centos

Complete!

The above command will ask confirmation before installing any package on your system. If you want to install packages automatically without asking any confirmation, use option -y as shown in below example.

# yum -y install firefox

2. Removing a Package with YUM

To remove a package completely with their all dependencies, just run the following command as shown below.

# yum remove firefox
Loaded plugins: fastestmirror
Setting up Remove Process
Resolving Dependencies
--> Running transaction check
---> Package firefox.i686 0:10.0.6-1.el6.centos set to be erased
--> Finished Dependency Resolution

Dependencies Resolved

====================================================================================================
 Package                    Arch        Version                        Repository            Size        
====================================================================================================
Removing:
 firefox                    i686        10.0.6-1.el6.centos            @updates              23 M

Transaction Summary
====================================================================================================
Remove        1 Package(s)
Reinstall     0 Package(s)
Downgrade     0 Package(s)

Is this ok [y/N]: y
Downloading Packages:
Running rpm_check_debug
Running Transaction Test
Transaction Test Succeeded
Running Transaction
  Erasing        : firefox-10.0.6-1.el6.centos.i686                                                                                                                          1/1

Removed:
  firefox.i686 0:10.0.6-1.el6.centos

Complete!

Same way the above command will ask confirmation before removing a package. To disable confirmation prompt just add option -y as shown in below.

# yum -y remove firefox

3. Updating a Package using YUM

Let’s say you have outdated version of MySQL package and you want to update it to the latest stable version. Just run the following command it will automatically resolves all dependencies issues and install them.

# yum update mysql
Loaded plugins: fastestmirror
Dependencies Resolved

============================================================================================================
 Package            Arch                Version                    Repository                    Size
============================================================================================================
Updating:
 vsftpd             i386                2.0.5-24.el5_8.1           updates                       144 k

Transaction Summary
============================================================================================================
Install       0 Package(s)
Upgrade       1 Package(s)

Total size: 144 k
Is this ok [y/N]: y
Downloading Packages:
Running rpm_check_debug
Running Transaction Test
Finished Transaction Test
Transaction Test Succeeded
Running Transaction
  Updating       : vsftpd                                                                     1/2
  Cleanup        : vsftpd                                                                     2/2

Updated:
  vsftpd.i386 0:2.0.5-24.el5_8.1

Complete!

4. List a Package using YUM

Use the list function to search for the specific package with name. For example to search for a package called openssh, use the command.

# yum list openssh
Loaded plugins: fastestmirror
Loading mirror speeds from cached hostfile
 * base: mirror.neu.edu.cn
 * epel: mirror.neu.edu.cn
 * extras: mirror.neu.edu.cn
 * rpmforge: mirror.nl.leaseweb.net
 * updates: mirror.nus.edu.sg
Installed Packages
openssh.i386                                       4.3p2-72.el5_6.3                                                                      installed
Available Packages                                 4.3p2-82.el5                                                                          base

To make your search more accurate, define package name with their version, in case you know. For example to search for a specific version openssh-4.3p2 of the package, use the command.

# yum list openssh-4.3p2

5. Search for a Package using YUM

If you don’t remember the exact name of the package, then use search function to search all the available packages to match the name of the package you specified. For example, to search all the packages that matches the word .

# yum search vsftpd
Loaded plugins: fastestmirror
Loading mirror speeds from cached hostfile
 * base: mirror.neu.edu.cn
 * epel: mirror.neu.edu.cn
 * extras: mirror.neu.edu.cn
 * rpmforge: mirror.nl.leaseweb.net
 * updates: ftp.iitm.ac.in
============================== Matched: vsftpd ========================
ccze.i386 : A robust log colorizer
pure-ftpd-selinux.i386 : SELinux support for Pure-FTPD
vsftpd.i386 : vsftpd - Very Secure Ftp Daemon

6. Get Information of a Package using YUM

Say you would like to know information of a package before installing it. To get information of a package just issue the below command.

# yum info firefox
Loaded plugins: fastestmirror
Loading mirror speeds from cached hostfile
 * base: mirror.neu.edu.cn
 * epel: mirror.neu.edu.cn
 * extras: mirror.neu.edu.cn
 * rpmforge: mirror.nl.leaseweb.net
 * updates: ftp.iitm.ac.in
Available Packages
Name       : firefox
Arch       : i386
Version    : 10.0.6
Release    : 1.el5.centos
Size       : 20 M
Repo       : updates
Summary    : Mozilla Firefox Web browser
URL        : http://www.mozilla.org/projects/firefox/
License    : MPLv1.1 or GPLv2+ or LGPLv2+
Description: Mozilla Firefox is an open-source web browser, designed for standards
           : compliance, performance and portability.

7. List all Available Packages using YUM

To list all the available packages in the Yum database, use the below command.

# yum list | less

8. List all Installed Packages using YUM

To list all the installed packages on a system, just issue below command, it will display all the installed packages.

# yum list installed | less

9. Yum Provides Function

Yum provides function is used to find which package a specific file belongs to. For example, if you would like to know the name of the package that has the /etc/httpd/conf/httpd.conf.

# yum provides /etc/httpd/conf/httpd.conf
Loaded plugins: fastestmirror
httpd-2.2.3-63.el5.centos.i386 : Apache HTTP Server
Repo        : base
Matched from:
Filename    : /etc/httpd/conf/httpd.conf

httpd-2.2.3-63.el5.centos.1.i386 : Apache HTTP Server
Repo        : updates
Matched from:
Filename    : /etc/httpd/conf/httpd.conf

httpd-2.2.3-65.el5.centos.i386 : Apache HTTP Server
Repo        : updates
Matched from:
Filename    : /etc/httpd/conf/httpd.conf

httpd-2.2.3-53.el5.centos.1.i386 : Apache HTTP Server
Repo        : installed
Matched from:
Other       : Provides-match: /etc/httpd/conf/httpd.conf

10. Check for Available Updates using Yum

To find how many of installed packages on your system have updates available, to check use the following command.

# yum check-update

11. Update System using Yum

To keep your system up-to-date with all security and binary package updates, run the following command. It will install all latest patches and security updates to your system.

# yum update

12. List all available Group Packages

In Linux, number of packages are bundled to particular group. Instead of installing individual packages with yum, you can install particular group that will install all the related packages that belongs to the group. For example to list all the available groups, just issue following command.

# yum grouplist
Installed Groups:
   Administration Tools
   DNS Name Server
   Dialup Networking Support
   Editors
   Engineering and Scientific
   FTP Server
   Graphics
   Java Development
   Legacy Network Server
Available Groups:
   Authoring and Publishing
   Base
   Beagle
   Cluster Storage
   Clustering
   Development Libraries
   Development Tools
   Eclipse
   Educational Software
   KDE (K Desktop Environment)
   KDE Software Development

13. Install a Group Packages

To install a particular package group, we use option as groupinstall. Fore example, to install “MySQL Database“, just execute the below command.

# yum groupinstall 'MySQL Database'
Dependencies Resolved

=================================================================================================
Package								Arch      Version			 Repository        Size
=================================================================================================
Updating:
 unixODBC                           i386      2.2.11-10.el5      base              290 k
Installing for dependencies:
 unixODBC-libs                      i386      2.2.11-10.el5      base              551 k

Transaction Summary
=================================================================================================
Install       1 Package(s)
Upgrade       1 Package(s)

Total size: 841 k
Is this ok [y/N]: y
Downloading Packages:
Running rpm_check_debug
Running Transaction Test
Finished Transaction Test
Transaction Test Succeeded
Running Transaction
  Installing     : unixODBC-libs	1/3
  Updating       : unixODBC         2/3
  Cleanup        : unixODBC         3/3

Dependency Installed:
  unixODBC-libs.i386 0:2.2.11-10.el5

Updated:
  unixODBC.i386 0:2.2.11-10.el5

Complete!

14. Update a Group Packages

To update any existing installed group packages, just run the following command as shown below.

# yum groupupdate 'DNS Name Server'

Dependencies Resolved
================================================================================================================
 Package			Arch	        Version				Repository           Size
================================================================================================================
Updating:
 bind                           i386            30:9.3.6-20.P1.el5_8.2          updates              981 k
 bind-chroot                    i386            30:9.3.6-20.P1.el5_8.2          updates              47 k
Updating for dependencies:
 bind-libs                      i386            30:9.3.6-20.P1.el5_8.2          updates              864 k
 bind-utils                     i386            30:9.3.6-20.P1.el5_8.2          updates              174 k

Transaction Summary
================================================================================================================
Install       0 Package(s)
Upgrade       4 Package(s)

Total size: 2.0 M
Is this ok [y/N]: y
Downloading Packages:
Running rpm_check_debug
Running Transaction Test
Finished Transaction Test
Transaction Test Succeeded
Running Transaction
  Updating       : bind-libs            1/8
  Updating       : bind                 2/8
  Updating       : bind-chroot          3/8
  Updating       : bind-utils           4/8
  Cleanup        : bind                 5/8
  Cleanup        : bind-chroot          6/8
  Cleanup        : bind-utils           7/8
  Cleanup        : bind-libs            8/8

Updated:
  bind.i386 30:9.3.6-20.P1.el5_8.2                  bind-chroot.i386 30:9.3.6-20.P1.el5_8.2

Dependency Updated:
  bind-libs.i386 30:9.3.6-20.P1.el5_8.2             bind-utils.i386 30:9.3.6-20.P1.el5_8.2

Complete!

15. Remove a Group Packages

To delete or remove any existing installed group from the system, just use below command.

# yum groupremove 'DNS Name Server'

Dependencies Resolved

===========================================================================================================
 Package                Arch              Version                         Repository          Size
===========================================================================================================
Removing:
 bind                   i386              30:9.3.6-20.P1.el5_8.2          installed           2.1 M
 bind-chroot            i386              30:9.3.6-20.P1.el5_8.2          installed           0.0

Transaction Summary
===========================================================================================================
Remove        2 Package(s)
Reinstall     0 Package(s)
Downgrade     0 Package(s)

Is this ok [y/N]: y
Downloading Packages:
Running rpm_check_debug
Running Transaction Test
Finished Transaction Test
Transaction Test Succeeded
Running Transaction
  Erasing        : bind                                                   1/2
warning: /etc/sysconfig/named saved as /etc/sysconfig/named.rpmsave
  Erasing        : bind-chroot                                            2/2

Removed:
  bind.i386 30:9.3.6-20.P1.el5_8.2                                        bind-chroot.i386 30:9.3.6-20.P1.el5_8.2

Complete!

16. List Enabled Yum Repositories

To list all enabled Yum repositories in your system, use following option.

# yum repolist

repo id                     repo name                                            status
base                        CentOS-5 - Base                                      enabled:  2,725
epel                        Extra Packages for Enterprise Linux 5 - i386         enabled:  5,783
extras                      CentOS-5 - Extras                                    enabled:    282
mod-pagespeed               mod-pagespeed                                        enabled:      1
rpmforge                    RHEL 5 - RPMforge.net - dag                          enabled: 11,290
updates                     CentOS-5 - Updates                                   enabled:    743
repolist: 20,824

16. List all Enabled and Disabled Yum Repositories

The following command will display all enabled and disabled yum repositories on the system.

# yum repolist all

repo id                     repo name                                            status
C5.0-base                   CentOS-5.0 - Base                                    disabled
C5.0-centosplus             CentOS-5.0 - Plus                                    disabled
C5.0-extras                 CentOS-5.0 - Extras                                  disabled
base                        CentOS-5 - Base                                      enabled:  2,725
epel                        Extra Packages for Enterprise Linux 5 - i386         enabled:  5,783
extras                      CentOS-5 - Extras                                    enabled:    282
repolist: 20,824

17. Install a Package from Specific Repository

To install a particular package from a specific enabled or disabled repository, you must use –enablerepo option in your yum command. For example to Install PhpMyAdmin 3.5.2 package, just execute the command.

# yum --enablerepo=epel install phpmyadmin

Dependencies Resolved
=============================================================================================
 Package                Arch           Version            Repository           Size
=============================================================================================
Installing:
 phpMyAdmin             noarch         3.5.1-1.el6        epel                 4.2 M

Transaction Summary
=============================================================================================
Install       1 Package(s)

Total download size: 4.2 M
Installed size: 17 M
Is this ok [y/N]: y
Downloading Packages:
phpMyAdmin-3.5.1-1.el6.noarch.rpm                       | 4.2 MB     00:25
Running rpm_check_debug
Running Transaction Test
Transaction Test Succeeded
Running Transaction
  Installing : phpMyAdmin-3.5.1-1.el6.noarch             1/1
  Verifying  : phpMyAdmin-3.5.1-1.el6.noarch             1/1

Installed:
  phpMyAdmin.noarch 0:3.5.1-1.el6

Complete!

18. Interactive Yum Shell

Yum utility provides a custom shell where you can execute multiple commands.

# yum shell
Loaded plugins: fastestmirror
Setting up Yum Shell
> update httpd
Loading mirror speeds from cached hostfile
 * base: mirrors.sin3.sg.voxel.net
 * epel: ftp.riken.jp
 * extras: mirrors.sin3.sg.voxel.net
 * updates: mirrors.sin3.sg.voxel.net
Setting up Update Process
>

19. Clean Yum Cache

By default yum keeps all the repository enabled package data in /var/cache/yum/ with each sub-directory, to clean all cached files from enabled repository, you need to run the following command regularly to clean up all the cache and make sure that there is nothing unnecessary space is using. We don’t want to give the output of the below command, because we like to keep cached data as it is.

# yum clean all

20. View History of Yum

To view all the past transactions of yum command, just use the following command.

# yum history

Loaded plugins: fastestmirror
ID     | Login user               | Date and time    | Action(s)      | Altered
-------------------------------------------------------------------------------
    10 | root               | 2012-08-11 15:19 | Install        |    3
     9 | root               | 2012-08-11 15:11 | Install        |    1
     8 | root               | 2012-08-11 15:10 | Erase          |    1 EE
     7 | root               | 2012-08-10 17:44 | Install        |    1
     6 | root               | 2012-08-10 12:19 | Install        |    2
     5 | root               | 2012-08-10 12:14 | Install        |    3
     4 | root               | 2012-08-10 12:12 | I, U           |   13 E<
     3 | root               | 2012-08-09 13:01 | Install        |    1 >
     2 | root               | 2012-08-08 20:13 | I, U           |  292 EE
     1 | System            | 2012-08-08 17:15 | Install        |  560
history list

We have tried to cover all the basic to advance yum commands with their examples. If anything related to yum commands may have missed out. Please update us through our comment box. So, we keep updating the same based on feedback’s received.

Source

How to Run MySQL/MariaDB Queries Directly from the Linux Command Line

If you are in charge of managing a database server, from time to time you may need to run a query and inspect it carefully. While you can do that from the MySQL / MariaDB shell, but this tip will allow you to execute the MySQL/MariaDB Queries directly using the Linux command line AND save the output to a file for later inspection (this is particularly useful if the query return lots of records).

Let us look at some simple examples of running queries directly from the command line before we can move to a more advanced query.

To view all the databases on your server, you can issue the following command:

# mysql -u root -p -e "show databases;"

Next, to create a database table named tutorials in the database tecmintdb, run the command below:

$ mysql -u root -p -e "USE tecmintdb; CREATE TABLE tutorials(tut_id INT NOT NULL AUTO_INCREMENT, tut_title VARCHAR(100) NOT NULL, tut_author VARCHAR(40) NOT NULL, submissoin_date DATE, PRIMARY KEY (tut_id));"

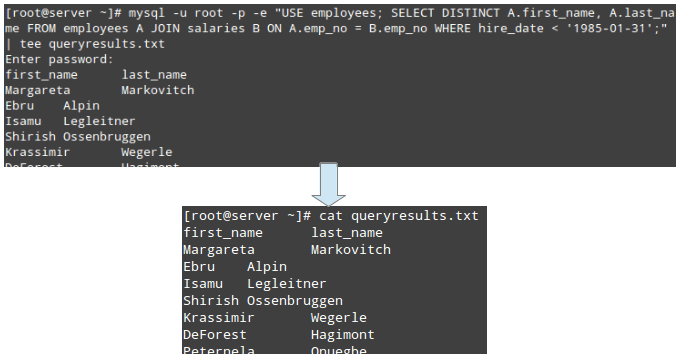
We will use the following command and pipe the output to the tee command followed by the filename where we want to store the output.

Suggested Read: 20 MySQL/MariaDB Commands for Database Administration in Linux

For illustration, we will use a database named employees and a simple join between the employees and salaries tables. In your own case, just type the SQL query between the quotes and hit Enter.

Note that you will be prompted to enter the password for the database user:

# mysql -u root -p -e "USE employees; SELECT DISTINCT A.first_name, A.last_name FROM employees A JOIN salaries B ON A.emp_no = B.emp_no WHERE hire_date < '1985-01-31';" | tee queryresults.txt

View the query results with the help of cat command.

# cat queryresults.txt

Run MySQL/MariaDB Queries from Commandline

Run MySQL/MariaDB Queries from Commandline

With the query results in a plain text files, you can process the records more easily using other command-line utilities.

Summary

We have shared several Linux tips that you, as a system administrator, may find useful when it comes to automating your daily Linux tasks or performing them more easily.

Suggested Read: How to Backup and Restore MySQL/MariaDB Databases

Do you have any other tips that you would like to share with the rest of the community? If so, please do so using the comment form below.

Otherwise, feel free to let us your thoughts about the assortment of tips that we have looked at, or what we can add or possibly do to improve each of them. We look forward to hearing from you!

Source
WP2Social Auto Publish Powered By : XYZScripts.com