1080p/1440p Linux Gaming Performance For Radeon RX 590/Vega & NVIDIA 1060/1070/1080/2060/2070

Complementing the benchmarks done earlier this week in the our NVIDIA GeForce RTX 2060 Linux review, here are more benchmarks of the GeForce RTX 2060 $349 USD graphics card that is beginning to ship next week. This article offers up a plethora of 1920 x 1080 and 2560 x 1440 Linux gaming benchmarks while providing the very latest driver performance results on the AMD Radeon RX 590, RX Vega 56, and RX Vega 64 while on the NVIDIA side was the GeForce GTX 1060/1070/1080 and RTX 2060/2070 graphics cards.

The RTX 2060 Linux review featured a number of 1440p/4K results while this article is focused on the 1080p and 1440p Linux gaming performance with the range of eight graphics cards tested. On the NVIDIA driver side was the 415.25 driver atop the Linux 4.20 kernel. On the Radeon side was the latest Mesa 19.0-devel state built against LLVM 8.0 SVN via the Padoka PPA as of this week, offering a look at the near-final Mesa 19.0 RADV/RadeonSI performance with the 19.0 code entering its feature freeze next week.

All of these tests were obviously done off the same system with the same Ubuntu Linux installation. All of these gaming benchmarks were carried out using the Phoronix Test Suite benchmarking software using a range of OpenGL and Vulkan games both new and older titles.
Source

Install Jetbrains GoLand Go IDE on Ubuntu – Linux Hint

Install Jetbrains GoLand Go IDE on Ubuntu

GoLand is an amazing Go IDE by JetBrains. If you love other JetBrains IDEs then, you will love GoLand as well. GoLand will improve your Go development workflow with it’s amazing features such as intelligent auto completion, syntax highlighting, code snippets etc. In this article, I will show you how to install GoLand Go IDE on Ubuntu. So, let’s get started.

Installing Go Programming Language on Ubuntu:

In order to run Go programs with GoLand Go IDE, you must have Go programming language installed on your machine.

I’ve written a dedicated article on installing Go programming language on Ubuntu. If you don’t have Go programming language installed on your Ubuntu machine already, you may check it out at https://linuxhint.com/install-golang-ubuntu/

Downloading GoLand:

GoLand is not available in the official package repository of Ubuntu. But, you can easily download GoLand from the official package repository of JetBrains and install it on Ubuntu.

First, visit the official website of JetBrains at https://www.jetbrains.com. Then, go to Tools > GoLand as marked in the screenshot below.

Now, click on Download.

Make sure Linux is selected. Then, click on DOWNLOAD.’

Your browser should prompt you to download GoLand archive. Select Save File and click on OK.

Your download should start. It may take a while to complete.

Installing and Configuring GoLand:

Once the download is complete, you can install GoLand from the command line interface.

First, navigate to the directory where you downloaded GoLand archive with the following command:

cd ~/Downloads

As you can see, the file I just downloaded is here.

Now, run the following command to install GoLand in /opt directory:

sudo tar xzf goland-2018.3.2.tar.gz -C /opt

NOTE: If you want to install GoLand somewhere other than /opt directory, just replace /opt with the directory path where you want to install GoLand.

Now, type in your login password and press <Enter>. GoLand should be installed.

As you can see, a new directory is created inside the /opt directory. Note the directory name. It may be different by the time you read this article. Make sure to replace it with yours from now on.

You have to run GoLand from the command line for the first time. Run GoLand as follows:

/opt/GoLand-2018.3.2/bin/goland.sh

As you’re running GoLand for the first time, you may not have any settings to import. So, select Do not import settings and click on OK.

Now, you have to accept the GoLand User Agreement. To do that, select I confirm that I have read and accept the terms of this User Agreement and click on Continue.

You may not may not want to share usage data with JetBrains. Click on any of the buttons depending on whether you want to share GoLand usage data with JetBrains or not.

Now, you have to activate GoLand. To do that, you have to buy a license for GoLand from JetBrains. Once you have the license, you can type in the credentials here and activate GoLand.

If you want to try out GoLand before you buy it, then select Evaluate for free and click on Evaluate. You can try out GoLand for 30 days as of the time of this writing.

GoLand is being loaded.

This is the dashboard of GoLand. From here you can create new projects and manage your existing projects.

Now, you should create a Desktop shortcut of GoLand. This way, you can launch GoLand from the Application Menu of Ubuntu. To do that, click on Configure.

Then, select Create Desktop Entry.

Now, check Create the entry for all users (requires superuser privileges) checkbox and click on OK.

Now, type in the password of your login user and click on Authenticate.

GoLand desktop shortcut should be created as you can see in the screenshot below. Now, you can easily run GoLand from the Application Menu of Ubuntu.

Creating a Go Project with GoLand:

In this section, I will show you how to create a new Go project with GoLand and run a simple Go program.

First, start GoLand and click on New Project.

Now, select Go from the list and make sure the project Location (where all the project files will be saved) and GOROOT is selected correctly. Then, click on Create.

A new Go project will be created.

Now, create a new file hello.go and type in the following lines of codes.

Now, press <Alt> + <Shift> + <F10> or go to Run > Run… and then select hello.go from the list as shown in the screenshot below.

The Go source file should run. As you can see, the correct output is displayed.

So, that’s how you install GoLand Go IDE on Ubuntu. Thanks for reading this article.

Source

IEI’s Puzzle family of x86 and Arm based net appliances debuts with two Coffee Lake models

IEI unveiled a Linux-driven “Puzzle” series of 1U rackmount network appliances and uCPE systems with VNF support and a choice of Intel Coffee Lake, AMD Epyc 3000, Armada 8040, NXP LS2088, and Cavium Octeon CPUs.

IEI is launching a new family of Puzzle-branded 1U network appliances that supports software virtual network functions (VNFs) and real-time software-defined wide-area network (SD-WAN) services. The Linux-powered rackmount systems can also be used for uCPE (Universal Customer Premise Equipment) systems and will be available with a variety of x86 and Arm processors.

Puzzle-IN001 (8th Gen Xeon) and Puzzle family ecosystem

The only models with product pages are based on Intel 8th Gen “Coffee Lake” CPUs: the Puzzle-IN001 with a Xeon E-2136 and the Puzzle-IN002 with a Pentium Gold G5400T (see farther below). These will be followed by Puzzle systems based on the AMD Epyc Embedded 3000 and Marvell 8040, which will be followed by NXP QorIQ LS2088 and Cavium Octeon CN8300 based Puzzle appliances.

The upcoming Puzzle-A001 and Puzzle-A002 systems run Ubuntu on the up to 16-core, Xeon-like AMD Epyc Embedded 3000 SoC, which has also appeared on Ibase’s 1U rackmount FWA880 network appliance. The Puzzle-A001 is the high-end model with 4x 10GbE SPF+ and 8x GbE RJ45 ports. An optional smart NIC increases performance and provide functions such as virtualization and packet processing.

The lower-end Puzzle-A002 has 6x GbE ports, as well as a mini-PCIe slot and 2x PCIe x4 slots. An older AMD R-Series SoC is available as an alternative for both models.

Puzzle family comparison chart (left) and Puzzle uCPE features

An “entry level”

Puzzle-M801

system in the works based on the Marvell Armada 8040 (or A8040). The quad-core, 2GHz Cortex-A72 based Armada 8040 recently appeared on a SolidRun

CEx7 A8040

COM Express Type 7 module, which drives the sandwich-style ClearFog CX 8K SBC. The Puzzle-M801 appliance offers dual 10GbE SFP+ ports and 4x GbE RJ45 ports, as well as a “brilliant AI hardware ready system ideal for deep learning inference computing,” says IEI.

No separate announcements were made for the unnamed NXP QorIQ LS2088 and Cavium Octeon CN8300 based Puzzle appliances. The feature comparison chart above, however, says the NXP offers the LS2088 SoC in quad- or octa-core versions. The SoC previously appeared on X-ES’ VPX form-factor XPedite6370 SBC. The LS2088 Puzzle appliance features at least one 10GbE port.

The Cavium-based Puzzle appliance will use Cavium’s up to 24-core, Cortex-A72 based Octeon CN8300, which appears to be new. It also features 10GbE support.

All the Puzzle systems ship with a Puzzle Finder software API for developing “environment and network applications,” says IEI. The API provides system management, resource monitoring, version maintenance, software installation, software updates, and information on CPU, memory, Internet, and more.

Coffee Lake based Puzzle-IN001 and Puzzle-IN002

The initial Puzzle-IN001 and Puzzle-IN002 systems run Ubuntu 16.04.04 on an Intel 8th Gen Xeon E-2136 and Pentium Gold G5400T, respectively. Both models also support the 8th Gen Core i3-8100T.

The Puzzle-IN001’s Xeon E-2136 is a dual-threaded, hexa-core SoC with 3.3GHz/4.5GHz clock and an 80W TDP. It’s accompanied here by an Intel C246 chipset.

Puzzle-IN001, front and back
(click images to enlarge)

Puzzle-IN002, front and back

The lower end Puzzle-IN002 ships with Intel’s dual-core, quad-threaded Pentium Gold G5400T, whichi is also available on IEI’s KINO-DH310 Mini-ITX board. No clock rate was listed by IEI, but the chip supports up to 3.1GHz. There’s also an Intel H310 chipset.

The Puzzle-IN002 supports up to 32GB DDR4 and offers a 2.5-inch SATA bay and an M.2 A-key slot (PCIe & USB 2.0). You get 6x GbE and 2x USB 3.0 ports, as well as 2x USB 2.0 interfaces and a serial port. Other features include mini-PCIe and PCIe x16 slots and a TPM header. Four cooling fans are also onboard.

Further information

No pricing or availability information was available for the Puzzle series of network appliances. However, the Intel Puzzle-IN001 and Puzzle-IN002 appear to be ready for order. More information may be found on the Puzzle-IN001/2 product page and the Puzzle family product page.

Source

Top Open Source Tools for Staying on Time and on Task | Reviews

Jan 11, 2019 10:53 AM PT

Keeping up to date with multiple daily activity calendars, tons of information, and long must-do lists can be a never-ending challenge. This week’s Linux Picks and Pans reviews the best open source Personal Information Managers (PIMs) that will serve you well on whatever Linux distribution you run.

In theory, computer tools should make managing a flood of personal and business information child’s play. In practice, however, many PIM tool sets are isolated from your other devices. This, of course, makes it difficult, if not impossible, to share essential information across your smartphone, desktop, laptop and tablet.

There are some obvious cloud solutions that ease the hassle of accessing personal and business information across devices. For instance, you can access Microsoft’s proprietary OneNote software for free via the cloud on your Linux gear, including Android and Chromebook devices.

As long as you have a free Microsoft email account, you can access your OneNote content directly from your browser or via the OneNote app available for most platforms. The only roadblock with Microsoft is using it on portable devices (laptops and tablets) beyond a certain screen size.

Google offers similar cloud-based PIM solutions with its Keep note-taking and Tasks to-do list services. Keep has numerous features for cataloging notes and imported images using labels and color options. Tasks lets you enter a simple event to track, as well as drill down to storing details and due dates.

If you use Google’s Chrome Web browser, you can integrate both the Keep and Tasks content as part of the Google Calendar display for added flexibility.

OneNote, Tasks and Keep serve different purposes and let you take the PIM process only so far. All three solutions lack specific tracking and reminder features that true PIM packages provide. Still, they do provide a reliable measure of cross-platform access for basic PIM functionality.

You already may be using these Microsoft or Google cloud-based tools. However, if your needs do not require sharing information on multiple devices, one of the following more traditional Linux PIM packages may be more to your liking.

Osmo: Info Management Done Simple

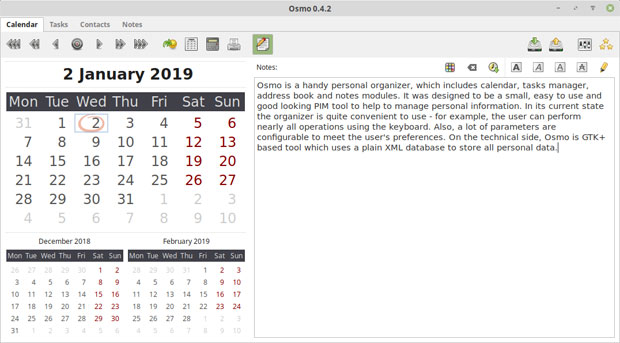
Osmo is a lightweight yet feature-heavy do-it-all PIM for any Linux desktop. It is an ideal all-around PIM that manages appointments, tasks, contacts and notes.

Osmo full-featured do-it-all PIM for any Linux desktop

Osmo is a full-featured do-it-all PIM for any Linux desktop. It manages appointments, tasks, contacts and notes.

Osmo’s design is not unlike other datebook-style calendars. You can choose a horizontal or vertical orientation. The preferences panel lets you juggle several appearance and functionality options for each of the components. These include the Calendar, Task List, Contacts and Notes databases. You even can hide PIM components to match the way you use Osmo.

Osmo employs a plain XML database to store all personal data. Find this file on the hard drive and copy it to a thumb drive to make Osmo portable, and to update the PIM on other Linux devices. Osmo does not have a real file storage exchange mechanism. A backup and restore features helps to automate this process.

Moving around the app is simple. Click the tab for the desired component. The display shows the current month with markers indicating days with events entered. Below the current month’s display is a selector arrow to show previous and next month.

The day note icon pops up a note entry screen for the selected date and shows it at the bottom of the app window. The day note panel has a tool row of buttons to modify the text display of information you enter.

The Notes panel is surprisingly flexible. For instance, the opening note screen shows a file-list type of directory display. You can use its dropdown menus to select a note category. A handy search window lets you find information in the notes database rapidly. Icons let you add a new note, select an existing note for editing, or delete a note from the list.

The contact component in Osmo is fairly slick. It has an icon and tool row along with a search window similar to the Notes component. These include New, Remove and Edit buttons. The search box finds matches as you type. The contact panel also has options to show birthdays, and buttons to import and export contacts.

A nice touch is a globe button that shows a contact’s location on a map. Osmo lets you choose either Google, Bing or OpenStreetMap as a map provider source.

While Osmo does not sync with other computers or a Web-based calendar, it does much of what you would expect from a solid PIM. Osmo does very well what it was designed to do — keep track of your lists, calendar events and contacts.

Osmo’s Last Update: 8-26-2018

Journal Life With RedNotebook

RedNotebook is built around the concept of a simple design with enhanced features. This application is much more than a daily diary maker. Its flexible design is a perfect platform for storing notes and information tracking.

RedNotebook

RedNotebook’s flexible design is a perfect platform for storing notes and information tracking.

It is an information magnet that lets you add files, links, images and notes divided into categories. Assigning tags to your entries adds a sophisticated way to organize the content. The ability to insert images, files and links to websites makes it very viable as a general note-taking program.

The design incorporates tags and other cool navigational features that drive RedNotebook’s functionality. Its interface is divided into three parts.

On the left is the calendar. Click a day within any month to see the content appear in the display panel in the center. The annotations panel is to the right. Annotations are notes that elaborate on the basic diary entry. You can sort annotations into categories easily.

RedNotebook’s features include easy calendar navigation, numerous customizable templates, export functionality and word clouds. It also lets you format, tag and search your entries, something that other diary and note apps do not offer.

Along with spell-checking capability, RedNotebook has some nice advanced-level features, including the ability to export in PDF format, drag and drop content between entries, and display markup highlighting. Plus, it automatically saves at set intervals and upon exit.

To facilitate use on multiple computers, you can save your journals on a remote server. The application by default makes Zipped backup copies of all entries upon exit.

Another cool feature is Word Cloud. RedNotebook keeps track of your most-often-used words in the note entries. Click on the Clouds tab to view this list. Select your category or tag clouds by clicking on the scroll-down menu. Right click on any words in the cloud that you want removed. Or you can add these words to the blacklist menu in the Preferences menu option to filter them out.

Use RedNotebook for a combination of things to keep track of daily information, activities and links to other reference files. You also can use it to maintain a running to-do list. The advantage to this feature is never having to enter a start or end date.

Last Update: 11-15-2018

qOrganizing for Multiple Device Use

qOrganizer goes a long way toward solving usage issues on multiple computers. This PIM does a nice job of going head-to-head with other information managers to track and manage your day.

You might have some trouble getting it from your distro’s repository, however. qOrganizer is readily available at Sourceforge, but it is available only in 32-bit architecture. You will have to unzip the archived file and manually install the program. Still, qOrganizer should run on your system and is worthy of a tryout.

qOrganizer

qOrganizer has a useful collection of tools that give it an edge over other PIM solutions.

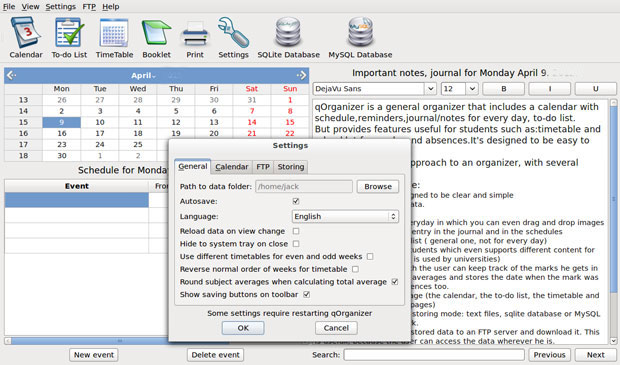
qOrganizer is a general organizer that includes a calendar with schedule, reminders, journal/notes and a to-do list. Its comprehensive collection of components and simple interface give this app a fresh, innovative approach to tracking your important activities.

One of gOrganizer’s most unique components makes it a cool tool for the academic set, both high school and college level. Its Timetable and Booklet features are unique to general purpose PIMs.

qOrganizer has an intuitive design so it mostly works the way you would use a handwritten day planner with pen on a page. Click an entry line and type your information. All the controls are handled by icons that switch easily from Calendar to To-Do List and other features. Icons in the tool row put every control one click away.

This PIM automatically saves all your data. You can choose the storing mode: text files, an SQlite database or MySQL database for transferring over the Internet. This gives you a way to sort of sync your PIM content on all your computers.

This app prints each module as a separate page, so you can carry a printed version of just the calendar, the to-do list, the timetable or the booklet.

Finding information stored in qOrganizer is fast and easy. A search window with previous and next buttons is located on the bottom right of the display. This tool searches for the entry data in any of the components.

A neat feature is data entry shortcuts. You can enter the number in the to-do start and deadline columns. The full date appears. The Priority column lets you enter a ranking number for each task. Click the arrow that appears in the entry line to have date selection calendar pop up.

The right side of the task display is the completed column. You can enter a number to show the percent of completion. A progress bar fills in the line.

The calendar page display is a split screen. The month fills the top left. The bottom left is the daily schedule for the highlighted date. The right side of the panel is the journal or note entry for the selected calendar date.

qOrganizer has a useful collection of tools that gives it an edge over other PIM solutions. It is too bad that the developer no longer provides updates for this open source project.

Making Informational Kontact

Kontact has its roots in the K Desktop environment. Originally, it was an integral set of tools designed as part of the KDE desktop. It still is.

However, you can use this integrated PIM with nearly any Linux distro. In most cases, any dependencies will be installed along with the core Kontact components.

Kontact information manager

Kontact’s integration makes it a more powerful information manager than other tools in this roundup. It displays email, address books, calendars, tasks, news feeds and other personal or business data in one window.

The integration built into Kontact makes it a more powerful information manager than other tools in this roundup. It supports the display of email, address books, calendars, tasks, news feeds and other personal or business data in one window.

The integration includes a PIM back end and the graphical applications connecting to the back end. The components include agents to merge new data with the existing data set, such as contacts and news.

This integration involves groupware servers that give your workgroup members access to shared email folders, group task lists, calendar sharing, central address books and meeting scheduling.

Kontact is not one program. In essence, it is a symbiotic collection of essential KDE tools.

One of its key components is Akonadi. This is a framework named after the oracle goddess of justice in Ghana. This framework provides applications with a centralized database to store, index and retrieve personal information, including emails, contacts, calendars, events, journals, alarms and notes.

Kontact’s other components:

  • Akregator — to read selected news feeds;
  • KAddressBook — to manage contacts;
  • KMail — to provide mail client services;
  • KNotes — to post sticky notes on the Desktop;
  • KOrganizer — to provide calendar, scheduling and journal/notes management;
  • Summary — to display an information summary screen;
  • KJots — to organize your ideas into a notebook structure that includes calendars, information and to-do lists.

This multifaceted PIM package helps you manage your information overload more easily. The result is better productivity and efficiency. The combination of tools and back-end servers offers additional benefits of group collaboration as a business tool.

Makagiga: The All-in-One PIM

Makagiga is an easy-to-use PIM solution that does everything. The project is about four years young. In fact, compared to the other products in this roundup, it is one of the most modern approaches to managing personal information.

Makagiga interface

Makagiga uses a modern, smart interface that contributes to its intuitive ability to handle to-do listing, text editing and RSS reading. It uses add-ons to implement its various capabilities.

Makagiga does just about anything you need it to do. It is a capable to-do manager. It handles note-taking with ease. It edits images you package into your notes.

Plus, it uses plug-ins to provide Web searching, an OpenStreetMap viewer, a thesaurus, and a LaTex/ Markdown/BB Code previewer. It can capture screenshots to integrate as notes, and it can generate bar codes.

Makagiga uses a modern, smart interface that contributes to its intuitive ability to handle to-do listing, text editing and RSS reading. It uses add-ons to implement its various capabilities.

Among them are a collection of widgets to provide calendars and sticky notes.

The main window displays a tree directory view for folders and feeds to the left. It shows a large pin board to the right. The window uses tabs to show changing content in the pin board — Widgets, Calendar and To-Do list.

A horizontal menu bar sits at the top of the main window.

A settings dialog sits under the settings option of both the View and Tools menu. Dialogues configure the software. The menu structure changes when a pin board tab is activated.

You can find the settings dialog for designing the view by selecting the Widgets tab. The three context-sensitive menus (Wallpaper, Colors and Border, Workspaces) are used to enhance the pin board’s visual appearance. Basic modifications are performed in the Tools | Settings menu.

The To-Do manager is one of the best in this roundup. You can set task priorities, assign them dates/times, and even organize them into categories. You also can add colors and tags for more organizational distinctions.

The Image editor has options to resize, rotate or flip pictures. It also has simple annotation tools and an inventory of filters and special effects.

The Notepad is more basic than I prefer. It limps along without a find-and-replace function. It does have word count, syntax highlighting and an HTML preview.

This application has mouse gesture support for 17 actions you can perform easily.

Latest version: Makagiga 6.4 | 11-17-2018

Bottom Line

Personal Information Management is a software category being overshadowed by cloud services and dedicated apps on portable devices. That is one reason there are few new contenders among open source PIM applications available for the Linux platform.

The titles in this roundup are solid performers. They offer a variety of options. They also share a similar look and feel. So trying out several of these PIMs is easy. Compare the features, and choose the best tool to meet your needs.

Source

Install NGINX on CentOS – Linux Hint

In the case of any web server, the performance is something that you need to keep in mind. In fact, performance is the main factor that decides the success of running a server. The faster the server, the better performance you get out of your current hardware config.

There are a number of available server apps out there. The most popular ones include Apache and NGINX. Both of them are free and open-source. Of course, in terms of popularity, Apache is a quite popular choice even in the world. In fact, more than 65% of all the servers in the current cyber world is powered by Apache!

However, that doesn’t diminish the benefits of NGINX (engine-ex – that’s how it’s pronounced). There are tons of additional benefits that NGINX provide that Apache fails to serve.

The first and foremost reason is the performance. NGINX, being a lightweight alternative to Apache, offers better overall performance than Apache. NGINX is also well-suited with the Linux and other UNIX-like environment. However, NGINX falls short in terms of flexibility. You need to compile additional modules into the NGINX binary in most cases as not all the modules of NGINX support dynamic module loading.

As both of them are free, you can easily start your own server right now! In today’s tutorial, we’ll be checking out NGINX running on my test CentOS system.

NGINX is available on the EPEL repository. Let’s start the installation!

At first, make sure that your system has EPEL repository enabled –

sudo yum install epel-release

Now, time to perform the installation!!!

Starting NGINX

The installation is complete, time to fire it up! It’s not going to start itself all by itself!

sudo systemctl start nginx

If your system is configured to use a firewall, enable HTTP and HTTPS traffic from/to the server –

sudo firewall-cmd –permanent –zone=public –add-service=http
sudo firewall-cmd –permanent –zone=public –add-service=https
sudo firewall-cmd –reload

Time to test the server working –

http://<server_domain_IP>

Don’t have the IP address of the server? Then you can find out by running the following command –

In my case, I need the “enp0s3” connection. Now, find out the IP address by running the following command –

ip addr show enp0s3 | grep inet | awk ‘{ print $2; }’ | sed ‘s//.*$//’

You may also want to enable NGINX every time your system boots up –

sudo systemctl enable nginx

Additional configurations

The default configuration isn’t always the best one as it depends on the particular usage case. Fortunately, NGINX comes up with a handy set of configuration files.

  • NGINX global configuration file
  • Default server root
  • Server block configuration

Enjoy!

Source

Download GDB Linux 8.2.1

GDB (also known as GNU Project debugger) is an open source and free command-line software that allows users and developers alike to see what is going on `inside’ another program, while it is executed, or why an application is crashing at a certain point.

Features at a glance

Key features include four different techniques to help developers catch bugs in the act, start an application and specifying anything that might affect its behavior, make a program stop on specified conditions, examine the logs when the application crashed, gradually change things in a program in order to experiment with correcting the effects of one issue, and continue by learning about another bug. It also supports debugging of programs written in a wide range of programming languages, including C, C++, Pascal, Ada, Objective-C, and many others.

It’s a command-line application

GNU Project debugger is an will always be a command-line application. To use it, you must run the “gdb” command in a terminal emulator, then execute the “help” command (without quotes) a the gdb prompt. In addition, you can also type the “help all” command to view a list of all commands, type “help” followed by command name to view the complete documentation, type “help” followed by a class name to view a list of commands in that class, to type “apropos word” to search for commands related to “word.”

List of classes of commands

After typing the “help” command as described above, you will see a list of classes of commands, including aliases (displays aliases of other commands), breakpoints (makes the program to stop at certain points), data (for examining data), files (for examining files), internals (maintenance commands), obscure (obscure features), running (for running the program), stack (for examining the stack), status (for status inquiries), support (for support facilities), tracepoints (for tracing program execution without stopping the program) and user-defined (user-defined commands).

Supported hardware platforms and OSes

GDB has been designed from the offset to be a cross-platform application, running on mainstream operating systems like Microsoft Windows and some of the most popular Linux/UNIX variants. It is supported on both 32-bit and 64-bit hardware platforms.

Source

What Is DevSecOps? | Linux.com

DevOps was born from merging the practices of development and operations, removing the silos, aligning the focus, and improving efficiency and performance of both the teams and the product.

Security is a common silo in many organizations. Security’s core focus is protecting the organization, and sometimes this means creating barriers or policies that slow down the execution of new services or products to ensure that everything is well understood and done safely and that nothing introduces unnecessary risk to the organization.

DevSecOps looks at merging the security discipline within DevOps. By enhancing or building security into the developer and/or operational role, or including a security role within the product engineering team, security naturally finds itself in the product by design.

Gettings started with DevSecOps involves shifting security requirements and execution to the earliest possible stage in the development process. It ultimately creates a shift in culture where security becomes everyone’s responsibility, not only the security team’s.

Read more at OpenSource.com

Source

Recover Deleted Files on Debian and Ubuntu

ext3grep – Recover Deleted Files on Debian and Ubuntu

ext3grep is a simple program for recovering files on an EXT3 filesystem. It is an investigation and recovery tool that is useful in forensics investigations. It helps to show information about files that existed on a partition and also recover accidentally deleted files.

In this article, we will demonstrate a useful trick, that will help you to recover accidentally deleted files on ext3 filesystems using ext3grep in Debian and Ubuntu.

Testing Scenario

  • Device name: /dev/sdb1
  • Mount point: /mnt/TEST_DRIVE
  • Filesystem type: EXT3

How to Recover Deleted Files Using ext3grep Tool

To recover deleted files, first you need to install ext3grep program on your Ubuntu or Debian system using APT package manager as shown.

$ sudo apt install ext3grep

Once installed, now we will demonstrate how to recover deleted files on a ext3 filesystem.

First, we will create some files for testing purpose in the mount point /mnt/TEST_DRIVE of the ext3 partition/device i.e. /dev/sdb1 in this case.

$ cd /mnt/TEST_DRIVE
$ sudo touch files[1-5]
$ ls -l

Create Files in Mount Point

Create Files in Mount Point

Now we will remove one file called file5 from the mount point /mnt/TEST_DRIVE of the ext3 partition.

$ sudo rm file5

Remove a File in Linux

Remove a File in Linux

Now we will see how to recover deleted file using ext3grep program on the targeted partition. First, we need to unmount it from the mount point above (note that you have to use cd command to switch to another directory for the unmount operation to work, otherwise the umount command will show the error “that target is busy“).

$ cd
$sudo umount /mnt/TEST_DRIVE

Now that we have deleted one of the files (which we’ll assume was done accidentally), to view all the files that existed in the device, run the --dump-name option (replace /dev/sdb1 with the actual device name).

$ ext3grep --dump-name /dev/sdb1

View Files on Partition

View Files on Partition

To recover the above deleted file i.e. file5, we use the --restore-all option as shown.

$ ext3grep --restore-all /dev/sdb1

Once the recovery process is complete, all recovered files will be written to the directory RESTORED_FILES, you can check if the deleted file is recovered or not.

$ cd RESTORED_FILES
$ ls 

Recover a Deleted File

Recover a Deleted File

We may specify a particular file to recover, for example the file called file5 (or specify the full path of the file within the ext3 device).

$ ext3grep --restore-file file5 /dev/sdb1 
OR
$ ext3grep --restore-file /path/to/some/file /dev/sdb1 

In addition, we can also restore files within a given period of time. For example, simply specify the correct date and time frame as shown.

$ ext3grep --restore-all --after `date -d 'Jan 1 2019 9:00am' '+%s'` --before `date -d 'Jan 5 2019 00:00am' '+%s'` /dev/sdb1 

For more information, see the ext3grep man page.

$ man ext3grep

That’s it! ext3grep is a simple and useful tool to investigate and recover deleted files on an ext3 filesystem. It is one of the the best programs to recover files on Linux. If you have any questions or any thoughts to share, reach us via the feedback form below.

Source

CentOS Delete Users – Linux Hint

Linux is, by default, designed in such a manner that it allows more than one user in a single system in a very secure manner. That’s why user accounts are important for keeping users organized and ensure privacy and security for everyone. For the professional/enterprise workspace, this is even more important. The system admin has to keep everything under control with proper user account management. Otherwise, there would be clashes and privacy/security issues that nobody wants to deal with.

CentOS is a great example of the professional workspace. It offers easy access to all the features of the RHEL (Red Hat Enterprise Linux). It’s possible to perform almost any action with the user accounts, for example, adding/deleting a user account(s), managing the permissions and others etc.

In today’s tutorial, we’ll start by deleting a demo user on CentOS.

At first, I’ll be creating a new user for deletion. This is not necessary to perform in the real life. Instead, you have to focus on the user’s data and permissions before deleting the account.

Let’s add a new user into the system. For this purpose, we need the root privilege.

Now, it’s time to create a new user!

Don’t forget to add a password for the newly created account!

Now, it’s time to delete the user! At first, make sure that the user is out of any group in your system –

Note – Depending on the situation in the real world, the following command should be used very carefully. This command will delete the user’s all files.

Make sure that you also remove the user from the privilege list. Run the following command –

Find out the following line –

Remove the entry of the user –

Voila! The user account is completely gone from your system!

Source

Understanding Debian GNU/Linux Releases – Linux Hint

The universe of the Debian GNU/Linux distribution comes with its own odds and ends. In this article we explain what a release of Debian is, how it is named, and what are the basic criteria for a software package to become part of a regular release.

What is a Debian release?

Debian GNU/Linux is a non-commercial Linux distribution that was started in 1993 by Ian Murdock. Currently, it consists of about 51,000 software packages that are available for a variety of architectures such as Intel (both 32 and 64 bit), ARM, PowerPC, and others [2]. Debian GNU/Linux is maintained freely by a large number of contributors from all over the world. This includes software developers and package maintainers – a single person or a group of people that takes care of a package as a whole [3].

A Debian release is a collection of stable software packages that follow the Debian Free Software Guidelines (DFSG) [4]. These packages are well-tested and fit together in such a way that all the dependencies between the packages are met and you can install und use the software without problems. This results in a reliable operating system needed for your every-day work. Originally targeted for server systems it has no more a specific target (“The Universal OS”) and is widely used on desktop systems as well as mobile devices, nowadays.

In contrast to other Linux distributions like Ubuntu or Linux Mint, the Debian GNU/Linux distribution does not have a release cycle with fixed dates. It rather follows the slogan “Release only when everything is ready” [1]. Nethertheless, a major release comes out about every two years [8]. For example, version 9 came out in 2017, and version 10 is expected to be available in mid-2019. Security updates for Debian stable releases are provided as soon as possible from a dedicated APT repository. Additionally, minor stable releases are published in between, and contain important non-security bug fixes as well as minor security updates. Both the general selection and the major version number of software packages do not change within a release.

In order to see which version of Debian GNU/Linux you are running on your system have a look at the file /etc/debian_version as follows:

cat /etc/debian_version
9.6
$

This shows that the command was run on Debian GNU/Linux 9.6. Having installed the package “lsb-release” [14], you can get more detailed information by running the command “lsb_release -a”:

$ lsb_release -a
No LSB modules are available.
Distributor ID: Debian
Description: Debian GNU/Linux 9.6 (stretch)
Release: 9.6
Codename: stretch
$

What about these funny release names?

This shows that the command was run on Debian GNU/Linux 9.6. Having installed the package “lsb-release” [14], you can get more detailed information by running the command “lsb_release -a”:

You may have noted that for every Debian GNU/Linux release there is a funny release name. This is called an alias name which is taken from a character of the film series Toy Story [5] released by Pixar [6]. When the first Debian 1.x release was due, the Debian Project Leader back then, Bruce Perens, worked for Pixar [9]. Up to now the following names have been used for releases:

  • Debian 1.0 was never published officially, because a CD vendor shipped a development version accidentially labeled as “1.0” [10], so Debian and the CD vendor jointly announced that “this release was screwed” and Debian released version 1.1 about half a year later, instead.
  • Debian 1.1 Buzz (17 June 1996) – named after Buzz Lightyear, the astronaut
  • Debian 1.2 Rex (12 December 1996) – named after Rex the plastic dinosaur
  • Debian 1.3 Bo (5 June 1997) – named after Bo Peep the shepherd
  • Debian 2.0 Hamm (24 July 1998) – named after Hamm the piggy bank
  • Debian 2.1 Slink (9 March 1999) – named after the dog Slinky Dog
  • Debian 2.2 Potato (15 August 2000) – named after the puppet Mr Potato Head
  • Debian 3.0 Woody (19 July 2002) – named after the cowboy Woody Pride who is the main character of the Toy Story film series
  • Debian 3.1 Sarge (6 June 2005) – named after the Seargeant of the green plastic soldiers
  • Debian 4.0 Etch (8 April 2007) – named after the writing board Etch-A-Sketch
  • Debian 5.0 Lenny (14 February 2009) – named after the pull-out binocular
  • Debian 6.0 Squeeze (6 February 2011) – named after the green three-eyed aliens
  • Debian 7 Wheezy (4 May 2013) – named after Wheezy the penguin with the red bow tie
  • Debian 8 Jessie (25 April 2015) – named after the cowgirl Jessica Jane “Jessie” Pride
  • Debian 9 Stretch (17 June 2017) – named after the lila octopus
  • Debian 10 Buster (no release date known so far) – named after the puppy dog from Toy Story 2

As of the beginning of 2019, the release names for two future releases are also already known [8]:

  • Debian 11 Bullseye – named after Bullseye, the horse of Woody Pride
  • Debian 12 Bookworm – named after Bookworm, the intelligent worm toy with a built-in flashlight from Toy Story 3.

Relation between alias name and development state

New or updated software packages are uploaded to the unstable branch, first. After some days a package migrates to the testing branch if it fulfills a number of criterias. This later becomes the basis for the next stable release. The release of a distribution contains stable packages, only, that are actually a snapshot of the current testing branch.

At the same moment as a new release is out the so-far stable release becomes oldstable, and an oldstable release becomes the oldoldstable release. The packages of any end-of-life release get removed from the normal APT repositories and mirrors, and are transferred to the Debian Archive [11], and are no longer maintained. Debian is currently developing a site to search through archived packages at Historical Packages Search [12]. This site is though still under development and known to be not yet fully functional.

As with the other releases, the unstable branch has the alias name Sid which is short for “still in development”. In Toy Story, Sid is the name of the evil neighbours child who always damages the toys. The name Sid accurately describes the condition of a package in the unstable branch.

Additionally, there is also the “experimental” branch which is not a complete distribution but an add-on repository for Debian Unstable. This branch contains packages which do not yet fulfill the quality expectations of Debian unstable. Furthermore, packages are placed there in order to prepare library transitions so that packages from Debian unstable can be checked for build issues with a new version of a library without breaking Debian unstable.

The exprimental branch of Debian also has a Toy Story name – “RC-Buggy”. On the one hand this is Andy’s remote-controlled car, and on the other hand it abbreviates the description “contains release-critical bugs” [13].

Parts of the Debian GNU/Linux Distribution

Debian software packages are categorized by their license as follows:

  • main: entirely free
  • contrib: entirely free but the packages depend on non-free packages
  • non-free: free software that does not conform to the Debian Free Software Guidelines (DFSG)

An official release of Debian GNU/Linux consists of packages from the main branch, only. The packages classified under contrib and non-free are not part of the release, and seen as additions that are just made available to you. Which packages you use on your system is defined in the file /etc/apt/sources.list as follows:

cat /etc/apt/sources.list deb
http://ftp.us.debian.org/debian/
stretch main contrib non-free
deb http://security.debian.org/
stretch/updates main contrib
non-free

# stretch-updates, previously
known as ‘volatile’ deb
http://ftp.us.debian.org/debian/
stretch-updates main contrib
non-free

# stretch-backports deb
http://ftp.debian.org/debian
stretch-backports main contrib
non-free

Debian Backports

From the listing above you may have noted the entry titled stretch-backports. This entry refers to software packages that are ported back from Debian testing to the current Debian stable release. The reason for this package repository is that the release cycle of a stable release of Debian GNU/Linux can be quite long, and sometimes a newer version of a software is required for a specific machine. Debian Backports [7] allows you to use packages from future releases in your current setup. Be aware that these packages might not be on par with the quality of Debian stable packages. Also, take into account that there might be the need to switch to a newer upstream release every once in a while even during a stable release cycle, as these packages follow Debian testing, which is a kind of a rolling release (similar to Debian unstable).Debian Backports

Further Reading

The story behind Debian GNU/Linux is amazing. We recommend you to have a closer look at the Debian History [15,16,17].

Source

WP2Social Auto Publish Powered By : XYZScripts.com