Wipro Joins Linux Foundation Networking (LFN) As Gold Member


Leading global IT services provider to help accelerate open technology development and industry adoption

SAN FRANCISCO – January 8, 2019 – The LF Networking Fund (LFN), which facilitates collaboration and operational excellence across open networking projects, continues its membership growth and deepens its global presence with the addition of new Gold member Wipro Limited, a leading global information technology, consulting and business process services company. Wipro Limited joins LFN to support the development of next-generation Open Networking Automation Platform (ONAP) technologies and use cases for current and future networks.

Wipro Limited joins six other LFN Gold members, including Accenture, Aptira, Inocybe Technologies, Lumina Networks, Microsoft and Telstra. A full list of LFN members by category is available at https://www.lfnetworking.org/members/.

K.R. Sanjiv, Chief Technology Officer, Wipro Limited, said, “Today, open source has become the preferred computing model for communications, artificial intelligence and analytics-driven technology solutions to facilitate innovation, cost efficiency and greater industry collaboration. Given Wipro’s focus on and investments in 5G, analytics and the Wipro HOLMESTM artificial intelligence platform, we believe ONAP is the right platform for us to leverage, for network management, automation and orchestration. We are committed to bringing best-of-breed open source-based solutions to the market and are excited to be a part of ONAP and LF Networking.”

Wipro is committed to collaborating with partners across the ecosystem to enable technologies that help organizations transform their digital networks. This collaboration will allow Wipro to leverage open source-based solutions, frameworks and accelerators to help enterprises develop open source strategies and enable their application modernization, cloud and digital transformation journeys.

LFN supports the momentum of open source networking, integrating governance of participating projects in order to enhance operational excellence, simplify member engagement, and increase collaboration.

“Wipro caps off a great first year for LFN and the propagation of open source networking technologies,” said Arpit Joshipura, general manager of Networking and Orchestration, The Linux Foundation. “The company’s global expertise will be a great asset as LFN enters its second year and continues to build a strong international community to accelerate continued deployment and global adoption of open source networking technologies by end users and commercial ecosystems.”

About The Linux Foundation

The Linux Foundation is the organization of choice for the world’s top developers and companies to build ecosystems that accelerate open technology development and industry adoption. Together with the worldwide open source community, it is solving the hardest technology problems by creating the largest shared technology investment in history. Founded in 2000, The Linux Foundation today provides tools, training and events to scale any open source project, which together deliver an economic impact not achievable by any one company. More information can be found at www.linuxfoundation.org.

###

The Linux Foundation has registered trademarks and uses trademarks. For a list of trademarks of The Linux Foundation, please see our trademark usage page: https://www.linuxfoundation.org/trademark-usage. Linux is a registered trademark of Linus Torvalds.


Source

Migrating to Linux: Network and System Settings | Linux.com

Migrating to Linux: Network and System Settings

migration

This series provides an overview of fundamentals to help you make the move to Linux; here we cover some common settings you’ll use on your desktop Linux system.

Learn how to transition to Linux in this tutorial series from our archives.

In this series, we provide an overview of fundamentals to help you successfully make the transition to Linux from another operating system. If you missed the earlier articles in the series, you can find them here:

Part 1 – An Introduction

Part 2 – Disks, Files, and Filesystems

Part 3 – Graphical Environments

Part 4 – The Command Line

Part 5 – Using sudo

Part 6 – Installing Software

Linux gives you a lot of control over network and system settings. On your desktop, Linux lets you tweak just about anything on the system. Most of these settings are exposed in plain text files under the /etc directory. Here I describe some of the most common settings you’ll use on your desktop Linux system.

A lot of settings can be found in the Settings program, and the available options will vary by Linux distribution. Usually, you can change the background, tweak sound volume, connect to printers, set up displays, and more. While I won’t talk about all of the settings here, you can certainly explore what’s in there.

Connect to the Internet

Connecting to the Internet in Linux is often fairly straightforward. If you are wired through an Ethernet cable, Linux will usually get an IP address and connect automatically when the cable is plugged in or at startup if the cable is already connected.

If you are using wireless, in most distributions there is a menu, either in the indicator panel or in settings (depending on your distribution), where you can select the SSID for your wireless network. If the network is password protected, it will usually prompt you for the password. Afterward, it connects, and the process is fairly smooth.

You can adjust network settings in the graphical environment by going into settings. Sometimes this is called System Settings or just Settings. Often you can easily spot the settings program because its icon is a gear or a picture of tools (Figure 1).

figure-1.png

Network Settings

Figure 1: Gnome Desktop Network Settings Indicator Icon.

Network Interface Names

Under Linux, network devices have names. Historically, these are given names like eth0 and wlan0 — or Ethernet and wireless, respectively. Newer Linux systems have been using different names that appear more esoteric, like enp4s0 and wlp5s0. If the name starts with en, it’s a wired Ethernet interface. If it starts with wl, it’s a wireless interface. The rest of the letters and numbers reflect how the device is connected to hardware.

Network Management from the Command Line

If you want more control over your network settings, or if you are managing network connections without a graphical desktop, you can also manage the network from the command line.

Note that the most common service used to manage networks in a graphical desktop is the Network Manager, and Network Manager will often override setting changes made on the command line. If you are using the Network Manager, it’s best to change your settings in its interface so it doesn’t undo the changes you make from the command line or someplace else.

Changing settings in the graphical environment is very likely to be interacting with the Network Manager, and you can also change Network Manager settings from the command line using the tool called nmtui. The nmtui tool provides all the settings that you find in the graphical environment but gives it in a text-based semi-graphical interface that works on the command line (Figure 2).

figure-2.png

nmtui

Figure 2: nmtui interface

On the command line, there is an older tool called ifconfig to manage networks and a newer one called ip. On some distributions, ifconfig is considered to be deprecated and is not even installed by default. On other distributions, ifconfig is still in use.

Here are some commands that will allow you to display and change network settings:

Process and System Information

In Windows, you can go into the Task Manager to see a list of the all the programs and services that are running. You can also stop programs from running. And you can view system performance in some of the tabs displayed there.

You can do similar things in Linux both from the command line and from graphical tools. In Linux, there are a few graphical tools available depending on your distribution. The most common ones are System Monitor or KSysGuard. In these tools, you can see system performance, see a list of processes, and even kill processes (Figure 3).

figure-3.png

NetHogs

Figure 3: Screenshot of NetHogs.

In these tools, you can also view global network traffic on your system (Figure 4).

figure-4.png

System Monitor

Figure 4: Screenshot of Gnome System Monitor.

Managing Process and System Usage

There are also quite a few tools you can use from the command line. The command ps can be used to list processes on your system. By default, it will list processes running in your current terminal session. But you can list other processes by giving it various command line options. You can get more help on ps with the commands info ps, or man ps.

Most folks though want to get a list of processes because they would like to stop the one that is using up too much memory or CPU time. In this case, there are two commands that make this task much easier. These are top and htop (Figure 5).

figure-5.png

top

Figure 5: Screenshot of top.

The top and htop tools work very similarly to each other. These commands update their list every second or two and re-sort the list so that the task using the most CPU is at the top. You can also change the sorting to sort by other resources as well such as memory usage.

In either of these programs (top and htop), you can type ‘?’ to get help, and ‘q’ to quit. With top, you can press ‘k’ to kill a process and then type in the unique PID number for the process to kill it.

With htop, you can highlight a task by pressing down arrow or up arrow to move the highlight bar, and then press F9 to kill the task followed by Enter to confirm.

The information and tools provided in this series will help you get started with Linux. With a little time and patience, you’ll feel right at home.

Source

How to Create Bootable Ubuntu 18.04 USB Stick on Windows

This tutorial will walk you through the process of creating a bootable Ubuntu USB stick on Windows. You can use this USB stick to boot and test out or install Ubuntu on any computer that supports booting from USB.

  • A 4GB or larger USB stick drive
  • Microsoft Windows XP or later

Creating Bootable Ubuntu 18.04 USB Stick on Windows is a relatively straightforward process, just follow the steps outlined below.

To download the Ubuntu ISO file visit the Ubuntu downloads page where you can find download links for Ubuntu Desktop, Ubuntu Server and various Ubuntu flavours.

Most likely you will want to download the latest Ubuntu LST Desktop version.

There are several different applications available for free use which will allow you to flash ISO images to USB drives. In this tutorial we will create a bootable ubuntu 18.04 USB stick using Etcher.

Etcher is a free and open-source utility for flashing images to SD cards & USB drives and supports Windows, macOS and Linux.

Head over to the balenaEtcher downloads page, and download the most recent Etcher for Windows.

Once the installation file is downloaded, double-click on it to launch the installation wizard. Follow the installation wizard’s steps to install Etcher on your Windows desktop.

Creating bootable Ubuntu USB stick with Etcher is an easy task to perform.

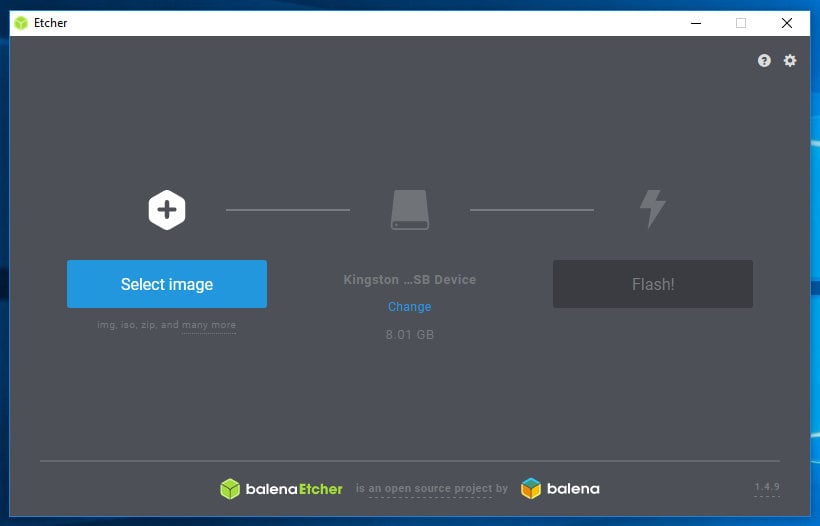
  1. Insert the USB flash drive into the USB port and Launch Etcher.
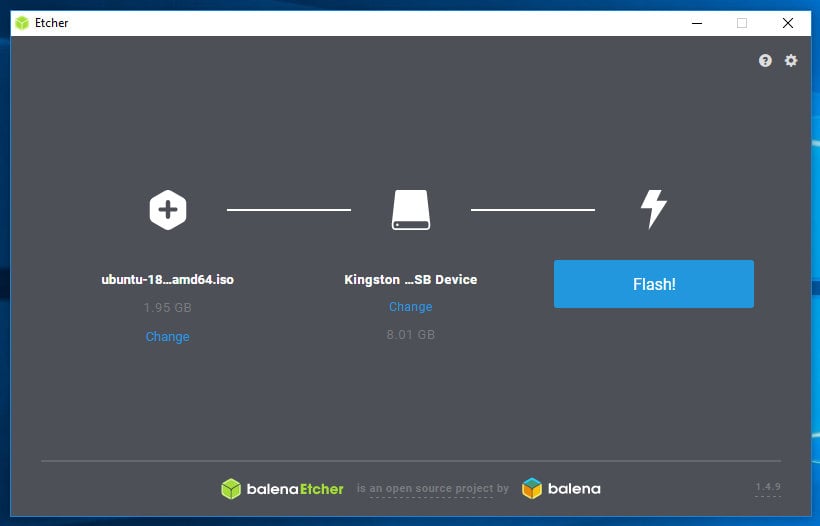
  2. Click on the Select image button and locate your Ubuntu .iso file. If you downloaded the file using a web browser then it should be stored in Downloads folder located in your user account.
  3. Etcher will autoselect the USB drive if only one drive is present. Otherwise if more than one SD cards or USB sticks are attached make sure you have selected the correct USB drive before flashing the image.
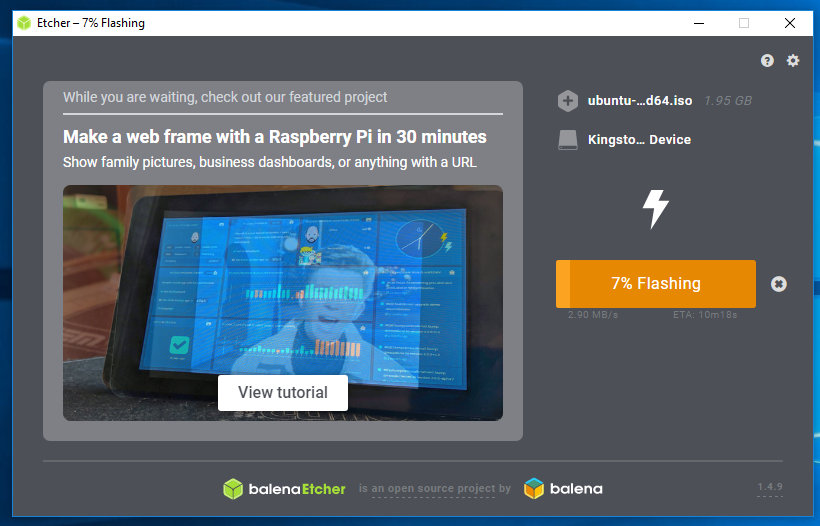
  4. Click on the Flash image button and the flashing process will start.

    Etcher will show a progress bar and ETA while flashing the image.

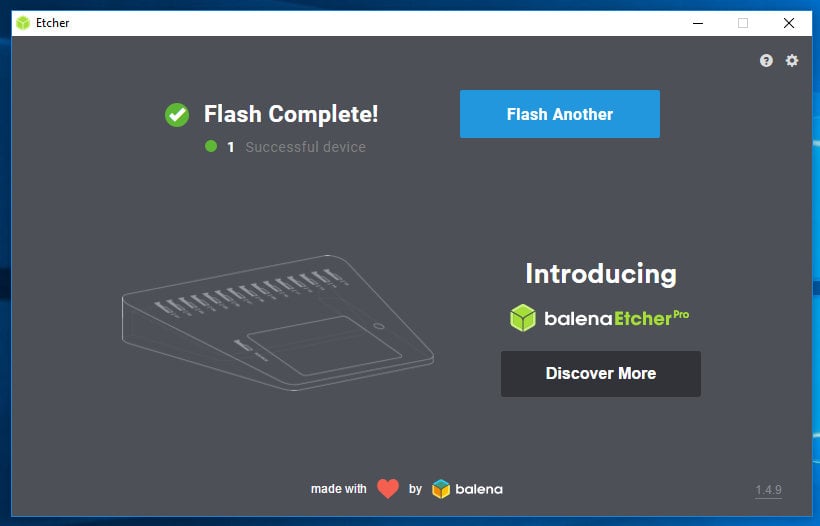
    The process may take several minutes, depending on the size of the ISO file and the USB stick speed. Once completed the following screen will appear informing you that the image is successfully flashed.

    Click on the [X] to close the Etcher window.

That’s all! You have a bootable Ubuntu on your USB stick.

Source

Linux Apps on Chromebooks Getting Display Scaling for High-Res Devices

Linux Apps on Chromebooks Getting Display Scaling for High-Res Devices

In retrospect, the entire project bringing Linux apps to Chrome OS has been a relatively smooth, fast, and painless process for end users. Unlike the years-long Play Store transition (which is still playing out in quite a few ways even a few years later), bringing Linux apps to Chromebooks has been a process that has evolved quite rapidly.

There are still a few notable missing pieces, however, like the lack of proper audio support, GPU support, and scaling for high DPI displays. We know GPU support is inbound in 2019 and that audio support is also in the works (though the team has missed the Chrome OS 71 target set earlier in the year), but little has been solidified on the resolution scaling front.

With Chrome OS 72 in Developer Channel, that all changes.

Discovered by Kevin Tofel over at About Chromebooks, Linux apps on Chromebooks now have a nifty scaling feature users can toggle right from the app shelf. With a right-click on your Linux app, a context menu will appear that will allow you to choose a “Use low density” option.

Select that, restart the app, and now your app will scale much better on your high-res display. Remember, on devices like the Pixelbook, Pixel Slate, HP Chromebook x2, and basically any 1080p device that has a screen smaller than 15-inches, Chrome OS scales the entire interface to make things a bit larger on the screen while keeping icons, text and graphics nice and sharp.

With Linux being unable to take advantage of this graphical trick, interface elements on a 12.3-inch screen with a 3000×2000 pixel resolution will render incredibly small to the point of obfuscation. Allowing Linux apps to leverage display scaling removes this problem.

An added benefit is Chrome OS can actually remember the setting for each app and scale that particular app the same way each time you open it in the future. For general usability, this is a very important step in the process.

As a test, we installed Inkscape: a great SVG editor that has been hard to use because of the ridiculously small interface elements. Take a look below at the before and after pics. Both are screenshots of the app running full-screen on the Pixelbook.

Inkscape running in native resolution.Inkscape running with “Use Low Density” option enabled.

As you can see, this little setting makes using apps like this a much better experience. Though Inkscape wouldn’t run when the low density option was selected initially, a quick restart of the Pixelbook allowed it to work. Just remember all this is firmly in Developer Mode, so you’ll have hiccups here and there. I have little doubt that things will get ironed out as this option makes its way to the Stable Channel.

As we see GPU acceleration and audio fixes come later this year, it is really exciting to think of all that will be possible on a Chromebook if users choose to leverage them.

Source

Install JetBrains IntelliJ IDEA Java IDE on Ubuntu – Linux Hint

IntelliJ IDEA is a very powerful Java IDE from JetBrains. You can develop Java apps, Java Swing GUI apps, Android apps and many more with IntelliJ IDEA. It has intelligent auto completion feature that will help you code efficiently in Java. It is a one stop solution to all your Java related tasks. In this article, I will show you how to install JetBrains IntelliJ IDEA on Ubuntu. So, let’s get started.

IntelliJ IDEA is not available in the official package repository of Ubuntu. But we can easily download IntelliJ IDEA from the official website of JetBrains and install it on Ubuntu.

First, visit the official website of Jetbrains at https://www.jetbrains.com. Once the page loads, go to Tools > IntelliJ IDEA as marked in the screenshot below.

Now, click on Download.

Now, make sure Linux is selected and click on the Download button as marked in the screenshot below.

NOTE: IntelliJ IDEA has 2 versions, Ultimate and Community. The Community version is free to use, but the Ultimate versions is not. You must buy a license from JetBrains if you want to use the Ultimate version fo IntelliJ IDEA. In this article, I will go with the Community version.

Now, select Save File and click on OK.

Your browser should start downloading the IntelliJ IDEA archive file. It may take a while to complete.

Installing and Configuring IntelliJ IDEA:

First, navigate to the directory where you downloaded IntelliJ IDEA with the following command:

As you can see, the file I just downloaded is here.

Now, run the following command to install IntelliJ IDEA to the /opt directory.

$ sudo tar xzf ideaIC-2018.3.2.tar.gz -C /opt

NOTE: If you want to install IntelliJ IDEA somewhere else, replace /opt with the directory path where you want to install it.

Once IntelliJ IDEA archive is extracted, you should see a new directory in the /opt directory as you can see in the screenshot below. Take a note of the directory name. You will need it to run IntelliJ IDEA for the first time.

Now, run IntelliJ IDEA as follows:

$ /opt/idea-IC-183.4886.37/bin/idea.sh

As you’re running IntelliJ IDEA for the first time, you will have to configure IntelliJ IDEA.

Here, select Do not import settings and click on OK.

Now, check the I confirm that I have read and accept the terms of this User Agreement checkbox and click on Continue to confirm the JetBrains Privacy Policy.

Now, you may click on any one of these buttons depending on whether you would like to share statistics data with JetBrains to help them improve their products.

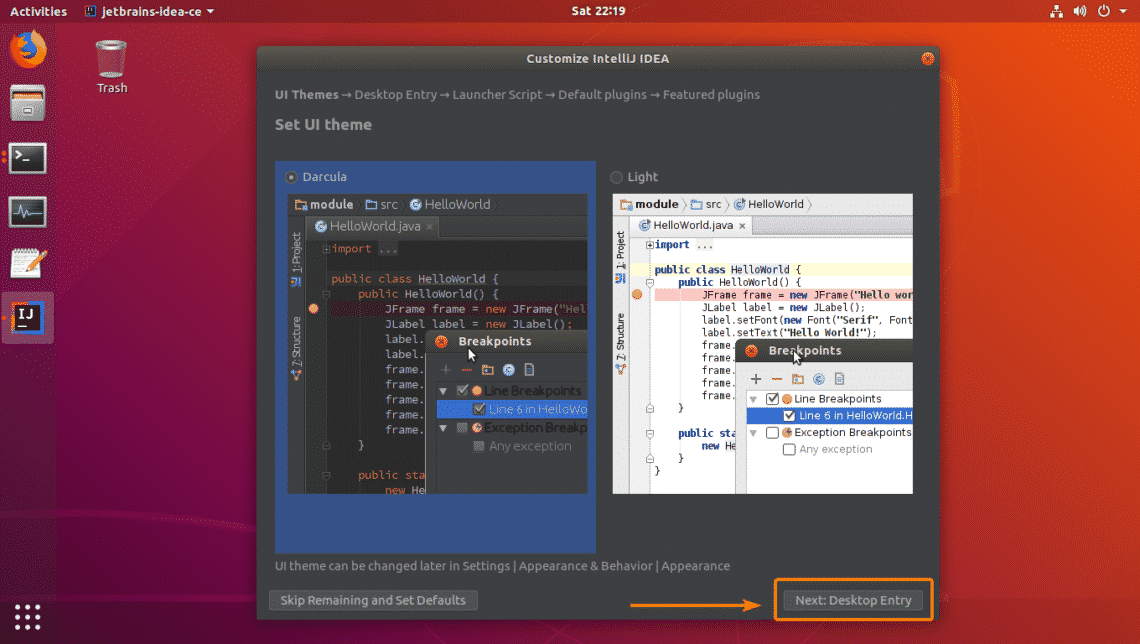
Now, select a UI theme and click on Next: Desktop Entry as marked in the screenshot below.

Now, you have to create a Desktop Entry for IntelliJ IDEA. That way, you can easily access IntelliJ IDEA from the Application Menu of Ubuntu. To do that, make sure the marked checkboxes are checked and click on the Next: Launcher Script button.

If you want to launch IntelliJ IDEA projects from the command line, check the marked checkbox. Otherwise, leave it unchecked. Once you’re done, click on Next: Default plugins.

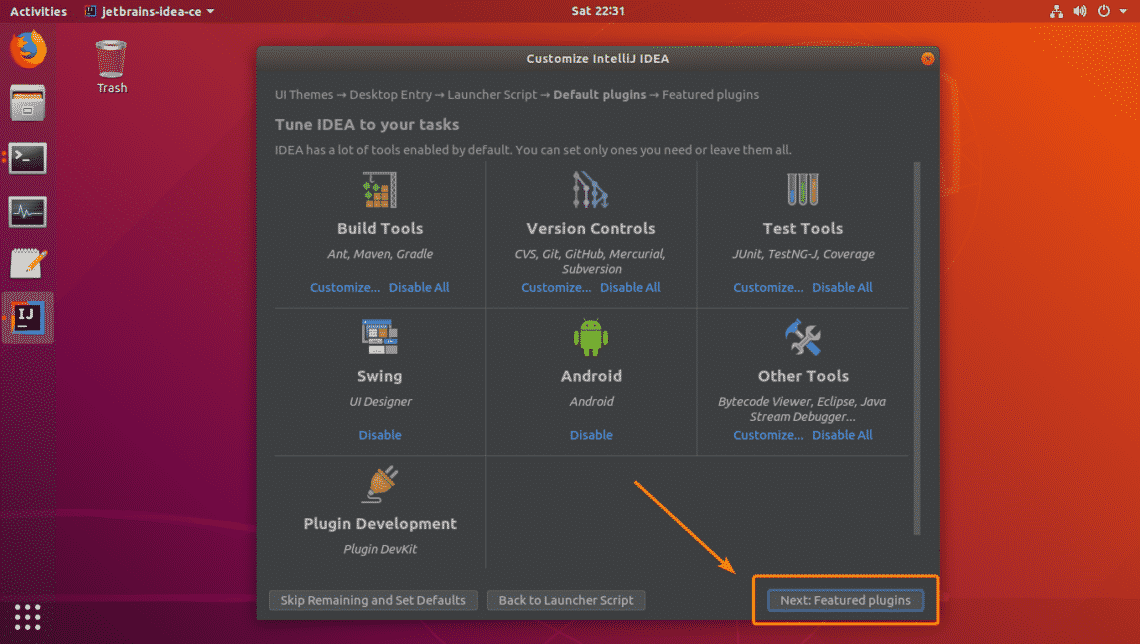
Now, you can enable/disable the plugins you need to tune IntelliJ IDEA to your need from here. Once you’re done, click on Next: Featured plugins.

Now, IntelliJ IDEA will suggest you some plugins that you may need. If you want to install any of them, just click on Install and it will be installed. Once you’re done, click on Start using IntelliJ IDEA.

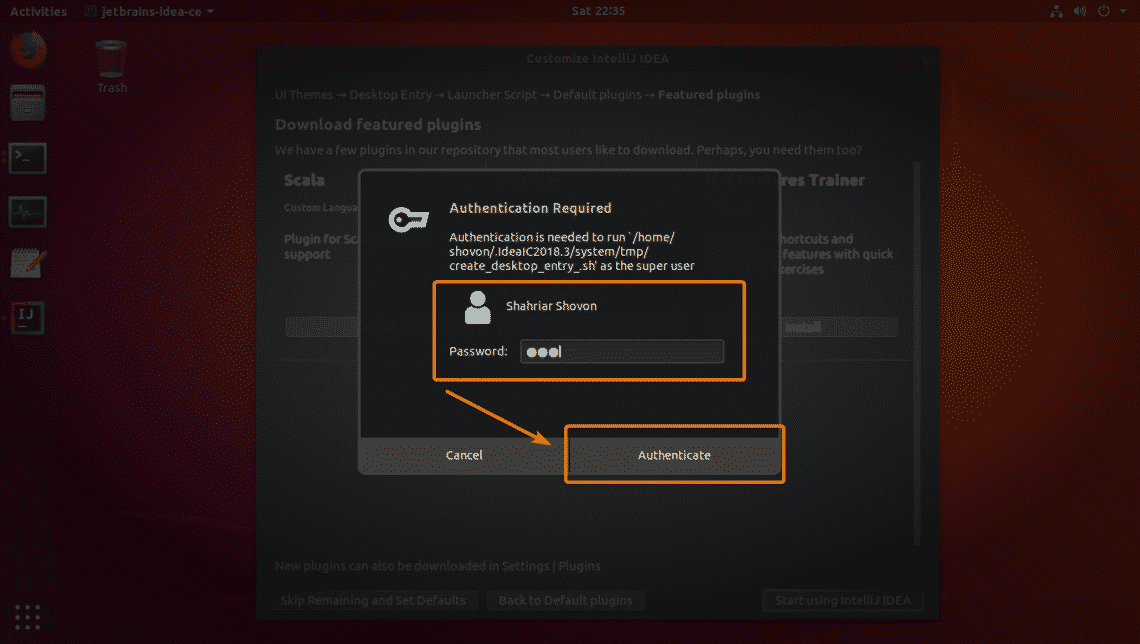
Now, type in your login password and click on Authenticate.

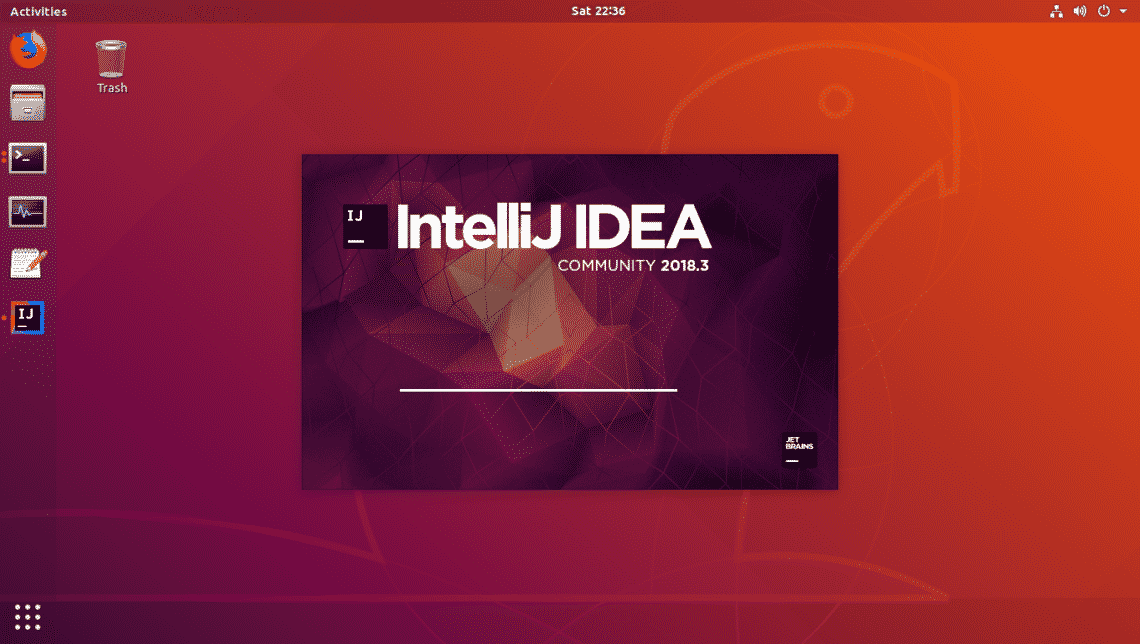
IntelliJ IDEA is loading as you can see in the screenshot below.

As you can see, IntelliJ IDEA is running. It is the dashboard of IntelliJ IDEA.

Now that IntelliJ IDEA is installed, you can also run it from the Application Menu of Ubuntu as you can see in the screenshot below.

Creating a New Java Project in IntelliJ IDEA:

In this section, I will show you how to create a new Java project in IntelliJ IDEA. So, let’s get started.

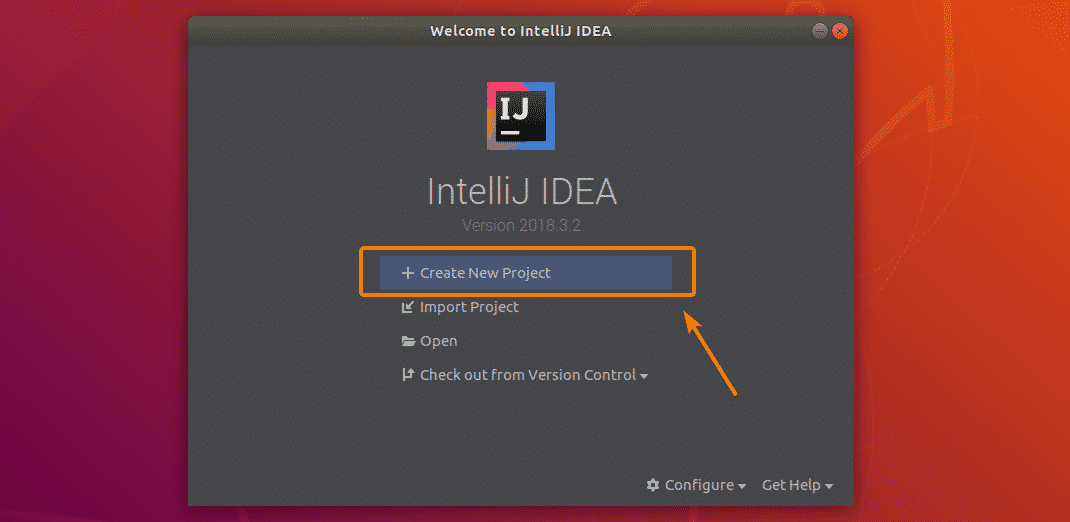
First, start IntelliJ IDEA and click on Create New Project.

Now, select Java from the list and click on Next.

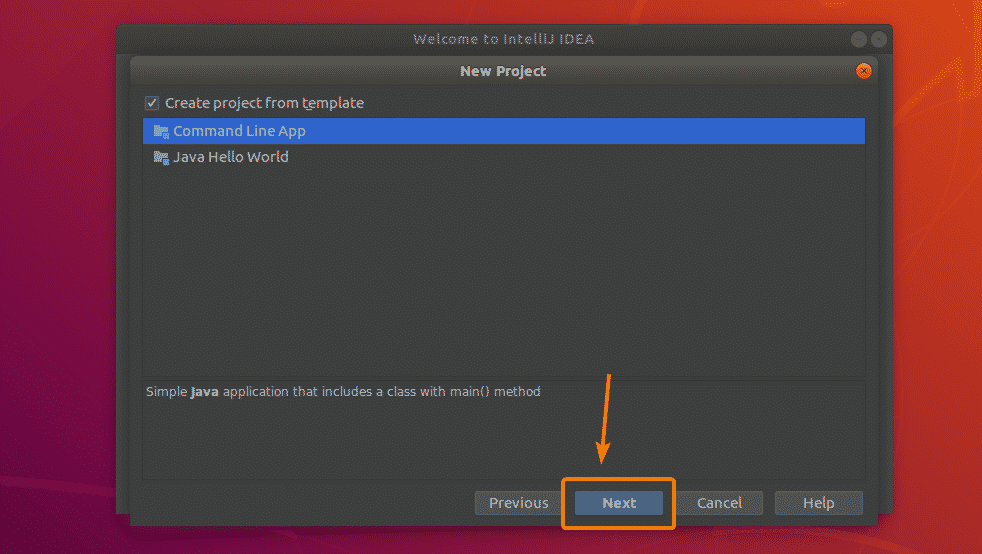
From here, check Create project from template and select Command Line App. Once you’re done, click on Next.

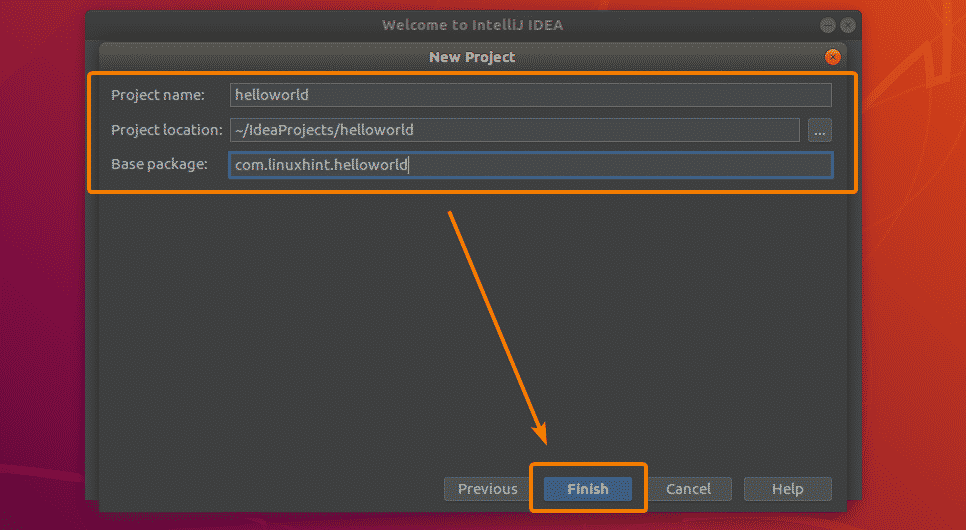
Now, type in your project name, project location, and package namespace. Once you’re done, click on Finish.

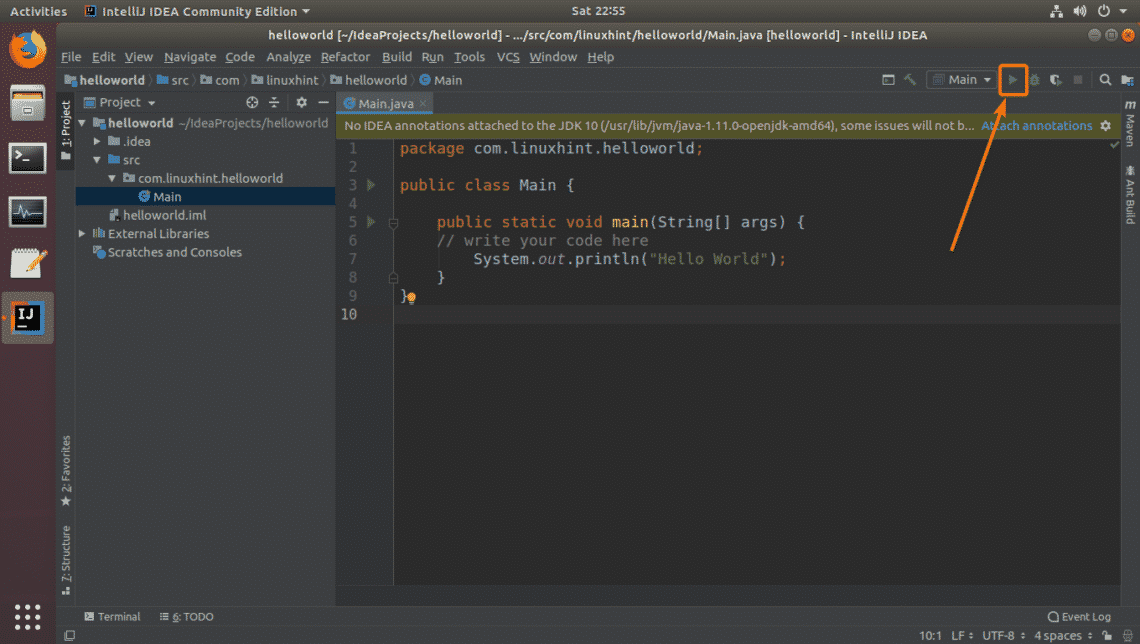
Now, write your Java program. Once you’re done, you need to compile and run your Java program. To do that click on the Play button as marked in the screenshot below.

As you can see, the correct output is displayed.

So, that’s how you install JetBrains IntelliJ IDEA Java IDE on Ubuntu. Thanks for reading this article.

Source

Guide to Sort a List with Python Sort List() Command

How to sort list in python

We have a list of numbers or strings, and we want to sort the items in this list. Basically, we can either use sort method or sorted function to achieve what we want.

The difference between sort and sorted is that sort is a list method that modifies the list in place and we can’t use sort method with another object like tuple whereas sorted is a built-in function that creates a new list and the original one didn’t change.

In this article, we will mention how to use these functions to sort, in an ascending or descending manner, a list of numbers, strings, tuples, or literally any object.

We will also mention how to define your own custom sort functions.

1) Sorting a list of numbers

By sort method, we can sort list of numbers whether integer or float.

Note: the method comes after the object as example below

>>> Lst = [20, 25.4, 12, -16, -3.14, 3, -5, 7]
>>> Lst.sort()
>>> Lst
[-16, -5, -3.14, 3, 7, 12, 20, 25.4]

As you see the order of the object Lst has been changed.

But if we want to keep the original list without changing and assigns the new order to new list, we will use sorted function as below.

>>> Lst = [20, 25.4, 12, -16, -3.14, 3, -5, 7]
>>> Sorted_Lst = sorted(Lst)
>>> Sorted_Lst
[-16, -5, -3.14, 3, 7, 12, 20, 25.4]

If we want to sort the list in a descending order, we will use keyword reverse and assigning to it True as below.

>>> Lst = [20, 25.4, 12, -16, -3.14, 3, -5, 7]
>>> Sorted_Lst = sorted(Lst, reverse = True)
>>> Sorted_Lst
[25.4, 20, 12, 7, 3, -3.14, -5, -16]

2) Sorting a list of strings

We will use sort or sorted for sorting strings

>>> Lst = [‘bmw’,’ford’,’audi’,’toyota’]
>>> Lst.sort()
>>> Lst
[‘audi’, ‘bmw’, ‘ford’, ‘toyota’]

Also we still use the reverse keyword to sort in a descending order.

>>> Lst = [‘bmw’,’ford’,’audi’,’toyota’]
>>> Lst.sort(reverse=True)
>>> Lst
[‘toyota’, ‘ford’, ‘bmw’, ‘audi’]

Note: Python treats all uppercase letters before lowercase letters

We will see that on the example below.

>>> Lst = [‘bmw’,’ford’,’audi’,’Toyota’]
>>> Lst.sort()
>>> Lst
[‘Toyota’, ‘audi’, ‘bmw’, ‘ford’]

But we can sort a list of strings in a case insensitive manner by using keyword key=str.lower for sort method as below.

>>> Lst = [‘bmw’,’ford’,’audi’,’Toyota’]
>>> Lst.sort(key=str.lower)
>>> Lst
[‘audi’, ‘bmw’, ‘ford’, ‘Toyota’]

3) Sorting a list of tuples

We should know that tuple is immutable object when list is mutable object, also when we sort two tuples, we start out by comparing the first elements of the tuples and if they are not equal, this is the result of the comparison.

>>> (5, 7) >> (5, 7) > (5, 9)
False

Of course we can use sort method or sorted function for sorting tuples as below.

>>> sorted([(5, 4), (3, 3), (3, 10)])
[(3, 3), (3, 10), (5, 4)]

>>> sorted([(‘watermelon’, ‘green’), (‘apple’, ”), (‘banana’, ”)])
[(‘apple’, ”), (‘banana’, ”), (‘watermelon’, ‘green’)]

Note: We can sort tuple by second element

we will use lambda to define our own key function as below.

>>> Lst = [(“Amanda”, 35), (“John”, 30), (“Monica”, 25)]
>>> Lst.sort(key=lambda x: x[1])
>>> print(Lst)
[(‘Monica’, 25), (‘John’, 30), (‘Amanda’, 35)]

4) Sorting a list of objects

Objects are type of data types for Python, to sort this type of data type, we should put this objects in a list as below.
Assume we have a Student class has name and age methods that looks like this:-

class Student:
def __init__(self, name, age):
self.name = name
self.age = age

Now we will create some Student objects and add them to a list for sorting them.

>>> John = Student(‘John’, 30)
>>> Amanda = Student(‘Amanda’, 35)
>>> Monica = Student(‘Monica’, 25)
>>> Lst = [John, Amanda, Monica]

If we sort the list upon name method.

>>> Lst.sort(key=lambda x: x.name)
>>> print([item.name for item in Lst])
[‘Amanda’, ‘John’, ‘Monica’]

If we sort the list upon age method.

>>> Lst.sort(key=lambda x: x.age)
>>> print([item.name for item in Lst])
[‘Monica’, ‘John’, ‘Amanda’]

Python has many built-in functions and methods helping us to solve problems,sort and sorted are used to sort any list of numbers, strings, tuples and objects.

Read Also:

Source

NSA to Open Source its Reverse Engineering Tool GHIDRA

NSA to Open Source its Reverse Engineering Tool GHIDRA

Last updated January 8, 2019 By Ankush Das

GHIDRA – NSA’s reverse engineering tool is getting ready for a free public release this March at the RSA Conference 2019 to be held in San Francisco.

The National Security Agency (NSA) did not officially announce this – however – a senior NSA advisor, Robert Joyce’s session description on the official RSA conference website revealed about it before any official statement or announcement.

Here’s what it mentioned:

Image Credits: Twitter
In case the text in the image isn’t properly visible, let me quote the description here:

NSA has developed a software reverse engineering framework known as GHIDRA, which will be demonstrated for the first time at RSAC 2019. An interactive GUI capability enables reverse engineers to leverage an integrated set of features that run on a variety of platforms including Windows, Mac OS, and Linux and supports a variety of processor instruction sets. The GHISDRA platform includes all the features expected in high-end commercial tools, with new and expanded functionality NSA uniquely developed. and will be released for free public use at RSA.

What is GHIDRA?

GHIDRA is a software reverse engineering framework developed by NSA that is in use by the agency for more than a decade.

Basically, a software reverse engineering tool helps to dig up the source code of a proprietary program which further gives you the ability to detect virus threats or potential bugs. You should read how reverse engineering works to know more.

The tool is is written in Java and quite a few people compared it to high-end commercial reverse engineering tools available like IDA.

A Reddit thread involves more detailed discussion where you will find some ex-employees giving good amount of details before the availability of the tool.

NSA open source

GHIDRA was a secret tool, how do we know about it?

The existence of the tool was uncovered in a series of leaks by WikiLeaks as part of Vault 7 documents of CIA.

Is it going to be open source?

We do think that the reverse engineering tool to be released could be made open source. Even though there is no official confirmation mentioning “open source” – but a lot of people do believe that NSA is definitely targeting the open source community to help improve their tool while also reducing their effort to maintain this tool.

This way the tool can remain free and the open source community can help improve GHIDRA as well.

You can also check out the existing Vault 7 document at WikiLeaks to come up with your prediction.

Is NSA doing a good job here?

The reverse engineering tool is going to be available for Windows, Linux, and Mac OS for free.

Of course, we care about the Linux platform here – which could be a very good option for people who do not want to or cannot afford a thousand dollar license for a reverse engineering tool with the best-in-class features.

Wrapping Up

If GHIDRA becomes open source and is available for free, it would definitely help a lot of researchers and students and on the other side – the competitors will be forced to adjust their pricing.

What are your thoughts about it? Is it a good thing? What do you think about the tool going open source? Let us know what you think in the comments below.

About Ankush Das

A passionate technophile who also happens to be a Computer Science graduate. He has had bylines at a variety of publications that include Ubergizmo & Tech Cocktail. You will usually see cats dancing to the beautiful tunes sung by him.

Source

How to Downgrade RHEL/CentOS to Previous Minor Release

Have you upgraded your kernel and redhat-release packages and you are encountering some issues. Do you want to downgrade to a lower minor release. In this article, we will describe how to do downgrade RHEL or CentOS version to previous minor version.

Note: The following steps will only work for downgrades within the same major version (such as from RHEL/CentOS 7.6 to 7.5) but not between major versions (such as from RHEL/CentOS 7.0 to 6.9).

A minor version is a release of RHEL that does not (in most cases) add new features or content. It focuses on solving minor problems, typically bugs or security issues. Most of what makes a specific minor version is included in the kernel, so you will need to find out which kernels are supported as part of the minor version you are targeting.

For the purpose of this article, we will show how to downgrade from 7.6 to 7.5. Before we proceed, note that the kernel version for 7.5 is 3.10.0-862. Got to Red Hat Enterprise Linux Release Dates for a complete list of minor releases and associated kernel versions.

Let’s check if the required kernel packages “kernel-3.10.0-862” is installed or not, using the following yum command.

 
# yum list kernel-3.10.0-862*
Check Kernel Version Package

Check Kernel Version Package

If the output of the previous command shows that the kernel package is not installed, you need to install it on the system.

# yum install kernel-3.10.0-862.el7

Once the kernel installation is compete, to apply the changes, you need to reboot the system.

Then downgrade the redhat-release package to complete the process. The command below targets the latest minor version that is lower than the current running one, such as from 7.6 to 7.5, or from 7.5 o 7.4.

# yum downgrade redhat-release

Finally, confirm the downgrade by checking the contents of /etc/redhat-release using the cat command.

# cat /etc/redhat-release
Check Release Version

Check Release Version

That’s all! In this article, we have explained how to downgrade RHEL or CentOS distribution to a lower minor release. If you have any queries, use the feedback form below to reach us.

Source

How to Install Apache Tomcat 9 on CentOS 7

How to install Tomcat 9 on CentOS 7

Install Apache Tomcat on CentOS

Apache Tomcat is an opensource web server used to server Java Applications. It is an opensource implementation of Java Servlet, Java Server Pages and Java Expression Language. In this tutorial, you are going to learn how to Install Apache Tomcat on CentOS 7.

Prerequisites

Before you start to install Apache Tomcat on CentOS 7. You must have the non-root user account on your system with sudo privileges.

Install Java with OpenJDK

It required to have Java installed on your system before we start to install Tomcat. Run following commands to install Java.

First, check if Java is already installed on your system running following command.

java -version

If Java does not installed on your system install it by running following command.

sudo yum install java-1.8.0-openjdk-devel

Now Java is installed on your system.

Create Tomcat User

Becuase of security reason Tomcat should not run as root user. So now you should create a non-root user for Tomcat typing following command.

sudo useradd -r -m -U -d /opt/tomcat -s /bin/false tomcat

Now you are ready to install Tomcat on CentOS 7.

Install Tomcat

To install Tomcat 9 you need to download latest binaries from Tomcat Download Page. At the time creating this tutorial latest version is 9.0.14. But you can use the latest stable version.

First navigate insode /tmp directory.

cd /tmp

To download Tomcat run following command.

wget http://www-eu.apache.org/dist/tomcat/tomcat-9/v9.0.14/bin/apache-tomcat-9.0.14.tar.gz -P

After downloading extract Tomcat archive and move to /opt/tomcat directory.

sudo tar xf /apache-tomcat-9*.tar.gz -C /opt/tomcat

Now create a symbolic link for installation directory so if you want to migrate to next Tomcat version you need to only change this symbolic link.

sudo ln -s /opt/tomcat/apache-tomcat-9.0.14 /opt/tomcat/enabled

Set Permissions

As Tomcat should run under tomcat user created previously. You need to give permissions to tomcat user to access tomcat installation directory.

Run following command to give installation directory ownership to tomcat user and tomcat group.

sudo chown -RH tomcat: /opt/tomcat/enabled

Set non executable flag for bin directory.

sudo chmod o+x /opt/tomcat/enabled/bin/

Create Systemd Unit File

To run Tomcat as a service you need to create a new unit file.

Run following command to create tomcat.service unit file inside /etc/systemd/system/ directory;

sudo nano /etc/systemd/system/tomcat.service

Copy the following code and paste it inside the above file.
NOTE: Modify JAVA_HOME path if it does not match with the value found on your system.

[Unit]
Description=Tomcat 9 servlet container
After=network.target

[Service]
Type=forking

User=tomcat
Group=tomcat

Environment="JAVA_HOME=/usr/lib/jvm/default-java"
Environment="JAVA_OPTS=-Djava.security.egd=file:///dev/urandom -Djava.awt.headless=true"

Environment="CATALINA_BASE=/opt/tomcat/latest"
Environment="CATALINA_HOME=/opt/tomcat/latest"
Environment="CATALINA_PID=/opt/tomcat/latest/temp/tomcat.pid"
Environment="CATALINA_OPTS=-Xms512M -Xmx1024M -server -XX:+UseParallelGC"

ExecStart=/opt/tomcat/latest/bin/startup.sh
ExecStop=/opt/tomcat/latest/bin/shutdown.sh

[Install]
WantedBy=multi-user.target

Now reload systemd daemon to notify new file created.

sudo systemctl daemon-reload

Now start the Tomcat service running following command.

sudo systemctl start tomcat

Check the status if tomcat running using the following command.

sudo systemctl status tomcat

If everything is ok then run the following command to autostart Tomcat after boot.

sudo systemctl enable tomcat

Update The Firewall Settings

If you are running Firewall then update settings then you should open port 8080 to access Tomcat from outside of your local system.

Run following command to allow traffic on port 8080:

sudo firewall-cmd --zone=public --permanent --add-port=8080/tcp
sudo firewall-cmd --reload

Configure Tomcat Web Management Interface

To use manager web app you should edit tomcat-users.xml file. This file contains users and roles. Edit tomcat-users.xml file by running following command:

sudo nano /opt/tomcat/latest/conf/tomcat-users.xml

Now add username and password for admin-gui and manager-gui. Make it sure you are setting strong username and password.

....
....
<role rolename="admin-gui"/>
<role rolename="manager-gui"/>
<user username="admin" password="admin_password" roles="admin-gui,manager-gui"/>

Now save and close the above file opened.

By default, Apache Tomcat restricts access to Manager and Host Manager apps to connections coming from the server also. You should remove these restrictions.

To change IP address restriction open following files.

Open Manager app context file using below command.

sudo nano /opt/tomcat/latest/webapps/manager/META-INF/context.xml

Open Host Manager app context file using below command.

sudo nano /opt/tomcat/latest/webapps/host-manager/META-INF/context.xml

Add commnets as given in following file.

<Context antiResourceLocking="false" privileged="true" >
<!--
  <Valve className="org.apache.catalina.valves.RemoteAddrValve"
         allow="127\.\d+\.\d+\.\d+|::1|0:0:0:0:0:0:0:1" />
-->
</Context>

Save and close the file and restart the Tomcat server.

sudo systemctl restart tomcat

NOTE: You can add only IP address to the file to allow connection as given below. In following file for example 192.0.0.0 IP address added.

<Context antiResourceLocking="false" privileged="true" >
  <Valve className="org.apache.catalina.valves.RemoteAddrValve"
         allow="127\.\d+\.\d+\.\d+|::1|0:0:0:0:0:0:0:1|192.0.0.0" />
</Context>

Testing Tomcat

Open browser and visit following link : http://YOUR_SERVER_DOMAIN_OR_IP_ADDRESS:8080

You should get the following output for the successful installation.

How to install tomcat 9 - homepage
How to install tomcat 9 – homepage

Now use Manager App visiting http://YOUR_SERVER_DOMAIN_OR_IP_ADDRESS:8080/manager/html. Now to login enter username and password you have created in tomcat-users.xml file.

how to install tomcat 9 - manager app
how to install tomcat 9 – manager app

The Virtual Host Manager App is available at http://YOUR_SERVER_DOMAIN_OR_IP_ADDRESS:8080/host-manager/html. By using this app you can manage virtual hosts.

how to install tomcat 9 - virtual host manager
how to install tomcat 9 – virtual host manager

Conclusion

You have successfully installed Tomcat 9 on CentOS 7. If you have any queries regarding this please don’t forget to comment below.

Source

How to Install Jetbrains RubyMine Ruby IDE on Ubuntu – Linux Hint

RubyMine is a powerful Ruby IDE from JetBrains. Like all the other JetBrains IDE, Ruby mine also has intelligent auto completion and many other tools to help you write and debug your Ruby application fast. In this article, I will show you how to install RubyMine on Ubuntu. The procedures shown here should work on Ubuntu 16.04 LTS and later. I will be using Ubuntu 18.04 LTS for the demonstration. So, let’s get started.

In order to run Ruby programs on RubyMine, you must have Ruby programming language installed on your machine.

On Ubuntu, you can install Ruby programming language with the following command:

$ sudo apt install ruby-full

Now, press y and then press <Enter> to continue.

Ruby should be installed.

Installing RubyMine:

On Ubuntu 16.04 LTS and later, RubyMine is available as a SNAP package. So, you can install the latest version of RubyMine on Ubuntu 16.04 LTS and later from the official SNAP package repository of Ubuntu.

To install RubyMine SNAP package on Ubuntu 16.04 LTS and later, run the following command:

$ sudo snap install rubymine –classic

Now, type in the password of your login user and press <Enter> to continue.

RubyMine snap package is being downloaded.

RubyMine is installed.

Initial Configuration of RubyMine:

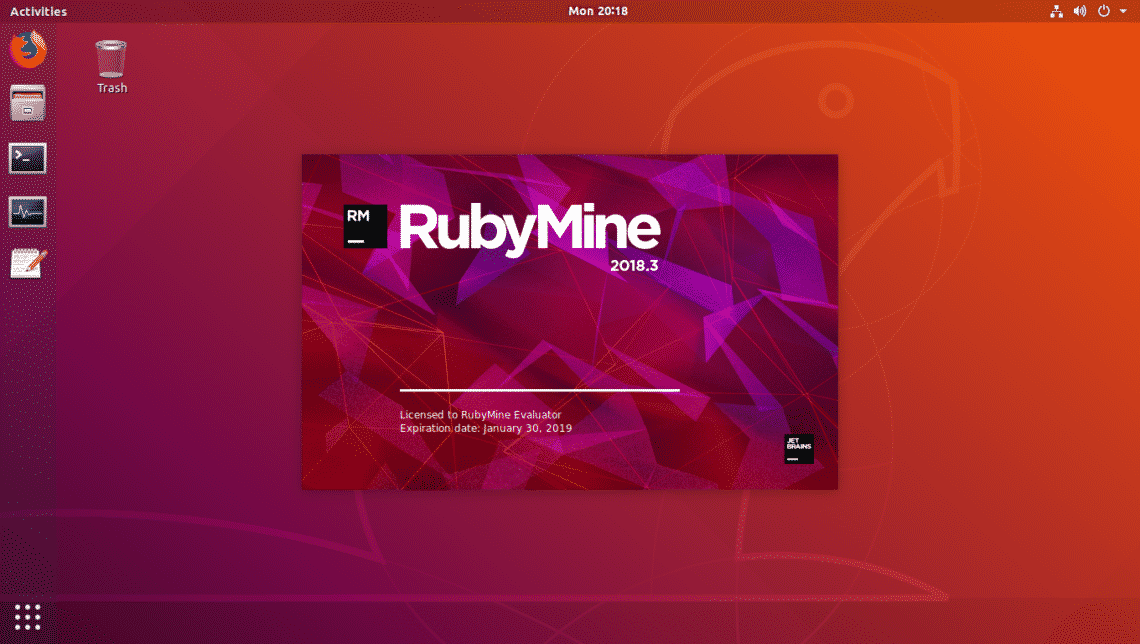
Now, you can start RubyMine from the Application Menu of Ubuntu as you can see in the screenshot below.

As you’re running RubyMine for the first time, you may not have any settings to import. Just select Do not import settings and click on OK.

Now, you have to accept the JetBrains User Agreement. To do that, check I confirm that I have read and accept the terms of this User Agreement checkbox and click on Continue.

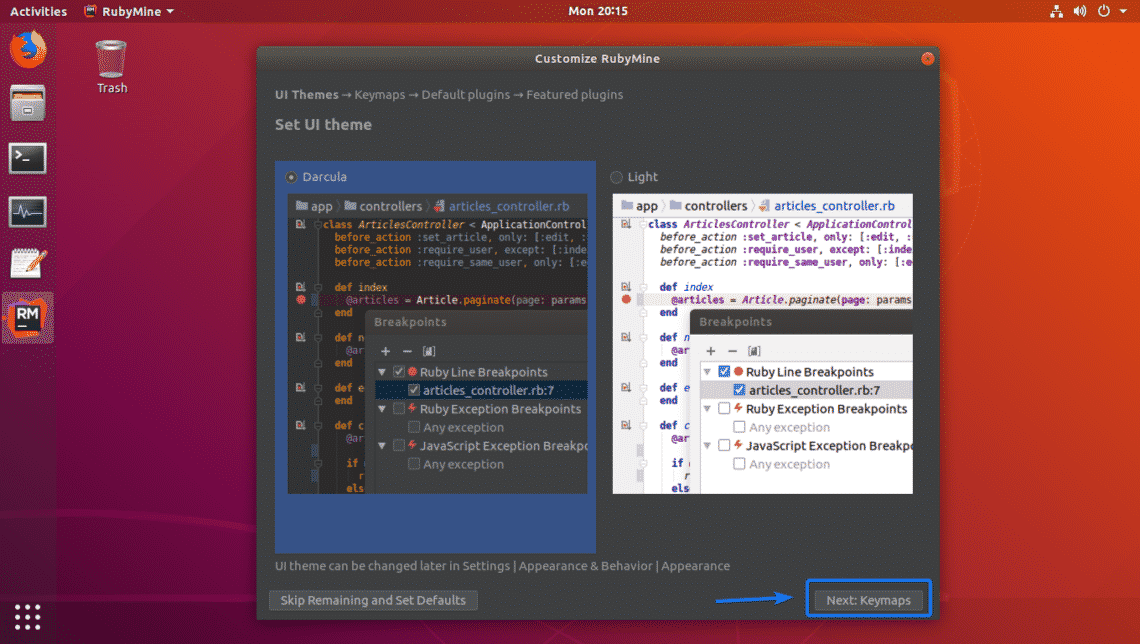
Now, select an UI theme and click on Next: Keymaps.

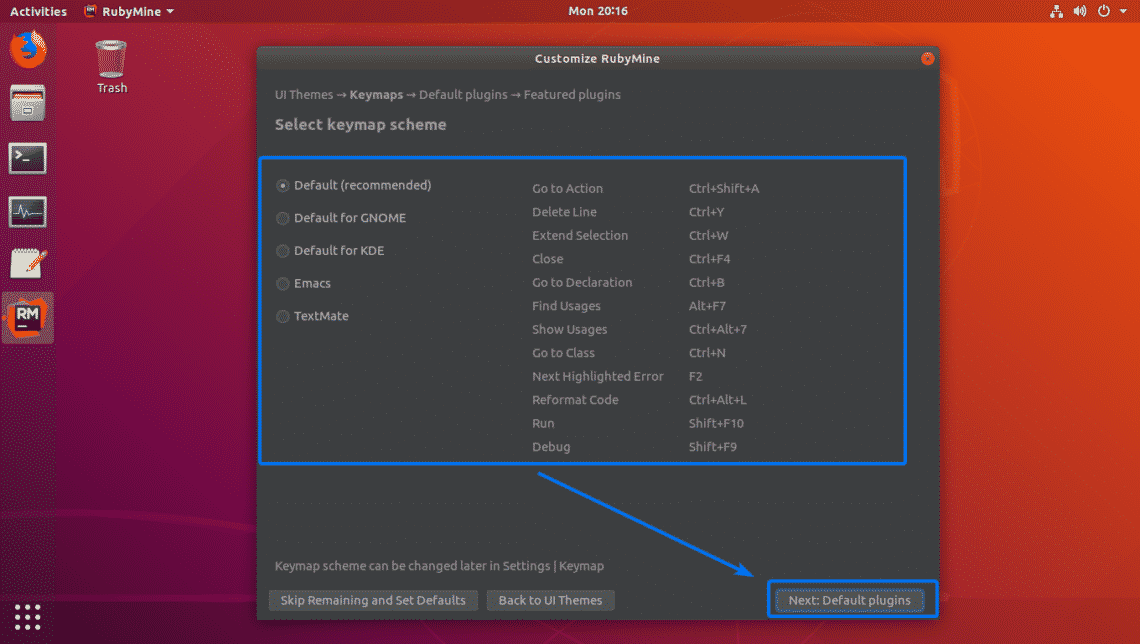
Now, select the keymap that you’re comfortable with and click on Next: default plugins.

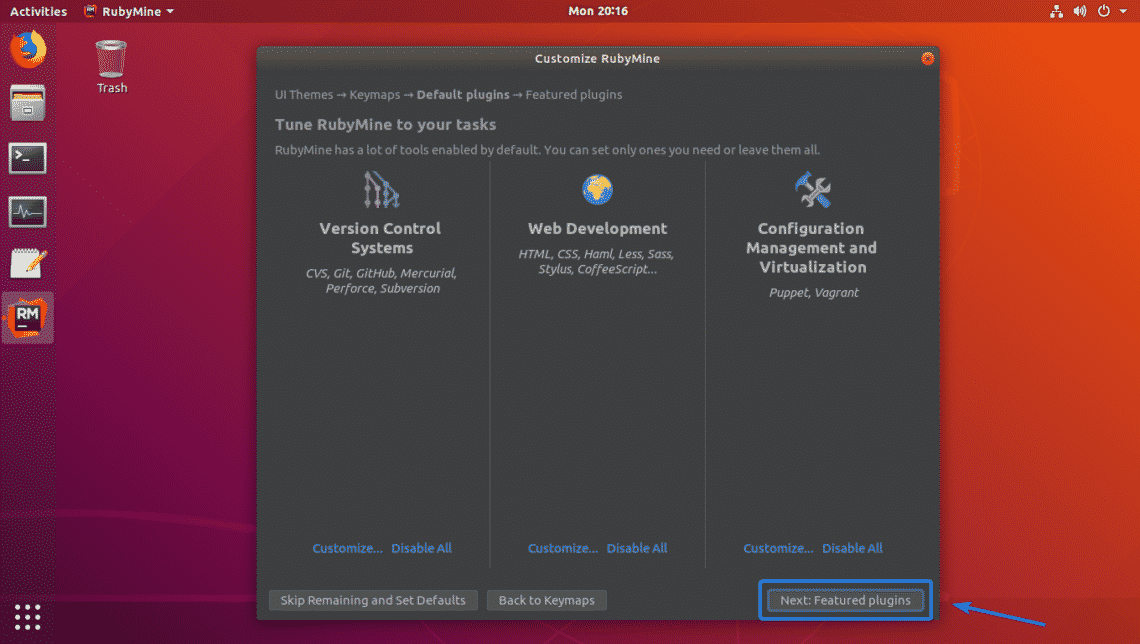
Now, you can enable/disable certain features to tune RubyMine to your needs. Once you’re done, click on Next: Featured plugins.

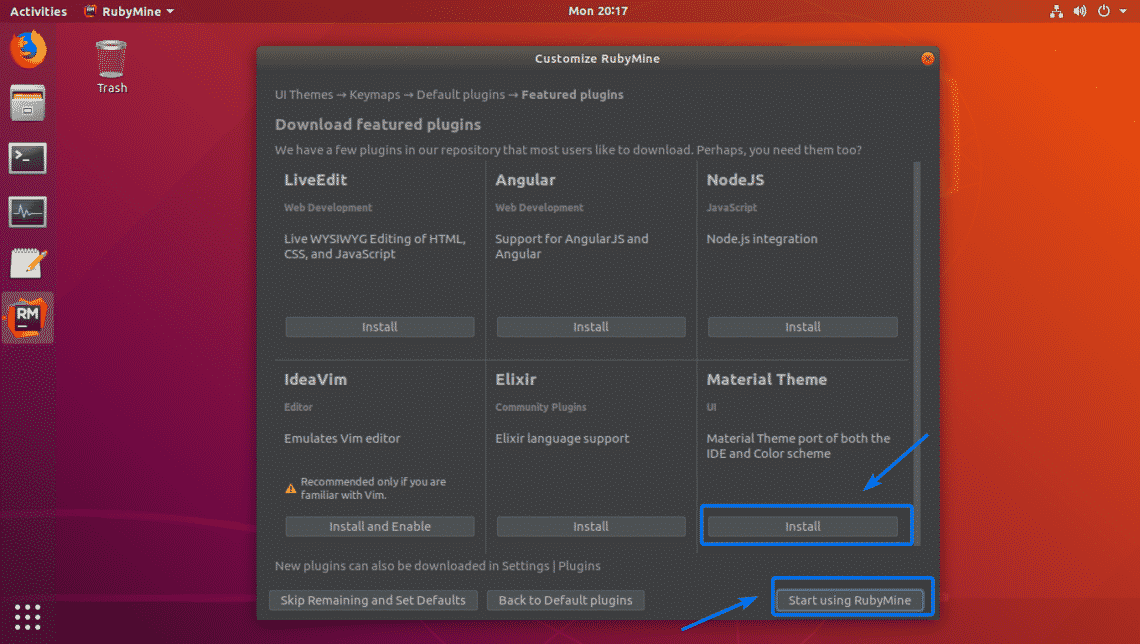
Now, JetBrains will suggest you some popular plugins for RubyMine. If you like/need any of them, just click on Install to install it. Once you’re done, click on Start using RubyMine.

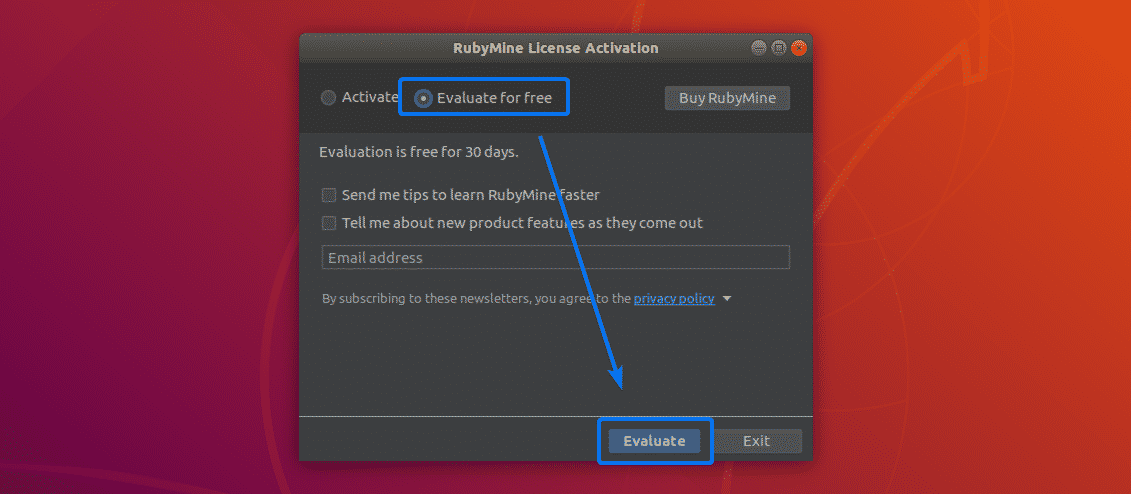
Now, you have to activate RubyMine. RubyMine is not free. In order to use RubyMine, you have to buy a license from JetBrains. Once you have the credentials, you can activate RubyMine from here.

If you want to try out RubyMine before you buy a license, you can do so for 30 days at the time of this writing. To do that, select Evaluate for free and click on Evaluate.

RubyMine is being loaded.

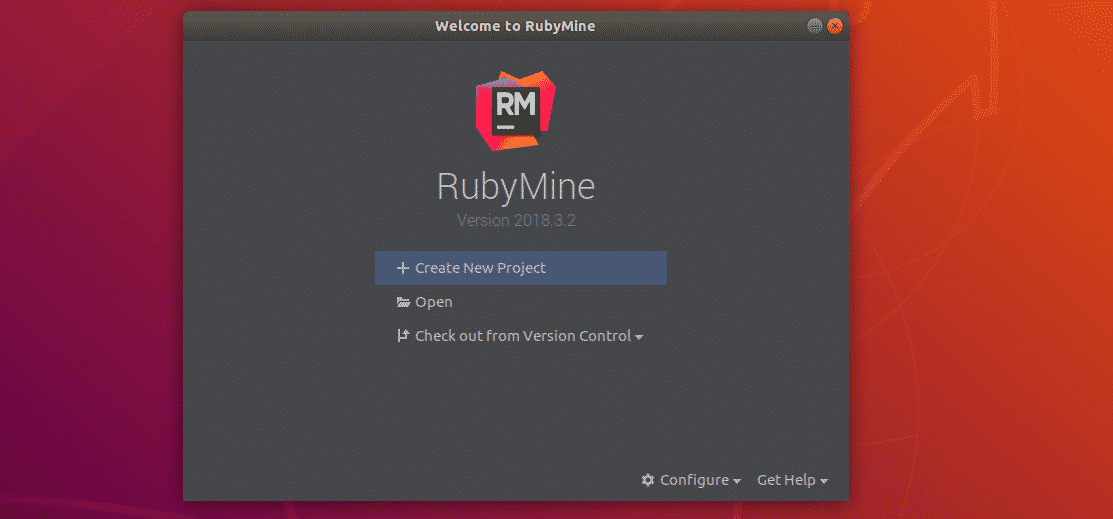
This is the dashboard of RubyMine. From here, you can create new projects and manage existing projects.

Creating a Ruby Project with RubyMine:

In this section, I will show you how to create a new Ruby project with RubyMine and run a simple Ruby program. So, let’s get started.

First, start RubyMine and click on Create New Project.

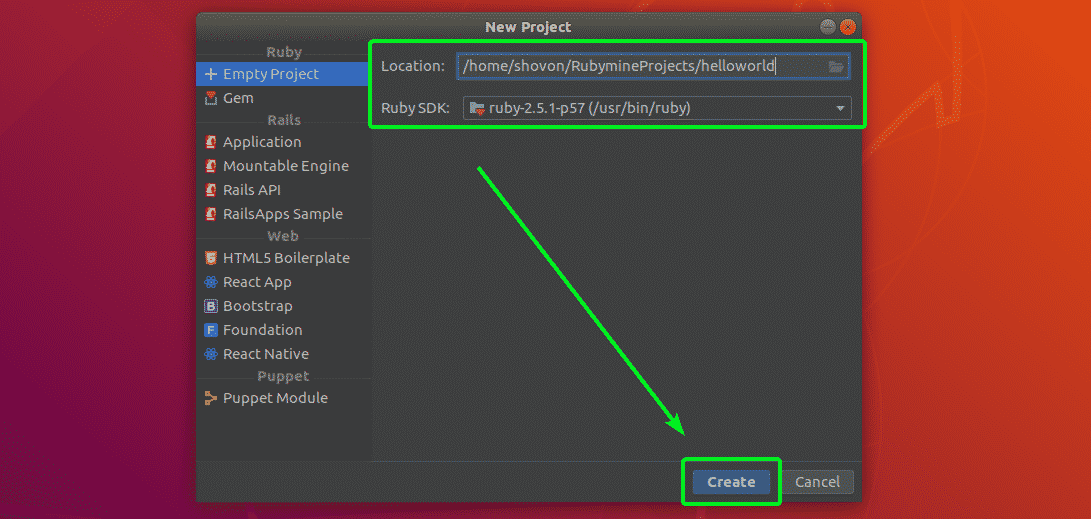
Now, select your project type. I selected Empty Project. Now, set your project Location (where RubyMine will save the files for this project) and make sure the Ruby SDK is correct. Once you’re done, click on Create.

A new project should be created.

Now, create a new file hello.rb and type in the following lines as shown in the screenshot below.

Once you’re done, click on the Play button as marked in the screenshot below to run the hello.rb Ruby program.

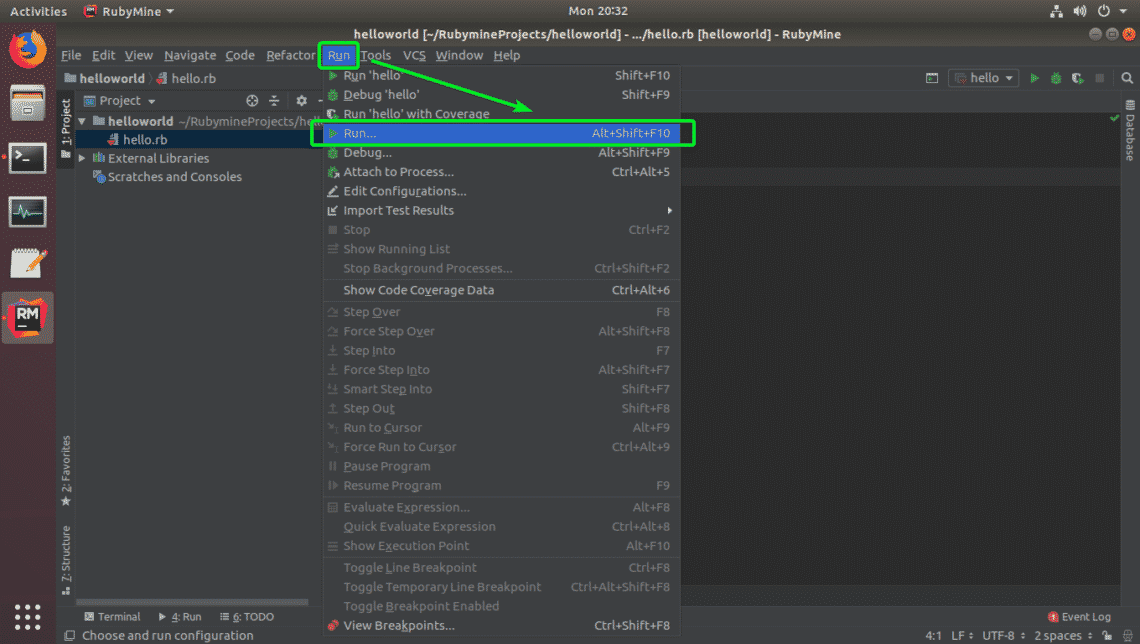
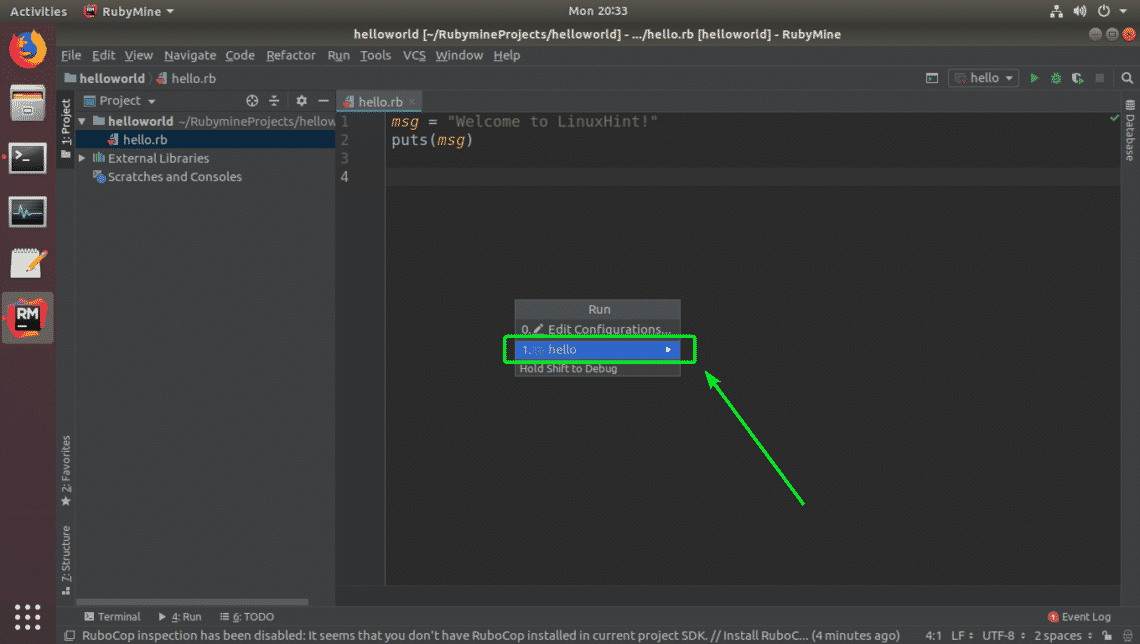
At times, the Play button I showed you earlier may be grayed out. Don’t worry. You can also run your favorite Ruby program from Rub > Run… as you can see in the screenshot below.

Now, select your Ruby program from the list.

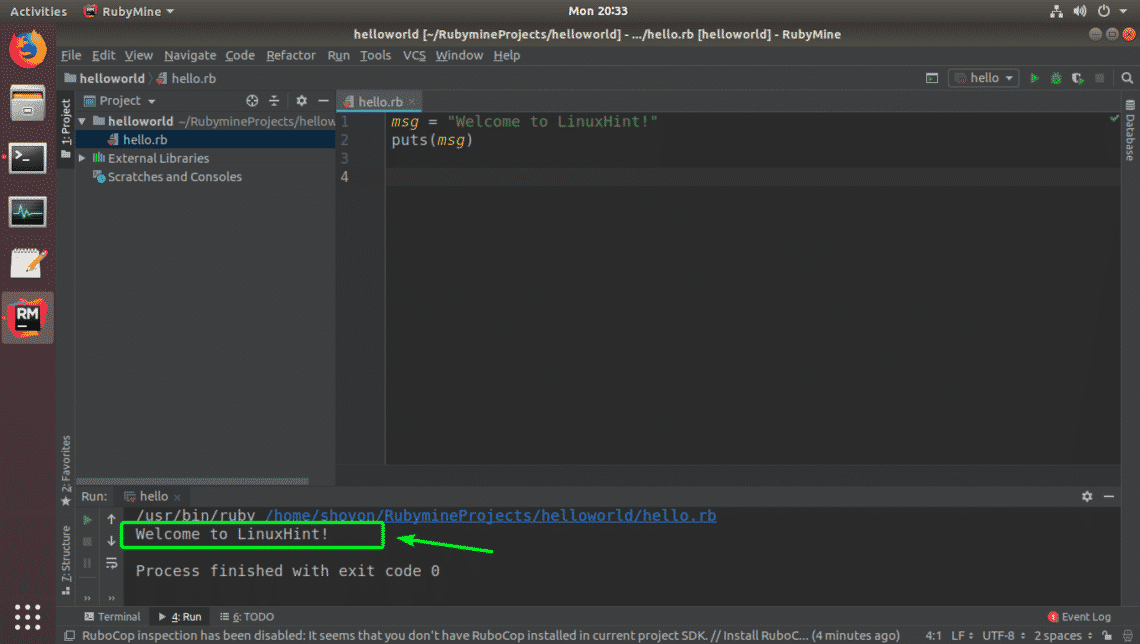
Your desired Ruby program should be executed and the correct output should be displayed as you can see in the screenshot below.

So, that’s how you install RubyMine Ruby IDE from JetBrains on Ubuntu. Thanks for reading this article.

Source

WP2Social Auto Publish Powered By : XYZScripts.com