Kubernetes Federation Evolution

Wednesday, December 12, 2018

Kubernetes Federation Evolution

Authors: Irfan Ur Rehman (Huawei), Paul Morie (RedHat) and Shashidhara T D (Huawei)

Deploying applications to a kubernetes cluster is well defined and can in some cases be as simple as kubectl create -f app.yaml. The user’s story to deploy apps across multiple clusters has not been that simple. How should an app workload be distributed? Should the app resources be replicated into all clusters, or replicated into selected clusters or partitioned into clusters? How is the access to clusters managed? What happens if some of the resources, which user wants to distribute pre-exist in all or fewer clusters in some form.

In SIG multicluster, our journey has revealed that there are multiple possible models to solve these problems and there probably is no single best fit all scenario solution. Federation however is the single biggest kubernetes open source sub project which has seen maximum interest and contribution from the community in this problem space. The project initially reused the k8s API to do away with any added usage complexity for an existing k8s user. This became non-viable because of problems best discussed in this community update.

What has evolved further is a federation specific API architecture and a community effort which now continues as Federation V2.

Conceptual Overview

Because federation attempts to address a complex set of problems, it pays to break the different parts of those problems down. Let’s take a look at the different high-level areas involved:

Kubernetes Federation V2 Concepts

Federating arbitrary resources

One of the main goals of Federation is to be able to define the APIs and API groups which encompass basic tenets needed to federate any given k8s resource. This is crucial due to the popularity of Custom Resource Definitions as a way to extend Kubernetes with new APIs.

The workgroup did arrive at a common definition of the federation API and API groups as ‘a mechanism that distributes “normal” Kubernetes API resources into different clusters’. The distribution in its most simple form could be imagined as simple propagation of this ‘normal Kubernetes API resource’ across the federated clusters. A thoughtful reader can certainly discern more complicated mechanisms, other than this simple propagation of the Kubernetes resources.

During the journey of defining building blocks of the federation APIs, one of the near term goals also evolved as ‘to be able to create a simple federation aka simple propagation of any Kubernetes resource or a CRD, writing almost zero code’. What ensued further was a core API group defining the building blocks as a Template resource, a Placement resource and an Override resource per given Kubernetes resource, a TypeConfig to specify sync or no sync for the given resource and associated controller(s) to carry out the sync. More details follow in the next section Federating resources: the details. Further sections will also talks about being able to follow a layered behaviour with higher level Federation APIs consuming the behaviour of these core building blocks, and users being able to consume whole or part of the API and associated controllers. Lastly this architecture also allows the users to write additional controllers or replace the available reference controllers with their own to carry out desired behaviour.

The ability to ‘easily federate arbitrary Kubernetes resources’, and a decoupled API, divided into building blocks APIs, higher level APIs and possible user intended types, presented such that different users can consume parts and write controllers composing solutions specific to them, makes a compelling case for Federation V2.

Federating resources: the details

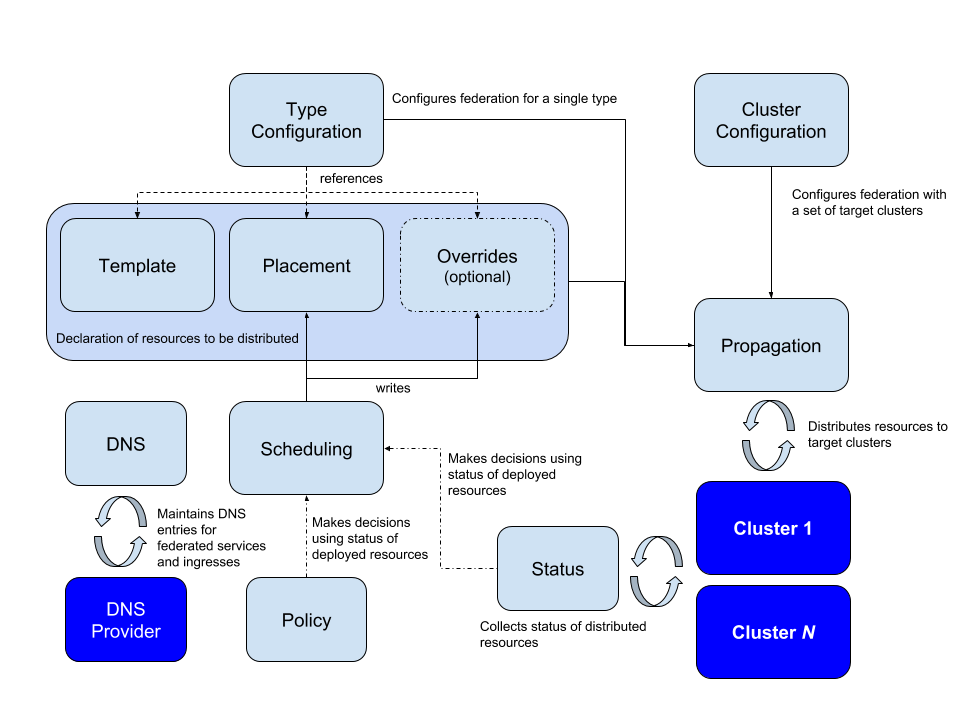
Fundamentally, federation must be configured with two types of information: Which API types federation should handle Which clusters federation should target for distributing those resources. For each API type that federation handles, different parts of the declared state live in different API resources: A template type holds the base specification of the resource – for example, a type called FederatedReplicaSet holds the base specification of a ReplicaSet that should be distributed to the targeted clusters A placement type holds the specification of the clusters the resource should be distributed to – for example, a type called FederatedReplicaSetPlacement holds information about which clusters FederatedReplicaSets should be distributed to An optional overrides type holds the specification of how the template resource should be varied in some clusters – for example, a type called FederatedReplicaSetOverrides holds information about how a FederatedReplicaSet should be varied in certain clusters. These types are all associated by name – meaning that for a particular templateresource with name foo, the placement and override information for that resource are contained by the override and placement resources with the same name and namespace as that of the template.

Higher level behaviour

The architecture of federation v2 API allows higher level APIs to be constructed using the mechanics provided by the core API types (templateplacementand override) and associated controllers for a given resource. In the community we could uncover few use cases and did implement the higher level APIs and associated controllers useful for those cases. Some of these types described in further sections also provide an useful reference to anybody interested in solving more complex use cases, building on top of the mechanics already available with federation v2 API.

ReplicaSchedulingPreference

ReplicaSchedulingPreference provides an automated mechanism of distributing and maintaining total number of replicas for deployment or replicasetbased federated workloads into federated clusters. This is based on high level user preferences given by the user. These preferences include the semantics of weighted distribution and limits (min and max) for distributing the replicas. These also include semantics to allow redistribution of replicas dynamically in case some replica pods remain unscheduled in some clusters, for example due to insufficient resources in that cluster. More details can be found at the user guide for ReplicaSchedulingPreferences.

Federated Services & Cross-cluster service discovery

kubernetes services are very useful construct in micro-service architecture. There is a clear desire to deploy these services across cluster, zone, region and cloud boundaries. Services that span clusters provide geographic distribution, enable hybrid and multi-cloud scenarios and improve the level of high availability beyond single cluster deployments. Customers who want their services to span one or more (possibly remote) clusters, need them to be reachable in a consistent manner from both within and outside their clusters.

Federated Service at its core contains a template (definition of a kubernetes service), a placement(which clusters to be deployed into), an override (optional variation in particular clusters) and a ServiceDNSRecord (specifying details on how to discover it).

Note: The Federated Service has to be of type LoadBalancer in order for it to be discoverable across clusters.

Discovering a Federated Service from pods inside your Federated Clusters

By default, Kubernetes clusters come preconfigured with a cluster-local DNS server, as well as an intelligently constructed DNS search path which together ensure that DNS queries like myservicemyservice.mynamespacesome-other-service.other-namespace, etc issued by your software running inside Pods are automatically expanded and resolved correctly to the appropriate service IP of services running in the local cluster.

With the introduction of Federated Services and Cross-Cluster Service Discovery, this concept is extended to cover Kubernetes services running in any other cluster across your Cluster Federation, globally. To take advantage of this extended range, you use a slightly different DNS name (e.g. myservice.mynamespace.myfederation) to resolve federated services. Using a different DNS name also avoids having your existing applications accidentally traversing cross-zone or cross-region networks and you incurring perhaps unwanted network charges or latency, without you explicitly opting in to this behavior.

Lets consider an example: (The example uses a service named nginx and the query name for described above)

A Pod in a cluster in the us-central1-a availability zone needs to contact our nginx service. Rather than use the service’s traditional cluster-local DNS name (nginx.mynamespace, which is automatically expanded to nginx.mynamespace.svc.cluster.local) it can now use the service’s Federated DNS name, which is nginx.mynamespace.myfederation. This will be automatically expanded and resolved to the closest healthy shard of my nginx service, wherever in the world that may be. If a healthy shard exists in the local cluster, that service’s cluster-local IP address will be returned (by the cluster-local DNS). This is exactly equivalent to non-federated service resolution.

If the service does not exist in the local cluster (or it exists but has no healthy backend pods), the DNS query is automatically expanded to nginx.mynamespace.myfederation.svc.us-central1-a.us-central1.example.com. Behind the scenes, this is finding the external IP of one of the shards closest to my availability zone. This expansion is performed automatically by cluster-local DNS server, which returns the associated CNAME record. This results in a traversal of the hierarchy of DNS records, and ends up at one of the external IP’s of the Federated Service near by.

It is also possible to target service shards in availability zones and regions other than the ones local to a Pod by specifying the appropriate DNS names explicitly, and not relying on automatic DNS expansion. For example, nginx.mynamespace.myfederation.svc.europe-west1.example.comwill resolve to all of the currently healthy service shards in Europe, even if the Pod issuing the lookup is located in the U.S., and irrespective of whether or not there are healthy shards of the service in the U.S. This is useful for remote monitoring and other similar applications.

Discovering a Federated Service from Other Clients Outside your Federated Clusters

For external clients, automatic DNS expansion described is currently not possible. External clients need to specify one of the fully qualified DNS names of the federated service, be that a zonal, regional or global name. For convenience reasons, it is often a good idea to manually configure additional static CNAME records in your service, for example:

SHORT NAME CNAME
eu.nginx.acme.com nginx.mynamespace.myfederation.svc.europe-west1.example.com
us.nginx.acme.com nginx.mynamespace.myfederation.svc.us-central1.example.com
nginx.acme.com nginx.mynamespace.myfederation.svc.example.com

That way your clients can always use the short form on the left, and always be automatically routed to the closest healthy shard on their home continent. All of the required failover is handled for you automatically by Kubernetes Cluster Federation.

As a further reading a more elaborate guide for users is available at Multi-Cluster Service DNS with ExternalDNS Guide

Try it yourself

To get started with Federation V2, please refer to the user guide hosted on github.
Deployment can be accomplished with a helm chart, and once the control plane is available, the user guide’s example can be used to get some hands-on experience with using Federation V2.

Federation V2 can be deployed in both cluster-scoped and namespace-scoped configurations. A cluster-scoped deployment will require cluster-admin privileges to both host and member clusters, and may be a good fit for evaluating federation on clusters that are not running critical workloads. Namespace-scoped deployment requires access to only a single namespace on host and member clusters, and is a better fit for evaluating federation on clusters running workloads. Most of the user guide refers to cluster-scoped deployment, with the Namespaced Federation section documenting how use of a namespaced deployment differs. Infact same cluster can host multiple federations and/or same clusters can be part of multiple federations in case of Namespaced Federation.

Source

Most home routers don’t take advantage of Linux’s improved security features

linksys-wrt32x.jpg

Linksys WRT32X, the router that scored the highest in the Cyber-ITL security-focused case study.

Image: Linksys

Many of today’s most popular home router models don’t take full advantage of the security features that come with the Linux operating system, which many of them use as a basis for their firmware.

Security hardening features such as ASLR (Address Space Layout Randomization), DEP (Data Execution Prevention), RELRO (RELocation Read-Only), and stack guards have been found to be missing in a recent security audit of 28 popular home routers.

Security experts from the Cyber Independent Testing Lab (Cyber-ITL) analyzed the firmware of these routers and mapped out the percentage of firmware code that was protected by the four security features listed above.

“The absence of these security features is inexcusable,” said Parker Thompson and Sarah Zatko, the two Cyber-ITL researchers behind the study.

“The features discussed in this report are easy to adopt, come with no downsides, and are standard practices in other market segments (such as desktop and mobile software),” the two added.

While some routers had 100 percent coverage for one feature, none implemented all four. Furthermore, researchers also found inconsistencies in applying the four security features within the same brand, with some router models from one vendor rating extremely high, while others had virtually no protection.

According to the research team, of the 28 router firmware images they analyzed, the Linksys WRT32X model scored highest with 100 percent DEP coverage for all firmware binaries, 95 percent RELRO coverage, 82 percent stack guard coverage, but with a lowly 4 percent ASLR protection.

The full results for each router model are available below. Researchers first looked at the ten home routers recommended by Consumer Reports (table 1), but then expanded their research to include other router models recommended by other news publications such as CNET, PCMag, and TrustCompass (table 2).

Test results for Consumer Reports recommended routers

Test results for CNET, PCMag, TrustCompass recommended routers

As a secondary conclusion of this study, the results also come to show that the limited hardware resources found on small home routers aren’t a valid excuse for failing to ship router firmware without improved security hardening features like ASLR, DEP, and others.

It is clear that some companies can ship routers with properly secured firmware, and routers can benefit from the same OS hardening features that Linux provides to desktop and server versions.

Last but not least, the study also showed an inherent weakness in routers that use a MIPS Linux kernel. The Cyber-ITL team says that during their analysis of the 28 firmware images (ten of which ran MIPS Linux and 18 of which ran ARM Linux) they also discovered a security weakness in MIPS Linux kernel versions from 2001 to 2016.

“The issue from 2001 to 2016 resulted in stack based execution being enabled on userland processes,” the researchers said –issue which made DEP protection impossible.

The 2016 MIPS Linux kernel patch re-enabled DEP protection for MIPS Linux, researchers said, but also introduced another bug that allows an attacker to bypass both DEP and ASLR protections. Researchers detailed this MIPS Linux bug in more detail in a separate research paper available here.

Source

10 React Native Libraries Every React Native Developer Should Know About | Linux.com

10 React Native Libraries Every React Native Developer Should Know About

If you are starting out a new app development project, chances are pretty high that you have already decided writing it with React Native. React Native gives you benefit of leveraging a single codebase to produce two different kind of apps.

In order to make React Native app development simpler for you and spare you the time you would spend composing certain parts for your application, you can take the assistance of some magnificent React Native libraries that do the hard work for you, making it simple to integrate the basis or some newest features in your app.

However, choosing the best React Native library for your project can be of much hassle for you since there are thousands of libraries out there. Henceforth, here I am mentioning 10 best React Native libraries that you may find useful while developing an app with React Native.

1) Create-react-native-app

Establishing the Initial setup for your React Native app can be much of time consuming especially if you are just starting out to develop your first app. Create-react-native-app is a library that comes handy if you want to develop a React Native app without any build configuration. Create React Native App enables you to work with a majority of Components and APIs in React Native, and in addition the greater part of the JavaScript APIs that the Expo App gives.

2) React-native-config

If you are a developer than you might already be familiar about an XML file which basically represents your app’s configuration file. The file stores any setting that you might want to change between deploys such as staging, environment variables, production or others. By default, some apps store this config as constants in the code which is a serious violation of 12 factors. Henceforth, it is very important to separate the config from the code. It is important to note that your app’s config may vary substantially across various deploys.

React-native-config is a cool library which makes it easier for you to stick and adhere to the 12 factor code while effectively managing your app config settings.

3) React-native-permissions

React-native-permissions allows you to implement check and request users permission anywhere in a React Native app. Currently, it offers you an easy access to the following permissions:

  • Location
  • Camera
  • Microphone
  • Photos
  • Contacts
  • Events
  • Reminders (iOS only)
  • Bluetooth (iOS only)
  • Push Notifications (iOS only)
  • Background Refresh (iOS only)
  • Speech Recognition (iOS only)
  • Call Phone (Android Only)
  • Read/Receive SMS (Android only)

4) React Navigation

Widely known as one of the most widely used navigational library in the React Native ecosystem, React Navigation is an enhanced version of Navigator, NavigatiorExperimental and Ex-Navigation.

It’s written completely in JavaScript which has a gigantic upside in its own sense since you can transport updates to it OTA and you can submit patches without having to know Objective C/Java and the stage’s individual route APIs.

5) React-native-Animatable

Looking for a kickass library for implementing Animations in React Native? React Native Animatable is here to help you with just that.

React-native-animatable can be used in two ways to add Animations and transitions in a React Native app development: Declarative and Imperative.

When it comes to Declarative usage then its as simple as it sounds. Whatever name of pre-built animation will be declared in your code, animation will only be applied on the element for which it has been declared. Pretty straightforward! Right?

6) React Native Push Notifications

This library is very useful to implement push notifications in a React Native app. With some additional features such as schedule notification, repeat notification based on the day, week, time etc., the library stands out from all other libraries for push notifications in React Native.

7) React Native Material Kit

React Native Native Material Kit is a magnificent help for Material Design themed applications. The library gives you customizable yet ready made UI components such as buttons, cards, loading indicators, and floating label text fields etc.  Furthermore, there are numerous approaches to build every segment: pick either the constructor or JSX procedure to best fit the structure of your venture. This library is certain to spare a huge amount of time and styling exertion for any engineer with application plans established in Material rules.

8) React Native Code Push

Codepush let you deploy your React Native code over-the-air without much of hassle. Moreover, you will find codepush as a great deal for pushing bug fixes to your app without having to wait for your user to update their existing app’s version.

9) React-Native-Map

React Native Map is an awesome component which helps you to avoid necessary complications in case of apple and google maps. You will have a flexible and customizable map that can be zoomed or panned with markers by just using one simple <MapView> tag in your code. Moreover, the map which is rendered will feel smooth, native and high performant.

10) React Native Vector Icons

You might be well aware of the fact that how Icons contribute to improve user experience of an application. React Native Vector Icons may come last but it is definitely not the least in my list of Top 10 React Native libraries.  It boasts over a myriad number of well crafted icons which are contributed by renowned publishers. You can seamlessly integrate them to your app through the elegantly designed API provided by the library.

Conclusion

Aforementioned are some popular React Native libraries that deserves your utmost attention in React Native app development.

Source

How to Check your Debian Linux Version

When you login to a Debian Linux system for the first time, before doing any work it is always a good idea to check what version of Debian is running on the machine.

Three releases of Debian are always actively maintained:

  • Stable – The latest officially released distribution of Debian. At the time of writing this article the current stable distribution of Debian is version 9 (stretch). This is the version that is recommended for production environments.
  • Testing – The preview distribution that will become the next stable release. It contains packages that are not ready for stable release yet, but they are in the queue for that. This release is updated continually until it is frozen and released as stable.
  • Unstable, always codenamed sid – This is the distribution where the active development of Debian is taking place.

In this tutorial, we’ll show several different commands on how to check what version of Debian Linux is installed on your system.

Checking Debian Version from the Command Line

The lsb_release utility displays LSB (Linux Standard Base) information about the Linux distribution.

The preferred method to check your Debian version is to use the lsb_release utility which displays LSB (Linux Standard Base) information about the Linux distribution. This method will work no matter which desktop environment or Debian version you are running.

No LSB modules are available.
Distributor ID: Debian
Description: Debian GNU/Linux 9.5 (stretch)
Release: 9.5
Codename: stretch

Your Debian version will be shown in the Description line. As you can see from the output above I am using Debian GNU/Linux 9.5 (stretch).

Instead of printing all of the above information you can display the description line which shows your Debian version passing the -d switch.

Output should look similar to below:

Description: Debian GNU/Linux 9.5 (stretch)

Alternatively, you can also use the following commands to check your Debian version.

Checking Debian Version using the /etc/issue file

The following cat command will display the contents of the /etc/issue which contains a system identification text:

The output will look something like below:

Checking Debian Version using the /etc/os-release file

/etc/os-release is a file which contain operating system identification data, and can be found only on the newer Debian distributions running systemd.

This method will work only if you have Debian 9 or newer:

The output will look something like below:

PRETTY_NAME=”Debian GNU/Linux 9 (stretch)”
NAME=”Debian GNU/Linux”
VERSION_ID=”9″
VERSION=”9 (stretch)”
ID=debian
HOME_URL=”https://www.debian.org/”
SUPPORT_URL=”https://www.debian.org/support”
BUG_REPORT_URL=”https://bugs.debian.org/”

Checking Debian Version using the hostnamectl command

hostnamectl is a command that allows you to set the hostname but you can also use it to check your Debian version.

This command will work only on Debian 9 or newer versions:

Static hostname: debian9.localdomain
Icon name: computer-vm
Chassis: vm
Machine ID: a92099e30f704d559adb18ebc12ddac4
Boot ID: 4224ba0d5fc7489e95d0bbc7ffdaf709
Virtualization: qemu
Operating System: Debian GNU/Linux 9 (stretch)
Kernel: Linux 4.9.0-8-amd64
Architecture: x86-64

Conclusion

In this guide we have shown you how to find the version of Debian installed on your system. For more information on Debian releases visit the Debian Releases page.

Feel free to leave a comment if you have any questions.

Source

IBM Began Buying Red Hat 20 Years Ago

How Big Blue became an open-source company.

News that IBM
is buying Red Hat
is, of course, a significant moment for the
world of free software. It’s further proof, as if any were needed,
that open source has won, and that even the mighty Big Blue must
make its obeisance. Admittedly, the company is not quite the
behemoth it was back in the 20th century, when “nobody
ever got fired for buying IBM
“. But it remains a benchmark for
serious, mainstream—and yes, slightly boring—computing. Its
acquisition of Red Hat for the not inconsiderable sum of $34 billion,
therefore, proves that selling free stuff is now regarded as a
completely normal business model, acknowledged by even the most
conservative corporations.

Many interesting analyses have been and will be written about why
IBM bought Red Hat, and what it means for open source, Red Hat,
Ubuntu, cloud computing, IBM, Microsoft and Amazon, amongst other
things. But one aspect of the deal people may have missed is
that in an important sense, IBM actually began buying Red Hat 20
years ago. After all, $34 billion acquisitions do not spring
fully formed out of nowhere. Reaching the point where IBM’s
management agreed it was the right thing to do required a journey.
And, it was a particularly drawn-out and difficult journey, given IBM’s
starting point not just as the embodiment of traditional proprietary
computing, but its very inventor.

Even the longest journey begins with a single step, and for IBM, it
was taken on June 22, 1998. On that day, IBM announced it
would ship the Apache web server with the IBM WebSphere Application
Server, a key component of its WebSphere product family. Moreover,
in an unprecedented move for the company, it would offer “commercial,
enterprise-level support” for that free software.

When I was writing my book Rebel
Code: inside Linux and the open source revolution
in 2000, I
had the good fortune to interview the key IBM employees who made
that happen. The events of two years before still were fresh in
their minds, and they explained to me why they decided to push IBM
toward the bold strategy of adopting free software, which ultimately
led to the company buying Red Hat 20 years later.

One of those people was James Barry, who was brought in to look at IBM’s lineup in
the web server sector. He found a mess there; IBM had around 50
products at the time. During his evaluation of IBM’s strategy, he
realized the central nature of the web server to all the other
products. At that time, IBM’s offering was Internet Connection
Server, later re-branded to Domino Go. The problem was that IBM’s
web server held just 0.2% of the market; 90% of web servers came
from Netscape (the first internet company, best known for its
browser), Microsoft and Apache. Negligible market share meant it
was difficult and expensive to find staff who were trained to use
IBM’s solution. That, in its turn, meant it was hard to sell IBM’s
WebSphere product line.

Barry, therefore, realized that IBM needed to adopt one of the
mainstream web servers. IBM talked about buying Netscape. Had
that happened, the history of open source would have been very
different. As part of IBM, Netscape probably would not have released
its browser code as the free software that became Mozilla. No
Mozilla would have meant no Firefox, with all the knock-on effects
that implies. But for various reasons, the idea of buying Netscape
didn’t work out. Since Microsoft was too expensive to acquire,
that left only one possibility: Apache.

For Barry, coming to that realization was easy. The hard part was
convincing the rest of IBM that it was the right thing to do. He tried
twice, unsuccessfully, to get his proposal adopted. Barry succeeded
on the third occasion, in part because he teamed up with someone
else at IBM who had independently come to the conclusion that Apache
was the way forward for the company.

Shan Yen-Ping was working on IBM’s e-business strategy in 1998 and,
like Barry, realized that the web server was key in this space.
Ditching IBM’s own software in favor of open source was likely to
be a traumatic experience for the company’s engineers, who had
invested so much in their own code. Shan’s idea to request his
senior developers to analyze Apache in detail proved key to winning
their support. Shan says that when they started to dig deep into
the code, they were surprised by the elegance of the architecture.
As engineers, they had to admit that the open-source project was
producing high-quality software. To cement that view, Shan asked
Brian Behlendof, one of the creators and leaders of the Apache
project, to come in and talk with IBM’s top web server architects.
They too were impressed by him and his team’s work. With the quality
of Apache established, it was easier to win over IBM’s developers
for the move.

Shortly after the announcement that IBM would be adopting Apache
as its web server, the company took another small but key step
toward embracing open source more widely. It involved the Jikes Java compiler that
had been written by two of IBM’s researchers: Philippe Charles and
Dave Shields. After a binary version of the program for GNU/Linux
was released in July 1998, Shields started receiving requests for
the source code. For IBM to provide access to the underlying code
was unprecedented, but Shields said he would try to persuade his
bosses that it would be a good move for the company.

A Jikes user suggested he should talk to Brian Behlendorf, who put
him in touch with James Barry. IBM’s recent adoption of Apache
paved the way for Shield’s own efforts to release the company’s
code as open source. Shields wrote his proposal in August 1998,
and it was accepted in September. The hardest part was not convincing
management, but drawing up an open-source license. Shields said
this involved “research attorneys, the attorneys at the software
division who dealt with Java, the trademark attorneys, patents
attorneys, contract attorneys”. Everyone involved was aware that
they were writing IBM’s first open-source license, so getting
it right was vital. In fact, the original Jikes license of December
1998 was later generalized into the IBM Public License in June 1999.
It was a key moment, because it made releasing more IBM code as
open source much easier, smoothing the way for the company’s
continuing march into the world of free software.

Barry described IBM as being like “a big elephant: very, very
difficult to move an inch, but if you point the elephant toward the
right direction and get it moving, it’s also very difficult to stop
it.” The final nudge that set IBM moving inexorably toward the
embrace of open source occurred on January, 10, 2000, when the company
announced that it would make all of its server platforms “Linux-friendly”,
including the S/390 mainframe, the AS/400 minicomputer and the
RS/6000 workstation. IBM was supporting GNU/Linux across its entire
hardware range—a massive vote of confidence in freely available
software written by a distributed community of coders.

The man who was appointed at the time as what amounted to a Linux
Tsar for the company, Irving
Wladawsky-Berger
, said that there were three main strands to
that historic decision. One was simply that GNU/Linux was a platform
with a significant market share in the UNIX sector. Another was
the early use of GNU/Linux by the supercomputing community—something
that eventually led to every single one of
the world’s top 500 supercomputers
running some form of Linux
today.

The third strand of thinking within IBM is perhaps the most
interesting. Wladawsky-Berger pointed out how the rise of TCP/IP
as the de facto standard for networking had made interconnection
easy, and powered the rise of the internet and its astonishing
expansion. People within IBM realized that GNU/Linux could do the
same for application development. As he told me back in 2000:

The whole notion separating application development
from the underlying deployment platform has been a Holy Grail of
the industry because it would all of the sudden unshackle the
application developers from worrying about all that plumbing. I
think with Linux we now have the best opportunity to do that. The
fact that it’s not owned by any one company, and that it’s open
source, is a huge part of what enables us to do that. If the answer
had been, well, IBM has invented a new operating system, let’s get
everybody in the world to adopt it, you can imagine how far that
would go with our competitors.

Far from inventing a “new operating system”, with its purchase of
Red Hat, IBM has now fully embraced the only one matters any more—GNU/Linux. In doing so, it confirms Wladawsky-Berger’s prescient
analysis and completes that fascinating journey the company began
all those years ago.

Source

7 CI/CD Tools for Sysadmins | Linux.com

7 CI/CD tools for sysadmins

An easy guide to the top open source continuous integration, continuous delivery, and continuous deployment tools.

CICD with gears

Continuous integration, continuous delivery, and continuous deployment (CI/CD) have all existed in the developer community for many years. Some organizations have involved their operations counterparts, but many haven’t. For most organizations, it’s imperative for their operations teams to become just as familiar with CI/CD tools and practices as their development compatriots are.

CI/CD practices can equally apply to infrastructure and third-party applications and internally developed applications. Also, there are many different tools but all use similar models. And possibly most importantly, leading your company into this new practice will put you in a strong position within your company, and you’ll be a beacon for others to follow.

Some organizations have been using CI/CD practices on infrastructure, with tools like AnsibleChef, or Puppet, for several years. Other tools, like Test Kitchen, allow tests to be performed on infrastructure that will eventually host applications. In fact, those tests can even deploy the application into a production-like environment and execute application-level tests with production loads in more advanced configurations. However, just getting to the point of being able to test the infrastructure individually is a huge feat. Terraform can also use Test Kitchen for even more ephemeral and idempotent infrastructure configurations than some of the original configuration-management tools. Add in Linux containers and Kubernetes, and you can now test full infrastructure and application deployments with prod-like specs and resources that come and go in hours rather than months or years. Everything is wiped out before being deployed and tested again.

However, you can also focus on getting your network configurations or database data definition language (DDL) files into version control and start running small CI/CD pipelines on them. Maybe it just checks syntax or semantics or some best practices. Actually, this is how most development pipelines started. Once you get the scaffolding down, it will be easier to build on. You’ll start to find all kinds of use cases for pipelines once you get started.

For example, I regularly write a newsletter within my company, and I maintain it in version control using MJML. I needed to be able to host a web version, and some folks liked being able to get a PDF, so I built a pipeline. Now when I create a new newsletter, I submit it for a merge request in GitLab. This automatically creates an index.html with links to HTML and PDF versions of the newsletter. The HTML and PDF files are also created in the pipeline. None of this is published until someone comes and reviews these artifacts. Then, GitLab Pages publishes the website and I can pull down the HTML to send as a newsletter. In the future, I’ll automatically send the newsletter when the merge request is merged or after a special approval step. This seems simple, but it has saved me a lot of time. This is really at the core of what these tools can do for you. They will save you time.

The key is creating tools to work in the abstract so that they can apply to multiple problems with little change. I should also note that what I created required almost no code except some light HTML templating, some node to loop through the HTML files, and some more node to populate the index page with all the HTML pages and PDFs.

Some of this might look a little complex, but most of it was taken from the tutorials of the different tools I’m using. And many developers are happy to work with you on these types of things, as they might also find them useful when they’re done. The links I’ve provided are to a newsletter we plan to start for DevOps KC, and all the code for creating the site comes from the work I did on our internal newsletter.

Many of the tools listed below can offer this type of interaction, but some offer a slightly different model. The emerging model in this space is that of a declarative description of a pipeline in something like YAML with each stage being ephemeral and idempotent. Many of these systems also ensure correct sequencing by creating a directed acyclic graph (DAG) over the different stages of the pipeline.

These stages are often run in Linux containers and can do anything you can do in a container. Some tools, like Spinnaker, focus only on the deployment component and offer some operational features that others don’t normally include. Jenkins has generally kept pipelines in an XML format and most interactions occur within the GUI, but more recent implementations have used a domain specific language (DSL) using Groovy. Further, Jenkins jobs normally execute on nodes with a special Java agent installed and consist of a mix of plugins and pre-installed components.

Jenkins introduced pipelines in its tool, but they were a bit challenging to use and contained several caveats. Recently, the creator of Jenkins decided to move the community toward a couple different initiatives that will hopefully breathe new life into the project—which is the one that really brought CI/CD to the masses. I think its most interesting initiative is creating a Cloud Native Jenkins that can turn a Kubernetes cluster into a Jenkins CI/CD platform.

As you learn more about these tools and start bringing these practices into your company or your operations division, you’ll quickly gain followers. You will increase your own productivity as well as that of others. We all have years of backlog to get to—how much would your co-workers love if you could give them enough time to start tackling that backlog? Not only that, but your customers will start to see increased application reliability, and your management will see you as a force multiplier. That certainly can’t hurt during your next salary negotiation or when interviewing with all your new skills.

Let’s dig into the tools a bit more. We’ll briefly cover each one and share links to more information.

GitLab CI

GitLab CI

GitLab is a fairly new entrant to the CI/CD space, but it’s already achieved the top spot in the Forrester Wave for Continuous Integration Tools. That’s a huge achievement in such a crowded and highly qualified field. What makes GitLab CI so great? It uses a YAML file to describe the entire pipeline. It also has a functionality called Auto DevOps that allows for simpler projects to have a pipeline built automatically with multiple tests built-in. This system uses Herokuish buildpacksto determine the language and how to build the application. Some languages can also manage databases, which is a real game-changer for building new applications and getting them deployed to production from the beginning of the development process. The system has native integrations into Kubernetes and will deploy your application automatically into a Kubernetes cluster using one of several different deployment methodologies, like percentage-based rollouts and blue-green deployments.

In addition to its CI functionality, GitLab offers many complementary features like operations and monitoring with Prometheus deployed automatically with your application; portfolio and project management using GitLab Issues, Epics, and Milestones; security checks built into the pipeline with the results provided as an aggregate across multiple projects; and the ability to edit code right in GitLab using the WebIDE, which can even provide a preview or execute part of a pipeline for faster feedback.

GoCD

GoCD

GoCD comes from the great minds at Thoughtworks, which is testimony enough for its capabilities and efficiency. To me, GoCD’s main differentiator from the rest of the pack is its Value Stream Map (VSM) feature. In fact, pipelines can be chained together with one pipeline providing the “material” for the next pipeline. This allows for increased independence for different teams with different responsibilities in the deployment process. This may be a useful feature when introducing this type of system in older organizations that intend to keep these teams separate—but having everyone using the same tool will make it easier later to find bottlenecks in the VSM and reorganize the teams or work to increase efficiencies.

It’s incredibly valuable to have a VSM for each product in a company; that GoCD allows this to be described in JSON or YAML in version control and presented visually with all the data around wait times makes this tool even more valuable to an organization trying to understand itself better. Start by installing GoCD and mapping out your process with only manual approval gates. Then have each team use the manual approvals so you can start collecting data on where bottlenecks might exist.

Travis CI

Travis CI

Travis CI was my first experience with a Software as a Service (SaaS) CI system, and it’s pretty awesome. The pipelines are stored as YAML with your source code, and it integrates seamlessly with tools like GitHub. I don’t remember the last time a pipeline failed because of Travis CI or the integration—Travis CI has a very high uptime. Not only can it be used as SaaS, but it also has a version that can be hosted. I haven’t run that version—there were a lot of components, and it looked a bit daunting to install all of it. I’m guessing it would be much easier to deploy it all to Kubernetes with Helm charts provided by Travis CI. Those charts don’t deploy everything yet, but I’m sure it will grow even more in the future. There is also an enterprise version if you don’t want to deal with the hassle.

However, if you’re developing open source code, you can use the SaaS version of Travis CI for free. That is an awesome service provided by an awesome team! This alleviates a lot of overhead and allows you to use a fairly common platform for developing open source code without having to run anything.

Jenkins

Jenkins

Jenkins is the original, the venerable, de facto standard in CI/CD. If you haven’t already, you need to read “Jenkins: Shifting Gears” from Kohsuke, the creator of Jenkins and CTO of CloudBees. It sums up all of my feelings about Jenkins and the community from the last decade. What he describes is something that has been needed for several years, and I’m happy CloudBees is taking the lead on this transformation. Jenkins will be a bit overwhelming to most non-developers and has long been a burden on its administrators. However, these are items they’re aiming to fix.

Jenkins Configuration as Code (JCasC) should help fix the complex configuration issues that have plagued admins for years. This will allow for a zero-touch configuration of Jenkins masters through a YAML file, similar to other CI/CD systems. Jenkins Evergreen aims to make this process even easier by providing predefined Jenkins configurations based on different use cases. These distributions should be easier to maintain and upgrade than the normal Jenkins distribution.

Jenkins 2 introduced native pipeline functionality with two types of pipelines, which I discuss in a LISA17 presentation. Neither is as easy to navigate as YAML when you’re doing something simple, but they’re quite nice for doing more complex tasks.

Jenkins X is the full transformation of Jenkins and will likely be the implementation of Cloud Native Jenkins (or at least the thing most users see when using Cloud Native Jenkins). It will take JCasC and Evergreen and use them at their best natively on Kubernetes. These are exciting times for Jenkins, and I look forward to its innovation and continued leadership in this space.

Concourse CI

Concourse CI

I was first introduced to Concourse through folks at Pivotal Labs when it was an early beta version—there weren’t many tools like it at the time. The system is made of microservices, and each job runs within a container. One of its most useful features that other tools don’t have is the ability to run a job from your local system with your local changes. This means you can develop locally (assuming you have a connection to the Concourse server) and run your builds just as they’ll run in the real build pipeline. Also, you can rerun failed builds from your local system and inject specific changes to test your fixes.

Concourse also has a simple extension system that relies on the fundamental concept of resources. Basically, each new feature you want to provide to your pipeline can be implemented in a Docker image and included as a new resource type in your configuration. This keeps all functionality encapsulated in a single, immutable artifact that can be upgraded and modified independently, and breaking changes don’t necessarily have to break all your builds at the same time.

Spinnaker

Spinnaker

Spinnaker comes from Netflix and is more focused on continuous deployment than continuous integration. It can integrate with other tools, including Travis and Jenkins, to kick off test and deployment pipelines. It also has integrations with monitoring tools like Prometheus and Datadog to make decisions about deployments based on metrics provided by these systems. For example, the canary deployment uses a judge concept and the metrics being collected to determine if the latest canary deployment has caused any degradation in pertinent metrics and should be rolled back or if deployment can continue.

A couple of additional, unique features related to deployments cover an area that is often overlooked when discussing continuous deployment, and might even seem antithetical, but is critical to success: Spinnaker helps make continuous deployment a little less continuous. It will prevent a stage from running during certain times to prevent a deployment from occurring during a critical time in the application lifecycle. It can also enforce manual approvals to ensure the release occurs when the business will benefit the most from the change. In fact, the whole point of continuous integration and continuous deployment is to be ready to deploy changes as quickly as the business needs to change.

Screwdriver

Screwdriver

Screwdriver is an impressively simple piece of engineering. It uses a microservices approach and relies on tools like Nomad, Kubernetes, and Docker to act as its execution engine. There is a pretty good deployment tutorial for deploying to AWS and Kubernetes, but it could be improved once the in-progress Helm chart is completed.

Screwdriver also uses YAML for its pipeline descriptions and includes a lot of sensible defaults, so there’s less boilerplate configuration for each pipeline. The configuration describes an advanced workflow that can have complex dependencies among jobs. For example, a job can be guaranteed to run after or before another job. Jobs can run in parallel and be joined afterward. You can also use logical operators to run a job, for example, if any of its dependencies are successful or only if all are successful. Even better is that you can specify certain jobs to be triggered from a pull request. Also, dependent jobs won’t run when this occurs, which allows easy segregation of your pipeline for when an artifact should go to production and when it still needs to be reviewed.


This is only a brief description of these CI/CD tools—each has even more cool features and differentiators you can investigate. They are all open source and free to use, so go deploy them and see which one fits your needs best.


What to read next

Serverless computing is transforming traditional software development. These open source platforms…

Source

Intro to Git and GitHub for Linux – ls /blog

The Git distributed revision control system is a sweet step up from Subversion, CVS, Mercurial, and all those others we’ve tried and made do with. It’s great for distributed development, when you have multiple contributors working on the same project, and it is excellent for safely trying out all kinds of crazy changes. We’re going to use a free Github account for practice so we can jump right in and start doing stuff.

Conceptually Git is different from other revision control systems. Older RCS tracked changes to files, which you can see when you poke around in their configuration files. Git’s approach is more like filesystem snapshots, where each commit or saved state is a complete snapshot rather than a file full of diffs. Git is space-efficient because it stores only changes in each snapshot, and links to unchanged files. All changes are checksummed, so you are assured of data integrity, and always being able to reverse changes.

Git is very fast, because your work is all done on your local PC and then pushed to a remote repository. This makes everything you do totally safe, because nothing affects the remote repo until you push changes to it. And even then you have one more failsafe: branches. Git’s branching system is brilliant. Create a branch from your master branch, perform all manner of awful experiments, and then nuke it or push it upstream. When it’s upstream other contributors can work on it, or you can create a pull request to have it reviewed, and then after it passes muster merge it into the master branch.

So what if, after all this caution, it still blows up the master branch? No worries, because you can revert your merge.

Practice on Github

The quickest way to get some good hands-on Git practice is by opening a free Github account. Figure 1 shows my Github testbed, named playground. New Github accounts come with a prefab repo populated by a README file, license, and buttons for quickly creating bug reports, pull requests, Wikis, and other useful features.

Free Github accounts only allow public repositories. This allows anyone to see and download your files. However, no one can make commits unless they have a Github account and you have approved them as a collaborator. If you want a private repo hidden from the world you need a paid membership. Seven bucks a month gives you five private repos, and unlimited public repos with unlimited contributors.

Github kindly provides copy-and-paste URLs for cloning repositories. So you can create a directory on your computer for your repository, and then clone into it:

$ mkdir git-repos
$ cd git-repos
$ git clone https://github.com/AlracWebmaven/playground.git
Cloning into 'playground'...
remote: Counting objects: 4, done.
remote: Compressing objects: 100% (4/4), done.
remote: Total 4 (delta 0), reused 0 (delta 0)
Unpacking objects: 100% (4/4), done.
Checking connectivity... done.
$ ls playground/
LICENSE  README.md

All the files are copied to your computer, and you can read, edit, and delete them just like any other file. Let’s improve README.md and learn the wonderfulness of Git branching.

Branching

Git branches are gloriously excellent for safely making and testing changes. You can create and destroy them all you want. Let’s make one for editing README.md:

$ cd playground
$ git checkout -b test
Switched to a new branch 'test'

Run git status to see where you are:

$ git status
On branch test
nothing to commit, working directory clean

What branches have you created?

$ git branch
* test
  master

The asterisk indicates which branch you are on. master is your main branch, the one you never want to make any changes to until they have been tested in a branch. Now make some changes to README.md, and then check your status again:

$ git status
On branch test
Changes not staged for commit:
  (use "git add ..." to update what will be committed)
  (use "git checkout -- ..." to discard changes in working directory)
        modified:   README.md
no changes added to commit (use "git add" and/or "git commit -a")

Isn’t that nice, Git tells you what is going on, and gives hints. To discard your changes, run

$ git checkout README.md

Or you can delete the whole branch:

$ git checkout master
$ git branch -D test

Or you can have Git track the file:

$ git add README.md
$ git status
On branch test
Changes to be committed:
  (use "git reset HEAD ..." to unstage)
        modified:   README.md

At this stage Git is tracking README.md, and it is available to all of your branches. Git gives you a helpful hint– if you change your mind and don’t want Git to track this file, run git reset HEAD README.md. This, and all Git activity, is tracked in the .git directory in your repository. Everything is in plain text files: files, checksums, which user did what, remote and local repos– everything.

What if you have multiple files to add? You can list each one, for example git add file1 file2 file2, or add all files with git add *.

When there are deleted files, you can use git rm filename, which only un-stages them from Git and does not delete them from your system. If you have a lot of deleted files, use git add -u.

Committing Files

Now let’s commit our changed file. This adds it to our branch and it is no longer available to other branches:

$ git commit README.md
[test 5badf67] changes to readme
 1 file changed, 1 insertion(+)

You’ll be asked to supply a commit message. It is a good practice to make your commit messages detailed and specific, but for now we’re not going to be too fussy. Now your edited file has been committed to the branch test. It has not been merged with master or pushed upstream; it’s just sitting there. This is a good stopping point if you need to go do something else.

What if you have multiple files to commit? You can commit specific files, or all available files:

$ git commit file1 file2
$ git commit -a

How do you know which commits have not yet been pushed upstream, but are still sitting in branches? git status won’t tell you, so use this command:

$ git log --branches --not --remotes
commit 5badf677c55d0c53ca13d9753344a2a71de03199
Author: Carla Schroder 
Date:   Thu Nov 20 10:19:38 2014 -0800
    changes to readme

This lists un-merged commits, and when it returns nothing then all commits have been pushed upstream. Now let’s push this commit upstream:

$ git push origin test
Counting objects: 7, done.
Delta compression using up to 8 threads.
Compressing objects: 100% (3/3), done.
Writing objects: 100% (3/3), 324 bytes | 0 bytes/s, done.
Total 3 (delta 1), reused 0 (delta 0)
To https://github.com/AlracWebmaven/playground.git
 * [new branch]      test -> test

You may be asked for your Github login credentials. Git caches them for 15 minutes, and you can change this. This example sets the cache at two hours:

$ git config --global credential.helper 'cache --timeout=7200'

Now go to Github and look at your new branch. Github lists all of your branches, and you can preview your files in the different branches

Source

Different Ways To Update Linux Kernel For Ubuntu

update linux kernel for ubuntu

Source

Download Calculate Linux Desktop KDE 18.12

Calculate Linux Desktop KDE is the main edition of the Calculate Linux operating system, built around the powerful KDE Plasma Workspaces and Applications desktop environment. Calculate Linux is an one-man, open source Linux distribution that gets its roots from the complex and exclusivist Gentoo Linux operating system, which is known to perform great on any type of computers and other devices.

Distributed in multiple editions, as Live DVDs

The project provides users with multiple editions, each one designed to be used for a specific task or by a distinct group of people. For example, the two desktop editions can be used by home users as a workstation, or on small and medium businesses as an office workstation.

Calculate Linux Desktop is distributed as two Live DVD ISO images, one for each of the officially supported architectures (64-bit and 32-bit). It supports many languages, including Russian and English.

Boot options

The boot menu will allow users to boot the operating system that is currently installed, test the system memory (RAM) for errors, start the live environment with the X11 Window System, copy the entire ISO image to RAM (requires at least 4GB of system memory).

Features the KDE desktop environment

The desktop session is carefully designed to provide users with a modern and stylish computing environment, comprised of a single panel placed by default on the upper part of the screen (it can be used to launch applications, switch between virtual workspaces and interact with the system tray area.

Default applications

Default applications include the Chromium web browser, LibreOffice office suite, Amarok music player and organizer, as well as the digiKam image viewer and editor. In addition to these, there are also many other useful utilities and tools.

If you don’t like the KDE desktop environment or you find it “too heavy” for your computer, Calculate Linux also provides a special edition dedicated to all fans of the Xfce window manager.

Source

The Many New Features & Improvements Of The Linux 5.0 Kernel

Linus Torvalds just released Linux 5.0-rc1, what was formerly known as Linux 4.21 over the past two weeks. While the bumping was rather arbitrary as opposed to a major change necessitating the big version bump, this next version of the Linux kernel does come with some exciting changes and new features (of course, our Twitter followers already have known Linux was thinking of the 5.0 re-brand from 4.21). Here is our original feature overview of the new material to find in this kernel.

The merge window is now closed so we have a firm look at what’s new for this next kernel version. As is standard practice, there will be seven to eight weekly release candidates before Linux 5.0 is officially ready for release around the end of February or early Match. Of the new features for Linux 5.0 below are the highlights from our close monitoring of the Linux kernel mailing list and Git repositories over the holidays. There are lots of CPU and GPU improvements as usual, the long-awaited AMD FreeSync display support, the Raspberry Pi Touchscreen is now supported by the mainline kernel, there is a new console font for HiDPI/retina displays, initial open-source NVIDIA RTX Turing display support, Adiantum data encryption support, Logitech high resolution scrolling support, the I3C subsystem was finally merged, and a lot more to get excited about as the first kernel cycle of 2019.

Direct Rendering Manager (DRM) Drivers / Graphics

AMD FreeSync support is easily the biggest AMDGPU feature we’ve seen in a while. The Linux 5.0 kernel paired with Mesa 19.0 can now yield working support for FreeSync / VESA Adaptive-Sync over DisplayPort connections! This was one of the few missing features from the open-source AMD Linux driver.

Support for a new VegaM and other new Vega IDs.

AMDKFD compute support for Vega 12 and Polaris 12.

NVIDIA Xavier display support with the Tegra DRM code.

– Continued work bringing up Intel Icelake Gen11 graphics and the Intel DRM driver also enables DP FEC support.

Initial support for NVIDIA Turing GPUs but only kernel mode-setting so far and no hardware acceleration on Nouveau.

– Media driver updates including ASpeed video engine support.

Processors

Initial support for the NXP i.MX8 SoCs as well as the MX8 reference board.

– The Cortex-A5-based RDA Micro RDA8810PL is another new ARM SoC now supported by the mainline kernel.

– Updates to the Chinese 32-bit C-SKY CPU architecture code.

– NVIDIA Tegra suspend-and-resume for the Tegra X2 and Xavier SoCs.

– Support for the Allwinner T3, Qualcomm QCS404, and NXP Layerscape LX2160A.

Intel VT-d Scalable Mode support for Scalable I/O Virtualization.

New Intel Stratix 10 FPGA drivers.

– Updates to the Andes NDS32 CPU architecture.

NXP PowerPC processors finally mitigated for Spectre V2.

ARM big.LITTLE Energy Aware Scheduling has made it into the kernel for conserving power and some minor possible performance benefits.

AArch64 pointer authentication support.

AMD Zen 2 temperature monitoring support. There is also temperature support for the Hygon Dhyana Chinese-made AMD CPUs.

POWER On-Chip Controller driver support.

Many updates for MIPS CPUs including prepping for nanoMIPS.

Improved AMD CPU microcode handling.

AMD Always-On STIBP Preferred Mode.

AMD Platform QoS support for next-generation EPYC processors.


Source

WP2Social Auto Publish Powered By : XYZScripts.com