Periodically new devices and technology coming out and it’s important to keep our Linux system kernel up-to-date if we want to get the most of out it.
Moreover, updating system kernel will ease us to take advantage of new kernel functions and also it helps us to protect ourselves from vulnerabilities that have been found in earlier versions.
Ready to update your kernel on Ubuntu and Debian or one of their derivatives such as Linux Mint? If so, keep reading!
Check Installed Kernel Version
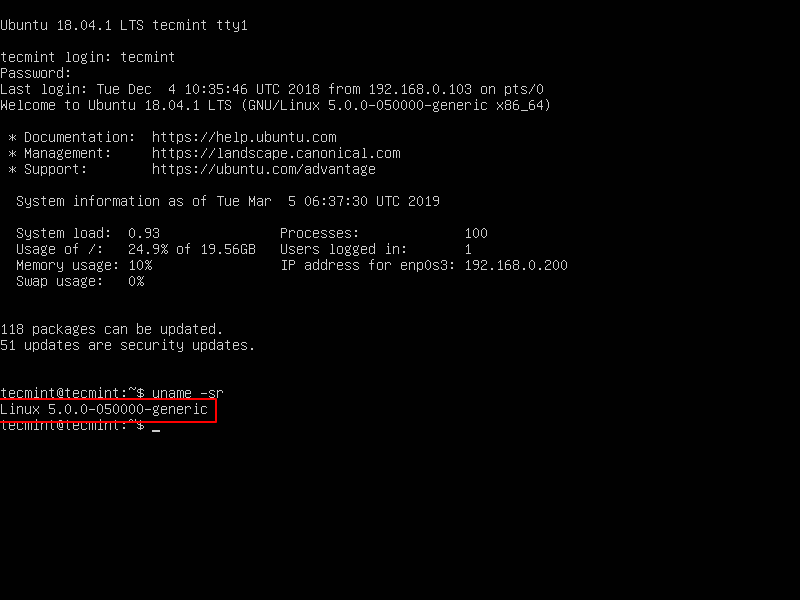
To find the current version of installed kernel on our system we can do:
$ uname -sr
The following shows the output of the above command in a Ubuntu 18.04 server:
Linux 4.15.0-42-generic
Upgrading Kernel in Ubuntu Server
To upgrade the kernel in Ubuntu, go to http://kernel.ubuntu.com/~kernel-ppa/mainline/ and choose the desired version (Kernel 5.0 is the latest at the time of writing) from the list by clicking on it.
Next, download the .deb files for your system architecture using wget command.
Once you’ve downloaded all the above kernel files, now install them as follows:
$ sudo dpkg -i *.deb
Sample Output
(Reading database ... 140176 files and directories currently installed.)
Preparing to unpack linux-headers-5.0.0-050000_5.0.0-050000.201903032031_all.deb ...
Unpacking linux-headers-5.0.0-050000 (5.0.0-050000.201903032031) over (5.0.0-050000.201903032031) ...
Preparing to unpack linux-headers-5.0.0-050000-generic_5.0.0-050000.201903032031_amd64.deb ...
Unpacking linux-headers-5.0.0-050000-generic (5.0.0-050000.201903032031) over (5.0.0-050000.201903032031) ...
Preparing to unpack linux-image-unsigned-5.0.0-050000-generic_5.0.0-050000.201903032031_amd64.deb ...
Unpacking linux-image-unsigned-5.0.0-050000-generic (5.0.0-050000.201903032031) over (5.0.0-050000.201903032031) ...
Selecting previously unselected package linux-modules-5.0.0-050000-generic.
Preparing to unpack linux-modules-5.0.0-050000-generic_5.0.0-050000.201903032031_amd64.deb ...
Unpacking linux-modules-5.0.0-050000-generic (5.0.0-050000.201903032031) ...
Setting up linux-headers-5.0.0-050000 (5.0.0-050000.201903032031) ...
Setting up linux-headers-5.0.0-050000-generic (5.0.0-050000.201903032031) ...
Setting up linux-modules-5.0.0-050000-generic (5.0.0-050000.201903032031) ...
Setting up linux-image-unsigned-5.0.0-050000-generic (5.0.0-050000.201903032031) ...
Processing triggers for linux-image-unsigned-5.0.0-050000-generic (5.0.0-050000.201903032031) ...
/etc/kernel/postinst.d/initramfs-tools:
update-initramfs: Generating /boot/initrd.img-5.0.0-050000-generic
/etc/kernel/postinst.d/x-grub-legacy-ec2:
Searching for GRUB installation directory ... found: /boot/grub
Searching for default file ... found: /boot/grub/default
Testing for an existing GRUB menu.lst file ... found: /boot/grub/menu.lst
Searching for splash image ... none found, skipping ...
Found kernel: /boot/vmlinuz-4.15.0-42-generic
Found kernel: /boot/vmlinuz-4.15.0-29-generic
Found kernel: /boot/vmlinuz-5.0.0-050000-generic
Found kernel: /boot/vmlinuz-4.15.0-42-generic
Found kernel: /boot/vmlinuz-4.15.0-29-generic
Replacing config file /run/grub/menu.lst with new version
Updating /boot/grub/menu.lst ... done

/etc/kernel/postinst.d/zz-update-grub:
Generating grub configuration file ...
Found linux image: /boot/vmlinuz-5.0.0-050000-generic
Found initrd image: /boot/initrd.img-5.0.0-050000-generic
Found linux image: /boot/vmlinuz-4.15.0-42-generic
Found initrd image: /boot/initrd.img-4.15.0-42-generic
Found linux image: /boot/vmlinuz-4.15.0-29-generic
Found initrd image: /boot/initrd.img-4.15.0-29-generic
done
Once the installation is complete, reboot your machine and verify that the new kernel version is being used:
$ uname -sr
Verify Kernel Version in Ubuntu
And that’s it. You are now using a much more recent kernel version than the one installed by default with Ubuntu.
Summary
In this article we’ve shown how to easily upgrade the Linux kernel on Ubuntu system. There is yet another procedure which we haven’t showed here as it requires compiling the kernel from source, which is not recommended on production Linux systems.
If you’re still interested in compiling the kernel as a learning experience, you will get the instructions on how to do it at the Kernel Newbies page.
As always, feel free to use the form below if you have any questions or comments about this article.
In this article, we will show how to remove old/unused kernel images on RHEL/CentOS/Fedora systems. However, before you remove an old kernel, it is important to keep your kernel up to date; install the latest version in order to leverage new kernel functions and to protect your system from vulnerabilities that have been discovered in older versions.
To install or upgrade to latest kernel version in RHEL/CentOS/Fedora systems, read this guide:
You need to install yum-utils, which is an assortment of utilities that integrate with yum to make it more powerful and easier to use, by extending its original features in several different ways.
# yum install yum-utils
One of these utilities is package-cleanup which you can use to delete old kernel as shown below, the count flag is used to specify the number of kernels you want to leave on the system.
# package-cleanup --oldkernels --count=2
Removing Old Kernels
Loaded plugins: fastestmirror, langpacks, product-id, versionlock
--> Running transaction check
---> Package kernel.x86_64 0:3.10.0-229.el7 will be erased
---> Package kernel.x86_64 0:3.10.0-229.14.1.el7 will be erased
---> Package kernel-devel.x86_64 0:3.10.0-229.1.2.el7 will be erased
---> Package kernel-devel.x86_64 0:3.10.0-229.14.1.el7 will be erased
--> Finished Dependency Resolution

Dependencies Resolved

===============================================================================================================================================================================================
 Package                                       Arch                                    Version                                                Repository                                  Size
===============================================================================================================================================================================================
Removing:
 kernel                                        x86_64                                  3.10.0-229.el7                                         @anaconda                                  131 M
 kernel                                        x86_64                                  3.10.0-229.14.1.el7                                    @updates                                   131 M
 kernel-devel                                  x86_64                                  3.10.0-229.1.2.el7                                     @updates                                    32 M
 kernel-devel                                  x86_64                                  3.10.0-229.14.1.el7                                    @updates                                    32 M

Transaction Summary
===============================================================================================================================================================================================
Remove  4 Packages

Installed size: 326 M
Is this ok [y/N]: y
Downloading packages:
Running transaction check
Running transaction test
Transaction test succeeded
Running transaction
  Erasing    : kernel-devel.x86_64                            1/4
  Erasing    : kernel.x86_64                                  2/4
  Erasing    : kernel-devel.x86_64                            3/4
  Erasing    : kernel.x86_64                                  4/4
Loading mirror speeds from cached hostfile
 * base: centos.mirror.snu.edu.in
 * epel: repo.ugm.ac.id
 * extras: centos.mirror.snu.edu.in
 * rpmforge: kartolo.sby.datautama.net.id
 * updates: centos.mirror.snu.edu.in
  Verifying  : kernel-3.10.0-229.el7.x86_64                   1/4
  Verifying  : kernel-devel-3.10.0-229.14.1.el7.x86_64        2/4
  Verifying  : kernel-3.10.0-229.14.1.el7.x86_64              3/4
  Verifying  : kernel-devel-3.10.0-229.1.2.el7.x86_64         4/4

Removed:
  kernel.x86_64 0:3.10.0-229.el7           kernel.x86_64 0:3.10.0-229.14.1.el7           kernel-devel.x86_64 0:3.10.0-229.1.2.el7           kernel-devel.x86_64 0:3.10.0-229.14.1.el7

Complete!
Important: After running the above command, it will remove all old/unused kernels and keep the current running and old latest kernel as backup.
In this article, we described how to remove old/unused kernel images on RHEL/CentOS/Fedora systems. You can share any thoughts via the feedback from below.
In this article, we will explain how to delete old unused kernels in Debian and Ubuntu systems, but before moving further, you may want to install the latest version in order to take advantage of: security fixes, new kernel functions, updated drivers and so much more.
To upgrade your kernel to latest version in Ubuntu and Debian, follow this guide:
Run the commands below to remove a particular linux-image along with its configuration files, then update grub2 configuration, and lastly reboot the system.
[sudo] password for tecmint:
Reading package lists... Done
Building dependency tree
Reading state information... Done
The following additional packages will be installed:
  linux-generic linux-headers-4.8.0-59 linux-headers-4.8.0-59-generic linux-headers-generic linux-image-4.8.0-59-generic linux-image-extra-4.8.0-59-generic linux-image-generic
Suggested packages:
  fdutils linux-doc-4.8.0 | linux-source-4.8.0 linux-tools
Recommended packages:
  thermald
The following packages will be REMOVED:
  linux-image-4.8.0-22-generic* linux-image-extra-4.8.0-22-generic*
The following NEW packages will be installed:
  linux-headers-4.8.0-59 linux-headers-4.8.0-59-generic linux-image-4.8.0-59-generic linux-image-extra-4.8.0-59-generic
The following packages will be upgraded:
  linux-generic linux-headers-generic linux-image-generic
3 upgraded, 4 newly installed, 2 to remove and 182 not upgraded.
Need to get 72.0 MB of archives.
After this operation, 81.7 MB of additional disk space will be used.
Do you want to continue? [Y/n] y
Get:1 http://us.archive.ubuntu.com/ubuntu yakkety-updates/main amd64 linux-headers-4.8.0-59 all 4.8.0-59.64 [10.2 MB]
Get:2 http://us.archive.ubuntu.com/ubuntu yakkety-updates/main amd64 linux-headers-4.8.0-59-generic amd64 4.8.0-59.64 [811 kB]
Get:3 http://us.archive.ubuntu.com/ubuntu yakkety-updates/main amd64 linux-generic amd64 4.8.0.59.72 [1,782 B]
Get:4 http://us.archive.ubuntu.com/ubuntu yakkety-updates/main amd64 linux-headers-generic amd64 4.8.0.59.72 [2,320 B]
Get:5 http://us.archive.ubuntu.com/ubuntu yakkety-updates/main amd64 linux-image-4.8.0-59-generic amd64 4.8.0-59.64 [23.6 MB]
Get:6 http://us.archive.ubuntu.com/ubuntu yakkety-updates/main amd64 linux-image-extra-4.8.0-59-generic amd64 4.8.0-59.64 [37.4 MB]
Get:7 http://us.archive.ubuntu.com/ubuntu yakkety-updates/main amd64 linux-image-generic amd64 4.8.0.59.72 [2,348 B]
Fetched 72.0 MB in 7min 12s (167 kB/s)
Selecting previously unselected package linux-headers-4.8.0-59.
(Reading database ... 104895 files and directories currently installed.)
Preparing to unpack .../0-linux-headers-4.8.0-59_4.8.0-59.64_all.deb ...
Unpacking linux-headers-4.8.0-59 (4.8.0-59.64) ...
Selecting previously unselected package linux-headers-4.8.0-59-generic.
Preparing to unpack .../1-linux-headers-4.8.0-59-generic_4.8.0-59.64_amd64.deb ...
Unpacking linux-headers-4.8.0-59-generic (4.8.0-59.64) ...
Preparing to unpack .../2-linux-generic_4.8.0.59.72_amd64.deb ...
Unpacking linux-generic (4.8.0.59.72) over (4.8.0.22.31) ...
Preparing to unpack .../3-linux-headers-generic_4.8.0.59.72_amd64.deb ...
Unpacking linux-headers-generic (4.8.0.59.72) over (4.8.0.22.31) ...
Selecting previously unselected package linux-image-4.8.0-59-generic.
Preparing to unpack .../4-linux-image-4.8.0-59-generic_4.8.0-59.64_amd64.deb ...
Done.
Removing linux-image-4.8.0-22-generic (4.8.0-22.24) ...
Examining /etc/kernel/postrm.d .
run-parts: executing /etc/kernel/postrm.d/initramfs-tools 4.8.0-22-generic /boot/vmlinuz-4.8.0-22-generic
update-initramfs: Deleting /boot/initrd.img-4.8.0-22-generic
run-parts: executing /etc/kernel/postrm.d/zz-update-grub 4.8.0-22-generic /boot/vmlinuz-4.8.0-22-generic
Generating grub configuration file ...
Found linux image: /boot/vmlinuz-4.12.0-041200-generic
Found initrd image: /boot/initrd.img-4.12.0-041200-generic
Found linux image: /boot/vmlinuz-4.8.0-59-generic
done
...
Although this method works just fine, it is more reliable and efficient to use a handy script called “byobu” that combines all the commands above into a single program with useful options such as specifying number of kernels to keep on the system.
Install byobu script package which provides a program called purge-old-kernels used for removing old kernels and header packages from the system.
$ sudo apt install byobu
Then remove old kernels like so (the command below allows 2 kernels to be kept on the system).
$ sudo purge-old-kernels --keep 2
You may also like to read these following related articles on Linux kernel.
In this article, we have described how to remove old unused kernel images on Ubuntu and Debian systems. You can share any thoughts via the feedback from below.
Last August, the Linux Foundation started the LFCS certification (Linux Foundation Certified Sysadmin), a brand new program whose purpose is to allow individuals everywhere and anywhere take an exam in order to get certified in basic to intermediate operational support for Linux systems, which includes supporting running systems and services, along with overall monitoring and analysis, plus intelligent decision-making to be able to decide when it’s necessary to escalate issues to higher level support teams.
Linux Foundation Certified Sysadmin – Part 8
Please have a quick look at the following video that describes an introduction to the Linux Foundation Certification Program.
This article is Part 8 of a 10-tutorial long series, here in this section, we will guide you on how to manage users and groups permissions in Linux system, that are required for the LFCS certification exam.
Since Linux is a multi-user operating system (in that it allows multiple users on different computers or terminals to access a single system), you will need to know how to perform effective user management: how to add, edit, suspend, or delete user accounts, along with granting them the necessary permissions to do their assigned tasks.
Adding User Accounts
To add a new user account, you can run either of the following two commands as root.
# adduser [new_account]
# useradd [new_account]
When a new user account is added to the system, the following operations are performed.
1. His/her home directory is created (/home/username by default).
2. The following hidden files are copied into the user’s home directory, and will be used to provide environment variables for his/her user session.
.bash_logout
.bash_profile
.bashrc
3. A mail spool is created for the user at /var/spool/mail/username.
4. A group is created and given the same name as the new user account.
Understanding /etc/passwd
The full account information is stored in the /etc/passwd file. This file contains a record per system user account and has the following format (fields are delimited by a colon).
Fields [username] and [Comment] are self explanatory.
The x in the second field indicates that the account is protected by a shadowed password (in /etc/shadow), which is needed to logon as [username].
The [UID] and [GID] fields are integers that represent the User IDentification and the primary Group IDentification to which [username] belongs, respectively.
The [Home directory] indicates the absolute path to [username]’s home directory, and
The [Default shell] is the shell that will be made available to this user when he or she logins the system.
Understanding /etc/group
Group information is stored in the /etc/group file. Each record has the following format.
An x in [Group password] indicates group passwords are not being used.
[GID]: same as in /etc/passwd.
[Group members]: a comma separated list of users who are members of [Group name].
Add User Accounts
After adding an account, you can edit the following information (to name a few fields) using the usermodcommand, whose basic syntax of usermod is as follows.
# usermod [options] [username]
Setting the expiry date for an account
Use the –expiredate flag followed by a date in YYYY-MM-DD format.
# usermod --expiredate 2014-10-30 tecmint
Adding the user to supplementary groups
Use the combined -aG, or –append–groups options, followed by a comma separated list of groups.
# usermod --append --groups root,users tecmint
Changing the default location of the user’s home directory
Use the -d, or –home options, followed by the absolute path to the new home directory.
# usermod --home /tmp tecmint
Changing the shell the user will use by default
Use –shell, followed by the path to the new shell.
# usermod --shell /bin/sh tecmint
Displaying the groups an user is a member of
# groups tecmint
# id tecmint
Now let’s execute all the above commands in one go.
In the example above, we will set the expiry date of the tecmint user account to October 30th, 2014. We will also add the account to the root and users group. Finally, we will set sh as its default shell and change the location of the home directory to /tmp:
For existing accounts, we can also do the following.
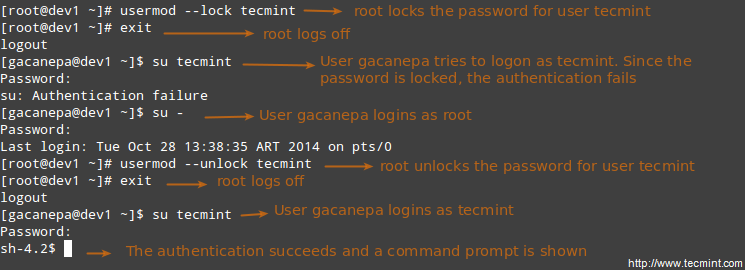
Disabling account by locking password
Use the -L (uppercase L) or the –lock option to lock a user’s password.
# usermod --lock tecmint
Unlocking user password
Use the –u or the –unlock option to unlock a user’s password that was previously blocked.
# usermod --unlock tecmint
Lock User Accounts
Creating a new group for read and write access to files that need to be accessed by several users
Run the following series of commands to achieve the goal.
# groupadd common_group # Add a new group
# chown :common_group common.txt # Change the group owner of common.txt to common_group
# usermod -aG common_group user1 # Add user1 to common_group
# usermod -aG common_group user2 # Add user2 to common_group
# usermod -aG common_group user3 # Add user3 to common_group
Deleting a group
You can delete a group with the following command.
# groupdel [group_name]
If there are files owned by group_name, they will not be deleted, but the group owner will be set to the GID of the group that was deleted.
Linux File Permissions
Besides the basic read, write, and execute permissions that we discussed in Archiving Tools and Setting File Attributes – Part 3 of this series, there are other less used (but not less important) permission settings, sometimes referred to as “special permissions”.
Like the basic permissions discussed earlier, they are set using an octal file or through a letter (symbolic notation) that indicates the type of permission.
Deleting user accounts
You can delete an account (along with its home directory, if it’s owned by the user, and all the files residing therein, and also the mail spool) using the userdel command with the –remove option.
# userdel --remove [username]
Group Management
Every time a new user account is added to the system, a group with the same name is created with the username as its only member. Other users can be added to the group later. One of the purposes of groups is to implement a simple access control to files and other system resources by setting the right permissions on those resources.
For example, suppose you have the following users.
user1 (primary group: user1)
user2 (primary group: user2)
user3 (primary group: user3)
All of them need read and write access to a file called common.txt located somewhere on your local system, or maybe on a network share that user1 has created. You may be tempted to do something like,
# chmod 660 common.txt
OR
# chmod u=rw,g=rw,o= common.txt [notice the space between the last equal sign and the file name]
However, this will only provide read and write access to the owner of the file and to those users who are members of the group owner of the file (user1 in this case). Again, you may be tempted to add user2 and user3to group user1, but that will also give them access to the rest of the files owned by user user1 and group user1.
This is where groups come in handy, and here’s what you should do in a case like this.
Understanding Setuid
When the setuid permission is applied to an executable file, an user running the program inherits the effective privileges of the program’s owner. Since this approach can reasonably raise security concerns, the number of files with setuid permission must be kept to a minimum. You will likely find programs with this permission set when a system user needs to access a file owned by root.
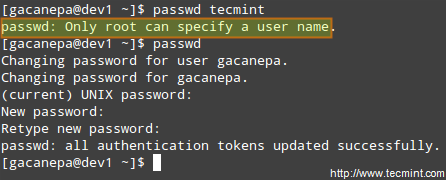
Summing up, it isn’t just that the user can execute the binary file, but also that he can do so with root’s privileges. For example, let’s check the permissions of /bin/passwd. This binary is used to change the password of an account, and modifies the /etc/shadow file. The superuser can change anyone’s password, but all other users should only be able to change their own.
passwd Command Examples
Thus, any user should have permission to run /bin/passwd, but only root will be able to specify an account. Other users can only change their corresponding passwords.
Change User Password
Understanding Setgid
When the setgid bit is set, the effective GID of the real user becomes that of the group owner. Thus, any user can access a file under the privileges granted to the group owner of such file. In addition, when the setgid bit is set on a directory, newly created files inherit the same group as the directory, and newly created subdirectories will also inherit the setgid bit of the parent directory. You will most likely use this approach whenever members of a certain group need access to all the files in a directory, regardless of the file owner’s primary group.
# chmod g+s [filename]
To set the setgid in octal form, prepend the number 2 to the current (or desired) basic permissions.
# chmod 2755 [directory]
Setting the SETGID in a directory
Add Setgid to Directory
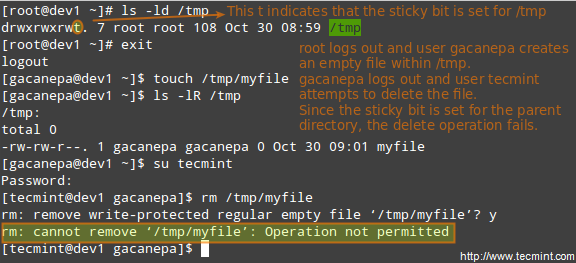
Understanding Sticky Bit
When the “sticky bit” is set on files, Linux just ignores it, whereas for directories it has the effect of preventing users from deleting or even renaming the files it contains unless the user owns the directory, the file, or is root.
# chmod o+t [directory]
To set the sticky bit in octal form, prepend the number 1 to the current (or desired) basic permissions.
# chmod 1755 [directory]
Without the sticky bit, anyone able to write to the directory can delete or rename files. For that reason, the sticky bit is commonly found on directories, such as /tmp, that are world-writable.
Add Stickybit to Directory
Special Linux File Attributes
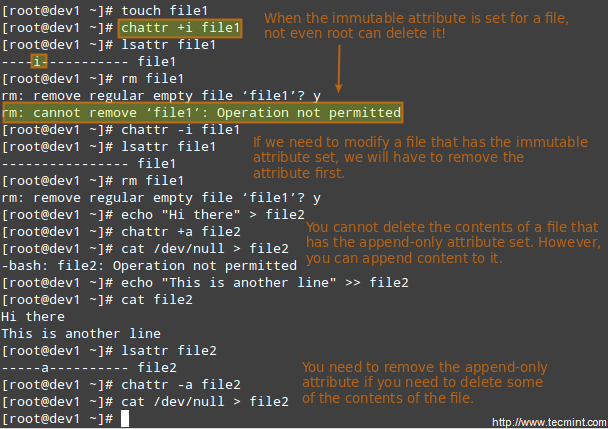
There are other attributes that enable further limits on the operations that are allowed on files. For example, prevent the file from being renamed, moved, deleted, or even modified. They are set with the chattr commandand can be viewed using the lsattr tool, as follows.
# chattr +i file1
# chattr +a file2
After executing those two commands, file1 will be immutable (which means it cannot be moved, renamed, modified or deleted) whereas file2 will enter append-only mode (can only be open in append mode for writing).
Chattr Command to Protect Files
Accessing the root Account and Using sudo
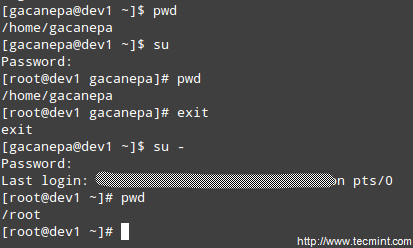
One of the ways users can gain access to the root account is by typing.
$ su
and then entering root’s password.
If authentication succeeds, you will be logged on as root with the current working directory as the same as you were before. If you want to be placed in root’s home directory instead, run.
$ su -
and then enter root’s password.
Enable Sudo Access on Users
The above procedure requires that a normal user knows root’s password, which poses a serious security risk. For that reason, the sysadmin can configure the sudo command to allow an ordinary user to execute commands as a different user (usually the superuser) in a very controlled and limited way. Thus, restrictions can be set on a user so as to enable him to run one or more specific privileged commands and no others.
To authenticate using sudo, the user uses his/her own password. After entering the command, we will be prompted for our password (not the superuser’s) and if the authentication succeeds (and if the user has been granted privileges to run the command), the specified command is carried out.
To grant access to sudo, the system administrator must edit the /etc/sudoers file. It is recommended that this file is edited using the visudo command instead of opening it directly with a text editor.
# visudo
This opens the /etc/sudoers file using vim (you can follow the instructions given in Install and Use vim as Editor – Part 2 of this series to edit the file).
These are the most relevant lines.
Defaults    secure_path="/usr/sbin:/usr/bin:/sbin"
root        ALL=(ALL) ALL
tecmint     ALL=/bin/yum update
gacanepa    ALL=NOPASSWD:/bin/updatedb
%admin      ALL=(ALL) ALL
This line lets you specify the directories that will be used for sudo, and is used to prevent using user-specific directories, which can harm the system.
The next lines are used to specify permissions.
root ALL=(ALL) ALL
The first ALL keyword indicates that this rule applies to all hosts.
The second ALL indicates that the user in the first column can run commands with the privileges of any user.
The third ALL means any command can be run.
tecmint ALL=/bin/yum update
If no user is specified after the = sign, sudo assumes the root user. In this case, user tecmint will be able to run yum update as root.
gacanepa ALL=NOPASSWD:/bin/updatedb
The NOPASSWD directive allows user gacanepa to run /bin/updatedb without needing to enter his password.
%admin ALL=(ALL) ALL
The % sign indicates that this line applies to a group called “admin”. The meaning of the rest of the line is identical to that of an regular user. This means that members of the group “admin” can run all commands as any user on all hosts.
To see what privileges are granted to you by sudo, use the “-l” option to list them.
Sudo Access Rules
PAM (Pluggable Authentication Modules)
Pluggable Authentication Modules (PAM) offer the flexibility of setting a specific authentication scheme on a per-application and / or per-service basis using modules. This tool present on all modern Linux distributions overcame the problem often faced by developers in the early days of Linux, when each program that required authentication had to be compiled specially to know how to get the necessary information.
For example, with PAM, it doesn’t matter whether your password is stored in /etc/shadow or on a separate server inside your network.
For example, when the login program needs to authenticate a user, PAM provides dynamically the library that contains the functions for the right authentication scheme. Thus, changing the authentication scheme for the login application (or any other program using PAM) is easy since it only involves editing a configuration file (most likely, a file named after the application, located inside /etc/pam.d, and less likely in /etc/pam.conf).
Files inside /etc/pam.d indicate which applications are using PAM natively. In addition, we can tell whether a certain application uses PAM by checking if it the PAM library (libpam) has been linked to it:
# ldd $(which login) | grep libpam # login uses PAM
# ldd $(which top) | grep libpam # top does not use PAM
Check Linux PAM Library
In the above image we can see that the libpam has been linked with the login application. This makes sense since this application is involved in the operation of system user authentication, whereas top does not.
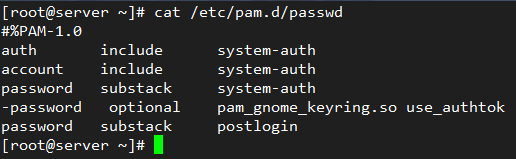
Let’s examine the PAM configuration file for passwd – yes, the well-known utility to change user’s passwords. It is located at /etc/pam.d/passwd:
# cat /etc/passwd
PAM Configuration File for Linux Password
The first column indicates the type of authentication to be used with the module-path (third column). When a hyphen appears before the type, PAM will not record to the system log if the module cannot be loaded because it could not be found in the system.
The following authentication types are available:
account: this module type checks if the user or service has supplied valid credentials to authenticate.
auth: this module type verifies that the user is who he / she claims to be and grants any needed privileges.
password: this module type allows the user or service to update their password.
session: this module type indicates what should be done before and/or after the authentication succeeds.
The second column (called control) indicates what should happen if the authentication with this module fails:
requisite: if the authentication via this module fails, overall authentication will be denied immediately.
required is similar to requisite, although all other listed modules for this service will be called before denying authentication.
sufficient: if the authentication via this module fails, PAM will still grant authentication even if a previous marked as required failed.
optional: if the authentication via this module fails or succeeds, nothing happens unless this is the only module of its type defined for this service.
include means that the lines of the given type should be read from another file.
substack is similar to includes but authentication failures or successes do not cause the exit of the complete module, but only of the substack.
The fourth column, if it exists, shows the arguments to be passed to the module.
The first three lines in /etc/pam.d/passwd (shown above), load the system-auth module to check that the user has supplied valid credentials (account). If so, it allows him / her to change the authentication token (password) by giving permission to use passwd (auth).
the last two hashed passwords of each user are saved in /etc/security/opasswd so that they cannot be reused:
Linux Password Fields
Summary
Effective user and file management skills are essential tools for any system administrator. In this article we have covered the basics and hope you can use it as a good starting to point to build upon. Feel free to leave your comments or questions below, and we’ll respond quickly.
In this tutorial, we will explain auxiliary file permissions, commonly referred to as “special permissions” in Linux, and also we will show you how to find files which have SUID (Setuid) and SGID (Setgid) set.
What is SUID and SGID?
SUID is a special file permission for executable files which enables other users to run the file with effective permissions of the file owner. Instead of the normal x which represents execute permissions, you will see an s(to indicate SUID) special permission for the user.
SGID is a special file permission that also applies to executable files and enables other users to inherit the effective GID of file group owner. Likewise, rather than the usual x which represents execute permissions, you will see an s (to indicate SGID) special permission for group user.
Let’s look at how to find files which have SUID and SGID set using the find command.
The syntax is as follows:
$ find directory -perm /permissions
Important: Certain directories (such as /etc, /bin, /sbin etc.) or files require root privileges in order to be accessed or listed, if you are managing your system as a normal user, use the sudo command to gain root privileges.
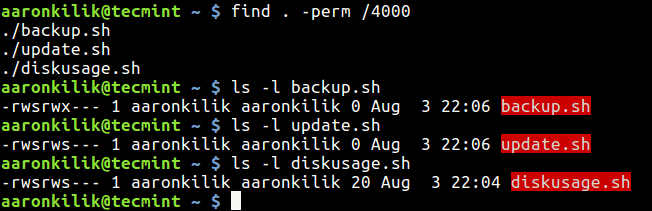
How to Find Files with SUID Set in Linux
This below example command will find all files with SUID set in the current directory using -perm (print files only with permissions set to 4000) option.
$ find . -perm /4000
Find Files with SUID Permissions
You can use the ls command with -l option (for long listing) to view the permissions on the listed files as shown in the image above.
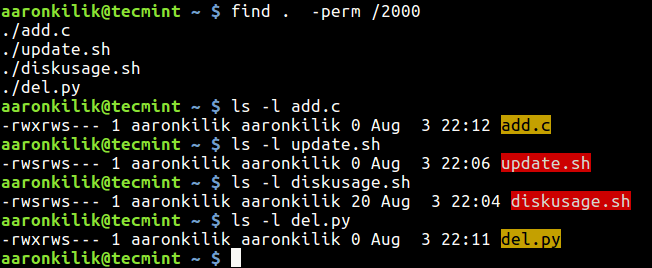
How to Find Files with SGID Set in Linux
To find files which have SGID set, type the following command.
$ find . -perm /2000
Find Files with SGID Permissions
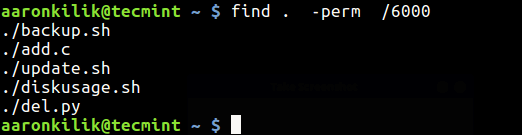
To find files which have both SUID and SGID set, run the command below.
$ find . -perm /6000
Find Files with SUID and SGID
You may also like to read these useful guides about file permissions in Linux:
That’s it for now! In this guide, we showed you how to find files which have SUID (Setuid) and SGID (Setgid) set in Linux. If you have any questions, use the feedback form below to share any queries or additional thoughts about this topic.
In this guide we are going to look at how to use a script and scriptreplay commands in Linux that can help you to record commands and their output printed on your terminal during a given session.
Record and Replay Linux Terminal Commands
The history command is a great command-line utility that helps users to store previous command used, though it does not store the output of a command.
Therefore the script command comes in handy to provide you a powerful functionality that helps you to record everything that is printed on your terminal to a log_file. You can then refer to this file later on in case you want to view the output of a command in history from the log_file.
You can also replay commands that you recorded using the scriptreplay command by using a timing information.
How to Record Linux Terminal Using script Command
The script command stores terminal activities in a log file that can be named by a user, when a name is not provided by a user, the default file name, typescript is used.
To start recording of Linux terminal, type script and add the log filename as shown.
tecmint@tecmint ~ $script history_log.txtScript started, file is history_log.txt
To stop script, type exit and press [Enter].
tecmint@tecmint ~ $exitScript done, file is history_log.txt
If the script can not write to the named log file then it shows an error.
For example, in the output below, the permissions of the file typescript does not allow reading, writing and execution of the file not by any user or group. When you run the script command without a log file name, it attempts to write to the default file, typescript hence showing an error.
I have named my log file script.log in the example below, you can give your file a different name.
tecmint@tecmint ~ $script script.log
Now try to execute few commands to allow script to record executed commands on the terminal.
tecmint@tecmint ~ $cal
September 2015
Su Mo Tu We Th Fr Sa
1 2 3 4 5
6 7 8 9 10 11 12
13 14 15 16 17 18 19
20 21 22 23 24 25 26
27 28 29 30
tecmint@tecmint ~ $w
14:49:40 up 4:06, 2 users, load average: 1.37, 1.56, 1.62
USER TTY FROM LOGIN@ IDLE JCPU PCPU WHAT
tecmint tty8 :0 10:45 4:06m 7:40 0.36s x-session-manager
tecmint pts/5 :0 13:42 4.00s 0.07s 0.00s script script.log
tecmint@tecmint ~ $uptime
14:49:43 up 4:06, 2 users, load average: 1.37, 1.56, 1.62
tecmint@tecmint ~ $whoami
tecmint
tecmint@tecmint ~ $echo 'using script'
using script
tecmint@tecmint ~ $exit
exit
Script done, file is script.log
Now try to view the log file ‘script.log‘ for all recorded commands, while you view the log you realize that the script also stores line feeds and backspaces.
tecmint@tecmint ~ $vi script.log
Sample Output
^[[0m^[[255D^[[01;32mtecmint@tecmint^[[01;34m ~ $^[[00m cal^M
   September 2015     ^M
Su Mo Tu We Th Fr Sa  ^M
       1  2  3  4  5  ^M
 6  7  8  9 10 11 12  ^M
13 14 15 ^[[7m16^[[27m 17 18 19  ^M
20 21 22 23 24 25 26  ^M
27 28 29 30           ^M
                      ^M
^[[01;32mtecmint@tecmint^[[01;34m ~ $^[[00m w^M
 14:49:40 up  4:06,  2 users,  load average: 1.37, 1.56, 1.62^M
USER     TTY      FROM             LOGIN@   IDLE   JCPU   PCPU WHAT^M
tecmint  tty8     :0               10:45    4:06m  7:40   0.36s x-session-manager^M
tecmint  pts/5    :0               13:42    4.00s  0.07s  0.00s script script.log^M
^[[01;32mtecmint@tecmint^[[01;34m ~ $^[[00m uptime^M
 14:49:43 up  4:06,  2 users,  load average: 1.37, 1.56, 1.62^M
^[[01;32mtecmint@tecmint^[[01;34m ~ $^[[00m whoami^M
tecmint^M
^[[01;32mtecmint@tecmint^[[01;34m ~ $^[[00m echo ''^Hu'^Hs'^Hi'^Hn'^Hg'^H '^Hs'^Hc'^Hr'^Hi'^Hp'^Ht'^H^M
using script^M
^[[01;32mtecmint@tecmint^[[01;34m ~ $^[[00m exit^M
exit^M

Script done on Wednesday 16 September 2015 02:49:59 PM IST
~
You may use the -a option to append the log file or typescript, retaining the prior contents.
tecmint@tecmint ~ $script -a script.log
Script started, file is script.log
tecmint@tecmint ~ $date
Wed Sep 16 14:59:36 IST 2015
tecmint@tecmint ~ $pwd
/home/tecmint
tecmint@tecmint ~ $whereis script
script: /usr/bin/script /usr/bin/X11/script /usr/share/man/man1/script.1.gz
tecmint@tecmint ~ $whatis script
script (1) - make typescript of terminal session
View the contents of script, log after using -a option to append it.
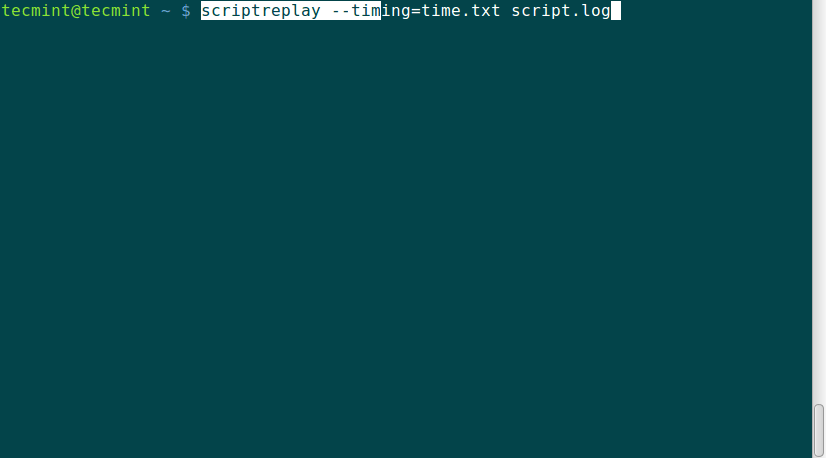
To set timing information to standard error or a file use the –timing option. The timing information is useful when you want to re-display the output stored in the log_file.
Let us start script and run the following commands w, uptime and cal to be recorded.
tecmint@tecmint ~ $script --timing=time.txt script.log
Script started, file is script.log
tecmint@tecmint ~ $w
15:09:31 up 4:26, 2 users, load average: 1.38, 1.39, 1.47
USER TTY FROM LOGIN@ IDLE JCPU PCPU WHAT
tecmint tty8 :0 10:45 4:26m 8:15 0.38s x-session-manager
tecmint pts/5 :0 13:42 3.00s 0.09s 0.00s script --timing=time.txt script.log
tecmint@tecmint ~ $uptime
15:09:36 up 4:26, 2 users, load average: 1.43, 1.40, 1.48
tecmint@tecmint ~ $cal
September 2015
Su Mo Tu We Th Fr Sa
1 2 3 4 5
6 7 8 9 10 11 12
13 14 15 16 17 18 19
20 21 22 23 24 25 26
27 28 29 30
You can view the script.log and time.txt file for the timing command above.
The time.txt file has two columns, the first column shows how much time has elapsed since the last display and the second column, shows the number of characters that have been displayed this time around.
Use the man page and –help to seek for more options and help in using the script command-line utility.
Using scriptreplay to replay scripts using timing information
The scriptreplay command helps to replay information in your log_file recorded by the script command.
The timing information is defined by the -timing=file option used with the script command and file in this case is file.txt that was used with script command .
Remember you need to specify the log_file you used with the script command.
Let us now replay the last three commands w, uptime and cal that we had run as follows.
When the log_file replayed using the timing information, the commands recorded are run and their output is displayed at the same time the original output was displayed while being recorded.
Summary
These two commands, script and scriptreplay easy to use and help a lot when you need to run the same batch of commands several times. They help a lot in managing servers that have only command-line interface for interaction with your system. Hope this guide was useful and if you have anything to add or face a challenge while using them, do not hesitate to post a comment.
Ever thought of using any computer which is not yours, with all your personal stuff and configuration? It is possible with any Linux distribution. Yes! You can use your own, customized Linux OS on any machine with just an USB drive.
This tutorial is all about installing Latest Linux OS on your pen-drive ( fully reconfigurable personalized OS, NOT just a Live USB ), customize it, and use it on any PC you have an access to. Here I am using Lubuntu 18.04 Bionic beaver for this tutorial (but, you can use any Linux distribution). So let’s gets started..
Requirements:
One Pendrive 4GB or More (Let’s call it as Main USB drive/Pendrive).
One PC (Don’t worry, there will not be any effect on that PC).
TIP: Use 32 bit Linux OS to make it compatible with any available PC.
That’s it! Go, and collect all of these. It’s time to do something new.
Step 1: Create Bootable Linux Installation Media
Use your Linux ISO image file to create a bootable USB installation media. You can use any software like Unetbootin, Gnome Disk Utility, Yumi Multi Boot, xboot, Live USB Creator etc. to create bootable usb with the help of ISO image file.
Alternatively you can use dvd disk by writing that ISO image to it (but that is the old school method).
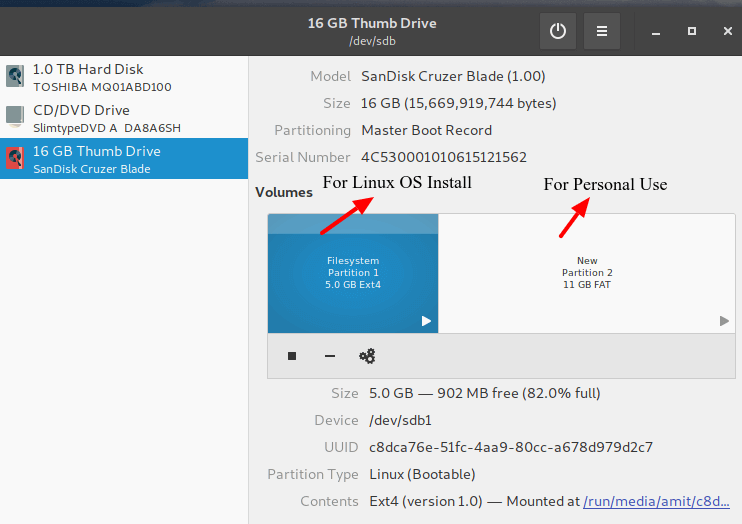
Step 2: Create Partitions On Main USB Drive
You have to make two partitions on your Main USB drive using Gparted or Gnome Disk Utility, etc.
Root partition of format ext4 of size according to your use.
Optionally you can use rest of the space as a FAT partition for using it as a normal USB drive.
I am having 16GB USB drive and I have created one root partition of 5GB and using rest 11GB as normal FATpartition. So my 16 GB USB drive is converted to 11GB drive for normal use on any PC. Sounds good!!!
This step you can do while installing Linux also, but it will be very complex while installing Operating System’s like Arch Linux.
Main USB Drive Partitions
Once you have created required partitions on Main USB drive. Now take a deep breath because it’s time to go for Linux installation section.
Step 3: Install Linux on USB Drive
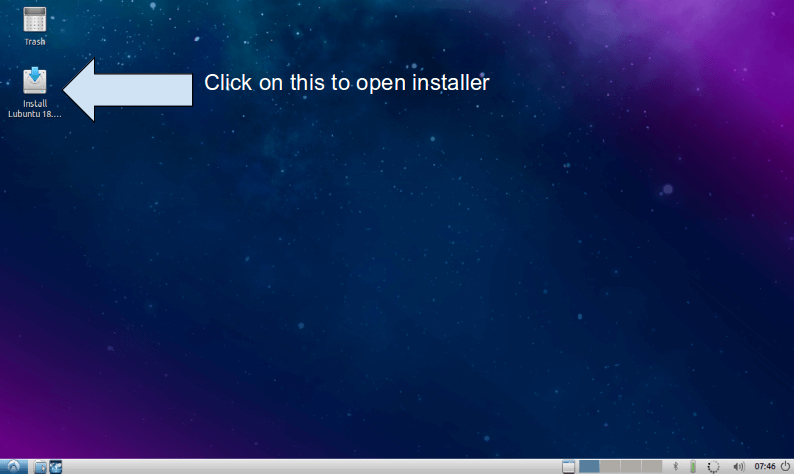
1. First boot Linux OS (Lubuntu 18.04) from your bootable installation media and launch installation application from live session. Live session of Lubuntu 18.04 will look like this.
Lubuntu Live Boot
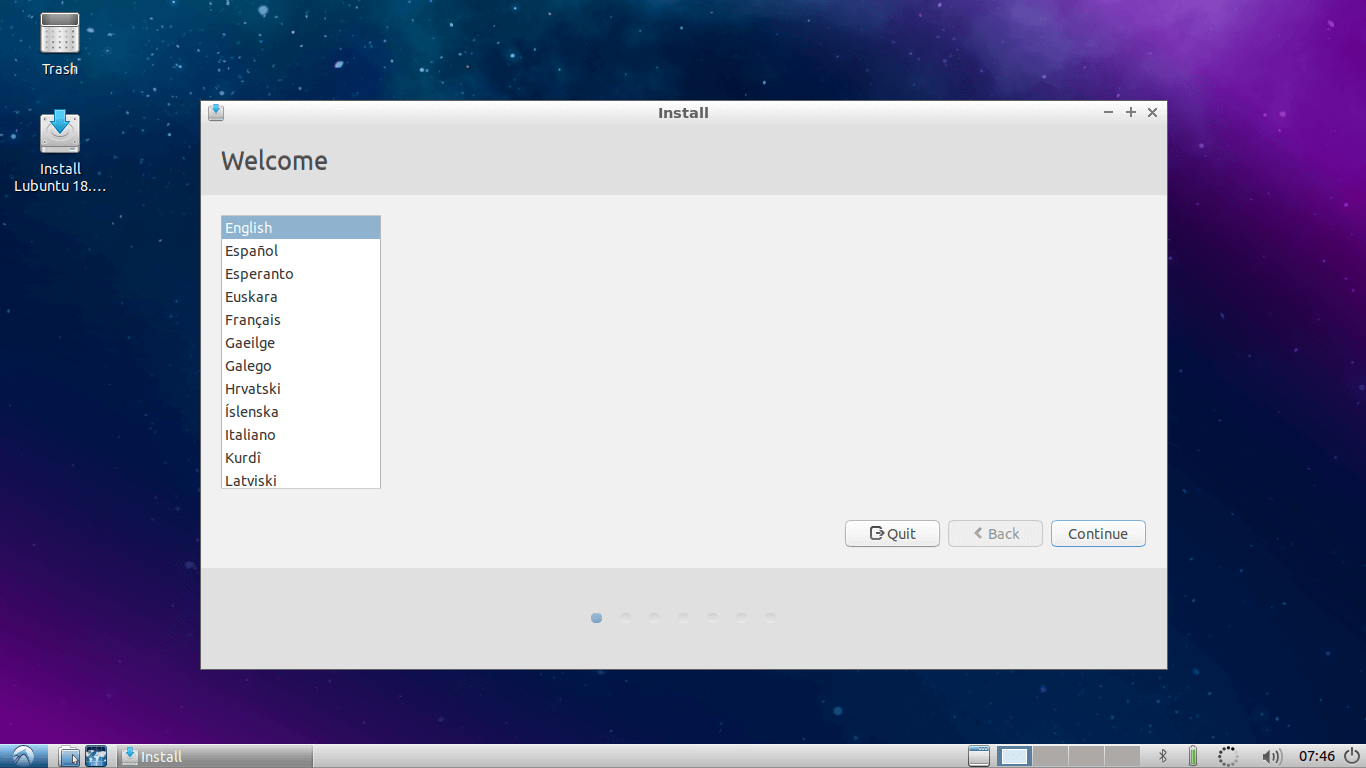
2. Installer welcome screen will appear, select Language there and hit Continue.
Select Lubuntu Installation Language
3. Select Keyboard Layout and continue…
Select Lubuntu Keyboard Layout
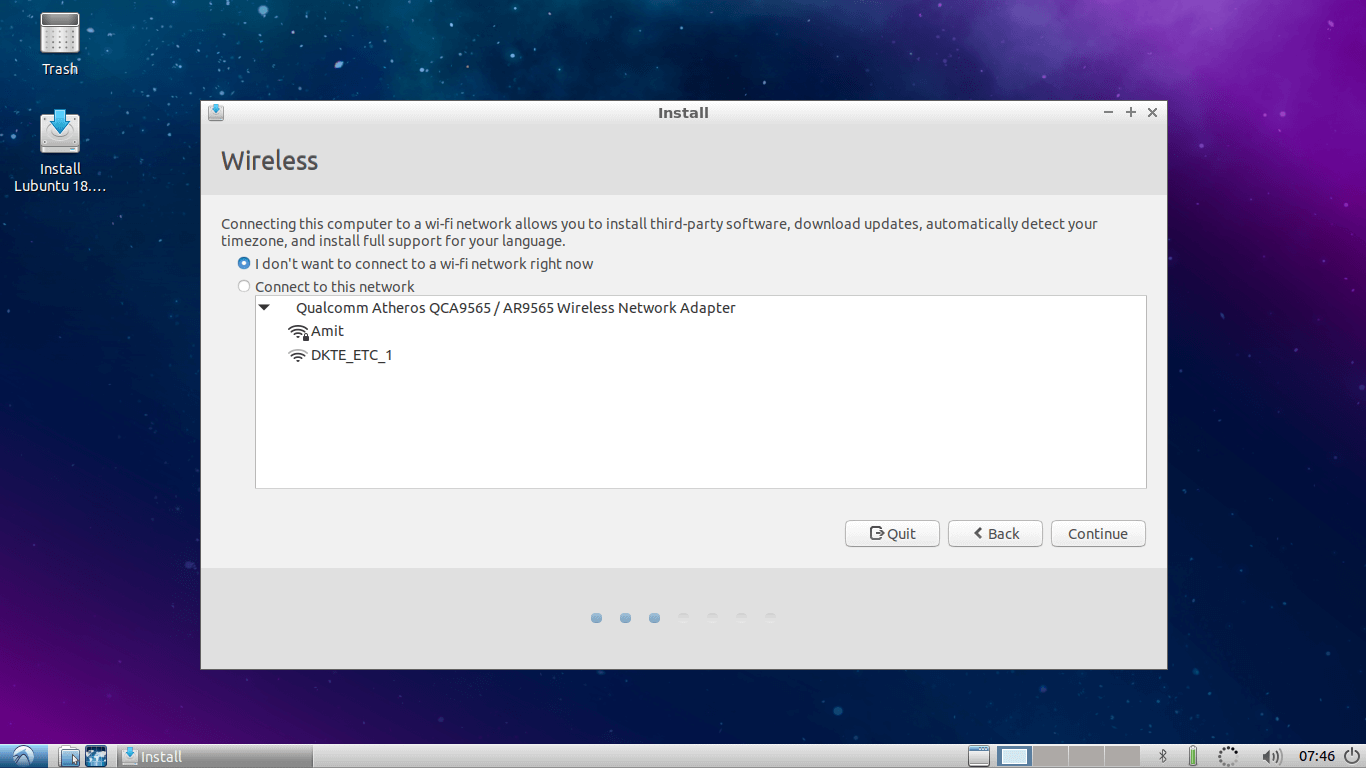
4. Select Wifi internet if you want to update Lubuntu while installation. I will skip it..
Select Wifi to Update Lubuntu
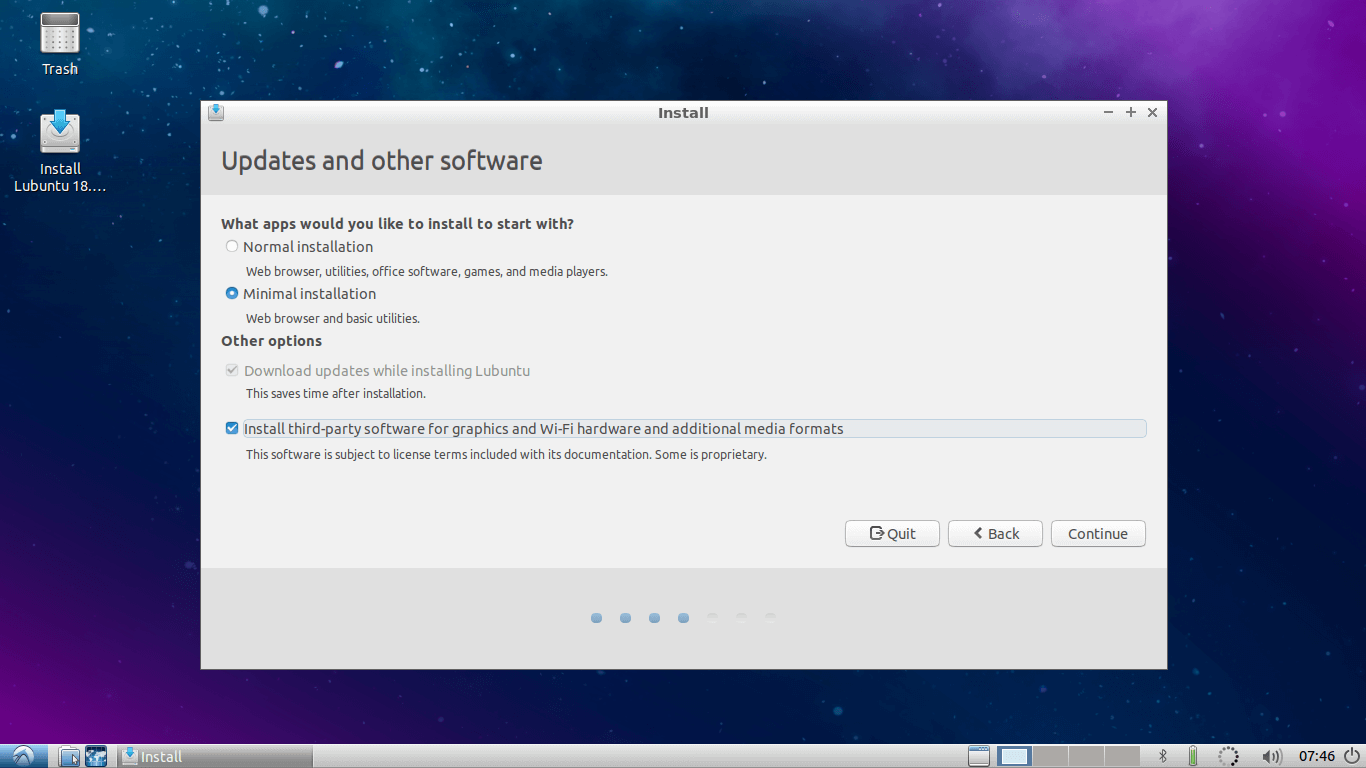
5. Select Installation Type and Third party installation as per your choice and go to next..
Select Lubuntu Software Updates
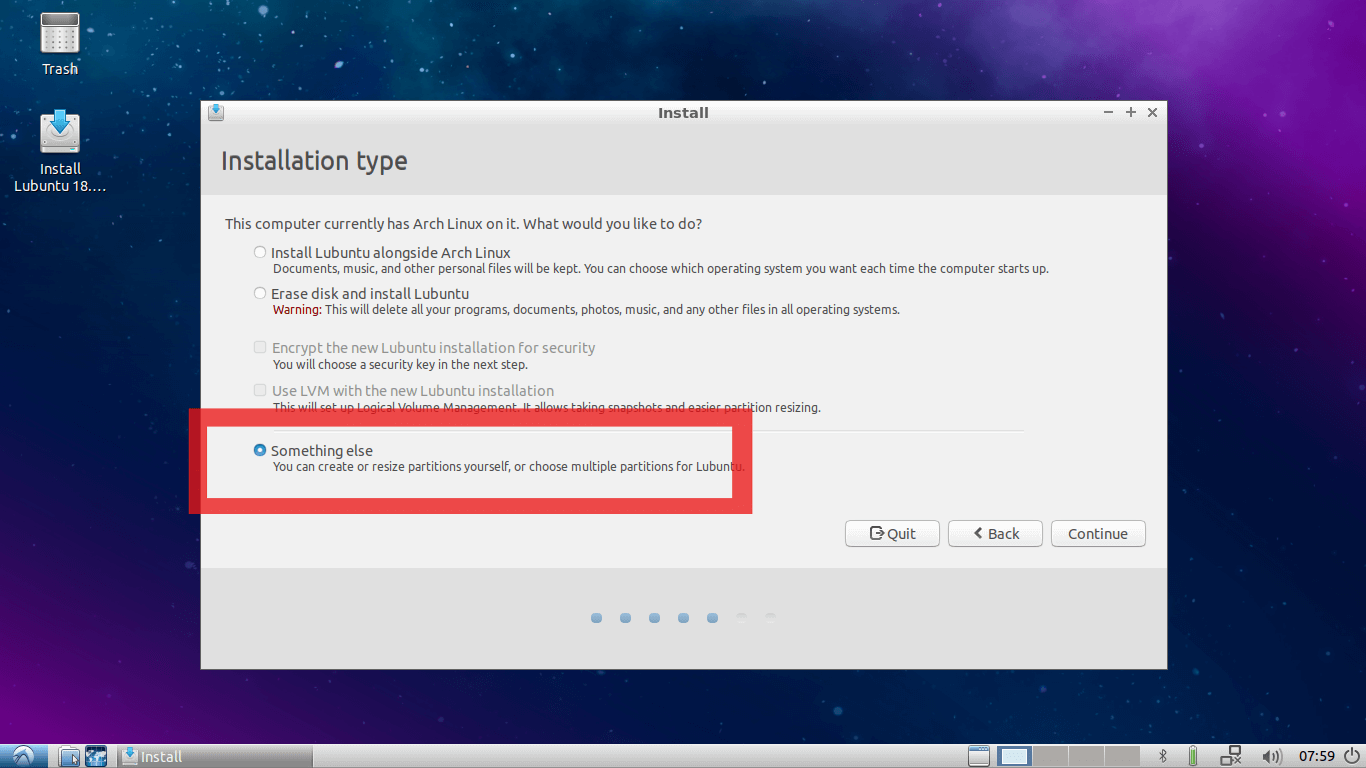
6. Here select Something Else Option (It is Mandatory) and go to next…
Select Lubuntu Installation Type
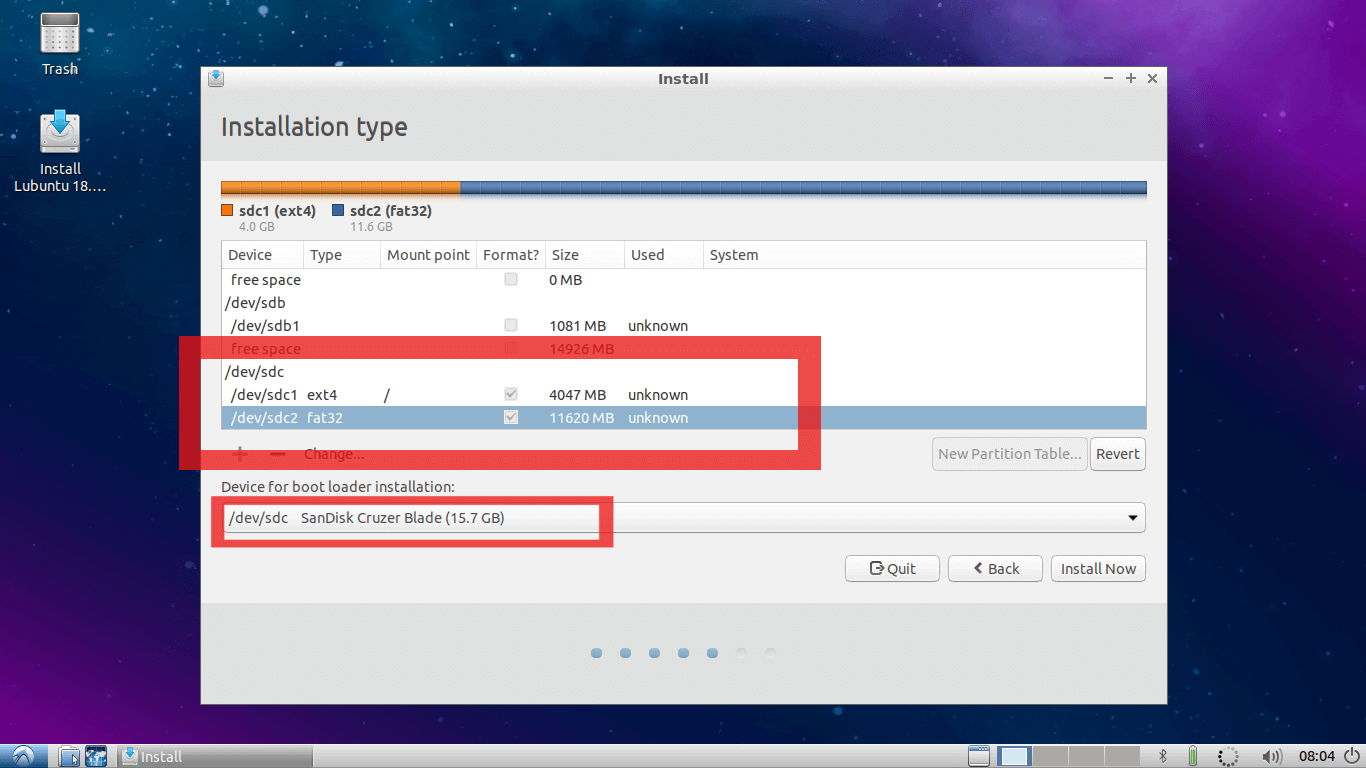
7. This is an an Important step, here you need to find out where your Main USB drive is mounted.
Find Main USB Drive
In my case /dev/sda is internal hard disk of the PC and I am using /dev/sdb is USB Lubuntu Installation media from where this live session is booted.
And /dev/sdc is my Main USB drive where I want to install my Linux system and where I have made two partition in step number 2. If you have skipped step 2, you can also make partitions in this window.
First change mount point of First partition on this Main USB drive to ROOT (i.e. “ / ”). And as shown in second red square select bootloader installation device as the Main USB drive.
In my case it is /dev/sdc. This is the most important step in this tutorial. If it is not done correctly your system will boot only on the current PC you are using, which is exactly opposite of your motivation to follow this tutorial.
Once it is completed, double check it and hit continue. You will get a small window showing devices and drive which will be affected.
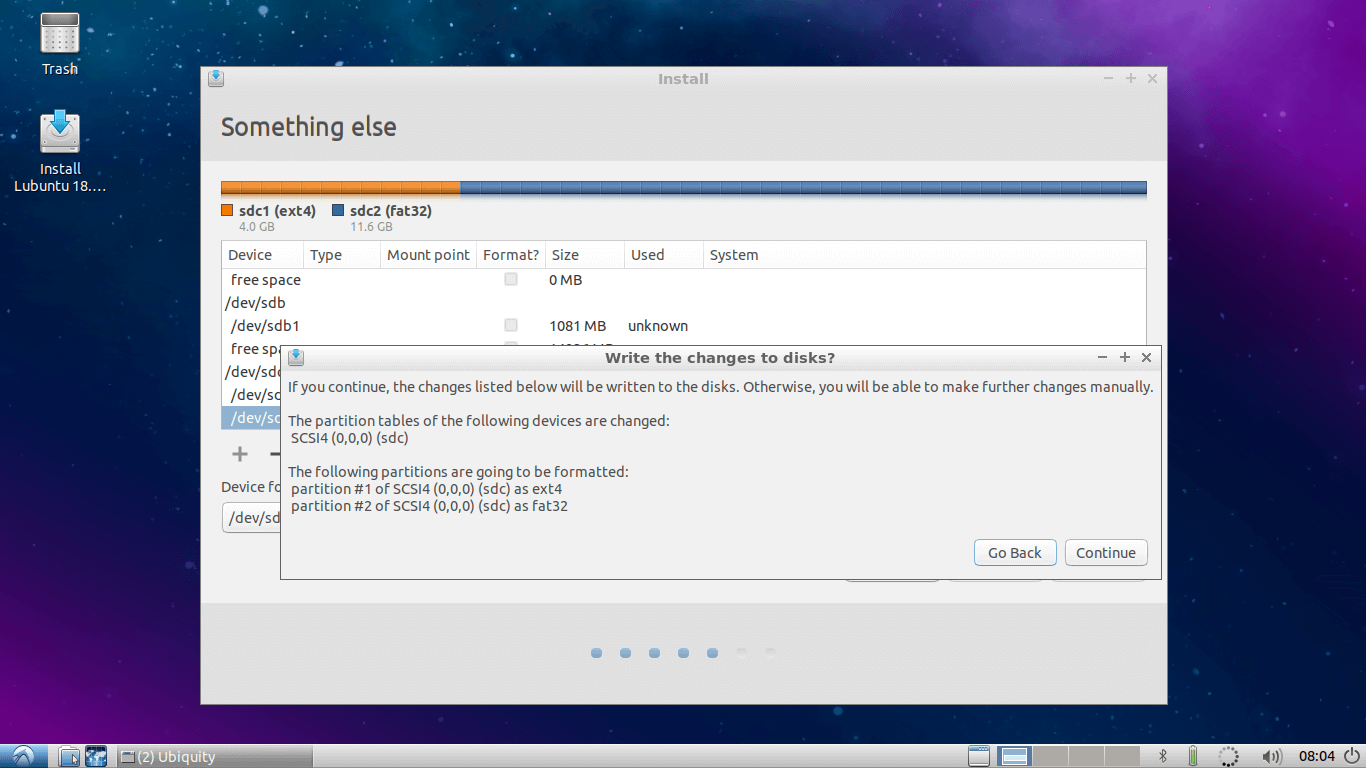
8. Make sure that the device and drives shown on this window are of your Main USB drive, which is in my case /dev/sdc. Hit continue…
Write Partition Changes to Disk
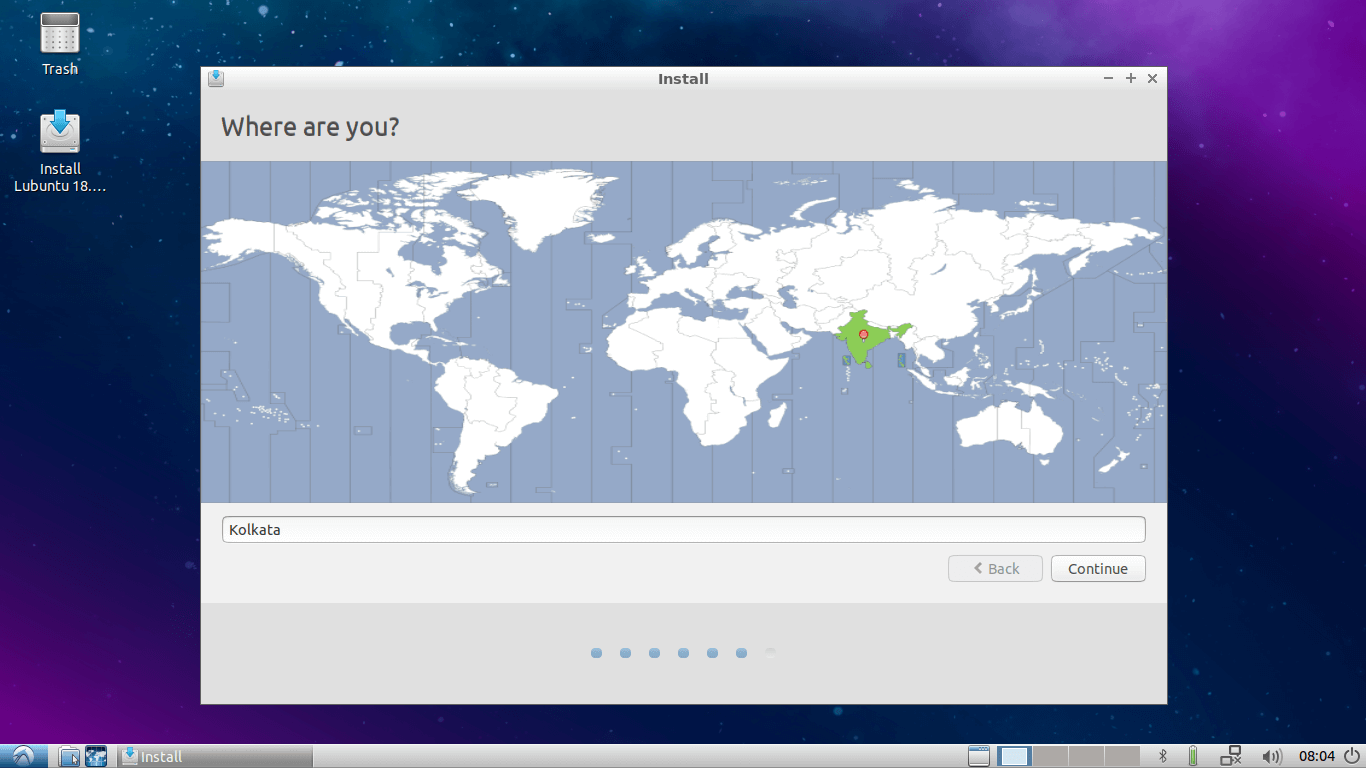
9. Now select your Region and hit Continue…
Select Lubuntu Region
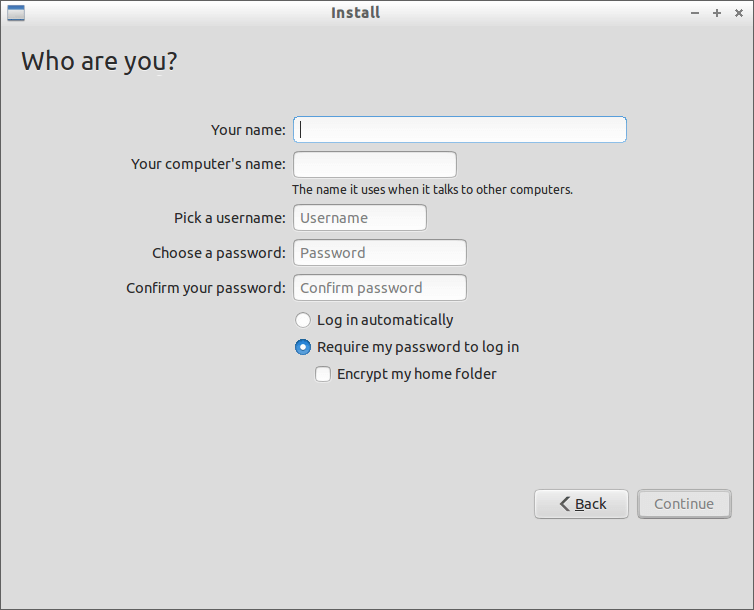
10. Add username, password and hostname etc…
Create Lubuntu User
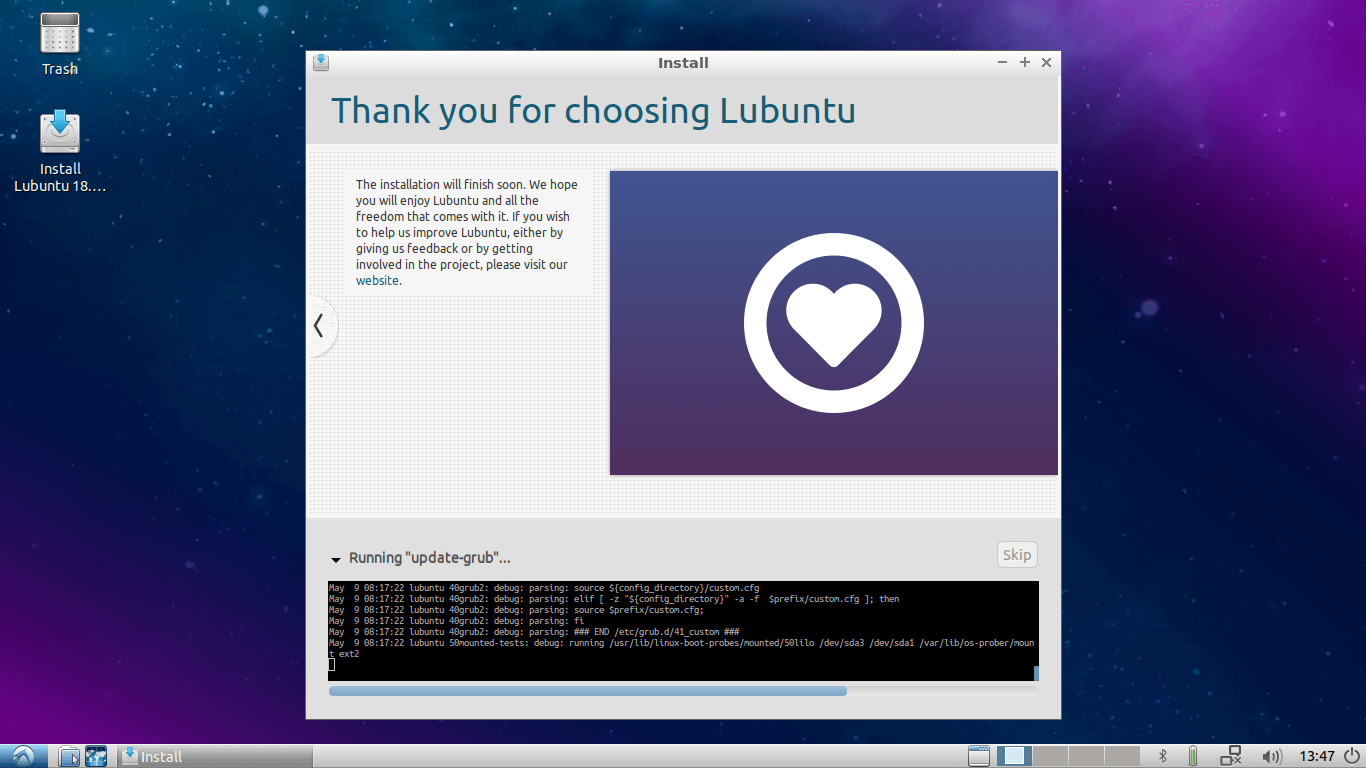
11. Let the installation finish..
Lubuntu Installation
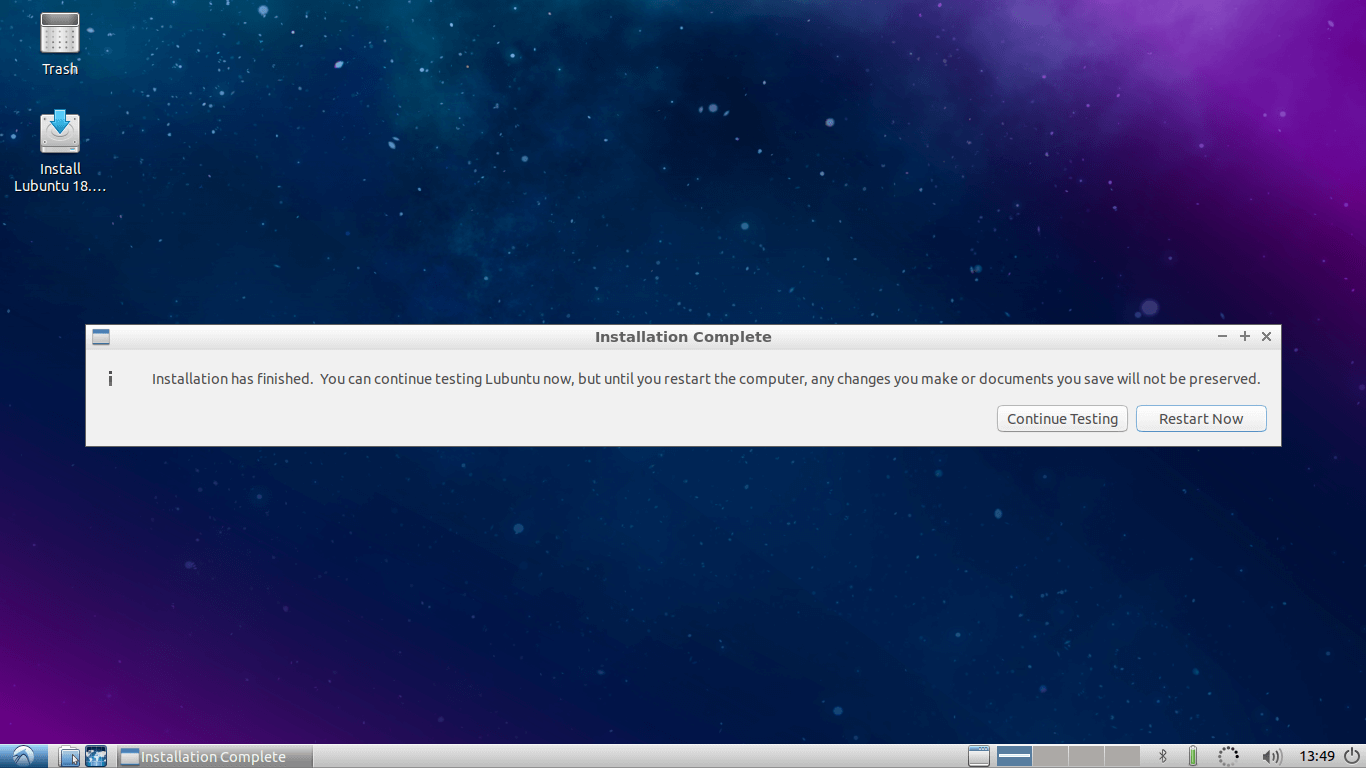
12. After completing installation hit restart and remove your installation media and press Enter.
Lubuntu Installation Completes
13. Congratulations, you have successfully installed your own Linux OS on your pen drive to use it on any PC. Now you can connect USB drive to any PC and start your system on that PC by simply selecting boot from usb option while booting.
Step 4: Customize Lubuntu System
Now it’s time for fun. Just boot your system on any PC and start customizing. You can install any softwares you want. You can change Themes, Icon themes, install docker.
You can add and store your online accounts on it. Install / modify / customize whatever you want. All the changes will be permanent. They will not change or reset after rebooting or booting on other PCs.
Following figure shows my customized Lubuntu 18.04.
Lubuntu Running on USB Drive
The main advantage of this method is you can use your personal stuff, your online accounts securely on any PC. You can even do secure online transactions as well on any available PC.
I hope it will be helpful for you, if you have questions regarding this article, please feel free to ask in the comment section below.
When you compile a custom kernel module such as device driver on a CentOS system, you need to have kernel header files installed on the system, which include the C header files for the Linux kernel. Kernel header files provide different kinds of function and structure definitions required when installing or compiling any code that interfaces with the kernel.
When you install Kernel Headers, make sure it matches with the currently installed kernel version on the system. If your Kernel version comes with the default distribution installation or you have upgraded your Kernel using yum package manager from system base repositories, then you must install matching kernel headers using package manager only. If you’ve compiled Kernel from sources, you can install kernel headers from sources only.
In this article, we will explain how to install Kernel Headers in CentOS/RHEL 7 and Fedora distributions using default package manager.
Install Kernel Headers in CentOS 7
First confirm that the matching kernel headers are already installed under /usr/src/kernels/ location on your system using following commands.
# cd /usr/src/kernels/
# ls -l
Check Kernel Headers in CentOS 7
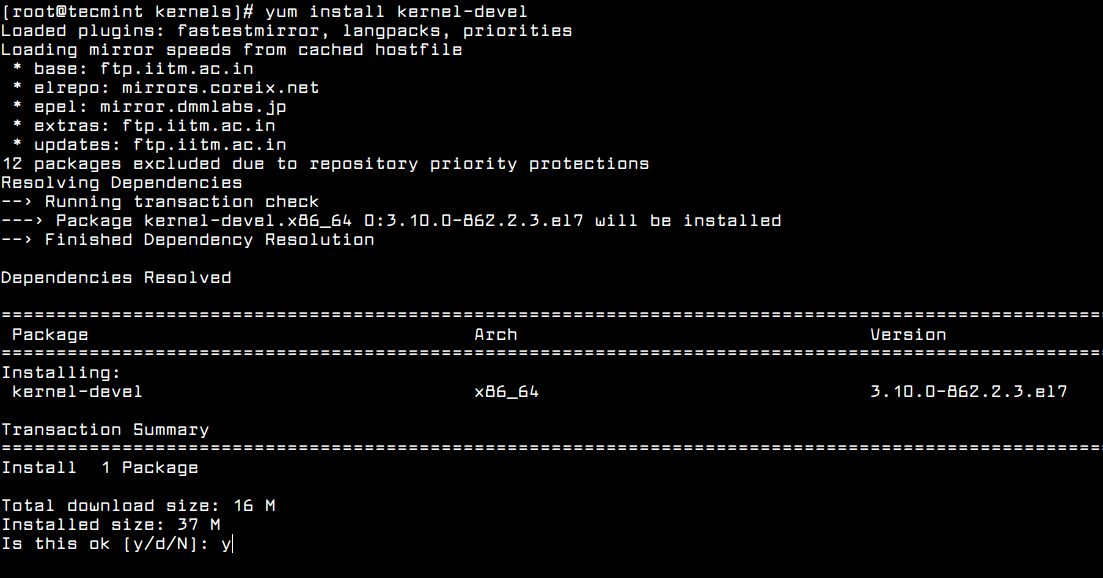
If no matching kernel headers are located in the /usr/src/kernels/ directory, go ahead and install kernel headers, which is provided by the kernel-devel package that can be installed using default package manager as shown.
After installing the kernel-devel package, you can find all the kernel headers files in /usr/src/kernels directory using following command.
# ls -l /usr/src/kernels/$(uname -r)
Note on a VPS (for instance a Linode VPS), a kernel may have a customized version name, in such scenario, you have to identify the kernel version manually and check the installed kernel header files using following commands.
# uname -r
# ls -l /usr/src/kernels/3.10.0-862.2.3.el7.x86_64
Check Kernel Version in CentOS 7
Sample Output
total 4544
drwxr-xr-x.  32 root root    4096 May 16 12:48 arch
drwxr-xr-x.   3 root root    4096 May 16 12:48 block
drwxr-xr-x.   4 root root    4096 May 16 12:48 crypto
drwxr-xr-x. 119 root root    4096 May 16 12:48 drivers
drwxr-xr-x.   2 root root    4096 May 16 12:48 firmware
drwxr-xr-x.  75 root root    4096 May 16 12:48 fs
drwxr-xr-x.  28 root root    4096 May 16 12:48 include
drwxr-xr-x.   2 root root    4096 May 16 12:48 init
drwxr-xr-x.   2 root root    4096 May 16 12:48 ipc
-rw-r--r--.   1 root root     505 May  9 19:21 Kconfig
drwxr-xr-x.  12 root root    4096 May 16 12:48 kernel
drwxr-xr-x.  10 root root    4096 May 16 12:48 lib
-rw-r--r--.   1 root root   51205 May  9 19:21 Makefile
-rw-r--r--.   1 root root    2305 May  9 19:21 Makefile.qlock
drwxr-xr-x.   2 root root    4096 May 16 12:48 mm
-rw-r--r--.   1 root root 1093137 May  9 19:21 Module.symvers
drwxr-xr-x.  60 root root    4096 May 16 12:48 net
drwxr-xr-x.  14 root root    4096 May 16 12:48 samples
drwxr-xr-x.  13 root root    4096 May 16 12:48 scripts
drwxr-xr-x.   9 root root    4096 May 16 12:48 security
drwxr-xr-x.  24 root root    4096 May 16 12:48 sound
-rw-r--r--.   1 root root 3409102 May  9 19:21 System.map
drwxr-xr-x.  17 root root    4096 May 16 12:48 tools
drwxr-xr-x.   2 root root    4096 May 16 12:48 usr
drwxr-xr-x.   4 root root    4096 May 16 12:48 virt
-rw-r--r--.   1 root root      41 May  9 19:21 vmlinux.id
In addition, if you need header files for the Linux kernel for use by glibc, install the kernel-header package using following command.
Now you are good to go with compiling your own or existing kernel modules for software such as VirtualBoxand many more.
That’s it! In this article, we have explained how to install kernel-devel and kernel-header packages in CentOS/RHEL 7 and Fedora systems. Remember that before you can compile kernel modules such as device driver on a Linux system, you should have necessary kernel header files installed. If you have queries, please use the comment form below to reach us.
Kernel Headers contain the Cheader files for the Linux kernel, which offers the various function and structure definitions required when compiling any code that interfaces with the kernel, such as kernel modules or device drivers and some user programs.
It is very important to note that the kernel headers package you install should match with the currently installed kernel version on your system. If your kernel version ships with the default distribution installation or you have upgraded your Kernel using dpkg or apt package manager from the Ubuntu or Debian base repositories, then you must install matching kernel headers using package manager only. And if you’ve compiled kernel from sources, you must also install kernel headers from sources.
In this article, we will explain how to install Kernel Headers in Ubuntu and Debian Linux distributions using default package manager.
Install Kernel Headers in Ubuntu and Debian
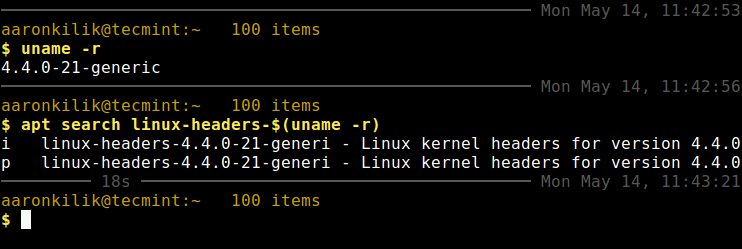
First check your installed kernel version as well as kernel header package that matches your kernel version using following commands.
$ uname -r
$ apt search linux-headers-$(uname -r)
Check Kernel Version and Kernel Headers in Ubuntu
On Debian, Ubuntu and their derivatives, all kernel header files can be found under /usr/src directory. You can check if the matching kernel headers for your kernel version are already installed on your system using the following command.
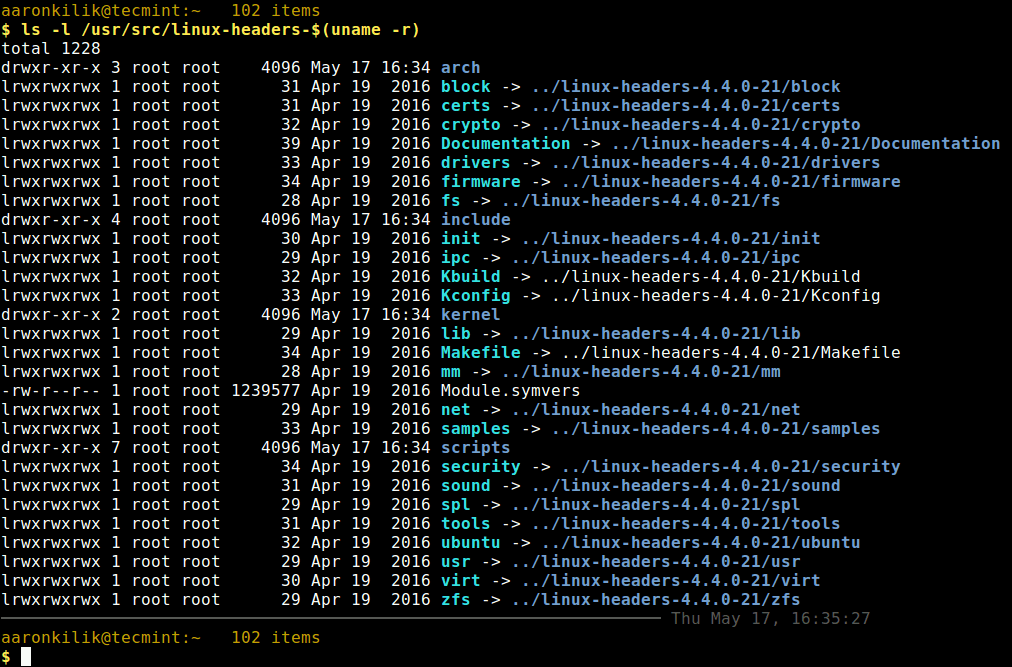
$ ls -l /usr/src/linux-headers-$(uname -r)
Check Kernel Headers in Ubuntu
From the above output, it’s clear that the matching kernel header directory doesn’t exist, meaning the package is not yet installed.
Before you can install the appropriate kernel headers, update your packages index, in order to grab information about the latest package releases, using the following command.
$ sudo apt update
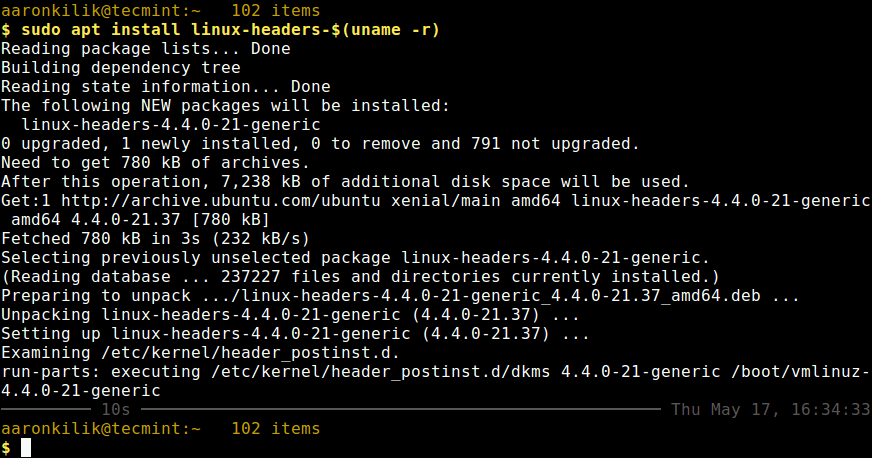
Then run the following command that follows to install the Linux Kernel headers package for your kernel version.
$ sudo apt install linux-headers-$(uname -r)
Install Kernel Headers in Ubuntu
Next, check if the matching kernel headers have been installed on your system using the following command
$ ls -l /usr/src/linux-headers-$(uname -r)
Verify Installed Kernel Headers in Ubuntu
That’s all! In this article, we have explained how to install kernel headers in Ubuntu and Debian Linux and other distributions in the Debian family tree.
Always keep in mind that to compile a kernel module, you will need the Linux kernel headers. If you have any quires, or thoughts to share, use the comment form below to reach us.
If you are a system administrator in charge of maintaining critical systems in enterprise environments, we are sure you know two important things:
1) Finding a downtime window to install security patches in order to handle kernel or operating system vulnerabilities can be difficult. If the company or business you work for does not have security policies in place, operations management may end up favoring uptime over the need to solve vulnerabilities. Additionally, internal bureaucracy can cause delays in granting approvals for a downtime. Been there myself.
2) Sometimes you can’t really afford a downtime, and should be prepared to mitigate any potential exposures to malicious attacks some other way.
The good news is that Canonical has recently released (actually, a couple of days ago) its Livepatch service to apply critical kernel patches to Ubuntu 16.04 (64-bit edition / 4.4.x kernel) without the need for a later reboot. Yes, you read that right: with Livepatch, you don’t need to restart your Ubuntu 16.04 server in order for the security patches to take effect.
Signing up for Ubuntu Livepatch
In order to use Canonical Livepatch Service, you need to sign up at https://auth.livepatch.canonical.com/ and indicate if you are a regular Ubuntu user or an Advantage subscriber (paid option). All Ubuntu users can link up to 3 different machines to Livepatch through the use of a token:
Canonical Livepatch Service
In the next step you will be prompted to enter your Ubuntu One credentials or sign up for a new account. If you choose the latter, you will need to confirm your email address in order to finish your registration:
Ubuntu One Confirmation Mail
Once you click on the link above to confirm your email address, you’ll be ready to go back to https://auth.livepatch.canonical.com/ and get your Livepatch token.
Getting and Using your Livepatch Token
To begin, copy the unique token assigned to your Ubuntu One account:
Canonical Livepatch Token
Then go to a terminal and type:
$ sudo snap install canonical-livepatch
The above command will install the livepatch, whereas
will enable it for your system. If this last command indicates it can’t find canonical-livepatch, make sure /snap/bin has been added to your path. A workaround consists of changing your working directory to /snap/bin and do.
Overtime, you’ll want to check the description and the status of patches applied to your kernel. Fortunately, this is as easy as doing.
$ sudo ./canonical-livepatch status --verbose
as you can see in the following image:
Check Livepatch Status in Ubuntu
Having enabled Livepatch on your Ubuntu server, you will be able to reduce planned and unplanned downtimes at a minimum while keeping your system secure. Hopefully Canonical’s initiative will award you a pat on the back by management – or better yet, a raise.
Feel free to let us know if you have any questions about this article. Just drop us a note using the comment form below and we will get back to you as soon as possible.