Devstack is a collection of scripts which deploy the latest version of openstack environment on virtual machine, personal laptop or a desktop. As the name suggests it is used for development environment and can be used for Openstack Project’s functional testing and sometime openstack environment deployed by devstack can also be used for demonstrations purpose and for some basic PoC.
In this article I will demonstrate how to install Openstack on CentOS 7 / RHEL 7 System using Devstack. Following are the minimum system requirements,
- Dual Core Processor
- Minimum 8 GB RAM
- 60 GB Hard Disk
- Internet Connection
Following are the details of my Lab Setup for Openstack deployment using devstack
- Minimal Installed CentOS 7 / RHEL 7 (VM)
- Hostname – devstack-linuxtechi
- IP Address – 169.144.104.230
- 10 vCPU
- 14 GB RAM
- 60 GB Hard disk
Let’s start deployment steps, login to your CentOS 7 or RHEL 7 System
Step:1 Update Your System and Set Hostname
Run the following yum command to apply latest updates to system and then take a reboot. Also after reboot set the hostname
~]# yum update -y && reboot
~]# hostnamectl set-hostname "devstack-linuxtechi"
~]# exec bash
Step:2) Create a Stack user and assign sudo rights to it
All the installations steps are to be carried out by a user name “stack“, refer the below commands to create and assign sudo rights .
[root@devstack-linuxtechi ~]# useradd -s /bin/bash -d /opt/stack -m stack
[root@devstack-linuxtechi ~]# echo "stack ALL=(ALL) NOPASSWD: ALL" | sudo tee /etc/sudoers.d/stack
stack ALL=(ALL) NOPASSWD: ALL
[root@devstack-linuxtechi ~]#
Step:3) Install git and download devstack
Switch to stack user and install git package using yum command
[root@devstack-linuxtechi ~]# su - stack
[stack@devstack-linuxtechi ~]$ sudo yum install git -y
Download devstack using below git command,
[stack@devstack-linuxtechi ~]$ git clone https://git.openstack.org/openstack-dev/devstack
Cloning into 'devstack'...
remote: Counting objects: 42729, done.
remote: Compressing objects: 100% (21438/21438), done.
remote: Total 42729 (delta 30283), reused 32549 (delta 20625)
Receiving objects: 100% (42729/42729), 8.93 MiB | 3.77 MiB/s, done.
Resolving deltas: 100% (30283/30283), done.
[stack@devstack-linuxtechi ~]$
Step:4) Create local.conf file and start openstack installation
To start openstack installation using devstack script (stack.sh), first we need to prepare local.conf file that suits to our setup.
Change to devstack folder and create local.conf file with below contents
[stack@devstack-linuxtechi ~]$ cd devstack/
[stack@devstack-linuxtechi devstack]$ vi local.conf
[[local|localrc]]
#Specify the IP Address of your VM / Server in front of HOST_IP Parameter
HOST_IP=169.144.104.230

#Specify the name of interface of your Server or VM in front of FLAT_INTERFACE
FLAT_INTERFACE=eth0

#Specify the Tenants Private Network and its Size
FIXED_RANGE=10.4.128.0/20
FIXED_NETWORK_SIZE=4096

#Specify the range of external IPs that will be used in Openstack for floating IPs
FLOATING_RANGE=172.24.10.0/24

#Number Host on which Openstack will be deployed
MULTI_HOST=1

#Installation Logs file
LOGFILE=/opt/stack/logs/stack.sh.log

#KeyStone Admin Password / Database / RabbitMQ / Service Password
ADMIN_PASSWORD=openstack
DATABASE_PASSWORD=db-secret
RABBIT_PASSWORD=rb-secret
SERVICE_PASSWORD=sr-secret

#Additionally installing Heat Service
enable_plugin heat https://git.openstack.org/openstack/heat master
enable_service h-eng h-api h-api-cfn h-api-cw
Save and exit the file.
Now start the deployment or installation by executing the script (stack.sh)
[stack@devstack-linuxtechi devstack]$ ./stack.sh
It will take between 30 to 45 minutes depending upon your internet connection.
While running the above command, if you got the below errors
+functions-common:git_timed:607            timeout -s SIGINT 0 git clone git://git.openstack.org/openstack/requirements.git /opt/stack/requirements --branch master
fatal: unable to connect to git.openstack.org:
git.openstack.org[0: 104.130.246.85]: errno=Connection timed out
git.openstack.org[1: 2001:4800:7819:103:be76:4eff:fe04:77e6]: errno=Network is unreachable
Cloning into '/opt/stack/requirements'...
+functions-common:git_timed:610            [[ 128 -ne 124 ]]
+functions-common:git_timed:611            die 611 'git call failed: [git clone' git://git.openstack.org/openstack/requirements.git /opt/stack/requirements --branch 'master]'
+functions-common:die:195                  local exitcode=0
[Call Trace]
./stack.sh:758:git_clone
/opt/stack/devstack/functions-common:547:git_timed
/opt/stack/devstack/functions-common:611:die
[ERROR] /opt/stack/devstack/functions-common:611 git call failed: [git clone git://git.openstack.org/openstack/requirements.git /opt/stack/requirements --branch master]
Error on exit
/bin/sh: brctl: command not found
[stack@devstack-linuxtechi devstack]$
To Resolve these errors, perform the following steps
Install bridge-utils package and change parameter from “GIT_BASE=${GIT_BASE:-git://git.openstack.org}” to “GIT_BASE=${GIT_BASE:-https://www.github.com}” in stackrc file
[stack@devstack-linuxtechi devstack]$ sudo yum install bridge-utils -y
[stack@devstack-linuxtechi devstack]$ vi stackrc
……
#GIT_BASE=${GIT_BASE:-git://git.openstack.org}
GIT_BASE=${GIT_BASE:-https://www.github.com}
……
Now re-run the stack.sh script,
[stack@devstack-linuxtechi devstack]$ ./stack.sh
Once the script is executed successfully, we will get the output something like below,
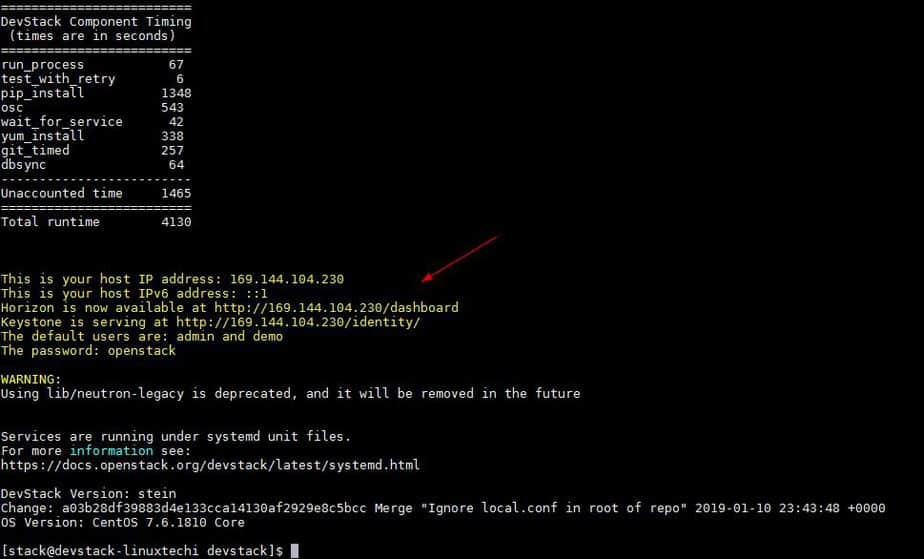
This confirms that openstack has been deployed successfully,
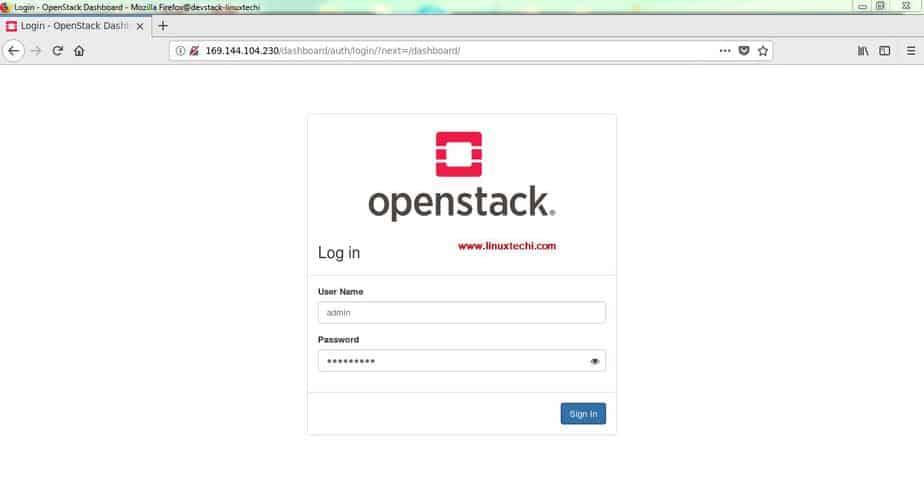
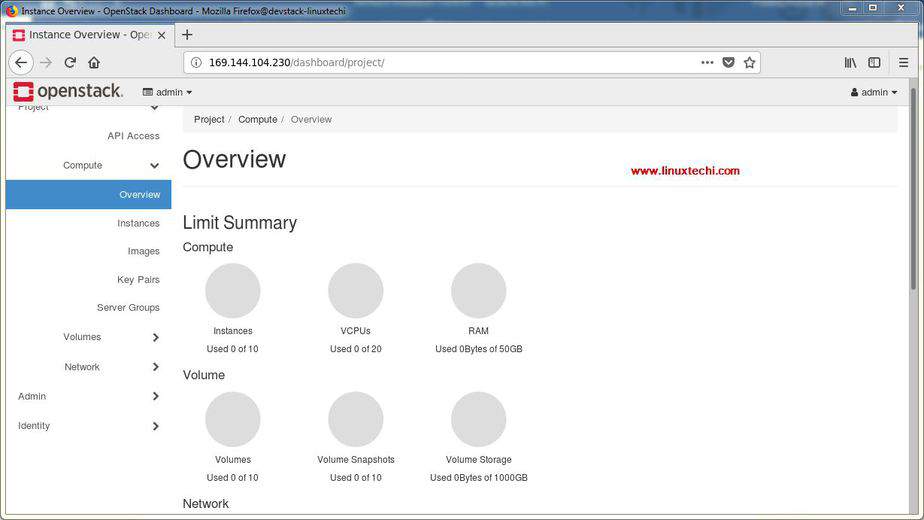
Step:5 Access OpenStack either via Openstack CLI or Horizon Dashboard
if you want to perform any task from openstack cli, then you have to firsr source openrc file, which contain admin credentials.
[stack@devstack-linuxtechi devstack]$ source openrc
WARNING: setting legacy OS_TENANT_NAME to support cli tools.
[stack@devstack-linuxtechi devstack]$ openstack network list
+--------------------------------------+---------+----------------------------------------------------------------------------+
| ID                                   | Name    | Subnets                                                                    |
+--------------------------------------+---------+----------------------------------------------------------------------------+
| 5ae5a9e3-01ac-4cd2-86e3-83d079753457 | private | 9caa54cc-f5a4-4763-a79e-6927999db1a1, a5028df6-4208-45f3-8044-a7476c6cf3e7 |
| f9354f80-4d38-42fc-a51e-d3e6386b0c4c | public  | 0202c2f3-f6fd-4eae-8aa6-9bd784f7b27d, 18050a8c-41e5-4bae-8ab8-b500bc694f0c |
+--------------------------------------+---------+----------------------------------------------------------------------------+
[stack@devstack-linuxtechi devstack]$ openstack image list
+--------------------------------------+--------------------------+--------+
| ID                                   | Name                     | Status |
+--------------------------------------+--------------------------+--------+
| 5197ed8e-39d2-4eca-b36a-d38381b57adc | cirros-0.3.6-x86_64-disk | active |
+--------------------------------------+--------------------------+--------+
[stack@devstack-linuxtechi devstack]$
Now Try accessing the Horizon Dashboard, URL details and Credentials are already there in stack command output.
http://{Your-Server-IP-Address}/dashboard
Remove/ Uninstall OpenStack using devstack scripts
If are done with testing and demonstration and want to remove openstack from your system then run the followings scripts via Stack user,
[stack@devstack-linuxtechi ~]$ cd devstack
[stack@devstack-linuxtechi devstack]$ ./clean.sh
[stack@devstack-linuxtechi devstack]$ ./unstack.sh
[stack@devstack-linuxtechi devstack]$ rm -rf /opt/stack/
[stack@devstack-linuxtechi ~]$ sudo rm -rf devstack
[stack@devstack-linuxtechi ~]$ sudo rm -rf /usr/local/bin/
That’s all from this tutorial, if you like the steps, please do share your valuable feedback and comments.