
5 Screen Recorders for the Linux Desktop | Linux.com
There are so many reasons why you might need to record your Linux desktop. The two most important are for training and for support. If you are training users, a video recording of the desktop can go a long way to help them understand what you are trying to impart. Conversely, if you’re having trouble with one aspect of your Linux desktop, recording a video of the shenanigans could mean the difference between solving the problem and not. But what tools are available for the task? Fortunately, for every Linux user (regardless of desktop), there are options available. I want to highlight five of my favorite screen recorders for the Linux desktop. Among these five, you are certain to find one that perfectly meets your needs. I will only be focusing on those screen recorders that save as video. What video format you prefer may or may not dictate which tool you select.
And, without further ado, let’s get on with the list.
Simple Screen Recorder
I’m starting out with my go-to screen recorder. I use Simple Screen Recorder on a daily basis, and it never lets me down. This particular take on the screen recorder is available for nearly every flavor of Linux and is, as the name implies, very simple to use. With Simple Screen Recorder you can select a single window, a portion of the screen, or the entire screen to record. One of the best features of Simple Screen Recorder is the ability to save profiles (Figure 1), which allows you to configure the input for a recording (including scaling, frame rate, width, height, left edge and top edge spacing, and more). By saving profiles, you can easily use a specific profile to meet a unique need, without having to go through the customization every time. This is handy for those who do a lot of screen recording, with different input variables for specific jobs.
Simple screen recorder also:
- Records audio input
- Allows you to pause and resume recording
- Offers a preview during recording
- Allows for the selection of video containers and codecs
- Adds timestamp to file name (optional)
- Includes hotkey recording and sound notifications
- Works well on slower machines
- And much more
Simple Screen Recorder is one of the most reliable screen recording tools I have found for the Linux desktop. Simple Screen Recorder can be installed from the standard repositories on many desktops, or via easy to follow instructions on the application download page.
Gtk-recordmydesktop
The next entry, gtk-recordmydesktop, doesn’t give you nearly the options found in Simple Screen Recorder, but it does offer a command line component (for those who prefer not working with a GUI). The simplicity that comes along with this tool also means you are limited to a specific video output format (.ogv). That doesn’t mean gtk-recordmydesktop isn’t without appeal. In fact, there are a few features that make this option in the genre fairly appealing. First and foremost, it’s very simple to use. Second, the record window automatically gets out of your way while you record (as opposed to Simple Screen Recorder, where you need to minimize the recording window when recording full screen). Another feature found in gtk-recordmydesktop is the ability to have the recording follow the mouse (Figure 2).
Unfortunately, the follow the mouse feature doesn’t always work as expected, so chances are you’ll be using the tool without this interesting option. In fact, if you opt to go the gtk-recordmydesktop route, you should understand the GUI frontend isn’t nearly as reliable as is the command line version of the tool. From the command line, you could record a specific position of the screen like so:
recordmydesktop -x X_POS -y Y_POS –width WIDTH –height HEIGHT -o FILENAME.ogv
where:
- X_POS is the offset on the X axis
- Y_POS is the offset on the Y axis
- WIDTH is the width of the screen to be recorded
- HEIGHT is the height of the screen to be recorded
- FILENAME is the name of the file to be saved
To find out more about the command line options, issue the command man recordmydesktop and read through the manual page.
Kazam
If you’re looking for a bit more than just a recorded screencast, you might want to give Kazam a go. Not only can you record a standard screen video (with the usual—albeit limited amount of—bells and whistles), you can also take screenshots and even broadcast video to YouTube Live (Figure 3).
Kazam falls in line with gtk-recordmydesktop, when it comes to features. In other words, it’s slightly limited in what it can do. However, that doesn’t mean you shouldn’t give Kazam a go. In fact, Kazam might be one of the best screen recorders out there for new Linux users, as this app is pretty much point and click all the way. But if you’re looking for serious bells and whistles, look away.
The version of Kazam, with broadcast goodness, can be found in the following repository:
ppa:sylvain-pineau/kazam
For Ubuntu (and Ubuntu-based distributions), install with the following commands:
sudo apt-add-repository ppa:sylvain-pineau/kazam
sudo apt-get update
sudo apt-get install kazam -y
Vokoscreen
The Vokoscreen recording app is for new-ish users who need more options. Not only can you configure the output format and the video/audio codecs, you can also configure it to work with a webcam (Figure 4).
As with most every screen recording tool, Vokoscreen allows you to specify what on your screen to record. You can record the full screen (even selecting which display on multi-display setups), window, or area. Vokoscreen also allows you to select a magnification level (200×200, 400×200, or 600×200). The magnification level makes for a great tool to highlight a specific section of the screen (the magnification window follows your mouse).
Like all the other tools, Vokoscreen can be installed from the standard repositories or cloned from its GitHub repository.
OBS Studio
For many, OBS Studio will be considered the mack daddy of all screen recording tools. Why? Because OBS Studio is as much a broadcasting tool as it is a desktop recording tool. With OBS Studio, you can broadcast to YouTube, Smashcast, Mixer.com, DailyMotion, Facebook Live, Restream.io, LiveEdu.tv, Twitter, and more. In fact, OBS Studio should seriously be considered the de facto standard for live broadcasting the Linux desktop.
Upon installation (the software is only officially supported for Ubuntu Linux 14.04 and newer), you will be asked to walk through an auto-configuration wizard, where you setup your streaming service (Figure 5). This is, of course, optional; however, if you’re using OBS Studio, chances are this is exactly why, so you won’t want to skip out on configuring your default stream.
I will warn you: OBS Studio isn’t exactly for the faint of heart. Plan on spending a good amount of time getting the streaming service up and running and getting up to speed with the tool. But for anyone needing such a solution for the Linux desktop, OBS Studio is what you want. Oh … it can also record your desktop screencast and save it locally.
There’s More Where That Came From
This is a short list of screen recording solutions for Linux. Although there are plenty more where this came from, you should be able to fill all your desktop recording needs with one of these five apps.
How much data in the world by 2025?
I was doing Enterprise Storage training and one of the presentations quoted an IDC report as having recently revised the estimated total amount of data produced on the planet as reaching 163 Zetabytes by 2025. That is 163 followed by 21 zeros.That is just a number, a very big number to be sure. But what does it really mean? How can we gain some perspective from it?
Then I was watching the rest of the video presentation which was about 4 minutes long. So I googled a few things and discovered the average video clip on YouTube is about 4.2 minutes. Now it also seems that an amazing number of people watch YouTube on their mobile devices, often in low resolution. So if we average the available resolutions to 480p (YouTube default) we discover the average YouTube clip consumes about 21MB of storage. Great! But so what?

Well, if my math is correct, and it could possibly be flawed, we can extrapolate the following:
163 Zetabytes could hold 7.7 quadrillion clips (more than 7 with 15 zeroes)
With an average length of 4.2 minutes that equals over 543 trillion hours of video.That is around 62 billion years of YouTube watching.
In 2018 the world population is estimated at over 7.6 billion. So every man, woman, and child on the planet could sit in front of the screen, or mobile, and watch over 71,000 hours of YouTube fun and frolics that no one else has.
So when your partner says there is nothing to watch on the box you could perhaps point out that he/she is wrong and there must be something to interest.
Another mind boggling fact I have discovered during my journey along this path is when we talk of billions and trillions and quintillions there are some inconsistencies in what the number actually are. The US tend to place a billion at 1000 million or 1 followed by 9 zeroes. The British have a billion as a million million or 1 followed by 12 zeroes and so on. In my calculations I have used US terminology as all these zeroes were doing my head in. Commonly referred to as ‘short scale’ and ‘long scale’ it leads me to wonder how, without a crystal ball, how you would know what scale is being used for any quoted number.All this leads to the fact that data collected and stored is accelerating at a mind blowing rate and will continue to do so. It may well be time for your organisation to think about how much data you need to store and for how long. It may be a surprise the amount of data, especially the 80% that is typically unstructured, that needs to be stored. A flexible, infinitely expandable storage solution may be just be applicable to your business.
Bash Variables: Environmental and Otherwise | Linux.com
Bash variables, including those pesky environment variables, have been popped up several times in previous articles, and it’s high time you get to know them better and how they can help you.
So, open your terminal window and let’s get started.
Environment Variables
Consider HOME. Apart from the cozy place where you lay down your hat, in Linux it is a variable that contains the path to the current user’s home directory. Try this:
echo $HOME
This will show the path to your home directory, usually /home/.
As the name indicates, variables can change according to the context. Indeed, each user on a Linux system will have a HOME variable containing a different value. You can also change the value of a variable by hand:
HOME=/home/<your username>/Documents
will make HOME point to your Documents/ folder.
There are three things to notice here:
- There are no spaces between the name of the variable and the = or between the = and the value you are putting into the variable. Spaces have their own meaning in the shell and cannot be used any old way you want.
- If you want to put a value into a variable or manipulate it in any way, you just have to write the name of the variable. If you want to see or use the contents of a variable, you put a $ in front of it.
- Changing HOME is risky! A lot programs rely on HOME to do stuff and changing it can have unforeseeable consequences. For example, just for laughs, change HOME as shown above and try typing cd and then [Enter]. As we have seen elsewhere in this series, you use cd to change to another directory. Without any parameters, cd takes you to your home directory. If you change the HOME variable, cd will take you to the new directory HOME points to.
Changes to environment variables like the one described in point 3 above are not permanent. If you close your terminal and open it back up, or even open a new tab in your terminal window and move there, echo $HOME will show its original value.
Before we go on to how you make changes permanent, let’s look at another environment variable that it does make sense changing.
PATH
The PATH variable lists directories that contain executable programs. If you ever wondered where your applications go when they are installed and how come the shell seems to magically know which programs it can run without you having to tell it where to look for them, PATH is the reason.
Have a look inside PATH and you will see something like this:
$ echo $PATH
/usr/local/sbin:/usr/local/bin:/usr/bin:/usr/sbin:/bin:/sbin
Each directory is separated by a colon (:) and if you want to run an application installed in any directory other than the ones listed in PATH, you will have to tell the shell where to find it:
/home/<user name>/bin/my_program.sh
This will run a program calle my_program.sh you have copied into a bin/ directory in your home directory.
This is a common problem: you don’t want to clutter up your system’s bin/ directories, or you don’t want other users running your own personal scripts, but you don’t want to have to type out the complete path every time you need to run a script you use often. The solution is to create your own bin/ directory in your home directory:
mkdir $HOME/bin
And then tell PATH all about it:
PATH=$PATH:$HOME/bin
After that, your /home//bin will show up in your PATH variable. But… Wait! We said that the changes you make in a given shell will not last and will lose effect when that shell is closed.
To make changes permanent for your user, instead of running them directly in the shell, put them into a file that gets run every time a shell is started. That file already exists and lives in your home directory. It is called .bashrc and the dot in front of the name makes it a hidden file — a regular ls won’t show it, but ls -a will.
You can open it with a text editor like kate, gedit, nano, or vim (NOT LibreOffice Writer — that’s a word processor. Different beast entirely). You will see that .bashrc is full of shell commands the purpose of which are to set up the environment for your user.
Scroll to the bottom and add the following on a new, empty line:
export PATH=$PATH:$HOME/bin
Save and close the file. You’ll be seeing what export does presently. In the meantime, to make sure the changes take effect immediately, you need to source .bashrc:
source .bashrc
What source does is execute .bashrc for the current open shell, and all the ones that come after it. The alternative would be to log out and log back in again for the changes to take effect, and who has the time for that?
From now on, your shell will find every program you dump in /home//bin without you having to specify the whole path to the file.
DYI Variables
You can, of course, make your own variables. All the ones we have seen have been written with ALL CAPS, but you can call a variable more or less whatever you want.
Creating a new variables is straightforward: just set a value within it:
new_variable=”Hello”
And you already know how to recover a value contained within a variable:
echo $new_variable
You often have a program that will require you set up a variable for things to work properly. The variable may set an option to “on”, or help the program find a library it needs, and so on. When you run a program in Bash, the shell spawns a daughter process. This means it is not exactly the same shell that executes your program, but a related mini-shell that inherits some of the mother’s characteristics. Unfortunately, variables, by default, are not one of them. This is because, by default again, variables are local. This means that, for security reasons, a variable set in one shell cannot be read in another, even if it is a daughter shell.
To see what I mean, set a variable:
robots=”R2D2 & C3PO”
… and run:
bash
You just ran a Bash shell program within a Bash shell program.
Now see if you can read the contents of you variable with:
echo $robots
You should draw a blank.
Still inside your bash-within-bash shell, set robots to something different:
robots=”These aren’t the ones you are looking for”
Check robots’ value:
$ echo $robots
These aren’t the ones you are looking for
Exit the bash-within-bash shell:
exit
And re-check the value of robots:
$ echo $robots
R2D2 & C3P0
This is very useful to avoid all sorts of messed up configurations, but this presents a problem also: if a program requires you set up a variable, but the program can’t access it because Bash will execute it in a daughter process, what can you do? That is exactly what export is for.
Try doing the prior experiment, but, instead of just starting off by setting robots=”R2D2 & C3PO”, export it at the same time:
export robots=”R2D2 & C3PO”
You’ll notice that, when you enter the bash-within-bash shell, robots still retains the same value it had at the outset.
Interesting fact: While the daughter process will “inherit” the value of an exported variable, if the variable is changed within the daughter process, changes will not flow upwards to the mother process. In other words, changing the value of an exported variable in a daughter process does not change the value of the original variable in the mother process.
You can see all exported variables by running
export -p
The variables you create should be at the end of the list. You will also notice some other interesting variables in the list: USER, for example, contains the current user’s user name; PWD points to the current directory; and OLDPWD contains the path to the last directory you visited and since left. That’s because, if you run:
cd –
You will go back to the last directory you visited and cd gets the information from OLDPWD.
You can also see all the environment variables using the env command.
To un-export a variable, use the -n option:
export -n robots
Next Time
You have now reached a level in which you are dangerous to yourself and others. It is time you learned how to protect yourself from yourself by making your environment safer and friendlier through the use of aliases, and that is exactly what we’ll be tackling in the next episode. See you then.
How to Install Jetbrains DataGrip on Ubuntu – Linux Hint
DataGrip is a SQL database IDE from JetBrains. It has auto completion support for SQL language. It even analyzes your existing databases and helps you write queries faster. DataGrip can be used to manage your SQL databases graphically as well. You can also export your database to various formats like JSON, CSV, XML etc. It is very user friendly and easy to use.
In this article, I will show you how to install DataGrip on Ubuntu. The procedure shown here will work on Ubuntu 16.04 LTS and later. I will use Ubuntu 18.04 LTS in this article for demonstration. So, let’s get started.
On Ubuntu 16.04 LTS and later, the latest version of DataGrip is available as a snap package in the official snap repository. So, you can easily install DataGrip on Ubuntu 16.04 LTS and later.
To install DataGrip snap package on Ubuntu 16.04 LTS and later, run the following command:
$ sudo snap install datagrip –classic

As you can see, DataGrip is being installed.

DataGrip is installed.

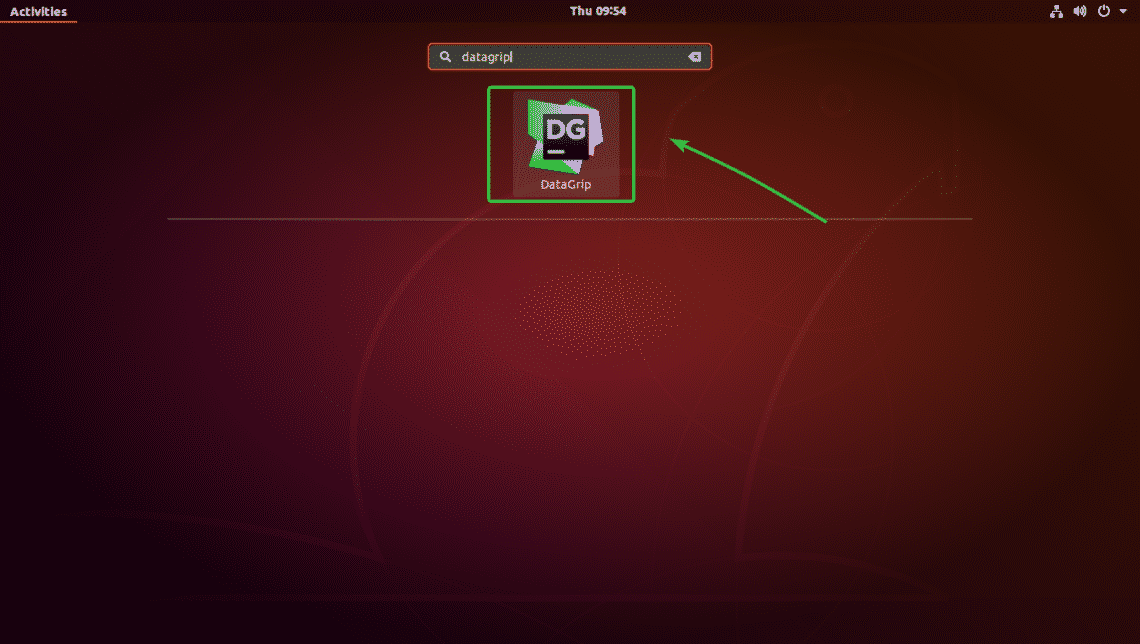
Now, you can start DataGrip from the Application Menu of Ubuntu. Search for datagrip in the Application Menu and you should see the DataGrip icon. Just click on it.
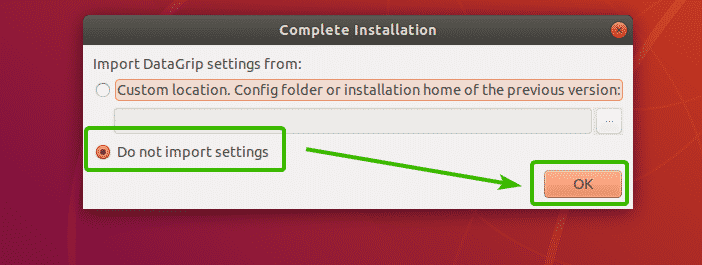
As you’re running DataGrip for the first time, you will have to do some initial configuration. From this window, select Do not import settings and then click on OK.
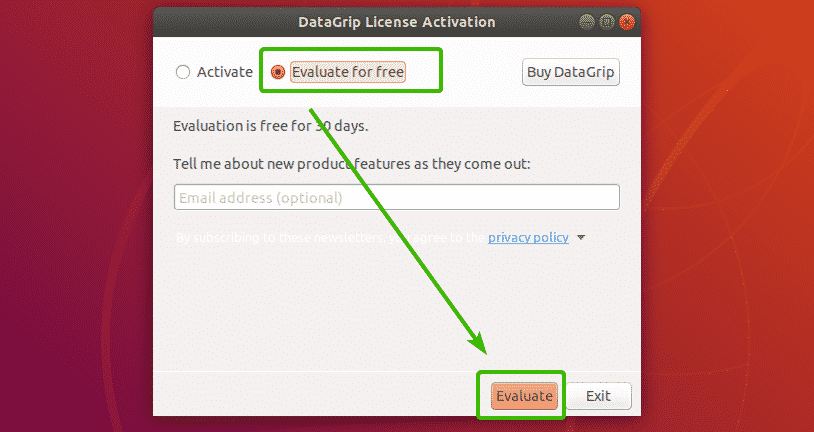
Now, you will see the activation window. DataGrip is not free. To use DataGrip, you will have to buy it from JetBrains. Once you buy it, you will be able to use this window to activate DataGrip.

If you want to try out DataGrip before you buy it, select Evaluate for free and click on Evaluate.
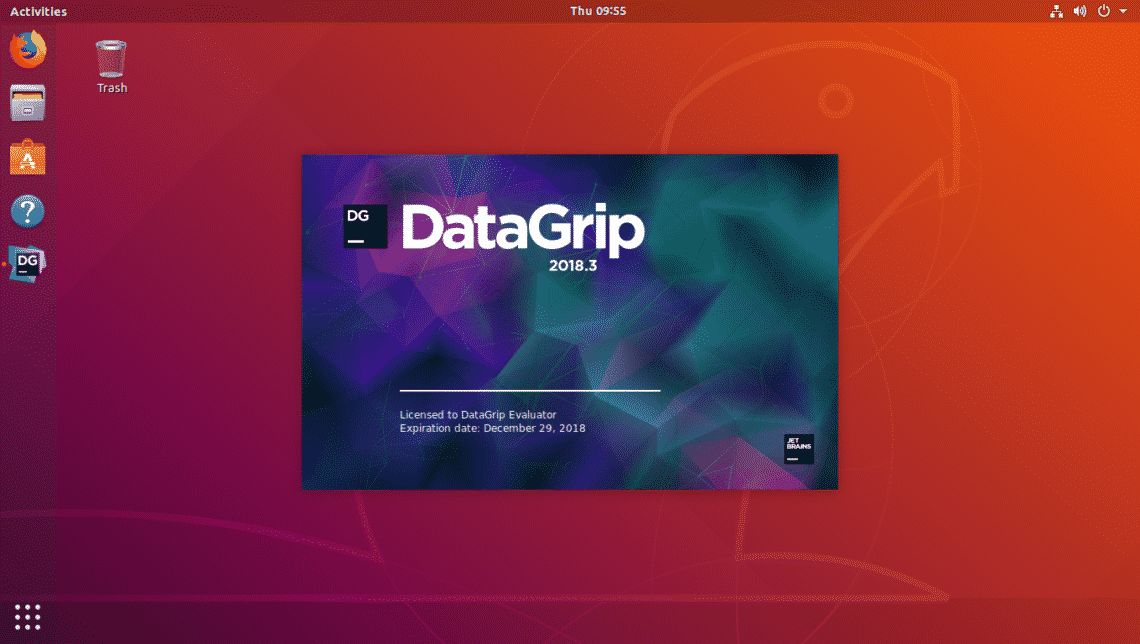
DataGrip is being started.
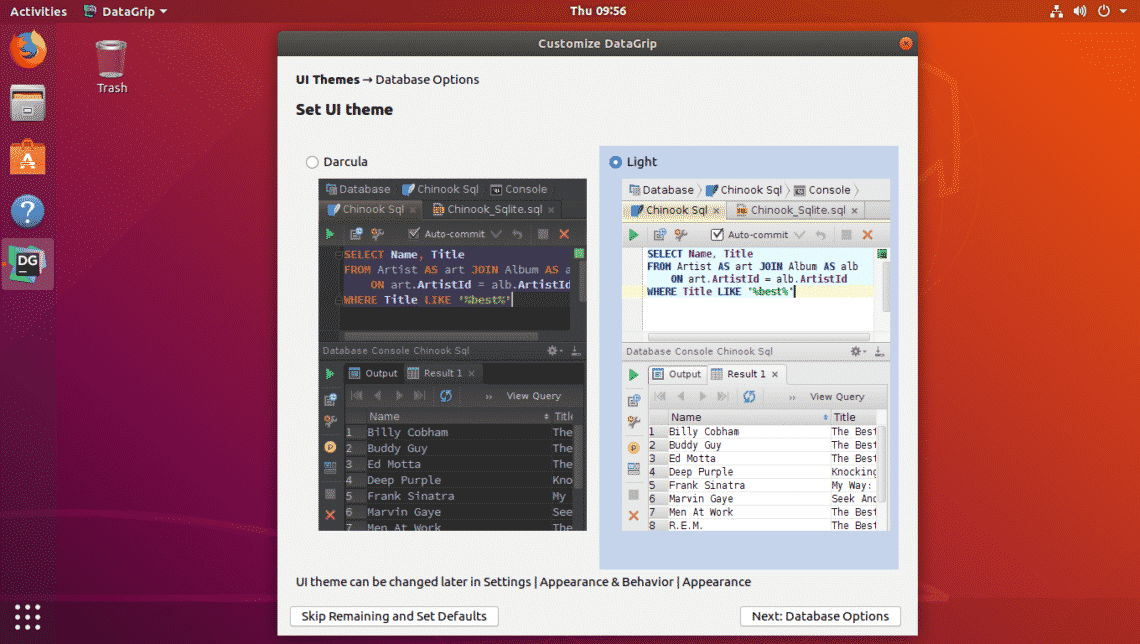
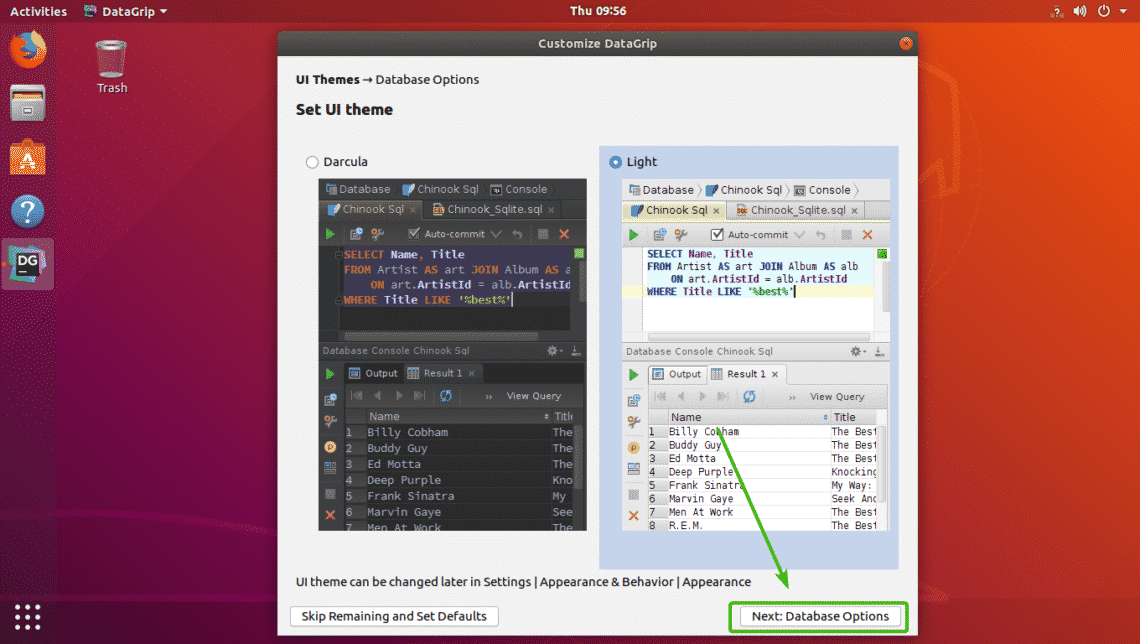
Now, you will have to customize DataGrip. From here, select an UI theme. You can either use Darcula dark theme from JetBrains or the Light theme depending on your preferences. Just, select the one you like.
If you don’t want to customize DataGrip now, instead leave the defaults, then click on Skip Remaining and Set Defaults.

Otherwise, click on Next: Database Options.
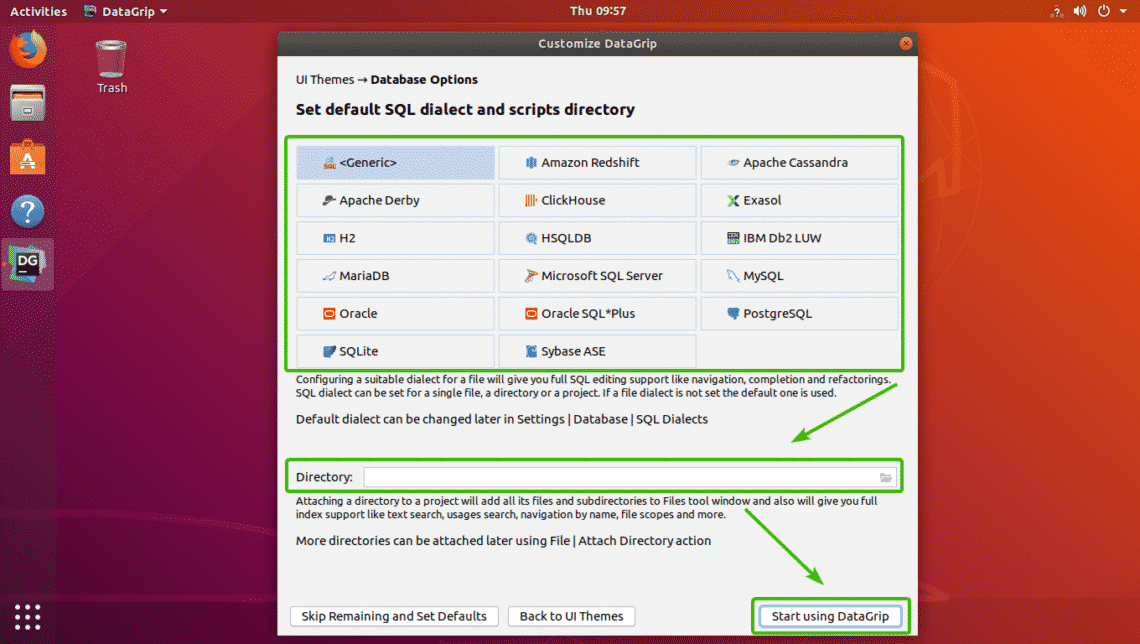
Now, select the default SQL dialect. For example, if you mostly use MySQL, then, you should select MySQL. You may also set the default script directory for your chosen database dialect. It’s optional.
Once you’re done, click on Start using DataGrip.
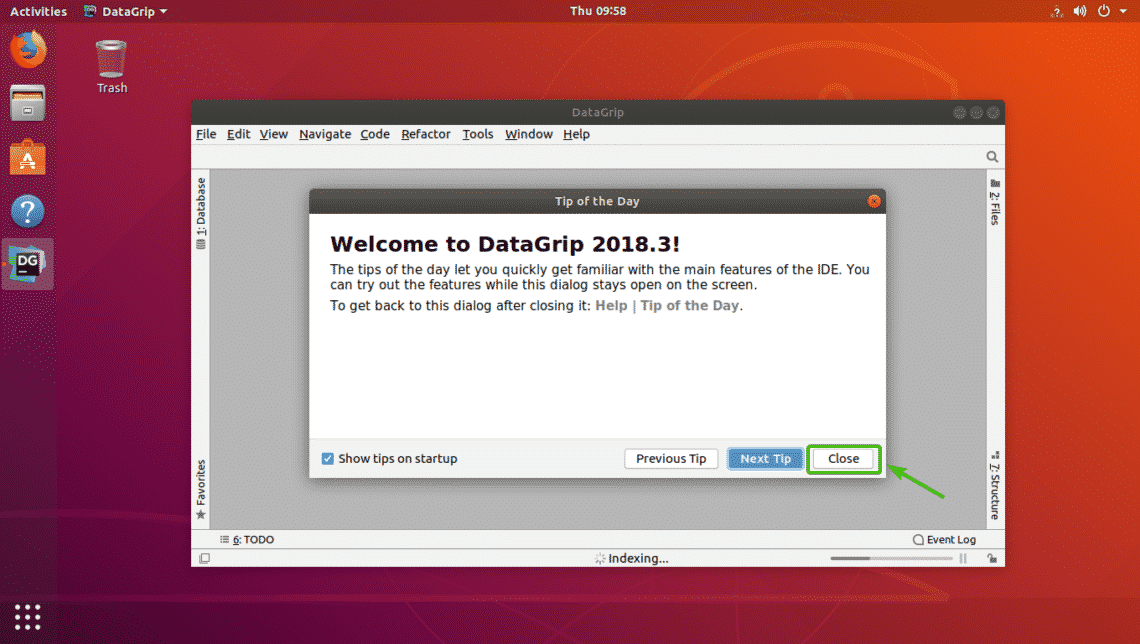
DataGrip should start. You may click on Close to close to Tip of the Day.
This is the main window of DataGrip.
Connecting to a Database:
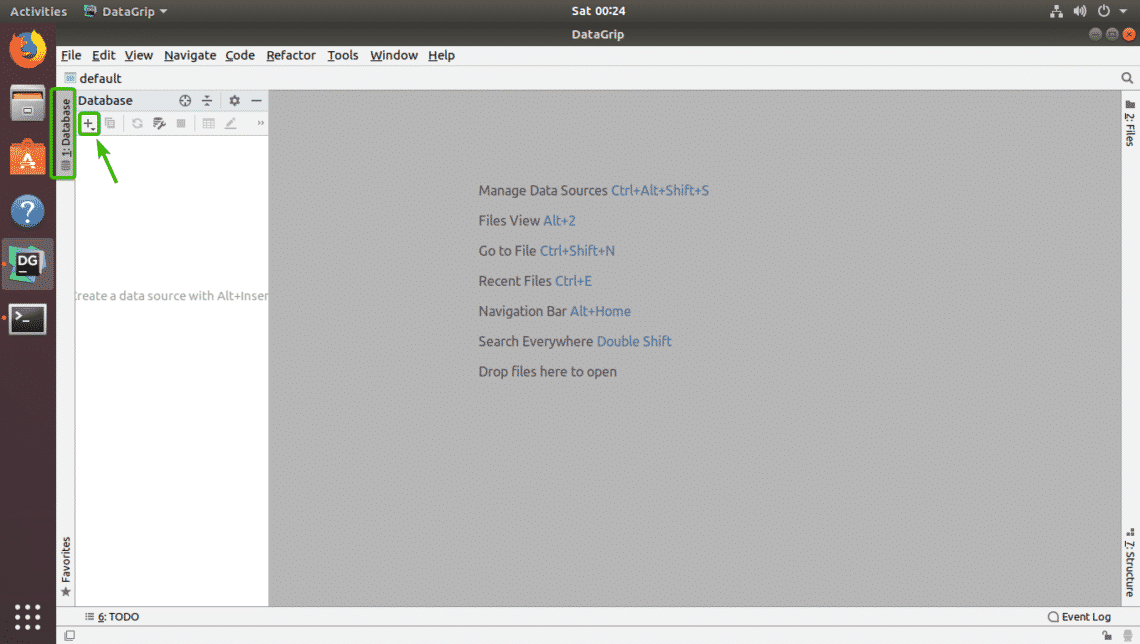
In this section, I will show you how to connect to a SQL database with DataGrip.
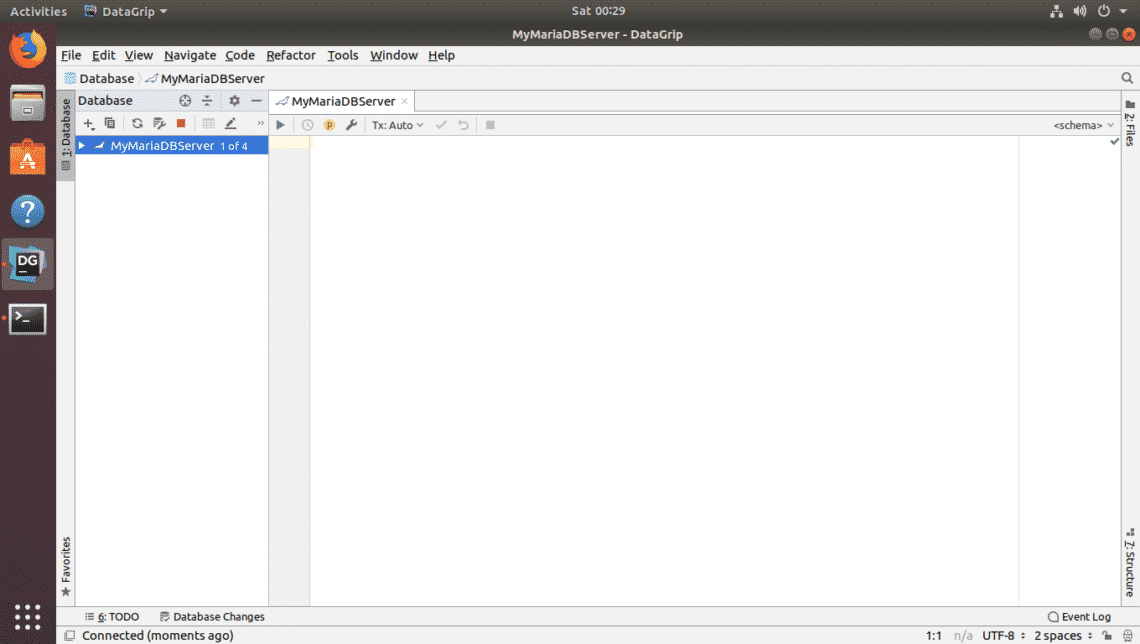
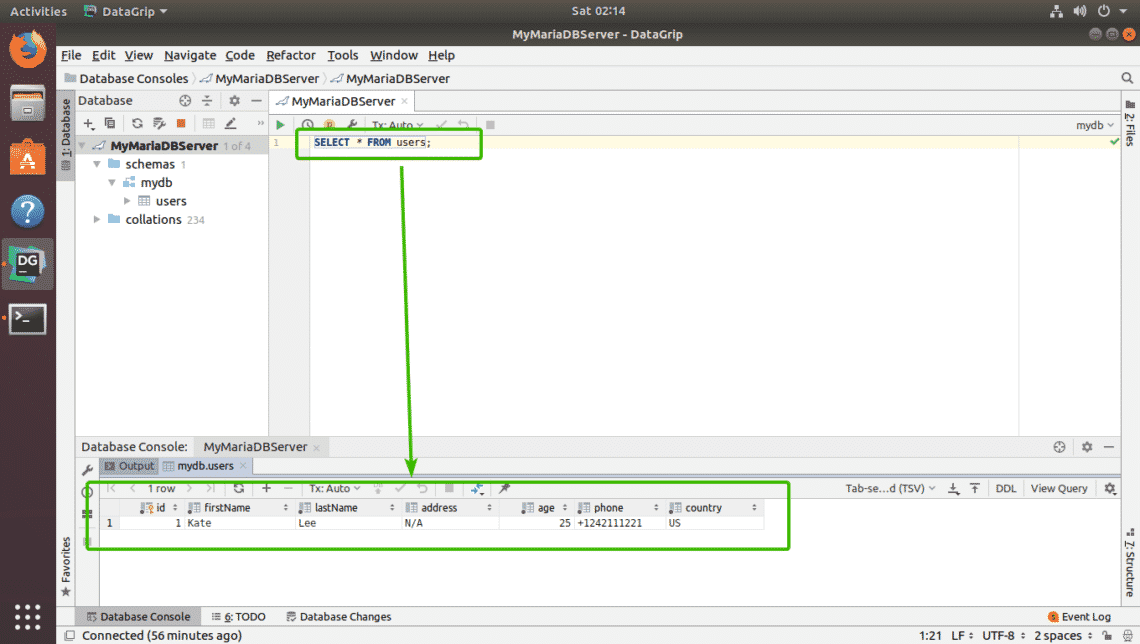
First, from the Database tab, click on the + icon as marked in the screenshot below.
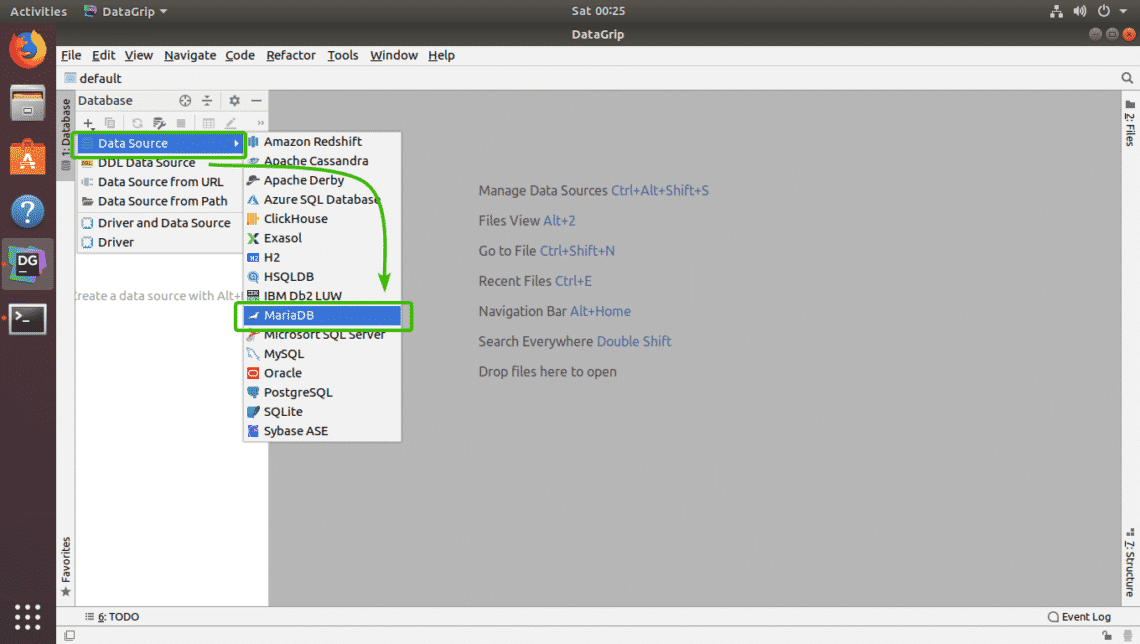
Now, from Data Source, select the database you want to connect to. I will pick MariaDB.
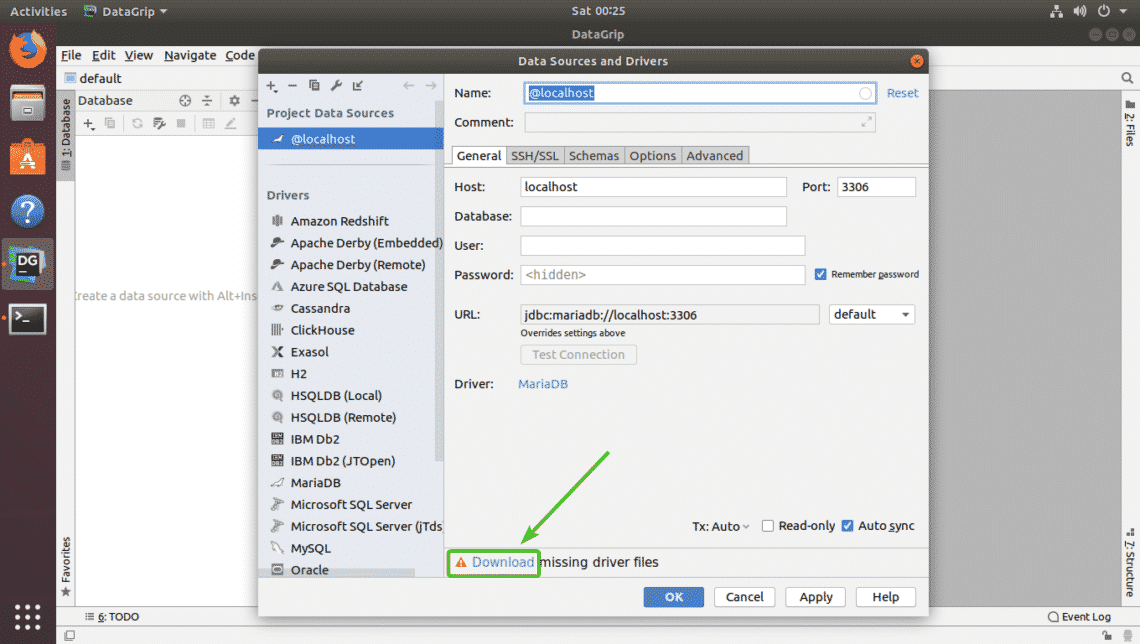
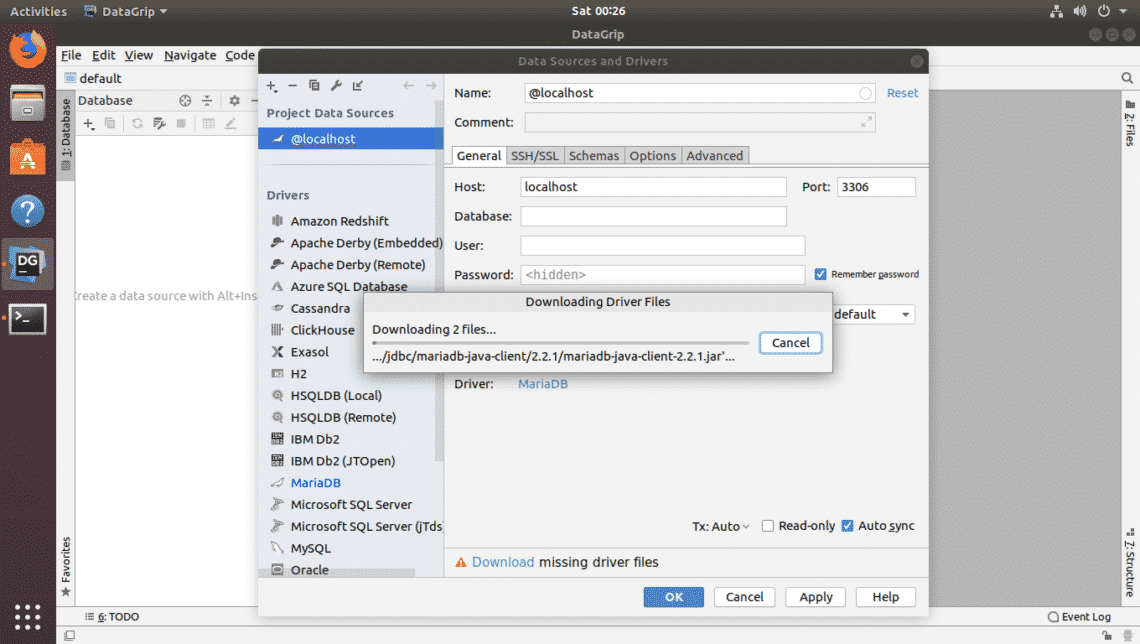
As you are running DataGrip for this database (MariaDB in my case) for the first time, you will have to download the database driver. You can click on Download as marked in the screenshot below to download the database driver.
As you can see, the required database driver files are being downloaded.
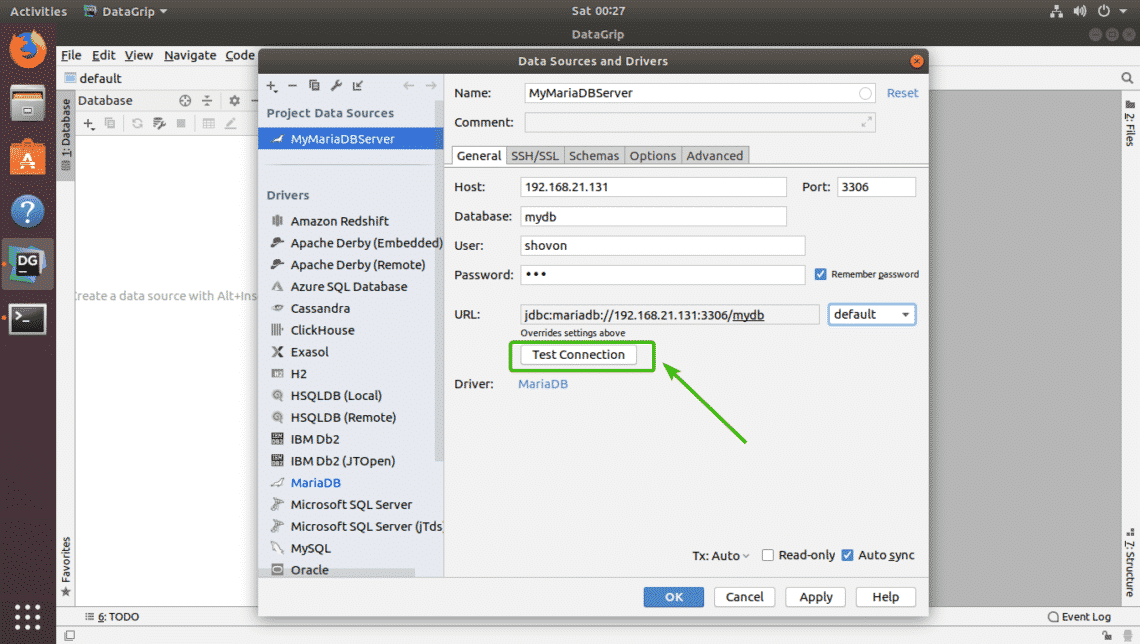
Once the driver is downloaded, fill in all the details and click on Test Connection.
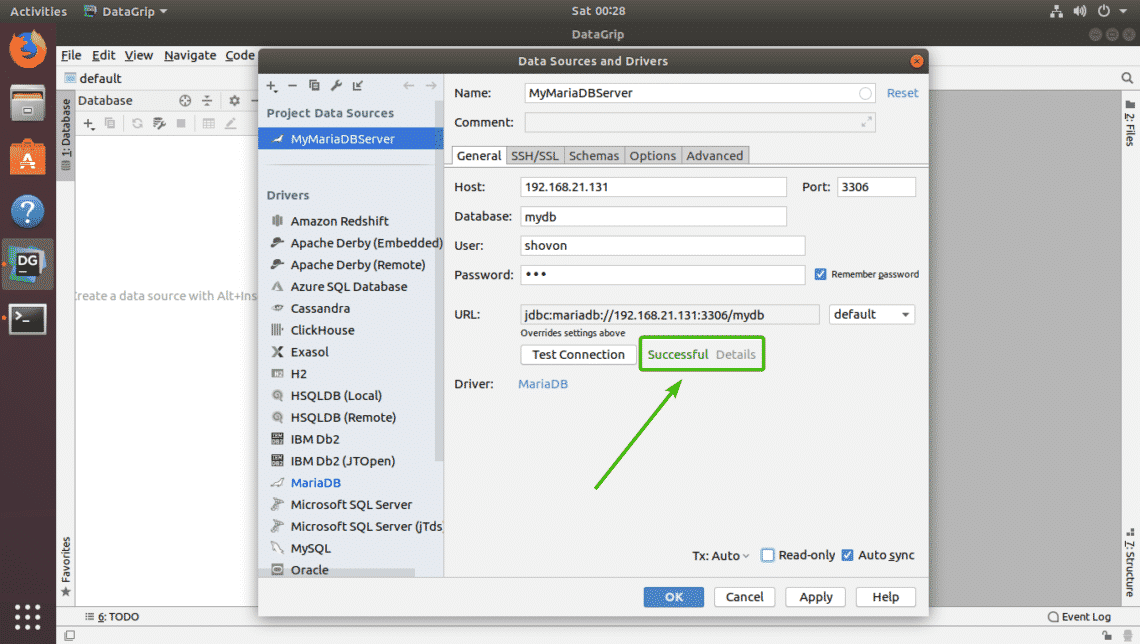
If everything is alright, you should see a green Successful message as shown in the screenshot below.
Finally, click on OK.
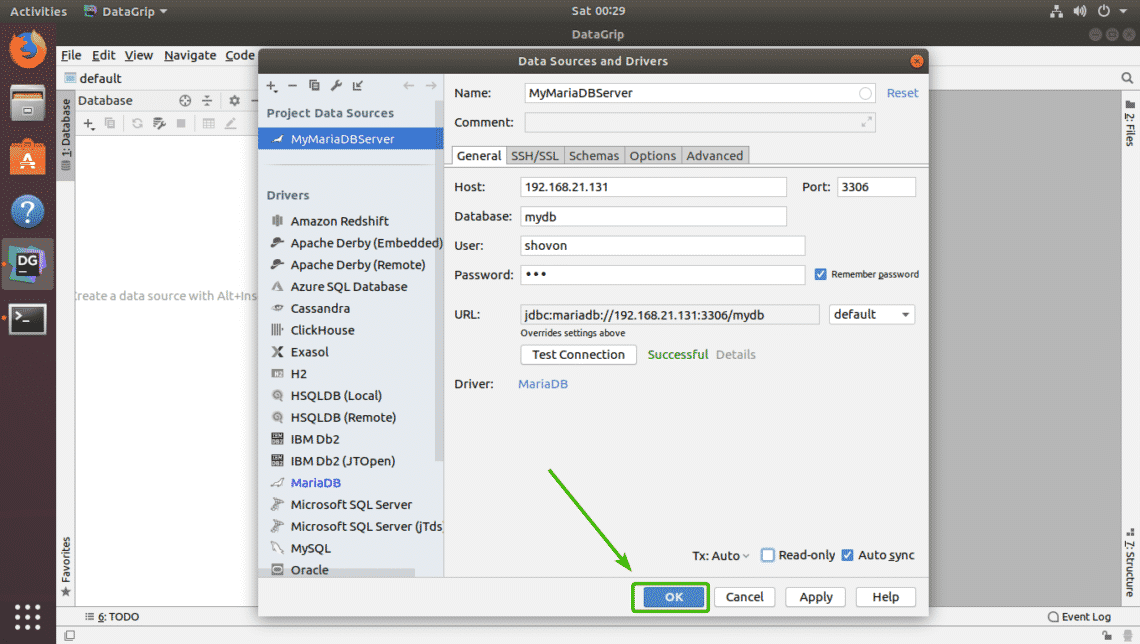
You should be connected to your desired database.
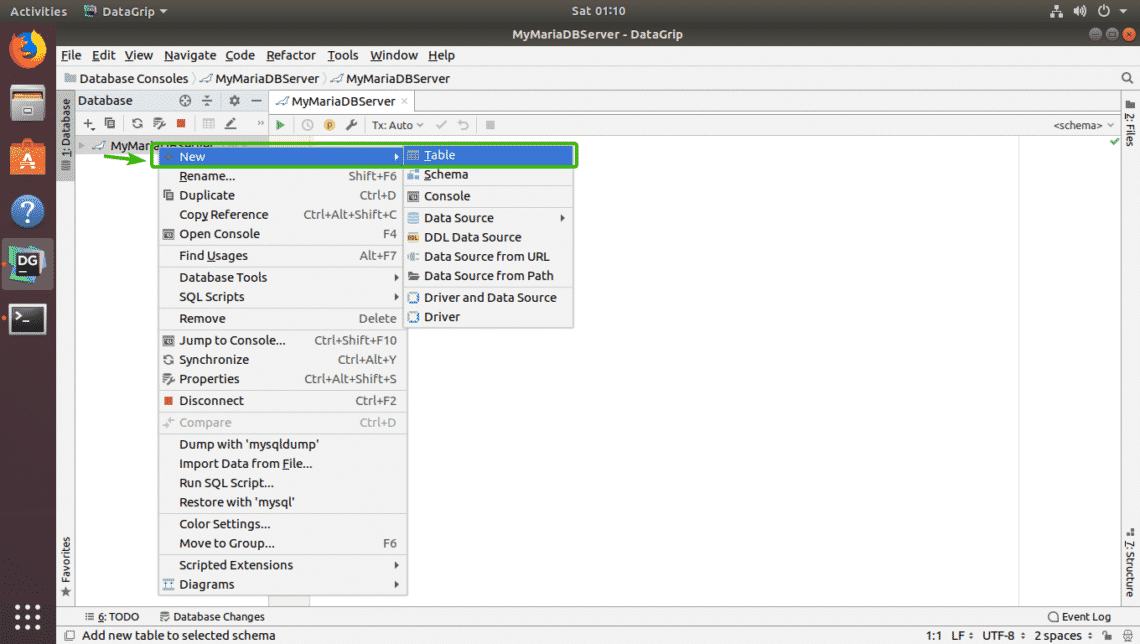
Creating Tables with DataGrip:
You can create tables in your database graphically using DataGrip. First, right click your database from the list and go to New > Table as marked in the screenshot below.
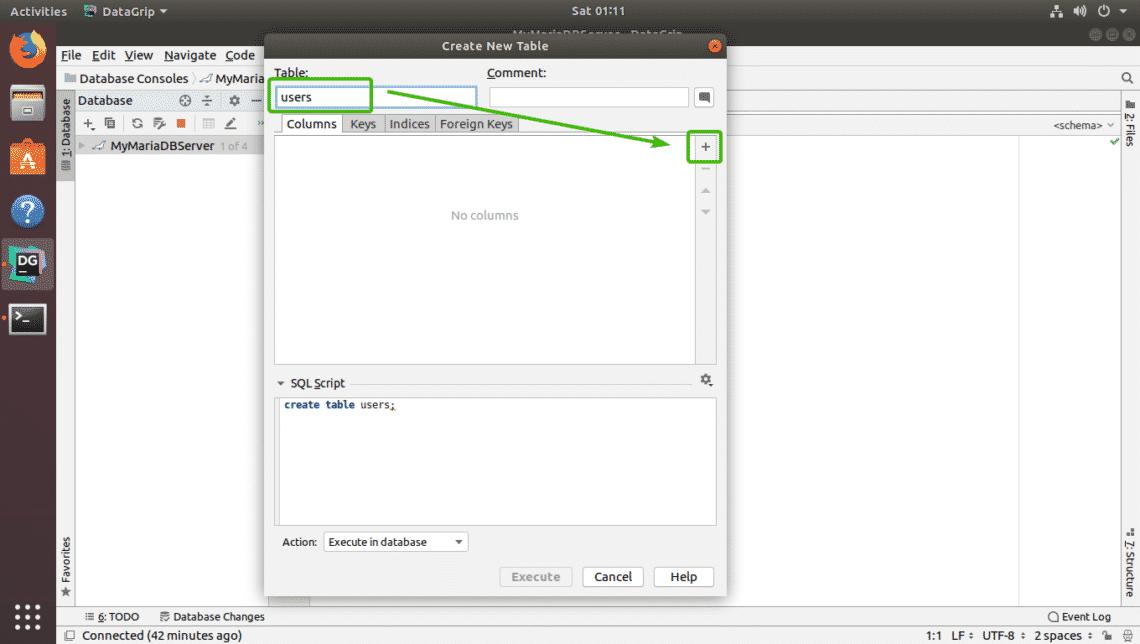
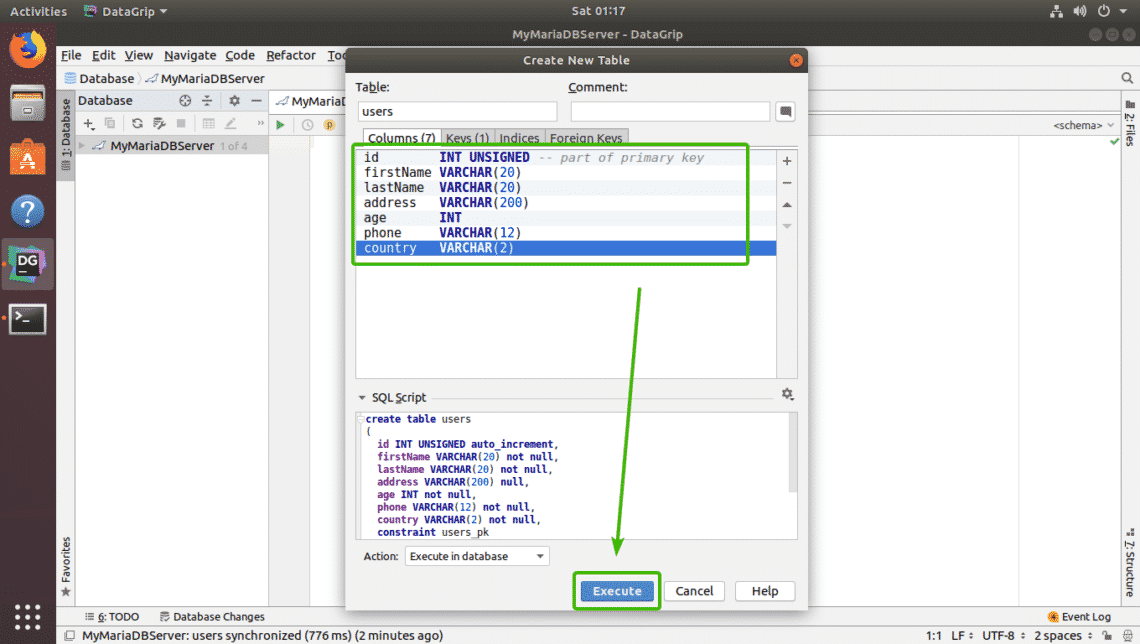
Now, type in your table name. To add new columns to the table, click on + icon as marked in the screenshot below.
Now, type in the column name, type, default value if it does have in your design, and check the column attributes such as Auto Increment, Not null, Unique, Primary key depending on your need.
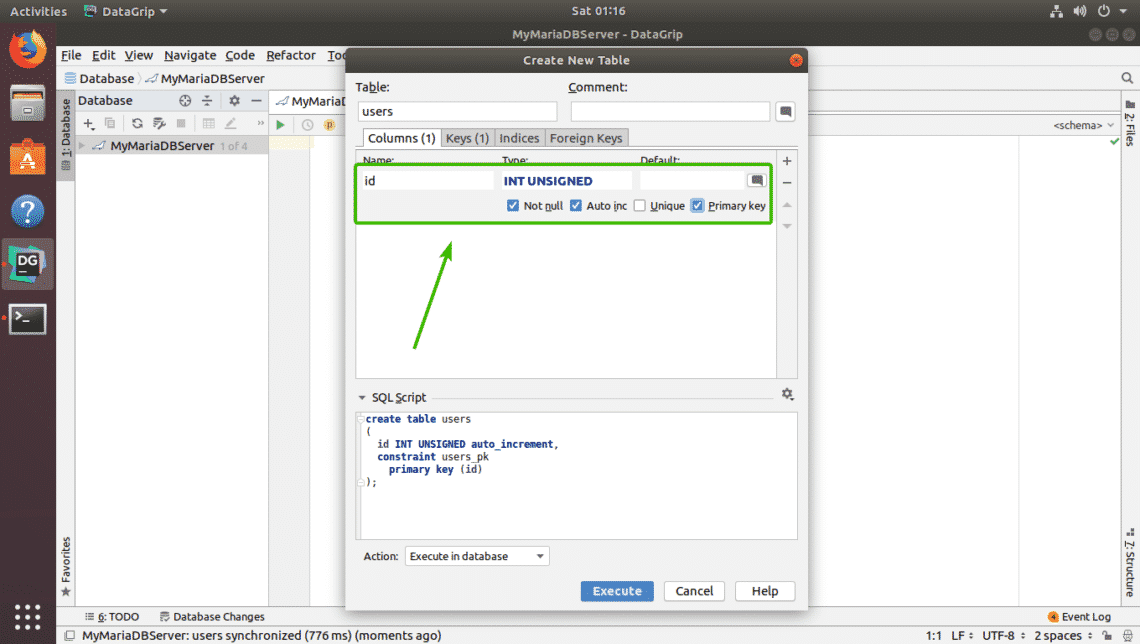
If you want to create another column, just click on the + icon again. As you can see, I created id, firstName, lastName, address, age, phone, and country columns. You can also use the – icon to remove a column, Up and Down arrow icons to change the position of the column. Once you’re satisfied with your table, click on Execute.
Your table should be created.
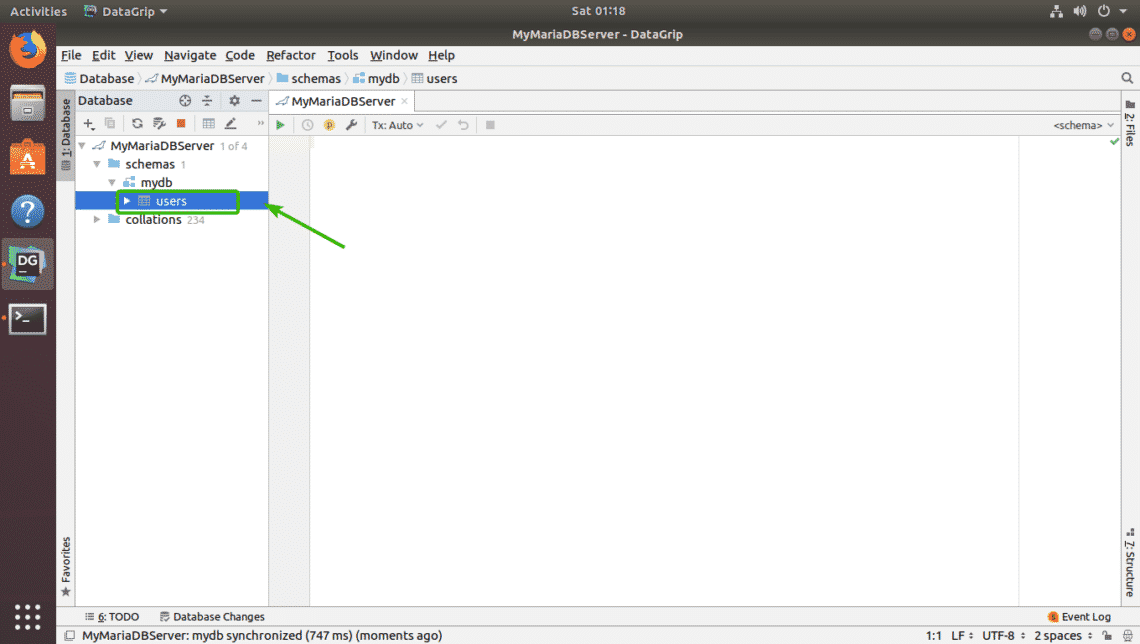
You can double click on the table to open it in a graphical editor. From here, you can add, modify, delete table rows very easily. This is the topic of the next section of this article.
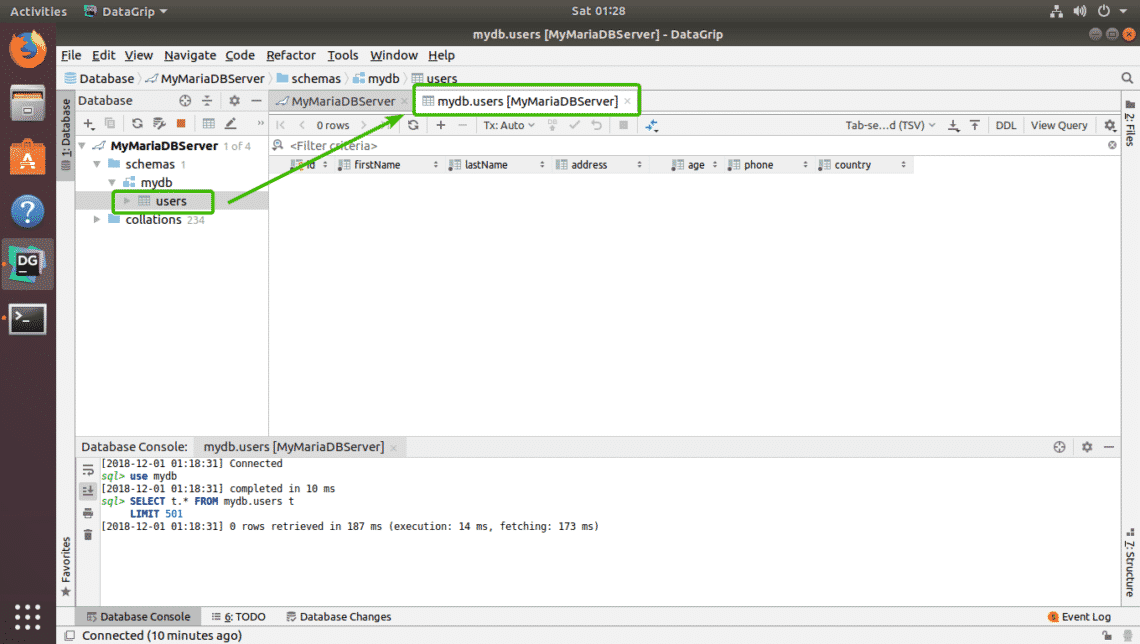
Working with Tables in DataGrip:
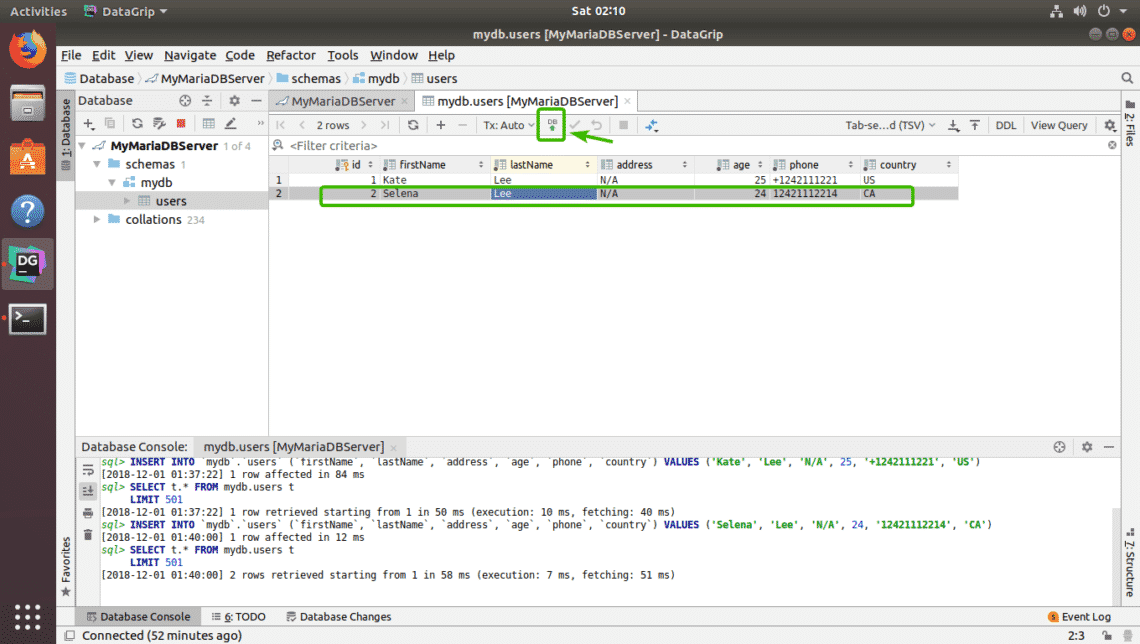
To add a new row, from the table editor, just click on the + icon as marked in the screenshot below.
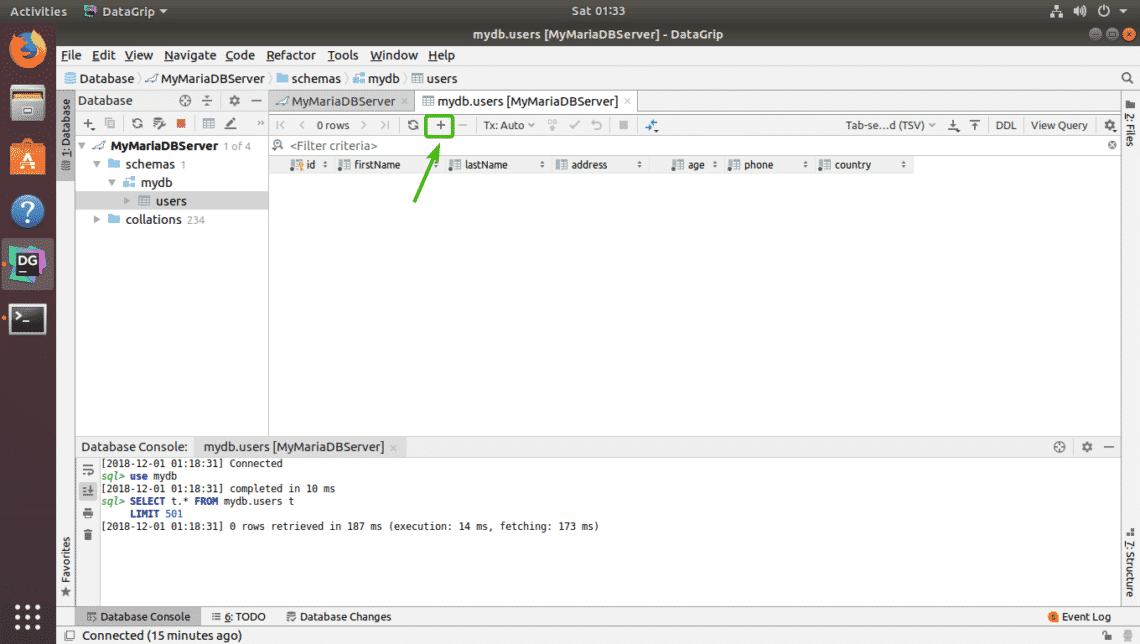
A new blank row should show up.
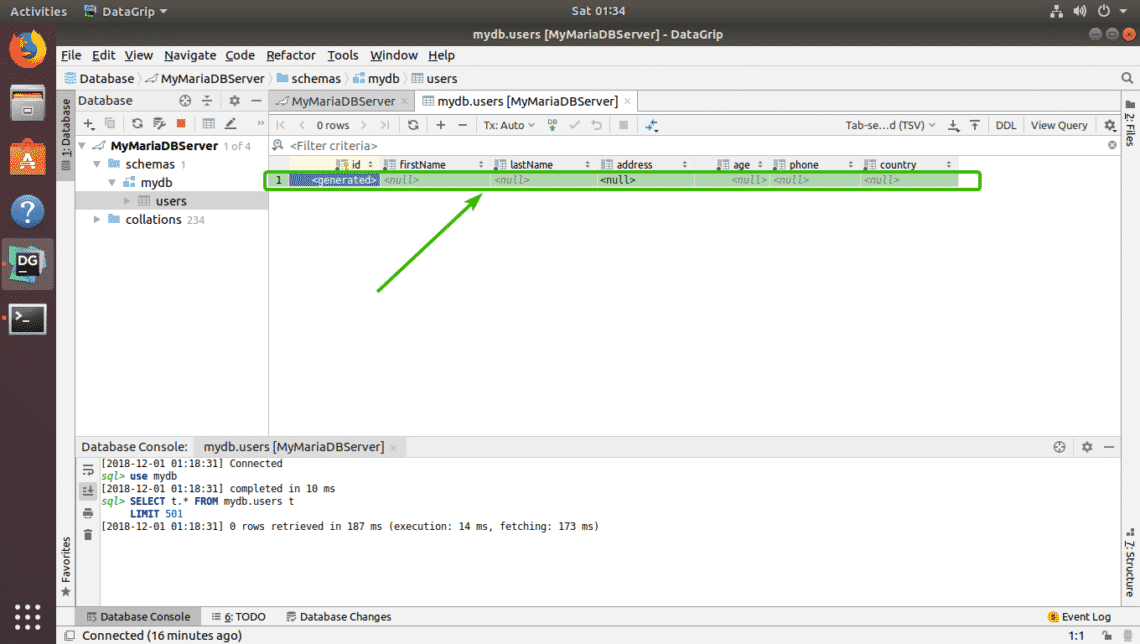
Now, click on the columns and type in the values that you want for the new row. Once you’re done, click on DB upload icon as marked in the screenshot below.
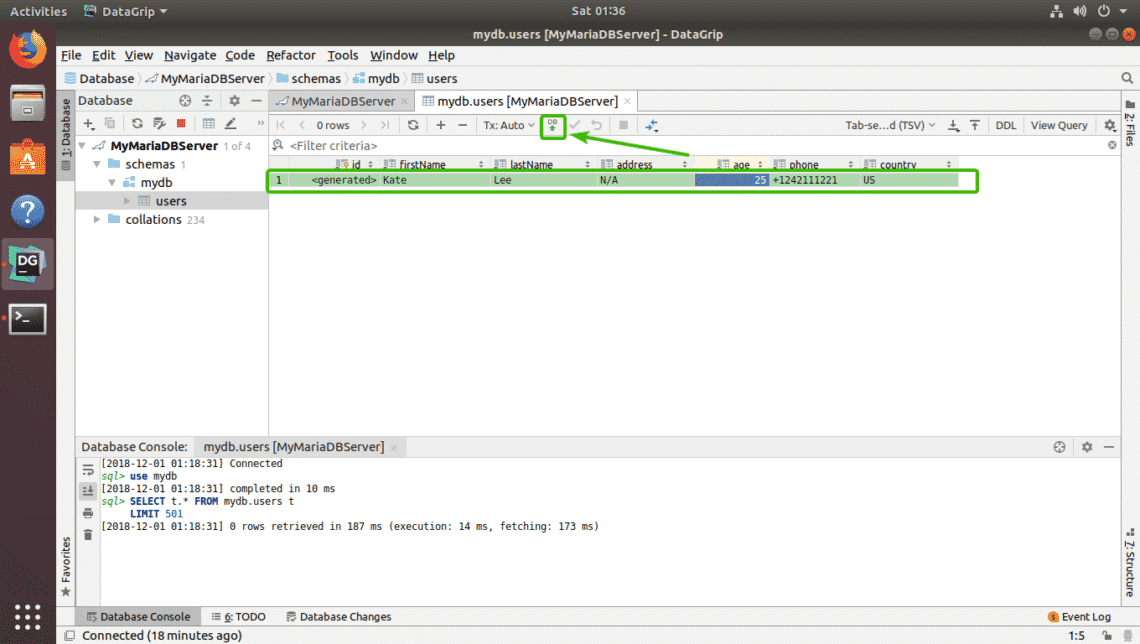
As you can see, the changes are saved permanently in the database.
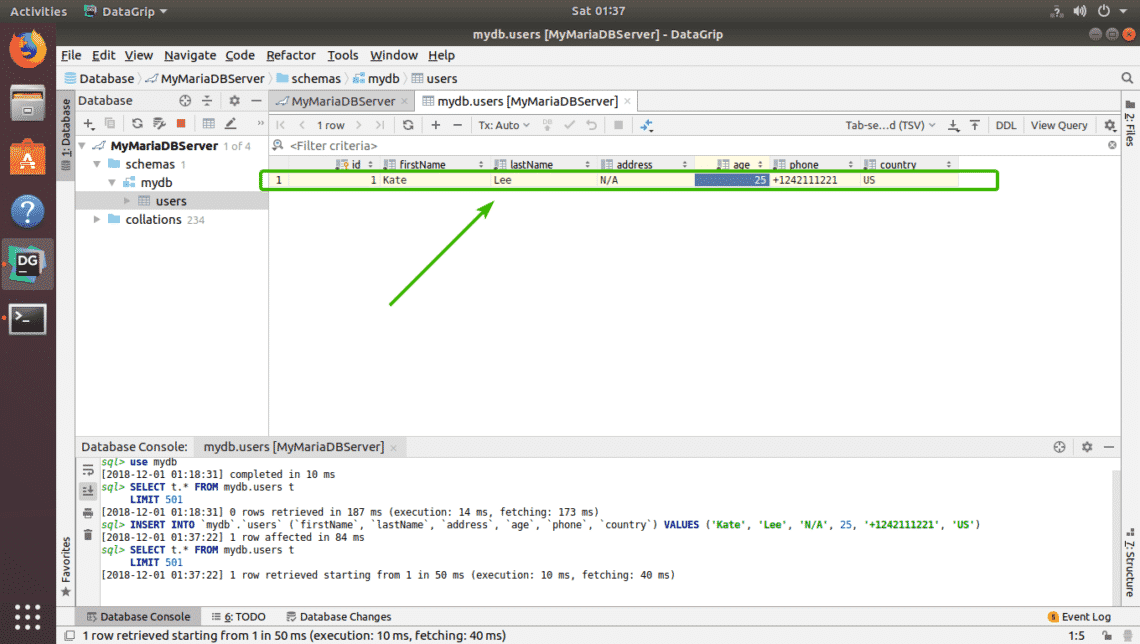
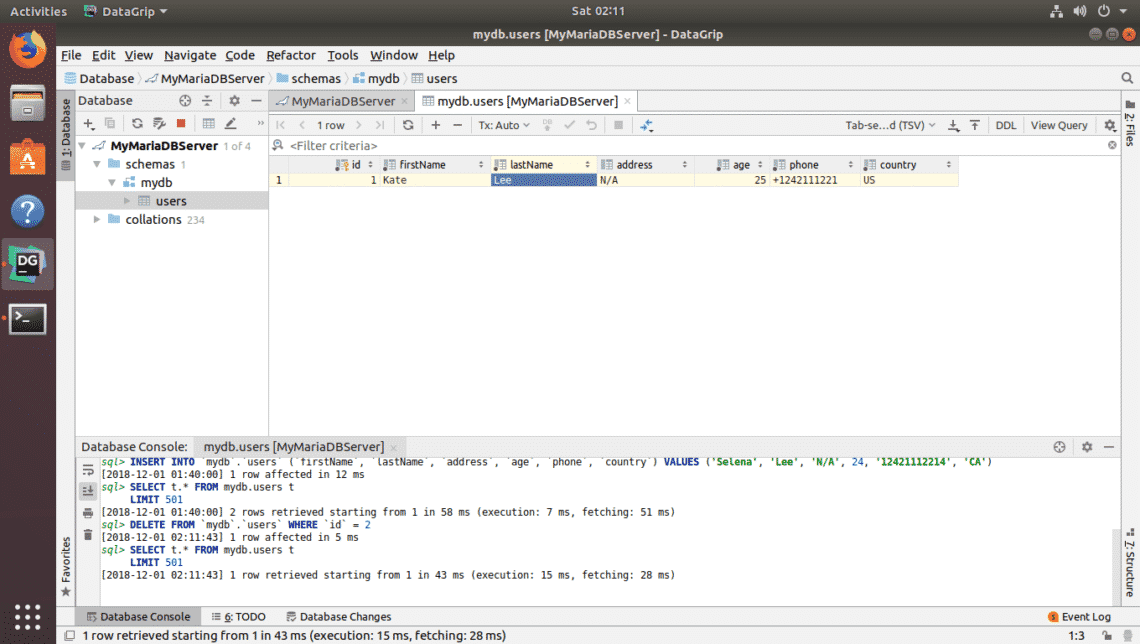
I added another row of dummy data just to demonstrate how delete and modify works.

To delete a row, select any column of the row you want to delete and click on the – icon marked in the screenshot below.
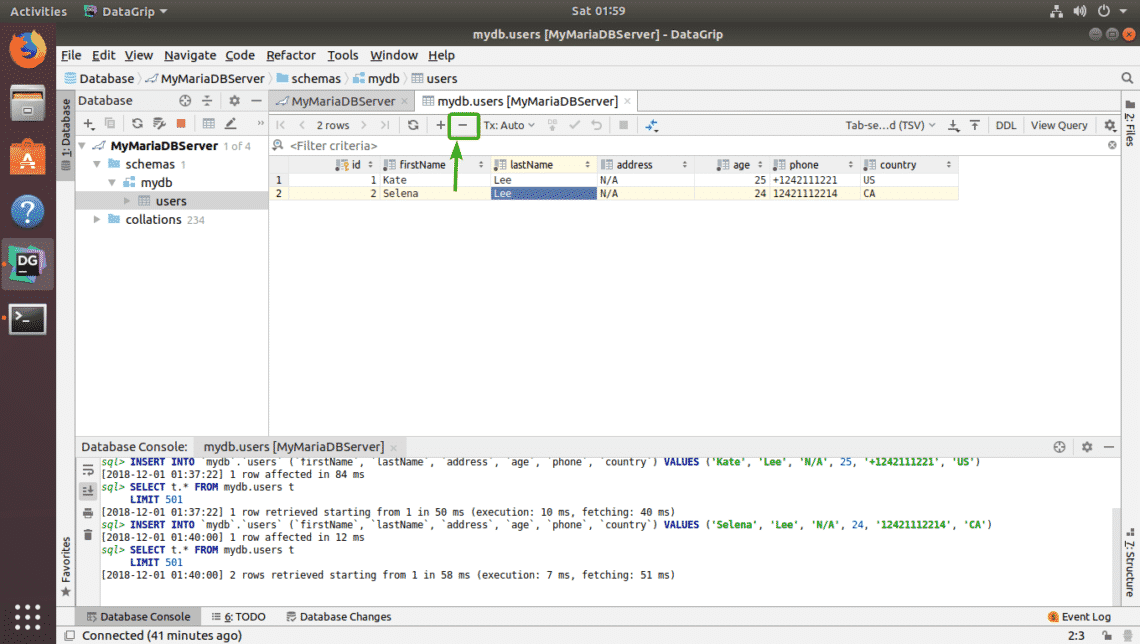
As you can see, the row is not in gray color. To save the changes, click on the DB upload icon as marked in the screenshot below.
As you can see, the table is gone.
To edit any row, just double click on the column of the row that you want to edit and type in the new value.
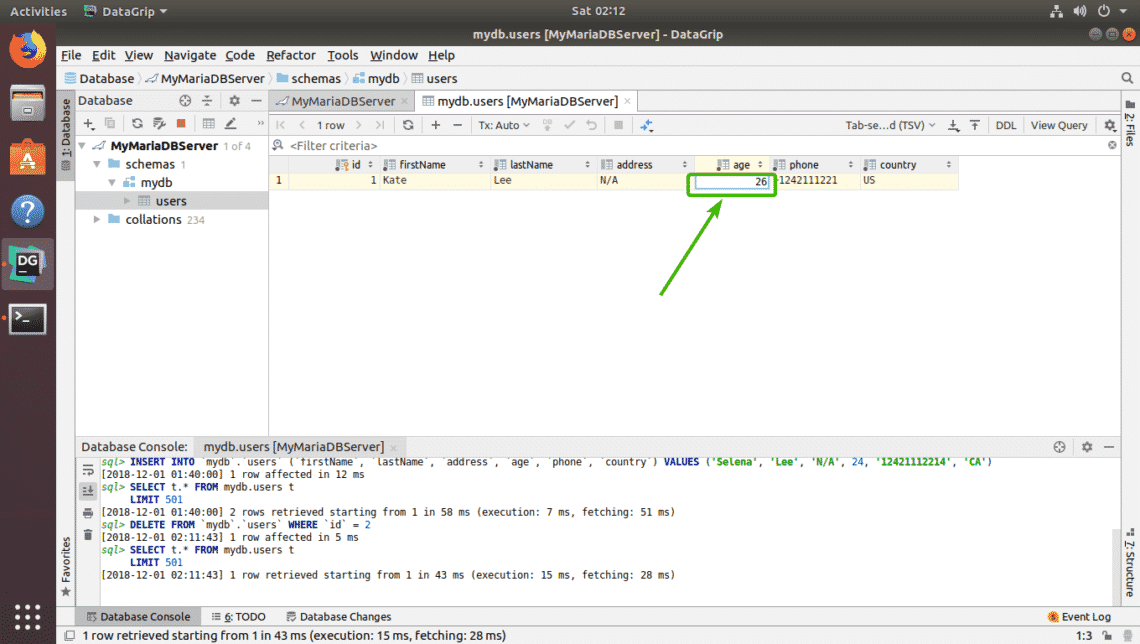
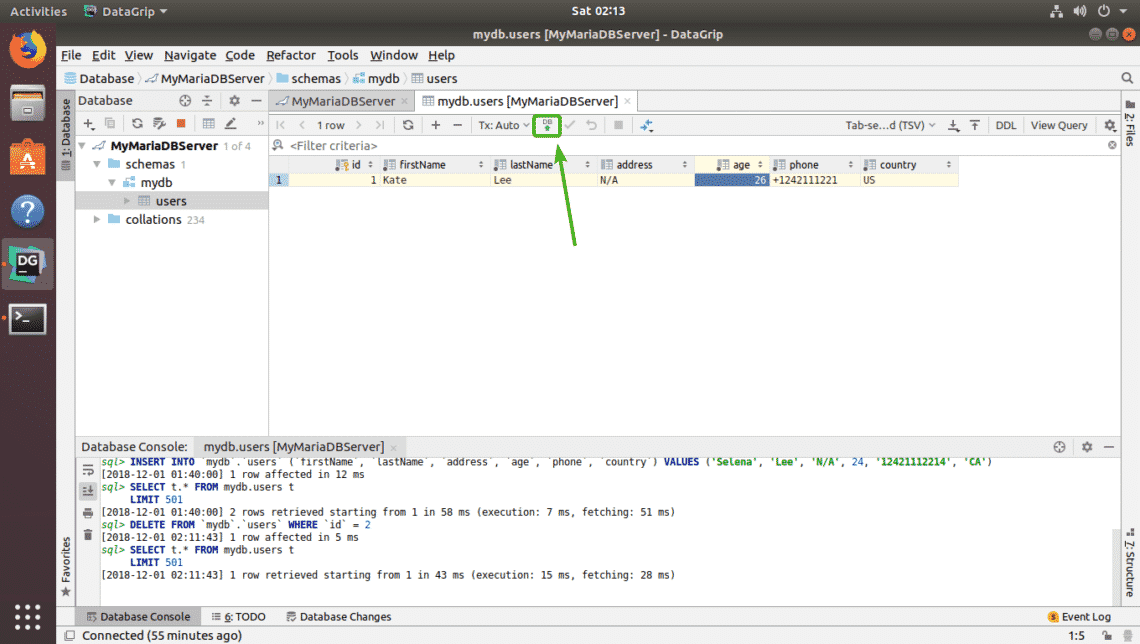
Finally, click somewhere else and then click on DB upload icon for the changes to be saved.
Running SQL Statements in DataGrip:
To run SQL statements, just type in the SQL statement, move the cursor to the end of the SQL statement and press <Ctrl> + <Enter>. It will execute and the result will be displayed as you can see in the screenshot below.
So, that’s how you install and use DataGrip on Ubuntu. Thanks for reading this article.
Interfacing with GitHub API using Python 3 – Linux Hint
GitHub as a web application is a huge and complex entity. Think about all the repositories, users, branches, commits, comments, SSH keys and third party apps that are a part of it. Moreover, there are multiple ways of communicating with it. There are desktop apps for GitHub, extensions for Visual Studio Code and Atom Editor, git cli, Android and iOS apps to name a few.
People at GitHub, and third party developers alike, can’t possibly manage all this complexity without a common interface. This common interface is what we call the GitHub API. Every GitHub utility like a cli, web UI, etc uses this one common interface to manage resources (resources being entities like repositories, ssh keys, etc).
In this tutorial we will learn a few basics of how one interfaces with an API using GitHub API v3 and Python3. The latest v4 of GitHub API requires you to learn about GraphQL which results in steeper learning curve. So I will stick to just version three which is still active and pretty popular.
Web APIs are what enable you to use all the services offered by a web app, like GitHub, programmatically using language of your choice. For example, we are going to use Python for our use case, here. Technically, you can do everything you do on GitHub using the API but we will restrict ourselves to only reading the publicly accessible information.
Your Python program will be talking to an API just the same way as your browser talks to a website. That is to say, mostly via HTTPS requests. These requests will contain different ‘parts’, starting from the method of the request [GET, POST, PUT, DELETE], the URL itself, a query string, an HTTP header and a body or a payload. Most of these are optional. We will however need to provide a request method and the URL to which we are making the request.
What these are and how they are represented in an HTTPS request is something we will see slow as we start writing Python Scripts to interact with GitHub.
Container: Docker Compose on Ubuntu 16.04
![]()
What is Docker Compose
Docker Compose is a tool for running multi-container Docker applications. To configure an application’s services with Compose we use a configuration file, and then, executing a single command, it is possible to create and start all the services specified in the configuration.
Docker Compose is useful for many different projects like:
- Development: with the Compose command line tools we create (and interact with) an isolated environment which will host the application being developed.
By using the Compose file, developers document and configure all of the application’s service dependencies. - Automated testing: this use case requires an environment for running tests in. Compose provides a convenient way to manage isolated testing environments for a test suite. The full environment is defined in the Compose file.
Docker Compose was made on the Fig source code, a community project now unused.
In this tutorial we will see how to install Docker Compose on an Ubuntu 16.04 machine.
Install Docker
We need Docker in order to install Docker Compose. First, add the public key for the official Docker repository:
$ curl -fsSL https://download.docker.com/linux/ubuntu/gpg | sudo apt-key add-
Next, add the Docker repository to apt sources list:
$ sudo add-apt-repository “deb [arch=amd64] https://download.docker.com/linux/ubuntu $(lsb_release -cs) stable”
Update the packages database and install Docker with apt:
$ sudo apt-get update
$ sudo apt install docker-ce
At the end of the installation process, the Docker daemon should be started and enabled to load at boot time. We can check its status with the following command:
$ sudo systemctl status docker
———————————
● docker.service – Docker Application Container Engine
Loaded: loaded (/lib/systemd/system/docker.service; enabled; vendor preset: enabled)
Active: active (running)
Install Docker Compose
At this point it is possible to install Docker Compose. Download the current release by executing the following command:
# curl -L https://github.com/docker/compose/releases/download/1.14.0/docker-compose-`uname -s`-`uname -m` > /usr/local/bin/docker-compose
Make the downloaded binary executable:
# chmod +x /usr/local/bin/docker-compose
Check the Docker Compose version:
$ docker-compose -v
The output should be something like this:
docker-compose version 1.14.0, build c7bdf9e
Testing Docker Compose
The Docker Hub includes a Hello World image for demonstration purposes, illustrating the configuration required to run a container with Docker Compose.
Create a new directory and move into it:
$ mkdir hello-world
$ cd hello-world
Create a new YAML file:
$ $EDITOR docker-compose.yml
In this file paste the following content:
unixmen-compose-test:
image: hello-world
Note: the first line is used as part of the container name.
Save and exit.
Run the container
Next, execute the following command in the hello-world directory:
$ sudo docker-compose up
If everything is correct, this should be the output shown by Compose:
Pulling unixmen-compose-test (hello-world:latest)…
latest: Pulling from library/hello-world
b04784fba78d: Pull complete
Digest: sha256:f3b3b28a45160805bb16542c9531888519430e9e6d6ffc09d72261b0d26ff74f
Status: Downloaded newer image for hello-world:latest
Creating helloworld_unixmen-compose-test_1 …
Creating helloworld_unixmen-compose-test_1 … done
Attaching to helloworld_unixmen-compose-test_1
unixmen-compose-test_1 |
unixmen-compose-test_1 | Hello from Docker!
unixmen-compose-test_1 | This message shows that your installation appears to be working correctly.
unixmen-compose-test_1 |
unixmen-compose-test_1 | To generate this message, Docker took the following steps:
unixmen-compose-test_1 | 1. The Docker client contacted the Docker daemon.
unixmen-compose-test_1 | 2. The Docker daemon pulled the “hello-world” image from the Docker Hub.
unixmen-compose-test_1 | 3. The Docker daemon created a new container from that image which runs the
unixmen-compose-test_1 | executable that produces the output you are currently reading.
unixmen-compose-test_1 | 4. The Docker daemon streamed that output to the Docker client, which sent it
unixmen-compose-test_1 | to your terminal.
unixmen-compose-test_1 |
unixmen-compose-test_1 | To try something more ambitious, you can run an Ubuntu container with:
unixmen-compose-test_1 | $ docker run -it ubuntu bash
unixmen-compose-test_1 |
unixmen-compose-test_1 | Share images, automate workflows, and more with a free Docker ID:
unixmen-compose-test_1 | https://cloud.docker.com/
unixmen-compose-test_1 |
unixmen-compose-test_1 | For more examples and ideas, visit:
unixmen-compose-test_1 | https://docs.docker.com/engine/userguide/
unixmen-compose-test_1 |
helloworld_unixmen-compose-test_1 exited with code 0
Docker containers only run as long as the command is active, so the container will stop when the test finishes running.
Conclusion
This concludes the tutorial about the installation of Docker Compose on an Ubuntu 16.04 machine. We have also seen how to create a simple project through the Compose file in YAML format.
6 Methods To Rename Multiple Files At Once In Linux | Linux.com
As you may already know, we use mv command to rename or move files and directories in Unix-like operating systems. But, the mv command won’t support renaming multiple files at once. It can rename only one file at a time. Worry not. There are few other utilities available, especially for batch renaming files. In this tutorial, we are going to learn to rename multiple files at once in six different methods. All examples provided here are tested in Ubuntu 18.04 LTS, however they should work on any Linux operating systems. Let’s get started!
Rename Multiple Files At Once In Linux
There could be many commands and utilities to a rename bunch of files. As of writing this, I know the following methods only. I will keep updating the list if I come across any method in future.
Method 1 – Using mmv
The mmv utility is used to move, copy, append and rename files in bulk using standard wildcards in Unix-like operating systems. It is available in the default repositories of Debian-based systems. To install it on Debian, Ubuntu, Linux Mint, run the following command:
$ sudo apt-get install mmv
Read more at OSTechnix
What now, Larry? AWS boss insists Amazon will have dumped Oracle database by end of 2019.
Clock’s ticking on Ellison’s smack talk

re:Invent AWS boss Andy Jassy has doubled down on claims Amazon will “be done” with Oracle databases by 2019, and used his Re:Invent keynote to throw shade at Big Red.
Speaking at Amazon’s main tech conference in Las Vegas this week, Jassy said that the world of “old guard commercial-grade databases” has been “miserable” for enterprises for the past 20 years.
Targeting cloud rival Oracle, Jassy said these legacy database vendors are too expensive and don’t serve customers well, pointing to aggressive audits and proprietary systems that lock in customers.
He also rubbished Big Red’s market share, showing a slide that was mostly AWS orange, followed by Microsoft at 13.3 per cent, Alibaba at 4.6 per cent and Google at 3.3 per cent.
Oracle was identified by a pop-up Larry Ellison, appearing like a small cartoon villain, in a segment of “other vendors”.
Amusing slide from Andy Jassy in his keynote showing market share (AWS being the big orange segment). @AWSreInvent pic.twitter.com/fLCHYRxsJy
— TechMarketView (@TechMarketView) November 28, 2018
The trading of blows is customary at vendor conferences – Ellison spends huge chunks of his keynotes trash-talking AWS, with the common refrain that Amazon still uses Oracle’s databases.
The online marketplace giant’s efforts to shift off its competitor’s tech is well documented – less well evidenced – but that hasn’t stopped Jassy from expanding on claims the firm is making strides.
In an interview with CNBC at re:Invent, he said: “We’re virtually done moving away from Oracle on the database side… I think by the end of 2019 or mid-2019 we’ll be done.”
He claimed that 88 per cent of databases running Oracle will be on Amazon’s DynamoDB or Aurora databases by January, and that 97 per cent of mission-critical databases will be on DynamoDB or Aurora by the end of next year.
Jassy also reiterated a previous tweet that Amazon moved its data warehouse from Oracle to Redshift on 1 November.
Elsewhere at the conference, AWS announced DeepRacer, a tiny radio-controlled “self-driving” car – which comes hot on the heels of Ellison’s comments at OpenWorld that Amazon’s database was semi-autonomous at best.
“That’s like a semi-autonomous car. You get in, drive it… and you die,” said Ellison. Of course, no one can get into this one. ®
Open Source Tools for Writers » Linux Magazine
When it comes to writing, using the right tools can free you up to focus on your content.
Sooner or later, open source development comes to every field, and tools for working writers are no exception. However, if you search for the topic, you will find the lists of writing tools are full of apps that are no longer in development and have been dropped from most distributions.
Accordingly, here is a list of useful writing apps that are still available as of late 2018. Some have been around for a long time, while others are newer and little known.
Braindump
Over the last two decades, over half a dozen tools for brainstorming have been released. However, if the proprietary ones are ignored, few free-licensed ones have survived. Technically, Braindump is one of the casualties, having been removed from Calligra 3.0, apparently because of a lack of developers.
Fortunately, Braindump remains available in places like the Debian Stable repository. It remains useful in its current state for brainstorming maps that are almost as quick as pencil and paper (Figure 1). Its support for images, charts, and diagrams gives it a versatility that allows rapid, unimpeded development of ideas.
As an alternative, brainstormers might also want to look at VYM.
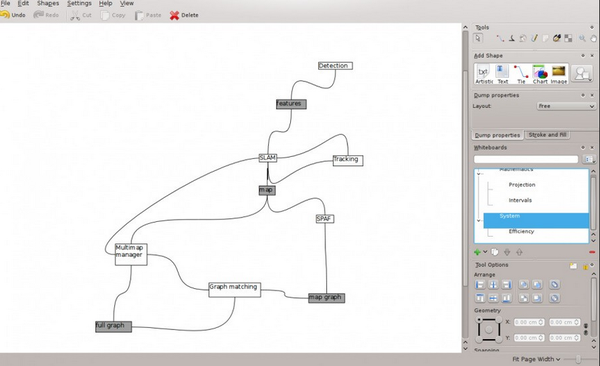
Figure 1: Originally part of Calligra Suite, Braindump is a brainstorming tool that is likely to be available for a while.
Zim
Longer works often require background material that the writer needs to know but which seldom finds its way into the story. This is especially true of fantasy. Often described as a desktop wiki, Zim is a convenient place to store such information and to link files together for quick reference. For example, I use Zim to store files with information such as character and historical background, as well as names for different cultures in my fantasy novel attempt (Figure 2).
KDE users might use BasKet instead. Although BasKet advertises itself more humbly as an advanced note taker, its capacities are similar to Zim’s.
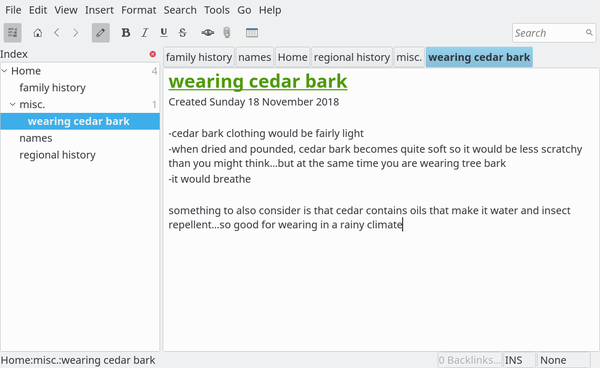
Figure 2: Zim is ideal for storing background material.
Artha
Artha promotes itself as an open source thesaurus. At first, I saw nothing in the app that suggested any benefit of being open source. Perhaps, I thought, open source’s influence will only become evident over time, possibly in the speed with which new words and meanings update it.
Meanwhile, Artha is a comprehensive, local thesaurus with some valuable features (Figure 3). Like the online Thesaurus.com, it includes antonyms and alternate meanings. However, Artha also includes jargon, related words, pertainyms (forms of the word that are parts of speech, such as an adverb based on a noun), and derivatives (for instance, “clearing” for “clear”), as well as sound-alikes and regular expressions. Best of all, when you enter a word for lookup, Artha displays a drop-down list of meanings instead of going directly to an arbitrarily defined core meaning.This drop-down list allows me to use Artha as a concept thesaurus – one based on categories of meaning rather than words – which is by far the most useful structure for writing, although it is rarely seen these days. If that is not enough, Artha also has a hot key feature, which allows users to get a definition of a highlighted word on the desktop.
After discovering all these feature, I only then realized that the evidence of Artha being open source lies in its comprehensiveness – a long-time open source tradition. As soon as I discovered all it could do, within moments Artha became my online thesaurus of choice.
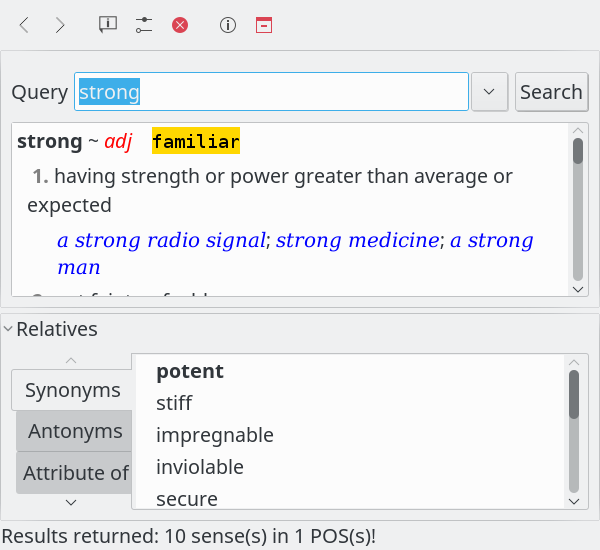
Figure 3: Artha is one of the most comprehensive thesauruses available online.
Klipper
Klipper is the clipboard in KDE (Figure 4). What makes it stand out is that it includes a buffer of previously copied or cut items to which it can revert with a couple of clicks on its icon in the system tray. This feature makes it ideal for copy editing when the same replacements are needed repeatedly. If necessary, items can be typed in to the buffer as needed. Why a similar buffer was not added to other desktops years ago is a mystery.
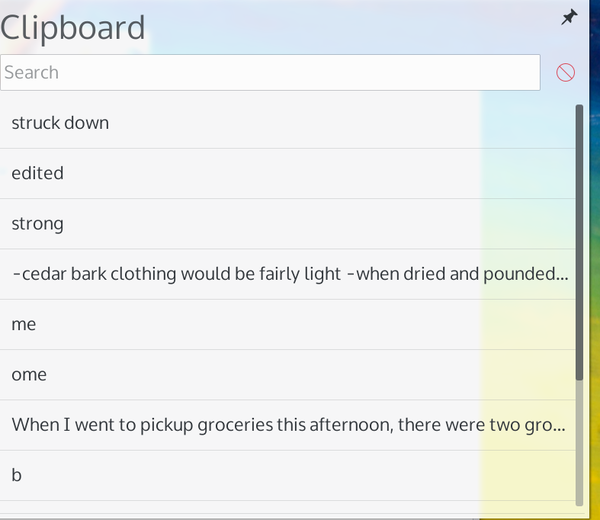
Figure 4: KDE’s long-time clipboard supports multiple items, which is useful in editing.
Diction
When I was a university instructor, I always told students that, if they had enough knowledge to use a grammar checker properly, then they had no need for one, except possibly to catch typos. Too often, the helpful suggestions can lead the unwary to further mistakes.
Diction is an exception to this rule – and a surprising one, considering that it runs from the command line (Figure 5). What makes Diction an exception is that it flags words that are common in grammatical errors and simply gives you the general rules associated with them, leaving you to decide whether to apply them or not. Instead of trustingly clicking a button to make a change, users have to stop and think whether each grammatical rule applies. Mistakes are less likely, and, confronted with these rules, users may actually learn a few points about grammar.
Starting with a plain text file, Diction has the options to flag words associated with common beginner’s mistakes and/or to suggest better wording. And Diction is thorough, averaging in my writing about 170 suggestions for about 2,000 words (most of which, I am happy to say, were false flags). In my experience, such thoroughness is unparalleled in grammar checkers, which makes the extra step of converting a file to plain text for the check well-worth it.

Figure 5: Diction shows where grammatical rules might apply, rather than suggesting changes.
Calibre
Many Linux users know Calibre as a convenient app for storing and launching ebooks. However, if you are producing ebooks yourself, Calibre is also a one-stop app for editing ebooks and exporting them to multiple formats (Figure 6).
The simplest way to edit ebooks is to write them in LibreOffice and export them to Calibre. Then, you can use Calibre to edit metadata, add graphics and tables of content, add new sections, and output the ebook to every major format. Armed with a knowledge of CSS, you can right-click to edit the raw code and validate it.
Calibre would be even more powerful if it included a guide to CSS tags. However, even so, it’s a basic necessity for writers who intend to self-publish online.
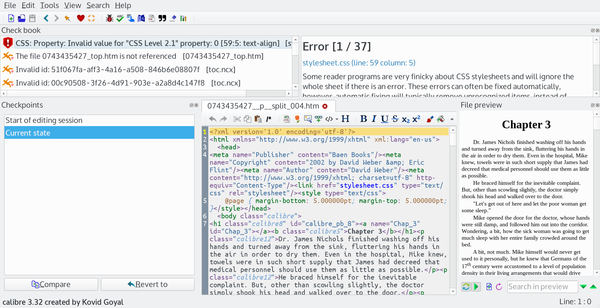
Figure 6: Besides being an ebook manager, Calibre also has tools for editing.
LibreOffice Writer
LibreOffice Writer may seem like an obvious choice, considering that it is a full-featured office suite. However, among those tools are several that are especially useful for professionals.
Admittedly, few editors accept manuscripts in LibreOffice’s default Open Document Format (ODT). However, formatting for manuscripts is simple enough that exporting files to MS Word format is no trouble. Moreover, Writer also exports to PDF (Figure 7), with enough options to give you full control over the process. The last few releases have even started to support exports to ePub, the leading free ebook format. Although the support for ePub within Writer is still limited, ODF files can be imported to the Calibre ebook manager and then converted with acceptable quality to ePub, Kindle’s MOBI, or any other popular ebook format.
In addition, Writer supports comments and tracking changes, two features that enable collaboration of exactly the kind that happens between writers and editors or critiquing readers. Using these tools, writers can accept or reject revisions and easily access revisions from within their manuscripts.
For those who are writing very long books, Writer has Master Documents, which are documents that consist of multiple files. These files can be edited separately, which reduces memory requirements and allows writers to work on different parts of the complete document at the same time.
Likewise, professionals may find features like AutoText and personal dictionaries for spell checking and hyphenation useful. Should you want to self-publish, either online or to hard copy, Writer also has the tools for professional layout and design unmatched by other word processors. With this array of tools, Writer is indispensable for serious writing.
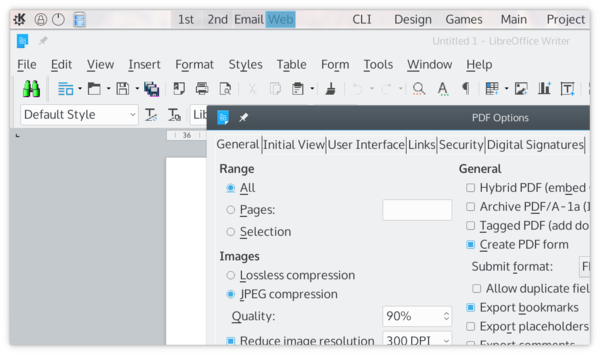
Figure 7: Extensive PDF options are one of several reasons for writers to prefer LibreOffice.
What’s Missing
This list of applications is what I consider the best of the best. For example, there are countless text editors and word processors that I might mention. However some are free to use, but do not have free licenses. Neither have I mentioned any online tools, for the simple reason that when you are a writer with deadlines, the risk of Internet connection problems is too great, even though this only occasionally happens. Local apps are simply more reliable.
Also, I have left out most so-called writers’ applications. Some, like FocusWriter, promise a distraction-free writing environment that I can get more conveniently in Bluefish or Vim, or even LibreOffice by using styles and templates – and at the expense of extra time spent reformatting for submission.
Another category I have left out are databases for fiction like bibisco. Such tools claim to help writers by peppering them with questions about characters, settings, unnecessary links, and organization. I remain deeply skeptical about such tools, because I have yet to hear of a professionally published writer who uses them. Just as importantly, they take much of the joy from writing for me, reducing the experience to something more akin to filling out a seemingly endless survey.
In the end, writing is about writing – or, failing that, streamlining necessary research so that you can return to writing as soon as possible. Properly used, the applications mentioned here should help you do just that.