
Download Fedora Workstation Live 29
This is in fact the Fedora GNOME Live distribution, but because GNOME is the default desktop environment of the Fedora Linux operating system, it is simply called Fedora Live CD. It is also the only Live CD edition of Fedora to feature a custom welcome screen that lets users to choose between the live mode or the install mode.
Availability, boot options, supported platforms
Just like any other Fedora Live CD flavor, this edition is distributed as Live DVD ISO images engineered to support both 64-bit (x86_64) and 32-bit (x86) instruction set architectures. They can be burned onto DVD discs or written on USB thumb drives of 1GB or higher capacity.
From the boot prompt, users can start the live environment with default settings or in safe graphics mode, boot an existing operating system from the first disk drive, run system memory test, or check the disc for defects (only if using a DVD media).
Pure GNOME experience with a default set of apps
The graphical session of this Fedora Live CD is powered by the modern GNOME desktop environment, which includes most of the standard GNOME apps. The desktop features a single top panel from where users can open apps, interact with running programs, as well as to switch between virtual workspaces.
Default applications include the LibreOffice office suite, Mozilla Firefox web browser, Cheese webcam viewer, Empathy instant messenger, Evolution email and calendar client, Gedit text editor, Shotwell image viewer and organizer, Totem video player, as well as Rhythmbox music player.
As mentioned, some of the default GNOME apps are also included in this Fedora edition, such as Clocks, Documents, Contacts, Files, Software, Terminal, Font Viewer, Screenshot, Calculator, Character Map, Disks, Disk Usage Analyzer, Document Viewer, System Monitor, Remote Desktop Client, and Orca.
Bottom line
Summing up, Fedora Live CD is a freely distributed and open source operating system that allows users to test the latest features of the Fedora Linux distribution without installing anything on their computers.
Blockchain as a Catalyst for Good | Linux.com
Blockchain and its ability to “embed trust” can help elevate trust, which right now, is low, according to Sally Eaves, a chief technology officer and strategic advisor to the Forbes Technology Council, speaking at The Linux Foundation’s Open FinTech Forum in New York City.
People’s trust in business, media, government and non-government organizations (NGOs) is at a 17-year low, and businesses are suffering as a result, Eaves said.
Additionally, Eaves said, 87 percent of millennials believe business success should be measured in more than just financial performance. People want jobs with real meaning and purpose, she added.
To provide further context, Eaves noted the following urgent global challenges:
- 1.5 billion people cannot prove their identity (which has massive implications in not just banking but education as well)
- 2 billion people worldwide do not have a bank account or access to a financial institution
- Identity fraud is estimated to cost the UK millions of euros annually.
Read more at The Linux Foundation
Should programming classes in high school be mandatory?
Should kids be technically literate? Of course! Is the best way to teach them this skill by turning them into programmers? Well, that’s a tougher question.
First, to be blunt, in much of the world, even in affluent areas, schools are not equipped to handle this task. Aside from lacking the physical technology, many also are lacking in adequate staffing resources in order to teach programming courses.
Second, it’s important to note that computer science and programming are not the same thing. Both are valuable, but in an academic program, it may actually be equally useful to teach computer science and formal logic, depending on what course of study a student wishes to pursue.
Third, programming and computer literacy are not the same thing, either. It’s entirely possible to be a computer power user without knowing how to program, and equally possible to be a programmer who doesn’t really know very much about the system that he or she is working on and how to optimize it for their use.
And fourth, instructional time is limited. Not everyone will end up using computer programming in their day jobs, so is taking time away from other subjects really going to lead to the best outcome?
That said, there’s still an argument to be made in favor.
The future is digital, and software is eating the world. To understand fundamentally how the world operates when algorithms are making decisions instead of humans requires some basic understanding of what an algorithm is and how it is created. Programming isn’t just about making things, it’s about understanding how things are made.
And the world frankly needs more programmers. There’s simply more and more code that needs to be written and managed than ever before, and while AI and automation might change what programmers are working on, it won’t change the need for them.
But further, understanding at least the basics of programming is important to being able to fully reap the benefits of open source. Having the code available to review, edit, and share under an open license is important, but can you really make use of the full power of an open license if you’re locked in by your own inability to make the changes you wish to make?
There are plenty of good reasons to take both sides.
What do you think? Should every kid today be learning to program? Why or why not?
Planetary Annihilation: TITANS continues to improve with another recent patch
Planetary Annihilation: TITANS, the massive scale RTS now being continued by the new Planetary Annihilation Inc had another small patch recently to further improve it.
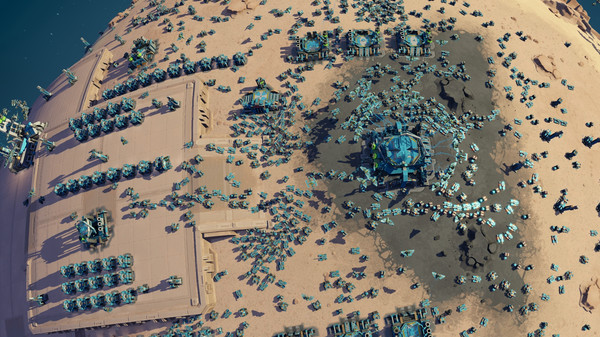
After the recent update to add in more multi-threading, they’ve expanded it a step further. Released on Friday last week, update 112314 added in experimental multi-threading on official servers, performance and memory usage improvements to navigation cost cells, more logging so they can find issues, plenty of AI improvements, some server bugs have been fixed along with modding adjustments and making orbital attack lines in the orbital path visualiser more visible.
I’m really quite impressed how quickly they’ve come back to continue improving this RTS. They’ve got a lot more improvements to come, as they haven’t upgraded the software behind various parts of the game yet like the UI system and so on.
It’s quite different to any other strategy game, especially since the maps are based across entire planets you scroll around. I love the fact that the mini-map is essentially another game window which you can set to watch any point you want, it’s very cleverly done.
Find it on Humble Store and Steam. With the current price, Humble seems cheaper than Steam.
Linux Fu: Pimp Your Pipes
One of the best things about working at the Linux (or similar OS) command line is the use of pipes. In simple terms, a pipe takes the output of one command and sends it to the input of another command. You can do a lot with a pipe, but sometimes it is hard to work out the right order for a set of pipes. A common trick is to attack it incrementally. That is, do one command and get it working with the right options and inputs. Then add another command until that works. Keep adding commands and tweaking until you get the final results.
That’s fine, but [akavel] wanted better and used Go to create “up” — an interactive viewer for pipelines.
Pipe Philosophy
Pipes can do a lot. They match in with the original Unix philosophy of making each tool do one thing really well. Pipe is really good at allowing Linux commands to talk to each other. If you want to learn all about pipes, have a look at the Linux Info project’s guide. They even talk about why MSDOS pipes were not really pipes at all. (One thing that write up doesn’t touch on is the named pipe. Do a “man fifo” if you want to learn more for now and perhaps that will be the subject of a future Linux Fu.)
This program — called up — continuously runs and reruns your pipeline as you make changes to the pipe. This way, every change you make is instantly reflected in the output. Here’s the video, here’s a quick video which shows off the interactive nature of up.
Installing
The GitHub page assumes you know how to install a go program. I tried doing a build but I didn’t have a few dependencies. Turns out the easy way to do it was to run this line:
go get -u github.com/akavel/up
This put the executable in ~/go/bin — which isn’t on my path. You can, of course, copy or link it to some directory that’s on your path or add that directory to your path. You could also set an alias, for example. Or, like I did in the video, just specify it every time.
Perfect?
This seems like a neat simple tool. What could be better? Well, I was a little sad that you can’t use emacs or vi edit keys on the pipeline, at least not as far as I could tell. This is exactly the kind of thing where you want to back up into the middle and change something. You can use the arrow keys, though, so that’s something. I also wished the scrollable window had a search feature like less.
Otherwise, though, there’s not much to dislike about the little tool. If writing a pipeline is like using a C compiler, up makes it more like writing an interactive Basic program.
Download SDL Linux 2.0.9
SDL stands for Simple DirectMedia Layer and it’s an open source multimedia library written in C and designed to provide low level access to mouse, keyboard, audio, joystick, 3D graphics hardware via Direct3D and OpenGL.
Used in many Humble Bundle games or Valve’s award winning catalog
These days, SDL is heavily used by emulators, video playback software, as well as numerous popular games, including the award winning Linux port of “Civilization: Call To Powe,” many Humble Bundle games, and Valve’s award winning catalog.
Runs on all mainstream operating systems
Simple DirectMedia Layer runs on numerous operating systems, including the mainstream GNU/Linux, Microsoft Windows and Mac OS X ones. The BeOS, BSD (FreeBSD, OpenBSD), BSD/OS, Solaris, IRIX, QNX OSes, as well as the Android and iOS mobile operating systems are also supported. Supported hardware platforms include 32 and 64-bit.
Getting started with SDL
SDL is usually available for download on numerous Linux kernel-based operating systems, through their official software repositories. Installing it using the latest source package, which is distributed for free on Softpedia, is easy as pie.
Download and save the archive on your Home directory, unpack it, open a Terminal app and navigate to the location where you’ve extracted the archive file (e.g. cd /home/softpedia/SDL2-2.0.3).
Run the ‘./configure && make’ command to configure, optimize and compile the program. After a successful compilation, run the ‘sudo make install’ command as a privileged user to install SDL system wide.
Under the hood
A quick look under the hood of the SDL project, will inform us that it is written in the C programming language and that it works natively with C++. Bindings for other programming languages are also available, supporting the popular Python, Ada, Java, Lua, Eiffel, ML, PHP, Perl, Pike, Ruby, and C#.
How to Move Files Using Linux Commands or File Managers | Linux.com
Learn how to move files with Linux commands in this tutorial from our archives.
There are certain tasks that are done so often, users take for granted just how simple they are. But then, you migrate to a new platform and those same simple tasks begin to require a small portion of your brain’s power to complete. One such task is moving files from one location to another. Sure, it’s most often considered one of the more rudimentary actions to be done on a computer. When you move to the Linux platform, however, you may find yourself asking “Now, how do I move files?”
If you’re familiar with Linux, you know there are always many routes to the same success. Moving files is no exception. You can opt for the power of the command line or the simplicity of the GUI – either way, you will get those files moved.
Let’s examine just how you can move those files about. First we’ll examine the command line.
Command line moving
One of the issues so many users, new to Linux, face is the idea of having to use the command line. It can be somewhat daunting at first. Although modern Linux interfaces can help to ensure you rarely have to use this “old school” tool, there is a great deal of power you would be missing if you ignored it all together. The command for moving files is a perfect illustration of this.
The command to move files is mv. It’s very simple and one of the first commands you will learn on the platform. Instead of just listing out the syntax and the usual switches for the command – and then allowing you to do the rest – let’s walk through how you can make use of this tool.
The mv command does one thing – it moves a file from one location to another. This can be somewhat misleading, because mv is also used to rename files. How? Simple. Here’s an example. Say you have the file testfile in /home/jack/ and you want to rename it to testfile2 (while keeping it in the same location). To do this, you would use the mv command like so:
mv /home/jack/testfile /home/jack/testfile2
or, if you’re already within /home/jack:
mv testfile testfile2
The above commands would move /home/jack/testfile to /home/jack/testfile2 – effectively renaming the file. But what if you simply wanted to move the file? Say you want to keep your home directory (in this case /home/jack) free from stray files. You could move that testfile into /home/jack/Documents with the command:
mv /home/jack/testfile /home/jack/Documents/
With the above command, you have relocated the file into a new location, while retaining the original file name.
What if you have a number of files you want to move? Luckily, you don’t have to issue the mv command for every file. You can use wildcards to help you out. Here’s an example:
You have a number of .mp3 files in your ~/Downloads directory (~/ – is an easy way to represent your home directory – in our earlier example, that would be /home/jack/) and you want them in ~/Music. You could quickly move them with a single command, like so:
mv ~/Downloads/*.mp3 ~/Music/
That command would move every file that ended in .mp3 from the Downloads directory, and move them into the Music directory.
Should you want to move a file into the parent directory of the current working directory, there’s an easy way to do that. Say you have the file testfile located in ~/Downloads and you want it in your home directory. If you are currently in the ~/Downloads directory, you can move it up one folder (to ~/) like so:
mv testfile ../
The “../” means to move the folder up one level. If you’re buried deeper, say ~/Downloads/today/, you can still easily move that file with:
mv testfile ../../
Just remember, each “../” represents one level up.
As you can see, moving files from the command line, isn’t difficult at all.
GUI
There are a lot of GUIs available for the Linux platform. On top of that, there are a lot of file managers you can use. The most popular file managers are Nautilus (GNOME) and Dolphin (KDE). Both are very powerful and flexible. I want to illustrate how files are moved using the Nautilus file manager (on the Ubuntu 13.10 distribution, with Unity as the interface).
Nautilus has probably the most efficient means of moving files about. Here’s how it’s done:
- Open up the Nautilus file manager.
- Locate the file you want to move and right-click said file.
- From the pop-up menu (Figure 1) select the “Move To” option.
- When the Select Destination window opens, navigate to the new location for the file.
- Once you’ve located the destination folder, click Select.
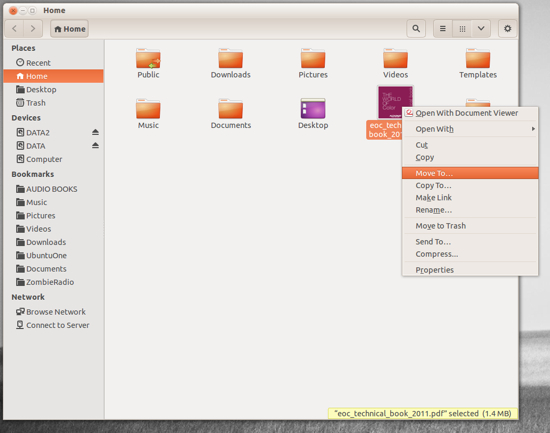
This context menu also allows you to copy the file to a new location, move the file to the Trash, and more.
If you’re more of a drag and drop kind of person, fear not – Nautilus is ready to serve. Let’s say you have a file in your home directory and you want to drag it to Documents. By default, Nautilus will have a few bookmarks in the left pane of the window. You can drag the file into the Document bookmark without having to open a second Nautilus window. Simply click, hold, and drag the file from the main viewing pane to the Documents bookmark.
If, however, the destination for that file is not listed in your bookmarks (or doesn’t appear in the current main viewing pane), you’ll need to open up a second Nautilus window. Side by side, you can then drag the file from the source folder in the original window to the the destination folder in the second window.
If you need to move multiple files, you’re still in luck. Similar to nearly every modern user interface, you can do multi-select of files by holding down the Ctrl button as you click each file. After you have selected each file (Figure 2), you can either right-click one of the selected files and the choose the Move To option, or just drag and drop them into a new location.
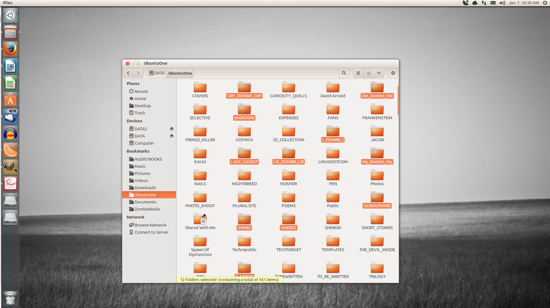
The selected files (in this case, folders) will each be highlighted.
Moving files on the Linux desktop is incredibly easy. Either with the command line or your desktop of choice, you have numerous routes to success – all of which are user-friendly and quick to master.
Linux Today – How to partition and format a drive on Linux
Nov 07, 2018, 12:00
On most computer systems, Linux or otherwise, when you plug a USB thumb drive in, you’re alerted that the drive exists. If the drive is already partitioned and formatted to your liking, you just need your computer to list the drive somewhere in your file manager window or on your desktop. It’s a simple requirement and one that the computer generally fulfills.
Create a Linux VM template in System Center Virtual Machine Manager
System Center Virtual Machine Manager is well known for its ability to create templates from which Windows virtual machines can be created. However, VMM is also capable of creating a Linux VM template. In this article, I will show you how it’s done.
The first thing that we will need to do is to set up a Linux VM from which the template can be created. For the purposes of this article, I will be using CentOS, which you can download here.
According to Microsoft, there are two main tasks that need to be completed in order to create a Linux VM template. First, you are going to need to install the Linux Integration Services onto the VM (if it is not already installed). Second, you will have to install the VMM guest agent. You can download the Linux Integration Services here.
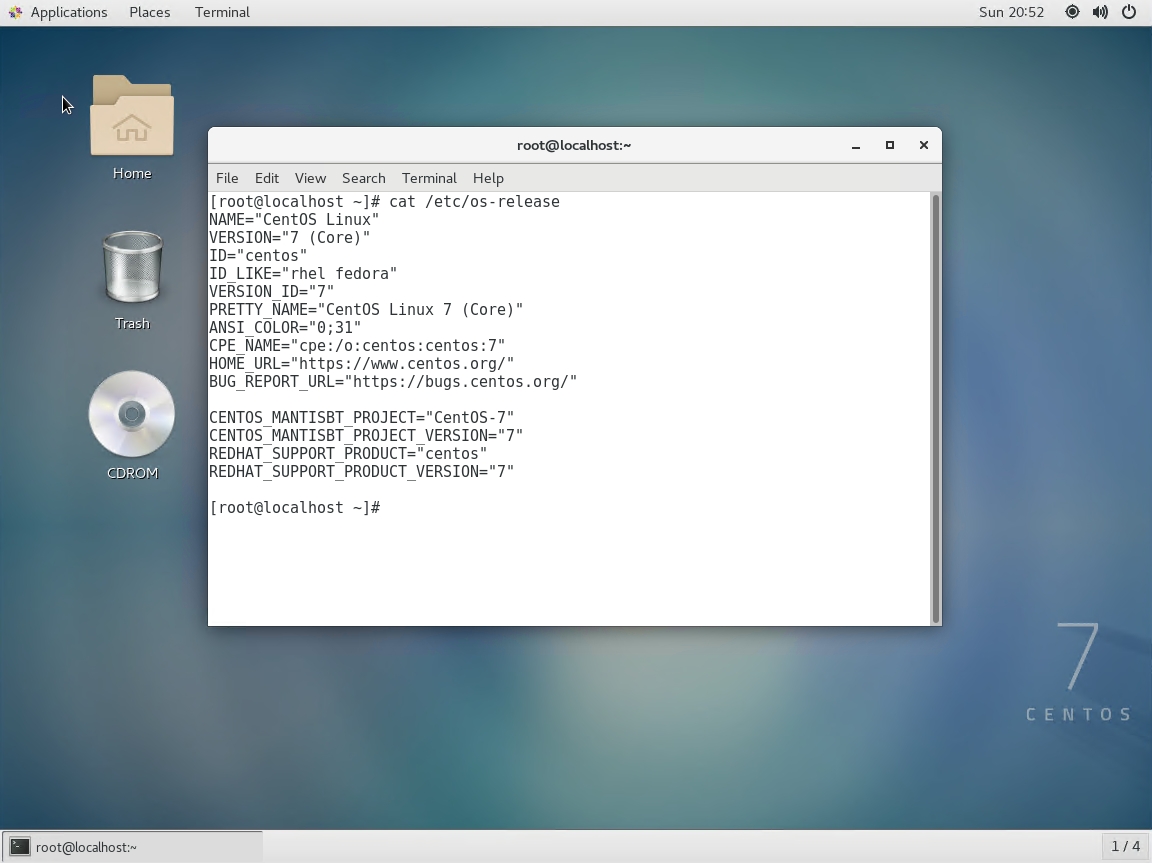
The Linux Integration Services are made available as an ISO file. You will need to mount this ISO file as a DVD drive. After doing so, log into the VM as root. Now, open the terminal and enter the following command:
cat /etc/os-release
This command will tell you the exact version of Linux that you are running. You will need to know the version because the Linux Integration Services are version specific. You can see what this looks like below.
Next, you will need to mount your Linux Integration Service DVD (which should already be attached to the VM). The commands below can be used to mount the DVD and verify its contents:
mount -t iso9660 /dev/cdrom /mnt/cdrom
cd /mnt/cdromls
Here is what this should look like:

Now you will need to navigate to the folder that corresponds to your Linux version. In my case, I am running CentOS version 7.5, so I would use the RHEL75 folder. The command for accessing that folder is:
CD RHEL75
From there, the command used to install the Linux Integration Services is:./install.sh
After a few minutes, you should see a confirmation message indicating that the Linux Integration Services have been installed, as shown below. You will now need to reboot your VM.

Although the integration services have been installed, the Linux VM template may lack network connectivity. The easiest way to check this is to open the terminal and enter the ifconfig command. Upon doing so, verify that eth0 exists, that it is listed as UP, and that the word inet appears, along with an IPv4 address. If you look at the figure below, you can see that the eth0 adapter exists within my VM, and is listed as being up, but lacks an IP address.
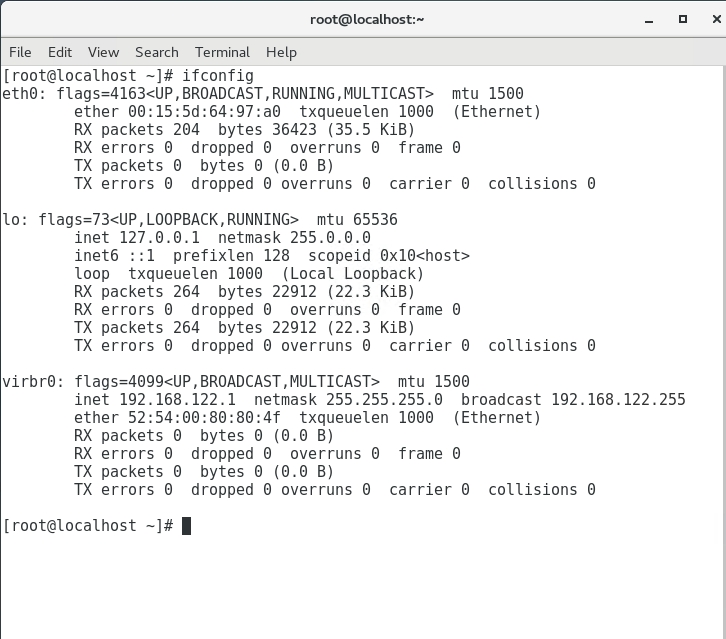
What if the IP address is missing?
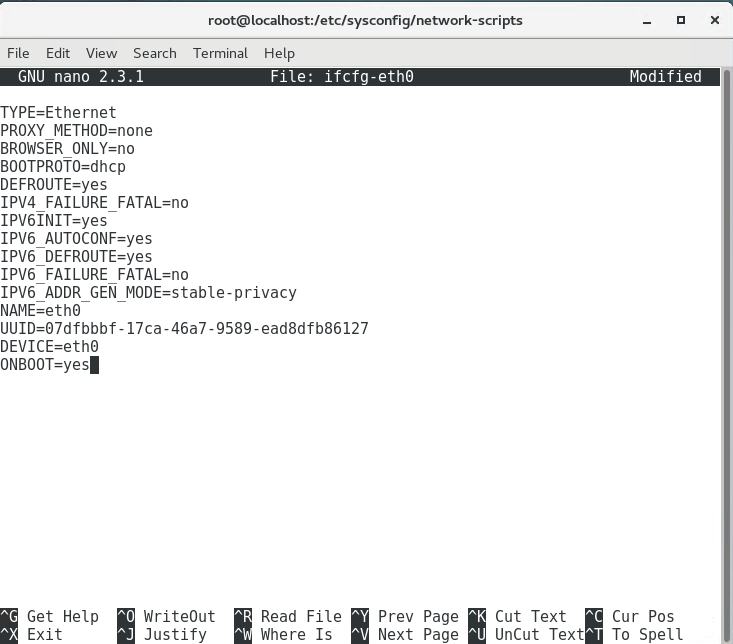
To fix the problem of a missing IP address, enter the following commands:
cd /etc/sysconfig/network-scripts/
nano ifcfg-eth0
This will bring up an editor that lets you make changes to the adapter’s configuration. You will need to set ONBOOT to Yes, and BOOTPRONTO to DHCP. Also, if there is a line for HWADDR, that should be removed. You can see the changes below. When you are done, press Ctrl-X, followed by Y and Enter to save your changes and close the editor.
Reboot and log in
Now, reboot the VM, log in, and make sure that you have network connectivity by using the ifconfig command. As you can see below, I now have an IP address.

The next step in the process is to install the VMM agent on the VM. System Center Virtual Machine Manager stores the agent in the following folder: C:Program FilesMicrosoft System Center 2016Virtual Machine ManagerAgentsLinux. You will need to share this folder to make it accessible to your Linux VM. It’s also helpful to create a local user on your VMM server named root.
Now, enter the following commands in the terminal on your Linux server:
yum -y install cifs-utils
mkdir /tmp/VMMAgentsmount.cifs //<server name>/agents/Linux /tmp/VMMAgentscd /tmp/VMMAgents/./install scvmmguestagent.1.0.2.1075×64.tar
You can see what the last three of these commands look like in the screenshot below.

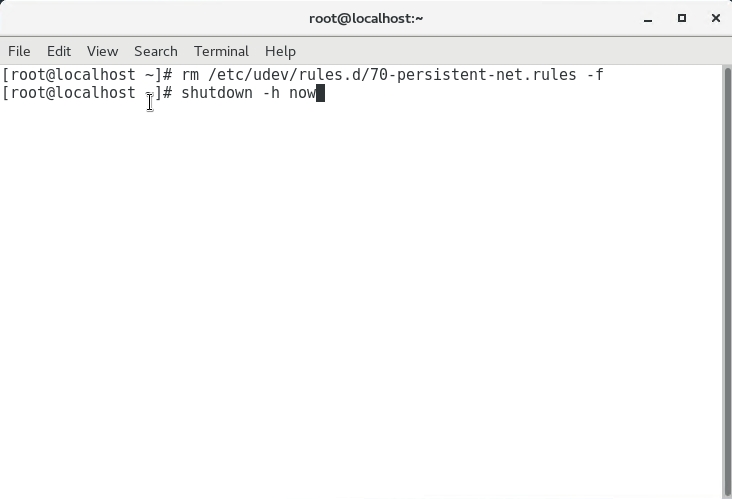
The last thing that has to be done before creating a template is to clear the network rules and shut down the server. This can be accomplished with these commands:
rm /etc/udev/rules.d/70-persistent-net.rules -f
shutdown -h now
Home stretch
Now that you have prepared the virtual machine, the template creation process is actually really straightforward. The first thing that you will need to do is copy the VM’s virtual hard disk to the VMM server’s library share.
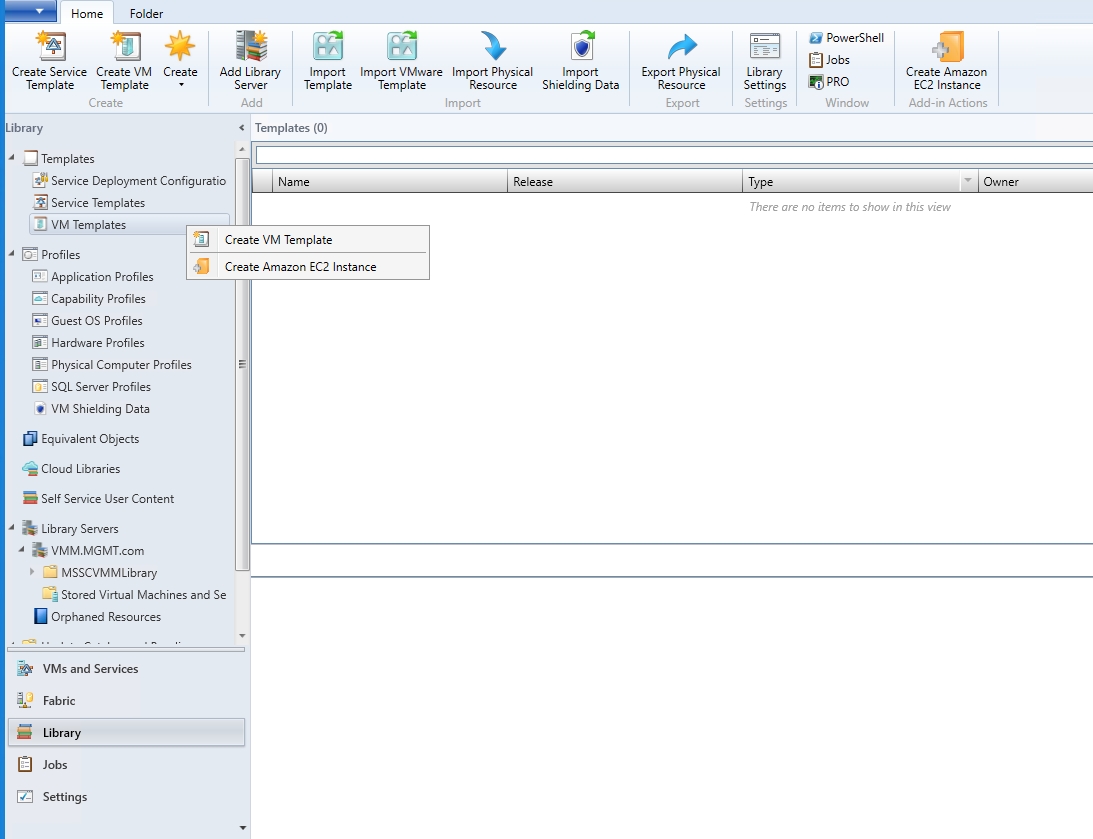
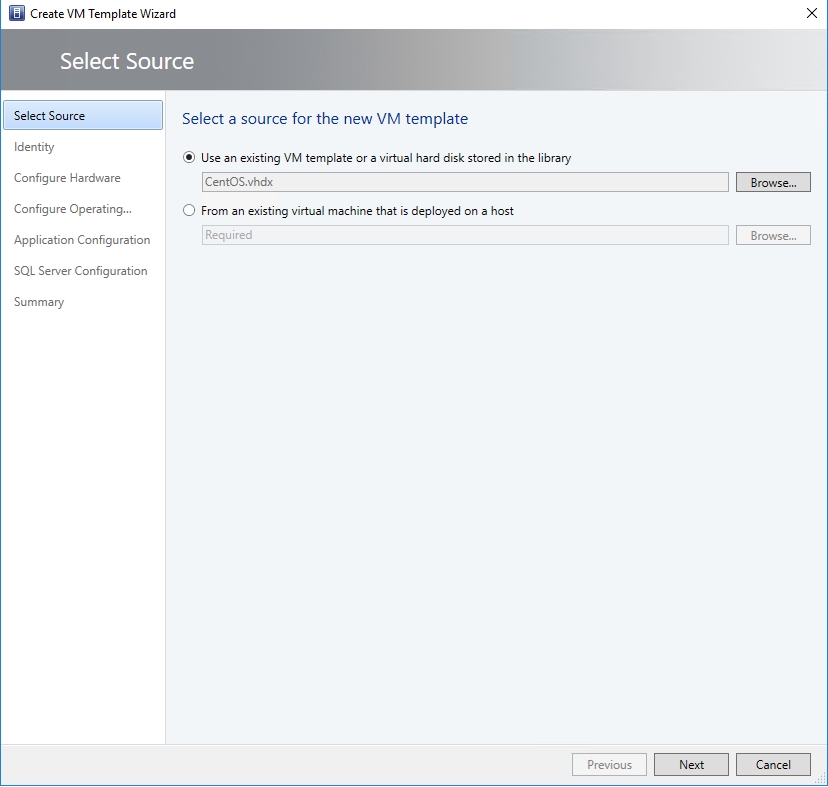
Now, launch the Virtual Machine Manager console, and go to the Library workspace. Right click on the VM Templates container and select the Create VM Template command from the shortcut menu.
Windows will now launch the Create VM Template Wizard. On the wizard’s first screen, choose the option to use an existing VM Template of a virtual hard disk stored in the library. Click the Browse button, and select the Linux virtual hard disk. If this virtual hard disk does not show up, you will need to refresh the library share.
The next screen requires you to enter a name for the template and to choose a generation. Make sure to choose the same generation as the VM from which the template is being created.
Click Next, and you will be taken to the Configure Hardware screen. Make any necessary hardware configurations, and click Next.
When you arrive at the Configure Operating System screen, you will need to set the Guest OS Profile to Create new Linux operating system customized settings. Next, set the Operating System option to CentOS Linux 7 (64 bit). Finally, enter your root credentials and make any other desired additions to the template.
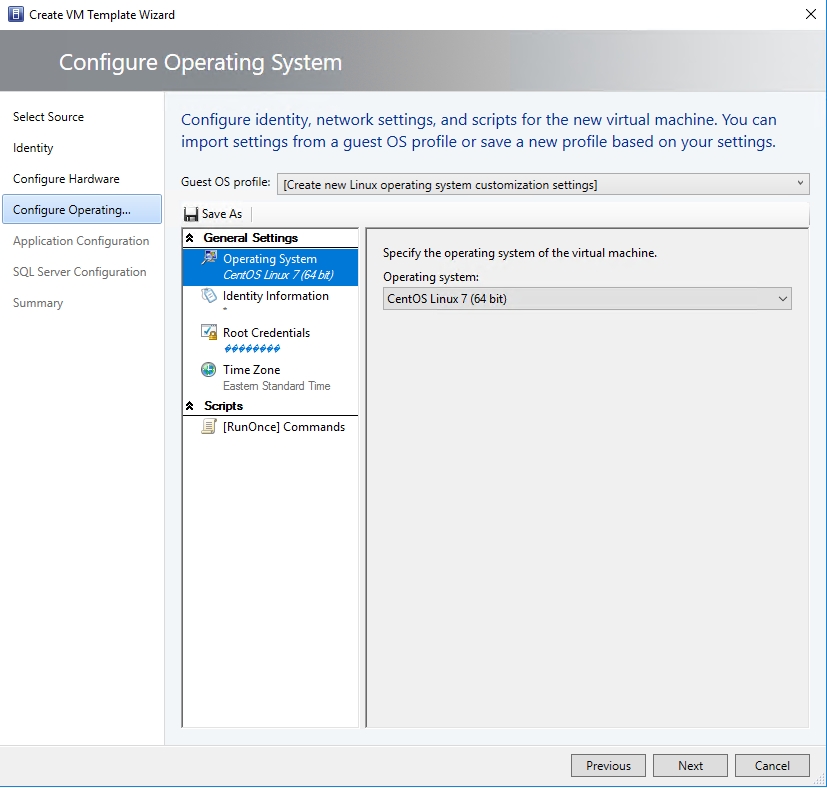
Be sure to set the operating system to CentOS Linux 7 (64 bit).
Now, click Next on the remaining screens, followed by Create. The new template will be created.

Yes, creating a Linux VM template can be tedious
Creating a Linux VM template can be a tedious process if you are not familiar with Linux. If you run into problems, remember that Linux commands tend to be case sensitive. You can use the screen captures for help. It is also important to note that I have based this article on CentOS. Other flavors of Linux may use slightly different commands.