By Jack M. Germain, Nov 2, 2018 11:52 AM PT


Feren OS is a nice alternative to Linux Mint and an easy stepping stone to transition to Linux from Microsoft Windows or macOS.
I am a long-time user of Linux Mint, but I am falling out of love with it. Mint is getting stale. It is annoyingly sluggish at times. I run it on a number of computers and experience the same symptoms on a variety of hardware configurations. Linux Mint is starting to suffer from a developmental malaise.
That diagnosis started me thinking about a suitable replacement distro that runs the Cinnamon desktop with a bit more innovation and flare. Not everyone finds the Cinnamon desktop to be an ideal computing environment. However, for me, Cinnamon offers the best all-around combination of features, productivity and ease of use.
Feren OS, with its tweaking of the Cinnamon desktop and other enhancements, is a very appealing replacement candidate. Plus, the developers plan to release a KDE edition as a desktop option in about 18 months.
Smart Strategy
What also makes Feren OS attractive is its developmental strategy. This distro follows a partial rolling release schedule that provides constant updates to the OS for its lifetime.
A true rolling release ensures that you never have to handle ISO installations again. That means no more configuring settings and getting the upgrade working with the same look and feel as the current version.
Feren OS pushes software updates and security patches as they are ready. At predetermined intervals, you can download an updated snapshot and let the software manager automatically integrate the latest core elements and system upgrades.
The latest snapshot upgrade came three months after the previous update. This process spares you from having to rebuild your system each time a new version is released. This modified rolling release feature is essential and convenient.
For example, it eliminates the hassle of upgrading each major new release on my cadre of Linux computers. Inevitably, one or two of my computers upgrade Linux Mint successfully over-the-air from the Mint repository.
I am always stuck having to do a fresh new installation on the other computers I use, or just skipping the upgrade entirely. A glitch always seems to find a weak spot in my hardware even though the installed version had no compatibility issues.
Feren’s Heritage
Feren OS is a desktop Linux distribution based on Linux Mint 19. It ships with the Cinnamon desktop environment and includes the WINE compatibility layer for running Windows applications.
Feren OS is a young entry in the crowded field of up and coming Linux operating systems. The distro first appeared in late 2015. The developers grew the Linux Mint alternative into a very polished computing platform in a relatively short period of time. It has its own personality, so you will not feel like you are using a Mint clone.
The U.S.-based developer last month released a new stable version of Feren OS, called “October snapshot.” The latest release comes with a number of desktop tweaks and is also available for 32-bit computers, something of an oddity today. The 32-bit architecture is aging and is suitable only for very old computers.
The latest Feren OS update has no big surprises or major improvements. It simply adds more spit and polish to an already fine-tuned operating system. Most of the work has been done improving the back end of many of Feren’s own applications.
I like the concept of downloading Feren OS once and staying updated forever. This October snapshot brings it completely up to date. Out of the box, it is ready to install and use without massive configuration steps.
What’s Inside
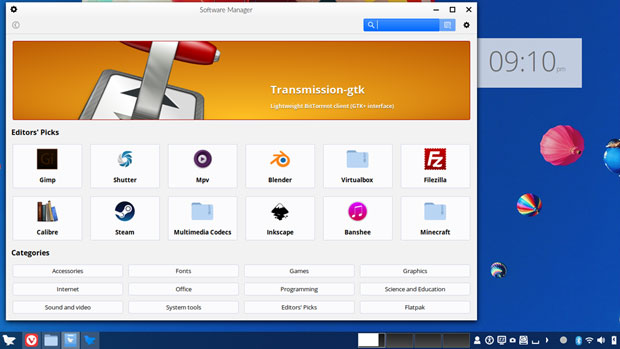
Feren OS comes with a handy selection of applications that are available by default. The OS also gives you access to thousands of applications available through the Ubuntu Repository.
Some of the Feren OS staples are the Vivaldi Web browser, Files to manage applications and system locations, Remmina for connecting to remote computers, LibreOffice, Calendar, Photos to display your photo collection, Text Editor for writing, Krita for digital painting, Evince document viewer, Weather, Calculator and Maps.
The Themes manager makes personalizing the desktop easy. It lets you alter the appearance of icons, background, window decoration, and just about everything else governing how Feren OS looks on the screen.
This distro provides a handy tool not available in most other Linux distros. The Windows Transfer Tool makes it next to foolproof to move your Microsoft Windows documents and some settings to the Feren OS partition during the installation process.
Feren OS runs the Vivaldi browser by default. The Web Browser Manager tool makes it easy to click and install other Web browsers.
Overall Impressions
Feren OS is very easy to install. This makes it suitable for those migrating to Linux, or at least to this operating system. Feren OS offers a specialized software repository that is colorful and efficient to use. It has several specialized launchers to install and configure software packages with a single mouse click.
The in-house customization of the Cinnamon desktop environment gives Feren OS a considerably different atmosphere than the current Linux Mint Cinnamon iteration. In several ways, the look and feel, along with the easy operation, resembles the Zorin OS. However, Feren OS has what Zorin OS lacks — the Cinnamon desktop.
Feren OS is not a retread of Zorin, which runs the GNOME desktop (or an alternative edition that runs the Xfce desktop) or Linux Mint. Both Feren and Zorin are designed to look like classic Windows.
They both resemble many other Linux distributions belonging to the Debian Linux family. Feren OS displays a handful of system icons on the desktop if you want them. It shows a fully functional taskbar or panel on the bottom of the screen.
Two strong points with Feren OS are the Cinnamon desktop-powered panel at the bottom of the screen and the Software Manager plugged into the Ubuntu repository.
Cinnamon Flavoring
If you are not familiar with the Cinnamon desktop, you do not have to worry about much of a learning curve. The Cinnamon desktop is easy to use, especially with all of the customized features the Feren OS developer team added.
The left side of the panel is home to the main menu button and several launch icons for the Web browser, the file manager and the Software Center. The right end of the panel houses the notifications tray and systems tools launchers.
You can add a broad assortment of applets to that taskbar. You can choose from a library of desklets on the desktop to display various readouts such as weather and system monitors.
Do embedded clock gadgets on the desktop bug you? Feren OS lets you easily enable or disable the clock widget on the screen. You do this simply by calling up the Conky Toggler tool from the main menu and clicking the enable/disable button. Simple and done.
Special Factors
The main menu in Feren OS is a change from the typical cascading display used in Windows and many Linux distros. It is a two-column display with the categories in the left column once you click on the All Applications label at the bottom of the menu panel. Otherwise, you see a left column with a few default applications and a right column showing places.
I like that I can hover the mouse pointer over a menu item to get a brief description of what that application does. This makes getting acclimated to the OS very easy.
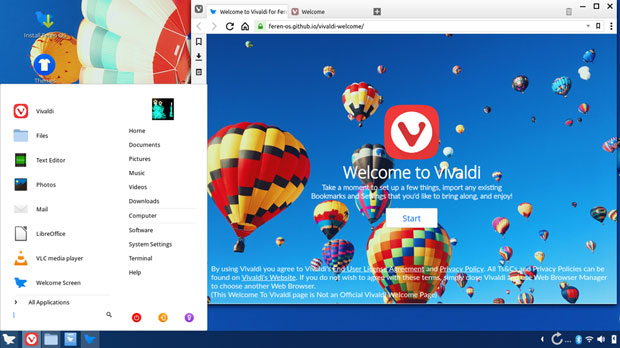
Feren OS runs the Vivaldi browser by default. The Web Browser Manager tool makes it easy to click and install other Web browsers. The main menu in Feren OS is a change from the typical cascading display used in Windows and many Linux distros.
Feren OS runs the Vivaldi browser by default. The Web Browser Manager tool makes it easy to click and install other Web browsers. This tool originally appeared in Zorin OS.
The browser options available in this tool are Firefox, Google Chrome, Chromium, Opera and Brave. You also can select a more generic Web browser called “Web.” Either way, this tool makes it a one-click process to add/remove Web browsers.
I have not seen this Web browser in other Linux distros. It is an open source simple, clean screen style powered WebKitGTK+.
Game players will be disappointed. No default games are included. In fact, the menu does not have a game category. That doesn’t mean you can’t run games on this distro. You just have to download games you want from the software center.
System Requirements
To run Feren OS smoothly, you need 1-2 GB of RAM. However, for the top-notch performance this distro can deliver, you need at least 4 GB of system memory.
You need at least 20 GB of disk space, too. To keep up with optimum performance needs, having 50 or more gigabytes is recommended.
If your hardware falls short of these minimum requirements or comes close to not measuring up with decent performance, try the lightweight version. This is a younger variant of Feren OS that is designed to run on PCs with lower specifications. It is a stripped-down desktop version.
Bottom Line
Feren OS is a popular replacement for Linux Mint. It is speedy and has enough developer differences to make using it interesting and fun. From a practical viewpoint, Feren OS does a nice job of improving on the core Linux Mint Cinnamon experience.
Feren OS is a nearly flawless Linux computing platform. This distro is practically maintenance-free. The developers have taken the best parts of several innovative Linux distros and seamlessly integrated them into an ideal computing platform.
Want to Suggest a Review?
Is there a Linux software application or distro you’d like to suggest for review? Something you love or would like to get to know?
Please
email your ideas to me, and I’ll consider them for a future Linux Picks and Pans column.
And use the Reader Comments feature below to provide your input!

 Jack M. Germain has been an ECT News Network reporter since 2003. His main areas of focus are enterprise IT, Linux and open source technologies. He has written numerous reviews of Linux distros and other open source software.
Email Jack.
Source

 Collected all your favorite fonts? Good! Time to install them in your system!
 System76 has launched a line of mostly open hardware, Ubuntu-equipped “Thelio” desktop PCs built in Colorado with a choice of AMD and Intel CPUs.