Crazy Taxi used to be an arcade game found in most arcades and restaurants near the racing games. Now you can race around the silly town picking up customers. Smash cars, jump rivers, drive through obects on the sidewalk and find hidden routes to your passengers destination.
Follow my step-by-step guide on installing, configuring and optimizing Crazy Taxi in Linux with PlayOnLinux.
Note: This guide applies to the Steam version of Crazy Taxi. Other versions may require additional steps.Tips & Specs:
To learn more about PlayOnLinux and Wine configuration, see the online manual: PlayOnLinux ExplainedMint 18.3 64-bit
PlayOnLinux: 4.2.12
Wine: 3.0Wine Installation
Click ToolsSelect “Manage Wine Versions”
Look for the Wine Version: 3.0
Select it
Click the arrow pointing to the right
Click Next
Downloading Wine
Extracting
Downloading Gecko
Installed
Wine 3.0 is installed and you can close this window
Downloading Steam
Go To: http://www.steampowered.comClick Install Steam
Do not click “Install Steam Now”
It will automatically install Linux Steam
Select Windows Steam instead
click “Windows” under the green button
Navigate to your desktop
Click Save
PlayOnLinux Setup
Launch PlayOnLinuxClick Install
Click “install a non-listed program”
Click Next
Select “Install a program in a new virtual drive”
Click Next
Name your virtual drive: crazytaxi
No spaces
Click Next
Check all three options:
- Use another version of Wine
- Configure Wine
- Install some libraries
Click Next
Select Wine 3.0
Click Next
Select “32 bits windows installation”
Click Next
Configure WineApplications Tab
Windows Version: Windows 7Click Apply
Graphics Tab
Check: Automatically capture the mouse in full-screen windowsClick Ok
PlayOnLinux Packages (Libraries, Components, DLL’s)
Check the following libraries:
- POL_Install_corefonts
- POL_Install_d3dx9
- POL_Install_tahoma
- POL_Install_vcrun2010
Click Next
Note: All packages will automatically download and installInstalling Steam
Click Browse
Navigate to your desktop
Select: SteamSetup.exe
Click Open
Click Next
Click Next
Check: I accept the license…
Click Next
Click Next
Click Next
Click Install
Click Finish
Updating Steam
Click the “X” to close Steam login
PlayOnLinux Shortcut
Select Steam.exeClick Next
Name your shortcut: Crazy Taxi
Click Next
Select “I don’t want to make another shortcut”
Click Next
PlayOnLinux Configure
Back to PlayOnLinuxClick Configure
General Tab
Wine Version: 3.0Arguments: -no-dwrite
This fixes any missing font problems
Note: Click the + to download other versions of Wine. Click the down-arrow to select other versions of wineDisplay Tab
Video Memory Size: Select the size of Memory your video card/chip uses
Close Configure
Steam Server Error
Before launching Steam you will get a Server Error for every game
Navigate to your game’s wineprefix:
Full Path:
Code:
/home/username/.PlayOnLinux/wineprefix/alienbreed3/drive_c/Program Files/Steam/config/
Open config.vdf with a text editor
Copy this code below
Code:
“CS” “valve511.steamcontent.com;valve530.steamcontent.com;valve548.steamcontent.com;valve539.steamcontent.com;valve519.steamcontent.com;valve555.steamcontent.com;valve504.steamcontent.com;valve529.steamcontent.com;valve558.steamcontent.com;valve500.steamcontent.com;valve561.steamcontent.com;valve532.steamcontent.com;valve540.steamcontent.com;valve502.steamcontent.com;valve544.steamcontent.com;valve528.steamcontent.com;valve556.steamcontent.com;valve520.steamcontent.com;valve542.steamcontent.com;valve538.steamcontent.com;valve551.steamcontent.com;valve521.steamcontent.com;valve564.steamcontent.com;valve516.steamcontent.com;valve535.steamcontent.com;valve541.steamcontent.com;valve533.steamcontent.com;valve536.steamcontent.com;valve557.steamcontent.com;valve559.steamcontent.com;valve537.steamcontent.com;valve508.steamcontent.com;valve525.steamcontent.com;valve565.steamcontent.com;valve566.steamcontent.com;valve514.steamcontent.com;valve545.steamcontent.com;valve517.steamcontent.com;valve547.steamcontent.com;valve549.steamcontent.com;valve503.steamcontent.com;valve515.steamcontent.com;valve506.steamcontent.com;valve562.steamcontent.com;valve526.steamcontent.com;valve543.steamcontent.com;valve522.steamcontent.com;valve518.steamcontent.com;valve509.steamcontent.com;valve550.steamcontent.com;valve552.steamcontent.com;valve505.steamcontent.com;valve553.steamcontent.com;valve512.steamcontent.com;valve546.steamcontent.com;valve554.steamcontent.com;valve510.steamcontent.com;valve563.steamcontent.com;valve501.steamcontent.com;valve531.steamcontent.com;valve523.steamcontent.com;valve524.steamcontent.com;valve507.steamcontent.com;valve560.steamcontent.com;valve567.steamcontent.com;valve513.steamcontent.com;valve1601.steamcontent.com;valve164.steamcontent.com;valve1615.steamcontent.com;valve1602.steamcontent.com;valve1604.steamcontent.com;valve1608.steamcontent.com;valve1603.steamcontent.com;valve1606.steamcontent.com;valve1609.steamcontent.com;valve1618.steamcontent.com;valve1617.steamcontent.com;valve1613.steamcontent.com;valve1607.steamcontent.com;valve1611.steamcontent.com;valve1614.steamcontent.com;valve1619.steamcontent.com;valve1616.steamcontent.com;valve1612.steamcontent.com;valve1610.steamcontent.com;valve165.steamcontent.com;valve1605.steamcontent.com;valve954.steamcontent.com;valve955.steamcontent.com;valve904.steamcontent.com;valve901.steamcontent.com;valve957.steamcontent.com;valve953.steamcontent.com;valve956.steamcontent.com;valve950.steamcontent.com;valve905.steamcontent.com;valve952.steamcontent.com;valve902.steamcontent.com;valve907.steamcontent.com;valve958.steamcontent.com”
Go to the line“InstallConfigStore”
{
“Software”
{
“Valve”
{
“Steam”
{
“CM”Paste in a new line under the “CM” line with all the IP Addresses
Save config.vdf
Launching Steam
Select Crazy TaxiClick Run
Note: Click debug to see errors and bugs
Click “Login to existing account”
Login
Find Crazy Taxi in your Steam Library
Click Install
- Uncheck “Created desktop shortcut”
- Uncheck “Create start menu shortcut”
Click Next
Click Play
Check “Configure Crazy Taxi”
Click Play
Adjust:
- Resolution
- V-Sync
- FXAA
- Windowed
Click the Play arrow
Conclusion:
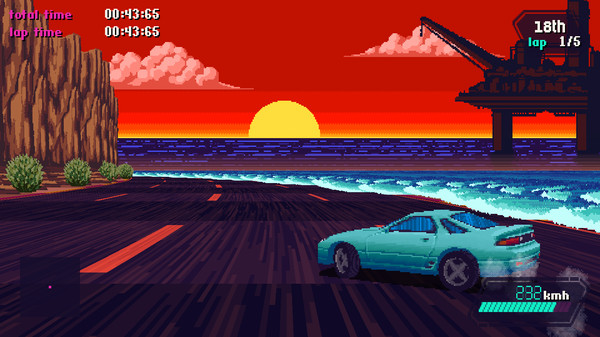
Crazy Taxi ran perfectly on my GeForce GTX 1060 in 1920×1080 resolution. I didn’t have any bugs or problems except the Steam server error/hack. I was also able to configure my Xbox controller in the Setup and play the game just fine.Gameplay Video:
Screenshots:
 Collected all your favorite fonts? Good! Time to install them in your system!
 System76 has launched a line of mostly open hardware, Ubuntu-equipped “Thelio” desktop PCs built in Colorado with a choice of AMD and Intel CPUs.


 Jack M. Germain has been an ECT News Network reporter since 2003. His main areas of focus are enterprise IT, Linux and open source technologies. He has written numerous reviews of Linux distros and other open source software.