How to Install cPanel on CentOS 7
![]() cPanel is the most popular and most widely-used control panel for managing and automating web hosting tasks. It is the world’s most intuitive and user-friendly control panel, with a very simple and straight-to-the-point graphical interface. cPanel is a Linux-based web hosting control panel, that utilizes a 3 tier structure for system administrators, resellers and end-user website owners, all via a web-browser. Other than the beautiful user interface, cPanel has command line access and API-based access for third-party software integration, for web hosting providers or developers and administrators to automate their system administration processes. In this tutorial, we will show you how to install WHM and cPanel on CentOS 7.
cPanel is the most popular and most widely-used control panel for managing and automating web hosting tasks. It is the world’s most intuitive and user-friendly control panel, with a very simple and straight-to-the-point graphical interface. cPanel is a Linux-based web hosting control panel, that utilizes a 3 tier structure for system administrators, resellers and end-user website owners, all via a web-browser. Other than the beautiful user interface, cPanel has command line access and API-based access for third-party software integration, for web hosting providers or developers and administrators to automate their system administration processes. In this tutorial, we will show you how to install WHM and cPanel on CentOS 7.
cPanel Installation Requirements
- CentOS 7 VPS
- Minimum of 1GB RAM (2GB RAM is recommended)
- Minimum 20GB disk space (40GB recommended)
- cPanel license (there is also 15 day trial period which gets activated as soon as the installation is complete)
Installation of cPanel in CentOS 7
1. Connect to your server
First, you need to connect to your server via SSH.
To connect to your server via SSH as user root, use the following command:
ssh root@IP_ADDRESS -p PORT_NUMBER
and replace “IP_ADDRESS” and “PORT_NUMBER” with your actual server IP address and SSH port number.
2. WHM/cPanel installation
Cpanel is written in Perl, so before we start the installation you must make sure that you have Perl installed on your server.
To install Perl in your server, run the following command:
yum install perl
WHM/cPanel also requires that the hostname of your server is a Fully Qualified Domain Name (FQDN) that does not match any of your server’s domains. In our example, we will set the hostname of our server to host.mydomain.com (you can replace mydomain.com with your actual domain name). To change the hostname of your server you can use the following command:
hostnamectl set-hostname host.mydomain.com
To download the cPanel installation script you will need to use the cURL command. If cURL is not present on your server you can install it with the following command:
yum install curl
Before you download the script, let’s change your current directory to /home with the following command:
cd /home
You can now download the latest version of cPanel & WHM with:
curl -o latest -L https://securedownloads.cpanel.net/latest
To start the installation, execute the following command:
sh latest
You should see the following output on your screen, indicating that the installation has been started:
Verifying archive integrity… All good.
Uncompressing cPanel & WHM Installer……
____ _
___| _ __ _ _ __ ___| |
/ __| |_) / _` | ‘_ / _ |
| (__| __/ (_| | | | | __/ |
___|_| __,_|_| |_|___|_|
Installer Version v00080 rfaafe3bcf5b92fd14d1cb80357765325dd0f351a
Beginning main installation.
The installation process may take up to 30 minutes. After the installation is complete, you may be asked to reboot your server. The following output will be displayed on your screen:
cPanel install finished in 17 minutes and 44 seconds!
2018-10-19 13:08:18 1195 ( INFO): Congratulations! Your installation of cPanel & WHM 11.74 is now complete. The next step is to configure your server.
2018-10-19 13:08:18 1195 ( INFO):
2018-10-19 13:08:18 1195 ( INFO): Before you configure your server, ensure that your firewall allows access on port 2087.
2018-10-19 13:08:18 1195 ( INFO): On RHEL, CentOS, and CloudLinux systems, execute /scripts/configure_firewall_for_cpanel to accomplish this.
2018-10-19 13:08:18 1195 ( INFO):
2018-10-19 13:08:18 1195 ( INFO): After ensuring that your firewall allows access on port 2087, you can configure your server.
2018-10-19 13:08:18 1195 ( INFO):
2018-10-19 13:08:18 1195 ( INFO): 1. Open your preferred browser
2018-10-19 13:08:18 1195 ( INFO):
2018-10-19 13:08:18 1195 ( INFO): 2. Type https://1.2.3.4:2087 in the address bar
2018-10-19 13:08:18 1195 ( INFO):
2018-10-19 13:08:18 1195 ( INFO): 3. Enter the word root in the Username text box
2018-10-19 13:08:18 1195 ( INFO):
2018-10-19 13:08:18 1195 ( INFO): 4. Enter your root password in the Password text box
2018-10-19 13:08:18 1195 ( INFO):
2018-10-19 13:08:18 1195 ( INFO): 5. Click the Login button
2018-10-19 13:08:18 1195 ( INFO):
2018-10-19 13:08:18 1195 ( INFO): Visit https://go.cpanel.net/whminit for more information about first-time configuration of your server.
2018-10-19 13:08:18 1195 ( INFO):
2018-10-19 13:08:18 1195 ( INFO): Visit http://support.cpanel.net or https://go.cpanel.net/whmfaq for additional support
2018-10-19 13:08:18 1195 ( INFO):
2018-10-19 13:08:18 1195 ( INFO): Thank you for installing cPanel & WHM 11.74!
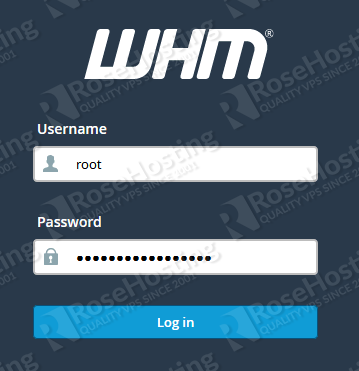
You can now open your browser and navigate to https://your-server-ip:2087
This will give you access to WHM (Web Host Manager) from where you can finish the installation in your browser. WHM is a web hosting manager that allows administrative access so you can manage every cPanel hosting account on your server.
With WHM you can create cPanel user accounts, manage them, establish pricing tiers, monitor the services running on the server and the server resources, generate user backups, transfer data between WHM hosts, and more.
To log in, enter “root” as username and use your root password.
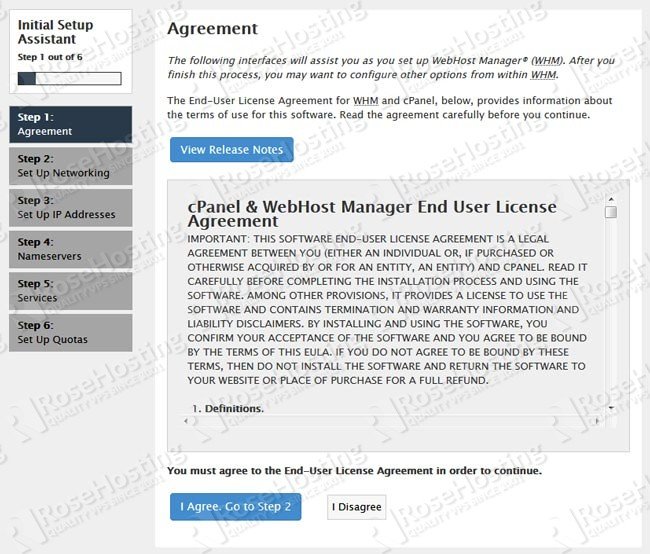
Once logged in, you need to read the cPanel and WHM End User License Agreement and then click on I Agree/Go to Step 2 to proceed to the next step.
You will be taken to the Set Up Networking part of the configuration. Here you will need to enter your contact information. Enter your email address in the Server Contact Email Address field. In the Hostname section, you will also be able to enter a new hostname.

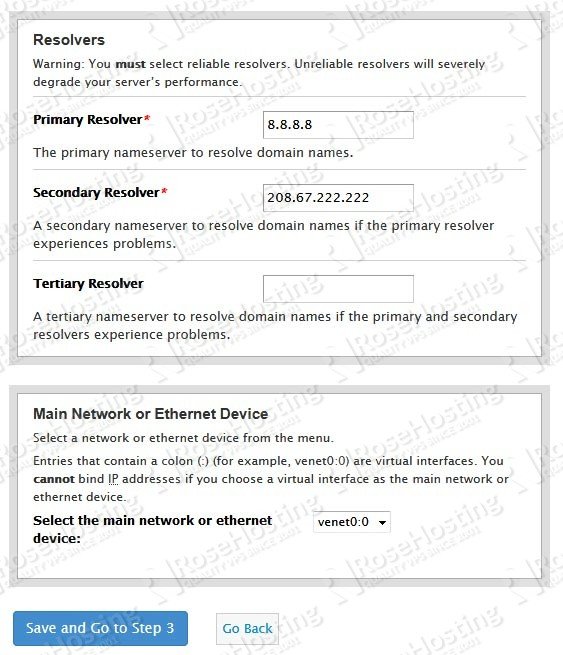
In the Resolvers section, cPanel will automatically detect and fill in the details with the resolvers provided by your internet service provider. If your ISP does not have DNS resolvers, you can use Google’s public DNS resolvers. The last section lets you choose the Main Network or Ethernet Device. After you are done, you can click on Save and Go to Step 3.
In Step 3, you will be able to set your server’s main IP address. You can also add additional IPs if you have more than one IP address assigned to your server. Once you are done with this step, you can click on Go to Step 4.
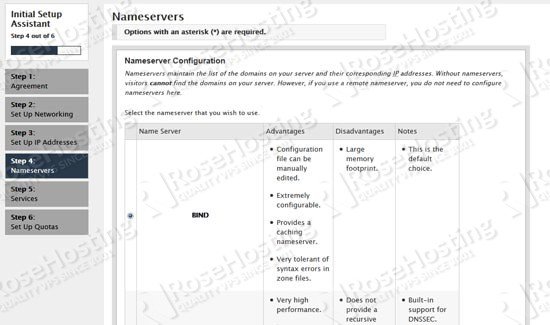
In Step 4, you can choose your Nameserver Configuration. There are multiple options available and you can check the advantages and disadvantages of each of them. It is recommended that you choose the BIND name server option. If you do not want to have DNS server on your VPS you can choose the Disabled option.
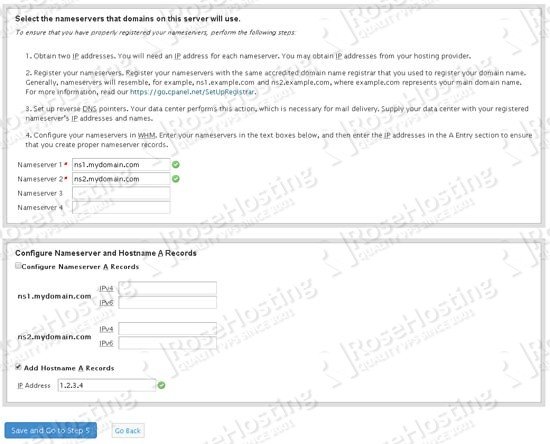
If you scroll down, you will also be able to enter the nameservers that will be assigned to your server (for example ns1.mydomain.com/ns2.mydomain.com). In the end, you will need to check the Add “A Entries” for Hostname checkbox and enter your server IP address. When you are done, click on Save and Go to Step 5.
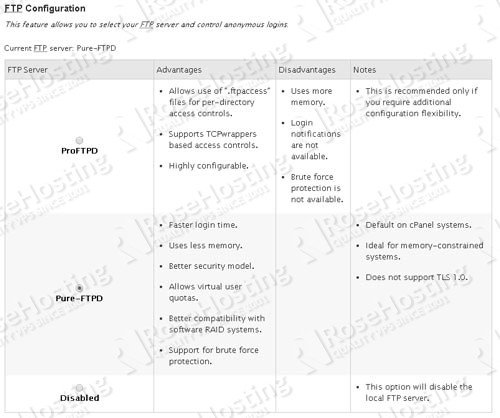
In the next step, you can choose which FTP server you would like to use on your server. The recommended option is Pure-FTPD, but if you want to use an FTP server you can choose the Disabled option. You can also enable and configure the cPHulk Brute Force Protection on this page.
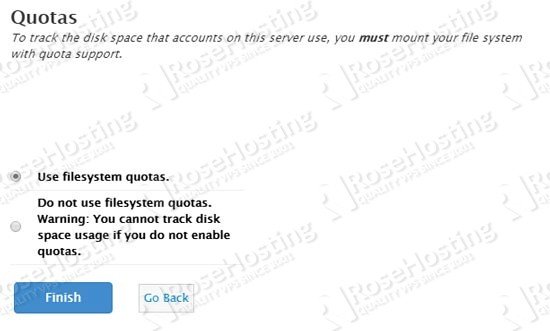
And finally, on the last step, you will be able to choose to enable file system quotas or not. If you want to be able to track the amount of disk space used by individual users, you should make sure that file system quotas are enabled. To finish the initial configuration click on the Finish button.
You can now access the main WHM home page. If you already have a valid cPanel license and it is not yet activated on your server, you can log back to your server via SSH and run the following command:
/usr/local/cpanel/cpkeyclt
And that’s it. WHM/cPanel has now been installed on your server. For more information about cPanel, its features, and configuration, you can check the official cPanel documentation page.
 Of course, you don’t have to Install cPanel on CentOS 7 if you use one of our cPanel hosting services, in which case you can simply ask our expert Linux admins to install Install cPanel on CentOS 7, for you. They are available 24×7 and will take care of your request immediately.
PS. If you liked this post, on Installing cPanel on CentOS 7, please share it with your friends on the social networks using the buttons below or simply leave a comment in the comments section. Thanks.