Before we talk about new features and project news I’d like to send a huge thank you to all the people who support our project. Many thanks to our donors, our sponsors, our patrons and all the people who are helping us. I’d also like to say we’ve had a lot of fun working on developing Linux Mint lately and we’re excited to share the news with you.
Release schedule
We will be working to get Linux Mint 19.1 out for Christmas this year, with all three editions released at the same time and the upgrade paths open before the holiday season.
Patreon
Following the many requests we received to look into an alternative to Paypal, we’re happy to announce Linux Mint is now on Patreon: https://www.patreon.com/linux_mint.
Our project received 33 pledges so far and we decided to use this service to help support Timeshift, a project which is very important to us and adds significant value to Linux Mint.
Mint-Y
Joseph Mccullar continued to improve the Mint-Y theme. Through a series of subtle changes he managed to dramatically increase the theme’s contrast.
The screenshot below shows the Xed text editor using the Mint-Y theme as it was in Mint 19 (on the left), and using the Mint-Y theme with Joseph’s changes (on the right):

The difference is immediately noticeable when the theme is applied on the entire desktop. Labels look sharp and stand out on top of their backgrounds. So do the icons which now look darker than before.
The changes also make it easier to visually identify the focused window:

In the above screenshot, the terminal is focused and its titlebar label is darker than in the other windows. This contrast is much more noticeable with Joseph’s changes (below the red line) than before (above the red line).
Status icons
Linux Mint 19 featured monochrome status icons. Although these icons looked nice on dark panels they didn’t work well in white context menus or in cases where the panel background color was changed by the user.
To tackle this issue, Linux Mint 19.1 will ship with support for symbolic icons in Redshift, mate-volume-control-applet, onboard and network-manager-applet.
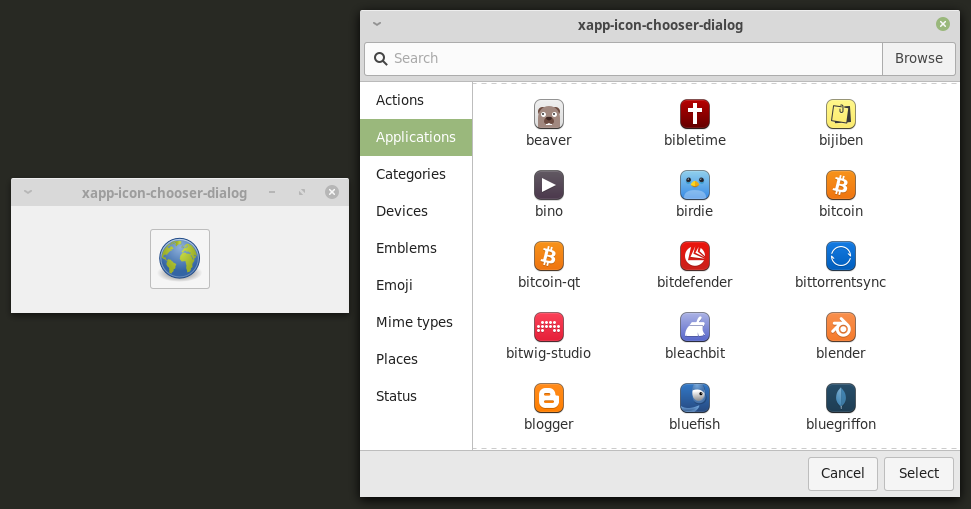
Xapp
Stephen Collins added an icon chooser to the XApp library.
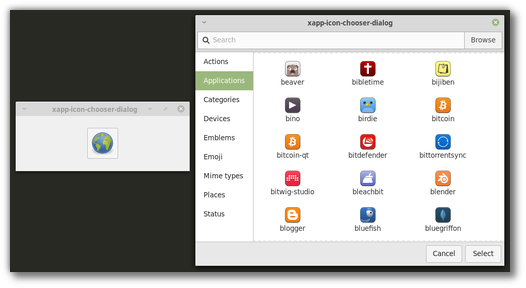
The icon chooser provides a dialog and a button and will make it easier for our applications to select themed icons and/or icon paths.
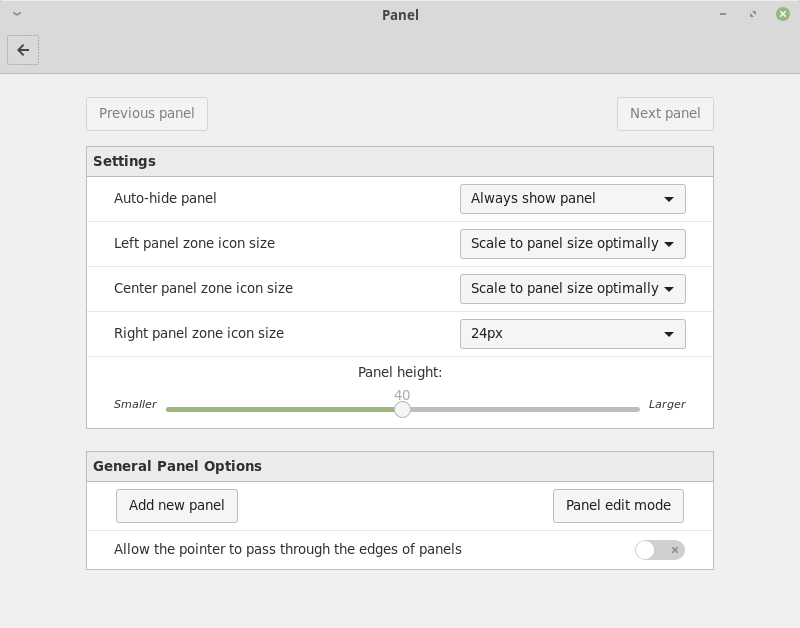
Cinnamon
Cinnamon 4.0 will look more modern thanks to a new panel layout. Whether you enjoy the new look or prefer the old one, we want everyone to feel at home in their operating system, so you’ll have the option to embrace the change or to click a button to make Cinnamon look just like it did before.
The idea of a larger and darker panel had been in the roadmap for a while.
Within our team, Jason Hicks and Lars Mueller (Cobinja) maintained two of the most successful 3rd party Cinnamon applets, respectively “Icing Task Manager” and “CobiWindowList”, two attempts at implementing a window list with app grouping and window previews, a feature which had become the norm in other major desktop operating systems, whether it was in the form of a dock (in Mac OS), a panel (in Windows) or a sidebar (in Ubuntu).
And recently German Franco had caught our attention on the need to use strict icon sizes to guarantee icons looked crisp rather than blurry.
We talked about all of this and Niko Krause, Joseph, Jason and I started working on a new panel layout for Cinnamon. We forked “Icing Task Manager” and integrated it into Cinnamon itself. That new applet received a lot of attention, many changes and eventually replaced the traditional window list and the panel launchers in the default Cinnamon panel.
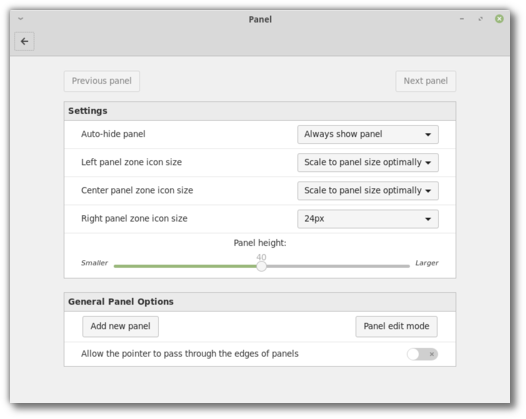
Users were given the ability to define a different icon size for each of the three panel zones (left, center and right for horizontal panels, or top, center and bottom for vertical ones). Each panel zone can now have a crisp icon size such as 16, 22, 24, 32, 48 or 64px or it can be made to scale either exactly (to fit the panel size) or optimally (to scale down to the largest crisp icon size which fits in the panel).
Mint-Y-Dark was adapted slightly to look even more awesome and is now the default Cinnamon theme in Linux Mint.
By default, Cinnamon will feature a dark large 40px panel, where icons look crisp everywhere, and where they scale in the left and center zones but are restricted to 24px on the right (where we place the system tray and status icons).
This new look, along with the new workflow defined by the grouped window list, make Cinnamon feel much more modern than before.
We hope you’ll enjoy this new layout, we’re really thrilled with it, and if you don’t that’s OK too. We made sure everyone would be happy.
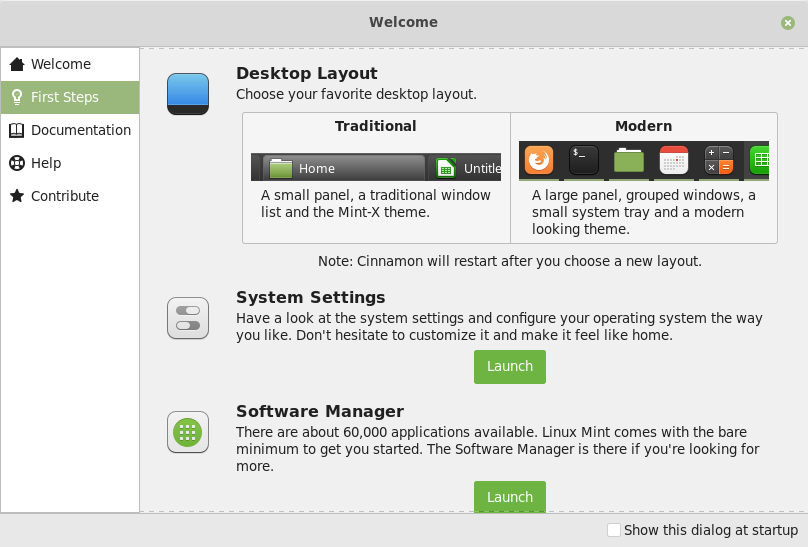
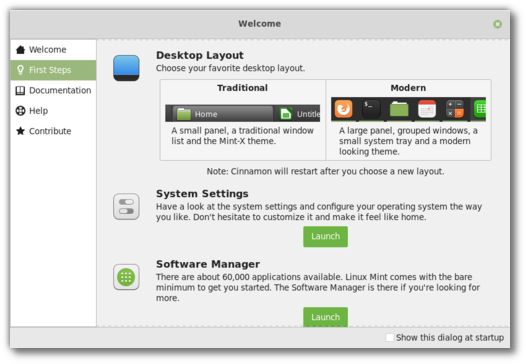
As you go through the “First Steps” section of the Linux Mint 19.1 welcome screen, you’ll be asked to choose your favorite desktop layout:
With a click of a button you’ll be able to switch back and forth between old and new and choose whichever default look pleases you the most.
Update Manager
Support for mainline kernels was added to the Update Manager. Thanks to “gm10” for implementing this.
Sponsorships:
Linux Mint is proudly sponsored by:
Donations in September:
A total of $9,932 were raised thanks to the generous contributions of 467 donors:
 $500, Marc M.
 $200, Anthony W.
 $200, Lasse S.
 $150 (4th donation), Jan S.
 $109 (14th donation), Hendrik S.
 $109 (2nd donation), Richard aka “Friendica @ meld.de”
$109 (2nd donation), Adler-Apotheke Ahrensburg
 $109, Juan E.
$109, Henning K.
$100 (6th donation), Robert K. aka “usmc_bob”
$100 (5th donation), Michael S.
$100 (5th donation), Kenneth P.
$100 (4th donation), Randall H.
$100 (2nd donation), Timothy M.
$100 (2nd donation), Timothy M.
$100 (2nd donation), Timothy M.
$100, Sherwood O.
 $100, John Czuba aka “Minky”
$100, Dorothy
$100, Megan C.
 $100, Stephen M.
$100, Philip C.
$100, Ronal M.
$84 (3rd donation), Thomas Ö.
$76, Jean-marc F.
$75 (2nd donation), D. C. .
$74, Mary A.
$54 (14th donation), Dr. R. M.
$54 (9th donation), Volker P.
$54 (3rd donation), Mark P.
 $54 (2nd donation), Danilo Cesari aka “Dany”
$54, Bernd W.
$54, Ronald S.
 $54, Marc V.
 $54, Jean-pierre V.
$54, David P.
$50 (9th donation), James Denison aka “Spearmint2”
$50 (8th donation), Hans J.
 $50 (4th donation), Tibor aka “tibbi”
$50 (3rd donation), An L.
$50 (3rd donation), Shermanda E.
$50 (3rd donation), Harry H. I.
$50 (2nd donation), Colin B.
$50 (2nd donation), Katherine K.
$50 (2nd donation), Richard O.
$50, Charles L.
$50, Thomas W.
$50, Dietrich S.
 $50, Harrie K.
$50, Martin S.
$50, Philip C.
$50, Randy R.
$50, Joseph D.
$50, Walter D.
$45 (2nd donation), The W.
$44, Den
$42 (23rd donation), Wolfgang P.
$40 (6th donation), Efran G.
$40 (3rd donation), Soumyashant Nayak
$40, Remi L.
$40, Flint W. O.
$40, Ivan Y.
$39, Steve S.
$35 (2nd donation), Joe L.
 $33 (103th donation), Olli K.
 $33 (7th donation), NAGY Attila aka “GuBo”
$33 (4th donation), Alfredo T.
$33 (3rd donation), Zerlono
$33 (2nd donation), Luca D. M.
$33 (2nd donation), Stephen M.
$33, aka “kaksikanaa”
$33, Sebastian J. E.
$33, Mario S.
 $33, Raxis E.
$30 (3rd donation), John W.
$30 (3rd donation), Fred C.
$30 (2nd donation), Colin H.
$30, Robert P.
$30, Paul W.
$30, Riccardo C.
$27 (6th donation), Ralf D.
$27 (2nd donation), Holger S.
$27, Florian B.
$27, Mirko G.
$27, Lars P.
$27, Horst K.
$27, Henrik K.
$26, Veikko M.
$25 (85th donation), Ronald W.
$25 (24th donation), Larry J.
 $25 (5th donation), Lennart J.
$25 (4th donation), B. H. .
$25 (3rd donation), Todd W.
$25 (3rd donation), Troy A.
$25 (3rd donation), William S.
$25 (3rd donation), Peter C.
$25 (2nd donation), William M.
$25 (2nd donation), Garrett R.
$25 (2nd donation), Chungkuan T.
$25 (2nd donation), Lynn H.
$25, Michael G.
$25, Nathan M.
$25, Fred V.
$25, Rory P.
$25, Anibal M.
$25, John S.
$25, Rick Oliver aka “Rick”
 $25, Tan T.
$25, Darren K.
$25, Robert M.
$25, Darren E.
$25, Leslie P.
$25, Bob S.
$25, Balázs S.
$25, Eric W.
$25, Robert M.
$22 (19th donation), Derek R.
$22 (5th donation), Nigel B.
$22 (5th donation), David M.
$22 (4th donation), Janne K.
$22 (3rd donation), Ernst L.
 $22 (3rd donation), Bernhard J.
 $22 (3rd donation), Daniel M.
$22 (3rd donation), Stefan N.
$22 (3rd donation), Bruno Weber
$22 (2nd donation), Bruno T.
$22 (2nd donation), Nicolas R.
$22 (2nd donation), Timm A. M.
$22, Klaus D.
 $22, Alexander L.
$22, Vincent G.
$22, Stefan L.
$22, George S.
$22, Roland T.
 $22, Peter D.
$22, Pa M.
$22, Thomas H.
$22, David H.
$22, Aritz M. O.
$22, Julien D.
$22, Tanguy R.
$22, Jean-christophe B.
$22, Johan Z.
$22, Alex Mich
$20 (43th donation), Curt Vaughan aka “curtvaughan ”
$20 (10th donation), Lance M.
$20 (9th donation), Kevin Safford
$20 (5th donation), John D.
$20 (4th donation), Marius G.
$20 (4th donation), K. T. .
 $20 (3rd donation), Mohamed A.
$20 (3rd donation), Bezantnet, L.
$20 (3rd donation), Bryan F.
$20 (3rd donation), Tim K.
$20 (3rd donation), David F.
$20 (2nd donation), Matthew M.
$20 (2nd donation), Barry D.
$20 (2nd donation), Ronald W.
$20 (2nd donation), Graham M.
 $20 (2nd donation), Srikanth P.
$20 (2nd donation), Pixel Motion Film Entertainment, LLC
$20 (2nd donation), Bryan F.
 $20, Thomas H.
$20, Eric W.
$20, Arthur S.
$20, Robert G.
$20, Stuart R.
$20, Stephen D.
$20, Joseph M.
$20, Carol V.
$20, David B.
$20, Kevin E.
$20, John K.
$20, Eyal D.
$20, Lawrence M.
$20, Jesse F.
$20, Manuel D. A.
$20, John C. B. J.
$20, Raymundo P.
 $20, Nemer A.
$20, Brad S.
$20, Andrew E.
$20, Mixso Qld
$20, David R DeSpain PE
$20, Monka S. aka “Kaz”
$20, Paul B.
$16 (20th donation), Andreas S.
$16 (6th donation), Sabine L.
$16 (2nd donation), Mathias B.
$16 (2nd donation), L. T. .
$16 (2nd donation), Bernard D. B.
$16, Michael N.
$16, Patrick H.
$16, Roland W.
 $15 (17th donation), Stefan M. H.
$15 (7th donation), John A.
$15 (6th donation), Hermann W.
 $15 (3rd donation), Ishiyama T.
$15 (2nd donation), Eugen T.
$15 (2nd donation), Thomas J. M.
$15, Fred B.
$15, Eric H.
$15, Barnard W.
$15, Francis D.
$15, Lim C. W.
$15, framaga2000
$15, Rodolfo L.
$15, Jonathan D.
$15, Travis B.
$13 (21st donation), Johann J.
 $13, Rafael A. O. Paulucci aka “rpaulucci3”
$12 (90th donation), Tony C. aka “S. LaRocca”
$12 (35th donation), JobsHiringNearMe
$12 (20th donation), Johann J.
$11 (16th donation), Alessandro S.
$11 (13th donation), Doriano G. M.
$11 (10th donation), Rufus
$11 (9th donation), Denis D.
$11 (9th donation), Per J.
$11 (6th donation), Annette T.
$11 (5th donation), Pierre G.
$11 (4th donation), Barry J.
 $11 (4th donation), Oprea M.
$11 (4th donation), Emanuele Proietti aka “Manuermejo”
$11 (3rd donation), Marcel S.
$11 (3rd donation), Michael B.
$11 (3rd donation), Tangi Midy
$11 (3rd donation), Christian F.
$11 (2nd donation), Dominique M.
$11 (2nd donation), Alisdair L.
$11 (2nd donation), Renaud B.
$11 (2nd donation), Björn M.
$11 (2nd donation), Marius G.
$11 (2nd donation), August F.
$11 (2nd donation), Reinhard P. G.
$11 (2nd donation), David G.
$11, August F.
$11, Jeffrey R.
$11, Kerstin J.
$11, Martin L.
 $11, Pjerinjo
$11, Stanislav G. aka “Sgcko7”
 $11, Chavdar M.
$11, David C.
$11, Angelos N.
$11, Adam Butler
$11, Daniel C. G.
$11, Marco B.
$11, Anthony M.
$11, Stuart G.
 $11, João P. D. aka “jpdiniz”
$11, Sven W.
$11, Radoslav J.
$11, Csaba Z. S.
$11, Alejandro M. G.
$11, Esa T.
$11, Hugo G.
$11, Lauri P.
$11, Johannes R.
$11, Vittorio F.
$10 (34th donation), Thomas C.
$10 (25th donation), Frank K.
$10 (21st donation), Jim A.
$10 (18th donation), Dinu P.
$10 (17th donation), Dinu P.
 $10 (12th donation), Tomasz K.
$10 (11th donation), Chris K.
$10 (11th donation), hotelsnearbyme.net
$10 (6th donation), Mattias E.
$10 (4th donation), Frederick M.
$10 (4th donation), John T.
$10 (3rd donation), Roger S.
$10 (3rd donation), Wilfred F.
$10 (3rd donation), Raymond H. aka “Rosko”
$10 (2nd donation), Bobby E.
$10 (2nd donation), Neilor C.
$10 (2nd donation), Sara E.
$10 (2nd donation), Scott O.
$10 (2nd donation), Michael S.
$10 (2nd donation), John W.
$10, Richard R.
$10, George M.
$10, Leszek D.
$10, Eduardo B.
$10, Dmytro L.
$10, Dave G.
$10, Arthur A.
$10, James S.
$10, Polk O.
$10, Reid N.
$10, Geoff H.
$10, Gary G.
$10, Rodney D.
$10, Jeremy P.
$10, Randolph R.
$10, Harry S.
$10, Jett Fuel Productions
$10, Douglas S. aka “AJ Gringo”
$10, Carlos M. P. A.
$10, alphabus
$10, Ivan M.
$10, Lebogang L.
 $10, lin pei hung
$10, Glen D.
$10, Brian H.
$10, Christopher D.
$10, Scott M.
$9, Roberto P.
$8 (3rd donation), Cyril U.
$8 (2nd donation), Caio C. M.
$8, Stefan S.
$8, John T.
 $7 (8th donation), GaryD
$7 (5th donation), Jan Miszura
$7 (3rd donation), Kiyokawa E.
$7 (3rd donation), Daniel J G II
 $7 (2nd donation), Mirko Bukilić aka “Bukela”
 $7, Ante B.
$7, Wayne O.
$6.44, Mahmood M.
$6 (2nd donation), Alan H.
$6, Sydney G.
$6, Nancy H.
$5 (28th donation), Eugene T.
$5 (21st donation), Kouji Sugibayashi
$5 (20th donation), Kouji Sugibayashi
$5 (19th donation), Bhavinder Jassar
$5 (14th donation), Dmitry P.
 $5 (11th donation), J. S. .
$5 (11th donation), Web Design Company
$5 (10th donation), Lumacad Coupon Advertising
$5 (10th donation), Blazej P. aka “bleyzer”
 $5 (7th donation), AlephAlpha
$5 (7th donation), Joseph G.
 $5 (7th donation), Халилова А.
$5 (6th donation), Goto M.
$5 (5th donation), Scott L.
$5 (5th donation), Russell S.
$5 (5th donation), Pokies Portal
$5 (4th donation), Giuseppino M.
 $5 (4th donation), Adjie aka “AJ”
$5 (4th donation), rptev
$5 (3rd donation), Jalister
$5 (3rd donation), Tomasz R.
$5 (3rd donation), Daniela K.
$5 (2nd donation), Pawel K.
$5 (2nd donation), Ramon O.
$5 (2nd donation), Sergei K.
$5 (2nd donation), Jerry F.
$5 (2nd donation), Joseph J. G.
$5 (2nd donation), Erik P.
$5 (2nd donation), Stefan N.
 $5 (2nd donation), Nenad G.
$5, Sergio M.
$5, Paul B.
$5, Sergio G.
$5, Gregory M.
$5, Almir D. A. B. F.
$5, Paul R.
$5, Stamatis S.
$5, The Art of War by Sun Tzu
 $5, Borut B.
$5, Mitchell S.
$5, Angela S.
$5, Manny V.
$5, Silviu P.
 $5, Lyudmila N.
$5, Ligrani F.
 $5, Drug Rehab Thailand aka “Siam Rehab”
$5, Alfredo G.
$5, Mike K.
 $5, Peter A. aka “Skwanchi”
$5, Harmen P.
$5, Joseangel S.
$5, Jaime S.
$5, Ruslan A.
$5, Corrie B.
$5, Beverlee H.
 $5, Akiva G.
$5, Alexander P.
$5, Kepa M. S.
$5, Christian M.
 $4 (9th donation), nordvpn coupon
$4, Alexander Z.
$3.7, Alex H.
$3.6, Allen D.
$3.4, Patricia G.
$3.35, Di_Mok
$3.2, Trina Z.
$3.1, Edward K.
$3.1, Sarie B.
 $3 (3rd donation), Lubos S.
$3, Frederik V. D.
$3, Somfalvi J.
$3, Therese N.
$3, Mikko S.
$2.9, Allison C.
$2.8, Marsha E.
$2.8, Joe F.
$2.6, Maureen M.
$2.6, Okneia F.
$2.5, Tonya G.
$2.4 (2nd donation), Tonya G.
$2.4, Jearlin B.
$2.3 (2nd donation), Edward K.
$2.3, Henry H.
$2.3, Pedro P.
$2.2, Joseph Lenzo DOB
$79.87 from 59 smaller donations
If you want to help Linux Mint with a donation, please visit https://www.linuxmint.com/donors.php
Patrons:
Linux Mint is proudly supported by 33 patrons, for a sum of $239 per month.
To become a Linux Mint patron, please visit https://www.patreon.com/linux_mint
Rankings:
- Distrowatch (popularity ranking): 2249 (2nd)
- Alexa (website ranking): 4180
Source