One of the oldest Linux distribution still in development, Debian has just turned 25.
10 Interesting facts about Debian Linux

The facts presented here have been collected from various sources available from the internet. They are true to my knowledge, but in case of any error, please remind me to update the article.
1. One of the oldest Linux distributions still under active development
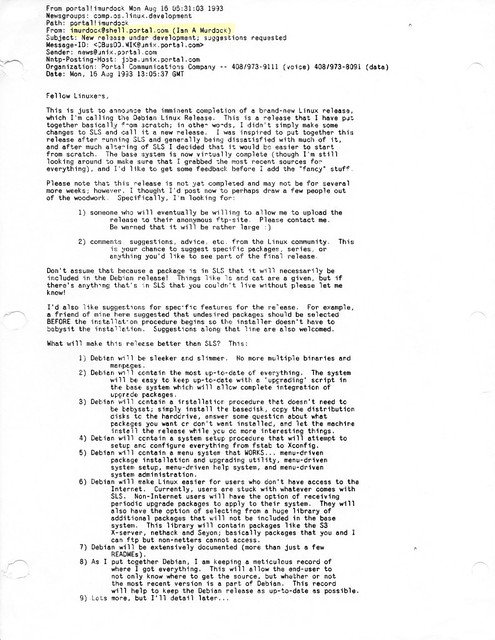
Debian project was announced on 16th August 1993 by Ian Murdock, Debian Founder. Like Linux creator Linus Torvalds, Ian was a college student when he announced Debian project.
2. Some people get tattoo while some name their project after their girlfriend’s name
The project was named by combining the name of Ian and his then-girlfriend Debra Lynn. Ian and Debra got married and had three children. Debra and Ian got divorced in 2008.
3. Ian Murdock: The Maverick behind the creation of Debian project
 Ian Murdock
Ian Murdock led the Debian project from August 1993 until March 1996. He shaped Debian into a community project based on the principals of Free Software. The Debian Manifesto and the Debian Social Contract are still governing the project.
He founded a commercial Linux company called Progeny Linux Systems and worked for a number of Linux related companies such as Sun Microsystems, Linux Foundation and Docker.
Sadly, Ian committed suicide in December 2015. His contribution to Debian is certainly invaluable.
4. Debian is a community project in the true sense
Debian is a community based project in true sense. No one ‘owns’ Debian. Debian is being developed by volunteers from all over the world. It is not a commercial project, backed by corporates like many other Linux distributions.
Debian Linux distribution is composed of Free Software only. It’s one of the few Linux distributions that is true to the spirit of Free Software and takes pride in being called a GNU/Linux distribution.
Debian has its non-profit organization called Software in Public Interest (SPI). Along with Debian, SPI supports many other open source projects financially.
5. Debian and its 3 branches
Debian has three branches or versions: Debian Stable, Debian Unstable (Sid) and Debian Testing.
Debian Stable, as the name suggests, is the stable branch that has all the software and packages well tested to give you a rock solid stable system. Since it takes time before a well-tested software lands in the stable branch, Debian Stable often contains older versions of programs and hence people joke that Debian Stable means stale.
Debian Unstable codenamed Sid is the version where all the development of Debian takes place. This is where the new packages first land or developed. After that, these changes are propagated to the testing version.
Debian Testing is the next release after the current stable release. If the current stable release is N, Debian testing would be the N+1 release. The packages from Debian Unstable are tested in this version. After all the new changes are well tested, Debian Testing is then ‘promoted’ as the new Stable version.
There is no strict release schedule for Debian.
7. There was no Debian 1.0 release
Debian 1.0 was never released. The CD vendor, InfoMagic, accidentally shipped a development release of Debian and entitled it 1.0 in 1996. To prevent confusion between the CD version and the actual Debian release, the Debian Project renamed its next release to “Debian 1.1”.
8. Debian releases are codenamed after Toy Story characters

Debian releases are codenamed after the characters from Pixar’s hit animation movie series Toy Story.
Debian 1.1 was the first release with a codename. It was named Buzz after the Toy Story character Buzz Lightyear.
It was in 1996 and Bruce Perens had taken over leadership of the Project from Ian Murdock. Bruce was working at Pixar at the time.
This trend continued and all the subsequent releases had codenamed after Toy Story characters. For example, the current stable release is Stretch while the upcoming release has been codenamed Buster.
The unstable Debian version is codenamed Sid. This character in Toy Story is a kid with emotional problems and he enjoys breaking toys. This is symbolic in the sense that Debian Unstable might break your system with untested packages.
9. Debian also has a BSD ditribution
Debian is not limited to Linux. Debian also has a distribution based on FreeBSD kernel. It is called Debian GNU/kFreeBSD.
10. Google uses Debian
Google uses Debian as its in-house development platform. Earlier, Google used a customized version of Ubuntu as its development platform. Recently they opted for Debian based gLinux.
Happy 25th birthday Debian

I hope you liked these little facts about Debian. Stuff like these are reasons why people love Debian.
I wish a very happy 25th birthday to Debian. Please continue to be awesome. Cheers 🙂