How To Setup SSH Key Authentication

SSH Key generation

SSH key authentication can be used for password-less login between 2 servers. This is also useful for adding a key to accounts like git or gitlab for version management.

Source Server SSH Key Configuration

Generate a RSA key for this system by typing the following

ssh-keygen -t rsa

The key generated will ask for a location to store the newly created key, the default is the home directory of the user creating it under the .ssh directory. It will also ask you for a password which you optionally leave blank.

Destination Server SSH Key Configuration

On the source server you can use ssh-copy-id to copy over the id_rsa.pub file to the new server. It will use the SSH protocol to copy over the public key and insert it into the authorized_keys file on the destination server. To read more about ssh-copy-id you can read the man page.

ssh-copy-id -i ~/.ssh/id_rsa.pub [email protected]Replacing 192.168.1.3 with the appropriate host name of the destination server and user with the user you would like to add the key too.

/bin/ssh-copy-id: INFO: attempting to log in with the new key(s), to filter out any that are already installed
/bin/ssh-copy-id: INFO: 1 key(s) remain to be installed — if you are prompted now it is to install the new keys
[email protected]‘s password:

Number of key(s) added: 1

Now try logging into the machine, with: “ssh ‘[email protected]‘”
and check to make sure that only the key(s) you wanted were added.

Manual SSH Key Configuration on the Destination Server

First verify if you already have a .ssh directory

ls ~/.ssh

If you do not you will want to create the following directory

mkdir ~/.ssh

You will also want to create authorized_keys file

touch ~/.ssh/authorized_keys

You will then want to copy the public key from the source server in to the authorized_keys file. You can do this by copying the id_rsa.pub on the source server.

scp ~/.ssh/id_rsa.pub [email protected]_host:~/.ssh/authorized_keys

Root SSH Key Configuration

If you are adding keys to a root user on the destination server, you will want to ensure the sshd configuration allows remote root logins with either the following 2 options enabled in /etc/ssh/sshd_config

PermitRootLogin yes

Which will allow root logins with both passwords and keys.

PermitRootLogin without-password

Which will allow root logins only with keys

If you modify the ssh configuration, you will need to reload sshd to load the new configuration

/etc/init.d/sshd reload

After you have added the key to the destination server, ssh from the source server it should allow you to login using the key.

Jul 4, 2017LinuxAdmin.io

Source

Slack for the CLI – Sclack — The Ultimate Linux Newbie Guide

The Slack Instant Messenger icon

At work, I’m always working at the Terminal. I have my email (mutt), a few bash terminals for looking after servers and cutting some code, my Facebook messenger (see messer) and my workplace instant messenger of choice, Slack. I combine all of this in tmux, so I can switch workstreams in a keypress or two. No moving those hands off the keyboard. The rodent stays idle.

sclack-example

If you’ve not already heard of Slack, it is quickly becoming one of he most popular instant messaging platforms for workplaces. It integrates with many tools that are commonplace in technology companies, and it is easy to use.

I have tried a number of Terminal based Slack clients, and for various reasons, they’ve always been ditched in favour of the official Linux Slack client, or the website version. They just didn’t work great. Sclack is different, it uses keybindings I’m used to (in my case ViM keybindings), it’s colourful and it even supports giphy! (well, kind of!).

To install Sclack, you’re going to need to have Python 3 & pip3 installed on your machine if you don’t already have it:

sudo apt install python3-pip

Once you have pip3, simply run the following commands:

git clone https://github.com/haskellcamargo/sclack.git
cd sclack
pip3 install -r requirements.txt
chmod +x ./app.py
./app.py

Run ./app.py after giving the correct permissions (chmod 755 app.py for example). If you don’t have a ~/.sclack file, you can generate one by providing your workspace token. You can change the theme, enable or disable images, emojis, markdown, configure keyboards and everything else in the config.jsonfile.

Sclack looks lovely, works the way I want, and does pretty much everything you need from a Slack client!

You can check out the author’s github website here: https://github.com/haskellcamargo/sclack

Source

cairo release 1.16.0 now available [LWN.net]

cairo release 1.16.0 now available

[Development] Posted Oct 20, 2018 14:57 UTC (Sat) by jake

After four years of development since 1.14.0, version 1.16.0 of the cairo 2D graphics library has been released. “Of particular note is a wealth of work by Adrian Johnson to enhance PDF
functionality, including restoring support for MacOSX 10.4, metadata,
hyperlinks, and more.

Much attention also went into fonts, including new colored emoji glyph
support, variable fonts, and fixes for various font idiosyncrasies.

Other noteworthy changes include GLESv3 support for the cairo_gl
backend, tracking of SVG units in generated SVG documents, and cleanups
for numerous test failures and related issues in the PDF and Postscript
backends.” More information can be found in the change log.

Source

Ergonomic Tactics in Linux » Linux Magazine

Many Linux users spend far more time on a computer than is probably healthy. With the addition of aging, it makes double sense to look for ways to reduce physical stress on our bodies. Fortunately, Linux has more ways than most operating systems to work more efficiently and minimize possible injuries.

Like all computer users, Linux users can benefit from a careful selection of hardware to minimize physical stress on their bodies. Large or multiple monitors reduce eye strain, especially when you set icons and text to sizes that remain easy to read after eight hours of constant computer use. Ergonomic chairs, like those made by Herman Miller, are expensive, but come with 12-year warranties for most parts. Ergonomic, programmable keyboards like the ones sold by ErgoDox (Figure 1) and Keyboardio are also worth the investment because of the way they reduce repetitive stress injury (RSI). A mouse arranged vertically rather than horizontally is a more ergonomic pointer, as are trackballs and graphic tablets. The effectiveness of all these devices can be further enhanced by positioning them so that all the hardware for basic computer use is close at hand and at a height that minimizes the need to reach for them. For convenience, that may mean individual workstations for each user, to avoid everyone having to adjust the work environment each time that they settle to work.
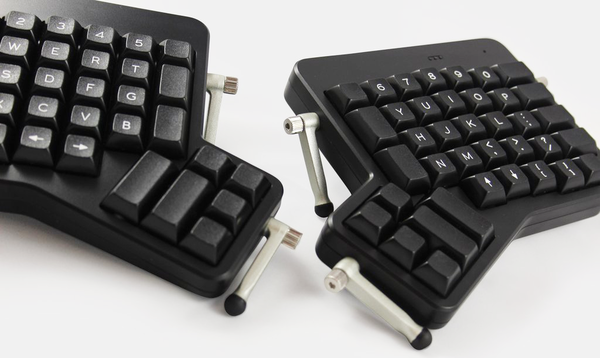

Figure 1: Ergonomic keyboards like those made by ErgoDox can be expensive, but can seriously reduce RSI.

In addition, all operating systems have utilities, like Take a Break, which help to ensure that users get up and stretch periodically. At the very least, you can find software that sets alarms, as in Gnome. In my experience, such tools always seem to interrupt crucial trains of thought, but they do help enforce regular breaks. I recommend setting them for 30-40 minutes – which, although longer than ideal, makes them less disruptive to productivity.

However, you do not need to seek out expensive hardware alternatives to improve your workflow ergonomics. Often, the careful selection of settings and software is enough to reduce the ravages of RSI.


Different Strokes

Ergonomics comes down to two main strategies: ways to keep your hands on the keyboard, and ways to reduce the stretches to use the mouse as much as possible. The goal of both strategies is to reduce the hundreds of tiny movements required to interact with a computer. Over the course of a long day, these tiny movements add up. Consequently, the more you can reduce them, the less likely RSI will afflict your overworked muscles.

Having a programmable keyboard is often the easiest way to accomplish both strategies. For example, creating an Emacs layer of keys can reduce that application’s often complicated series of keyboard shortcuts to a single key press each. However, all major Linux desktops have keyboard shortcuts that are not only less stressful but also more efficient than mouse clicks (Figure 2). These shortcuts are useful for simple acts such as switching between active windows or virtual workspaces, moving around in text editors, and playing audio tracks. Many applications like Krita and LibreOffice also have their own keyboard shortcuts. Since many of these shortcuts are close to universal, such as Ctrl+V for pasting from the keyboard, they can be easily learned. In particular, if you are already familiar with the Vim text editor, you can modify many standard apps by adding Vim keybindings to simplify the task (Figure 3). Surprisingly, many users are unaware of these shortcuts, most likely because using a mouse is more visual.
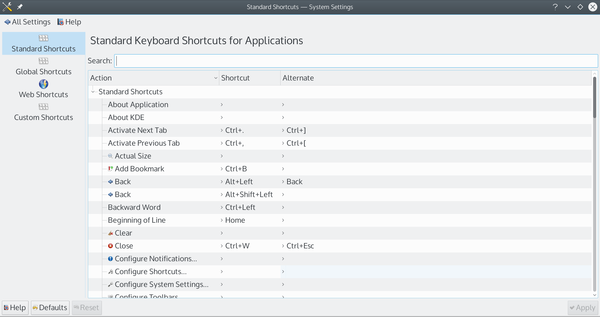

Figure 2: Like KDE, all major Linux desktops support extensive keyboard shortcuts.
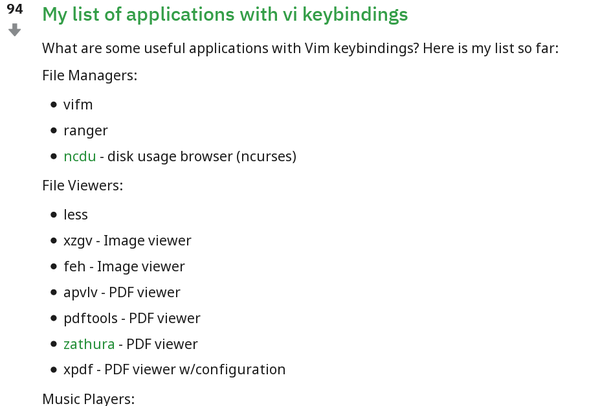

Figure 3: Many variants of standard apps support Vim keybindings, making it easier to keep your fingers on the keyboard.

These shortcuts can be boosted in a number of ways, depending on your desktop. For example, on major desktops, you can set applications to start as you log in (and log out), which can be handy if you consistently use the same apps. For applications that are tightly integrated into the desktop, as Gedit in Gnome or Kate in KDE Plasma, the function can be as simple as leaving a commonly used application on its own virtual workspace to open as you log in. With other apps, you may need to open the system settings. KDE’s Plasma also has dozens of Web Shortcuts (Figure 4), which lets you type amz instead of Amazon.com, as well as live links on screen edges that place commands a single click away. Both Plasma and Cinnamon give you the option of activating icons with one click instead of the more traditional two. With such tactics, a reduction in repetitive motions is as easy as changing a few settings, which then work invisibly in the background with no more than minimal changes to your work habits.
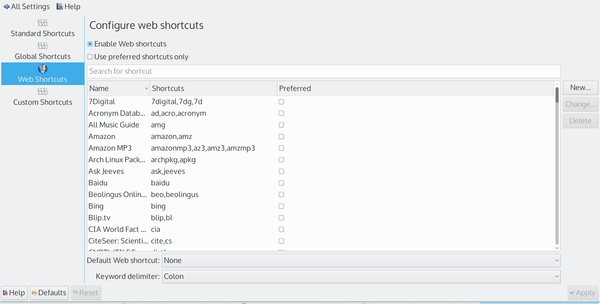

Figure 4: KDE’s Web Shortcuts are another way to reduce keystrokes.

Docks and Activities

One reason that ergonomics has become more important is that modern computers are still using interfaces that were designed for much small computers. For instance, where two decades ago a menu was a reasonable selection method for the few dozen applications on a hard drive, today a menu can require several clicks to start a program. Although menus are less efficient than they used to be, some interfaces such as Gnome and Unity discourage the use of icons on the desktop. Although adding a Favorites submenu helps, the inefficiency continues whenever you want anything out of the ordinary.

Two solutions help reduce menu use. The first, inspired by OS X, is a dock, a floating window with links to favorite applications that can be positioned anywhere on the desktop. The advantage of a dock is that these applications are launched with a single click. Some users fill their dock with so many icons that much of the usefulness is lost, but if the available applications are kept to a dozen or so, docks can be a useful ergonomic strategy. I am especially fond of Plank, which allows the creation of multiple docks, each of which can be configured for a different purpose.

Even easier to use are Plasma Activities (Figure 5). Each Activity is a separate desktop with its own configuration, including icons. Activities can be organized by any principle that you find useful, including task, project, or physical location. For example, I have a Writing Activity that includes LibreOffice (my favorite text editor), a link to my spreadsheet of sold articles, and the URLs for online resources such as a thesaurus. Since I have only seven icons on the desktop, I never have any trouble finding the resource I need for writing, and all are a single click away. My other Activities include ones for working at the command line, graphic design, games, and a default desktop for email, web browsing, and music. Thanks to a widget that fits on the panel, each of these desktops is a click away. The result is that I spend less time looking for a resource and have multiple desktops without requiring multiple monitors. And, most important of all, my RSI has become nearly nonexistent.
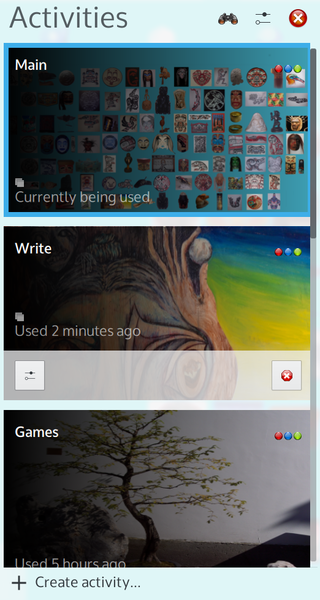

Figure 5: Plasma Activities give users multiple desktops, making applications more accessible than in menus.

Side Benefits

For a technology that prides itself on innovation, computers carry a lot of baggage. Too often, they continue to depend on devices like the mouse, which could not be harder on the human hand or wrist than if it were designed to be so, and on interfaces that were designed for systems with far less memory.

Working around these limitations can be expensive and requires extra initial setup, to say nothing of experimentation. In my own case, it has taken over a year to make the changes in hardware and work habits that I required. Yet, the results have repaid me many times. Not only is the stress on my overworked and aging body decreased, but I am also working more efficiently, spending less time interacting with the interface and more time on actual productivity. With patience, I find, perfecting tactics for increased ergonomics has not only reduced the pain in my overworked and aging body, but also has helped me to work with more focus and quicker results. By paying attention to my physical needs, I have made my computing more efficient overall.

Source

How to install tcsh or csh shell on a Debian or Ubuntu Linux ?

Cshell is a shell (command interpreter) with C-like syntax.

csh is a command language interpreter incorporating a history mechanism , job control facilities , interactive file name and user name completion, and a C-like syntax. It is used both as an interactive login shell and a shell script command processor. tcsh is an enhanced but completely compatible version of the Berkeley UNIX C shell. – The ability to use multiline aliases and exec statements in a reliable and consistent way. (Hense “sh” scripts can be re-written as tcsh scripts with aliases instead of functions.) – “tcsh” is the same on all machines. For “csh” I typically have to modify scripts for different machines. [example: HP-UX “set nonomatch” needs to be replaced by “set nonomatch = ()”] – source code is freely available – PWD and other common environmental variables are always defined. With “csh” this depends on the machine.In most cases csh / tcsh is installed by default. All you have to do is type shell name to start using it:

Install csh / tcsh

In case csh is not installed, type the following command at shell prompt as per your Linux distro / version.

Install it on Debian/Ubuntu/Mint Linux

$ sudo apt-get install csh

Install it on CentOS/RHEL

Install it on Fedora Linux

Set csh as default login shellTo make csh as default login shell, type the following command:Note down the /bin/csh or /bin/tcsh path. To change the shell simply type

Source

Bash Scripting Introduction – LinuxAdmin.io

Bash Scripting Introduction

Essentially bash scripting is just linking commands together. You can perform many tasks consistently using predefined scripts allowing them to become repeatable and standardized. If you are looking for more information you can check out the bash man page.

Each script should start with a “shebang” telling which environment to interpret the script, bash scripts start with

#!/bin/bash

In CentOS/RHEL 7 , /bin/sh is symlinked to /bin/bash

To make a script execute, you can either call it via the interpreter

/bin/bash myscript.sh

Or change the permissions to make it executable

chmod ug+x myscript.sh

and then execute it directly

./myscript.sh

Bash Test Comparison Operators

Test comparison operators are use to compare two pieces of information.

String Tests:

Are used to compare to strings together

$x = $y – if $x is equal to $y, this will be true
$x != $y – if $x is not equal to $y, this will be true

Integer Tests:

Integer tests are used to compare to integers together

$x -eq $y – if $x is equal to $y this will be true.
$x -ne $y – if $x is not equal to $y, this will be true.
$x -ge $y – if $x is greater than or equal to $y, this will be true.
$x -gt $y – if $x is greater than $y, this will be true.
$x -le $y -if $x is less than or equal to $y, this will be true.
$x -lt $y – if $x is less then $y, this will be true.

Bash Test Operators

Test operators are used to test if a condition is true.

-d FILE – True if file is a directory.
-e FILE – True if file exists.
-f FILE – True if exists and is a file.
-r FILE – True if file exists and is readable.
-w FILE – True if file exists and is granted write permissions.
-x FILE – True if file exists and is granted execute permissions.

Bash If Statements

To utilize the above test operators, you will need to use ‘if’ statements

To use a comparison:

if [ $x -eq $y ]; then
echo “x equals y”;
else
echo “x does not equal y”;
fi

To use a test operator:

if [ -d /home ]; then
echo “/home exists”;
else
echo “/home does not exist”;
fi

Bash Loops

For Loops

Loops can be utilized to do the same task multiple times

for i in ; do
echo “I have a $”;
done

The output will be

I have a apple
I have a orange
I have a watermelon

While Loops

These are done, while something is true perform the following task

i=0
while [ $i -le 5 ]
do
echo “i is currently at $”;
((i++))
done

The output will be:

i is currently at 0
i is currently at 1
i is currently at 2
i is currently at 3
i is currently at 4
i is currently at 5

Bash Script Arguments

You can use arguments to pass stored data into a script and store it as a variable. The first argument is stored as $1, the second argument is stored as $2 and so on.

if [ $1 -eq $2 ]; then
echo “The arguments are equal”;
else
echo “The arguments are not equal”
fi

The output would be

./compare_arguments 3 5
The arguments are not equal

./compare_arguments 4 4
The arguments are equal

You can also require a certain number of arguments be entered by using $#

if [ $# -ne 2 ]; then
echo “the number of required arguments is 2”;
exit;
fi

Which indicates if the number of required arguments is not 2, then exit.

Jul 16, 2017LinuxAdmin.io

Source

Univention Corporate Server (UCS) 4.2 Installation and Review on VMware Workstation

Univention Corporate Server (UCS) 4.2 Installation
Univention Corporate Server (UCS) 4.2 Installation on VMware Workstation

This video tutorial shows

Univention Corporate Server (UCS) 4.2 Installation and Review

on VMware Workstation/Player step by step. This tutorial is also helpful to install Univention Corporate Server 4.2 on physical computer or bare-metal server hardware. We also install

VMware Tools

(Open VM Tools) on UCS 4.2 for better performance and usability features.

Univention Corporate Server (UCS) 4.2 Installation Steps:

  1. Download Univention Corporate Server (UCS) 4.2 ISO
  2. Create Virtual Machine on VMware Workstation/Player
  3. Start Univention Corporate Server Installation
  4. Install VMware Tools (Open VM Tools)
  5. Univention Corporate Server (UCS) 4.2 Review

Installing Univention Corporate Server (UCS) 4.2 on VMware Workstation


Univention Corporate Server (UCS) 4.2 New Features and Improvements

Univention Corporate Server (UCS)

is a Debian-based Linux distribution for enterprise server environments. UCS 4.2 shifts the distribution’s base from Debian 7 to Debian 8 which also transitions UCS from using SysV init to the systemd init software. The entire Debian distribution will no longer be rebuilt. This allows security updates to be released even faster, and binary compatibility is increased. This change also involves the switch of the default start-up system to systemd. However, all previous init scripts are still started, so that the apps can be migrated successively. A configurable web portal provides an overview of the services installed in the domain. If there is more than one UCS system in the domain, an overview of servers is displayed.

Univention Corporate Server Website:

https://www.univention.com/

  1. With Univention Corporate Server 4.2, the second minor release of Univention Corporate Server (UCS) is now available. It provides several substantial feature improvements and extensions, new properties as well as various improvements and bugfixes. An overview of the most important changes:
  2. UCS 4.2 is based on Debian GNU/Linux 8 (Jessie). More than 16,000 source packages have been updated and adapted to the needs of UCS administrators. Selected core components, e.g. Linux Kernel (4.9), Docker (1.12) or QEMU (2.8) are more recent in UCS compared to Debian GNU/Linux 8.
  3. From UCS 4.2, the management system offers a central portal for quick access to all applications in the environment, as well as the management of the various UCS instances. This allows users to access their applications more easily. The portal is configurable and can be adapted to individual needs.
  4. The design and user experience have been improved further with UCS 4.2. For example, the password self service provides a simplified usage. The management system now uses SAML (Web Single Sign-On) by default, provided that the prerequisites, such as working name resolution, are given.
  5. Samba has been updated to version 4.6.1. This includes various improvements in the areas of DRS replication, Active Directory compatibility, file services and printer handling, among other things. In addition, the performance has been improved in environments with many users.

Hope you found this Univention Corporate Server (UCS) 4.2 Installation and Review tutorial helpful and informative. Please consider sharing it. Your feedback and questions are welcome!

Source

Install Packet Tracer on Ubuntu 18.04 LTS

If you’re a newbie in networking trying to get certifications such as Cisco CCENT or CCNA, then Packet Tracer will be a great help to you.

Cisco Packet Tracer is a network simulation software for simulating Cisco networking devices. You can use Cisco Packet Tracer to design simple to pretty complex network topologies. You can also configure the virtual computers, routers, switches etc in Packet Tracer to test your network topology.

Cisco Packet Tracer can also be used to simulate wireless networks, IP telephony networks (VoIP) and many more.

If you’re aiming for Cisco certification such as CCENT, CCNA etc, then you can use Cisco Packet Tracer to learn to configure Cisco networking devices (such as Switches and Routers) using Cisco IOS commands.

In this article, I will show you how to install and use Cisco Packet Tracer on Ubuntu 18.04 LTS. Let’s get started.

Source

Linux Today – Pagely NorthStack Makes WordPress Serverless

Oct 19, 2018, 13:00

(Other stories by Sean Michael Kerner)

The new NorthStack platform disaggregates the usual stack that WordPress requires into a series of services that largely run on serverless infrastructure at Amazon Web Services (AWS). The NorthStack effort is an attempt to lower the fixed costs and infrastructure needed to deploy and run WordPress.

“WordPress itself is based on 12 year old code, it does not want to be in a serverless environment,” Joshua Strebel, CEO of Pagely told eWEEK. “WordPress wants to live on one AWS EC2 node up next to its’ database with everything all contained in it.”

Complete Story

Related Stories:

Source

Aspyr Media are getting a little help from Intel for the long-delayed Linux patch to Civilization VI

The patch to bring cross-platform online play for Linux players of Civilization VI has been long delayed, with Aspyr Media now getting a little help from Intel.

After cross-platform originally being planned for early in 2017, Linux gamers have sadly been left waiting. By the looks of it, we’re also behind on normal patches right now too.

Writing on Steam earlier, a rep from Aspyr Media said this:

[…] This issue naggingly staying around is certainly not due to lack of effort on our part.

I’ll also remind the forum that xplatform is confirmed fixed in this patch.

Also, in reply to a user jokingly telling them to blink if it’s a third-party issue, they said:

Lol…no blinks…this one is on us. Intel has been kind enough to jump in and help.

We still don’t know exactly what the issue is, since Aspyr Media haven’t said. They gave a hint that it was due to a serious crash on a specific Intel chipset although they’re likely not able to give out any technical details on it.

Thinking of picking up Civilization VI for Linux? Head to Humble Store or Steam.

Source

WP2Social Auto Publish Powered By : XYZScripts.com