As you may know, most of the Linux distributions are easy to install and you can do by just few clicks. But there are some Linux distributions that first needs to compile then install and Gentoo is one of them. Installing Gentoo on your system or in VirtualBox/VMware isn’t easy if you are new to Linux, it is time consuming because it has to compile and there whole lots of things that needs to take care of.

In this article, we will show you step by step how you can easily install Gentoo on your System HDD or in VirtualBox/VMware. The instructions will be easy to follow and you also don’t need deep knowledge of everything, if you are new then with time things will get much clear to you. If you haven’t tried Gentoo before then first experiment it in VirtualBox or VMware.
The instructions will be divided into three parts: first part of instructions will show how to install Gentoo command-line (CLI); in second part instructions to get KDE Plasma on Gentoo; and last part is for those who install Gentoo in VirtualBox or VMware and want to install vmware-tools or vitualbox-guest-additions. So Lets start!
Getting Started – Install CLI
First we are going to install Gentoo Command-line-interface (CLI):
Download Gentoo
minimal iso. If you are installing it on your system then write it on USB using unetbootin utility, if you are installing it in VirtualBox or VMware then mount iso in virtual cdrom.
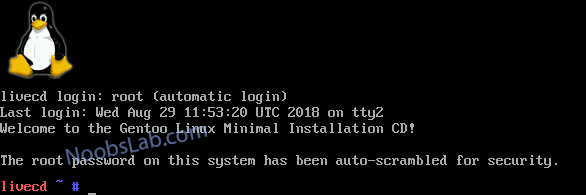
You will be dropped at command line shell, once you boot the iso.
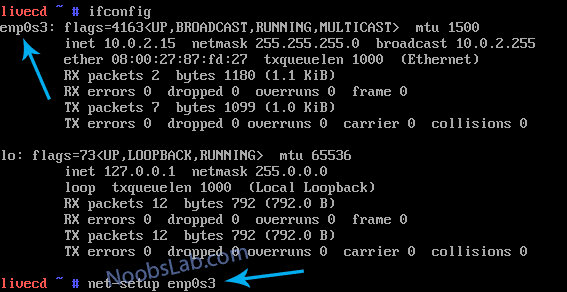
Next step is to configure the network.
Run this command to see the network adapter (Ethernet/Wireless)
To view processes by the your logged-in user:
ifconfig
Now with this command you can configure your connected internet connection.
To view processes by the your logged-in user:
net-setup your_network_adapter
Partitioning with FDisk
There are multiple ways to partition HDD, we chose FDisk because it is very simple to use and pretty much you can find it on most Linux distributions.
Warning:
Be careful! If you are doing partitions on your system HDD. You can lose your data, if you don’t know what you are going to do!!!
Run this command to see available disk in system:
fdisk -l
We assume output HDD as /dev/sda/ from previous command.
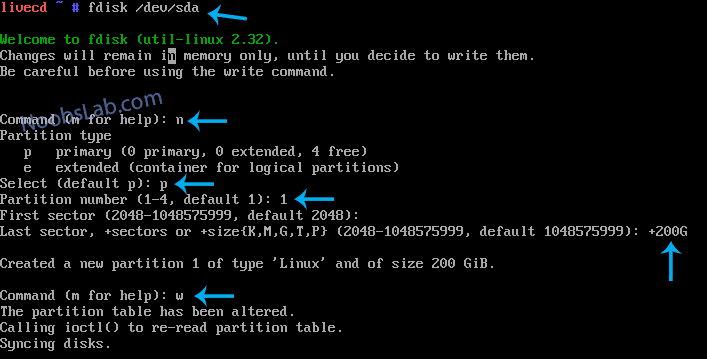
This command will open FDisk to partition /dev/sda/ HDD:
fdisk /dev/sda
Press m key to see options for using FDisk.
In the following picture, we created 200GB of primary partition for root. You can create more partitions by yourself using this example.
Format partition using EXT4 filesystem:
mkfs.ext4 /dev/sda1
For swap partition use this command: (PS: first create swap partition)
mkswap /dev/sda2
swapon /dev/sda2
PS: You should create your home directory on separate partition! Also if you want you can create separate boot partition.
Installation
Create directory to mount root partition, where Gentoo will install:
mkdir -p /mnt/gentoo/
mount /dev/sda1 /mnt/gentoo/
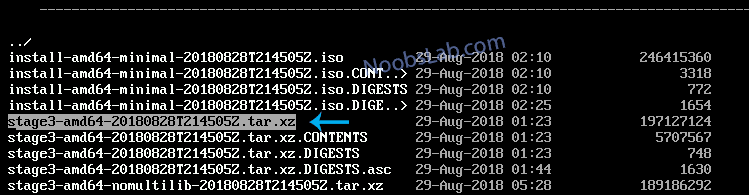
Lets download the latest stage to start the installation:
cd /mnt/gentoo
links http://www.gentoo.org/main/en/mirrors.xml
Download latest version of stage3 according to your system architecture:
Next step to extract the downloaded stage3 archive:
cd /mnt/gentoo
tar xf stage3-*.tar.xz
for tar.bz2 use this command:
tar xvjpf stage3-*.tar.bz2
Mount filesystem:
mount -t proc none /mnt/gentoo/proc
mount –rbind /sys /mnt/gentoo/sys
mount –rbind /dev /mnt/gentoo/dev
Copy DNS info:
cp -L /etc/resolv.conf /mnt/gentoo/etc/
Chroot into installation partition:
chroot /mnt/gentoo /bin/bash
source /etc/profile
export PS1=”(chroot) $PS1″
Edit make.conf file to add some necessary flags:
nano -w /etc/portage/make.conf
Add following lines in opened file then press
CTRL+O
and
CTRL+X
to save and close: (Don’t remove anything from file)
USE=”bindist mmx sse”
INPUT_DEVICES=”evdev keyboard mouse synaptics”
MAKEOPTS=”-j3″
Configure portage:
emerge-webrsync
emerge –sync
emerge –oneshot portage
Set timezone:
cp /usr/share/zoneinfo/America/New_York /etc/localtime
echo “America/New_York” > /etc/timezone
Set-up the Locale:
nano -w /etc/locale.gen
Uncomment following lines in the file or according to your needs:
en_US ISO-8859-1
en_US.UTF-8 UTF-8
Now run these commands:
locale-gen
nano -p /etc/env.d/02locale
Add following lines in the file then press
CTRL+O
and
CTRL+X
to save and close:
LANG=”en_US.UTF-8″
LC_COLLATE=”C”
Now run this command:
env-update && source /etc/profile
Compile the kernel:
emerge gentoo-sources
cd /usr/src/linux
make menuconfig
Choose options according to your system hardware. For x86/i386/i486/i686 architecture untick the 64-bit kernel option from menu.
Follow these steps to configure kernel options for VirtualBox and VMware:
| Linux Kernel Configuration: VMware tools configuration |
| Loadable module support —>
[*] Enable loadable module support —>
[*] Module unloading |
| Linux Kernel Configuration: Intel PCI/ISA Bridge |
| Bus options (PCI etc.) —>
[*] PCI Support
[*] ISA Support
[*] EISA support
<*> Support for PCI Hotplug
Support for PCI Hotplug —>
<*> SHPC PCI Hotplug driver |
| Linux Kernel Configuration: IEEE 1394 |
| Device Drivers —>
IEEE 1394 (Firewire) support —>
<*> Firewire driver stack
<*> OHCI-1394 controllers
<*> Storage devices (SBP-2 protocol) |
| Linux Kernel Configuration: Parallel port |
| Device Drivers —>
<*> Parallel port support —>
<*> PC-style hardware |
| Linux Kernel Configuration: Parallel ATA |
|
| Device Drivers —>
<*> Serial ATA and Parallel ATA drivers
<*> PCMCIA PATA support |
—> |
| Linux Kernel Configuration: I2C |
| Device Drivers —>
I2C Support —>
I2C Hardware Bus support —>
<*> Intel PIIX4 and compatible (ATI/Serverworks/Broadcom/SMSC) |
| Linux Kernel Configuration: Backplane |
| Device Drivers —>
Sonics Silicon Backplane —>
<*> Sonics Silicon Backplane support |
| Linux Kernel Configuration: LSI Logic SCSI adapter |
| Device Drivers —>
[*] Fusion MPT device support —>
<*> Fusion MPT ScsiHost drivers for SPI
<*> Fusion MPT ScsiHost drivers for SAS
SCSI device support —>
<*> SCSI device support
<*> SCSI disk support
SCSI low-level drivers —>
<*> SYM53C8XX Version 2 SCSI support
<*> BusLogic SCSI Support
[*] USB support —>
<*> Support for Host-side USB
<*> SL811HS HCD support |
| Linux Kernel Configuration: BusLogic |
| Device Drivers —>
SCSI device support —>
<*> SCSI device support
<*> SCSI disk support
SCSI low-level drivers —>
<*> BusLogic SCSI support |
| Linux Kernel Configuration: HID support |
| Device Drivers —>
[*] HID Devices —>
<*> USB Human Interface Device (full HID) support
[*] USB support —>
<*> Support for Host-side USB <*> SL811HS HCD support |
| Linux Kernel Configuration: CDROM |
| Device Drivers —>
<*> ATA/ATAPI/MFM/RLL support —>
<*> Include IDE/ATAPI CDROM support
PCI IDE chipset support
<*> Intel PIIXn chipsets support
File systems —>
CD-ROM/DVD Filesystems —>
<*> ISO 9660 CDROM file system support
[*] Microsoft Joliet CDROM extensions |
| Linux Kernel Configuration: Gameport |
| Device Drivers —>
Input device support —>
Hardware I/O ports —> <*> Gameport support |
| Linux Kernel Configuration: Device mapper support |
| Device Drivers —>
[*] Multiple devices driver support (RAID and LVM) —>
<*> Device mapper support
<*> Snapshot target |
| Linux Kernel Configuration: Network |
| Networking —>
[*] Networking support
Networking options —>
<*> Packet socket
<*> Unix domain sockets
[*] TCP/IP networking
<*> 802.1d Ethernet Bridging
Device Drivers —>
Network Device support —>
[*] Network device support
[*] Ethernet driver support —>
[*] AMD devices
<M> AMD PCnet32 PCI support
[*] Intel devices
<M> Intel(R) PRO/1000 Gigabit Ethernet support |
| Linux Kernel Configuration: Audio |
| Device Drivers —>
Sound Card Support —>
<*> Advanced Linux Sound Architecture —>
<M> Sequencer support
< > Sequencer dummy client
<*> OSS Sequencer API
[*] Enable OSS Simulation
<M> OSS Mixer API
<M> OSS PCM (digital audio) API
[*] OSS PCM (digital audio) API
[*] Dynamic device file minor numbers
[*] Support old ALSA API
[*] Verbose procfs contents
[*] Generic sound devices —>
[*] PCI sound devices —>
<M> (Creative) Ensoniq AudioPCI 1371/1373
[*] USB sound devices —>
[*] PCMCIA sound devices —> |
| Linux Kernel Configuration: Graphics |
| Device Drivers —>
Graphics support —>
<*> /dev/agpgart (AGP Support) —>
<*> Intel 440LX/BX/GX, I8xx and E7x05 chipset support |
Save and exit the kernel configuration menu.
Now run these commands to compile the kernel with options you have selected:
make -j2 && make modules_install
cp arch/x86_64/boot/bzImage /boot/kernel-kernel_version-gentoo

Configure initramfs:
emerge genkernel
If you get the similar output with above command:
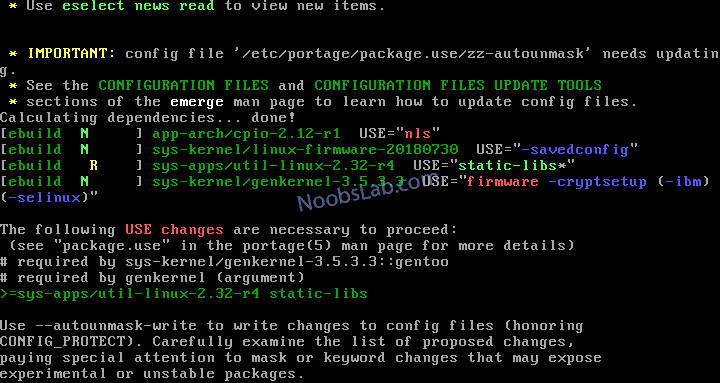
Then run this command:
dispatch-conf
At genkernel screen press “u”

Now try to install it again:
genkernel -install initramfs
Set the hostname:
nano -w /etc/conf.d/hostname
Change hostname as you like.
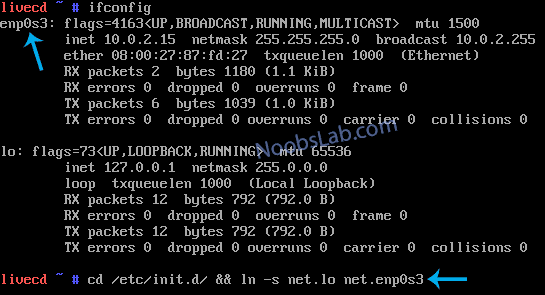
Now create symbolic link for network adapter. Run this command to see the adapter:
ifconfig
Replace your network adapter name with “your_network_adapter” in the following command:
cd /etc/init.d/ && ln -s net.lo net.your_network_adapter
Install and setup DHCP client:
emerge -av dhcpcd
rc-update add dhcpcd default
Set password for root:
passwd root
Install syslog-ng: it is powerful, massively configurable monitoring and logging daemon:
emerge syslog-ng
rc-update add syslog-ng default
In this step, install grub bootloader:
emerge –ask sys-boot/grub
grub-install /dev/sda
grub-mkconfig -o /boot/grub/grub.cfg
Add an non-root user:
useradd -m -G wheel,audio,video,usb,cdrom -s /bin/bash username
passwd username
Install sudo and add user to sudo:
emerge -av sudo
nano -w /etc/sudoers
Add this line in the file then press
CTRL+O
and
CTRL+X
to save and close:
Update packages:
emerge -avuND world
Cleanup:
rm /usr/portage/distfiles/*
Finally, unmount everything and reboot to your minimal Gentoo CLI system:
exit && cd ~
umount -l /mnt/gentoo/
umount /mnt/gentoo
reboot
At this point you got Gentoo minimal CLI installed on your system. If you want to install KDE Plasma on Gentoo then proceed!
Install KDE Plasma Desktop in Gentoo
Boot into your system and login as root.
You need to add some flags for KDE Plasma desktop in make.conf file:
nano -w /etc/portage/make.conf
Add following lines in the file then press CTRL+O and CTRL+X to save and close:
USE=”bindist mmx sse sse2 mmxext dbus udev branding icu python X acpi display-manager sddm gtk handbook libkms wallpapers pulseaudio legacy-systray gtk2 gtk3″
INPUT_DEVICES=”evdev keyboard mouse synaptics”
Choose the profile:
eselect profile list
eselect profile set 19
Select KDE Plasma profile (with or without systemd)

Install any available update and dbus:
emerge -avuND world
emerge -av dbus
/etc/init.d/dbus start
rc-update add dbus default
rc-update add udev sysinit
Install Xorg Drivers:
emerge -av x11-base/xorg-drivers
emerge -av x11-base/xorg-x11
Allow users to video access:
gpasswd -a root video
gpasswd -a username video
Start installing KDE Plasma. The following command will install all required KDE Plasma packages:
emerge -av kde-plasma/plasma-meta
If you want to install basic KDE Plasma and want to install packages separately then use this command:
emerge -av kde-plasma/plasma-desktop
Install some necessary packages:
emerge -av kde-plasma/kdeplasma-addons kde-apps/kwalletmanager kde-apps/dolphin x11-misc/sddm kde-plasma/systemsettings kde-plasma/kscreen kde-plasma/console
If you want to get KDE full applications bundle then run this command:
emerge -av kde-apps/kde-apps-meta
Configure the display manager:
nano -w /etc/conf.d/xdm
Change displaymanager line to the following one:
Now run these commands:
rc-update add xdm default
usermod -a -G video sddm
Install VirtualBox Guest Additions in Gentoo
Use following commands to get installed virtualbox-guest-additions in Gentoo:
emerge -av app-emulation/virtualbox-guest-additions
gpasswd -a root vboxguest
gpasswd -a username vboxguest
Install VMware Tools in Gentoo
Use following commands to get installed VMware Tools (open-vm-tools) in Gentoo:
emerge -av app-emulation/open-vm-tools
If above command don’t install open-vm-tools then do following:
emerge –ask –autounmask-write app-emulation/open-vm-tools
dispatch-conf #(Press u at open-vm-tools menu)
emerge -av app-emulation/open-vm-tools
If above command don’t install open-vm-tools then do following:
rc-update add vmware-tools default
usermod -a -G vmware username
usermod -a -G vmware root
Cleanup and reboot:
rm /usr/portage/distfiles/*
reboot
That’s it. Hope you had fun installing Gentoo.

Source


 Hardkernel unveiled the Odroid-H2, the first hacker board with an Intel Gemini Lake SoC. The Ubuntu 18.10 driven SBC ships with 2x SATA 3.0, 2x GbE, HDMI and DP, 4x USB, and an M.2 slot for NVMe.