Ebook: Introducing the Awk Getting Started Guide for Beginners
As a Linux system administrator, many times, you will get into situations where you need to manipulate and reformat the output from different commands, to simply display part of a output by filtering out a few lines. This process can be referred to as text filtering, using a collection of Linux programs known as filters.
There are several Linux utilities for text filtering and some of the well known filters include head, tail, grep, tr, fmt, sort, uniq, pr and more advanced and powerful tools such as Awk and Sed.

Introducing the Awk Getting Started Guide for Beginners
Unlike Sed, Awk is more than just a text filtering tool, it is a comprehensive and flexible text pattern scanning and processing language.
Awk is a strongly recommended text filtering tool for Linux, it can be utilized directly from the command line together with several other commands, within shell scripts or in independent Awk scripts. It searches through input data or a single or multiple files for user defined patterns and modifies the input or file(s) based on certain conditions.
Since Awk is a sophisticated programming language, learning it requires a lot of time and dedication just as any other programming language out there. However, mastering a few basic concepts of this powerful text filtering language can enable you to understand how it actually works and sets you on track to learn more advanced Awk programming techniques.
After carefully and critically revising our 13 articles in the Awk programming series, with high consideration of the vital feedback from our followers and readers over the last 5 months, we have managed to organize the Introduction to Awk programming language eBook.
Therefore, if you are ready to start learning Awk programming language from the basic concepts, with simple and easy-to-understand, well explained examples, then you may consider reading this concise and precise eBook.
What’s Inside this eBook?
This book contains 13 chapters with a total of 41 pages, which covers all Awk basic and advance usage with practical examples:
- Chapter 1: Awk Regular Expressions to Filter Text in Files
- Chapter 2: Use Awk to Print Fields and Columns in File
- Chapter 3: Use Awk to Filter Text Using Pattern Specific Actions
- Chapter 4: Learn Comparison Operators with Awk
- Chapter 5: Learn Compound Expressions with Awk
- Chapter 6: Learn ‘next’ Command with Awk
- Chapter 7: Read Awk Input from STDIN in Linux
- Chapter 8: Learn Awk Variables, Numeric Expressions and Assignment Operators
- Chapter 9: Learn Awk Special Patterns ‘BEGIN and END’
- Chapter 10: Learn Awk Built-in Variables
- Chapter 11: Learn Awk to Use Shell Variables
- Chapter 12: Learn Flow Control Statements in Awk
- Chapter 13: Write Scripts Using Awk Programming Language
How to Use Awk and Regular Expressions to Filter Text or String in Files
When we run certain commands in Unix/Linux to read or edit text from a string or file, we most times try to filter output to a given section of interest. This is where using regular expressions comes in handy.
Read Also: 10 Useful Linux Chaining Operators with Practical Examples
What are Regular Expressions?
A regular expression can be defined as a strings that represent several sequence of characters. One of the most important things about regular expressions is that they allow you to filter the output of a command or file, edit a section of a text or configuration file and so on.
Features of Regular Expression
Regular expressions are made of:
- Ordinary characters such as space, underscore(_), A-Z, a-z, 0-9.
- Meta characters that are expanded to ordinary characters, they include:
(.) it matches any single character except a newline.(*) it matches zero or more existences of the immediate character preceding it.[ character(s) ] it matches any one of the characters specified in character(s), one can also use a hyphen (-) to mean a range of characters such as [a-f], [1-5], and so on.^ it matches the beginning of a line in a file.$ matches the end of line in a file.\ it is an escape character.
In order to filter text, one has to use a text filtering tool such as awk. You can think of awk as a programming language of its own. But for the scope of this guide to using awk, we shall cover it as a simple command line filtering tool.
The general syntax of awk is:
# awk 'script' filename
Where 'script' is a set of commands that are understood by awk and are execute on file, filename.
It works by reading a given line in the file, makes a copy of the line and then executes the script on the line. This is repeated on all the lines in the file.
The 'script' is in the form '/pattern/ action' where pattern is a regular expression and the action is what awk will do when it finds the given pattern in a line.
How to Use Awk Filtering Tool in Linux
In the following examples, we shall focus on the meta characters that we discussed above under the features of awk.
A simple example of using awk:
The example below prints all the lines in the file /etc/hosts since no pattern is given.
# awk '//{print}'/etc/hosts
Awk Prints all Lines in a File
Use Awk with Pattern:
I the example below, a pattern localhost has been given, so awk will match line having localhost in the /etc/hosts file.
# awk '/localhost/{print}' /etc/hosts

Awk Print Given Matching Line in a File
Using Awk with (.) wild card in a Pattern
The (.) will match strings containing loc, localhost, localnet in the example below.
That is to say * l some_single_character c *.
# awk '/l.c/{print}' /etc/hosts
Use Awk to Print Matching Strings in a File
Using Awk with (*) Character in a Pattern
It will match strings containing localhost, localnet, lines, capable, as in the example below:
# awk '/l*c/{print}' /etc/localhost
Use Awk to Match Strings in File
You will also realize that (*) tries to a get you the longest match possible it can detect.
Let look at a case that demonstrates this, take the regular expression t*t which means match strings that start with letter t and end with t in the line below:
this is tecmint, where you get the best good tutorials, how to's, guides, tecmint.
You will get the following possibilities when you use the pattern /t*t/:
this is t
this is tecmint
this is tecmint, where you get t
this is tecmint, where you get the best good t
this is tecmint, where you get the best good tutorials, how t
this is tecmint, where you get the best good tutorials, how tos, guides, t
this is tecmint, where you get the best good tutorials, how tos, guides, tecmint
And (*) in /t*t/ wild card character allows awk to choose the the last option:
this is tecmint, where you get the best good tutorials, how to's, guides, tecmint
Using Awk with set [ character(s) ]
Take for example the set [al1], here awk will match all strings containing character a or l or 1 in a line in the file /etc/hosts.
# awk '/[al1]/{print}' /etc/hosts

Use-Awk to Print Matching Character in File
The next example matches strings starting with either K or k followed by T:
# awk '/[Kk]T/{print}' /etc/hosts

Use Awk to Print Matched String in File
Specifying Characters in a Range
Understand characters with awk:
[0-9] means a single number[a-z] means match a single lower case letter[A-Z] means match a single upper case letter[a-zA-Z] means match a single letter[a-zA-Z 0-9] means match a single letter or number
Lets look at an example below:
# awk '/[0-9]/{print}' /etc/hosts
Use Awk To Print Matching Numbers in File
All the line from the file /etc/hosts contain at least a single number [0-9] in the above example.
Use Awk with (^) Meta Character
It matches all the lines that start with the pattern provided as in the example below:
# awk '/^fe/{print}' /etc/hosts
# awk '/^ff/{print}' /etc/hosts
Use Awk to Print All Matching Lines with Pattern
Use Awk with ($) Meta Character
It matches all the lines that end with the pattern provided:
# awk '/ab$/{print}' /etc/hosts
# awk '/ost$/{print}' /etc/hosts
# awk '/rs$/{print}' /etc/hosts
Use Awk to Print Given Pattern String
Use Awk with (\) Escape Character
It allows you to take the character following it as a literal that is to say consider it just as it is.
In the example below, the first command prints out all line in the file, the second command prints out nothing because I want to match a line that has $25.00, but no escape character is used.
The third command is correct since a an escape character has been used to read $ as it is.
# awk '//{print}' deals.txt
# awk '/$25.00/{print}' deals.txt
# awk '/\.00/{print}' deals.txt
Use Awk with Escape Character
Summary
That is not all with the awk command line filtering tool, the examples above a the basic operations of awk. In the next parts we shall be advancing on how to use complex features of awk. Thanks for reading through and for any additions or clarifications, post a comment in the comments section.
How to Use Awk to Print Fields and Columns in File
In this part of our Linux Awk command series, we shall have a look at one of the most important features of Awk, which is field editing.
It is good to know that Awk automatically divides input lines provided to it into fields, and a field can be defined as a set of characters that are separated from other fields by an internal field separator.

Awk Print Fields and Columns
If you are familiar with the Unix/Linux or do bash shell programming, then you should know what internal field separator (IFS) variable is. The default IFS in Awk are tab and space.
This is how the idea of field separation works in Awk: when it encounters an input line, according to the IFS defined, the first set of characters is field one, which is accessed using $1, the second set of characters is field two, which is accessed using $2, the third set of characters is field three, which is accessed using $3 and so forth till the last set of character(s).
To understand this Awk field editing better, let us take a look at the examples below:
Example 1: I have created a text file called tecmintinfo.txt.
# vi tecmintinfo.txt
# cat tecmintinfo.txt

Create File in Linux
Then from the command line, I try to print the first, second and third fields from the file tecmintinfo.txt using the command below:
$ awk '//{print $1 $2 $3 }' tecmintinfo.txt

TecMint.comisthe
From the output above, you can see that the characters from the first three fields are printed based on the IFSdefined which is space:
- Field one which is “TecMint.com” is accessed using
$1.
- Field two which is “is” is accessed using
$2.
- Field three which is “the” is accessed using
$3.
If you have noticed in the printed output, the field values are not separated and this is how print behaves by default.
To view the output clearly with space between the field values, you need to add (,) operator as follows:
$ awk '//{print $1, $2, $3; }' tecmintinfo.txt

TecMint.com is the
One important thing to note and always remember is that the use of ($) in Awk is different from its use in shell scripting.
Under shell scripting ($) is used to access the value of variables while in Awk ($) it is used only when accessing the contents of a field but not for accessing the value of variables.
Example 2: Let us take a look at one other example using a file which contains multiple lines called my_shoping.list.
No	Item_Name		Unit_Price	Quantity	Price
1	Mouse			#20,000		   1		#20,000
2 	Monitor			#500,000	   1		#500,000
3	RAM_Chips		#150,000	   2		#300,000
4	Ethernet_Cables	        #30,000		   4		#120,000
Say you wanted to only print Unit_Price of each item on the shopping list, you will need to run the command below:
$ awk '//{print $2, $3 }' my_shopping.txt

Item_Name Unit_Price
Mouse #20,000
Monitor #500,000
RAM_Chips #150,000
Ethernet_Cables #30,000
Awk also has a printf command that helps you to format your output is a nice way as you can see the above output is not clear enough.
Using printf to format output of the Item_Name and Unit_Price:
$ awk '//{printf "%-10s %s\n",$2, $3 }' my_shopping.txt

Item_Name  Unit_Price
Mouse      #20,000
Monitor    #500,000
RAM_Chips  #150,000
Ethernet_Cables #30,000
Summary
Field editing is very important when using Awk to filter text or strings, it helps you get particular data in columns in a list. And always remember that the use of ($) operator in Awk is different from that in shell scripting.
I hope the article was helpful to you and for any additional information required or questions, you can post a comment in the comment section.
How to Use Awk to Filter Text or Strings Using Pattern Specific Actions
In the third part of the Awk command series, we shall take a look at filtering text or strings based on specific patterns that a user can define.
Sometimes, when filtering text, you want to indicate certain lines from an input file or lines of strings based on a given condition or using a specific pattern that can be matched. Doing this with Awk is very easy, it is one of the great features of Awk that you will find helpful.
Let us take a look at an example below, say you have a shopping list for food items that you want to buy, called food_prices.list. It has the following list of food items and their prices.
$ cat food_prices.list
No	Item_Name		Quantity	Price
1	Mangoes			   10		$2.45
2	Apples			   20		$1.50
3	Bananas			   5		$0.90
4	Pineapples		   10		$3.46
5	Oranges			   10		$0.78
6	Tomatoes		   5		$0.55
7	Onions			   5            $0.45
And then, you want to indicate a (*) sign on food items whose price is greater than $2, this can be done by running the following command:
$ awk '/ *$[2-9]\.[0-9][0-9] */ { print $1, $2, $3, $4, "*" ; } / *$[0-1]\.[0-9][0-9] */ { print ; }' food_prices.list
Print Items Whose Price is Greater Than $2
From the output above, you can see that the there is a (*) sign at the end of the lines having food items, mangoes and pineapples. If you check their prices, they are above $2.
In this example, we have used used two patterns:
- the first:
/ *\$[2-9]\.[0-9][0-9] */ gets the lines that have food item price greater than $2 and
- the second:
/*\$[0-1]\.[0-9][0-9] */ looks for lines with food item price less than $2.
This is what happens, there are four fields in the file, when pattern one encounters a line with food item price greater than $2, it prints all the four fields and a (*) sign at the end of the line as a flag.
The second pattern simply prints the other lines with food price less than $2 as they appear in the input file, food_prices.list.
This way you can use pattern specific actions to filter out food items that are priced above $2, though there is a problem with the output, the lines that have the (*) sign are not formatted out like the rest of the lines making the output not clear enough.
We saw the same problem in Part 2 of the awk series, but we can solve it in two ways:
1. Using printf command which is a long and boring way using the command below:
$ awk '/ *$[2-9]\.[0-9][0-9] */ { printf "%-10s %-10s %-10s %-10s\n", $1, $2, $3, $4 "*" ; } / *$[0-1]\.[0-9][0-9] */ { printf "%-10s %-10s %-10s %-10s\n", $1, $2, $3, $4; }' food_prices.list
Filter and Print Items Using Awk and Printf
2. Using $0 field. Awk uses the variable 0 to store the whole input line. This is handy for solving the problem above and it is simple and fast as follows:
$ awk '/ *$[2-9]\.[0-9][0-9] */ { print $0 "*" ; } / *$[0-1]\.[0-9][0-9] */ { print ; }' food_prices.list
Filter and Print Items Using Awk and Variable
Conclusion
That’s it for now and these are simple ways of filtering text using pattern specific action that can help in flagging lines of text or strings in a file using Awk command.
Hope you find this article helpful and remember to read the next part of the series which will focus on using comparison operators using awk tool.
How to Use Comparison Operators with Awk in Linux – Part 4
When dealing with numerical or string values in a line of text, filtering text or strings using comparison operators comes in handy for Awk command users.
In this part of the Awk series, we shall take a look at how you can filter text or strings using comparison operators. If you are a programmer then you must already be familiar with comparison operators but those who are not, let me explain in the section below.
What are Comparison operators in Awk?
Comparison operators in Awk are used to compare the value of numbers or strings and they include the following:
> – greater than< – less than>= – greater than or equal to<= – less than or equal to== – equal to!= – not equal tosome_value ~ / pattern/ – true if some_value matches patternsome_value !~ / pattern/ – true if some_value does not match pattern
Now that we have looked at the various comparison operators in Awk, let us understand them better using an example.
In this example, we have a file named food_list.txt which is a shopping list for different food items and I would like to flag food items whose quantity is less than or equal 20 by adding (**) at the end of each line.
File – food_list.txt
No      Item_Name               Quantity        Price
1       Mangoes                    45           $3.45
2       Apples                     25           $2.45
3       Pineapples                 5            $4.45
4       Tomatoes                   25           $3.45
5       Onions                     15           $1.45
6       Bananas                    30           $3.45
The general syntax for using comparison operators in Awk is:
# expression { actions; }
To achieve the above goal, I will have to run the command below:
# awk '$3 <= 30 { printf "%s\t%s\n", $0,"**" ; } $3 > 30 { print $0 ;}' food_list.txt

No	Item_Name`		Quantity	Price
1	Mangoes	      		   45		$3.45
2	Apples			   25		$2.45	**
3	Pineapples		   5		$4.45	**
4	Tomatoes		   25		$3.45	**
5	Onions			   15           $1.45	**
6	Bananas			   30           $3.45	**
In the above example, there are two important things that happen:
- The first expression { action ; } combination, $3 <= 30 { printf “%s\t%s\n”, $0,”**” ; } prints out lines with quantity less than or equal to 30 and adds a (**) at the end of each line. The value of quantity is accessed using $3 field variable.
- The second expression { action ; } combination, $3 > 30 { print $0 ;} prints out lines unchanged since their quantity is greater then 30.
One more example:
# awk '$3 <= 20 { printf "%s\t%s\n", $0,"TRUE" ; } $3 > 20  { print $0 ;} ' food_list.txt

No	Item_Name		Quantity	Price
1	Mangoes			   45		$3.45
2	Apples			   25		$2.45
3	Pineapples		   5		$4.45	TRUE
4	Tomatoes		   25		$3.45
5	Onions			   15           $1.45	TRUE
6       Bananas	                   30           $3.45
In this example, we want to indicate lines with quantity less or equal to 20 with the word (TRUE) at the end.
Summary
This is an introductory tutorial to comparison operators in Awk, therefore you need to try out many other options and discover more.
In case of any problems you face or any additions that you have in mind, then drop a comment in the comment section below. Remember to read the next part of the Awk series where I will take you through compound expressions.
How to Use Compound Expressions with Awk in Linux – Part 5
All along, we have been looking at simple expressions when checking whether a condition has been meet or not. What if you want to use more then one expression to check for a particular condition in?
In this article, we shall take a look at the how you can combine multiple expressions referred to as compound expressions to check for a condition when filtering text or strings.
In Awk, compound expressions are built using the && referred to as (and) and the || referred to as (or)compound operators.
The general syntax for compound expressions is:
( first_expression ) && ( second_expression )
Here, first_expression and second_expression must be true to make the whole expression true.
( first_expression ) || ( second_expression)
Here, one of the expressions either first_expression or second_expression must be true for the whole expression to be true.
Caution: Remember to always include the parenthesis.
The expressions can be built using the comparison operators that we looked at in Part 4 of the awk series.
Let us now get a clear understanding using an example below:
In this example, a have a text file named tecmint_deals.txt, which contains a list of some amazing random Tecmint deals, it includes the name of the deal, the price and type.
TecMint Deal List
No      Name                                    Price           Type
1       Mac_OS_X_Cleanup_Suite                  $9.99           Software
2       Basics_Notebook                         $14.99          Lifestyle
3       Tactical_Pen                            $25.99          Lifestyle
4       Scapple                                 $19.00          Unknown
5       Nano_Tool_Pack                          $11.99          Unknown
6       Ditto_Bluetooth_Altering_Device         $33.00          Tech
7       Nano_Prowler_Mini_Drone                 $36.99          Tech
Say that we want only print and flag deals that are above $20 and of type “Tech” using the (**) sign at the end of each line.
We shall need to run the command below.
# awk '($3 ~ /^$[2-9][0-9]*\.[0-9][0-9]$/) && ($4=="Tech") { printf "%s\t%s\n",$0,"*"; } ' tecmint_deals.txt

6	Ditto_Bluetooth_Altering_Device		$33.00		Tech	*
7	Nano_Prowler_Mini_Drone			$36.99          Tech	 *
In this example, we have used two expressions in a compound expression:
- First expression, ($3 ~ /^\$[2-9][0-9]*\.[0-9][0-9]$/) ; checks the for lines with deals with price above $20, and it is only true if the value of $3 which is the price matches the pattern /^\$[2-9][0-9]*\.[0-9][0-9]$/
- And the second expression, ($4 == “Tech”) ; checks whether the deal is of type “Tech” and it is only true if the value of $4 equals to “Tech”.
Remember, a line will only be flagged with the (**), if first expression and second expression are true as states the principle of the && operator.
Summary
Some conditions always require building compound expressions for you to match exactly what you want. When you understand the use of comparison and compound expression operators then, filtering text or strings based on some difficult conditions will become easy.
Hope you find this guide useful and for any questions or additions, always remember to leave a comment and your concern will be solved accordingly.
How to Use ‘next’ Command with Awk in Linux – Part 6
In this sixth part of Awk series, we shall look at using next command, which tells Awk to skip all remaining patterns and expressions that you have provided, but instead read the next input line.
The next command helps you to prevent executing what I would refer to as time-wasting steps in a command execution.
To understand how it works, let us consider a file called food_list.txt that looks like this:
Food List Items
No      Item_Name               Price           Quantity
1       Mangoes                 $3.45              5
2       Apples                  $2.45              25
3       Pineapples              $4.45              55
4       Tomatoes                $3.45              25
5       Onions                  $1.45              15
6       Bananas                 $3.45              30
Consider running the following command that will flag food items whose quantity is less than or equal to 20with a (*) sign at the end of each line:
# awk '$4 <= 20 { printf "%s\t%s\n", $0,"*" ; } $4 > 20 { print $0 ;} ' food_list.txt

No	Item_Name		Price		Quantity
1	Mangoes			$3.45		   5	*
2	Apples			$2.45              25
3	Pineapples		$4.45              55
4	Tomatoes		$3.45              25
5	Onions			$1.45              15	*
6	Bananas	                $3.45              30
The command above actually works as follows:
- First, it checks whether the quantity, fourth field of each input line is less than or equal to 20, if a value meets that condition, it is printed and flagged with the
(*) sign at the end using expression one: $4 <= 20
- Secondly, it checks if the fourth field of each input line is greater than 20, and if a line meets the condition it gets printed using expression two:
$4 > 20
But there is one problem here, when the first expression is executed, a line that we want to flag is printed using: { printf "%s\t%s\n", $0,"**" ; } and then in the same step, the second expression is also checked which becomes a time wasting factor.
So there is no need to execute the second expression, $4 > 20 again after printing already flagged lines that have been printed using the first expression.
To deal with this problem, you have to use the next command as follows:
# awk '$4 <= 20 { printf "%s\t%s\n", $0,"*" ; next; } $4 > 20 { print $0 ;} ' food_list.txt

No	Item_Name		Price		Quantity
1	Mangoes			$3.45		   5	*
2	Apples			$2.45              25
3	Pineapples		$4.45              55
4	Tomatoes		$3.45              25
5	Onions			$1.45              15	*
6	Bananas	                $3.45              30
After a single input line is printed using $4 <= 20 { printf "%s\t%s\n", $0,"*" ; next ; }, the next command included will help skip the second expression $4 > 20 { print $0 ;}, so execution goes to the next input line without having to waste time on checking whether the quantity is greater than 20.
The next command is very important is writing efficient commands and where necessary, you can always use to speed up the execution of a script. Prepare for the next part of the series where we shall look at using standard input (STDIN) as input for Awk.
Hope you find this how to guide helpful and you can as always put your thoughts in writing by leaving a comment in the comment section below.
How to Read Awk Input from STDIN in Linux – Part 7
In the previous parts of the Awk tool series, we looked at reading input mostly from a file(s), but what if you want to read input from STDIN.
In this Part 7 of Awk series, we shall look at few examples where you can filter the output of other commands instead of reading input from a file.
We shall start with the dir utility that works similar to ls command, in the first example below, we use the output of dir -l command as input for Awk to print owner’s username, groupname and the files he/she owns in the current directory:
# dir -l | awk '{print $3, $4, $9;}'
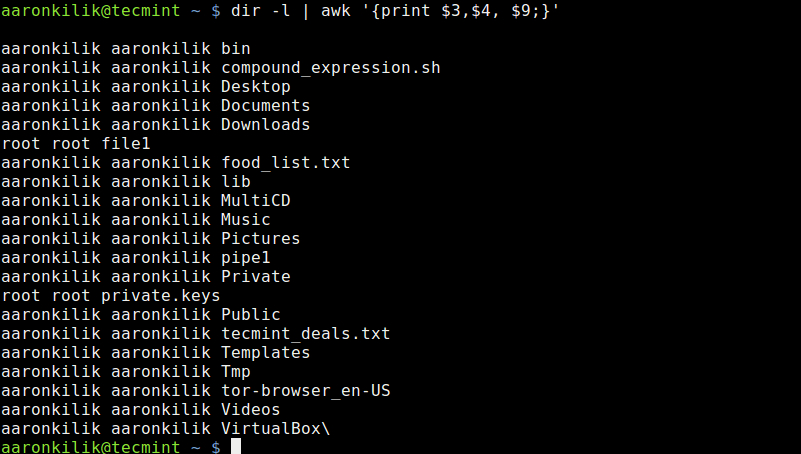
List Files Owned By User in Directory
Take a look at another example where we employ awk expressions, here, we want to print files owned by the root user by using an expression to filter strings as in the awk command below:
# dir -l | awk '$3=="root" {print $1,$3,$4, $9;} '

List Files Owned by Root User
The command above includes the (==) comparison operator to help us filter out files in the current directory which are owned by the root user. This is achieved using the expression $3==”root”.
Let us look at another example of where we use a awk comparison operator to match a certain string.
Here, we have used the cat utility to view the contents of a file named tecmint_deals.txt and we want to view the deals of type Tech only, so we shall run the following commands:
# cat tecmint_deals.txt
# cat tecmint_deals.txt | awk '$4 ~ /tech/{print}'
# cat tecmint_deals.txt | awk '$4 ~ /Tech/{print}'
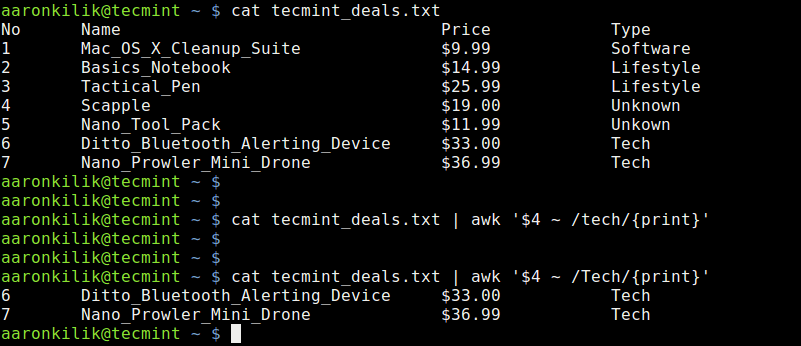
Use Awk Comparison Operator to Match String
In the example above, we have used the value ~ /pattern/ comparison operator, but there are two commands to try and bring out something very important.
When you run the command with pattern tech nothing is printed out because there is no deal of that type, but with Tech, you get deals of type Tech.
So always be careful when using this comparison operator, it is case sensitive as we have seen above.
You can always use the output of another command instead as input for awk instead of reading input from a file, this is very simple as we have looked at in the examples above.
Hope the examples were clear enough for you to understand, if you have any concerns, you can express them through the comment section below and remember to check the next part of the series where we shall look at awk features such as variables, numeric expressions and assignment operators.
Learn How to Use Awk Variables, Numeric Expressions and Assignment Operators – Part 8
The Awk command series is getting exciting I believe, in the previous seven parts, we walked through some fundamentals of Awk that you need to master to enable you perform some basic text or string filtering in Linux.
Starting with this part, we shall dive into advance areas of Awk to handle more complex text or string filtering operations. Therefore, we are going to cover Awk features such as variables, numeric expressions and assignment operators.

Learn Awk Variables, Numeric Expressions and Assignment Operators
These concepts are not comprehensively distinct from the ones you may have probably encountered in many programming languages before such shell, C, Python plus many others, so there is no need to worry much about this topic, we are simply revising the common ideas of using these mentioned features.
This will probably be one of the easiest Awk command sections to understand, so sit back and lets get going.
1. Awk Variables
In any programming language, a variable is a place holder which stores a value, when you create a variable in a program file, as the file is executed, some space is created in memory that will store the value you specify for the variable.
You can define Awk variables in the same way you define shell variables as follows:
variable_name=value
In the syntax above:
variable_name: is the name you give a variablevalue: the value stored in the variable
Let’s look at some examples below:
computer_name=”tecmint.com”
port_no=”22”
email=”admin@tecmint.com”
server=”computer_name”
Take a look at the simple examples above, in the first variable definition, the value tecmint.com is assigned to the variable computer_name.
Furthermore, the value 22 is assigned to the variable port_no, it is also possible to assign the value of one variable to another variable as in the last example where we assigned the value of computer_name to the variable server.
If you can recall, right from part 2 of this Awk series were we covered field editing, we talked about how Awk divides input lines into fields and uses standard field access operator, $ to read the different fields that have been parsed. We can also use variables to store the values of fields as follows.
first_name=$2
second_name=$3
In the examples above, the value of first_name is set to second field and second_name is set to the third field.
As an illustration, consider a file named names.txt which contains a list of an application’s users indicating their first and last names plus gender. Using the cat command, we can view the contents of the file as follows:
$ cat names.txt

List File Content Using cat Command
Then, we can also use the variables first_name and second_name to store the first and second names of the first user on the list as by running the Awk command below:
$ awk '/Aaron/{ first_name=$2 ; second_name=$3 ; print first_name, second_name ; }' names.txt

Store Variables Using Awk Command
Let us also take a look at another case, when you issue the command uname -a on your terminal, it prints out all your system information.
The second field contains your hostname, therefore we can store the hostname in a variable called hostnameand print it using Awk as follows:
$ uname -a
$ uname -a | awk '{hostname=$2 ; print hostname ; }'

Store Command Output to Variable Using Awk
2. Numeric Expressions
In Awk, numeric expressions are built using the following numeric operators:
* : multiplication operator+ : addition operator/ : division operator- : subtraction operator% : modulus operator^ : exponentiation operator
The syntax for a numeric expressions is:
$ operand1 operator operand2
In the form above, operand1 and operand2 can be numbers or variable names, and operator is any of the operators above.
Below are some examples to demonstrate how to build numeric expressions:
counter=0
num1=5
num2=10
num3=num2-num1
counter=counter+1
To understand the use of numeric expressions in Awk, we shall consider the following example below, with the file domains.txt which contains all domains owned by Tecmint.
news.tecmint.com
tecmint.com
linuxsay.com
windows.tecmint.com
tecmint.com
news.tecmint.com
tecmint.com
linuxsay.com
tecmint.com
news.tecmint.com
tecmint.com
linuxsay.com
windows.tecmint.com
tecmint.com
To view the contents of the file, use the command below:
$ cat domains.txt

View Contents of File
If we want to count the number of times the domain tecmint.com appears in the file, we can write a simple script to do that as follows:
#!/bin/bash
for file in $@; do
        if [ -f $file ] ; then
                #print out filename
                echo "File is: $file"
                #print a number incrementally for every line containing tecmint.com
                awk  '/^tecmint.com/ { counter=counter+1 ; printf "%s\n", counter ; }'   $file
        else
                #print error info incase input is not a file
                echo "$file is not a file, please specify a file." >&2 && exit 1
        fi
done
#terminate script with exit code 0 in case of successful execution
exit 0
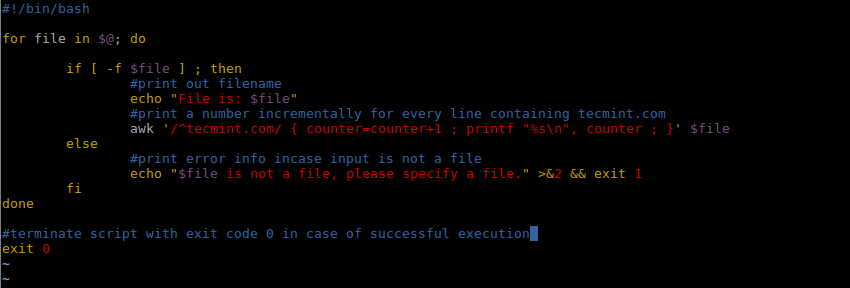
Shell Script to Count a String or Text in File
After creating the script, save it and make it executable, when we run it with the file, domains.txt as out input, we get the following output:
$ ./script.sh ~/domains.txt

Script to Count String or Text
From the output of the script, there are 6 lines in the file domains.txt which contain tecmint.com, to confirm that you can manually count them.
3. Assignment Operators
The last Awk feature we shall cover is assignment operators, there are several assignment operators in Awk and these include the following:
*= : multiplication assignment operator+= : addition assignment operator/= : division assignment operator-= : subtraction assignment operator%= : modulus assignment operator^= : exponentiation assignment operator
The simplest syntax of an assignment operation in Awk is as follows:
$ variable_name=variable_name operator operand
Examples:
counter=0
counter=counter+1

num=20
num=num-1
You can use the assignment operators above to shorten assignment operations in Awk, consider the previous examples, we could perform the assignment in the following form:
variable_name operator=operand
counter=0
counter+=1

num=20
num-=1
Therefore, we can alter the Awk command in the shell script we just wrote above using += assignment operator as follows:
#!/bin/bash
for file in $@; do
        if [ -f $file ] ; then
                #print out filename
                echo "File is: $file"
                #print a number incrementally for every line containing tecmint.com
                awk  '/^tecmint.com/ { counter+=1 ; printf  "%s\n",  counter ; }'   $file
        else
                #print error info incase input is not a file
                echo "$file is not a file, please specify a file." >&2 && exit 1
        fi
done
#terminate script with exit code 0 in case of successful execution
exit 0
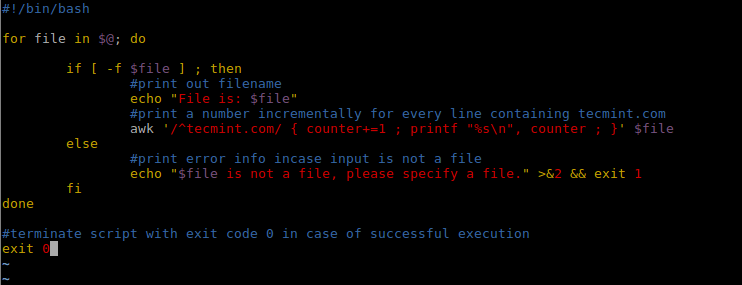
Alter Shell Script
In this segment of the Awk series, we covered some powerful Awk features, that is variables, building numeric expressions and using assignment operators, plus some few illustrations of how we can actually use them.
These concepts are not any different from the one in other programming languages but there may be some significant distinctions under Awk programming.
In part 9, we shall look at more Awk features that is special patterns: BEGIN and END.
Learn How to Use Awk Special Patterns ‘BEGIN and END’ – Part 9
In Part 8 of this Awk series, we introduced some powerful Awk command features, that is variables, numeric expressions and assignment operators.
As we advance, in this segment, we shall cover more Awk features, and that is the special patterns: BEGIN and END.

Learn Awk Patterns BEGIN and END
These special features will prove helpful as we try to expand on and explore more methods of building complex Awk operations.
To get started, let us drive our thoughts back to the introduction of the Awk series, remember when we started this series, I pointed out that the general syntax of a running an Awk command is:
# awk 'script' filenames
And in the syntax above, the Awk script has the form:
/pattern/ { actions }
When you consider the pattern in the script, it is normally a regular expression, additionally, you can also think of pattern as special patterns BEGIN and END. Therefore, we can also write an Awk command in the form below:
awk '
 	BEGIN { actions }
 	/pattern/ { actions }
 	/pattern/ { actions }
            ……….
	 END { actions }
' filenames
In the event that you use the special patterns: BEGIN and END in an Awk script, this is what each of them means:
- BEGIN pattern: means that Awk will execute the action(s) specified in BEGIN once before any input lines are read.
- END pattern: means that Awk will execute the action(s) specified in END before it actually exits.
And the flow of execution of the an Awk command script which contains these special patterns is as follows:
- When the
BEGIN pattern is used in a script, all the actions for BEGIN are executed once before any input line is read.
- Then an input line is read and parsed into the different fields.
- Next, each of the non-special patterns specified is compared with the input line for a match, when a match is found, the action(s) for that pattern are then executed. This stage will be repeated for all the patterns you have specified.
- Next, stage 2 and 3 are repeated for all input lines.
- When all input lines have been read and dealt with, in case you specify the
END pattern, the action(s) will be executed.
You should always remember this sequence of execution when working with the special patterns to achieve the best results in an Awk operation.
To understand it all, let us illustrate using the example from part 8, about the list of domains owned by Tecmint, as stored in a file named domains.txt.
news.tecmint.com
tecmint.com
linuxsay.com
windows.tecmint.com
tecmint.com
news.tecmint.com
tecmint.com
linuxsay.com
tecmint.com
news.tecmint.com
tecmint.com
linuxsay.com
windows.tecmint.com
tecmint.com
$ cat ~/domains.txt
View Contents of File
In this example, we want to count the number of times the domain tecmint.com is listed in the file domains.txt. So we wrote a small shell script to help us do that using the idea of variables, numeric expressions and assignment operators which has the following content:
#!/bin/bash
for file in $@; do
        if [ -f $file ] ; then
                #print out filename
                echo "File is: $file"
                #print a number incrementally for every line containing tecmint.com
                awk '/^tecmint.com/ { counter+=1 ; printf "%s\n", counter ; }' $file
        else
                #print error info incase input is not a file
                echo "$file is not a file, please specify a file." >&2 && exit 1
        fi
done
#terminate script with exit code 0 in case of successful execution
exit 0
Let us now employ the two special patterns: BEGIN and END in the Awk command in the script above as follows:
We shall alter the script:
awk '/^tecmint.com/ { counter+=1 ; printf "%s\n", counter ; }' $file
To:
awk ' BEGIN {  print "The number of times tecmint.com appears in the file is:" ; }
                      /^tecmint.com/ {  counter+=1  ;  }
                      END {  printf "%s\n",  counter  ; }
                    '  $file
After making the changes to the Awk command, the complete shell script now looks like this:
#!/bin/bash
for file in $@; do
        if [ -f $file ] ; then
                #print out filename
                echo "File is: $file"
                #print the total number of times tecmint.com appears in the file
                awk ' BEGIN {  print "The number of times tecmint.com appears in the file is:" ; }
                      /^tecmint.com/ {  counter+=1  ;  }
                      END {  printf "%s\n",  counter  ; }
                    '  $file
        else
                #print error info incase input is not a file
                echo "$file is not a file, please specify a file." >&2 && exit 1
        fi
done
#terminate script with exit code 0 in case of successful execution
exit 0
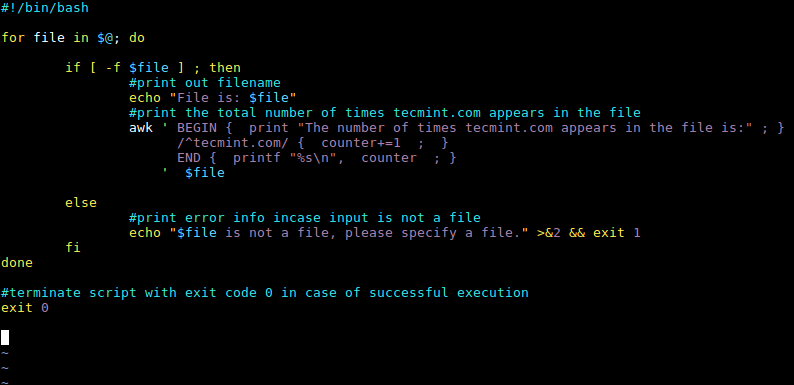
Awk BEGIN and END Patterns
When we run the script above, it will first of all print the location of the file domains.txt, then the Awk command script is executed, where the BEGIN special pattern helps us print out the message “The number of times tecmint.com appears in the file is:” before any input lines are read from the file.
Then our pattern, /^tecmint.com/ is compared against every input line and the action, { counter+=1 ; }is executed for each input line, which counts the number of times tecmint.com appears in the file.
Finally, the END pattern will print the total the number of times the domain tecmint.com appears in the file.
$ ./script.sh ~/domains.txt

Script to Count Number of Times String Appears
To conclude, we walked through more Awk features exploring on the concepts of special pattern: BEGIN and END.
As I pointed out before, these Awk features will help us build more complex text filtering operations, there is more to cover under Awk features and in part 10, we shall approach the idea of Awk built-in variables, so stay connected.
Learn How to Use Awk Built-in Variables – Part 10
As we uncover the section of Awk features, in this part of the series, we shall walk through the concept of built-in variables in Awk. There are two types of variables you can use in Awk, these are; user-defined variables, which we covered in Part 8 and built-in variables.

Awk Built in Variables Examples
Built-in variables have values already defined in Awk, but we can also carefully alter those values, the built-in variables include:
FILENAME : current input file name( do not change variable name)FR : number of the current input line (that is input line 1, 2, 3… so on, do not change variable name)NF : number of fields in current input line (do not change variable name)OFS : output field separatorFS : input field separatorORS : output record separatorRS : input record separator
Let us proceed to illustrate the use of some of the Awk built-in variables above:
To read the filename of the current input file, you can use the FILENAME built-in variable as follows:
$ awk ' { print FILENAME } ' ~/domains.txt
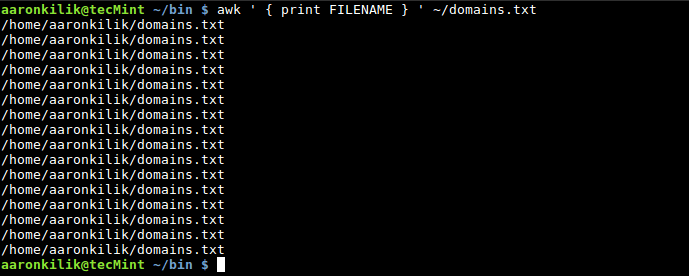
Awk FILENAME Variable
You will realize that, the filename is printed out for each input line, that is the default behavior of Awk when you use FILENAME built-in variable.
Using NR to count the number of lines (records) in an input file, remember that, it also counts the empty lines, as we shall see in the example below.
When we view the file domains.txt using cat command, it contains 14 lines with text and empty 2 lines:
$ cat ~/domains.txt

Print Contents of File
$ awk ' END { print "Number of records in file is: ", NR } ' ~/domains.txt

Awk Count Number of Lines
To count the number of fields in a record or line, we use the NR built-in variable as follows:
$ cat ~/names.txt

List File Contents
$ awk '{ print "Record:",NR,"has",NF,"fields" ; }' ~/names.txt
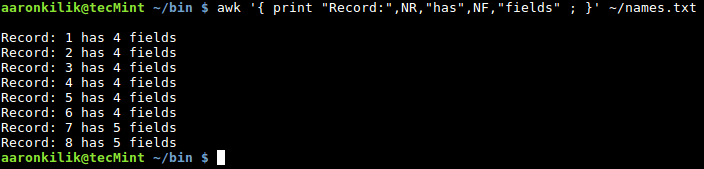
Awk Count Number of Fields in File
Next, you can also specify an input field separator using the FS built-in variable, it defines how Awk divides input lines into fields.
The default value for FS is space and tab, but we can change the value of FS to any character that will instruct Awk to divide input lines accordingly.
There are two methods to do this:
- one method is to use the FS built-in variable
- and the second is to invoke the -F Awk option
Consider the file /etc/passwd on a Linux system, the fields in this file are divided using the : character, so we can specify it as the new input field separator when we want to filter out certain fields as in the following examples:
We can use the -F option as follows:
$ awk -F':' '{ print $1, $4 ;}' /etc/passwd

Awk Filter Fields in Password File
Optionally, we can also take advantage of the FS built-in variable as below:
$ awk ' BEGIN { FS=“:” ; } { print $1, $4 ; } ' /etc/passwd
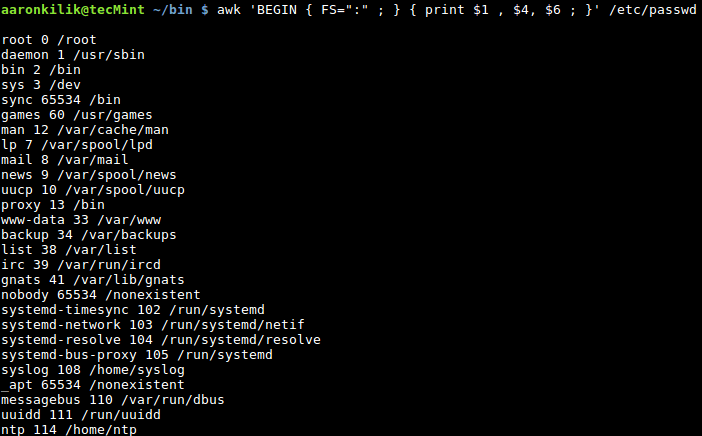
Filter Fields in File Using Awk
To specify an output field separator, use the OFS built-in variable, it defines how the output fields will be separated using the character we use as in the example below:
$ awk -F':' ' BEGIN { OFS="==>" ;} { print $1, $4 ;}' /etc/passwd
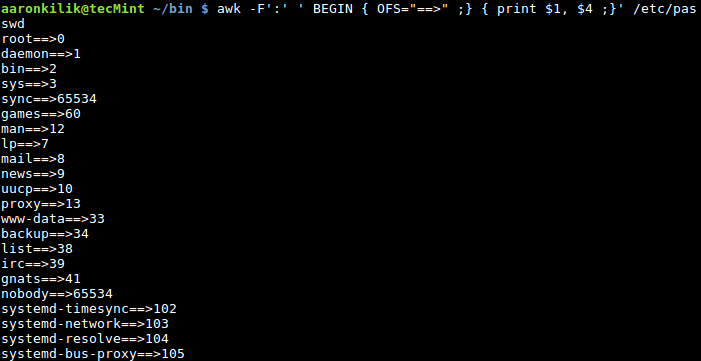
Add Separator to Field in File
In this Part 10, we have explored the idea of using Awk built-in variables which come with predefined values. But we can also change these values, though, it is not recommended to do so unless you know what you are doing, with adequate understanding. After this, we shall progress to cover how we can use shell variables in Awk command operations.
How to Allow Awk to Use Shell Variables – Part 11
When we write shell scripts, we normally include other smaller programs or commands such as Awk operations in our scripts. In the case of Awk, we have to find ways of passing some values from the shell to Awk operations.
This can be done by using shell variables within Awk commands, and in this part of the series, we shall learn how to allow Awk to use shell variables that may contain values we want to pass to Awk commands.
There possibly two ways you can enable Awk to use shell variables:
1. Using Shell Quoting
Let us take a look at an example to illustrate how you can actually use shell quoting to substitute the value of a shell variable in an Awk command. In this example, we want to search for a username in the file /etc/passwd, filter and print the user’s account information.
Therefore, we can write a test.sh script with the following content:
#!/bin/bash

#read user input
read -p "Please enter username:" username

#search for username in /etc/passwd file and print details on the screen
cat /etc/passwd | awk "/$username/ "' { print $0 }'
Thereafter, save the file and exit.
Interpretation of the Awk command in the test.sh script above:
cat /etc/passwd | awk "/$username/ "' { print $0 }'
"/$username/ " – shell quoting used to substitute value of shell variable username in Awk command. The value of username is the pattern to be searched in the file /etc/passwd.
Note that the double quote is outside the Awk script, ‘{ print $0 }’.
Then make the script executable and run it as follows:
$ chmod  +x  test.sh
$ ./text.sh
After running the script, you will be prompted to enter a username, type a valid username and hit Enter. You will view the user’s account details from the /etc/passwd file as below:
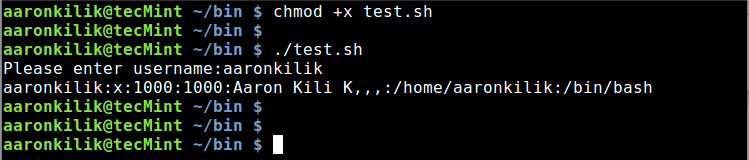
Shell Script to Find Username in Password File
2. Using Awk’s Variable Assignment
This method is much simpler and better in comparison to method one above. Considering the example above, we can run a simple command to accomplish the job. Under this method, we use the -v option to assign a shell variable to a Awk variable.
Firstly, create a shell variable, username and assign it the name that we want to search in the /etc/passswdfile:
username="aaronkilik"
Then type the command below and hit Enter:
# cat /etc/passwd | awk -v name="$username" ' $0 ~ name {print $0}'

Find Username in Password File Using Awk
Explanation of the above command:
-v – Awk option to declare a variableusername – is the shell variablename – is the Awk variable
Let us take a careful look at $0 ~ name inside the Awk script, ' $0 ~ name {print $0}'. Remember, when we covered Awk comparison operators in Part 4 of this series, one of the comparison operators was value ~pattern, which means: true if value matches the pattern.
The output($0) of cat command piped to Awk matches the pattern (aaronkilik) which is the name we are searching for in /etc/passwd, as a result, the comparison operation is true. The line containing the user’s account information is then printed on the screen.
Conclusion
We have covered an important section of Awk features, that can help us use shell variables within Awk commands. Many times, you will write small Awk programs or commands within shell scripts and therefore, you need to have a clear understanding of how to use shell variables within Awk commands.
In the next part of the Awk series, we shall dive into yet another critical section of Awk features, that is flow control statements. So stay tunned and let’s keep learning and sharing.
How to Use Flow Control Statements in Awk – Part 12
When you review all the Awk examples we have covered so far, right from the start of the Awk series, you will notice that all the commands in the various examples are executed sequentially, that is one after the other. But in certain situations, we may want to run some text filtering operations based on some conditions, that is where the approach of flow control statements sets in.

Use Flow Control Statements in Awk
There are various flow control statements in Awk programming and these include:
- if-else statement
- for statement
- while statement
- do-while statement
- break statement
- continue statement
- next statement
- nextfile statement
- exit statement
However, for the scope of this series, we shall expound on: if-else, for, while and do while statements. Remember that we already walked through how to use next statement in Part 6 of this Awk series.
1. The if-else Statement
The expected syntax of the if statement is similar to that of the shell if statement:
if  (condition1) {
     actions1
}
else {
      actions2
}
In the above syntax, condition1 and condition2 are Awk expressions, and actions1 and actions2 are Awk commands executed when the respective conditions are satisfied.
When condition1 is satisfied, meaning it’s true, then actions1 is executed and the if statement exits, otherwise actions2 is executed.
The if statement can also be expanded to a if-else_if-else statement as below:
if (condition1){
     actions1
}
else if (conditions2){
      actions2
}
else{
     actions3
}
For the form above, if condition1 is true, then actions1 is executed and the if statement exits, otherwise condition2 is evaluated and if it is true, then actions2 is executed and the if statement exits. However, when condition2 is false then, actions3 is executed and the if statement exits.
Here is a case in point of using if statements, we have a list of users and their ages stored in the file, users.txt.
We want to print a statement indicating a user’s name and whether the user’s age is less or more than 25 years old.
aaronkilik@tecMint ~ $ cat users.txt
Sarah L			35    	F
Aaron Kili		40    	M
John  Doo		20    	M
Kili  Seth		49    	M
We can write a short shell script to carry out our job above, here is the content of the script:
#!/bin/bash
awk ' {
        if ( $3 <= 25 ){
           print "User",$1,$2,"is less than 25 years old." ;
        }
        else {
           print "User",$1,$2,"is more than 25 years old" ;
}
}'    ~/users.txt
Then save the file and exit, make the script executable and run it as follows:
$ chmod +x test.sh
$ ./test.sh
Sample Output
User Sarah L is more than 25 years old
User Aaron Kili is more than 25 years old
User John Doo is less than 25 years old.
User Kili Seth is more than 25 years old
2. The for Statement
In case you want to execute some Awk commands in a loop, then the for statement offers you a suitable way to do that, with the syntax below:
Here, the approach is simply defined by the use of a counter to control the loop execution, first you need to initialize the counter, then run it against a test condition, if it is true, execute the actions and finally increment the counter. The loop terminates when the counter does not satisfy the condition.
for ( counter-initialization; test-condition; counter-increment ){
      actions
}
The following Awk command shows how the for statement works, where we want to print the numbers 0-10:
$ awk 'BEGIN{ for(counter=0;counter<=10;counter++){ print counter} }'
Sample Output
0
1
2
3
4
5
6
7
8
9
10
3. The while Statement
The conventional syntax of the while statement is as follows:
while ( condition ) {
          actions
}
The condition is an Awk expression and actions are lines of Awk commands executed when the condition is true.
Below is a script to illustrate the use of while statement to print the numbers 0-10:
#!/bin/bash
awk ' BEGIN{ counter=0 ;

        while(counter<=10){
              print counter;
              counter+=1 ;

}
}
Save the file and make the script executable, then run it:
$ chmod +x test.sh
$ ./test.sh
Sample Output
0
1
2
3
4
5
6
7
8
9
10
4. The do while Statement
It is a modification of the while statement above, with the following underlying syntax:
do {
     actions
}
 while (condition)
The slight difference is that, under do while, the Awk commands are executed before the condition is evaluated. Using the very example under while statement above, we can illustrate the use of do while by altering the Awk command in the test.sh script as follows:
#!/bin/bash

awk ' BEGIN{ counter=0 ;
        do{
            print counter;
            counter+=1 ;
        }
        while (counter<=10)
}
'
After modifying the script, save the file and exit. Then make the script executable and execute it as follows:
$ chmod +x test.sh
$ ./test.sh
Sample Output
0
1
2
3
4
5
6
7
8
9
10
Conclusion
This is not a comprehensive guide regarding Awk flow control statements, as I had mentioned earlier on, there are several other flow control statements in Awk.
Nonetheless, this part of the Awk series should give you a clear fundamental idea of how execution of Awk commands can be controlled based on certain conditions.
You can as well expound more on the rest of the flow control statements to gain more understanding on the subject matter. Finally, in the next section of the Awk series, we shall move into writing Awk scripts.
How to Write Scripts Using Awk Programming Language – Part 13
All along from the beginning of the Awk series up to Part 12, we have been writing small Awk commands and programs on the command line and in shell scripts respectively.
However, Awk, just as Shell, is also an interpreted language, therefore, with all that we have walked through from the start of this series, you can now write Awk executable scripts.
Similar to how we write a shell script, Awk scripts start with the line:
#! /path/to/awk/utility -f
For example on my system, the Awk utility is located in /usr/bin/awk, therefore, I would start an Awk script as follows:
#! /usr/bin/awk -f
Explaining the line above:
#! – referred to as Shebang, which specifies an interpreter for the instructions in a script/usr/bin/awk – is the interpreter-f – interpreter option, used to read a program file
That said, let us now dive into looking at some examples of Awk executable scripts, we can start with the simple script below. Use your favorite editor to open a new file as follows:
$ vi script.awk
And paste the code below in the file:
#!/usr/bin/awk -f
BEGIN { printf "%s\n","Writing my first Awk executable script!" }
Save the file and exit, then make the script executable by issuing the command below:
$ chmod +x script.awk
Thereafter, run it:
$ ./script.awk
Sample Output
Writing my first Awk executable script!
A critical programmer out there must be asking, “where are the comments?”, yes, you can also include comments in your Awk script. Writing comments in your code is always a good programming practice.
It helps other programmers looking through your code to understand what you are trying to achieve in each section of a script or program file.
Therefore, you can include comments in the script above as follows.
#!/usr/bin/awk -f

#This is how to write a comment in Awk
#using the BEGIN special pattern to print a sentence

BEGIN { printf "%s\n","Writing my first Awk executable script!" }
Next, we shall look at an example where we read input from a file. We want to search for a system user named aaronkilik in the account file, /etc/passwd, then print the username, user ID and user GID as follows:
Below is the content of our script called second.awk.
#! /usr/bin/awk -f

#use BEGIN sepecial character to set FS built-in variable
BEGIN { FS=":" }

#search for username: aaronkilik and print account details
/aaronkilik/ { print "Username :",$1,"User ID :",$3,"User GID :",$4 }
Save the file and exit, make the script executable and execute it as below:
$ chmod +x second.awk
$ ./second.awk /etc/passwd
Sample Output
Username : aaronkilik User ID : 1000 User GID : 1000
In the last example below, we shall use do while statement to print out numbers from 0-10:
Below is the content of our script called do.awk.
#! /usr/bin/awk -f

#printing from 0-10 using a do while statement
#do while statement
BEGIN {
#initialize a counter
x=0

do {
    print x;
    x+=1;
}
while(x<=10)
}
After saving the file, make the script executable as we have done before. Afterwards, run it:
$ chmod +x do.awk
$ ./do.awk
Sample Output
0
1
2
3
4
5
6
7
8
9
10
Summary
We have come to the end of this interesting Awk series, I hope you have learned a lot from all the 13 parts, as an introduction to Awk programming language.
As I mentioned from the beginning, Awk is a complete text processing language, for that reason, you can learn more other aspects of Awk programming language such as environmental variables, arrays, functions (built-in & user defined) and beyond.
There is yet additional parts of Awk programming to learn and master, so, below, I have provided some links to important online resources that you can use to expand your Awk programming skills, these are not necessarily all that you need, you can also look out for useful Awk programming books.
Reference Links: The GNU Awk User’s Guide and AWK Language Programming
For any thoughts you wish to share or questions, use the comment form below.
Source