Which Distro Should I Choose?

Linux Distributions for Professionals

If you currently work in IT or aspire to work in IT, then use RedHat, CentOS, or Ubuntu.

Linux Distributions for Hobbyists

If you are using Linux as a hobby or for personal projects, then almost any Linux distro will work. Stick to the most popular distros as you will be better supported if you need help.

Here is the list of the top 10 most popular Linux distributions:

For even more Linux distros to choose from, visit DistroWatch.

The Biggest Distro Mistake Beginners Make

If you are new to Linux or a looking for a general purpose desktop distro, do NOT use Kali Linux.

Kali is a very specialized Linux distribution. It doesn’t work like ANY of the other distros listed above. If you are ONLY interested in penetration testing, then Kali is for you.

Source

Linux Scoop — Ubuntu Kylin 18.04 LTS

Ubuntu Kylin 18.04 LTS – See What’s New

Ubuntu Kylin 18.04 LTS is latest version of Ubuntu Kylin. As part of Ubuntu 18.04 Flavor, this release ships with UKUI desktop environment 1.0 series. Linux kernel has been updated to 4.15. Besides, all the special software and the jointly developed software are updated to the new version, including Kylin Assistant, Ubuntu Kylin Software Center, Kylin Video, Youker Weather, Sougou Pinyin and WPS Office. Especially, Electronic Wechat and Burner have been added to the default normal install for better user experience in work and entertainment.

WPS Office is a suite of software which is made up of three primary components: WPS Writer, WPS Presentation, and WPS Spreadsheet. Ubuntu Kylin team is working with Kingsoft Corp to continue providing WPS for Ubuntu Kylin users for free. Foxit reader is based on the Foxit for Linux and designed for Chinese user to be simple during installation. It provides a way to view, create and sign PDF files, and add annotations to them.

Download Ubuntu Kylin 18.04 LTS

Source

How do I display the list of loaded Linux Kernel modules or device drivers on Linux ?

You need to use lsmod program which show the status of loaded modules in the Linux Kernel. Linux kernel use a term modules for all hardware device drivers.Please note that lsmod is a trivial program which nicely formats the contents of the /proc/modules, showing what kernel modules are currently loaded.

Module Commands

There are a few commands that allow you to maniuplate the kernel. Each is quickly described below, for more information say `man [command]`.


  • depmod – handle dependency descriptions for loadable kernel modules.
  • insmod – install loadable kernel module.
  • lsmod – list loaded modules.
  • modinfo – display information about a kernel module.
  • modprobe – high level handling of loadable modules.
  • rmmod – unload loadable modules.

List or display loaded modules

Method 1: less /proc/modulesram@linuxforfreshers.com#less /proc/modulesuas 24576 0 – Live 0x0000000000000000usb_storage 69632 1 uas, Live 0x0000000000000000bridge 126976 0 – Live 0x0000000000000000stp 16384 1 bridge, Live 0x0000000000000000llc 16384 2 bridge,stp, Live 0x0000000000000000xt_CHECKSUM 16384 3 – Live 0x0000000000000000ipt_MASQUERADE 16384 9 – Live 0x0000000000000000nf_nat_masquerade_ipv4 16384 1 ipt_MASQUERADE, Live 0x0000000000000000ebtable_nat 16384 0 – Live 0x0000000000000000ebtables 36864 1 ebtable_nat, Live 0x0000000000000000nf_log_ipv4 16384 0 – Live 0x0000000000000000nf_log_common 16384 1 nf_log_ipv4, Live 0x0000000000000000xt_tcpudp 16384 13 – Live 0x0000000000000000ip6table_mangle 16384 0 – Live 0x0000000000000000iptable_nat 16384 1 – Live 0x0000000000000000nf_conntrack_ipv4 16384 3 – Live 0x0000000000000000ram@linuxforfreshers.com# lsmod | tail -10hid_generic 16384 0 usbhid 49152 0 psmouse 126976 0 hid 118784 2 hid_generic,usbhidpata_acpi 16384 0 floppy 73728 0 fjes 28672 0 e1000e 233472 0 ptp 20480 1 e1000epps_core 20480 1 ptp

Finding more info about any module or driver

Syntax: modinfo driver-Name-Hereram@linuxforfreshers.com#modinfo e1000efilename: /lib/modules/4.4.0-59-generic/kernel/drivers/net/ethernet/intel/e1000e/e1000e.kodescription: Intel(R) PRO/1000 Network Driverauthor: Intel Corporation, <linux.nics@intel.com>srcversion: 8D9E9AFD67E40CA48E61582alias: pci:v00008086d000015D6sv*sd*bc*sc*i*alias: pci:v00008086d000015E3sv*sd*bc*sc*i*alias: pci:v00008086d000015D8sv*sd*bc*sc*i*alias: pci:v00008086d000015D7sv*sd*bc*sc*i*alias: pci:v00008086d000015B9sv*sd*bc*sc*i*alias: pci:v00008086d000015B8sv*sd*bc*sc*i*alias: pci:v00008086d000015B7sv*sd*bc*sc*i*alias: pci:v00008086d00001570sv*sd*bc*sc*i*alias: pci:v00008086d0000156Fsv*sd*bc*sc*i*alias: pci:v00008086d000015A3sv*sd*bc*sc*i*alias: pci:v00008086d000015A2sv*sd*bc*sc*i*alias: pci:v00008086d000015A1sv*sd*bc*sc*i*alias: pci:v00008086d000015A0sv*sd*bc*sc*i*alias: pci:v00008086d00001559sv*sd*bc*sc*i*alias: pci:v00008086d0000155Asv*sd*bc*sc*i*alias: pci:v00008086d0000153Bsv*sd*bc*sc*i*alias: pci:v00008086d0000153Asv*sd*bc*sc*i*alias: pci:v00008086d00001503sv*sd*bc*sc*i*alias: pci:v00008086d00001502sv*sd*bc*sc*i*alias: pci:v00008086d000010F0sv*sd*bc*sc*i*alias: pci:v00008086d000010EFsv*sd*bc*sc*i*alias: pci:v00008086d000010EBsv*sd*bc*sc*i*alias: pci:v00008086d000010EAsv*sd*bc*sc*i*alias: pci:v00008086d00001525sv*sd*bc*sc*i*alias: pci:v00008086d000010DFsv*sd*bc*sc*i*alias: pci:v00008086d000010DEsv*sd*bc*sc*i*alias: pci:v00008086d000010CEsv*sd*bc*sc*i*alias: pci:v00008086d000010CDsv*sd*bc*sc*i*alias: pci:v00008086d000010CCsv*sd*bc*sc*i*alias: pci:v00008086d000010CBsv*sd*bc*sc*i*alias: pci:v00008086d000010F5sv*sd*bc*sc*i*alias: pci:v00008086d000010BFsv*sd*bc*sc*i*alias: pci:v00008086d000010E5sv*sd*bc*sc*i*alias: pci:v00008086d0000294Csv*sd*bc*sc*i*alias: pci:v00008086d000010BDsv*sd*bc*sc*i*alias: pci:v00008086d000010C3sv*sd*bc*sc*i*alias: pci:v00008086d000010C2sv*sd*bc*sc*i*alias: pci:v00008086d000010C0sv*sd*bc*sc*i*alias: pci:v00008086d00001501sv*sd*bc*sc*i*alias: pci:v00008086d00001049sv*sd*bc*sc*i*alias: pci:v00008086d0000104Dsv*sd*bc*sc*i*alias: pci:v00008086d0000104Bsv*sd*bc*sc*i*alias: pci:v00008086d0000104Asv*sd*bc*sc*i*alias: pci:v00008086d000010C4sv*sd*bc*sc*i*alias: pci:v00008086d000010C5sv*sd*bc*sc*i*alias: pci:v00008086d0000104Csv*sd*bc*sc*i*alias: pci:v00008086d000010BBsv*sd*bc*sc*i*alias: pci:v00008086d00001098sv*sd*bc*sc*i*alias: pci:v00008086d000010BAsv*sd*bc*sc*i*alias: pci:v00008086d00001096sv*sd*bc*sc*i*alias: pci:v00008086d0000150Csv*sd*bc*sc*i*alias: pci:v00008086d000010F6sv*sd*bc*sc*i*alias: pci:v00008086d000010D3sv*sd*bc*sc*i*alias: pci:v00008086d0000109Asv*sd*bc*sc*i*alias: pci:v00008086d0000108Csv*sd*bc*sc*i*alias: pci:v00008086d0000108Bsv*sd*bc*sc*i*alias: pci:v00008086d0000107Fsv*sd*bc*sc*i*alias: pci:v00008086d0000107Esv*sd*bc*sc*i*alias: pci:v00008086d0000107Dsv*sd*bc*sc*i*alias: pci:v00008086d000010B9sv*sd*bc*sc*i*alias: pci:v00008086d000010D5sv*sd*bc*sc*i*alias: pci:v00008086d000010DAsv*sd*bc*sc*i*alias: pci:v00008086d000010D9sv*sd*bc*sc*i*alias: pci:v00008086d00001060sv*sd*bc*sc*i*alias: pci:v00008086d000010A5sv*sd*bc*sc*i*alias: pci:v00008086d000010BCsv*sd*bc*sc*i*alias: pci:v00008086d000010A4sv*sd*bc*sc*i*alias: pci:v00008086d0000105Fsv*sd*bc*sc*i*alias: pci:v00008086d0000105Esv*sd*bc*sc*i*vermagic: 4.4.0-59-generic SMP mod_unload modversions parm: debug:Debug level (0=none,…,16=all) (int)parm: copybreak:Maximum size of packet that is copied to a new buffer on receive (uint)parm: TxIntDelay:Transmit Interrupt Delay (array of int)parm: TxAbsIntDelay:Transmit Absolute Interrupt Delay (array of int)parm: RxIntDelay:Receive Interrupt Delay (array of int)parm: RxAbsIntDelay:Receive Absolute Interrupt Delay (array of int)parm: InterruptThrottleRate:Interrupt Throttling Rate (array of int)parm: IntMode:Interrupt Mode (array of int)parm: SmartPowerDownEnable:Enable PHY smart power down (array of int)parm: KumeranLockLoss:Enable Kumeran lock loss workaround (array of int)parm: WriteProtectNVM:Write-protect NVM [WARNING: disabling this can lead to corrupted NVM] (array of int)parm: CrcStripping:Enable CRC Stripping, disable if your BMC needs the CRC (array of int)Using following command to find list of installed drivers.ls -l /lib/modules/$(uname -r)/kernel/drivers/ram@linuxforfreshers.com#ls /lib/modules/$(uname -r)/kernel/drivers/ | tail -10

What is the standard directory for driver files are stored?

Using following command u can get standard Directory for Driver files are stored.echo “Kernel drivers dir: “/lib/modules/$(uname -r)/kernel/drivers/” for Linux kernel version “$(uname -r)” “ram@linuxforfreshers.com#echo “Kernel drivers dir: “/lib/modules/$(uname -r)/kernel/drivers/” for Linux kernel version “$(uname -r)” “Kernel drivers dir: “/lib/modules/4.4.0-59-generic/kernel/drivers/” for Linux kernel version “4.4.0-59-generic”

Source

OWASP Security Shepherd – SQL Injection Solution – LSB – ls /blog

A SQL injection attack consists of insertion or “injection” of a SQL query via the input data from the client to the application. A successful SQL injection exploit can read sensitive data from the database, modify database data (Insert/Update/Delete), execute administration operations on the database (such as shutdown the DBMS), recover the content of a given file present on the DBMS file system and in some cases issue commands to the operating system. SQL injection attacks are a type of injection attack, in which SQL commands are injected into data-plane input in order to effect the execution of predefined SQL commands.

REGISTER TODAY FOR YOUR KUBERNETES FOR DEVELOPERS (LFD259) COURSE AND CKAD CERTIFICATION TODAY! $499!

sql1

With that in mind, let’s tackle this Security Shepherd injection module. We are presented with a brief lesson telling us what SQL Injection is and to get the key we have to fool the database into giving us some information that it would not normally divulge. So we need to craft an SQL query that would give us the information we want.

sql2

We are given a list of names and if we type a name in the text field and hit enter, the database spits out some information on that person. So we need to find someones name that’s hidden to us that spits out the key to pass the module.

Our SQL query will be entered into the text field above. We noticed immediately that anything that we typed, the server would add a ‘; at the end of the query. So if we have another ‘ in our injection, that would cancel the one thatthe server adds. Then if we say something like ‘and 1=1’ and end the query, the database would send us back a Boolean YES, or a positive.

$299 WILL ENROLL YOU IN OUR SELF PACED COURSE – LFS205 – ADMINISTERING LINUX ON AZURE!

We need to craft an SQL query that would list all rows and columns in the database. This proved to be tough and we tried many different queries but the one that worked for us was the query below.

sql3

That’s how SQL Injection works. We fooled the SQL database into giving us some information that was hidden from us. A nice module and it took a while to crack, but we got there.

Thanks for reading and if you like what you’ve read, please add a comment. Like and share too guys, it’s appreciated.

QuBits 2018-09-15

BUNDLE CLOUD FOUNDRY FOR DEVELOPERS COURSE(LFD232) AND THE CFCD CERTIFICATION FOR $499!

Source

How to Install Invoice Ninja on Ubuntu 16.04 – LinuxCloudVPS Blog

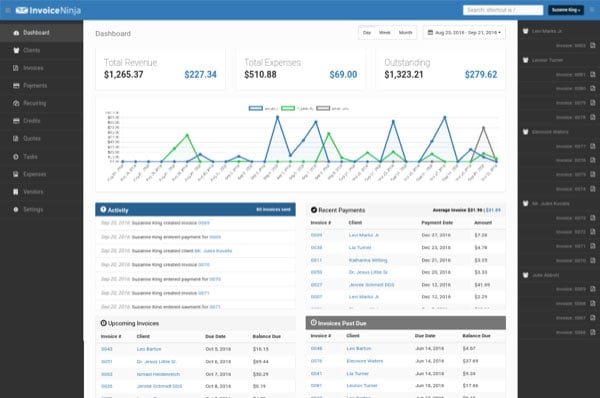
In this article we will show you how to install Invoice Ninja on an Ubuntu 16.04 server. InvoiceNinja is a free and open source software application written in PHP used for invoicing, billing customers and time tracking management system.

Requirements

In order to run Invoice Ninja on your Ubuntu 16.04 VPS, we need the following requirements met:

  • Apache Web Server >= 2.0 compiled with mod_rewrite module, or Nginx
  • MySQL 5.5 or later is recommended, or MariaDB installed on your Linux virtual server.
  • PHP 7.0 or higher with the mcrypt, mbstring, xml, curl, gd, json and mysql PHP extensions enabled.
  • Full SSH root access or a user with sudo privileges is also required

Step 1: Log in via SSH on the Ubuntu server:

Log in to the VPS via SSH as user root

ssh roo@IP_Address -p Port_number

Step 2: Update all packages

Once you are logged, run the following command to make sure that all installed OS packages are up to date:

apt-get update
apt-get upgrade

Step 3: Install Apache, MySQL (MariaDB) and PHP 7

Install Apache, MySQL (or MariaDB) and PHP 7 on your server using the following command:

apt-get install apache2 libapache2-mod-php mysql-server php7.0-cli php7.0-common php7.0-curl php7.0-gd php7.0-mysql php7.0-xml php7.0-mcrypt php7.0-mbstring php7.0-json

Enable the Apache mod_rewrite module:

sudo a2enmod rewrite

Restart the Apache web server for the changes to take effect:

sudo systemctl restart apache2

Step 4: Create a MySQL database for Invoice Ninja

Log into MySQL console with the root account:

mysql -u root -p

Now we will create a MySQL database for Invoice Ninja using the following query:

mysql> CREATE DATABASE invoiceninja;

Then, execute the following query to add a separate user for Invoice Ninja that will interact with the database:

mysql> GRANT ALL PRIVILEGES ON invoiceninja.* to ‘invoiceninja’@’localhost’ IDENTIFIED BY ‘5tr0ng_Pa55w0rd’;

Do not forget to replace ‘5tr0ng_Pa55w0rd’ with an actual strong password.

Execute the following command to apply the privileges we set:

mysql> FLUSH PRIVILEGES;

Now we can exit the MySQL session:

mysql> quit

Step 5: Install Invoice Ninja

Download the latest stable version of Invoice Ninja in the /opt directory on your server and extract it in the /var/www/html/ directory:

cd /opt
wget https://download.invoiceninja.com/ -O invoice-ninja.zip
unzip invoice-ninja.zip -d /var/www/html/

Set the appropriate file permissions and ownership (www-data is the user of the Apache web server):

chown -R www-data:www-data /var/www/html/ninja/

Step 6: Configure Apache to serve Invoice Ninja

Now we will have to setup the Apache configuration so it can serve the Invoice Ninja directory, add the following contents below to the /etc/apache2/sites-available/invoice-ninja.conf file with nano or your favorite editor:

sudo nano /etc/apache2/sites-available/invoice-ninja.conf

Add the following lines:

<VirtualHost *:80>
ServerAdmin admin@your-domain.com
ServerName your-domain.com
ServerAlias www.your-domain.com
DocumentRoot /var/www/html/ninja/public/

<Directory /var/www/html/ninja/public>
Options +FollowSymlinks
AllowOverride All
Require all granted
</Directory>

ErrorLog /var/log/apache2/ninja-error_log
CustomLog /var/log/apache2/ninja-access_log common
</VirtualHost>

Enable the Apache Invoice Ninja configuration:

sudo a2ensite invoice-ninja.conf

Remove the default Apache configuration file:

rm /etc/apache2/sites-enabled/000-default.conf

Now restart the Apache web server:

sudo systemctl restart apache2

Open your favorite web browser and type in the following URL to access the Invoice Ninja web interface and start the setup:

http://your-domain.com/

From here you can finish the setup by entering the following information:

Database Connection

Driver: MySQL

Database: invoiceninja

Username: invoiceninja

Password: enter the MySQL password for the invoiceninja MySQL user.

Email Settings

From Name: Enter your name

From Address: use an email address on your server

Username: enter the username of your email account

Host: enter your domain name

Port: 587

Encryption: TLS

Password: enter your email account password

Then, create a new administrator account: enter your first name, last name, email address and password in the User details section.

Once you created a new administrator account, log in at http://your-domain.com/login.

Install Invoice Ninja on Ubuntu 16.04


Congratulations! Invoice Ninja has been successfully installed on your server. You can now start using Invoice Ninja and customize it according to your needs.

How to Install Invoice Ninja Ubuntu 16.04

If you are one of our Ubuntu Cloud Hosting clients, you can let our system administrators to install Invoice Ninja on your Ubuntu 16.04 server. They are super responsive and available 24/7.

Be the first to write a comment.

Source

WebP Image Conversion On A Linux Server

WebP is a new image format that provides a lossless and lossy compression on PNG and JPEG file types. It was developed by Google resulting in up to 80% smaller image size. It is supported on all most all modern browser versions. You can use Nginx and Apache to determine if this format is supported by the browser Agent then server the image in a new format instead of the original image. This file format also supports animated images which can also result in large reductions in image sizes. Converting to a smaller size file will improve load times and SEO scores and improve the end user experience of viewing your site. This guide is a tutorial to convert images to this format via command line utilities on a Linux server.

Install WebP Tools

Change to the src directory to download the packages:

cd /usr/src

You can retrieve the packages from Googles repository. We are going to get the x86 64 bit linux packages in this example

wget https://storage.googleapis.com/downloads.webmproject.org/releases/webp/libwebp-0.6.0-rc3-linux-x86-64.tar.gz

Untar the files

tar xfvz libwebp-0.6.0-rc3-linux-x86-64.tar.gz

Go in to the directory:

cd libwebp-0.6.0-rc3-linux-x86-64

This will provide the following binaries in the bin directory

cwebp – WebP encoder tool
dwebp – WebP decoder tool
vwebp – WebP file viewer
webpmux – WebP muxing tool
gif2webp – Tool for converting GIF images to WebP

Convert Images to WebP

First you will want to export the bin directory to your path:

PATH=$PATH:”/usr/src/libwebp-0.6.0-rc3-linux-x86-64/bin”

Then export the PATH variable:

export PATH

Now if you type cwebp it should work as a valid command

# cwebp
Usage:

cwebp [options] -q quality input.png -o output.webp

where quality is between 0 (poor) to 100 (very good).
Typical value is around 80.

Try -longhelp for an exhaustive list of advanced options.

Now you can convert images to webp formatting using the cwebp command:

cwebp [options] -q quality input.jpg -o output.webp

The quality can be between 0 (poor) and 100 (very good). You will need to determine the quality you are looking for, the lower the quality the more reduction in size you will also achieve. You will want to replace intput.jpg with the input file and output.webp with the output file.

Once you have converted your images you will also need to detect browser compatibility to server the appropriate image as not all browsers support the WebP format for images at this time. We will be covering how to do this selection in later guides based on individual web server packages.

Sep 18, 2017LinuxAdmin.io

Source

Configure Zabbix Monitoring Server with Puppet | Lisenet.com :: Linux | Security

We’re going to use Puppet to install and configure a Zabbix server. We will also allow active Zabbix agent auto-registration.

This article is part of the Homelab Project with KVM, Katello and Puppet series.

Homelab

We have a CentOS 7 VM installed which we want to configure as a Zabbix server:

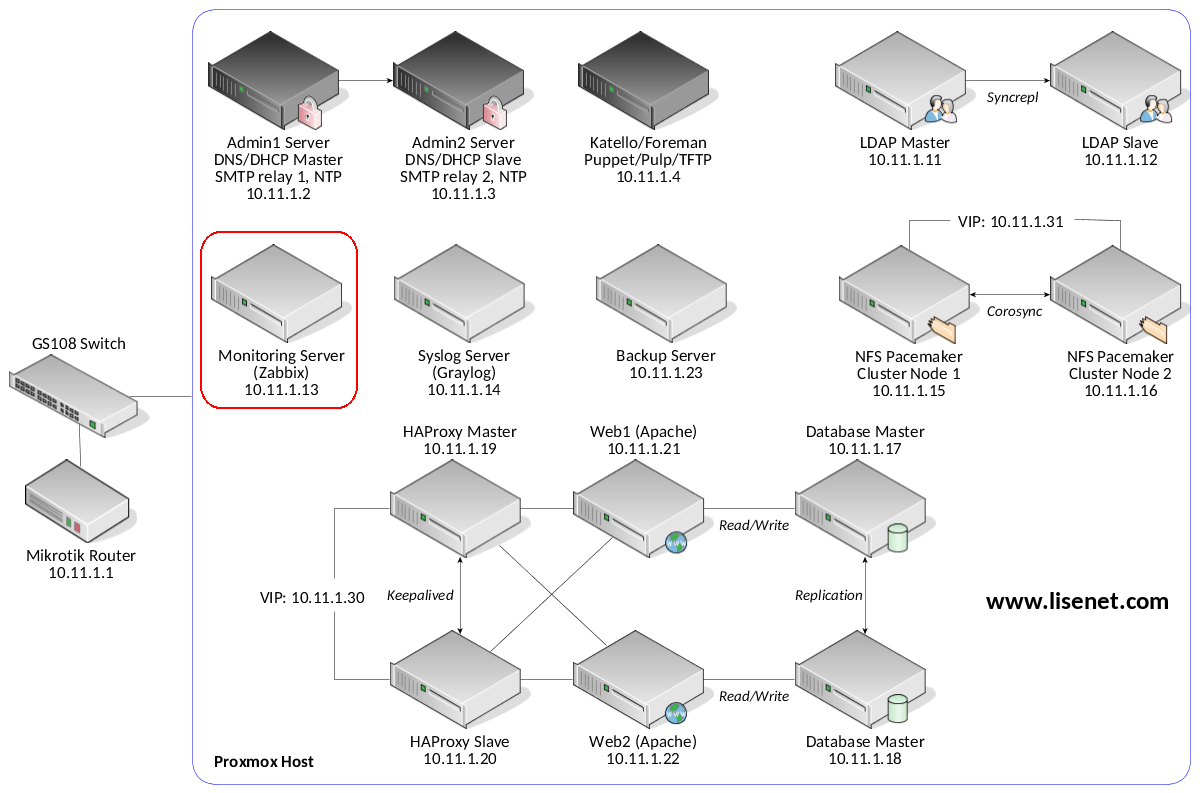
monitoring.hl.local (10.11.1.13) – Zabbix server with agent auto-registration

SELinux set to enforcing mode.

See the image below to identify the homelab part this article applies to.
Zabbix LTS and PHP

We want to use a stable Zabbix LTS release, which is Zabbix 3.0 at the time of writing.

Note that Zabbix 3.0 LTS release supports PHP 5.4 or later, however PHP v7 is not supported yet. For more info, see Zabbix documentation.

Also note that PHP 5.6 will receive security support until 31 December 2018. For more info, see PHP supported versions. We will therefore use Remi’s PHP 5.6 repository served by Katello (we configured it here).

Configuration with Puppet

Puppet master runs on the Katello server.

Puppet Modules

We use puppet-zabbix Puppet module to configure the server. We also use puppetlabs-apache and puppetlabs-mysql to configure frontend and backend services.

Please see each module’s documentation for features supported and configuration options available.

Manage Firewall

We start with firewall configuration:

firewall { ‘007 allow Zabbix active checks’:
dport => [10051],
source => ‘10.11.1.0/24’,
proto => tcp,
action => accept,
}->
firewall { ‘008 allow Zabbix WebUI’:
dport => [80, 443],
source => ‘10.11.1.0/24’,
proto => tcp,
action => accept,
}

Install Apache

We use Apache to run Zabbix frontend, and MySQL as Zabbix backend database.

Do a minimal Apache install only, but make sure that a PHP module is loaded:

class { ‘apache’:
default_vhost => false,
default_ssl_vhost => false,
default_mods => false,
mpm_module => ‘prefork’,
server_signature => ‘Off’,
server_tokens => ‘Prod’,
trace_enable => ‘Off’,
}
include apache::mod::php

Install MySQL

MySQL 5.7 repository is served by Katello (we configured it here).

class { ‘mysql::server’:
package_name => ‘mysql-community-server’,
service_name => ‘mysqld’,
root_password => ‘PleaseChangeMe’,
create_root_my_cnf => true,
manage_config_file => true,
config_file => ‘/etc/my.cnf’,
purge_conf_dir => true,
restart => true,
override_options => {
mysqld => {
bind-address => ‘127.0.0.1’,
datadir => ‘/var/lib/mysql’,
log-error => ‘/var/log/mysqld.log’,
pid-file => ‘/var/run/mysqld/mysqld.pid’,
wait_timeout => ‘3600’,
interactive_timeout => ‘3600’,
},
mysqld_safe => {
log-error => ‘/var/log/mysqld.log’,
},
},
remove_default_accounts => true,
}

Install Zabbix Server

Zabbix 3.0 repository is served by Katello. Since this is the case, we set manage_repo to false.

class { ‘zabbix’:
zabbix_version => ‘3.0’,
zabbix_url => ‘monitoring.hl.local’,
database_type => ‘mysql’,
manage_repo => false,
manage_firewall => true,
manage_vhost => true,
apache_use_ssl => true,
}

If all goes well, at this point Zabbix should be up and running.

Configure Active Agent Auto-Registration

This part should be configured after the server has been created.

It is possible to allow active Zabbix agent auto-registration, after which the server can start monitoring them. This way new hosts can be added for monitoring without configuring them manually on the server.

When installed succesfully, Zabbix web interface will be accessibe and we can log in with the default credentials:

  1. Username: Admin
  2. Password: zabbix

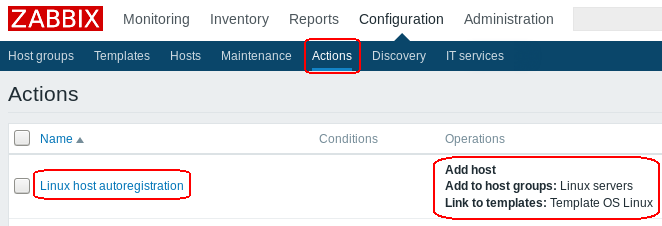
In the Zabbix frontend, go to Configuration > Actions, select Auto registration as the event source and click on Create action. Use something like this:

  1. Name: Linux host autoregistration
  2. Conditions: none
  3. Operations: Link to templates: Template OS Linux

See the image below for more info.
We don’t use any conditions here as it’s optional and not really necessary for the homelab, however, we could use HostMetadataItem=system.uname if we wanted to separate say Linux servers from Windows.

Install Zabbix Agents on All Servers

By now we should have our Zabbix server running with agent auto-registration enabled. One thing that is still left to do is to configure Puppet to install a Zabbix agent on all homelab servers, and allow Zabbix passive checks.

This needs to go in to the main environment manifest file /etc/puppetlabs/code/environments/homelab/manifests/site.pp so that configuration is applied to all servers.

class { ‘zabbix::agent’:
zabbix_version => ‘3.0’,
## Do not use DNS, use IP address.
server => ‘10.11.1.13’,
## Do not set logtype to ‘system’ unless you want
## to find yourself debugging SELinux problems.

logtype => ‘file’,
logfile => ‘/var/log/zabbix/zabbix_agentd.log’,
## Use Katello repository
manage_repo => false,
manage_firewall => false,
manage_selinux => true,
## Zabbix Agent does not work well with SELinux
## See: https://support.zabbix.com/browse/ZBX-12592

selinux_require => [
‘type kernel_t’,
‘type devlog_t’,
‘type zabbix_agent_t’,
‘class sock_file write’,
‘class process setrlimit’,
‘class unix_dgram_socket ‘,
],
selinux_rules => { ‘zabbix_agent_t’ => [
‘allow zabbix_agent_t kernel_t:unix_dgram_socket sendto’,
‘allow zabbix_agent_t self:process setrlimit’,
‘allow zabbix_agent_t self:unix_dgram_socket { connect create }’,
]
},
## Allow active Zabbix agent auto-registration,
## after which the server can start monitoring them.

serveractive => ‘monitoring.hl.local’,
hostmetadata => ‘system.uname’,
}

Configure firewall on all servers to allow Zabbix passive checks:

firewall { ‘006 allow Zabbix passive checks’:
proto => ‘tcp’,
source => ‘monitoring.hl.local’,
dport => ‘10050’,
action => ‘accept’,
}

The end result should be similar to this:
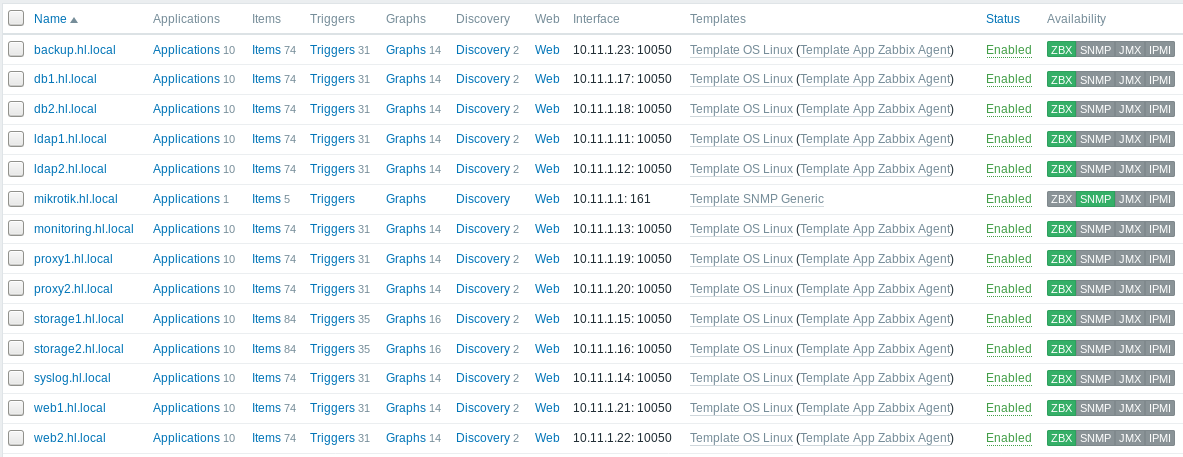
All agents auto-register with the server.

Source

Sonic Heroes Guide | GamersOnLinux


sonicheroes80.jpg

Choose a team of 3 characters from the Sonic games and work your way through fast levels full of jumps, traps and enemies. Switch between your characters abilities to eliminate enemies and finish the level. Each level can be completed in different ways and then at the end is a boss fight.

sonicheroes96.jpg

Follow my step-by-step guide on installing, configuring and optimizing Sonic Heroes in Linux with PlayOnLinux.

Note: This guide applies to the Retail CD ROM version of Sonic Heroes. Other versions may require additional steps.Tips & Specs:
To learn more about PlayOnLinux and Wine configuration, see the online manual: PlayOnLinux Explained

Mint 18.3 64-bit

PlayOnLinux: 4.2.12
Wine: 3.0

Wine Installation
Click Tools

Select “Manage Wine Versions”
wine01.png

Look for the Wine Version: 3.0

Select it
Click the arrow pointing to the right
wine02.png

Click Next

Downloading Wine

wine04.png

Extracting

Downloading Gecko

wine05.png

Installed

wine06.png

Wine 3.0 is installed and you can close this window

Copy Disk Data

  1. Enter Disk 1 of 2
  2. Create a folder on your Desktop
  3. Copy all of the files from Disk 1
  4. Paste the files in your new folder
  5. Eject Disk 1 (right-Click, select Eject)
  6. Enter Disk 2 and repeat
  7. Over-write any existing files

Note: Keep Disk 2 in the CD/DVD ROM drivePlayOnLinux Setup
Launch PlayOnLinux

Click Install
sonicheroes01.png

Click “Install a non-listed program”

sonicheroes02.png

Select “Install a program in a new virtual drive”

Click Next
sonicheroes03.png

Name the virtual drive: sonicheroes

Click Next
sonicheroes04.png

Check all three options:


  • Use another version of Wine
  • Configure Wine
  • Install some libraries

Click Next
sonicheroes05.png

Select Wine: 3.0

Click Next
sonicheroes06.png

Select “32 bits windows installation”

Click Next
sonicheroes07.png

Wine ConfigurationApplications Tab
Windows version: Windows XP

Click Apply
sonicheroes08.png

Drives Tab
Select Drive D:

Click Remove
Click Add
sonicheroes08a.png

Select D:

Click OK
sonicheroes08b.png

Navigate to your Desktop folder


Code:

/home/username/Desktop/sonicheroes
Click OK
sonicheroes08c.png

Type: CD-ROM

Click Apply
sonicheroes09.png

Graphics Tab
Check “Automatically capture the mouse in full-screen windows”

Click OK
sonicheroes10.png

PlayOnLinux Packages (DLLs, Libraries, Components)

Check the following:


  • POL_Install_corefonts
  • POL_Install_d3dx9
  • POL_Install_tahoma

Click Next
sonicheroes11.png

Note: All packages should automatically download and install
Click Browse

Navigate to the folder on your Desktop

Select “setup.exe”
Click Open
sonicheroes13.png

Click Next again…

Check “Agree”

Click Next
sonicheroes15.png

Check “Full”

Click Next
sonicheroes16.png

Click “Start Installation”

sonicheroes17.png

Disk Warning

Click Browse
sonicheroes17a.png

Select [-D-]

Click OK
sonicheroes18.png

Click OK

If the installer still doesn’t continue, Cancel and start over
Make sure Disk 1 is properly unmounted and Disk 2 is in the drive
Re-do the Drives Tab steps in Wine Configuration
It took me a few tries to get this right and the installer would complete

PlayOnLinux Shortcut
Select “Launcher.exe”

Click Next
sonicheroes21.png

Name the shortcut: Sonic Heroes

Click Next
sonicheroes20.png

Select “I don’t want to make another shortcut”

Click Next
sonicheroes23.png

PlayOnLinux Configure
Select “Sonic Heroes”

Click Configure
sonicheroes24.png

General Tab
Wine version: 3.0

sonicheroes25.png

Note: Click the down-arrow to select other versions of Wine. Click the + to download other versions of WineDisplay Tab
Video memory size: Enter the amount of memory your video card/chip uses

sonicheroes26.png

Close Configure

Launch Sonic Heroes (Launcher)

Click Run
sonicheroes27.png

Note: Click debug to see bugs and errors
Click Options

sonicheroes28.png

Screen Setting Tab

Adjust:

  • Window Mode
  • Fullscreen
  • Resolution
  • Fog
  • Anisotropic Filter
  • Shadow Setting
  • Free Camera
  • Clipping
  • Frame Rate

Click Select
sonicheroes29.png

Click “Play game”

sonicheroes28.png

Conclusion:
Unfortunately the highest resolution Sonic Heroes can run at is 1280×960. No widescreen support, so you will either have to run it windowed or change your Linux Desktop resolution to match before launching Sonic Heroes. Once the game is running, everything performs perfectly. I was able to play on my keyboard and my old Logitech controller.

Gameplay Video:

Screenshots:sonicheroes81.jpg

sonicheroes84.jpg

sonicheroes86.jpg

sonicheroes90.jpg

sonicheroes97.jpg

sonicheroes99.jpg

sonicheroes100.jpg

Source

Announcing Managed Databases for Amazon Lightsail

Posted On: Oct 16, 2018

Today, Amazon Lightsail announces the addition of managed databases to its easy-to-use cloud platform, allowing you to create a fully configured database in minutes for a low, predictable price. Lightsail databases bundle together a database instance, SSD-backed storage, a data transfer allocation, and management tools, starting at $15/month.

With Lightsail databases, you can scale your databases independently of your virtual servers, improve the availability of your applications, or easily run standalone databases in the cloud. You can now more easily deploy multi-tiered applications entirely within the Lightsail experience by combining Lightsail load balancers, virtual servers, and managed databases.

As a fully managed service, Lightsail automatically performs common maintenance tasks, like patching the underlying database infrastructure and operating system, and upgrading databases between minor versions. Lightsail also helps you keep your data secure by providing data encryption and protecting connection information with integrated password management.

With Lightsail, you benefit from free automated backups and point-in-time restores, and you can access metrics and database logs anytime through the Lightsail console. You can also further improve the redundancy and availability of your applications by using High Availability plans and on-demand database snapshots.

Lightsail databases support MySQL (PostgreSQL coming soon) in all regions where Lightsail is available. You can create Lightsail databases using the Lightsail console and the Lightsail CLI/SDK.

For more information on Amazon Lightsail and managed databases, visit the AWS Blog.

Source

Debian 8.8 XFCE Desktop Installation on Oracle VirtualBox

Debian 8.8 XFCE Desktop Installation on VirtualBox
Debian 8.8 XFCE Desktop Installation on Oracle VirtualBox

This video tutorial shows

Debian 8.8 XFCE Desktop installation

on Oracle

VirtualBox

step by step. This tutorial is also helpful to install Debian 8.8 on physical computer or laptop hardware. We also install

Guest Additions

on Debian 8.8 XFCE Desktop for better performance and usability features: Automatic Resizing Guest Display, Shared Folder, Seamless Mode and Shared Clipboard, Improved Performance and Drag and Drop.

Debian GNU/Linux 8.8 Xfce Desktop Installation Steps:

  1. Create Virtual Machine on Oracle VirtualBox
  2. Start Debian 8.8 XFCE Desktop Installation
  3. Install Guest Additions
  4. Test Guest Additions Features: Automatic Resizing Guest Display and Shared Clipboard

Installing Debian 8.8 Xfce Desktop on Oracle VirtualBox


Debian 8.8 New Features and Improvements

Debian 8.8

mainly adds corrections for security problems to the stable release, along with a few adjustments for serious problems. Security advisories were already published separately and are referenced where available. Those who frequently install updates from security.debian.org won’t have to update many packages and most updates from security.debian.org are included in this update.

Debian GNU/Linux 8.8

is not a new version of Debian. It’s just a Debian 8 image with the latest updates of some of the packages. So, if you’re running a Debian 8 installation with all the latest updates installed, you don’t need to do anything.

Debian Website:

https://www.debian.org/

What is Xfce Desktop Environment?

Xfce is a lightweight desktop environment for UNIX-like operating systems. It aims to be fast and low on system resources, while still being visually appealing and user friendly. It includes a window manager, a file manager, desktop and panel.

Xfce Desktop Website:

https://www.xfce.org/

Hope you found this Debian GNU/Linux 8.8 XFCE Desktop installation on Oracle VirtualBox tutorial helpful and informative. Please consider sharing it. Your feedback and questions are welcome!

Source

WP2Social Auto Publish Powered By : XYZScripts.com