By Jack M. Germain
Jul 10, 2018 9:56 AM PT


Ascensio System SIA recently released its free office suite upgrade —
OnlyOffice Desktop Editors — with a ribbon and tab interface plus numerous updated features. The refresh makes version 5.1 a potential alternative to Web versions of the Microsoft Office suite and Google Docs for Linux users.
The three-module set of OnlyOffice Desktop Editors has an impressive collection of tools geared toward individual consumers and small offices. It provides many of the conveniences available when using MS Word or Google G-Suite apps.
However, the real workplace benefits of collaborating on files through cloud storage come at an add-on cost once the free-trial period ends. Still, the core functionality — word processor, spreadsheet and slide presentations — remains free and installs locally as standalone apps in Linux distributions that use .DEB, .RPM and Snap software packages.
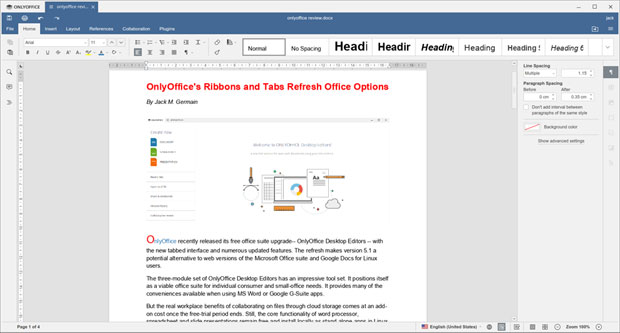
The OnlyOffice Desktop Editors have a new tabbed and ribbon-style interface with numerous updated features.
The completely reorganized interface of the free version of OnlyOffice now matches that of the OnlyOffice commercial online suite. Its other benefits include a near-seamless connection to the Web-based OnlyOffice applications for collaboration tools that include two co-editing modes (fast and strict), commenting, built-in chat, tracking changes and version history. (But more later on how seamless is not always all that it seems.)
The free and the commercial versions of OnlyOffice on Linux offer a common appearance and tools organized into tabs by their purposes: File, Home, Insert, Layout, References, Collaboration and Plugins. OnlyOffice also gives users the ability to extend the fully functional office suite with ready-to-use add-ons such as macros, WordPress, Translator and YouTube.
Whether the mostly-free features will win out over the paid add-on collaboration tools depends solely on your workflow. I use the Google Doc apps only occasionally, having found over the years that the open source LibreOffice has met or exceeded my personal and professional office suite needs. I even run LibreOffice on my Windows computer instead of MS Office.
So for the purpose of this review, I used my hands-on familiarity with LibreOffice, MS Word and Google Docs as a baseline for comparisons. In most categories, OnlyOffice showed it was up to the task.
First Impressions
OnlyOffice is a free open source office suite that is well-tuned, and it reads and writes Microsoft Office file formats reliably. It also supports other mainstream file formats, making it a good contender for your computer’s hard drive.
LibreOffice developers have been slow to offer a ribbon-style user interface. So, that is a nice new feature in OnlyOffice, even though it takes some getting used to. Having open documents in tabs is a great design that is very useful.
OnlyOffice Desktop Editors use OOXML as a native format. The developer claims this offers better support for MS Office formats than any other office suite, allowing users to work with all popular formats: DOC, DOCX, ODT, RTF, TXT, PDF, HTML, EPUB, XPS, DjVu, XLS, XLSX, ODS, CSV, PPT, PPTX, ODP.
This wide range of file formats is a good mix for users who have to exchange a variety of file types created by most of the popular text and graphics creation applications. This ability is essential for using open source software for certain work tasks. While I have a few gripes about other aspects of OnlyOffice, file interoperability is not one of them.
Modern Interface Options
One of the biggest user features that sets OnlyOffice apart from other office suites is the tabbed interface. It brings the same convenience of moving among open documents that tabbed pages bring to surfing in a Web browser.
Writing and researching require that I bounce around several websites constantly. I normally use Geany IDE or gEdit text editors to take notes or write in multiple files when document formatting is not required. Those two text editors use tabs for open documents.
So I can use OnlyOffice as an all-in-one text editor and word processor. OpenOffice gives me built-in access to spreadsheets and slide shows using the same interface and other features. LibreOffice and other office suites for Linux — even MS Office on line — do not offer a tabbed interface. So pairing tabs for open documents with a ribbon style interface is a great productivity combination.
Work in the Cloud
I often work with multiple computers in several office locations. Cloud storage is more than just a convenience for my work flow. It is a necessity. My primary cloud storage solution has been Dropbox, which has nice integration with the several Linux distros that I use.
OnlyOffice blends access to its own online storage and its online office service from the OnlyOffice Desktop Editors. That cloud access and the availability of collaboration tools, even with an add-on price — give me that same degree of flexibility.
The OnlyAccess cloud server is similar to Google Docs with its automatic storage on Google Drive. When you install OnlyOffice Desktop Editors, you also are prompted to set up a free account on the OnlyOffice cloud service associated with its standalone desktop office suite.
The Downside
OnlyOffice Desktop Editors give you solid performance and several reasons to switch from your current Linux office software — but it is not a perfect solution yet. This application has several quirks.
The spell check feature is active by default. You do not have to add anything. However, you can not add words to a personal dictionary. Your only option is to ignore words flagged as errors.
OnlyOffice is missing two critical components for any office software suite. It has no thesaurus or option to add one. Ditto for a grammar-checking feature.
Another big weakness in OnlyOffice Desktop Editors is the absence of significant settings to personalize or adapt it to your user preferences. There are no application-wide user preference settings. In an open file, however, under the File/Advanced Settings menu, is a skimpy check list for very minimal user options for that file. There is nothing “advanced” about these settings choices.
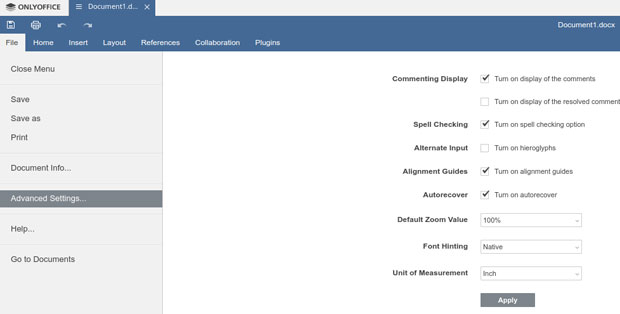
In OnlyOffice no application-wide settings exist, but you can make slight adjustments to default settings in an open file using the File/Advanced Settings menu.
More Feature Flameouts
Each of these feature missteps might be minor to some users. However, regular professional users will suffer from OnlyOffice’s shortcomings:
- You can auto recover a file, but you cannot set an auto save interval;
- There is no save all option; if multiple document tabs are open, each must be saved manually;
- You can not modify the tool bar or create special quick access icons. You must click through the ribbon categories;
- There is no ability to get a word count of highlighted text;
- You can hide/unhide the toolbar, but you can’t configure it — only a save icon, a print icon, and undo/redo arrows are available.
Two more bothersome quirks involve file conversion and spell checker glitches. I opened an MS Word document that had large bullets in the text. OnlyOffice replaced the bullets with small question marks in a box.
The spell checker did not always replace the selected correction from the options list. I had to redo the spell check correction several times for it to replace the typos.
Usage Fail Issues
I did discover one potentially serious flaw in the otherwise impressive ability of the OnlyOffice Desk Editors to read and write so many file formats. The seamless functionality the developer touts may have limitations. If you save your documents only to a hard drive or the OnlyOffice cloud, the process works reasonably well.
However, two quirks in the way OnlyOffice manages documents may force you to develop workarounds for the way *you* work. One, the OnlyOffice Desktop Editors insist on converting file formats from older to most-current versions. Two, it seems to have its own mind about where it places the file.
It took me a while to figure out what was happening. I would open an existing file created with another office application. After editing the file, I would click the Save File icon. A Save File As dialogue box would appear on the screen. At first, I didn’t pay close attention to its content. I merely clicked the OK button and closed the application.
In subsequent work sessions, I would open the file to resume editing by clicking on the file name in File Manager or from the recent files list within OnlyOffice. The file that loaded was not the last file saved. The content I added or edited was missing. This happened regularly if I used a different workstation or mobile device to access the file.
Remember what I said earlier about my cloud storage setup? Each of my computers has a Dropbox folder with subfolders. These instantly sync with my master files stored in the Dropbox cloud. The key to this file management process is having the same folder and subfolder tree on each device and in the cloud storage system.
Problem Exposed
This was a major usability issue for me. When I clicked the Save File Button in OnlyOffice, the Save As dialogue box displayed two things that caused the problem.
One was the file location. It did not keep the path location of the opened file. It always defaulted to the main folder location, not the designated subfolder.
Two, OnlyOffice converts the existing file type when a document is first opened to a different file type. This is a problem with files created in another office application that were saved in an older format version. If you create a new file, on first saving you select the file type. However, OnlyOffice uses the latest file version for new file creations.
For example, when I first began testing OnlyOffice, I created a new file to write my observations and first draft of this review. I then used OnlyOffice to continue work projects on existing files. That is when I noticed the content was different.
Why Stuff Happens
OnlyOffice has a menu option to open local files. There is no auto save feature, so the first save pops up the Save As dialogue box. It defaults to username/documents/filename and adds the latest file format. Older format options are not available. Therein lies the problem for reliable file interoperability.
For example, I opened a work document saved as “ARTICLE1.DOC” created in MS Word stored in the /Dropbox/documents/Freelance/Client A subdirectory. OnlyOffice saved the file as “ARTICLE1.DOCX” in the /Dropbox/Documents directory.
When I thought I was resuming work on that file in a subsequent editing session, the recent documents list in the menu loaded an earlier file without the latest changes in it. The same wrong file loaded when accessed from my other devices.
A similar scenario occurred when I loaded a spreadsheet file in OnlyOffice created with LibreOffice Calc. OnlyOffice saved the original “SPREADSHEET2.xls”
as “SPREADSHEET2.xlxs” in the /Dropbox/documents/ directory.
Another usability issue involves default application status. OnlyOffice automatically appoints itself the default application after installation. In order to stop this default status, right-click on a file name in File Manager and select the file as the default application for that type of file. Some Linux distros give you that option in the Preferences panel also.
Give It a Spin
Unlike most office suite applications, OnlyOffice has a single launcher. It has no separate launchers for word processor, spreadsheet and slide presentation module. You click on the single menu item and the application opens to a file manager type page.
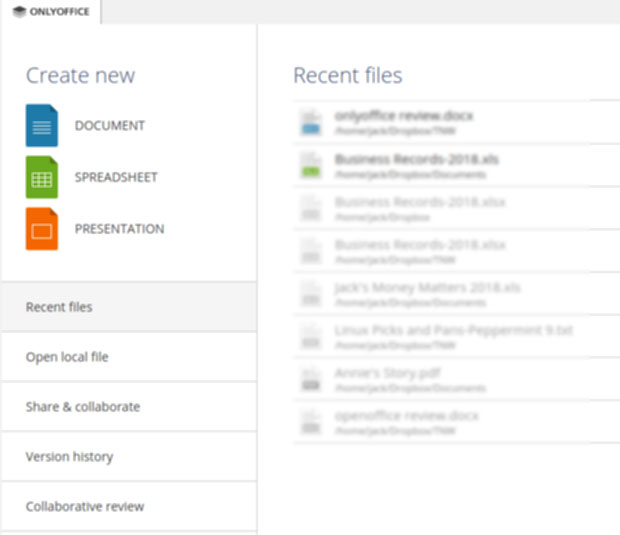
OnlyOffice does not have separate launchers for word processor, spreadsheet and slide presentation modules. You click on the single menu item and the application opens to a file manager page. From there you create a new file or open an existing document by clicking on the file name.
In the left column are buttons to create a new file for each of the three modules. On the larger right side of the screen is a directory view based on which option you select in the left column.
Under those options are buttons to display a list of recent files on the larger right column or open local files stored on the computer. Three other buttons let you sign up for a free trial period of collaboration features. The options are Share and Collaborate, view version histories, and collaborative review.
The OnlyOffice Desktop Editors release is available for Linux, Windows and Mac OS. The source code is available on GitHub released under the AGPL v.3 license.
Want to Suggest a Review?
Is there a Linux software application or distro you’d like to suggest for review? Something you love or would like to get to know?
Please
email your ideas to me, and I’ll consider them for a future Linux Picks and Pans column.
And use the Reader Comments feature below to provide your input.

 Jack M. Germain has been an ECT News Network reporter since 2003. His main areas of focus are enterprise IT, Linux and open source technologies. He has written numerous reviews of Linux distros and other open source software.
Email Jack.
Source

 Kontron announced two Ubuntu-driven computers for autonomous vehicles. The S2000 is a lab dev platform with a Xeon 8160T and the EvoTRAC S1901 offers a choice of Kontron modules including a new Atom C3000 based, Type 7 COMe-bDV7R.