Working with Katello – part 4. We’re going to install Puppet modules, we’re also going to create a custom firewall module, define some rules, configure Puppet to serve files from a custom location and declare the site manifest.
This article is part of the Homelab Project with KVM, Katello and Puppet series.
Homelab
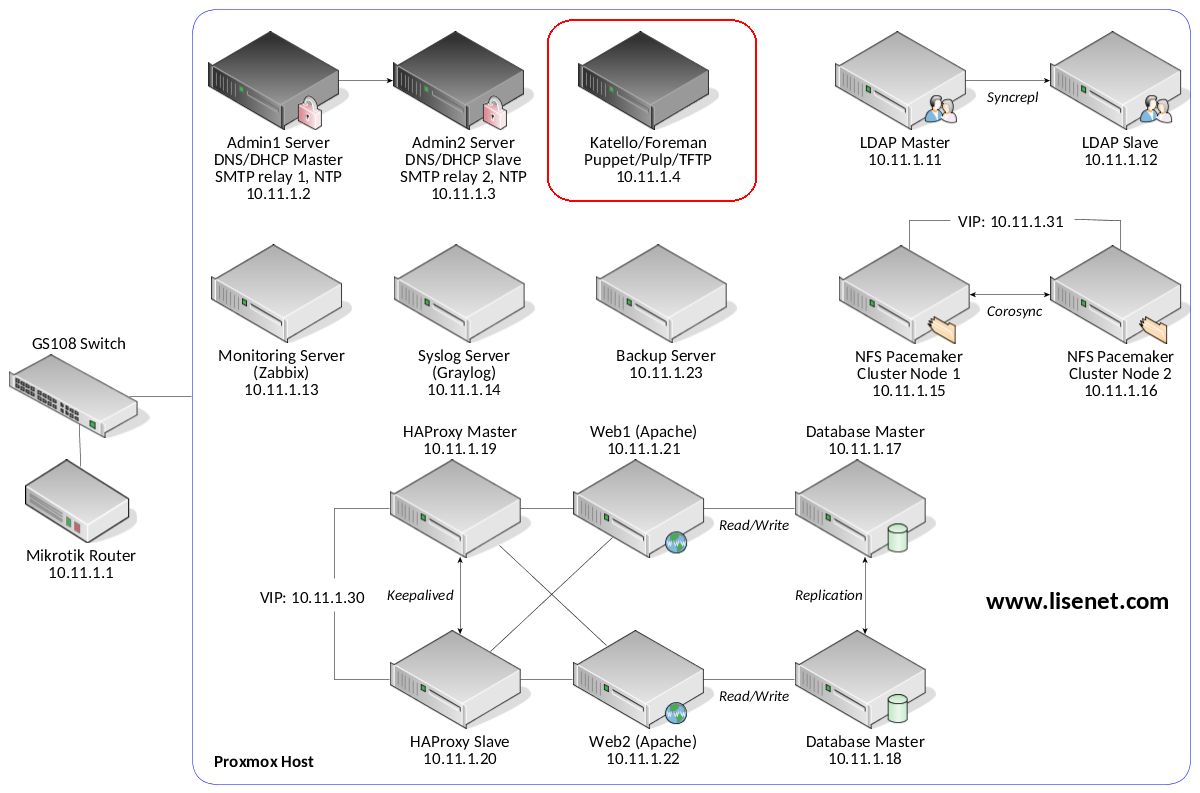
We have Katello installed on a CentOS 7 server:
katello.hl.local (10.11.1.4) – see here for installation instructions
See the image below to identify the homelab part this article applies to.
Puppet Configuration
What we’ve done in the previous article is we’ve created a new environment called “homelab”. What we haven’t done yet is we haven’t created a Puppet folder structure.
Folder Structure
Let us go ahead and create a folder structure:
# mkdir -p /etc/puppetlabs/code/environments/homelab/
Create the main manifest and set appropriate group permissions:
# touch /etc/puppetlabs/code/environments/homelab/manifests/site.pp
# chgrp puppet /etc/puppetlabs/code/environments/homelab/manifests/site.pp
# chmod 0640 /etc/puppetlabs/code/environments/homelab/manifests/site.pp
We can now go ahead and start installing Puppet modules.
Puppet Modules
Below is a list of Puppet modules that we have installed and are going to use. It may look like a long list at first, but it really isn’t. Some of the modules are installed as dependencies.
We can see modules for SELinux, Linux security limits, kernel tuning (sysctl), as well as OpenLDAP and sssd, Apache, WordPress and MySQL, Corosync and NFS, Zabbix and SNMP.
There is the whole Graylog stack with Java/MongoDB/Elasticsearch, also Keepalived and HAProxy.
# puppet module list –environment homelab
/etc/puppetlabs/code/environments/homelab/modules
├── arioch-keepalived (v1.2.5)
├── camptocamp-openldap (v1.16.1)
├── camptocamp-systemd (v1.1.1)
├── derdanne-nfs (v2.0.7)
├── elastic-elasticsearch (v6.2.1)
├── graylog-graylog (v0.6.0)
├── herculesteam-augeasproviders_core (v2.1.4)
├── herculesteam-augeasproviders_shellvar (v2.2.2)
├── hunner-wordpress (v1.0.0)
├── lisenet-lisenet_firewall (v1.0.0)
├── puppet-archive (v2.3.0)
├── puppet-corosync (v6.0.0)
├── puppet-mongodb (v2.1.0)
├── puppet-selinux (v1.5.2)
├── puppet-staging (v3.1.0)
├── puppet-zabbix (v6.2.0)
├── puppetlabs-accounts (v1.3.0)
├── puppetlabs-apache (v2.3.1)
├── puppetlabs-apt (v4.5.1)
├── puppetlabs-concat (v2.2.1)
├── puppetlabs-firewall (v1.12.0)
├── puppetlabs-haproxy (v2.1.0)
├── puppetlabs-java (v2.4.0)
├── puppetlabs-mysql (v5.3.0)
├── puppetlabs-ntp (v7.1.1)
├── puppetlabs-pe_gem (v0.2.0)
├── puppetlabs-postgresql (v5.3.0)
├── puppetlabs-ruby (v1.0.0)
├── puppetlabs-stdlib (v4.24.0)
├── puppetlabs-translate (v1.1.0)
├── razorsedge-snmp (v3.9.0)
├── richardc-datacat (v0.6.2)
├── saz-limits (v3.0.2)
├── saz-rsyslog (v5.0.0)
├── saz-ssh (v3.0.1)
├── saz-sudo (v5.0.0)
├── sgnl05-sssd (v2.7.0)
└── thias-sysctl (v1.0.6)
/etc/puppetlabs/code/environments/common (no modules installed)
/etc/puppetlabs/code/modules (no modules installed)
/opt/puppetlabs/puppet/modules (no modules installed)
/usr/share/puppet/modules (no modules installed)
The lisenet-lisenet_firewall module is the one we’ve generated ourselves. We’ll discuss it shortly.
Now, how do we actually install modules into our homelab environment? The default Puppet environment is production (see the previous article), that’s where all modules go by default. In order to install them into the homelab environment, we can define the installation command with the homelab environment specified:
# MY_CMD=”puppet module install –environment homelab”
To install modules, we can now use something like this:
# $MY_CMD puppetlabs-firewall ;
$MY_CMD puppetlabs-accounts ;
$MY_CMD puppetlabs-ntp ;
$MY_CMD puppet-selinux ;
$MY_CMD saz-ssh ;
$MY_CMD saz-sudo ;
$MY_CMD saz-limits ;
$MY_CMD thias-sysctl
This isn’t a full list of modules, but rather the one required by our main manifest (see the main manifest paragraph below). We could also loop the module list if we wanted to install everything in one go.
Let us go back to the firewall module. We want to be able to pass custom firewall data through the Katello WeUI by using a smart class parameter. Create a new firewall module:
# cd /etc/puppetlabs/code/environments/homelab/modules
# puppet module generate lisenet-lisenet_firewall
Create manifests:
# touch ./lisenet_firewall/manifests/
All good, let us create the rules. Here is the content of the file pre.pp (only allow ICMP and SSH by default):
class lisenet_firewall::pre {
Firewall {
require => undef,
}
firewall { ‘000 drop all IPv6’:
proto => ‘all’,
action => ‘drop’,
provider => ‘ip6tables’,
}->
firewall { ‘001 allow all to lo interface’:
proto => ‘all’,
iniface => ‘lo’,
action => ‘accept’,
}->
firewall { ‘002 reject local traffic not on loopback interface’:
iniface => ‘! lo’,
proto => ‘all’,
destination => ‘127.0.0.1/8’,
action => ‘reject’,
}->
firewall { ‘003 allow all ICMP’:
proto => ‘icmp’,
action => ‘accept’,
}->
firewall { ‘004 allow related established rules’:
proto => ‘all’,
state => [‘RELATED’, ‘ESTABLISHED’],
action => ‘accept’,
}->
firewall { ‘005 allow SSH’:
proto => ‘tcp’,
source => ‘10.0.0.0/8′,
state => [ “NEW” ],
dport => ’22’,
action => ‘accept’,
}
}
Here is the content of the file post.pp:
class lisenet_firewall::post {
firewall {‘999 drop all’:
proto => ‘all’,
action => ‘drop’,
before => undef,
}
}
The main module manifest init.pp:
class lisenet_firewall($firewall_data = false) {
include lisenet_firewall::pre
include lisenet_firewall::post
resources { “firewall”:
purge => true
}
Firewall {
before => Class[‘lisenet_firewall::post’],
require => Class[‘lisenet_firewall::pre’],
}
if $firewall_data != false {
create_resources(‘firewall’, $firewall_data)
}
}
One other thing we have to take care of after installing modules is SELinux context:
# restorecon -Rv /etc/puppetlabs/code/environments/homelab/
At this stage Katello has no knowledge of our newly installed Puppet modules. We have to go to the Katello WebUI, navigate to:
Configure > Puppet Environments > Import environments from katello.hl.local
This will import the modules into the homelab environment. Do the same for Puppet classes:
Configure > Puppet Classes > Import environments from katello.hl.local
This will import the lisenet_firewall class.
Strangely, I couldn’t find a Hammer command to perform the imports above, chances are I may have overlooked something. If you know how to do that with the Hammer, then let me know in the comments section.
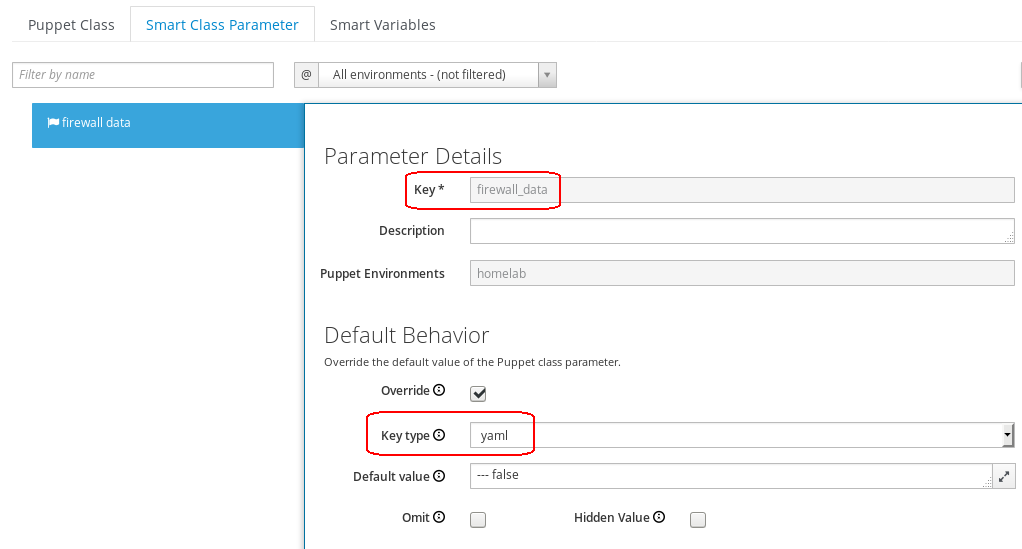
Configure lisenet_firewall Smart Class Parameter
Open Katello WebUI, navigate to:
Configure > Puppet Classes
Find the class lisenet_firewall, edit Smart Class Parameter, and set the $firewall_data key param type to yaml. This will allow to pass in any additional firewall rules via yaml, e.g.:
“007 accept TCP Apache requests”:
dport:
– “80”
– “443”
proto: tcp
source: “10.0.0.0/8”
action: accept
See the image below to get the idea.
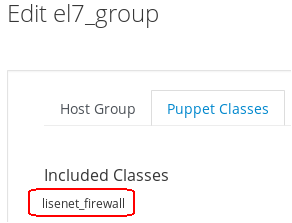
The next step is to assign the lisenet_firewall class to the host group that we’ve created previously, what in turn will apply default firewall rules defined in the manifests pre.pp and post.pp, as well as allow us to add new firewall rules directly to any host (which is a member of the group) via yaml.
We can view the host list to get a host ID:
# hammer host list
Then verify that the parameter has been applied, e.g.:
# hammer host sc-params –host-id “32”
—|—————|—————|———-|—————–
ID | PARAMETER | DEFAULT VALUE | OVERRIDE | PUPPET CLASS
—|—————|—————|———-|—————–
58 | firewall_data | | true | lisenet_firewall
—|—————|—————|———-|—————–
Serving Files from a Custom Location
Puppet automatically serves files from the files directory of every module. This does the job for the most part, however, when working in a homelab environment, we prefer to have a custom mount point where we can store all files.
The file fileserver.conf configures custom static mount points for Puppet’s file server. If custom mount points are present, file resources can access them with their source attributes.
Create a custom directory to serve files from:
# mkdir /etc/puppetlabs/code/environments/homelab/homelab_files
To create a custom mount point, open the file /etc/puppetlabs/puppet/fileserver.conf and add the following:
[homelab_files]
path /etc/puppetlabs/code/environments/homelab/homelab_files
allow *
As a result, files in the path directory will be served at puppet:///homelab_files/.
There are a couple of files that we want to create and put in the directory straight away, as these will be used by the main manifest.
We’ll strive to use encryption as much as possible, therefore we’ll need to have a TLS/SSL certificate. Let us go ahead and generate a self-signed one. We want to create a wildcard certificate so that we can use it with any homelab service, therefore when asked for a Common Name, type *.hl.local.
# cd /etc/puppetlabs/code/environments/homelab/homelab_files
# DOMAIN=hl
# openssl genrsa -out “$DOMAIN”.key 2048 && chmod 0600 “$DOMAIN”.key
# openssl req -new -sha256 -key “$DOMAIN”.key -out “$DOMAIN”.csr
# openssl x509 -req -days 1825 -sha256 -in “$DOMAIN”.csr
-signkey “$DOMAIN”.key -out “$DOMAIN”.crt
# openssl pkcs8 -topk8 -inform pem -in “$DOMAIN”.key
-outform pem -nocrypt -out “$DOMAIN”.pem
Ensure that the files have been created:
# ls
hl.crt hl.csr hl.key hl.pem
Verify the certificate:
# openssl x509 -in hl.crt -text -noout|grep CN
Issuer: C=GB, L=Birmingham, O=HomeLab, CN=*.hl.local
Subject: C=GB, L=Birmingham, O=HomeLab, CN=*.hl.local
All looks good, we can proceed forward and declare the main manifest.
Define the Main Manifest for the Homelab Environment
Edit the main manifest file /etc/puppetlabs/code/environments/homelab/manifests/site.pp and define any global overrides for the homelab environment.
Note how the TLS certificate that we created previously is configured to be deployed on all servers.
##
## File: site.pp
## Author: Tomas at www.lisenet.com
## Date: March 2018
##
## This manifest defines services in the following order:
##
## 1. OpenSSH server config
## 2. Packages and services
## 3. Sudo and User config
## 4. SELinux config
## 5. Sysctl config
## 6. System security limits
##
##
## The name default (without quotes) is a special value for node names.
## If no node statement matching a given node can be found, the default
## node will be used.
##
node ‘default’ {}
##
## Note: the lisenet_firewall class should not be assigned here,
## but rather added to Katello Host Groups. This is to allow us
## to utilise Smart Class Parameters and add additional rules
## per host by using Katello WebUI.
##
#################################################
## OpenSSH server configuration for the env
#################################################
## CentOS 7 OpenSSH server configuration
if ($facts[‘os’][‘family’] == ‘RedHat’) and ($facts[‘os’][‘release’][‘major’] == ‘7’) {
class { ‘ssh::server’:
validate_sshd_file => true,
options => {
‘Port’ => ’22’,
‘ListenAddress’ => ‘0.0.0.0’,
‘Protocol’ => ‘2’,
‘SyslogFacility’ => ‘AUTHPRIV’,
‘LogLevel’ => ‘INFO’,
‘MaxAuthTries’ => ‘3’,
‘MaxSessions’ => ‘5’,
‘AllowUsers’ => [‘root’,’tomas’],
‘PermitRootLogin’ => ‘without-password’,
‘HostKey’ => [‘/etc/ssh/ssh_host_ed25519_key’, ‘/etc/ssh/ssh_host_rsa_key’],
‘PasswordAuthentication’ => ‘yes’,
‘PermitEmptyPasswords’ => ‘no’,
‘PubkeyAuthentication’ => ‘yes’,
‘AuthorizedKeysFile’ => ‘.ssh/authorized_keys’,
‘KerberosAuthentication’ => ‘no’,
‘GSSAPIAuthentication’ => ‘yes’,
‘GSSAPICleanupCredentials’ => ‘yes’,
‘ChallengeResponseAuthentication’ => ‘no’,
‘HostbasedAuthentication’ => ‘no’,
‘IgnoreUserKnownHosts’ => ‘yes’,
‘PermitUserEnvironment’ => ‘no’,
‘UsePrivilegeSeparation’ => ‘yes’,
‘StrictModes’ => ‘yes’,
‘UsePAM’ => ‘yes’,
‘LoginGraceTime’ => ’60’,
‘TCPKeepAlive’ => ‘yes’,
‘AllowAgentForwarding’ => ‘no’,
‘AllowTcpForwarding’ => ‘no’,
‘PermitTunnel’ => ‘no’,
‘X11Forwarding’ => ‘no’,
‘Compression’ => ‘delayed’,
‘UseDNS’ => ‘no’,
‘Banner’ => ‘none’,
‘PrintMotd’ => ‘no’,
‘PrintLastLog’ => ‘yes’,
‘Subsystem’ => ‘sftp /usr/libexec/openssh/sftp-server’,
‘Ciphers’ => ‘[email protected],[email protected],[email protected],aes256-ctr,aes192-ctr,aes128-ctr’,
‘MACs’ => ‘[email protected],[email protected],[email protected]‘,
‘KexAlgorithms’ => ‘[email protected],diffie-hellman-group18-sha512,diffie-hellman-group16-sha512,diffie-hellman-group14-sha256′,
‘HostKeyAlgorithms’ => ‘ssh-ed25519,[email protected],ssh-rsa,ecdsa-sha2-nistp256,ecdsa-sha2-nistp384,[email protected],[email protected],[email protected],[email protected],[email protected]‘,
},
}
}
#################################################
## Packages/services configuration for the env
#################################################
## We want these packages installed on all servers
$packages_to_install = [
‘bzip2’,
‘deltarpm’,
‘dos2unix’,
‘gzip’,
‘htop’,
‘iotop’,
‘lsof’,
‘mailx’,
‘net-tools’,
‘nmap-ncat’,
‘postfix’,
‘rsync’,
‘screen’ ,
‘strace’,
‘sudo’,
‘sysstat’,
‘unzip’,
‘vim’ ,
‘wget’,
‘xz’,
‘yum-cron’,
‘yum-utils’,
‘zip’,
]
package { $packages_to_install: ensure => ‘installed’ }
## We do not want these packages on servers
$packages_to_purge = [
‘aic94xx-firmware’,
‘alsa-firmware’,
‘alsa-utils’,
‘ivtv-firmware’,
‘iw’,
‘iwl1000-firmware’,
‘iwl100-firmware’,
‘iwl105-firmware’,
‘iwl135-firmware’,
‘iwl2000-firmware’,
‘iwl2030-firmware’,
‘iwl3160-firmware’,
‘iwl3945-firmware’,
‘iwl4965-firmware’,
‘iwl5000-firmware’,
‘iwl5150-firmware’,
‘iwl6000-firmware’,
‘iwl6000g2a-firmware’,
‘iwl6000g2b-firmware’,
‘iwl6050-firmware’,
‘iwl7260-firmware’,
‘iwl7265-firmware’,
‘wireless-tools’,
‘wpa_supplicant’,
]
package { $packages_to_purge: ensure => ‘purged’ }
##
## Manage some specific services below
##
service { ‘kdump’: enable => false, }
service { ‘puppet’: enable => true, }
service { ‘sysstat’: enable => false, }
service { ‘yum-cron’: enable => true, }
##
## Configure NTP
##
class { ‘ntp’:
servers => [ ‘admin1.hl.local’, ‘admin2.hl.local’ ],
restrict => [‘127.0.0.1’],
}
##
## Configure Postfix via postconf
## Note how we configure smtp_fallback_relay
##
service { ‘postfix’: enable => true, ensure => “running”, }
exec { “configure_postfix”:
path => ‘/usr/bin:/usr/sbin:/bin:/sbin’,
provider => shell,
command => “postconf -e ‘inet_interfaces = localhost’
‘relayhost = admin1.hl.local’
‘smtp_fallback_relay = admin2.hl.local’
‘smtpd_banner = $hostname ESMTP'”,
unless => “grep ^smtp_fallback_relay /etc/postfix/main.cf”,
notify => Exec[‘restart_postfix’]
}
exec {‘restart_postfix’:
path => ‘/usr/bin:/usr/sbin:/bin:/sbin’,
provider => shell,
## Using service rather than systemctl to make it portable
command => “service postfix restart”,
refreshonly => true,
}
if ($facts[‘os’][‘release’][‘major’] == ‘7’) {
## Disable firewalld and install iptables-services
package { ‘iptables-services’: ensure => ‘installed’ }
service { ‘firewalld’: enable => “mask”, ensure => “stopped”, }
service { ‘iptables’: enable => true, ensure => “running”, }
service { ‘ip6tables’: enable => true, ensure => “running”, }
service { ‘tuned’: enable => true, }
package { ‘chrony’: ensure => ‘purged’ }
}
## Wildcard *.hl.local TLS certificate for homelab
file {‘/etc/pki/tls/certs/hl.crt’:
ensure => ‘file’,
source => ‘puppet:///homelab_files/hl.crt’,
path => ‘/etc/pki/tls/certs/hl.crt’,
owner => ‘0’,
group => ‘0’,
mode => ‘0644’,
}
file {‘/etc/pki/tls/private/hl.key’:
ensure => ‘file’,
source => ‘puppet:///homelab_files/hl.key’,
path => ‘/etc/pki/tls/private/hl.key’,
owner => ‘0’,
group => ‘0’,
mode => ‘0640’,
}
}
#################################################
## Sudo and Users configuration for the env
#################################################
class { ‘sudo’:
purge => true,
config_file_replace => true,
}
sudo::conf { ‘wheel_group’:
content => “%wheel ALL=(ALL) ALL”,
}
## These are necessary for passwordless SSH
file {‘/root/.ssh’:
ensure => ‘directory’,
owner => ‘0’,
group => ‘0’,
mode => ‘0700’,
}->
file {‘/root/.ssh/authorized_keys’:
ensure => ‘file’,
owner => ‘0’,
group => ‘0’,
mode => ‘0600’,
content => “# Managed by Puppetnnnssh-rsa key-stringn”,
}
#################################################
## SELinux configuration for the environment
#################################################
class { selinux:
mode => ‘enforcing’,
type => ‘targeted’,
}
#################################################
## Sysctl configuration for the environment
#################################################
sysctl { ‘fs.suid_dumpable’: value => ‘0’ }
sysctl { ‘kernel.dmesg_restrict’: value => ‘1’ }
sysctl { ‘kernel.kptr_restrict’: value => ‘2’ }
sysctl { ‘kernel.randomize_va_space’: value => ‘2’ }
sysctl { ‘kernel.sysrq’: value => ‘0’ }
sysctl { ‘net.ipv4.tcp_syncookies’: value => ‘1’ }
sysctl { ‘net.ipv4.tcp_timestamps’: value => ‘1’ }
sysctl { ‘net.ipv4.conf.default.accept_source_route’: value => ‘0’ }
sysctl { ‘net.ipv4.conf.all.accept_redirects’: value => ‘0’ }
sysctl { ‘net.ipv4.conf.default.accept_redirects’: value => ‘0’ }
sysctl { ‘net.ipv4.conf.all.send_redirects’: value => ‘0’ }
sysctl { ‘net.ipv4.conf.default.send_redirects’: value => ‘0’ }
sysctl { ‘net.ipv4.conf.all.secure_redirects’: value => ‘0’ }
sysctl { ‘net.ipv4.conf.default.secure_redirects’: value => ‘0’ }
sysctl { ‘net.ipv4.conf.all.rp_filter’: value => ‘1’ }
sysctl { ‘net.ipv4.conf.default.rp_filter’: value => ‘1’ }
sysctl { ‘net.ipv4.conf.all.log_martians’: value => ‘1’ }
sysctl { ‘net.ipv4.conf.default.log_martians’: value => ‘1’ }
sysctl { ‘net.ipv6.conf.lo.disable_ipv6’: value => ‘0’ }
sysctl { ‘net.ipv6.conf.all.disable_ipv6’: value => ‘0’ }
sysctl { ‘net.ipv6.conf.default.disable_ipv6’: value => ‘0’ }
sysctl { ‘net.ipv6.conf.all.accept_redirects’: value => ‘0’ }
sysctl { ‘net.ipv6.conf.default.accept_redirects’: value => ‘0’ }
sysctl { ‘vm.swappiness’: value => ’40’ }
#################################################
## Security limits configuration for the env
#################################################
limits::limits{‘*/core’: hard => 0; }
limits::limits{‘*/fsize’: both => 67108864; }
limits::limits{‘*/locks’: both => 65535; }
limits::limits{‘*/nofile’: both => 65535; }
limits::limits{‘*/nproc’: both => 16384; }
limits::limits{‘*/stack’: both => 32768; }
limits::limits{‘root/locks’: both => 65535; }
limits::limits{‘root/nofile’: both => 65535; }
limits::limits{‘root/nproc’: both => 16384; }
limits::limits{‘root/stack’: both => 32768; }
## Module does not manage the file /etc/security/limits.conf
## We might as well warn people from editing it.
file {‘/etc/security/limits.conf’:
ensure => ‘file’,
owner => ‘0’,
group => ‘0’,
mode => ‘0644’,
content => “# Managed by Puppetnn”,
}
Any server that uses the Puppet homelab environment will get the configuration above applied.
What’s Next?
While using the Puppet homelab environment gives us flexibility to develop and test Puppet modules without having to publish them (Katello content views are published in order to lock their contents in place), once we hit production, we will need to be able to define a stable state of the modules so that anything that hasn’t been tested yet doesn’t get rolled into the environment.
Katello allows us to use a separate lifecycle for Puppet modules, we’ll discuss this in the next article.
Source


 Jack M. Germain has been an ECT News Network reporter since 2003. His main areas of focus are enterprise IT, Linux and open source technologies. He has written numerous reviews of Linux distros and other open source software.