How to Install Rocket.Chat on Debian 9 – LinuxCloudVPS Blog

How to install rocket.chat on Debian 9

Rocket.chat is an open source application that can be used as a team communication solution and can be deployed on your own server. There are many options for this application, such as chatting with team members and friends, using audio and video chat, interacting with website visitors in real time, sharing files and more. In this tutorial, we will install and deploy Rocket.Chat on Debian 9 server. Let’s get started!

1. Update the system

Once you are logged in to your server, you need to update and upgrade RPM packages. You can upgrade and upgrade your server with the following commands:

sudo apt update
sudo apt upgrade -y

2. Install Dependencies

Before starting the Rocket.Chat installation, you need to install the following required dependencies so that the application can work:

Node.js – an open source cross-platform JavaScript run-time environment.
MongoDB – is an open-source leading NoSQL database program written in C++.
cURL- know as “Client URL” is the command-line tool for transferring data.
GraphicsMagick – is a collection of tools and image processing libraries. GraphicsMagick is an ImageMagick fork.

First, we are going to install cURL , MongoDB and GraphicsMagick with this command:

sudo apt install -y curl mongodb graphicsmagick

Run the next command to install the Node.js:

sudo curl -sL https://deb.nodesource.com/setup | sudo bash –

sudo apt install -y nodejs

also you need to install the npm package

sudo npm install -g n

Use n to download and install Node.js version 8.9.3 which is required by Rocket.Chat

sudo n 8.9.3

You can check the Node.js current version with the following command:

node –version
v8.9.3

In order for some npm packages which require building from source, you will need to install the build-essentials and python-dev packages:

sudo apt install build-essential python-dev

Now when you set all the necessary dependencies we can continue with installing the Rocket.Chat.

3. Installing Rocket.Chat

We will use the curl command to download the Rocket.Chat latest version and we will extract into the /opt directory:

cd /opt
curl -L https://releases.rocket.chat/latest/download -o rocket.chat.tgz
tar zxvf rocket.chat.tgz
mv bundle Rocket.Chat
cd Rocket.Chat/programs/server
npm install
cd ../..

There are two ways to populate and start the Rocket.Chat. First one is manually to set the necessary environment variables and start the Rocket.Chat:

export ROOT_URL=http://your_domain-or-IP_addres:3000/
export MONGO_URL=mongodb://localhost:27017/rocketchat
export PORT=3000

Replace ‘your_domain-or-IP_addres’ with your actual domain name or server’s IP address.

Run the Rocket.Chat server

node main.js

The second one is to create the Rocket.Chat systemd service unit:

nano /etc/systemd/system/rocketchat.service
[Unit]
Description=RocketChat Server
After=network.target remote-fs.target nss-lookup.target mongod.target nginx.target # Remove or Replace nginx with your proxy

[Service]
ExecStart=/usr/local/bin/node /opt/Rocket.Chat/main.js # The location of node and location of main.js
Restart=always # When is set to always, the service will be restarted in any case (hit a timeout, got terminated)
RestartSec=15 # If node service crashes, restart the service after 15 seconds
StandardOutput=syslog # Output to syslog
StandardError=syslog # Output to syslog
SyslogIdentifier=nodejs-example
#User=<alternate user>
#Group=<alternate group>
Environment=NODE_ENV=production PORT=3000 ROOT_URL=https://your_domain.com MONGO_URL=mongodb://localhost:27017/rocketchat

[Install]
WantedBy=multi-user.target

You can change ROOT_URL and replace the domain you want to use. If you do not have an available domain, you can instead enter your IP address on your server. You can also change the port number that is currently set to 3000 to a port number of your choice.

In order to notify the systemd that you just created a new unit file you need to execute the following command:

sudo systemctl daemon-reload

Start the MongoDB and Rocket.Chat services:

sudo systemctl start mongodb
sudo systemctl start rocketchat

You can check the status of the service by running the command:

sudo systemctl status rocketchat
Output:

● rocketchat.service – RocketChat Server
Loaded: loaded (/etc/systemd/system/rocketchat.service; enabled; vendor preset: disabled)
Active: active (running) since Sat 2018-08-25 08:35:50 CDT; 4s ago
Main PID: 894 (node)
CGroup: /system.slice/rocketchat.service
└─894 /usr/local/bin/node /opt/Rocket.Chat/main.js

If the rocketchat.service is enabled and there are no errors, you can enable it also the automatically to start at boot time:

sudo systemctl enable rocketchat

4. Access Rocket.Chat in the web browser

Now, open http://your_domain-or-IP_addres:3000 in your favorite web browser and you should see the RocketChat login/register screen. The first user created will get administrative privileges by default.

That’s it. You have successfully installed Rocket.Chat on your Debian 9 VPS. For more information about how to manage your Rocket.Chat installation, please refer to the official Rocket.Chat documentation.

installing rocket.chat on debian 9

Of course, you don’t have to do any of this if you use one of our Debian Cloud VPS plans, in which case you can simply ask our expert Linux admins to set Rocket.Chat web communication and collaboration software for you. They are available 24×7 and will take care of your request immediately.

Be the first to write a comment.

Source

Mod_Expires Configuration In Apache – LinuxAdmin.io

How to setup mod_expires in Apache

mod_expires is a module which runs on the Apache web server. It allows manipulation of the cache control headers to leverage browser caching. What this means more specifically is that you will be able to set values on how long the image will be stored by the browser when a client makes a request. This will greatly improve page load times on subsequent requests by that same client. If a asset it set to not change very often, then using longer cache times are better, if the asset changes frequently you would want to use a shorter cache time so that returning visitors will see the updated asset. You can read more about the granular configuration on Apache’s site.

This guide assumes you already have a working version of Apache web server. If you do not, please see How To Install Apache.

Verify mod_expires is loaded

First you will want to check to see if mod_expires is loaded by performing the following

$ httpd -M 2>&1|grep expires
expires_module (static)

If it returns nothing, you will need to verify mod_expires is loaded the the config:

cat httpd.conf|grep expires
#LoadModule expires_module modules/mod_expires.so

If it is commented out, you will want to uncomment it and restart Apache.

Configure mod_expires Rules

You will now want to set rules for your site. The configuration can either be placed in the .htaccess or directly in the Apache vhost stanza. The expiration time you will want to set largely depends on how long you plan on keeping the asset as it is. The below ruleset is fairly conservative, if you do not plan on updating those media types at all, you can set them for even a year before expiration.

In this example we will just set the mod_expires values in the .htaccess file in the document root

nano .htaccess

Add the following, adjust any for longer or shorter times depending on your needs:

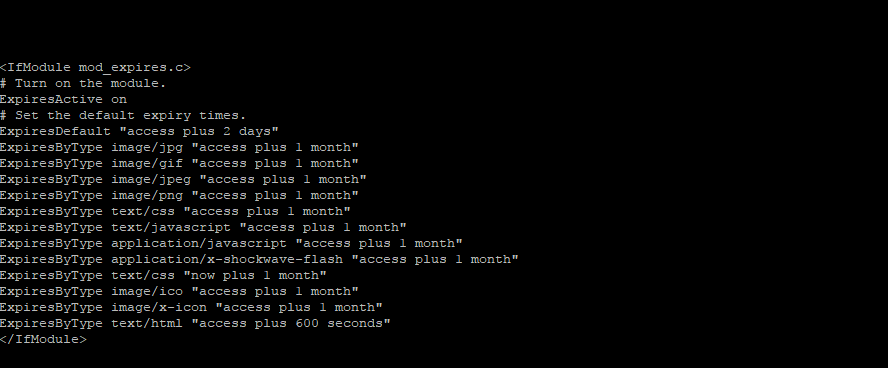
<IfModule mod_expires.c>
# Turn on the module.
ExpiresActive on
# Set the default expiry times.
ExpiresDefault “access plus 2 days”
ExpiresByType image/jpg “access plus 1 month”
ExpiresByType image/gif “access plus 1 month”
ExpiresByType image/jpeg “access plus 1 month”
ExpiresByType image/png “access plus 1 month”
ExpiresByType text/css “access plus 1 month”
ExpiresByType text/javascript “access plus 1 month”
ExpiresByType application/javascript “access plus 1 month”
ExpiresByType application/x-shockwave-flash “access plus 1 month”
ExpiresByType text/css “now plus 1 month”
ExpiresByType image/ico “access plus 1 month”
ExpiresByType image/x-icon “access plus 1 month”
ExpiresByType text/html “access plus 600 seconds”
</IfModule>

Once you have set those values, further subsequent requests should now start setting expires headers. If you set the expires values directly in the Apache v-host stanza, you will want to restart Apache.

Testing mod_expires to ensure its working correctly

There are a couple different ways, you can use the developer tools in a browser to verify the expires value is being set correctly. You can also test this functionality with curl. You will want to curl the URL of the file you are checking

$ curl -Is https://linuxadmin.io/wp-content/uploads/2017/04/linuxadmin_io_logo.png
HTTP/1.1 200 OK
Date: Mon, 09 Oct 2017 23:10:29 GMT
Content-Type: image/png
Content-Length: 6983
Connection: keep-alive
Set-Cookie: __cfduid=d7768a9a20888ada8e0cee831245051cc1507590629; expires=Tue, 09-Oct-18 23:10:29 GMT; path=/; domain=.linuxadmin.io; HttpOnly
Last-Modified: Fri, 28 Apr 2017 02:21:20 GMT
ETag: “5902a720-1b47”
Expires: Sun, 30 Sep 2018 21:49:53 GMT
Cache-Control: max-age=31536000
CF-Cache-Status: HIT
Accept-Ranges: bytes
Server: cloudflare-nginx
CF-RAY: 3ab5037b7ac291dc-EWR

The line you are checking for is what starts with Expires:

Expires: Sun, 30 Sep 2018 21:49:53 GMT

this should return a time based on the mod_expires value you set. That is it for setting mod_expires headers in Apache to leverage browser caching.

Oct 9, 2017LinuxAdmin.io

Source

Configure Graylog Server with Puppet | Lisenet.com :: Linux | Security

We’re going to use Puppet to install and configure a Graylog server.

This article is part of the Homelab Project with KVM, Katello and Puppet series. See here (CentOS 7) and here (CentOS 6) for blog posts on how to configure a Graylog server manually.

Homelab

We have a CentOS 7 VM installed which we want to configure as a Graylog server:

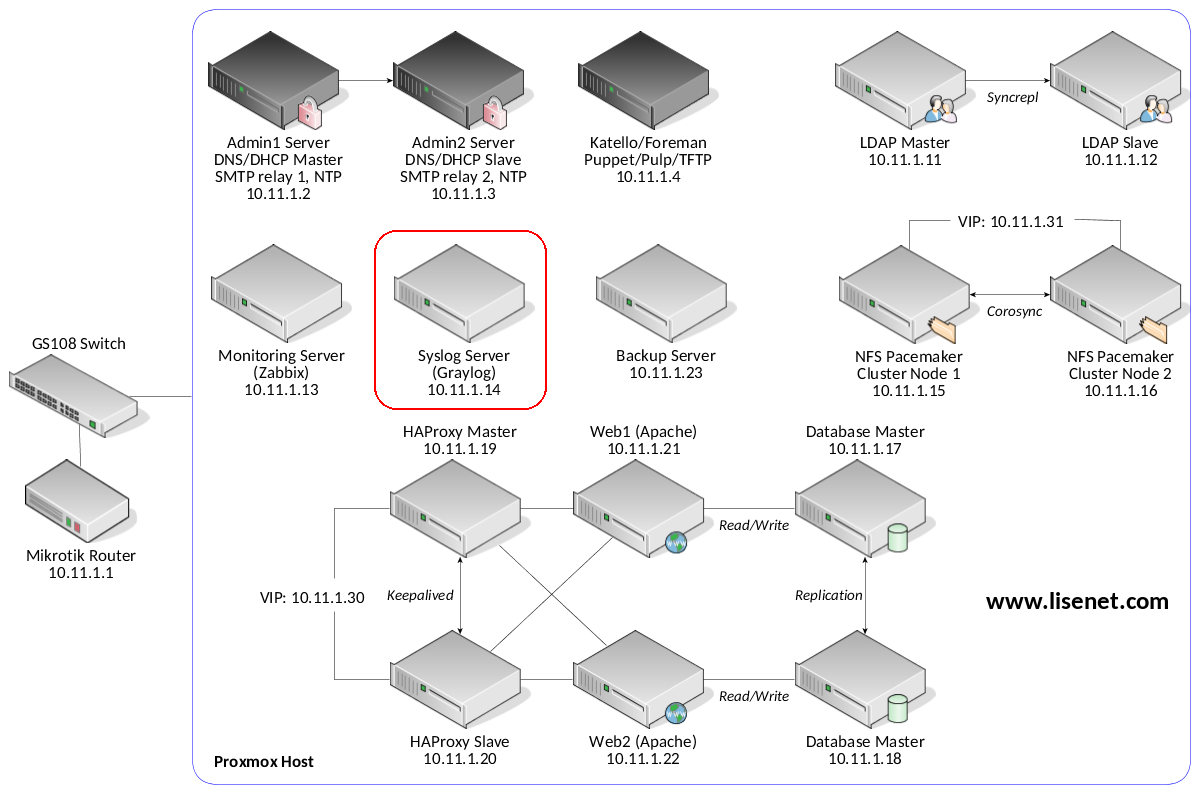
syslog.hl.local (10.11.1.14) – Graylog/Elasticsearch/MongoDB with Apache frontend

SELinux set to enforcing mode.

See the image below to identify the homelab part this article applies to.

Configuration with Puppet

Puppet master runs on the Katello server.

Puppet Modules

We use graylog-graylog Puppet module to configure the server. The module only manages Graylog itself. We need other modules to install the required dependencies like Java, MongoDB, Elasticsearch and Apache (as a reverse proxy):

  1. puppetlabs-java
  2. elastic-elasticsearch
  3. puppet-mongodb
  4. puppetlabs-apache
  5. saz-rsyslog

Please see each module’s documentation for features supported and configuration options available.

Katello Repositories

Repositories for Graylog, Elasticsearch and MongoDB are provided by Katello (we configured them here).

Note that Graylog 2.4 does not work with Elasticsearch 6.x, we’ll therefore use Elasticsearch 5.x.

Install MongoDB

class { ‘mongodb::globals’:
## Use Katello repository
manage_package_repo => false,
}->
class { ‘mongodb::server’:
ensure => ‘present’,
restart => true,
bind_ip => [‘127.0.0.1’],
port => 27017,
smallfiles => true,
}

Install Elasticsearch

class { ‘elasticsearch’:
ensure => ‘present’,
status => ‘enabled’,
## Use Katello repository
manage_repo => false,
restart_on_change => true,
}->
elasticsearch::instance { ‘graylog’:
config => {
‘cluster.name’ => ‘graylog’,
‘network.host’ => ‘127.0.0.1’,
},
jvm_options => [
‘-Xms512m’,
‘-Xmx512m’
]
}

Install Java and Graylog

include ::java

class { ‘graylog::server’:
enable => true,
ensure => ‘running’,
config => {
‘is_master’ => true,
‘password_secret’ => ‘3jC93bTD…OS7F7H87O’,
‘root_password_sha2’ => ‘008e3a245354b…f0d9913325f26b’,
‘web_enable’ => true,
‘web_listen_uri’ => ‘http://syslog.hl.local:9000/’,
‘rest_listen_uri’ => ‘http://syslog.hl.local:9000/api/’,
‘rest_transport_uri’ => ‘http://syslog.hl.local:9000/api/’,
‘root_timezone’ => ‘GMT’,
}
}->
##
## Use a script to automatically create
## UDP Syslog/GELF inputs via Graylog API.
##

file { ‘/root/syslog_inputs.sh’:
ensure => file,
source => ‘puppet:///homelab_files/syslog_inputs.sh’,
owner => ‘0’,
group => ‘0’,
mode => ‘0700’,
notify => Exec[‘create_syslog_inputs’],
}
exec {‘create_syslog_inputs’:
command => ‘/root/syslog_inputs.sh’,
refreshonly => true,
}

The content of the file syslog_inputs.sh can be seen below.

We create two Graylog inputs, one for syslog to bind to UDP 1514, and one for GELF. See the section below for port redirection from UDP 514 to UDP 1514 as Graylog cannot bind to UDP 514 unless run as root.

#!/bin/bash
GRAYLOG_URL=”http://admin:[email protected]:9000/api/system/inputs”;

GRAYLOG_INPUT_SYSLOG_UDP=’
{
“global”: “true”,
“title”: “Syslog UDP”,
“configuration”: {
“port”: 1514,
“bind_address”: “0.0.0.0”
},
“type”: “org.graylog2.inputs.syslog.udp.SyslogUDPInput”
}’;

GRAYLOG_INPUT_GELF_UDP=’
{
“global”: “true”,
“title”: “Gelf UDP”,
“configuration”: {
“port”: 12201,
“bind_address”: “0.0.0.0”
},
“type”: “org.graylog2.inputs.gelf.udp.GELFUDPInput”
}’;

curl -s -X POST -H “Content-Type: application/json” -d “$” $ >/dev/null;

exit 0;

Configure Firewall

Configure firewall to allow WebUI, syslog and GELF traffic. Also configure port redirection as Graylog cannot bind to UDP 514 unless run as root.

firewall { ‘007 allow Graylog HTTP/S’:
dport => [80, 443, 9000],
source => ‘10.11.1.0/24’,
proto => tcp,
action => accept,
}->
firewall { ‘008 allow Syslog’:
dport => [‘514’, ‘1514’],
source => ‘10.11.1.0/24’,
proto => udp,
action => accept,
}->
firewall { ‘009 redirect Syslog 514 to Graylog 1514’:
chain => ‘PREROUTING’,
jump => ‘REDIRECT’,
proto => ‘udp’,
dport => ‘514’,
toports => ‘1514’,
table => ‘nat’,
}->
firewall { ‘010 allow Gelf’:
dport => [‘12201’],
source => ‘10.11.1.0/24’,
proto => udp,
action => accept,
}

Apache Reverse Proxy with TLS

Install Apache as a reverse proxy for Graylog.

class { ‘apache’:
default_vhost => false,
default_ssl_vhost => false,
default_mods => false,
mpm_module => ‘prefork’,
server_signature => ‘Off’,
server_tokens => ‘Prod’,
trace_enable => ‘Off’,
}
include apache::mod::proxy
include apache::mod::proxy_http
include apache::mod::rewrite
include apache::mod::ssl
include apache::mod::headers

apache::vhost { ‘graylog_http’:
port => 80,
servername => ‘syslog.hl.local’,
rewrites => [
{ rewrite_rule => [‘(.*) https://%%’],
rewrite_cond => [‘% off’],
},
],
docroot => false,
manage_docroot => false,
suphp_engine => ‘off’,
}
apache::vhost { ‘graylog_https’:
port => 443,
servername => ‘syslog.hl.local’,
docroot => false,
manage_docroot => false,
suphp_engine => ‘off’,
ssl => true,
ssl_cert => ‘/etc/pki/tls/certs/hl.crt’,
ssl_key => ‘/etc/pki/tls/private/hl.key’,
ssl_protocol => [‘all’, ‘-SSLv2’, ‘-SSLv3’],
ssl_cipher => ‘HIGH:!aNULL!MD5:!RC4’,
ssl_honorcipherorder => ‘On’,
## Pass a string of custom configuration directives
custom_fragment => ‘
ProxyRequests Off
<Proxy *>
Require ip 10.11.1.0/24
</Proxy>
<Location />
RequestHeader set X-Graylog-Server-URL “https://syslog.hl.local/api/”
ProxyPass http://syslog.hl.local:9000/
ProxyPassReverse http://syslog.hl.local:9000/
</Location>
‘,
}

Configure Log Forwarding on All Servers

We want to configure all homelab servers to forward syslog to Graylog.

This needs to go in to the main environment manifest file /etc/puppetlabs/code/environments/homelab/manifests/site.pp so that configuration is applied to all servers.

class { ‘rsyslog::client’:
log_remote => true,
log_local => true,
remote_servers => false,
server => ‘syslog.hl.local’,
port => ‘1514’,
remote_type => ‘udp’,
remote_forward_format => ‘RSYSLOG_SyslogProtocol23Format’,
}

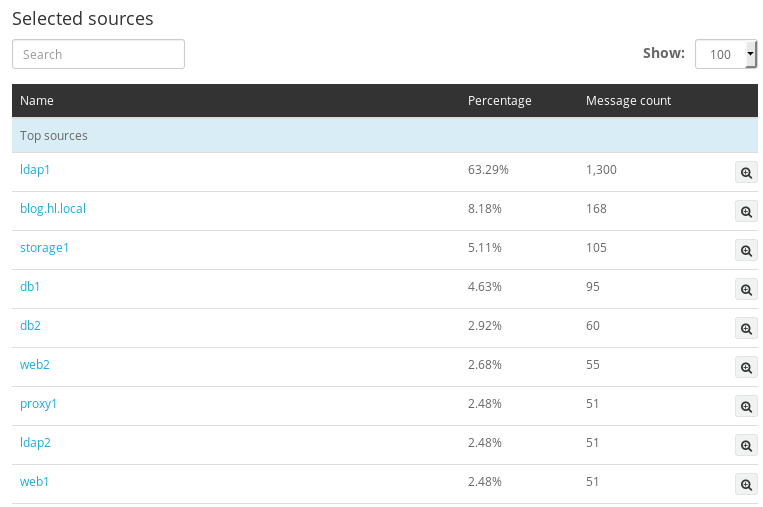
The result should be something like this:

All servers forward logs to Graylog.

Source

Your next Linux computer? A Samsung mobile phone — The Ultimate Linux Newbie Guide

The Samsung DeX Dock with the Samsung S8 will shortly be able to run stock Linux distributions.The Samsung DeX Dock with the Samsung S8 will shortly be able to run stock Linux distributions.

Yep, you can soon use a Samsung Mobile phone as a fully fledged Linux PC running Ubuntu. Sit it on the Samsung Dock, which is attached to a monitor, keyboard and mouse and et voila!

Samsung say it’s aimed at developers, but there’s no reason why it shouldn’t be suitable for general use. It’ll run Ubuntu. Samsung released this information at its developer conference in San Francisco last week. The new app called “Linux on Galaxy” works best when paired with a DeX station. Apparently it can run on a range of smartphones compatible with the DeX station, including the Samsung Galaxy S8, S8 Plus, or the latest Note 8.

If you want to sign up to receive a notification from Samsung when the project goes live, visit this link: https://seap.samsung.com/linux-on-galaxy

NB: This isn’t the first time Linux has been available in a similar setup. Recently, we covered how to run Linux on your Android phone with or without root access. From there, you can mirror/cast your mobile screen to a TV or monitor with HDMI, and use a bluetooth keyboard and mouse. Here’s a video demonstration of how to do that:

Source

Microsoft Offers its Patent Portfolio » Linux Magazine

The company ends its long war; vows to protect Linux.

In a surprise and historical move Microsoft has released its entire patent portfolio to Open Innovation Network (OIN) by joining the organization. Microsoft has released all 60,000 patents to OIN.

“We bring a valuable and deep portfolio of over 60,000 issued patents to OIN for the benefit of Linux and other open source technologies,” said Erich Andersen Corporate Vice President, Deputy General Counsel.

These patents also include those 235 patents that Microsoft once claimed were infringed upon by the Linux kernel. Linus Torvalds had dismissed those claims stating, “Microsoft just made up the number.”

It’s a major u-turn for Microsoft, which has a history of exploiting patents as a weapon against Linux players. This move brings an end to the long hostility between Linux and Microsoft.

There are more than 2,650 members, including numerous Fortune 500 enterprises, that make OIN the largest patent non-aggression community.

OIN has created a massive pool of patents affecting Linux and open source projects. The organization offers these patents on a royalty-free basis to member organizations. Companies not yet member of OIN can also tap into its pool of patents if they promise not to assert its patents against the Linux system.

Back in 2005, OIN was created by a group of companies with vested interests in open source. The goal was to fend off any patent attacks on open source companies. Founding members included IBM, NEC, SUSE/Novell, Philips, Red Hat, and Sony.

Microsoft has around 90,000 patents, but over 30,000 as still pending with the US Patent Office. Once those patents are approved, they will also become part of OIN pool.

Source

Debian 8.8 LXDE Desktop Installation on Oracle VirtualBox

Debian 8.8 LXDE Desktop Installation on VirtualBox
Debian 8.8 LXDE Desktop Installation on Oracle VirtualBox

This video tutorial shows

Debian 8.8 LXDE Desktop installation

on Oracle

VirtualBox

step by step. This tutorial is also helpful to install Debian 8.8 on physical computer or laptop hardware. We also install

Guest Additions

on Debian 8.8 LXDE for better performance and usability features: Automatic Resizing Guest Display, Shared Folder, Seamless Mode and Shared Clipboard, Improved Performance and Drag and Drop.

Debian 8.8 LXDE Desktop Installation Steps:

  1. Create Virtual Machine on Oracle VirtualBox
  2. Start Debian 8.8 LXDE Desktop Installation
  3. Install Guest Additions
  4. Test Guest Additions Features: Automatic Resizing Guest Display and Shared Clipboard

Installing Debian 8.8 LXDE on Oracle VirtualBox


Debian 8.8 New Features and Improvements

Debian 8.8

mainly adds corrections for security problems to the stable release, along with a few adjustments for serious problems. Security advisories were already published separately and are referenced where available. Those who frequently install updates from security.debian.org won’t have to update many packages and most updates from security.debian.org are included in this update. Debian 8.8 is not a new version of Debian. It’s just a Debian 8 image with the latest updates of some of the packages. So, if you’re running a Debian 8 installation with all the latest updates installed, you don’t need to do anything.

Debian Website:

https://www.debian.org/

What is LXDE Desktop?

LXDE, which stands for Lightweight X11 Desktop Environment, is a desktop environment which is lightweight and fast. It is designed to be user friendly and slim, while keeping the resource usage low. LXDE uses less RAM and less CPU while being a feature rich desktop environment. Unlike other tightly integrated desktops LXDE strives to be modular, so each component can be used independently with few dependencies. This makes porting LXDE to different distributions and platforms easier.

LXDE Website:

http://lxde.org/

Hope you found this Debian 8.8 LXDE Desktop installation on Oracle VirtualBox tutorial helpful and informative. Please consider sharing it. Your feedback and questions are welcome!

Source

Linux Today – DMARC Email Security Adoption Soars as US Government Deadline Hits

Oct 16, 2018, 23:00 (0 Talkback[s])

(Other stories by Sean Michael Kerner)

The U.S. government has advanced email security significantly over the course of the past year, thanks to the adoption of the Domain-based Message Authentication, Reporting and Conformance (DMARC) email security protocols.

As of Oct. 16, a large set of U.S. federal government agencies are required to be compliant with the Department of Homeland Security (DHS) 18-01 binding operational directive (BOD), which mandates the use of DMARC. The directive was issued in October 2017, giving agencies a year to incrementally implement the new email security approach.

Complete Story

Related Stories:

Source

Arch Linux – News: mesa with libglvnd support is now in testing

mesa-17.0.0-3 can now be installed side-by-side with nvidia-378.13 driver without any libgl/libglx hacks, and with the help of Fedora and upstream xorg-server patches.

  • First step was to remove the libglx symlinks with xorg-server-1.19.1-3 and associated mesa/nvidia drivers through the removal of various libgl packages. It was a tough moment because it was breaking optimus system, xorg-server configuration needs manual updating.
  • The second step is now here, with an updated 10-nvidia-drm-outputclass.conf file that should help to have an “out-of-the-box” working xorg-server experience with optimus system.

Please test this extensively and post your feedback in this forum thread or in our bugtracker.

Source

Linux vs. Windows | Linux Hint

Despite it being 2018, there is still a common misconception related to Linux; that Linux is mainly utilized for people who want better access to their operating system. While that is most certainly true, there are many reasons why Linux also stands out as a better operating system than Windows.

Furthermore, Windows has strategically placed itself as the go-to OS in the world and most devices have partnered with them and are providing Windows as their default OS. This highlights the problems of users being forced to use something.

However, there are always options. To make up your mind, today we will discuss the top 5 reasons why Linux is a better operating system than Windows.

First and foremost, the major difference between both operating systems is that Linux is free whereas Windows is not. For those interested in premium quality, Linux is the go-to solution irrespective of the fact whether they want to utilize their OS as a desktop or a server.

In addition to that, the related applications are also completely free and open source. This is a massive difference when drawing a comparison with Windows. Although Windows does provide the flexibility of installing free software – they are generally cracked meaning that they are an illegal copy of the original software.

This also raises a key point of security, which Linux deals with swiftly. On the other hand, Windows is prone to security threats and other Trojans; this also eliminates the need for an anti-virus in Linux-based systems.

For those looking for a free and a safer option, Linux is the obvious answer.

2. Compatible with Lower-end Hardware

To improve the user experience, Windows put a minimum hardware requirement which limits users who own a lower tier device. The newer version of Windows, such as 7, 8 and 10 require at least 1GB RAM. The Windows experience on devices, which barely meet the minimum requirement, is rather poor; the devices experience awfully slow performance along with auto shutdown of the devices.

Similarly, older generation laptops have aging components and since Linux consumes fewer system resources (RAM, disk space etc), it makes Linux the ideal operating system for those devices.

With the introduction of simpler distros like Ubuntu and Elementary OS, users migrating from Windows can enjoy similar but simpler graphical user-friendliness. This acts as an added incentive as to why users should opt for Linux.

3. No need for drivers anymore:

If you have ever used a Windows device for an extensive period of time, then you are automatically aware of the struggle of finding drivers for the device itself and for other devices you want to connect for example a printer.

With Linux, users don’t have to worry about additional drivers as most of them are supported directly by the Linux kernel; this implies that most devices are plug and play for Linux, which is a huge advantage for consumers.

This alone can be a reason to switch to Linux as the annoyance of having to deal with finding the right drivers and making them work with the particular model of the device you have.

4. Reliability is Key!

How often have you ended up pressing the Ctrl-Alt-Del combination on Windows? Probably enough times to lose count. This is one of the biggest drawbacks of Windows operating system that applications often face issues while launching, often aggravated due to device’s limitations.

However, with Linux, users experience unparalleled up-time. The operating system provides built-in security which helps keep the system secure from all the harm which might be caused later on.

Traditionally, Unix-like systems are renowned for running without registering a single issue or failure which demands a restart; this is a key aspect to consider when choosing a server system. This is why most servers in the modern world are running Linux.

5. Massive Community Support

The best thing about being a Linux user is perhaps that you will never feel alone if an issue arises. Apart from a handful of forums, you can drop by any forum with your problems; either you will find a solution right away or someone will always try to help you out since the community members are very active.

There is no doubt that every operating system has its pros and cons. However, Linux has many reasons to be picked over Windows OS. Linux provides flexibility and good control over everything whereas those things are limited in Windows OS. The number of flavors it provides can cater to the needs of various users; be it a graphic designer, programmer or a content writer.

What do you think about our list? If you are an avid user of Linux let us know what you like most about the OS and how it compares with Windows OS?

Source

WP2Social Auto Publish Powered By : XYZScripts.com