We’re going to use Puppet to install MySQL and configure Master/Master replication.
This article is part of the Homelab Project with KVM, Katello and Puppet series.
Homelab
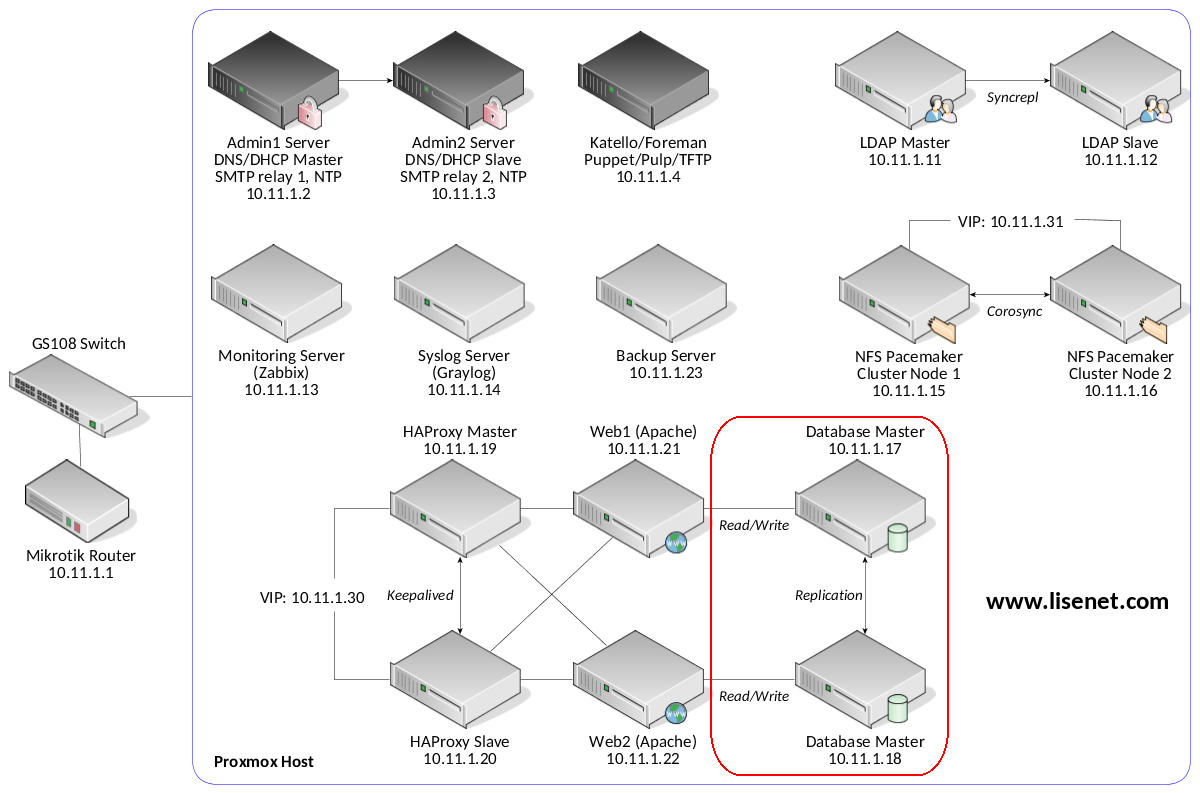
We have two CentOS 7 servers installed which we want to configure as follows:
db1.hl.local (10.11.1.17) – will be configured as a MySQL master
db2.hl.local (10.11.1.18) – will be configured as a MySQL master
SELinux set to enforcing mode.
See the image below to identify the homelab part this article applies to.
Configuration with Puppet
Puppet master runs on the Katello server.
Puppet Modules
We use puppetlabs-mysql Puppet module to configure the server.
Please see the module documentation for features supported and configuration options available.
Katello Repositories
MySQL repository is provided by Katello (we configured them here).
Configure Firewall
It is essential to ensure that MySQL servers can talk to each other. The following needs applying to both MySQL masters:
firewall { ‘007 allow MySQL’:
dport => [3306],
source => ‘10.11.1.0/24’,
proto => tcp,
action => accept,
}
This will also allow Apache connections to the database.
Configure MySQL Master on db1.hl.local
Nothing groundbreaking here really, but note the auto-increment-offset. This is to help prevent the situation where two queries insert data at the same time in the same database and the same table on both servers db1 and db2, and different entries end up with the same id.
class { ‘mysql::server’:
package_name => ‘mysql-community-server’,
service_name => ‘mysqld’,
root_password => ‘PleaseChangeMe’,
create_root_my_cnf => true,
manage_config_file => true,
config_file => ‘/etc/my.cnf’,
purge_conf_dir => true,
restart => true,
override_options => {
mysqld => {
bind-address => ‘0.0.0.0’,
datadir => ‘/var/lib/mysql’,
log-error => ‘/var/log/mysqld.log’,
pid-file => ‘/var/run/mysqld/mysqld.pid’,
wait_timeout => ‘600’,
interactive_timeout => ‘600’,
server-id => ‘1’,
log-bin => ‘mysql-bin’,
relay-log => ‘mysql-relay-log’,
auto-increment-offset => ‘1’,
auto-increment-increment => ‘2’,
},
mysqld_safe => {
log-error => ‘/var/log/mysqld.log’,
},
},
remove_default_accounts => true,
}->
## MySQL admin user who can connect remotely
mysql_user { ‘[email protected]%’:
ensure => ‘present’,
password_hash => mysql_password(‘PleaseChangeMe’),
}->
mysql_grant { ‘[email protected]%/*.*’:
ensure => ‘present’,
options => [‘GRANT’],
privileges => [‘ALL’],
table => ‘*.*’,
user => ‘[email protected]%’,
}->
## MySQL user for replication
mysql_user { ‘[email protected]%’:
ensure => ‘present’,
password_hash => mysql_password(‘PleaseChangeMe’),
}->
mysql_grant { ‘[email protected]%/*.*’:
ensure => ‘present’,
privileges => [‘REPLICATION SLAVE’],
table => ‘*.*’,
user => ‘[email protected]%’,
}
Configure MySQL Master on db2.hl.local
Configuration of the second server is almost identical to the first one with two exceptions: server-id and auto-increment-offset.
class { ‘mysql::server’:
package_name => ‘mysql-community-server’,
service_name => ‘mysqld’,
root_password => ‘PleaseChangeMe’,
create_root_my_cnf => true,
manage_config_file => true,
config_file => ‘/etc/my.cnf’,
purge_conf_dir => true,
restart => true,
override_options => {
mysqld => {
bind-address => ‘0.0.0.0’,
datadir => ‘/var/lib/mysql’,
log-error => ‘/var/log/mysqld.log’,
pid-file => ‘/var/run/mysqld/mysqld.pid’,
wait_timeout => ‘600’,
interactive_timeout => ‘600’,
server-id => ‘2’,
log-bin => ‘mysql-bin’,
relay-log => ‘mysql-relay-log’,
auto-increment-offset => ‘2’,
auto-increment-increment => ‘2’,
},
mysqld_safe => {
log-error => ‘/var/log/mysqld.log’,
},
},
remove_default_accounts => true,
}->
## MySQL admin user who can connect remotely
mysql_user { ‘[email protected]%’:
ensure => ‘present’,
password_hash => mysql_password(‘PleaseChangeMe’),
}->
mysql_grant { ‘[email protected]%/*.*’:
ensure => ‘present’,
options => [‘GRANT’],
privileges => [‘ALL’],
table => ‘*.*’,
user => ‘[email protected]%’,
}->
## MySQL user for replication
mysql_user { ‘[email protected]%’:
ensure => ‘present’,
password_hash => mysql_password(‘PleaseChangeMe’),
}->
mysql_grant { ‘[email protected]%/*.*’:
ensure => ‘present’,
privileges => [‘REPLICATION SLAVE’],
table => ‘*.*’,
user => ‘[email protected]%’,
}
Configure Master/Master Replication
The easy part is complete, and we should have our MySQL nodes provisioned at this stage.
We don’t have any databases created yet, therefore at this point there isn’t much we want to sync between the two servers.
Let us go ahead and put the steps required to configure MySQL replication manually into a Bash script start_mysql_repl.sh. Note that the script is a quick and dirty way of getting MySQL replication working, but it’s not the right approach.
Ideally we should use a Puppet template with parameters, so that we can provide values for them by passing a parameter hash to a function and wouldn’t have to hardcode hostnames, usernames etc.
#!/bin/bash
#
# Author: Tomas at www.lisenet.com
# Configure MySQL Replication with Puppet
#
# Variables below must match with the ones
# defined in the Puppet manifest
#
master1_host=”db1.hl.local”;
master2_host=”db2.hl.local”;
repl_user=”dbrepl”;
repl_pass=”PleaseChangeMe”;
db_user=”dbadmin”;
db_pass=”PleaseChangeMe”;
master1_status=”/tmp/master1.status”;
master2_status=”/tmp/master2.status”;
if ! [ -f “/root/.replication1.done” ];then
mysql -h”$master1_host” -u”$db_user” -p”$db_pass” -ANe “SHOW MASTER STATUS;”|awk ” >”$master1_status” &&
log_file=$(cut -d” ” -f1 “$master1_status”) &&
log_pos=$(cut -d” ” -f2 “$master1_status”) &&
mysql -h”$master2_host” -u”$db_user” -p”$db_pass” “$master2_status” &&
log_file=$(cut -d” ” -f1 “$master2_status”) &&
log_pos=$(cut -d” ” -f2 “$master2_status”) &&
mysql -h”$master1_host” -u”$db_user” -p”$db_pass”
Note: there are no spaces between in front of EOSQL. WordPress does funny things with formatting sometimes.
The script configures master host db1.hl.local as a slave for master host db2.hl.local.
The script also configures master host db2.hl.local as a slave for master host db1.hl.local.
Apply the following Puppet configuration to the server db1.hl.local (it must not be applied to the second server).
Note how we deploy the script, configure replication and then create a database. The name of the database is “blog”, mostly because of the fact that we’ll be using it for WordPress.
file { ‘/root/start_mysql_repl.sh’:
ensure => ‘file’,
source => ‘puppet:///homelab_files/start_mysql_repl.sh’,
owner => ‘0’,
group => ‘0’,
mode => ‘0700’,
notify => Exec[‘configure_replication’],
}
exec { ‘configure_replication’:
command => ‘/root/start_mysql_repl.sh’,
path => ‘/usr/bin:/usr/sbin:/bin:/sbin’,
provider => shell,
unless => [‘test -f /root/.replication1.done’, ‘test -f /root/.replication2.done’],
notify => Exec[‘create_database’],
}
## We want to create the database after
## the replication has been established
exec { ‘create_database’:
command => ‘mysql –defaults-file=/root/.my.cnf -e “DROP DATABASE IF EXISTS blog; CREATE DATABASE blog; GRANT ALL PRIVILEGES ON blog.* TO ‘dbuser1’@’10.11.1.%’ IDENTIFIED BY ‘PleaseChangeMe’; FLUSH PRIVILEGES;”‘,
path => ‘/usr/bin:/usr/sbin:/bin:/sbin’,
provider => shell,
refreshonly => true,
notify => Exec[‘import_database’],
}
## We want to import the database from a dump file
exec { ‘import_database’:
command => ‘mysql –defaults-file=/root/.my.cnf blog ‘/usr/bin:/usr/sbin:/bin:/sbin’,
provider => shell,
onlyif => [‘test -f /root/blog.sql’],
refreshonly => true,
}
file { ‘/root/blog.sql’:
ensure => file,
source => ‘puppet:///homelab_files/blog.sql’,
owner => ‘0’,
group => ‘0’,
mode => ‘0600’,
}
The database import part restores the content of our WordPress database. Because the import is performed after the replication has been established, the database is available on both MySQL masters.
Source