We’re going to use Puppet to install Pacemaker/Corosync and configure an NFS cluster.
For instructions on how to compile fence_pve on CentOS 7, scroll to the bottom of the page.
This article is part of the Homelab Project with KVM, Katello and Puppet series.
Homelab
We have two CentOS 7 servers installed which we want to configure as follows:
storage1.hl.local (10.11.1.15) – Pacemaker cluster node
storage2.hl.local (10.11.1.16) – Pacemaker cluster node
SELinux set to enforcing mode.
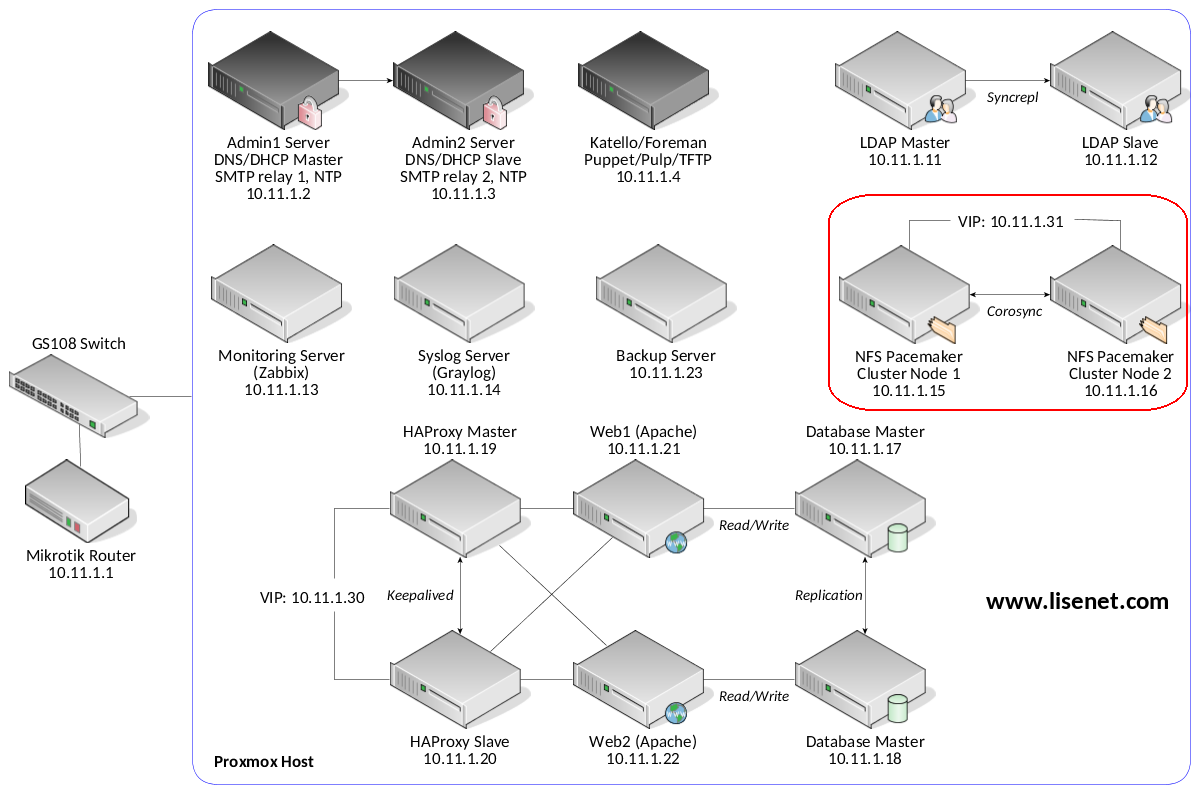
See the image below to identify the homelab part this article applies to.
Cluster Requirements
To configure the cluster, we are going to need the following:
- A virtual IP address, required for the NFS server.
- Shared storage for the NFS nodes in the cluster.
- A power fencing device for each node of the cluster.
The virtual IP is 10.11.1.31 (with the DNS name of nfsvip.hl.local).
With regards to shared storage, while I agree that iSCSI would be ideal, the truth is that “we don’t have that kind of money“. We will have to make it with a shared disk among different VMs on same Proxmox host.
In terms of fencing, as mentioned earlier, Proxmox does not use libvirt, therefore Pacemaker clusters cannot be fenced by using fence-agents-virsh. There is fence_pve available, but we won’t find it in CentOS/RHEL. We’ll need to compile it from source.
Proxmox and Disk Sharing
I was unable to find a WebUI way to add an existing disk to another VM. Proxmox forum was somewhat helpful, and I ended up manually editing the VM’s config file since the WebUI would not let me assign the same disk to two VMs.
Take a look at the following image, showing two disks attached to the storage1.hl.local node:
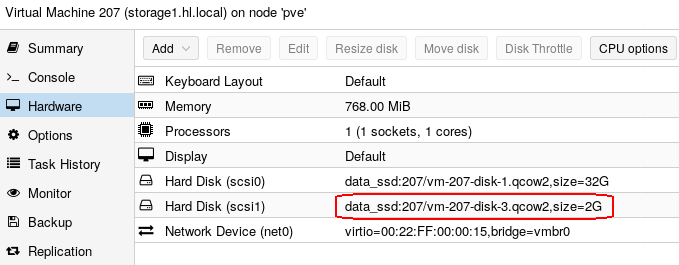
We want to use the smaller (2GB) disk for NFS.
The VM ID of the storage2.hl.local node is 208 (see here), therefore we can add the disk by editing the node’s configuration file.
# cat /etc/pve/qemu-server/208.conf
boot: cn
bootdisk: scsi0
cores: 1
hotplug: disk,cpu
memory: 768
name: storage2.hl.local
net0: virtio=00:22:FF:00:00:16,bridge=vmbr0
onboot: 1
ostype: l26
scsi0: data_ssd:208/vm-208-disk-1.qcow2,size=32G
scsi1: data_ssd:207/vm-207-disk-3.qcow2,size=2G
scsihw: virtio-scsi-pci
smbios1: uuid=030e28da-72e6-412d-be77-a79f06862351
sockets: 1
startup: order=208
The disk that we’ve added is scsi1. Note how it references the VM ID 207.
The disk will be visible on both nodes as /dev/disk/by-id/scsi-0QEMU_QEMU_HARDDISK_drive-scsi1.
Configuration with Puppet
Puppet master runs on the Katello server.
Puppet Modules
We use puppet-corosync Puppet module to configure the server. We also use puppetlabs-accounts for Linux account creation.
Please see the module documentation for features supported and configuration options available.
Configure Firewall
It is essential to ensure that Pacemaker servers can talk to each other. The following needs applying to both cluster nodes:
firewall { ‘007 accept HA cluster requests’:
dport => [‘2224’, ‘3121’, ‘5403’, ‘21064’],
proto => ‘tcp’,
source => ‘10.11.1.0/24’,
action => ‘accept’,
}->
firewall { ‘008 accept HA cluster requests’:
dport => [‘5404’, ‘5405’],
proto => ‘udp’,
source => ‘10.11.1.0/24’,
action => ‘accept’,
}->
firewall { ‘009 accept NFS requests’:
dport => [‘2049’],
proto => ‘tcp’,
source => ‘10.11.1.0/24’,
action => ‘accept’,
}->
firewall { ‘010 accept TCP mountd requests’:
dport => [‘20048’],
proto => ‘tcp’,
source => ‘10.11.1.0/24’,
action => ‘accept’,
}->
firewall { ‘011 accept UDP mountd requests’:
dport => [‘20048’],
proto => ‘udp’,
source => ‘10.11.1.0/24’,
action => ‘accept’,
}->
firewall { ‘012 accept TCP rpc-bind requests’:
dport => [‘111’],
proto => ‘tcp’,
source => ‘10.11.1.0/24’,
action => ‘accept’,
}->
firewall { ‘013 accept UDP rpc-bind requests’:
dport => [‘111’],
proto => ‘udp’,
source => ‘10.11.1.0/24’,
action => ‘accept’,
}
Create Apache User and NFS Mountpoint
Before we configure the cluster, we need to make sure that we have the nfs-utils package installed and that the nfs-lock service is disabled – it will be managed by pacemaker.
The Apache user is created in order to match ownership and allow web servers to write to the NFS share.
The following needs applying to both cluster nodes:
package { ‘nfs-utils’: ensure => ‘installed’ }->
service { ‘nfs-lock’: enable => false }->
accounts::user { ‘apache’:
comment => ‘Apache’,
uid => ’48’,
gid => ’48’,
shell => ‘/sbin/nologin’,
password => ‘!!’,
home => ‘/usr/share/httpd’,
home_mode => ‘0755’,
locked => false,
}->
file {‘/nfsshare’:
ensure => ‘directory’,
owner => ‘root’,
group => ‘root’,
mode => ‘0755’,
}
Configure Pacemaker/Corosync on storage1.hl.local
We disable STONITH initially because the fencing agent fence_pve is simply not available yet. We will compile it later, however, it’s not required in order to get the cluster into an operational state.
We use colocations to keep primitives together. While colocation defines that a set of primitives must live together on the same node, order definitions will define the order of which each primitive is started. This is importat, as we want to make sure that we start cluster resources in the correct order.
Note how we configure NFS exports to be available to two specific clients only: web1.hl.local and web2.hl.local. In reality there is no need for any other homelab server to have access to the NFS share.
We make the apache user the owner of the NFS share, and export it with no_all_squash.
class { ‘corosync’:
authkey => ‘/etc/puppetlabs/puppet/ssl/certs/ca.pem’,
bind_address => $::ipaddress,
cluster_name => ‘nfs_cluster’,
enable_secauth => true,
enable_corosync_service => true,
enable_pacemaker_service => true,
set_votequorum => true,
quorum_members => [ ‘storage1.hl.local’, ‘storage2.hl.local’ ],
}
corosync::service { ‘pacemaker’:
## See: https://wiki.clusterlabs.org/wiki/Pacemaker
version => ‘1.1’,
}->
cs_property { ‘stonith-enabled’:
value => ‘false’,
}->
cs_property { ‘no-quorum-policy’:
value => ‘ignore’,
}->
cs_primitive { ‘nfsshare’:
primitive_class => ‘ocf’,
primitive_type => ‘Filesystem’,
provided_by => ‘heartbeat’,
parameters => { ‘device’ => ‘/dev/disk/by-id/scsi-0QEMU_QEMU_HARDDISK_drive-scsi1’, ‘directory’ => ‘/nfsshare’, ‘fstype’ => ‘ext4’ },
}->
cs_primitive { ‘nfsd’:
primitive_class => ‘ocf’,
primitive_type => ‘nfsserver’,
provided_by => ‘heartbeat’,
parameters => { ‘nfs_shared_infodir’ => ‘/nfsshare/nfsinfo’ },
require => Cs_primitive[‘nfsshare’],
}->
cs_primitive { ‘nfsroot1’:
primitive_class => ‘ocf’,
primitive_type => ‘exportfs’,
provided_by => ‘heartbeat’,
parameters => { ‘clientspec’ => ‘web1.hl.local’, ‘options’ => ‘rw,async,no_root_squash,no_all_squash’, ‘directory’ => ‘/nfsshare’, ‘fsid’ => ‘0’ },
require => Cs_primitive[‘nfsd’],
}->
cs_primitive { ‘nfsroot2’:
primitive_class => ‘ocf’,
primitive_type => ‘exportfs’,
provided_by => ‘heartbeat’,
parameters => { ‘clientspec’ => ‘web2.hl.local’, ‘options’ => ‘rw,async,no_root_squash,no_all_squash’, ‘directory’ => ‘/nfsshare’, ‘fsid’ => ‘0’ },
require => Cs_primitive[‘nfsd’],
}->
cs_primitive { ‘nfsvip’:
primitive_class => ‘ocf’,
primitive_type => ‘IPaddr2’,
provided_by => ‘heartbeat’,
parameters => { ‘ip’ => ‘10.11.1.31’, ‘cidr_netmask’ => ’24’ },
require => Cs_primitive[‘nfsroot1′,’nfsroot2’],
}->
cs_colocation { ‘nfsshare_nfsd_nfsroot_nfsvip’:
primitives => [
[ ‘nfsshare’, ‘nfsd’, ‘nfsroot1’, ‘nfsroot2’, ‘nfsvip’ ],
}->
cs_order { ‘nfsshare_before_nfsd’:
first => ‘nfsshare’,
second => ‘nfsd’,
require => Cs_colocation[‘nfsshare_nfsd_nfsroot_nfsvip’],
}->
cs_order { ‘nfsd_before_nfsroot1’:
first => ‘nfsd’,
second => ‘nfsroot1’,
require => Cs_colocation[‘nfsshare_nfsd_nfsroot_nfsvip’],
}->
cs_order { ‘nfsroot1_before_nfsroot2’:
first => ‘nfsroot1’,
second => ‘nfsroot2’,
require => Cs_colocation[‘nfsshare_nfsd_nfsroot_nfsvip’],
}->
cs_order { ‘nfsroot2_before_nfsvip’:
first => ‘nfsroot2’,
second => ‘nfsvip’,
require => Cs_colocation[‘nfsshare_nfsd_nfsroot_nfsvip’],
}->
file {‘/nfsshare/uploads’:
ensure => ‘directory’,
owner => ‘apache’,
group => ‘root’,
mode => ‘0755’,
}
Configure Pacemaker/Corosync on storage2.hl.local
class { ‘corosync’:
authkey => ‘/etc/puppetlabs/puppet/ssl/certs/ca.pem’,
bind_address => $::ipaddress,
cluster_name => ‘nfs_cluster’,
enable_secauth => true,
enable_corosync_service => true,
enable_pacemaker_service => true,
set_votequorum => true,
quorum_members => [ ‘storage1.hl.local’, ‘storage2.hl.local’ ],
}
corosync::service { ‘pacemaker’:
version => ‘1.1’,
}->
cs_property { ‘stonith-enabled’:
value => ‘false’,
}
Cluster Status
If all went well, we should have our cluster up and running at this point.
[[email protected] ~]# pcs status
Cluster name: nfs_cluster
Stack: corosync
Current DC: storage2.hl.local (version 1.1.16-12.el7_4.8-94ff4df) – partition with quorum
Last updated: Sun Apr 29 17:04:50 2018
Last change: Sun Apr 29 16:56:25 2018 by root via cibadmin on storage1.hl.local
2 nodes configured
5 resources configured
Online: [ storage1.hl.local storage2.hl.local ]
Full list of resources:
nfsshare (ocf::heartbeat:Filesystem): Started storage1.hl.local
nfsd (ocf::heartbeat:nfsserver): Started storage1.hl.local
nfsroot1 (ocf::heartbeat:exportfs): Started storage1.hl.local
nfsroot2 (ocf::heartbeat:exportfs): Started storage1.hl.local
nfsvip (ocf::heartbeat:IPaddr2): Started storage1.hl.local
Daemon Status:
corosync: active/enabled
pacemaker: active/enabled
pcsd: inactive/disabled
[[email protected] ~]# pcs status
Cluster name: nfs_cluster
Stack: corosync
Current DC: storage2.hl.local (version 1.1.16-12.el7_4.8-94ff4df) – partition with quorum
Last updated: Sun Apr 29 17:05:04 2018
Last change: Sun Apr 29 16:56:25 2018 by root via cibadmin on storage1.hl.local
2 nodes configured
5 resources configured
Online: [ storage1.hl.local storage2.hl.local ]
Full list of resources:
nfsshare (ocf::heartbeat:Filesystem): Started storage1.hl.local
nfsd (ocf::heartbeat:nfsserver): Started storage1.hl.local
nfsroot1 (ocf::heartbeat:exportfs): Started storage1.hl.local
nfsroot2 (ocf::heartbeat:exportfs): Started storage1.hl.local
nfsvip (ocf::heartbeat:IPaddr2): Started storage1.hl.local
Daemon Status:
corosync: active/enabled
pacemaker: active/enabled
pcsd: inactive/disabled
Test cluster failover by putting the active node into standby:
[[email protected] ~]# pcs node standby
Services should become available on the other cluster node:
[[email protected] ~]# pcs status
Cluster name: nfs_cluster
Stack: corosync
Current DC: storage2.hl.local (version 1.1.16-12.el7_4.8-94ff4df) – partition with quorum
Last updated: Sun Apr 29 17:06:36 2018
Last change: Sun Apr 29 16:56:25 2018 by root via cibadmin on storage1.hl.local
2 nodes configured
5 resources configured
Node storage1.hl.local: standby
Online: [ storage2.hl.local ]
Full list of resources:
nfsshare (ocf::heartbeat:Filesystem): Started storage2.hl.local
nfsd (ocf::heartbeat:nfsserver): Started storage2.hl.local
nfsroot1 (ocf::heartbeat:exportfs): Started storage2.hl.local
nfsroot2 (ocf::heartbeat:exportfs): Started storage2.hl.local
nfsvip (ocf::heartbeat:IPaddr2): Started storage2.hl.local
Daemon Status:
corosync: active/enabled
pacemaker: active/enabled
pcsd: inactive/disabled
Do showmount on the virtual IP address:
[[email protected] ~]# showmount -e 10.11.1.31
Export list for 10.11.1.31:
/nfsshare web1.hl.local,web2.hl.local
Compile fence_pve on CentOS 7
This is where the automated part ends I’m afraid, however, there is nothing that stops you from putting the manual steps below into a Puppet manifest.
Install Packages
# yum install git gcc make automake autoconf libtool
pexpect python-requests
Download Source and Compile
# git clone https://github.com/ClusterLabs/fence-agents.git
Note the configuration part, we are interested in compiling one fencing agent only, fence_pve.
# cd fence-agents/
# ./autogen.sh
# ./configure –with-agents=pve
# make && make install
Verify:
# fence_pve –version
4.1.1.51-6e6d
Configure Pacemaker to Use fence_pve
Big thanks to Igor Cicimov’s blog post which helped me to get it working with minimal effort.
To test the fencing agent, do the following:
[[email protected] ~]# fence_pve –ip=10.11.1.5 –nodename=pve
[email protected] –password=passwd
–plug=208 –action=off
Where 10.11.1.5 is the IP of the Proxmox hypervisor, pve is the name of the Proxmox node, and the plug is the VM ID. In this case we fenced the storage2.hl.local node.
To configure Pacemaker, we can create two STONITH configurations, one for each node that we want to be able to fence.
[[email protected] ~]# pcs stonith create my_proxmox_fence207 fence_pve
ipaddr=”10.11.1.5″ inet4_only=”true” vmtype=”qemu”
login=”[email protected]” passwd=”passwd”
node_name=”pve” delay=”15″
port=”207″
pcmk_host_check=static-list
pcmk_host_list=”storage1.hl.local”
[[email protected] ~]# pcs stonith create my_proxmox_fence208 fence_pve
ipaddr=”10.11.1.5″ inet4_only=”true” vmtype=”qemu”
login=”[email protected]” passwd=”passwd”
node_name=”pve” delay=”15″
port=”208″
pcmk_host_check=static-list
pcmk_host_list=”storage2.hl.local”
Verify:
[[email protected] ~]# stonith_admin -L
my_proxmox_fence207
my_proxmox_fence208
2 devices found
[[email protected] ~]# pcs status
Cluster name: nfs_cluster
Stack: corosync
Current DC: storage1.hl.local (version 1.1.16-12.el7_4.8-94ff4df) – partition with quorum
Last updated: Sun Apr 29 17:50:59 2018
Last change: Sun Apr 29 17:50:55 2018 by root via cibadmin on storage1.hl.local
2 nodes configured
7 resources configured
Online: [ storage1.hl.local ]
OFFLINE: [ storage2.hl.local ]
Full list of resources:
nfsshare (ocf::heartbeat:Filesystem): Started storage1.hl.local
nfsd (ocf::heartbeat:nfsserver): Started storage1.hl.local
nfsroot1 (ocf::heartbeat:exportfs): Started storage1.hl.local
nfsroot2 (ocf::heartbeat:exportfs): Started storage1.hl.local
nfsvip (ocf::heartbeat:IPaddr2): Started storage1.hl.local
my_proxmox_fence207 (stonith:fence_pve): Started storage1.hl.local
my_proxmox_fence208 (stonith:fence_pve): Started storage1.hl.local
Daemon Status:
corosync: active/enabled
pacemaker: active/enabled
pcsd: inactive/disabled
Note how the storage2.hl.local node is down, because we’ve fenced it.
If you decide to use test configuration, do not forget to stop the Puppet agent on the cluster nodes as it will disable STONITH (we set stonith-enabled to false in the manifest).
For more info, do the following:
# pcs stonith describe fence_pve
This will give you a list of other STONITH options available.
Source