
We’re going to use Puppet to install Apache and WordPress.
This article is part of the Homelab Project with KVM, Katello and Puppet series.
Homelab
We have two CentOS 7 servers installed which we want to configure as follows:
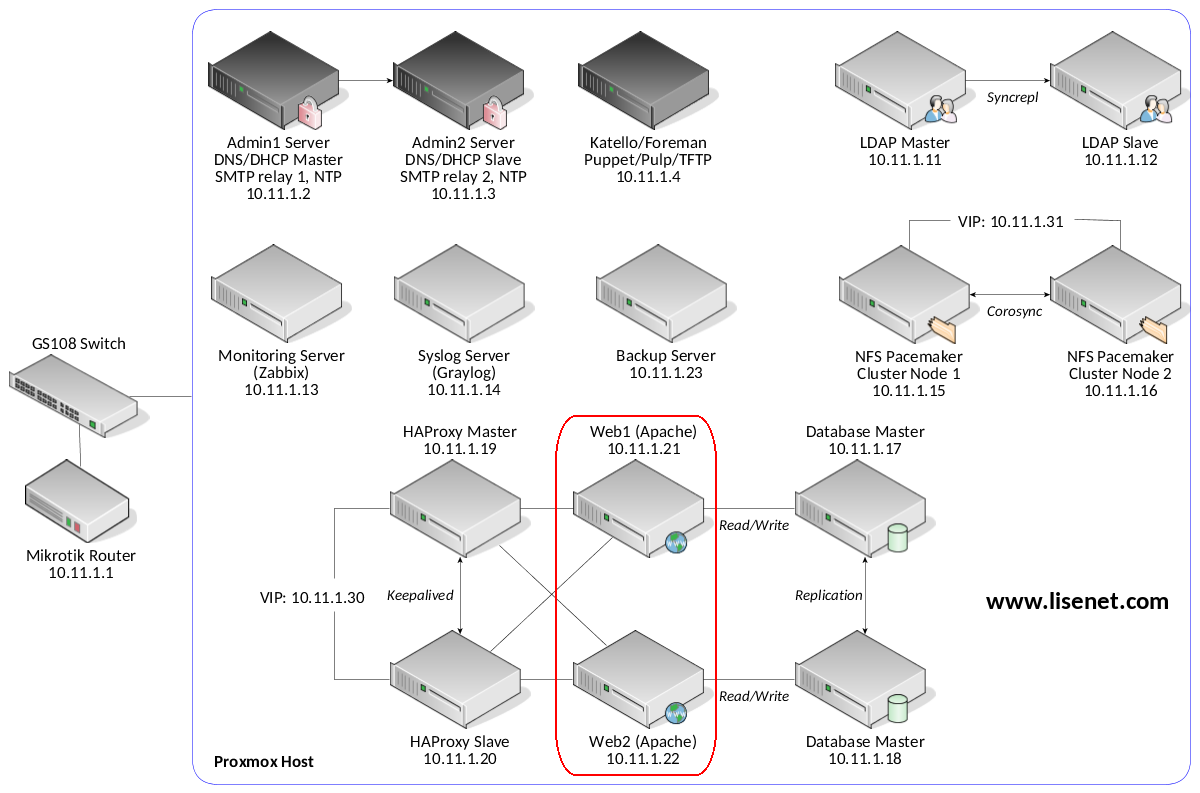
web1.hl.local (10.11.1.21) – Apache server with WordPress and NFS mount
web2.hl.local (10.11.1.22) – Apache server with WordPress and NFS mount
SELinux set to enforcing mode.
See the image below to identify the homelab part this article applies to.
WordPress from a Custom Tarball
We won’t be downloading WordPress from the Internet, but will be using our own custom build (tarball) instead. Each build is source controlled and tested locally prior releasing to the environment.
The name of the tarball is wordpress-latest.tar.gz, and it’s currently stored on the Katello server under /var/www/html/pub/. This allows us to pull the archive from https://katello.hl.local/pub/wordpress-latest.tar.gz.
Note that the file wp-config.php is never stored inside the tarball, but gets generated by Puppet.
Redundand Apache/MySQL Architecture
To increase redundancy, each Apache server will be configured to use a different MySQL database server.
Since our MySQL nodes are configured to use a Master/Master replication, there should, in theory, be no difference in terms of data that’s stored on each VM.
We’ll plug web1.hl.local in to db1.hl.local, and web2.hl.local in to db2.hl.local.
NFS Mount for Uploads
Both Apache servers will need an NFS client configured to mount shared storage.
While users can use either of the Apache servers to upload files, we need to ensure that regardless of the VM they end up on, files across WordPress instances are the same. We could use rsync to solve the problem, but I’m not sure on how well that would scale. Perhaps something to look at in the future.
Configuration with Puppet
Puppet master runs on the Katello server.
Puppet Modules
We use the following Puppet modules:
- derdanne-nfs – to mount an NFS share for WordPress /uploads folder
- puppetlabs-apache – to install and configure Apache
- puppet-selinux – to configure SELinux booleans (e.g. httpd_use_nfs)
- hunner-wordpress – to install WordPress
Please see each module’s documentation for features supported and configuration options available.
Firewall Configuration
Configure both Apache servers to allow HTTPS traffic:
firewall { ‘007 allow HTTPS’:
dport => ‘443’,
source => ‘10.11.1.0/24’,
proto => tcp,
action => accept,
}
There may be an insignificant performance penalty incurred while using encryption between HAProxy and Apache compared to plaintext HTTP, but we want to ensure that traffic is secured. HAProxy can be re-configured to offload TLS if this becomes a problem.
SELinux Booleans
Configure SELinux on both Apache servers. These are required in order to allow Apache to use NFS and connect to a remote MySQL instance. We also want to allow Apache (WordPress) to send email notifications.
selinux::boolean { ‘httpd_use_nfs’:
persistent => true, ensure => ‘on’
}->
selinux::boolean { ‘httpd_can_network_connect_db’:
persistent => true, ensure => ‘on’
}->
selinux::boolean { ‘httpd_can_sendmail’:
persistent => true, ensure => ‘on’
}
Configure NFS Client
This needs to be applied for both Apache servers.
class { ‘::nfs’:
server_enabled => false,
client_enabled => true,
}->
nfs::client::mount { ‘/var/www/html/wp-content/uploads’:
server => ‘nfsvip.hl.local’,
share => ‘/nfsshare/uploads’,
}
The virtual IP (which NFS cluster runs on) is 10.11.1.31, and the DNS name is nfsvip.hl.local. The cluster is configured to export /nfsshare. See here for more info.
Install Apache
This needs to be applied for both Apache servers.
We deploy one Apache virtualhost, and configure log forwarding to Graylog (see the custom_fragment section). I wrote a separate post for how to send Apache logs to Graylog, take a look here if you need more info.
TLS certificates are taken care of by the main Puppet manifest for the environment. See here for more info.
package { ‘php-mysql’:
ensure => ‘installed’
}->
class { ‘apache’:
default_vhost => false,
default_ssl_vhost => false,
default_mods => false,
mpm_module => ‘prefork’,
server_signature => ‘Off’,
server_tokens => ‘Prod’,
trace_enable => ‘Off’,
log_formats => { graylog_access => ‘{ “version”: “1.1”, “host”: “%V”, “short_message”: “%r”, “timestamp”: %{%s}t, “level”: 6, “_user_agent”: “%i”, “_source_ip”: “%h”, “_duration_usec”: %D, “_duration_sec”: %T, “_request_size_byte”: %O, “_http_status_orig”: %s, “_http_status”: %>s, “_http_request_path”: “%U”, “_http_request”: “%U%q”, “_http_method”: “%m”, “_http_referer”: “%i”, “_from_apache”: “true” }’ },
}
include apache::mod::alias
include apache::mod::headers
include apache::mod::php
include apache::mod::rewrite
include apache::mod::ssl
::apache::mod { ‘logio’: }
## Configure VirtualHosts
apache::vhost { ‘blog_https’:
port => 443,
servername => ‘blog.hl.local’,
docroot => ‘/var/www/html’,
manage_docroot => false,
options => [‘FollowSymLinks’,’MultiViews’],
override => ‘All’,
suphp_engine => ‘off’,
ssl => true,
ssl_cert => ‘/etc/pki/tls/certs/hl.crt’,
ssl_key => ‘/etc/pki/tls/private/hl.key’,
ssl_protocol => [‘all’, ‘-SSLv2’, ‘-SSLv3’],
ssl_cipher => ‘HIGH:!aNULL!MD5:!RC4’,
ssl_honorcipherorder => ‘On’,
redirectmatch_status => [‘301’],
redirectmatch_regexp => [‘(.*).gz’],
redirectmatch_dest => [‘/’],
custom_fragment => ‘CustomLog “|/usr/bin/nc -u syslog.hl.local 12201” graylog_access’,
}
Install WordPress from Our Custom Tarball
We want to use our existing MySQL configuration, meaning that we don’t want WordPress creating any databases nor users. The details below are the ones we used when setting up MySQL servers.
The only thing that’s going to different here is the db_host parameter – one Apache server uses db1.hl.local, another one uses db2.hl.local.
class { ‘wordpress’:
db_user => ‘dbuser1’,
db_password => ‘PleaseChangeMe’,
db_name => ‘blog’,
db_host => ‘db1.hl.local’,
create_db => false,
create_db_user => false,
install_dir => ‘/var/www/html’,
install_url => ‘http://katello.hl.local/pub’,
version => ‘latest’,
wp_owner => ‘apache’,
wp_group => ‘root’,
}
Note how we set the owner to apache. This is something we may want to harden further depending on security requirements.
If all goes well, we should end up with both servers using the NFS share:
[[email protected] ~]# df -h|egrep “File|uploads”
Filesystem Size Used Avail Use% Mounted on
nfsvip.hl.local:/nfsshare/uploads 2.0G 53M 1.9G 3% /var/www/html/wp-content/uploads
[[email protected] ~]# df -h|egrep “File|uploads”
Filesystem Size Used Avail Use% Mounted on
nfsvip.hl.local:/nfsshare/uploads 2.0G 53M 1.9G 3% /var/www/html/wp-content/uploads
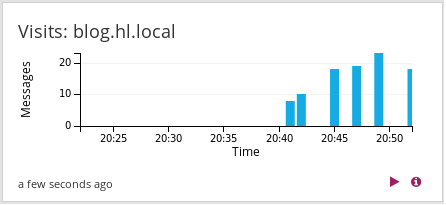
We should also be able to create Graylog dashboard widgets by using Apache data, e.g.:
What’s Next?
We’ll look into putting a pair of HAProxy servers in front of Apache to perform load balancing.