5 Docker Compose Examples | Linux Hint

Docker compose is an efficient and easy way of deploying docker containers on a host. Compose takes in a YAML file and creates containers according to its specifications. The specification includes what images are needed to be deployed, which specific ports are needed to be exposed, volumes, cpu and memory usage limits, etc.

It is an easy way to set up automated application deployment with a frontend, a database and a few passwords and access keys thrown in for good measure. Everytime you run docker-compose up from inside a directory that contains a docker-compose.yml it goes through the file and deploys your application as specified.

To help you write your own docker-compose.yml here are 5 simple and, hopefully, helpful YAML snippets that you can mix and match.

Probably the most common application to be deployed as a Docker container is Nginx. Nginx can serve as reverse proxy server and as SSL termination point for your web applications. Different content management systems like Ghost and WordPress can be hosted behind a single Nginx reverse proxy server and thus it makes sense to have an nginx server snippet handy at all times. The first thing you would need is an nginx configuration file. If you choose not to create one, the default HTTP server is what you will get.

For example, I would create a folder nginx-configuration in my home folder. The configuration file nginx.conf will be present inside this folder, along with other files directories that nginx would expect at /etc/nginx. This includes SSL certs and keys, and host names for the backend servers where the traffic needs to be forwarded.

This folder can then be mounted inside nginx container at /etc/nginx (with read-only permission if you prefer extra precaution) and you can run the server as a container, but you can configure it locally from your home directory without having to log into the container.

This is a sample:

version: ‘3’
services:
nginx:
image: nginx:latest
volumes:
– /home/USER/nginx-configuration:/etc/nginx
ports:
– 80:80
– 443:443

2. Ghost Blog

Ghost is a CMS written mostly in Node.js and is simplistic, fast and elegant in design. It relies on Nginx to route traffic to it and uses MariaDB or sometimes SQLite to store data. You can deploy a quick and dirty Docker image for Ghost using a simple snippet as shown below:

version:

‘3’

services:

ghost:

image: ghost:latest

ports:

2368

:

2368

volumes:

– ghost-data:/var/lib/ghost/content/

volumes:

Ghost-data:

This creates a new volume and mounts it inside the container to store the website’s content persistently. You can add the previous nginx reverse proxy service to this compose file and have a production grade Ghost Blog up and running in the matter of minutes, provided you have configured Nginx to route the relevant traffic from port 80 or 443 to port 2368 on the ghost container.

3. MariaDB

MariaDB is quite a useful piece of software to not be available at a moment’s call on your server. However, databases create a lot of logs, the actual data tends to get spread all over the place and setting up database servers and/or clients never goes smoothly. The carefully crafted docker-compose file can mitigate some of the problems by trying to store all the relevant data in a single Docker volume, while the database software and its complexities are tucked away in the a container:

version

:

‘3’

services:

mydb:

image: mariadb

environment:

MYSQL_ROOT_PASSWORD

=

my

secret

pw

You can create a new database container for each new application, instead of creating more users on the same database, setting up privileges and going through a painful rigmarole of ensuring every app and user stays on its own turf. You also won’t have to open ports on the host system since the database container will run on its own isolated network and you can have it so that only your application can be a part of that network and thus access the database.

4. WordPress Stack

A culmination of all the various parts from the use of environment variables to running a frontend web server and a backend database can be combined in a docker-compose file for a WordPress website, as shown below:

version

:

‘3.3’

services:

db:

image: mysql:

5.7

volumes:

db_data:

/

var

/

lib

/

mysql

restart: always

environment:

MYSQL_ROOT_PASSWORD: somewordpress

MYSQL_DATABASE: wordpress

MYSQL_USER: wordpress

MYSQL_PASSWORD: wordpress

wordpress:

depends_on:

db

image: wordpress:latest

ports:

– “8000:80”

restart: always

environment:

WORDPRESS_DB_HOST: db:

3306

WORDPRESS_DB_USER: wordpress

WORDPRESS_DB_PASSWORD: wordpress

volumes:

db_data:

This is the most popular example and is also mentioned in the official Docker-Compose documentation. Chances are you won’t be deploying WordPress, but the compose file here can still serve as a quick reference for similar application stacks.

5. Docker-Compose with Dockerfiles

So far we have only been dealing with the pure deployment side of docker-compose. But chances are you will be using Compose to not just deploy but develop, test and then deploy applications. Whether running on your local workstation, or on a dedicated CD/CI server, docker-compose can build an image by using the Dockerfile present at the root of the repository concerning your application or part of the application:

version: ‘3’
services:
front-end:
build: ./frontend-code
back-end:
image: mariadb

You will have noticed that while the backend service is using a pre-existing image of mariadb, the frontend image is first built from the Dockerfile located inside ./frontend-code directory.

Lego blocks of Docker-Compose

The entire functionality of Docker-Compose is pretty easy to grasp if only we first ask ourselves what it is that we are trying to build. After a few typos and failed attempted, you will be left with a set of snippets that work flawlessly and can be put together like lego building blocks to define your application deployment.

I hope the above few examples will give you a good head start with that. You can find the complete reference for writing compose file here.

Source

How to use arrays in bash script

Objective

After following this tutorial you should be able to understand how

bash

arrays work and how to perform the basic operations on them.

Requirements

  • No special system privileges are required to follow this tutorial

Difficulty

EASY

Introduction

bash-logoBash

, the

Bourne Again Shell

, it’s the default shell on practically all major linux distributions: it is really powerful and can be also considered as a programming language, although not as sophisticated or feature-reach as python or other “proper” languages. In this tutorial we will see how to use bash arrays and perform fundamental operations on them.

Create an array

The first thing to do is to distinguish between bash

indexed

array and bash

associative

array. The former are arrays in which the keys are ordered integers, while the latter are arrays in which the keys are represented by strings. Although indexed arrays can be initialized in many ways, associative ones can only be created by using the

declare

command as we will see in a moment.

Create indexed or associative arrays by using declare

We can explicitly create an array by using the

declare

command:

$ declare -a my_array

Declare, in bash, it’s used to set variables and attributes. In this case, since we provided the

-a

option, an

indexed array

has been created with the “my_array” name.

Associative arrays can be created in the same way: the only thing we need to change is the option used: instead of lowercase -a we must use the -A option of the declare command: $ declare -A my_array This, as already said, it’s the only way to create associative arrays in bash.

Create indexed arrays on the fly

We can create indexed arrays with a more concise syntax, by simply assign them some values: $ my_array=(foo bar) In this case we assigned multiple items at once to the array, but we can also insert one value at a time, specifying its index: $ my_array[0]=foo

Array operations

Once an array is created, we can perform some useful operations on it, like displaying its keys and values or modifying it by appending or removing elements:

Print the values of an array

To display all the values of an array we can use the following shell expansion syntax: $ Or even: $ Both syntax let us access all the values of the array and produce the same results, unless the expansion it’s quoted. In this case a difference arises: in the first case, when using @, the expansion will result in a word for each element of the array. This becomes immediately clear when performing a for loop. As an example, imagine we have an array with two elements, “foo” and “bar”: $ my_array=(foo bar) Performing a for loop on it will produce the following result:
$ for i in “$”; do echo “$i”; done
foo
bar
When using *, and the variable is quoted, instead, a single “result” will be produced, containing all the elements of the array:
$ for i in “$”; do echo “$i”; done
foo bar

Print the keys of an array

It’s even possible to retrieve and print the keys used in an indexed or associative array, instead of their respective values. The syntax is almost identical, but relies on the use of the ! operator:
$ my_array=(foo bar baz)
$ for index in “${!my_array[@]}”; do echo “$index”; done
0
1
2
The same is valid for associative arrays:
$ declare -A my_array
$ my_array=([foo]=bar [baz]=foobar)
$ for key in “${!my_array[@]}”; do echo “$key”; done
baz
foo
As you can see, being the latter an associative array, we can’t count on the fact that retrieved values are returned in the same order in which they were declared.

Getting the size of an array

We can retrieve the size of an array (the number of elements contained in it), by using a specific shell expansion:
$ my_array=(foo bar baz)
$ echo “the array contains ${#my_array[@]} elements”
the array contains 3 elements
We have created an array which contains three elements, “foo”, “bar” and “baz”, then by using the syntax above, which differs from the one we saw before to retrieve the array values only for the # character before the array name, we retrieved the number of the elements in the array instead of its content.

Adding elements to an array

As we saw, we can add elements to an indexed or associative array by specifying respectively their index or associative key. In the case of indexed arrays, we can also simply add an element, by appending to the end of the array, using the += operator:
$ my_array=(foo bar)
$ my_array+=(baz)
If we now print the content of the array we see that the element has been added successfully:
$ echo “$”
foo bar baz
Multiple elements can be added at a time:
$ my_array=(foo bar)
$ my_array+=(baz foobar)
$ echo “$”
foo bar baz foobar
To add elements to an associative array, we are bound to specify also their associated keys:

$ declare -A my_array

# Add single element
$ my_array[foo]=”bar”

# Add multiple elements at a time
$ my_array+=([baz]=foobar [foobarbaz]=baz)

Deleting an element from the array

To delete an element from the array we need to know it’s index or its key in the case of an associative array, and use the unset command. Let’s see an example:
$ my_array=(foo bar baz)
$ unset my_array[1]
$ echo $
foo baz
We have created a simple array containing three elements, “foo”, “bar” and “baz”, then we deleted “bar” from it running unset and referencing the index of “bar” in the array: in this case we know it was 1, since bash arrays start at 0. If we check the indexes of the array, we can now see that 1 is missing:
$ echo ${!my_array[@]}
0 2
The same thing it’s valid for associative arrays:
$ declare -A my_array
$ my_array+=([foo]=bar [baz]=foobar)
$ unset my_array[foo]
$ echo $
foobar
In the example above, the value referenced by the “foo” key has been deleted, leaving only “foobar” in the array.

Deleting an entire array, it’s even simpler: we just pass the array name as an argument to the unset command without specifying any index or key:
$ unset my_array
$ echo ${!my_array[@]}

After executing unset against the entire array, when trying to print its content an empty result is returned: the array doesn’t exist anymore.

Conclusions

In this tutorial we saw the difference between indexed and associative arrays in bash, how to initialize them and how to perform fundamental operations, like displaying their keys and values and appending or removing items. Finally we saw how to unset them completely. Bash syntax can sometimes be pretty weird, but using arrays in scripts can be really useful. When a script starts to become more complex than expected, my advice is, however, to switch to a more capable scripting language such as python.

Source

Linux-driven LoRaWAN gateway ships with new “Wzzard” LoRa nodes

Advantech has launched a rugged, Arm Linux based “WISE-6610” LoRaWAN gateway in 100- or 500-node versions with either 915MHz or 868MHz support. There’s also a “Wzzard LRPv2 Node” that can connect four sensors at once.

Advantech announced the industrial WISE-6610 gateway and Wzzard LRPv2 Node for long-range, low-bandwidth LoRaWAN gateways on May 31, and judging from this Oct. 5 Electronics Weekly post, they are now available. Designed for I/O sensor data management and network protocol conversion primarily on private LoRaWAN networks, the products are part of a Wzzard LoRa Sensing Network family that includes a recent SmartSwarm 243 gateway that appears to be almost identical to the WISE-6610 (see farther below).

The WISE-6610 product page and data sheet are a little thin on hardware details, but Advantech has informed us the gateway runs Linux on an ARM-based processor.

Advantech’s Wzzard devices (l to r): SmartSwarm 243, an unidentified LoRa node, Wzzard LRPv2 Node, and WISE-6610
(click image to enlarge)

The 868MHz or 915MHz LoRa wireless technology can work in peer-to-peer fashion between low-cost, low-power LoRa nodes. LoRa nodes can also connect to the Internet via a LoRaWAN gateway, thereby avoiding cellular data costs for long distance IoT data acquisition and aggregation. Other LoRaWAN gateways include Aaeon’s Intel Cherry Trail based

AIOT-ILRA01

and more recently, Pi Supply’s

Iot LoRa Gateway and IoT LoRa Node pHAT

add-ons for the Raspberry Pi.

WISE-6610

Advantech offers four models of the WISE-6610 gateway, letting you mix and match capacity and frequency. The WISE-6610-N100 and WISE-6610-N500 support 100 and 500 nodes, respectively, using the 915MHz LoRa standard used primarily the U.S. The WISE-6610-E100 and WISE-6610-E500 support 100 and 500 nodes, respectively, but with the more widely used 868MHz European standard.

WISE-6610

The WISE-6610 is equipped with 512MB of RAM and 128KB of M-RAM, Advantech informs us. There is also 256MB of flash “for hosting custom software applications.”

The gateway can connect to an application or SCADA server using the MQTT protocol, and VPN tunnel creation is available via Open VPN, EasyVPN, and other protocols. The network server can encrypt and convert LoRaWAN data.

The WISE-6610 is equipped with a 10/100 Ethernet port with 1.5-kV magnetic isolation protection, and there’s an SMA female connector for attaching an antenna. A Molex port provides Digital I/O with a 2.7 to 36VDC range.

There’s a wide-range, 9-36VDC input with a Molex port, as well as “redundancy-enhanced functions…specifically designed to prevent connection loss,” says Advantech. Power consumption which is low enough to support solar or battery powered operation, is listed as “3.1/6.6/40 mW (average/peak/sleep mode).”

The 150 x 83 x 30mm device can be wall or DIN-rail mounted and features 4x LEDs and a reset button. The gateway offers IP30 ingress protection and a -40 to 75°C operating range, and there are regulatory approvals for EMC (EN61000-4-x Level 3), shock (IEC 60068-2-27), free fall (IEC 60068-2-32), and vibration (IEC 60068-2-6).

SmartSwarm 243

We didn’t see a product page for a Wzzard LRPv2 Node, but we did find one for a first-gen Wzzard LRPv Node. On May 1, a month prior to the WISE-6610 announcement, Advantech announced a Wzzard LRPv Node paired with a new Advantech SmartSwarm 243 LoRaWAN gateway, also referred to as the BB-SG30000115-43. The launch was said to be in partnership with Semtech, which presumably supplies the
LoRa chipsets for the systems, and most likely also for the WISE-6610.

SmartSwarm 243
(click image to enlarge)

The SmartSwarm 243 appears to be identical to the WISE-6610 in size, ruggedization features, power, and I/O, and it presumably also runs Linux on an Arm processor. The only difference we can see is in the external design and in the image above (but not at top), the addition of two more antenna connectors.

Wzzard LRPv2 Node

Based on the Wzzard LRPv2 Node announcement and image, it’s almost identical to the Wzzard LRPv Node described in the datasheet. The only additional information we spotted was a claim that the v2 model can connect and acquire data from up to four sensor devices simultaneously.


Wzzard LRPv2 Node

The Wzzard LRPv Node supports either 868MHz or 915MHz LoRa networks and offers an optional omnidirectional antenna. There are no details on processor, memory, or firmware, but the system is said to support MQTT and JSON protocols. In addition: “The software is specifically designed to be customizable so as to accommodate the most sophisticated of monitoring plans,” says Advantech.

The Wzzard LRPv Node is available in several different I/O models including a high-end SKU with single digital inputs and outputs, dual 12-bit analog outputs, and dual thermocouple inputs. Other options provide 3x and 2x analog inputs and 1x digital input, but no thermocouples or digital outputs. I/O connections can be implemented via conduit fittings, cable glands, or an M12 connector.

The 115.9 x 95.25 x 65.15mm, 0.34 kg device offers the same -40 to 75°C range as the WISE-6610 gateway and the same shock, free fall, and vibration ratings. In addition, it features a higher IP66 level of ingress protection.

The Wzzard LRPv Node ships with dual 3.6-V, 2400-mAH AA batteries, and there’s an optional external 6-12V input. Sleep and operation modes are available, and there’s an embedded alarm system “to notify users when a threshold has been exceeded so that action can be taken,” says Advantech.

Further information

The WISE-6610 gateway and Wzzard LRPv2 Node appear to be available now with undisclosed pricing. More information may be found on Advantech’s WISE-6610 and Wzzard LoRa Sensing Network page, which offers links to individual product pages, including the BB-SG30000115-43 (SmartSwarm 243). (The Wzzard nodes are listed under BB-WSL2xx product names.)

Source

NanoPi Neo4 SBC breaks RK3399 records for size and price

FriendlyElec has launched a $45, Rockchip RK3399 based “NanoPi Neo4” SBC with a 60 x 45mm footprint, WiFi/BT, GbE, USB 3.0, HDMI 2.0, MIPI-CSI, a 40-pin header, and -20 to 70℃ support — but only 1GB of RAM.

In August, FriendlyElec introduced the NanoPi M4, which was then the smallest, most affordable Rockchip RK3399 based SBC yet. The company has now eclipsed the Raspberry Pi style, 85 x 56mm NanoPi M4 on both counts, with a 60 x 45mm size and $45 promotional price ($50 standard). The similarly open-spec, Linux and Android-ready NanoPi Neo4, however, is not likely to beat the M4 on performance, as it ships with only 1GB of DDR3-1866 instead of 2GB or 4GB of LPDDR3.

NanoPi Neo4 and detail view
(click images to enlarge)

This is the first SBC built around the hexa-core RK3399 that doesn’t offer 2GB RAM at a minimum. That includes the still unpriced

Khadas Edge

, which will soon launch on Indiegogo, and Vamrs’ $99 and up, 96Boards form factor

Rock960

, in addition to the many other RK3399 based entries listed in our

June catalog of 116 hacker boards

.


NanoPi M4

Considering that folks are complaining that the quad -A53, 1.4GHz Raspberry Pi 3+ is limited to only 1GB, it’s hard to imagine the RK3399 is going to perform up to par with only 1GB. The SoC has a pair of up to 2GHz Cortex-A72 cores and four Cortex -A53 cores clocked to up to 1.5GHz plus a high-end Mali-T864 GPU.

Perhaps size was a determining factor in limiting the board to 1GB along with price. Indeed, the 60 x 45mm footprint ushers the RK3399 into new space-constrained environments. Still, this is larger than the earlier 40 x 40mm Neo boards or the newer, 52 x 40mm NanoPi Neo Plus2, which is based on an Allwinner H5.

We’re not sure why FriendlyElec decided against calling the new SBC the NanoPi Neo 3, but there have been several Neo boards that have shipped since the Neo2, including the NanoPi Neo2-LTS and somewhat Neo-like, 50 x 25.4mm NanoPi Duo.

The NanoPi Neo4 differs from other Neo boards in that it has a coastline video port, in this case an HDMI 2.0a port with support for up to [email protected] video with HDCP 1.4/2.2 and audio out. Another Neo novelty is the 4-lane MIPI-CSI interface for up to a 13-megapixel camera input.

NanoPi Neo4 with and without optional heatsink
(click images to enlarge)

You can boot a variety of Linux and Android distributions from the microSD slot or eMMC socket (add $12 for 16GB eMMC). Thanks to the RK3399, you get native Gigabit Ethernet. There’s also a wireless module with 802.11n (now called WiFi 4) limited to 2.4GHz WiFi and Bluetooth 4.0.

The NanoPi Neo4 is equipped with coastline USB 3.0 and USB 2.0 host ports plus a Type-C power and OTG port and an onboard USB 2.0 header. The latter is found on one of the two smaller GPIO connectors that augment the usual 40-pin header, which like other RK3399 boards, comes with no claims of Raspberry Pi compatibility. Other highlights include an RTC and -20 to 70℃ support.

Specifications listed for the NanoPi Neo4 include:

  • Processor — Rockchip RK3399 (2x Cortex-A72 at up to 2.0GHz, 4x Cortex-A53 @ up to 1.5GHz); Mali-T864 GPU
  • Memory:
    • 1GB DDR3-1866 RAM
    • eMMC socket with optional ($12) 16GB eMMC
    • MicroSD slot for up to 128GB
  • Wireless — 802.11n (2.4GHz) with Bluetooth 4.0; ext. antenna
  • Networking — Gigabit Ethernet port
  • Media:
    • HDMI 2.0a port (with audio and HDCP 1.4/2.2) for up to 4K at 60Hz
    • 1x 4-lane MIPI-CSI (up to 13MP);
  • Other I/O:
    • USB 3.0 host port
    • USB 2.0 Type-C port (USB 2.0 OTG or power input)
    • USB 2.0 host port
  • Expansion:
    • GPIO 1: 40-pin header — 3x 3V/1.8V I2C, 3V UART, SPDIF_TX, up to 8x 3V GPIOs, PCIe x2, PWM, PowerKey
    • GPIO 2: 1.8V 8-ch. I2S
    • GPIO 3: Debug UART, USB 2.0
  • Other features — RTC; 2x LEDs; optional $6 heatsink, LCD, and cameras
  • Power — DC 5V/3A input or USB Type-C; optional $9 adapter
  • Operating temperature — -20 to 70℃
  • Dimensions — 60 x 45mm; 8-layer PCB
  • Weight – 30.25 g
  • Operating system — Linux 4.4 LTS with U-boot 2014.10; Android 7.1.2 or 8.1 (requires eMMC module); Lubuntu 16.04 (32-bit); FriendlyCore 18.04 (64-bit), FriendlyDesktop 18.04 (64-bit); Armbian via third party;

Further information

The NanoPi Neo4 is available for a promotional price of $45 (regularly $50) plus shipping, which ranges from $16 to $20. More information may be found on FriendlyElec’s NanoPi Neo4 product page and wiki, which includes schematics, CAD files, and OS download links.

Source

Android Apps Riskier Than Ever: Report | Mobile

By Jack M. Germain

Sep 12, 2018 12:08 PM PT

Widespread use of unpatched open source code in the most popular Android apps distributed by Google Play has caused significant security vulnerabilities, suggests an
American Consumer Institute report released Wednesday.

Thirty-two percent — or 105 apps out of 330 of the most popular apps in 16 categories sampled — averaged 19 vulnerabilities per app, according to the
report, titled “How Safe Are Popular Apps? A Study of Critical Vulnerabilities and Why Consumers Should Care.”

Researchers found critical vulnerabilities in many common applications, including some of the most popular banking, event ticket purchasing, sports and travel apps.

Chart: Distribution of Vulnerabilities Based on Security Risk Severity

Distribution of Vulnerabilities Based on Security Risk Severity

ACI, a nonprofit consumer education and research organization, released the report to spearhead a public education campaign to encourage app vendors and developers to address the worsening security crisis before government regulations impose controls over Android and open source code development, said Steve Pociask, CEO of the institute.

The ACI will present the report in Washington D.C. on Wednesday, at a public panel attended by congressional committee members and staff. The session is open to the public.

“There were 40,000 known open source vulnerabilities in the last 17 years, and one-third of them came last year,” ACI’s Pociask told LinuxInsider. That is a significant cause for concern, given that 90 percent of all software in use today contains open source software components.

Pushing the Standards

ACI decided the public panel would be a good venue to start educating consumers and the industry about security failings that infect Android apps, said Pociask. The report is meant to be a starting point to determine whether developers and app vendors are keeping up with disclosed vulnerabilities.

“We know that hackers certainly are,” Pociask remarked. “In a way, we are giving … a road map to hackers to get in.”

The goal is to ward off the need for eventual government controls on software by creating a public dialog that addresses several essential questions. Given the study’s results, consumers and legislators need to know if app vendors and developers are slow to update because of the expense, or merely complacent about security.

Other essential unanswered questions, according to Pociask, include the following: Do the vendors notify users of the need to update apps? To what extent are customers updating apps?

Not everyone relies on auto update on the Android platform, he noted.

“Some vendors outsource their software development to fit their budget and don’t follow up on vulnerabilities,” Pociask said.

Having the government step in can produce detrimental consequences, he warned. Sometimes the solutions imposed are not flexible, and they can discourage innovation.

“It is important for the industry to get itself in order regarding privacy requirements, spoofing phone numbers and security issues,” said Pociask.

Report Parameters

Businesses struggle to provide adequate protection for consumer personal information and privacy. Governments in California and the European Union have been putting more aggressive consumer privacy laws in place. Americans have become more aware of how vulnerable to theft their data is, according to the report.

One seemingly indispensable device that most consumers and businesses use is a smartphone. However, the apps on it may be one of the most serious data and privacy security risks, the report notes.

Researchers tested 330 of the most popular Android apps on the Google Play Store during the first week in August. ACI’s research team used a binary code scanner — Clarity, developed by Insignary — to examine the APK files.

Rather than focus on a random sampling of Google Play Store apps, ACI researchers reported on the largest or most popular apps in categories. Most of the apps are distributed within the United States. Researchers picked 10 top apps in each of the 33 categories in the Play store.

Factoring the Results

Results were charted as critical, high, medium and low vulnerability scores. Of 330 tested apps, 105 — or 32 percent — contained vulnerabilities. Of those identified, 43 percent either were critical or high risk, based on the national vulnerability database, according to the report.

“We based our study on the most popular apps in each category. Who knows how much worse the untested apps are in terms of vulnerabilities?” Pociask asked.

In the apps sampled, 1,978 vulnerabilities were found across all severity levels, and 43 percent of the discovered vulnerabilities were deemed high-risk or critical. Approximately 19 vulnerabilities existed per app.

The report provides the names of some apps as examples of the various ways vendors deal with vulnerabilities. Critical vulnerabilities were found in many common applications, including some of the most popular banking, event ticket purchasing, sports and travel apps.

For example, Bank of America had 34 critical vulnerabilities, and Wells Fargo had 35 critical vulnerabilities. Vivid Seats had 19 critical and five high vulnerabilities.

A few weeks later, researchers retested some of the apps that initially tested way out of range. They found that the two banking apps had been cleaned up with updates. However, the Vivid Seats app still had vulnerabilities, said Pociask.

Indications for Remedies

More effective governance is critical to addressing “threats such as compromised consumer devices, stolen data, and other malicious activity including identity theft, fraud or corporate espionage,” states the report.

These results increasingly have been taking center stage, noted the researchers.

The ACI study recommends that Android app developers scan their binary files to ensure that they catch and address all known security vulnerabilities. The study also stresses the urgency and need for apps providers to develop best practices now, in order to reduce risks and prevent a backlash from the public and policymakers.

The researchers highlighted the complacency that many app providers have exhibited in failing to keep their software adequately protected against known open source vulnerabilities that leave consumers, businesses and governments open to hacker attacks, with potentially disastrous results.

Note: Google routinely scans apps for malware, but it does not oversee the vulnerabilities that could allow them.

“We want to create a lot more awareness for the need to update the vulnerabilities quickly and diligently. There is a need to push out the updates and notify consumers. The industries should get involved in defining best practices with some sort of recognizable safety seal or rating or certification,” Pociask said.

App Maker or User Problem?

This current ACI report, along with others providing
similar indications about software vulnerabilities, concerns an area many app users and vendors seem to ignore. That situation is exacerbated by hackers finding new ways to trick users into allowing them access to their devices and networks.

“Posing as real apps on an accredited platform like the Google Play Store makes this type of malicious activity all the more harmful to unsuspecting users,” said Timur Kovalev, chief technology officer at
Untangle.

It is critical for app users to be aware that hackers do not care who becomes their next victim, he told LinuxInsider.

Everyone has data and private information that can be stolen and sold. App users must realize that while hackers want to gain access and control of their devices, most also will try to infiltrate a network that the device connects to. Once this happens, any device connected to that network is at risk, Kovalev explained.

Even if an app maker is conscientious about security and follows best practices, other vulnerable apps or malware on Android devices can put users at risk, noted Sam Bakken, senior product marketing manager at
OneSpan.

“App makers need to protect their apps’ runtime against external threats over which they don’t have control, such as malware or other benign but vulnerable apps,” he told LinuxInsider.

Part of the Problem Cycle

The issue of unpatched vulnerabilities makes the ongoing situation of malicious apps more troublesome. Malicious apps have been a consistent problem for the Google Play Store, said Chris Morales, head of security analytics at
Vectra.

Unlike Apple, Google does not maintain strict control over the applications developed using the Android software development kit.

“Google used to perform basic checks to validate an app is safe for distribution in the Google Play Store, but the scale of apps that exists today and are submitted on a daily basis means it has become very difficult for Google to keep up,” Morales told LinuxInsider.

Google has implemented new machine learning models and techniques within the past year, he pointed out, in an effort to improve the company’s ability to detect abuse — such as impersonation, inappropriate content or malware.

“While these techniques have proven effective at reducing the total number of malicious apps in the Google Play Store, there will always be vulnerabilities in application code that get by Google’s validation,” noted Morales.

Developers still need to address the problem of malicious or vulnerable apps that could be exploited after being installed on a mobile device. That would be handled by applying machine learning models and techniques on the device and on the network. That would help to identify malicious behaviors that would occur after an app is already installed and bypassed the Google security checks, Morales explained.

Time for Big Brother?

Having government agencies step in to impose solutions may lead to further problems. Rather than a one-size-fits-all solution, ACI’s Pociask prefers a system of priorities.

“Let’s see if the industry can come up with something before government regulations are imposed. Getting a knee-jerk reaction right now would be the wrong thing to do in terms of imposing a solution,” he cautioned.

Still, personal devices are the user’s responsibility. Users need to take more accountability with regards to what apps they are allowing on their devices, insisted Untangle’s Kovalev.

“Government intervention at this time is likely not needed, as both users and Google can take additional actions to protect themselves against malicious apps,” he said.

Frameworks Exist

Dealing with unpatched Android apps may not need massive efforts to reinvent the wheel. Two potential starting points already are available, according to OneSpan’s Bakken.

One is the U.S. National Institute of Standards and Technology, or NIST. It has guidelines for vetting mobile apps, which lay out a process for ensuring that mobile apps comply with an organization’s mobile security requirement.

“This can help an enterprise, for example, to keep some vulnerable mobile apps out of their environment, but instituting such a program is no small feat. It’s also simply guidance at this point,” said Bakken.

The other starting point could be the Federal Institutions Examination Council, or FFIEC, which provides some guidance for examiners to evaluate a financial institution’s management of mobile financial services risk. It also provides some safeguards an institution should implement to secure the mobile financial services they offer, including mobile apps.

“In the end, the effectiveness of any government intervention really depends on enforcement. It’s likely that any intervention would focus on a specific industry or industries, meaning not all mobile app genres would be in scope,” Bakken said. “That means that developers of some mobile apps for consumers would not necessarily have any incentive to secure their apps.”

What Needs to Happen?

One major solution focuses on patching the Google Play platform. Joining the platform is straightforward, according to Kovalev. Developers complete four basic steps and pay a fee.

Once joined, developers can upload their apps. Google processes them through a basic code check. Often, malicious apps do not appear to be malicious, as they have been programmed with a time-delay for malicious code to be executed, he noted.

“To combat these malicious apps, Google has begun to implement better vetting techniques — like AI learning and providing rewards to white hat pros who hunt down and surface these malicious apps,” Kovalev said.

While these techniques have helped to pinpoint malicious apps, the apps should be vetted more thoroughly prior to being publicly available to unsuspecting users, he stressed.

Final Solution

The ultimate fix for broken Android apps rests with app makers themselves, OneSpan’s Bakken said. They are in the best position to lead the charge.

He offered this checklist for mobile app developers:

  • Do threat modeling and include security in product requirements.
  • Provide secure code training to Android developers.
  • Do security testing of their apps on a regular basis as part of the development cycle.
  • Fix identified vulnerabilities as they go.
  • Submit their apps to penetration testing prior to release.

“And then, finally, they should proactively strengthen their app with app-shielding technology that includes runtime protection,” Baken said, “so the app itself is protected, even in untrusted and potentially insecure mobile environments, to mitigate external threats from malware and other vulnerable apps.”

Jack M. Germain has been an ECT News Network reporter since 2003. His main areas of focus are enterprise IT, Linux and open source technologies. He has written numerous reviews of Linux distros and other open source software.
Email Jack.

Source

Cinnamon Mint for Debian Just as Tasty | Reviews

By Jack M. Germain

Sep 7, 2018 9:53 AM PT

Cinnamon Mint for Debian Just as Tasty

The official release of version 3 of
Linux Mint Debian Edition hit the download servers at summer’s end, offering a subtle alternative to the distro’s Ubuntu-based counterpart.

Codenamed “Cindy,” the new version of LMDE is based on Debian 9 Stretch and features the Cinnamon desktop environment. Its release creates an unusual situation in the world of Linux distro competition. Linux Mint developers seem to be in competition with themselves.

LMDE is an experimental release. The Linux Mint community offers its flagship distro based on Ubuntu Linux in three desktop versions: Cinnamon, Mate and Xfce.

The Debian version is different under the hood.

For example, the software package base is provided by Debian repositories instead of from Ubuntu repositories. Another difference is the lack of point releases in LMDE. The only application updates between each annual major upgrade are bug and security fixes.

In other words, Debian base packages will stay the same in LMDE 3 until LMDE 4 is released next year. That is a significant difference.

Mint system and desktop components get updated continuously in a semi-rolling release process as opposed to periodic point releases. So newly developed features are pushed directly into LMDE. Those same changes are held for inclusion on the next upcoming Linux Mint (Ubuntu-based) point release.

Using LMDE instead of the regular Linux Mint distro is more cutting edge — but only if you use the Cinnamon desktop. LMDE does not offer versions with Mate and Xfce desktops.

Personal Quest

Linux Mint — as in the well-established Ubuntu-based release — is my primary computing workhorse, mostly thanks to the continuing refinements in the Cinnamon desktop. However, I spend a portion of my weekly computing time using a variety of other Linux distros on a collection of “test bench” desktops and laptops dedicated to my regular Linux distro reviews.

The most critical part of my regular distro hopping is constantly adjusting to the peculiar antics of a host of user interfaces, including GNOME, Mate, KDE Plasma and Xfce. I return to some favorites more than others depending on a distro’s usability. That, of course, is a function of my own preferences and computing style.

So when LMDE 3 became available, I gave in to finding the answer to a question I had avoided since the creation of Linux Mint Debian Edition several years ago. I already knew the issues separating Debian from Ubuntu.

The dilemma: Does Debian-based versus Ubuntu-based Linux Mint really matter?

Linux Mint Debian applications menu

Linux Mint Debian is a near-identical replication of the Ubuntu-based Standard Linux Mint Cinnamon version.

Confusing Scenario

Does a Debian family tree make Linux Mint’s Cinnamon distro better than the Ubuntu-based main version? Given the three desktop options in the Linux Mint distro, does a duplicate Cinnamon desktop choice involving a Debian base instead of an Ubuntu base make more sense?

Consider this: Ubuntu Linux is based on Debian Linux. The Linux Mint distro is based on Ubuntu, which is based on Debian.

So why does Linux Mint creator and lead developer Clement Lefebvre care about developing a Debian strain of Linux Mint Cinnamon anyway? The Debian distro also offers a Cinnamon desktop option, but no plans exist for other desktop varieties.

Clarifying Clarity

I have found in years of writing software reviews that two factors are critical to how I respond to a particular Linux distribution. One is the underlying infrastructure or base a particular distro uses.

A world of differences can exist when comparing an Arch-based distro to a Debian- or RPM- or Slackware-based distro, for instance — and yes, there are numerous more family categories of Linux distributions.

My second critical factor is the degree of tweaking a developer applies to the chosen desktop environment. That also involves considering the impact of whether the distro is lightweight for speed and simplicity or heavyweight for productivity and better performance.

Some desktop options are little more than window managers like Openbox or Joe’s Window Manager (JWN), IceWM or Fluxbox. Others are shell environments patched over GNOME 3 like Mate and Cinnamon.

Assessing performance gets more involved when a distro offers more than one desktop option. Or when a distro uses a more modern or experimental desktop environment like Enlightenment, Pantheon, LXQt or Budgie.

Reasonable Need

What if the Ubuntu base went away? The Ubuntu community is headed by a commercial parent company, Canonical. The road to Linux development is littered with used-to-be Linux distros left abandoned. Their users had to move on.

When the Ubuntu community years ago made its new Unity desktop the default, Lefebvre created Linux Mint as an alternative and replaced Unity with the infant Cinnamon he helped create. Ironically, the Ubuntu community recently jettisoned Unity and replaced it with the GNOME desktop.

In Lefebvre’s release notes for LMDE 3, he noted the development team’s main goal was to see how viable the Linux Mint distribution would be and how much work would be necessary if Ubuntu ever should disappear.

Same Difference Maybe

The challenge is to make LMDE as similar as possible to Linux Mint without using Ubuntu. I am not a programmer, but it seems to me that what Lefebvre has been doing is make square pegs fit into round holes.

It seems to be working. Debian, Linux Mint and Ubuntu all hail from the Debian repositories. Ubuntu also is derived from Debian. However, the base editions are different.

The main difference between editions, Lefebvre explained, is that the standard edition may have a desktop application for some features. To get the same features in LMDE, users might have to compensate by altering a configuration file using a text editor.

So far, that makes LMDE less polished than the standard (Ubuntu-based) edition, just as Debian tends to be less polished on the first bootup than Ubuntu, he suggested.

His point is well taken. Linux Mint modifies the base integration to create a better user experience. That is why years ago, as an Ubuntu user, I crossed over to Linux Mint. It also bolsters what I previously said about my two essential factors in reviewing Linux distros.

From Lefebvre’s view, LMDE likely is a smarter choice over the Ubuntu-based version for users who prioritize stability and security. Users looking for more recent packages likely will be less satisfied with LMDE 3. Despite the more rigorous updates, some packages on LMDE could be several years old by the time the next release comes out.

Linux Mint Debian screen shot

Some software package delays and other minor differences lie under the surface of the Debian edition of Linux Mint, but you will look long and hard to find them.

First Impressions

“Cindy” installed and ran without issue. Its iteration of the Cinnamon desktop displayed and performed like its near-twin from the Ubuntu family. That was a pleasant surprise that reinforced my longstanding reliance on the Cinnamon desktop over other options.

To say that the Cindy release *just works* is an understatement. The menus and configuration settings are the same. The panel bar is an exact replica in terms of its appearance and functionality. The hot corners work the same way in both versions. So do the applets and desklets that I have grown so fond of over the years.

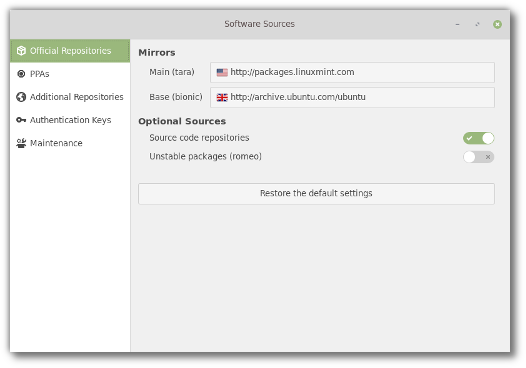
Even the Software Center remains the same. Of course, the location of the repositories points to different locations, but the same package delivery system underlies both LMDE 3 and the Ubuntu-based Tara version of Linux Mint Cinnamon.

My only gripe with functionality centers on the useless extensions. I hoped that the experience with Cindy would transcend the longstanding failure of extensions in the Ubuntu-based Cinnamon desktop. It didn’t.

Almost every extension I tried issued a warning that the extension was not compatible with the current version of the desktop. So in one way at least, the Debian and the Ubuntu versions remain in sync. Neither works — and yes, both Cinnamon versions were the current 3.8.8.

Other Observations

I was disappointed to see LibreOffice 5 preinstalled rather than the current LibreOffice 6.1. Cindy has both Ubiquity and Calamares installers.

I suggest using the Calamares installer. It has a great disk partitioning tool and a more efficient automated installation process. For newcomers, the Linux Mint installer is easier to use, though.

As for the kernel, the Cindy version is a bit behind the times. It ships with kernel version 4.9.0-8; my regular Linux Mint distro is updated to 4.15-0-33.

Also consider the basic hardware requirements for LMDE. They might not be as accommodating as the Ubuntu version of Linux Mint Cinnamon.

You will need at least 1 GB RAM, although 2 GB is recommended for a comfortable fit. Also, 15 GB of disk space is the minimum, although 20 GB is recommended.

Here are some additional potential limitations for your hardware:

  • The 64-bit ISO can boot with BIOS or UEFI;
  • The 32-bit ISO can only boot with BIOS;
  • The 64-bit ISO is recommended for all computers sold since 2007 as they are equipped with 64-bit processors.

Bottom Line

If you are considering taking Cindy for a joyride, be sure to check out the release notes for known issues. Also, thoroughly test the live session before installing LMDE 3 to any mission-critical computers.

If you do follow through and install the Debian version of Linux Mint, consider the move a short-term computing solution — that is, unless you like doing a complete system upgrade. LMDE is not a long-term support release.

Unlike the five-year support for the regular LTS release with the Ubuntu-based version, Cindy’s support runs out perhaps at the end of this year. The developers cannot project an exact release schedule for LMDE 4, either.

Lefebvre warned that several potential compatibility issues loom in the near future. For example, Cinnamon 4.0 is likely to be incompatible with Debian Stretch. A contemplated change in the Meson build system may get in the way as well.

Want to Suggest a Review?

Is there a Linux software application or distro you’d like to suggest for review? Something you love or would like to get to know?

Please
email your ideas to me, and I’ll consider them for a future Linux Picks and Pans column.

And use the Reader Comments feature below to provide your input!

Jack M. Germain has been an ECT News Network reporter since 2003. His main areas of focus are enterprise IT, Linux and open source technologies. He has written numerous reviews of Linux distros and other open source software.
Email Jack.

Source

How to Install and use Open vSwitch (OVS) 2.9 with KVM on CentOS 7

by
Pradeep Kumar
·
Published August 8, 2018
· Updated August 8, 2018

‘,
enableHover: false,
enableTracking: true,
buttons: { twitter: },
click: function(api, options){
api.simulateClick();
api.openPopup(‘twitter’);
}
});
$(‘#facebook’).sharrre({
share: {
facebook: true
},
template: ‘

‘,
enableHover: false,
enableTracking: true,
buttons:,
click: function(api, options){
api.simulateClick();
api.openPopup(‘facebook’);
}
});
$(‘#googleplus’).sharrre({
share: {
googlePlus: true
},
template: ‘

‘,
enableHover: false,
enableTracking: true,
buttons:,
urlCurl: ‘https://www.linuxtechi.com/wp-content/plugins/hueman-addons/addons/assets/front/js/sharrre.php’,
click: function(api, options){
api.simulateClick();
api.openPopup(‘googlePlus’);
}
});
$(‘#linkedin’).sharrre({
share: {
linkedin: true
},
template: ‘

‘,
enableHover: false,
enableTracking: true,
buttons: {
linkedin: {
description: ‘How to Install and use Open vSwitch 2.9 with KVM on CentOS 7 / RHEL 7 Server’,media: ‘https://www.linuxtechi.com/wp-content/uploads/2018/08/Install-openvswitch-KVM-CentOS7-RHEL7.jpg’ }
},
click: function(api, options){
api.simulateClick();
api.openPopup(‘linkedin’);
}
});


// Scrollable sharrre bar, contributed by Erik Frye. Awesome!
var $_shareContainer = $(“.sharrre-container”),
$_header = $(‘#header’),
$_postEntry = $(‘.entry’),
$window = $(window),
startSharePosition = $_shareContainer.offset(),//object
contentBottom = $_postEntry.offset().top + $_postEntry.outerHeight(),
topOfTemplate = $_header.offset().top,
topSpacing = _setTopSpacing();

//triggered on scroll
shareScroll = function(){
var scrollTop = $window.scrollTop() + topOfTemplate,
stopLocation = contentBottom – ($_shareContainer.outerHeight() + topSpacing);

$_shareContainer.css();

if( scrollTop > stopLocation ){
$_shareContainer.css( { position:’relative’ } );
$_shareContainer.offset(
{
top: contentBottom – $_shareContainer.outerHeight(),
left: startSharePosition.left,
}
);
}
else if (scrollTop >= $_postEntry.offset().top – topSpacing){
$_shareContainer.css( { position:’fixed’,top: ‘100px’ } );
$_shareContainer.offset(
{
//top: scrollTop + topSpacing,
left: startSharePosition.left,
}
);
} else if (scrollTop 1024 ) {
topSpacing = distanceFromTop + $(‘.nav-wrap’).outerHeight();
} else {
topSpacing = distanceFromTop;
}
return topSpacing;
}

//setup event listeners
$window.scroll( _.throttle( function() {
if ( $window.width() > 719 ) {
shareScroll();
} else {
$_shareContainer.css({
top:”,
left:”,
position:”
})
}
}, 50 ) );
$window.resize( _.debounce( function() {
if ( $window.width() > 719 ) {
shareMove();
} else {
$_shareContainer.css({
top:”,
left:”,
position:”
})
}
}, 50 ) );

});

Source

Learn Git Command with Practical Examples on Linux

by
Narendra K
·
Published August 15, 2018
· Updated August 15, 2018

‘,
enableHover: false,
enableTracking: true,
buttons: { twitter: },
click: function(api, options){
api.simulateClick();
api.openPopup(‘twitter’);
}
});
$(‘#facebook’).sharrre({
share: {
facebook: true
},
template: ‘

‘,
enableHover: false,
enableTracking: true,
buttons:,
click: function(api, options){
api.simulateClick();
api.openPopup(‘facebook’);
}
});
$(‘#googleplus’).sharrre({
share: {
googlePlus: true
},
template: ‘

‘,
enableHover: false,
enableTracking: true,
buttons:,
urlCurl: ‘https://www.linuxtechi.com/wp-content/plugins/hueman-addons/addons/assets/front/js/sharrre.php’,
click: function(api, options){
api.simulateClick();
api.openPopup(‘googlePlus’);
}
});
$(‘#linkedin’).sharrre({
share: {
linkedin: true
},
template: ‘

‘,
enableHover: false,
enableTracking: true,
buttons: {
linkedin: {
description: ‘Learn Git Command with Practical Examples on Linux – Part 2’,media: ‘https://www.linuxtechi.com/wp-content/uploads/2018/08/Git-Command-Example-Part2.jpg’ }
},
click: function(api, options){
api.simulateClick();
api.openPopup(‘linkedin’);
}
});


// Scrollable sharrre bar, contributed by Erik Frye. Awesome!
var $_shareContainer = $(“.sharrre-container”),
$_header = $(‘#header’),
$_postEntry = $(‘.entry’),
$window = $(window),
startSharePosition = $_shareContainer.offset(),//object
contentBottom = $_postEntry.offset().top + $_postEntry.outerHeight(),
topOfTemplate = $_header.offset().top,
topSpacing = _setTopSpacing();

//triggered on scroll
shareScroll = function(){
var scrollTop = $window.scrollTop() + topOfTemplate,
stopLocation = contentBottom – ($_shareContainer.outerHeight() + topSpacing);

$_shareContainer.css();

if( scrollTop > stopLocation ){
$_shareContainer.css( { position:’relative’ } );
$_shareContainer.offset(
{
top: contentBottom – $_shareContainer.outerHeight(),
left: startSharePosition.left,
}
);
}
else if (scrollTop >= $_postEntry.offset().top – topSpacing){
$_shareContainer.css( { position:’fixed’,top: ‘100px’ } );
$_shareContainer.offset(
{
//top: scrollTop + topSpacing,
left: startSharePosition.left,
}
);
} else if (scrollTop 1024 ) {
topSpacing = distanceFromTop + $(‘.nav-wrap’).outerHeight();
} else {
topSpacing = distanceFromTop;
}
return topSpacing;
}

//setup event listeners
$window.scroll( _.throttle( function() {
if ( $window.width() > 719 ) {
shareScroll();
} else {
$_shareContainer.css({
top:”,
left:”,
position:”
})
}
}, 50 ) );
$window.resize( _.debounce( function() {
if ( $window.width() > 719 ) {
shareMove();
} else {
$_shareContainer.css({
top:”,
left:”,
position:”
})
}
}, 50 ) );

});

Source

How to hack WPS wifi using android

Below is a guest post by Shabbir, and I’d like to add some comments describing what to expect ahead. First, there are two methods, both are very simple. One works with rooted phones only, and the other works with/without root. Without root you can get connected to the wireless network, but won’t find out it’s password. These methods work only on vulnerable wifis, so success rate is low. Still, since it’s a 5 minute process (simply install an app from play store), it might be worth the effort for most people. <actual post starts below>

You know if you ask me, hacking a wifi network
is easiest of the all hacking techniques. And Yes, it is Boring, time consuming
and difficult to hack wifi when it comes to android. Because in android you
don’t have much powerful resources and you don’t have many hacking attacks and
don’t have lots of hacking tools like you do have in Laptop, Pc or mac.

In Today’s post we are going to cover the
topic “how to hack wifi with android”.

We are going to exploit a wifi vulnerability
found in most of the router’s security called WPS (wifi protected setup).

According to Wikipedia. A major security flaw was revealed in December
2011 that affects wireless routers with the WPS PIN feature, which most recent
models have enabled by default. The flaw allows a remote attacker to recover
the WPS PIN in a few hours with a brute-force
attack and, with the WPS PIN, the network’s WPA/WPA2 pre-shared key. Users have been urged
to turn off the WPS PIN feature.

We are describing two methods that are most
effective in hacking wifi with android and are almost successful.

Things Required for Both tutorials

  • Android
    Phone with good Processor and RAM
  • Android
    Phone Must be Rooted
  • A
    Wifi Network to hack (Very Important)
  • WPS CONNECT app from Play store (for 1st
    tutorial)
  • WPS
    WPA Tester
    app (for 2nd tutorial)

How this is
going hack wi-fi Let’s get to the process

Many Guy says this is the fake app but hey guys this is not a fake
app, this is working app for hacking wi-fi password from android mobile. You
can hack WiFi network with this app, which has WPS enabled in their router
security.

If you found any wi-fi network in your Android
mobile, which shows WPS security. You can easily connect with any WPS
security wifi without given any type password. WPS Connect bypasses WPS
security and gives you access to connect with wi-fi without typing any
password.
Check this guide to learn how to hack wifi

Some of recent
wifi hacking tutorials.

With this app, you’ll connect to WiFi networks
which have WPS protocol enabled. This feature was only available in version
4.1.2 of Android.

App developed for educational purposes. I am not
responsible for any misuse.WPS Connect is focused on verifying if your
router is vulnerable to a default PIN. Many routers that companies install own
vulnerabilities in this aspect. With this application, you can check if your
router is vulnerable or not and act accordingly.Includes default PINs, as well as algorithms
such Zhao Chesung (ComputePIN) or Stefan Viehböck (easyboxPIN).

Tap Refresh Icon to get wifi AP with Mac addresses

Tap on the wifi you wanna hack

Try every pin one by one in the app and try to hack wifi
password

You have successfully hacked wi-fi via WPS.

2nd app is Wi-fi WPS WPA Tester

WPS
Connect app hack only WPS routers with limited features. But this is an
advanced app for hacking wifi password from
android mobile. Make sure your phone is rooted. You can check
the wireless security of your routers from this Android app. If your router is
not secure this wifi hacking android app easily
bypass wifi password from android mobile and connect with
android mobile to router directly without need any type of password.
The algorithm of wps default (zaochensung) SOME of the routers, you can receive
the WPA WPA2 WEP set to the router.

Open the app

Tap on the wifi you wanna hack

Try every pin one by one in the app and try to hack wifi
password

After that app will
try to brute force and if it succeeded then You have successfully hacked wi-fi
via WPS. If some problem came in that process. Ask us in Comment Section.

Conlusion:

This wifi hacking Android apps works in rooted
and without rooted android mobile. So you can easily hack wifi password from your android phone without rooting your
android phone with
this app.

Source

Compiling Linux Kernel (on Ubuntu)

This guide may not exactly be relevant to this blog, but as an exercise in getting familiar with Linux, I’ll post it anyways. Here are a few disclaimers-

  1. Don’t follow this guide for compiling linux kernel, there are much better guides out there for that purpose (this is the one I followed). The guide exists to help you learn some new stuff which you didn’t know before, and to improve your understanding of Linux a bit.
  2. My knowledge of Linux and operating systems, in general, is somewhat limited, and hence, some things might be wrong (or at least not perfectly correct).
  3. The main reason for writing this tutorial is because I had to submit a document showing what I did. It’s not exactly related to hacking. It just gives you some insight into linux (which I perceive is helpful).
  4. Do everything on a virtual machine, and be prepared for the eventuality that you’ll break your installation completely.

Linux Kernel

Running uname -r on your machine would show you what kernel version you’re using. uname -a would give you some more details regarding that.

Every once in a while, a new

stable

kernel release is made available on

kernel.org

. At the time of writing this, the release was 4.9.8. At the same time, there is also the latest release

candidate kernel

, which is not of our interest, as it’s bleeding edge (latest features are available in the kernel, but there could be bugs and compatibility issues), and hence not stable enough for our use.

I download the tar ball for the latest kernel (a compressed archive of ~100MB size, which becomes ~600 MB upon extraction). What we get upon extraction is the source files of your linux kernel. We need to compile this to get an object file which will run our OS. To get a feel for what this means, I have a little exercise for you-

Small (and optional) exercise

We will do the following-

  1. Make a folder, and move to that folder
  2. Write a small c++ hello world program
  3. Compile it, using make
  4. Run the compiled object file.

On the terminal, run the following-

Step 1:

mkdir testing

cd testing

Step 2:

cat > code.cpp

Paste this into the terminal
#include <iostream>

int main(){

std::cout << “Hello Worldn”;
return 0;
}

After pasting this, press ctrl+d on your keyboard (ctrl+d = EOL = end of line).

If this doesn’t work, just write the above code in your favourite text editor and save as code.cpp

Step 3:

make code

Step 4:

./code

Notice how we used the make command to compile our source code and get an executable. Also, notice how the make command itself executed this command for us-

g++ code.cpp -o code

In our case, since there was only one source file, make knew what to do (just compile the single file). However, in case there are multiple source, make can’t determine what to do.

For example, if you have 2 files, and the second one depends on the first one in some way. Then, you need the first one to be compiled before the second one. In case of the kernel, there are possibly millions of source code files, and how they get compiled is a very complex process.

If you navigate to the folder containing linux kernel (the folder where you extracted the tar ball), you’ll get an idea of the sheer magnitude of complexity behind a kernel. For example, open the Makefile file in that folder in your favourite text and editor and see the contents of the folder. Makefile contains instructions which make (the command line tool we used earlier) uses to determine how to compile the source files in that directory (and subdirectories).

Some tools

Compiling our simple c++ program didn’t need much, and your linux distribution (I’m using Ubuntu 16 for this tutorial) would come with the required tools pre-installed. However, compiling kernel needs some more stuff, and you’ll need to install the required tools. For me, this command installed everything that was needed-

sudo apt-get install libncurses5-dev gcc make git exuberant-ctags bc libssl-dev

Many of these tools would actually be pre-installed, so downloading and installing this won’t take too long.

(if you’re not on Ubuntu/Kali, then refer to this guide, as it has instruction for Red Hat based and SUSE based systems as well)

Download kernel

In the guide that I followed, he suggested that I clone this repository-

git clone git://git.kernel.org/pub/scm/linux/kernel/git/stable/linux-stable.git

After cloning the repo, I had to choose the latest stable kernel and then proceed further with it. This would be useful when you want to keep pulling updates and recompiling your kernel. However, for the purpose of this tutorial, let’s ignore this possibility (because cloning the git repo took a lot of time and the downloaded file was huge and everything was taking forever).

Instead, we just download and extract the tarball (as discussed earlier in the Linux Kernel section).

Configuration

Here, we have two options.

  1. Use a default configuration
  2. Use the configuration of your current kernel (on which your OS is running right now).

As in downloading the kernel step, I tried both methods, and for me, the default one worked better. Anyways, for current configuration, run the following-

cp /boot/config-`uname -r`* .config

This copies the configuration for your current kernel to a file in the current folder. So, before running this command, navigate to the folder containing the extracted tarball. For me, it was /home/me/Download/linux-4.9.8

For default config (recommended), run

make defconfig

If you don’t see a config file, don’t worry. In linux, files/directories starting with . are hidden. On your terminal, type vi .config (replace vi with your favourite text editor) and you can see the config file.

Compiling

Similar to the way you compiled your c++ program, you can compile the kernel. In case of c++ program, we didn’t have any Makefile, so we had to specify the name of the source file (make code), however, since we have a Makefile here, we can simply type make, and our Makefile and .config file (and probably many more files) will tell make what to do. Note that the config file contains the options which were chosen for your current kernel. However, on a later kernel, there might be some choices which weren’t available in the the previous kernel (the one you’re using). In that case, make will ask you what to do (you’ll get to choose between option – yes and no, or options – 1,2,3,4,5,6, etc.). Pressing enter chooses the default option. Again, I suggest you use the default configuration file to avoid any issues.

To summarise, simply run this command-

make

If you have multiple cores, then specify it as an argument (compilation will be faster). For example, if you have two cores, run make -j2

If you have 4 cores, run make -j4


Now, you can do something else for a while. Compilation will take some time. When it’s finished, follow the remaining steps.

Installation

Simply run this command-

sudo make modules_install install

Fixing grub

There are following things that need to be changed in the /etc/default/grub file. Open this file as sudo, with your favourite text editor, and do the following.

  1. Remove GRUB_HIDDEN_TIMEOUT_QUIET line from the file.
  2. Change GRUB_DEFAULT to 10 from 0

This is how my file looks after being edited.

What these changes do is-

  1. Grub menu for choosing OS to boot from is hidden by default in Ubuntu, it changes that to visible.
  2. The menu shows up for 0secs, before choosing the default option. It changes it to 10 secs, so we get a chance to choose which OS to boot from.

After all this, just run the command to apply the changes.

sudo update-grub2

Now restart the machine.

Did it work?

If it worked, then you’ll ideally see something like this upon restart –


In advanced options, you’ll see two kernels. If you did everything perfectly, and no drivers issues are there, then your new kernel will boot up properly (4.9.8 for me). If you did everything reasonably well, and didn’t mess things up too bad, then at least your original kernel should work, if not the new one. If you messed things up completely, then the new kernel won’t work, nor would the old kernel (which was working fine to begin with). In my case, in the first trial, my new kernel wasn’t working. In the second trial, both kernels were working.

Once you have logged in to your new kernel, just do a uname -r and see the version, and give yourself a pat on the back if it is the kernel version you tried to download.

I did give myself a pat on the back

If your new kernel is not working, then either go through the steps and see if you did something wrong, or compare with this guide and see if I wrote something wrong. If it’s none of these, then try the other methods (default config instead of current kernel config, and vice versa). If that too doesn’t work, try out some other guides. The purpose of the guide, as explained already, isn’t to teach you how to compile linux kernel, but to improve your understanding, and I hope I succeeded in that.

Removing the kernel (optional and untidy section)

The

accepted answer here

is all you need. I’m gonna write it here anyways. Note that I’m writing this from memory, so some things may be a bit off. Follow the AskUbuntu answer to be sure.

Remove the following (this is correct)-

/boot/vmlinuz*KERNEL-VERSION*
/boot/initrd*KERNEL-VERSION*
/boot/System-map*KERNEL-VERSION*
/boot/config-*KERNEL-VERSION*
/lib/modules/*KERNEL-VERSION*/
/var/lib/initramfs/*KERNEL-VERSION*/

For me, Kernel version is 4.9.8. I don’t remember exactly what commands I typed, and am too lazy to check them again, but I think these would work (no guarantee).

cd /boot/

rm *4.9.8*

cd /lib/module

rm *4.9.8*

cd /var/lib/initramfs

rm *4.9.8*

Also, I have a faint recollection that the name of the initramfs folder was something a bit different in my case (not sure).

Kthnxbye

Source

WP2Social Auto Publish Powered By : XYZScripts.com