How to Reset Forgotten Root Password in RHEL/CentOS and Fedora

In this post will guide you simple steps to reset forgotten root password in RHELCentOS and Fedora Linux with example. There are various ways to reset root password which are.

  1. Booting into single user mode.
  2. Using boot disk and edit passwd file.
  3. Mount drive to another system and change passwd file.

Reset Root Password

Reset Forgotten Root Password

Here, in this article we are going to review “Booting into single user mode” option to reset forgotten rootpassword.

CautiousWe urge to take backup of your data and try it out at your own risk.

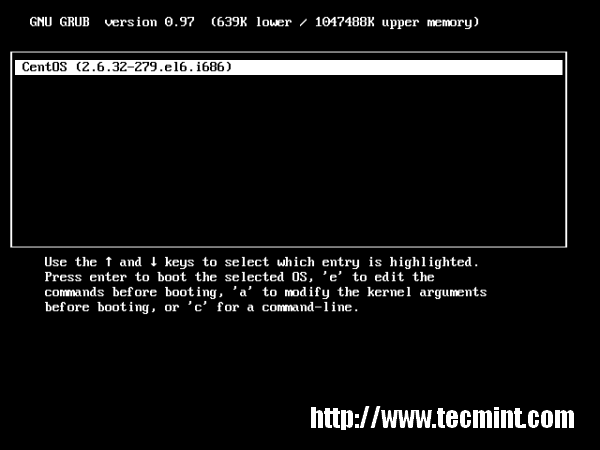
STEP 1. Boot Computer and Interrupt while booting at GRUB stage hitting ‘arrow‘ keys or “space bar“.

Booting Grub Stage

Booting GRUB Stage

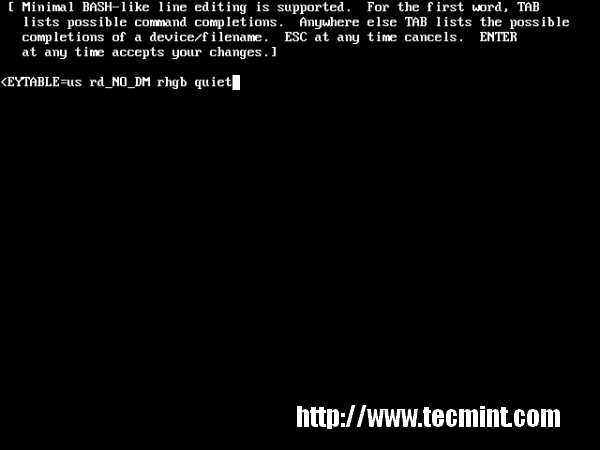
STEP 2. Type ‘a‘ to modify kernel argument. Anytime you can cancel typing ‘ESC‘ key.

Modifying Kernel Parameters

Modify Kernel Argument

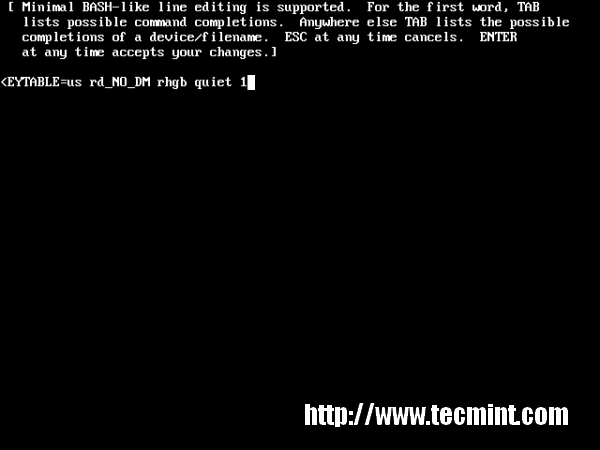
STEP 3. Append 1 at the end of “rhgb quiet” and press “Enter” key to boot into single user mode.

Append 1 at the GRUB

Append 1 at the Screen

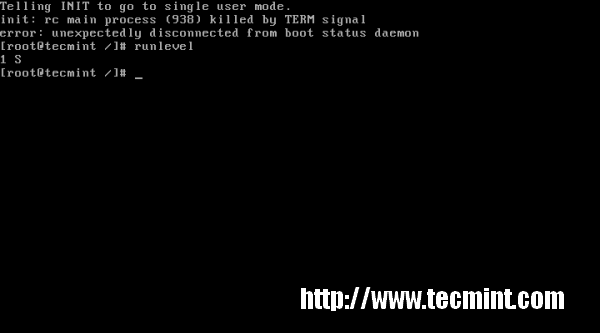
STEP 4. Type command “runlevel” to know the the runlevel where you are standing. Here “1 S” state that your are in a single user mode.

Command runlevel

Type Command runlevel

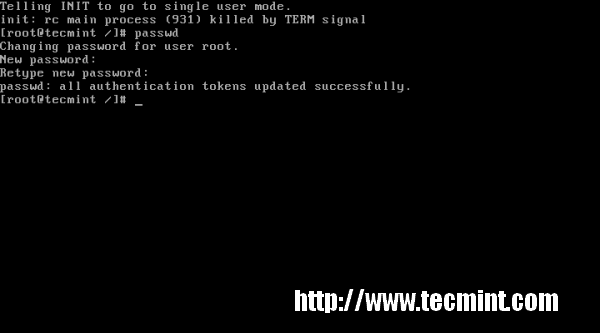
STEP 5. Type ‘passwd‘ command without username and press ‘Enter‘ key in command prompt. It’ll ask to supply new root password and re-type the same password for confirmation. “Your are Done” Congratulation!!!

Passwd Command

Type passwd Command

What if GRUB bootloader is password protected? We’ll cover in our next article, how to protect GRUB with password and reset the same. Stay tuned…

If you find this article is helpful, or you may have some comments or query about it please feel free to contact with us through below comment box.

Source

How to View Configuration Files Without Comments in Linux

Are you looking through an extremely lengthy configuration file, one with hundreds of lines of comments, but only want to filter the important settings from it. In this article, we will show you different ways to view a configuration file without comments in Linux.

Read Alsoccat – Show ‘cat Command’ Output with Syntax Highlighting or Colorizing

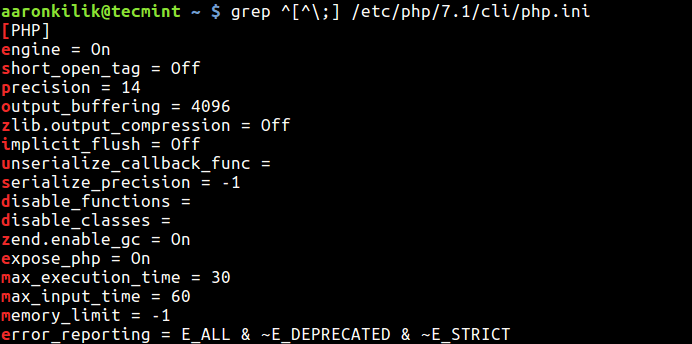
You can use the grep command to for this purpose. The following command will enable you view the current configurations for PHP 7.1 without any comments, it will remove lines starting with the ; character which is used for commenting.

Note that since ; is a special shell character, you need to use the \ escape character to change its meaning in the command.

$ grep ^[^\;] /etc/php/7.1/cli/php.ini

View Files Without Comments

View Files Without Comments

In most configuration files, the # character is used for commenting out a line, so you can use the following command.

$ grep ^[^#] /etc/postfix/main.cf

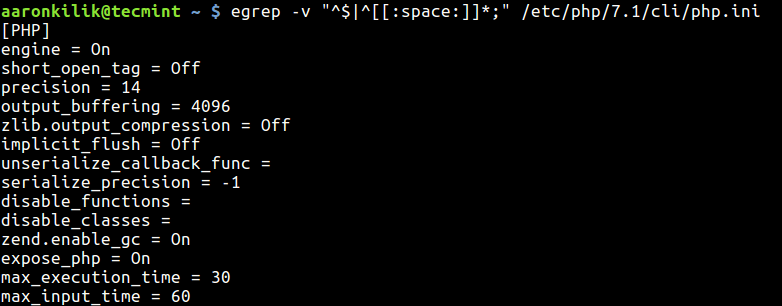
What if you have lines starting with some spaces or tabs other then # or ; character?. You can use the following command which should also remove empty spaces or lines in the output.

$ egrep -v "^$|^[[:space:]]*;" /etc/php/7.1/cli/php.ini 
OR
$ egrep -v "^$|^[[:space:]]*#" /etc/postfix/main.cf

View Files Without Spaces

View Files Without Spaces

From the above example, the -v switch means show non-matching lines; instead of showing matched lines (it actually inverts the meaning of matching) and in the pattern “^$|^[[:space:]]*#”:

  • ^$ – enables for deleting empty spaces.
  • ^[[:space:]]*# or ^[[:space:]]*; – enables matching of lines that starting with # or ; or “some spaces/tabs.
  • | – the infix operator joins the two regular expressions.

Also learn more about grep command and its variations in these articles:

  1. What’s Difference Between Grep, Egrep and Fgrep in Linux?
  2. 11 Advanced Linux ‘Grep’ Commands on Character Classes and Bracket Expressions

That’s all for now! We would love to hear from you, share with us any alternative methods for viewing configuration files without comments, via the feedback form below.

Source

Linux sdiff Command Examples for Linux Newbies

In one of our earlier article, we have explained about 9 best file comparison and difference (Diff) tools for Linux systems. We listed a mixture of command-line and GUI tools for comparing and finding differences between files, each with certain remarkable features. Another useful diff utility for Linux is called sdiff.

Read AlsoHow to Find Difference Between Two Directories Using Diff and Meld Tools

sdiff is a simple command line utility for showing the differences between two files and merge interactively. It is easy to use and comes with straightforward usage options as explained below.

The syntax for using sdiff is as follows.

$ sdiff option... file1 file2

Show Difference Between Two Files in Linux

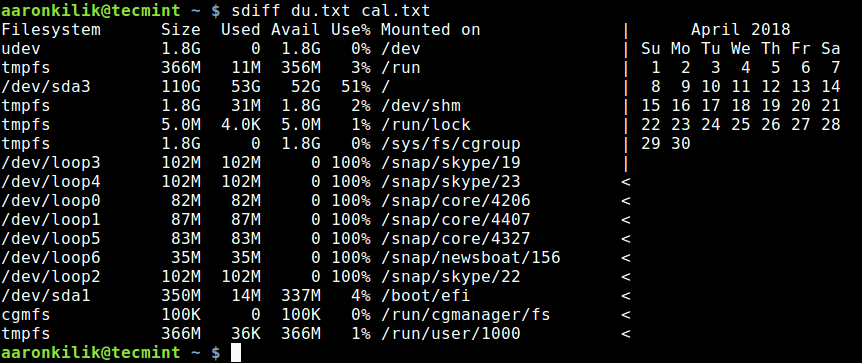
1. The easiest way to run sdiff is to provide the two filenames you are trying to compare. It will show the merged difference side-by-side as shown in the following screenshot.

$ cal >cal.txt
$ df -h >du.txt
$ sdiff du.txt cal.txt

Check Difference Between Files in Linux

Check Difference Between Files in Linux

Treat all Files as Text Files

2. To treat all files as text and compare them line-by-line, whether they are text files or not, use the -a flag.

$ sdiff -a du.txt cal.txt

Filesystem      Size  Used Avail Use% Mounted on	      |	     April 2018       
udev            3.9G     0  3.9G   0% /dev		      |	Su Mo Tu We Th Fr Sa  
tmpfs           788M  9.7M  779M   2% /run		      |	 1  2  3  4  5  6  7  
/dev/sda10      324G  265G   43G  87% /			      |	 8  9 10 11 12 13 14  
tmpfs           3.9G  274M  3.6G   7% /dev/shm		      |	15 16 17 18 19 20 21  
tmpfs           5.0M  4.0K  5.0M   1% /run/lock		      |	22 23 24 25 26 27 28  
tmpfs           3.9G     0  3.9G   0% /sys/fs/cgroup	      |	29 30                 
/dev/loop2       82M   82M     0 100% /snap/core/4206	      |	                      
/dev/loop4      181M  181M     0 100% /snap/vlc/190	      <
/dev/loop1       87M   87M     0 100% /snap/core/4407	      <
/dev/loop0      189M  189M     0 100% /snap/vlc/158	      <
/dev/loop3       83M   83M     0 100% /snap/core/4327	      <
cgmfs           100K     0  100K   0% /run/cgmanager/fs	      <
tmpfs           788M   40K  788M   1% /run/user/1000	      <

Ignore Tabs and White Space

3. If you have files with too much whitespace, you can tell sdiff to ignore all white space while comparing using the -W switch.

$ sdiff -W du.txt cal.txt

4. You can also tell sdiff to ignore any white space at line end using the -z option.

$ sdiff -z du.txt cal.txt

5. In addition, you can instruct sdiff to ignore changes due to tab expansion with the -E flag.

$ sdiff -E du.txt cal.txt

Ignore Case While Comparing Difference

6. To ignore case (where sdiff treats upper- and lower-case as the same), use the -i option as shown.

$ sdiff -i du.txt cal.txt

Ignore Blank Lines While Comparing Difference

7. The -B option helps to ignore blank line in files.

$ sdiff -B du.txt cal.txt

Define Number of Columns to Output

8. sdiff allows you to set the number of columns to be printed (default is 130), by using the -w switch as follows.

$ sdiff -w 150 du.txt cal.txt

Expand Tabs to Spaces

9. To expand tabs to spaces in output, use the -t option.

$ sdiff -t du.txt cal.txt

Run sdiff Interactively

10. The -o flag enables it to run more interactively and send output to a file. In this command, the output will be sent to the sdiff.txt file, press Enter after seeing the % sign, to get the interactive menu.

$ sdiff du.txt cal.txt -o sdiff.txt

Filesystem      Size  Used Avail Use% Mounted on	      |	     April 2018       
udev            3.9G     0  3.9G   0% /dev		      |	Su Mo Tu We Th Fr Sa  
tmpfs           788M  9.7M  779M   2% /run		      |	 1  2  3  4  5  6  7  
/dev/sda10      324G  265G   43G  87% /			      |	 8  9 10 11 12 13 14  
tmpfs           3.9G  274M  3.6G   7% /dev/shm		      |	15 16 17 18 19 20 21  
tmpfs           5.0M  4.0K  5.0M   1% /run/lock		      |	22 23 24 25 26 27 28  
tmpfs           3.9G     0  3.9G   0% /sys/fs/cgroup	      |	29 30                 
/dev/loop2       82M   82M     0 100% /snap/core/4206	      |	                      
/dev/loop4      181M  181M     0 100% /snap/vlc/190	      <
/dev/loop1       87M   87M     0 100% /snap/core/4407	      <
/dev/loop0      189M  189M     0 100% /snap/vlc/158	      <
/dev/loop3       83M   83M     0 100% /snap/core/4327	      <
cgmfs           100K     0  100K   0% /run/cgmanager/fs	      <
tmpfs           788M   40K  788M   1% /run/user/1000	      <
% ed: Edit then use both versions, each decorated with a header. eb: Edit then use both versions. el or e1: Edit then use the left version. er or e2: Edit then use the right version. e: Discard both versions then edit a new one. l or 1: Use the left version. r or 2: Use the right version. s: Silently include common lines. v: Verbosely include common lines. q: Quit. %

Note that you need to have some of the editors such as ed installed on your system before using them, in this scenario.

Invoke Another Program To Compare Files

11. The --diff-program switch allows you to call another command-line tool, other than sdiff itself to compare files, for instance, you can call the diff program as shown.

$ sdiff --diff-program=diff du.txt cal.txt

For more information, consult the sdiff man page.

$ man sdiff

In this article, we looked at sdiff command-line tool examples for beginners. If you have any questions, use the comment form below to reach us.

Source

Progress – A Tiny Tool to Monitor Progress for (cp, mv, dd, tar, etc.) Commands in Linux

Progress, formerly known as Coreutils Viewer, is a light C command that searches for coreutils basic commands such as cpmvtarddgzip/gunzipcatgrep etc currently being executed on the system and shows the percentage of data copied, it only runs on Linux and Mac OS X operating systems.

Additionally, it also displays important aspects such as estimated time and throughput, and offers users a “top-like” mode.

Suggested Read: Monitor Progress of (Copy/Backup/Compress) Data using ‘pv’ Command

It utterly scans the /proc filesystem for fascinating commands, and then searches the fd and fdinfodirectories to find opened files, seeks positions, and reports status for the extensive files. Importantly, it is a very light tool, and compatible with practically any command.

How to Install Progress Viewer in Linux

Progress requires the ncurses library in order to work, therefore install libncurses before proceeding to install it, by running the appropriate command below:

-------------- On RHEL, CentOS and Fedora -------------- 
# yum install ncurses-devel  

-------------- On Fedora 22+ Releases --------------         
# dnf install ncurses-devel

-------------- On Debian, Ubuntu and Linux Mint -------------- 
$ sudo apt-get install libncurses5-dev

You can start by cloning or downloading the package files from its Github repo as follows:

# git clone  https://github.com/Xfennec/progress.git

Next, move into the progress directory and build it as shown:

$ cd progress
$ make 
$ sudo make install

After successfully installing it, simply run this tool from your terminal, below we shall walk through a few examples of using Progress on a Linux system.

You can view all the coreutils commands that Progress works with by running it without any options, provided non of the coreutils commands is being executed on the system:

$ progress 

Progress Viewer Commands

Progress Viewer Commands

To display estimated I/O throughput and estimated remaining time for on going coreutils commands, enable the -w option:

$ progress -w

Monitor Progress of Running Commands

Monitor Progress of Running Commands

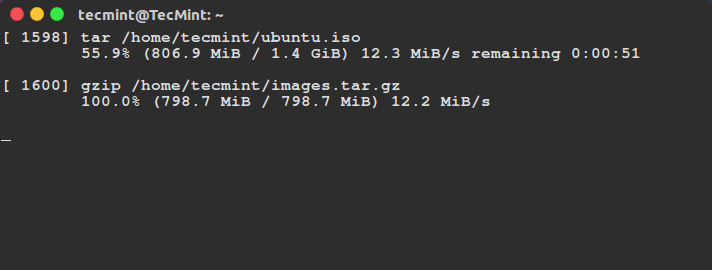
Start a heavy command and monitor it using -m option and $! as follows:

$ tar czf images.tar.gz linuxmint-18-cinnamon-64bit.iso CentOS-7.0-1406-x86_64-DVD.iso CubLinux-1.0RC-amd64.iso | progress  -m  $!

Monitor Progress of Linux Commands

Monitor Progress of Linux Commands

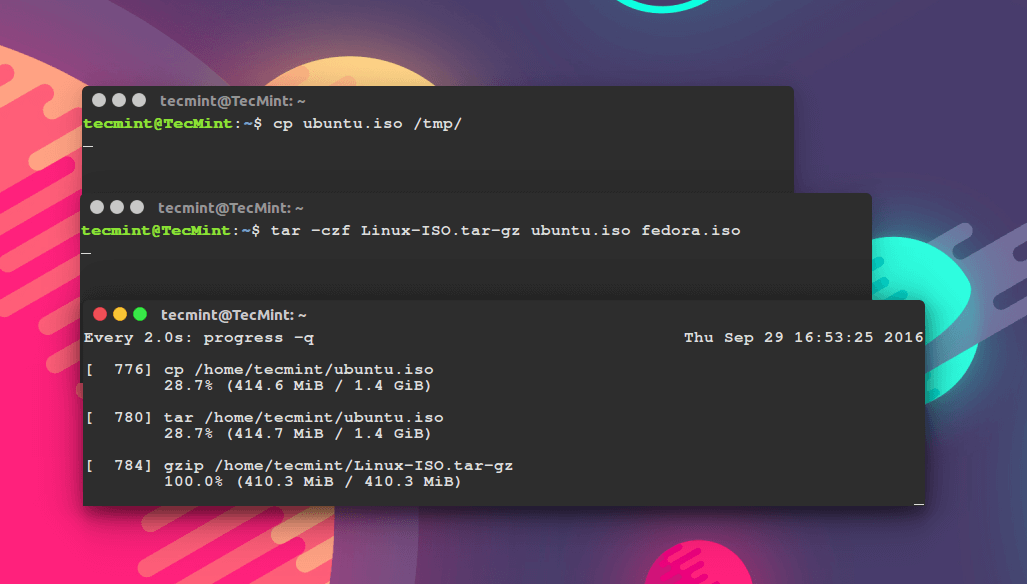
In the next example, you can open two or more terminal windows, then run the coreutils commands in one each, and watch their progress using the other terminal window as shown in the image below.

The command below will enable you to monitor all the current and imminent instances of coreutils commands:

$ watch progress -q

For more interesting options, look through the progress man pages or visit https://github.com/Xfennec/progress :

$ man progress

As a concluding remark, this is very useful tool for monitoring the progress of coreutils commands, especially when copying or archiving and compressing heavy files, plus so much more.

If you have installed it successfully, use it and share your experience with us via the comment section below. You can as well provide us some great usage examples where you find it helpful for important everyday system administration tasks and more.

Source

How to Download and Extract Tar Files with One Command

Tar (Tape Archive) is a popular file archiving format in Linux. It can be used together with gzip (tar.gz) or bzip2 (tar.bz2) for compression. It is the most widely used command line utility to create compressed archive files (packages, source code, databases and so much more) that can be transferred easily from machine to another or over a network.

Read Also18 Tar Command Examples in Linux

In this article, we will show you how to download tar archives using two well known command line downloaders– wget or cURL and extract them with one single command.

How to Download and Extract File Using Wget Command

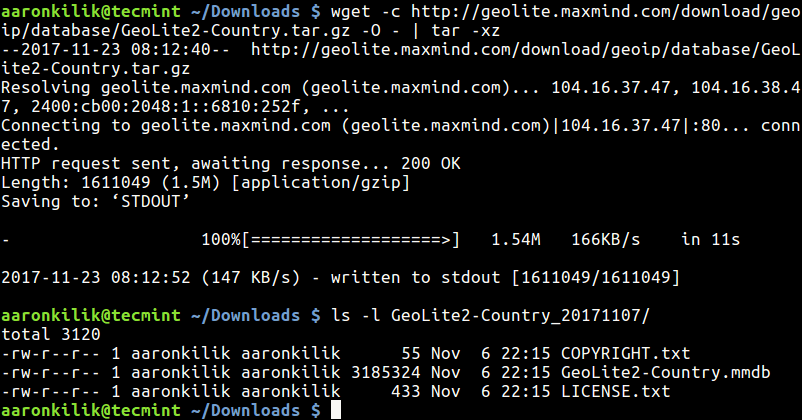
The example below shows how to download, unpack the latest GeoLite2 Country databases (use by the GeoIP Nginx module) in the current directory.

# wget -c http://geolite.maxmind.com/download/geoip/database/GeoLite2-Country.tar.gz -O - | tar -xz

Download and Extract File with Wget

Download and Extract File with Wget

The wget option -O specifies a file to which the documents is written, and here we use -, meaning it will written to standard output and piped to tar and the tar flag -x enables extraction of archive files and -zdecompresses, compressed archive files created by gzip.

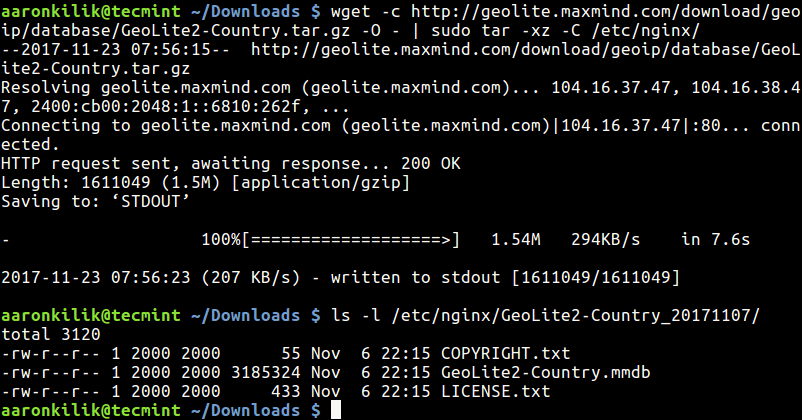
To extract tar files to specific directory/etc/nginx/ in this case, include use the -C flag as follows.

Note: If extracting files to particular directory that requires root permissions, use the sudo command to run tar.

$ sudo wget -c http://geolite.maxmind.com/download/geoip/database/GeoLite2-Country.tar.gz -O - | sudo tar -xz -C /etc/nginx/

Download and Extract File to Directory

Download and Extract File to Directory

Alternatively, you can use the following command, here, the archive file will be downloaded on your system before you can extract it.

$ sudo wget -c http://geolite.maxmind.com/download/geoip/database/GeoLite2-Country.tar.gz && tar -xzf  GeoLite2-Country.tar.gz

To extract compressed archive file to a specific directory, use the following command.

$ sudo wget -c http://geolite.maxmind.com/download/geoip/database/GeoLite2-Country.tar.gz && sudo tar -xzf  GeoLite2-Country.tar.gz -C /etc/nginx/

How to Download and Extract File Using cURL Command

Considering the previous example, this is how you can use cURL to download and unpack archives in the current working directory.

$ sudo curl http://geolite.maxmind.com/download/geoip/database/GeoLite2-Country.tar.gz | tar -xz 

Download and Extract File with cURL

Download and Extract File with cURL

To extract file to different directory while downloading, use the following command.

$ sudo curl http://geolite.maxmind.com/download/geoip/database/GeoLite2-Country.tar.gz | sudo tar -xz  -C /etc/nginx/
OR
$ sudo curl http://geolite.maxmind.com/download/geoip/database/GeoLite2-Country.tar.gz && sudo tar -xzf GeoLite2-Country.tar.gz -C /etc/nginx/

That’s all! In this short but useful guide, we showed you how to download and extract archive files in one single command. If you have any queries, use the comment section below to reach us.

Source

How to Show Asterisks While Typing Sudo Password in Linux

Most applications normally display a feedback using asterisks (*******) when a user is typing a password, but on the Linux terminal, when a normal user runs the sudo command to gain super user privileges, he/she is asked for a password, but no visual feedback is seen by the user while typing the password.

In this article, we will show how to display asterisks as feedback when you type passwords in the terminal in Linux.

Take a look at the following screen shot, here the user tecmint has invoked the sudo command to install the vim text editor in CentOS 7, but there is no visual feedback as the password is typed (in this case the password has already been entered):

$ sudo yum install vim

No Sudo Password Shown

No Sudo Password Shown

You can enable the password feedback feature in /etc/sudoers file, but first create a backup of the file, then open it for editing using the visudo command.

$ sudo cp /etc/sudoers /etc/sudoers.bak
$ sudo visudo 

Search for the following line.

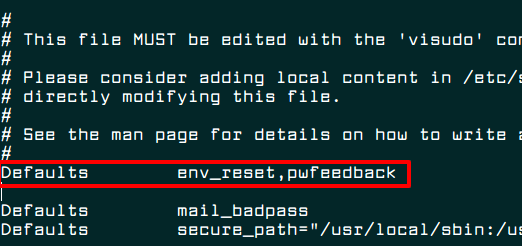
Defaults env_reset

And append pwfeedback to it, so that it looks like this.

Defaults env_reset,pwfeedback

Configure Sudoers File

Configure Sudoers File

Now press Esc key and type :wq to save and close the file. But if you are using nano editor, save the file by hitting “Ctrl+x” and then “y” followed by “ENTER” to close it.

Then run the command below to reset your terminal for the above changes to start working.

$ reset

That’s it, now you should be able to see a visual feedback (****) every time when you typing a password on the terminal, as shown in the following screen shot.

$ sudo yum update

Visible Sudo Password

Visible Sudo Password

You might also like to read these following related articles.

  1. 10 Useful Sudoers Configurations for Setting ‘sudo’ in Linux
  2. How to Run ‘sudo’ Command Without Entering a Password in Linux
  3. Let Sudo Insult You When You Enter Incorrect Password
  4. How to Run Shell Scripts with Sudo Command in Linux

If you have any Linux terminal tips or tricks to share with us, use the comment section below.

Source

PhotoRec – Recover Deleted or Lost Files in Linux

When you delete a file accidentally or intentionally on your system using ‘shift + delete‘ or delete option or empty Trash, the file content is not destroyed from the hard disk (or any storage media).

It is simply removed from the the directory structure and you cannot see the file in the directory where you deleted it, but it still remains somewhere in your hard drive.

If you have the appropriate tools and knowledge, you can recover lost files from your computer. However, as you store more files on your hard disk, the deleted files are overwritten, you may only recover recently deleted files.

In this tutorial, we will explain how to recover lost or deleted files on a hard disk in Linux using Testdisk, is a remarkable recovery tool ships in with a free tool called PhotoRec.

PhotoRec is used to recover lost files from storage media such as hard drives, digital camera and cdrom.

Install Testdisk (PhotoRec) in Linux Systems

To install Testdisk by running the relevant command below for your distribution:

------- On Debian/Ubuntu/Linux Mint ------- 
$ sudo apt-get install testdisk

------- On CentOS/RHEL/Fedora ------- 
$ sudo yum install testdisk

------- On Fedora 22+ ------- 
$ sudo dnf install testdisk   

------- On Arch Linux ------- 
$ pacman -S testdisk             

------- On Gentoo ------- 
$ emerge testdisk  

In case it is not available on your Linux distribution’s repositories, download it from here and run it on a Live CD.

It can also be found in rescue CD such as Gparted LiveCDParted MagicUbuntu Boot CDUbuntu-Rescue-Remix and many more.

Once the installation is complete, start PhotoRec in a text window as follows with root privileges and specify the partition from which the files where deleted:

$ sudo photorec /dev/sda3

You’ll see the interface below:
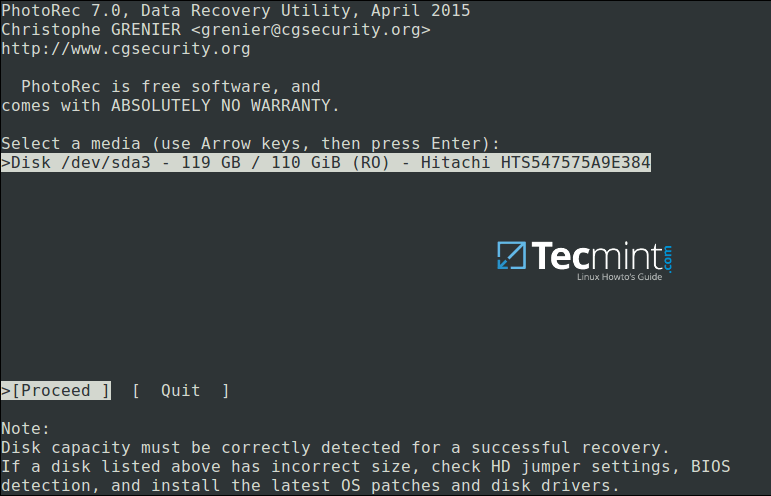
PhotoRec Data Recovery Tool for Linux

PhotoRec Data Recovery Tool for Linux

Use the right and left arrow keys to select a menu item, and press Enter. To continue with the recovery operation, select [Proceed] and hit Enter.

You will be at the following interface:
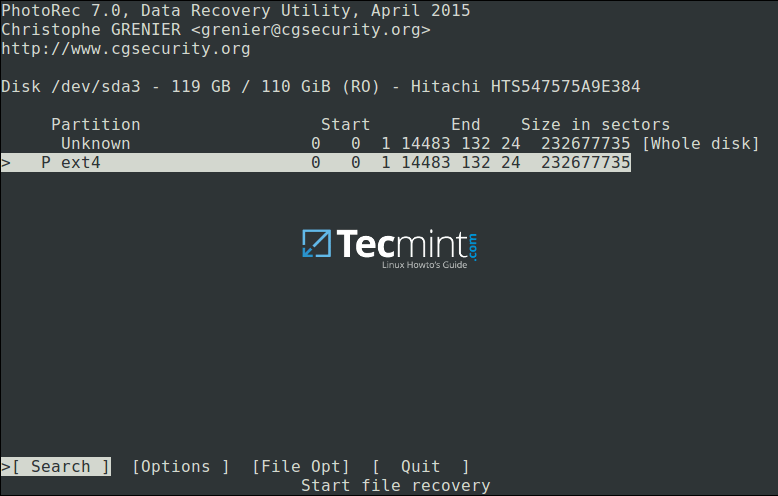
Select Partition to Proceed File Recovery

Select Partition to Proceed File Recovery

Select [Options] to view available recovery operation options as in the interface below:

Linux File Recovery Options

Linux File Recovery Options

Press Q to move back, at the interface below, you can specify the file extensions you want to search and recover. Therefore, select [File Opt] and press Enter.

Press s to disable/enable all file extensions, and in case you have disabled all file extensions, only choose types of files you want to recover by selecting them using right arrow keys (or left arrow key to deselect).

For instance, I want to recover all .mov files that I lost on my system.
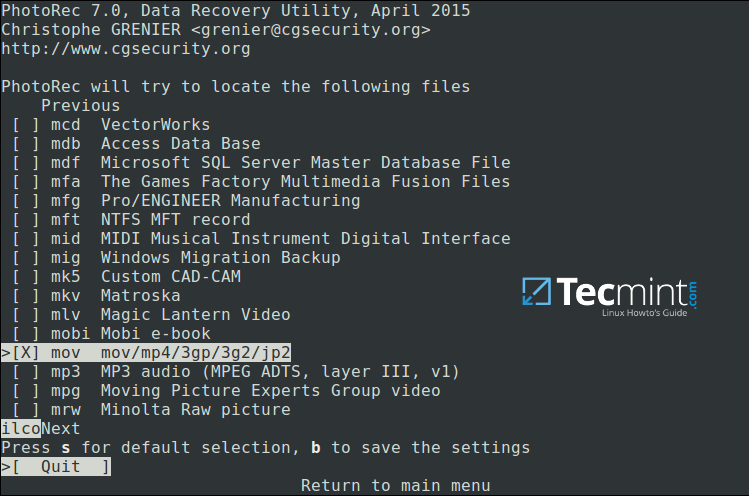
Specify Recovery File Type

Specify Recovery File Type

Then press b to save the setting, you should see the message below after pressing it. Move back by hitting Enter (or simply press Q button), then press Q again to go back to the main menu.

Save File Recovery Settings

Save File Recovery Settings

Now select [Search] to start the recovery process. In the interface below, choose the filesystem type where the file(s) were stored and hit Enter.
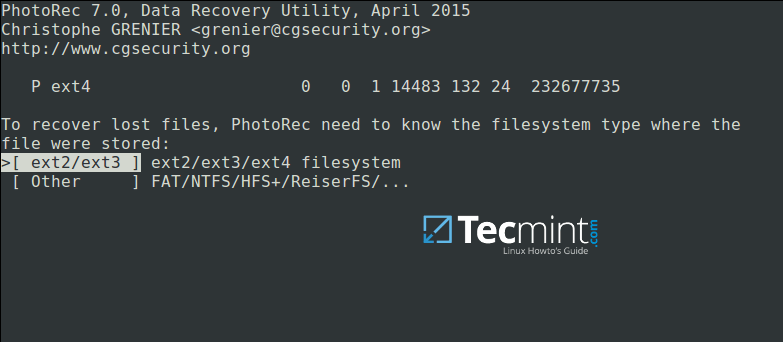
Select Filesystem to Recover Deleted Files

Select Filesystem to Recover Deleted Files

Next, choose if only free space or the whole partition needs to be analyzed as below. Note that choosing whole partition will make the operation slower and longer. Once you have selected the appropriate option, press Enterto proceed.
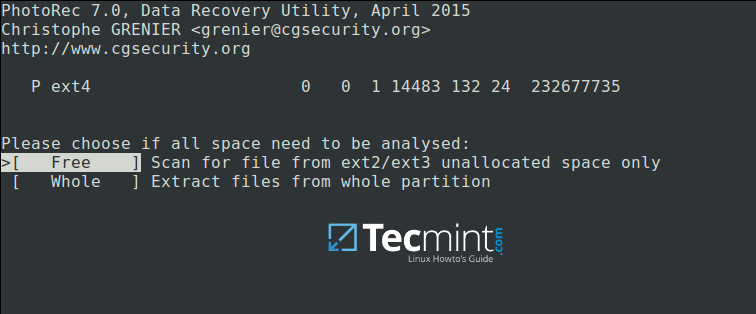
Choose Filesystem to Analyze

Choose Filesystem to Analyze

Closely select a directory where recovered files will be stored, if the destination is correct, press C button to continue. Choose a directory on a different partition to avoid deleted files being overwritten when more data is stored on the partition.

To move back until the root partition, use the left arrow key.
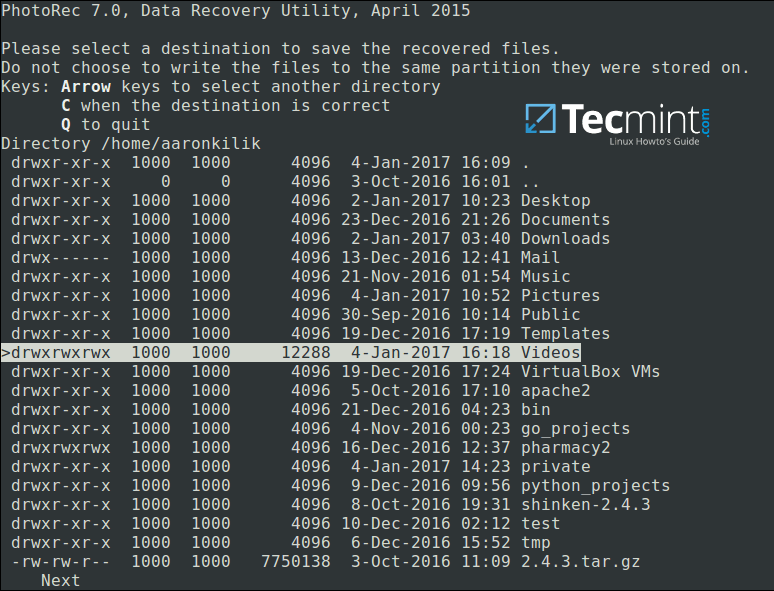
Select Directory to Save Recovered Files

Select Directory to Save Recovered Files

The screenshot below shows deleted files of the specified type being recovered. You can stop the operation by pressing Enter.

Note: Your system may become slow, and possibly freeze at certain moments, so you need to be patient until when the process is complete.
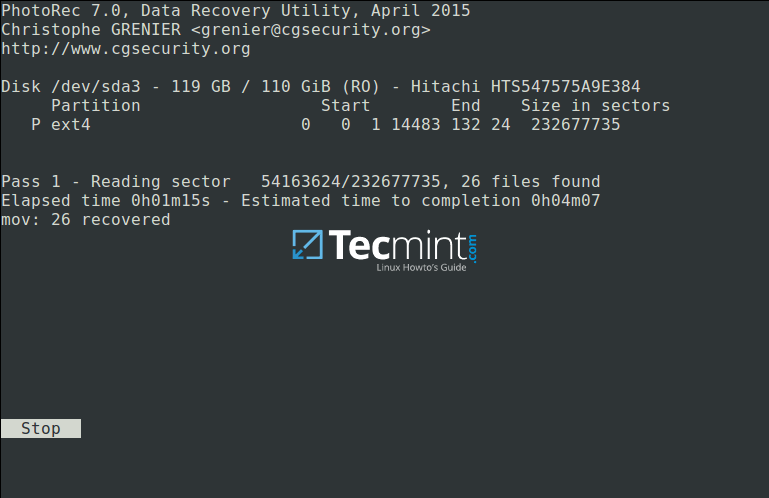
Recovering Deleted Files in Linux

Recovering Deleted Files in Linux

At the end of the operation, Photorec will show you the number and the location of files recovered.

Linux File Recovery Summary

Linux File Recovery Summary

The recovered files will be stored with root privileges by default, therefore open your file manager with elevated privileges to access the files.

Use the command below (specify your file manager):

$ gksudo nemo
or
$ gksudo nautilus 

For more information, visit PhotoRec homepage: http://www.cgsecurity.org/wiki/PhotoRec.

That’s all! In this tutorial, we explained the necessary steps to recover deleted or lost files from hard disk using PhotoRec. This is so far the most reliable and effective recovery tool I have ever used, if you know any other similar tool, do share with us in the comments.

Source

11 Advanced Linux ‘Grep’ Commands on Character Classes and Bracket Expressions

Have you ever been into a situation where you need to search for a string, word or pattern inside a file? if yes, then the grep utility comes handy in such situation.

grep is a command line utility for searching plain-text data for lines which matching a regular expression. If you will divide the word grep like g/re/p then the meaning of grep is (globally search a regular expression and print) which search pattern from the file and print the line on the screen i.e. standard output.

Suggested Read: 12 Basic Practical Examples of Linux grep Command

In this article I will be going to explain advanced commands on grep for the Character Classes in Linux and Unix like operating system.

Here I have considered tecmint.txt is the base file where we will search pattern with the help of grep command in this article for explanation.

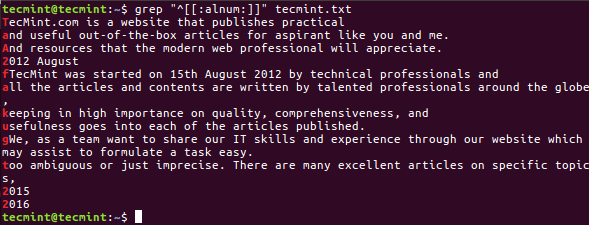
1. Search Alphanumeric Characters

If you have thousands of lines in a file and wanted to search a line which will start from only A-Za-z & 0-9(Alphanumeric Characters).

$ grep "^[[:alnum:]]" tecmint.txt

Grep - Search Alphanumeric Characters in File

Grep – Search Alphanumeric Characters in File

2. Search Alpha Characters

Similar options like if you want to search line which will start from only [A-Z & a-z] i.e. Alpha Characters.

$ grep "^[[:alpha:]]" tecmint.txt

Grep - Search Alpha Characters in File

Grep – Search Alpha Characters in File

3. Search Blank Characters

Another options like if you want to search line which will start from [Tab & Space] i.e. Blank Characters.

$ grep "^[[:blank:]]" tecmint.txt

Grep - Search for Spaces or Tabs in File

Grep – Search for Spaces or Tabs in File

4. Search Digit Characters

The digit option for grep is also very useful to search line which will start from digit [0-9] i.e. Digit Characters.

$ grep "^[[:digit:]]" tecmint.txt

Grep - Search Number Characters in File

Grep – Search Number Characters in File

5. Search Lower Letters

Another option for grep is to search line which will start from lower letters i.e [a-z] (Lower Letters).

$ grep "^[[:lower:]]" tecmint.txt

Grep - Search Lower Letters or Words in File

Grep – Search Lower Letters or Words in File

6. Search Punctuation Characters

The Punctuation characters for grep is to search line which will start from [! ” # $ % & ‘ ( ) * + , – . / : ; < = > ? @ [ \ ] ^ _ ` { | } ~. ] i.e. Punctuation Characters.

$ grep "^[[:punct:]]" tecmint.txt

Grep - Search Punctuation Characters in File

Grep – Search Punctuation Characters in File

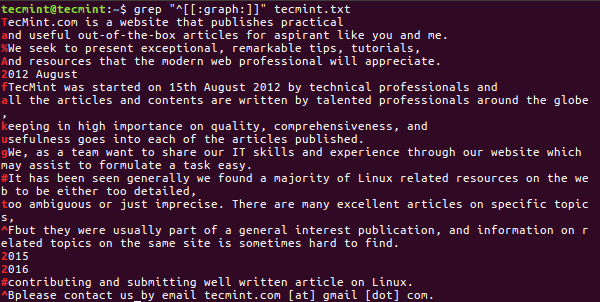
7. Search Graphical Characters

The grep is also used to search a line which will start from Alphanumeric & Punctuation Characters called as Graphical Characters.

$ grep "^[[:graph:]]" tecmint.txt

Grep - Search Graphical Characters in File

Grep – Search Graphical Characters in File

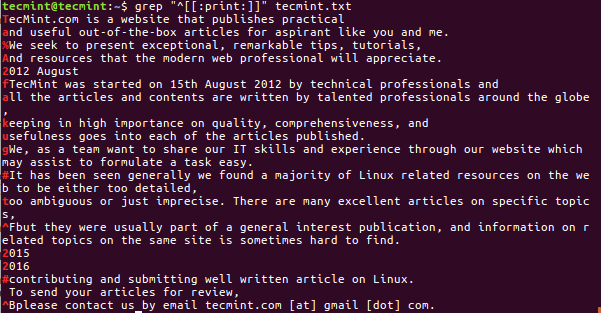
8. Search Printable Characters

Similarly like Graphical Characters, grep is useful to search a line which will start from Alphanumeric, Punctuation and space characters.

$ grep "^[[:print:]]" tecmint.txt

Grep - Search Printable Characters in File

Grep – Search Printable Characters in File

9. Search Space Characters

The grep has also a functionality to search a line which will start from [tab, newline, vertical tab, form feed, carriage return, and space] i.e. Space Characters.

$ grep "^[[:space:]]" tecmint.txt

Grep - Search Space Characters in File

Grep – Search Space Characters in File

10. Search Uppercase Letters

Another option in the grep is also used to search a line which will start from [A-Z] i.e Upper-case Letters.

$ grep "^[[:upper:]]" tecmint.txt

Grep - Search Uppercase Letters in File

Grep – Search Uppercase Letters in File

11. Search Hexadecimal Digits

The grep searches a line which will start from [0-9, A-F and a-f] i.e Hexadecimal Digits.

$ grep "^[[:xdigit:]]" tecmint.txt

Grep - Search Hexadecimal Digits in File

Grep – Search Hexadecimal Digits in File

I have explained the advanced functionality of grep which is very strong and powerful tool to search the pattern in a File. Grep is also an important tool for shell scripting and programmers to search the pattern in the programs. It is worth to be familiar with other options and syntax to save the time.

Suggested Read: What’s Difference Between Grep, Egrep and Fgrep in Linux?

In case any issues on the commands which is explained in the article, you can post your comment in the comment section below.

Source

How to Sync Files/Directories Using Rsync with Non-standard SSH Port

Today, we will be discussing about how to sync files using rsync with non-standard SSH port. You might wonder why do we need to use non-standard SSH port? It is because of security reasons. Everybody knows 22 is the SSH default port.

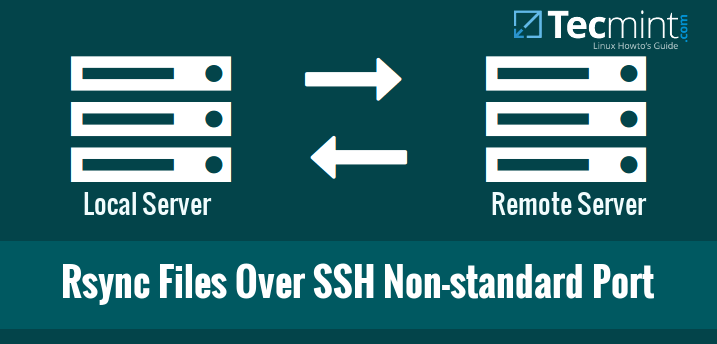
Rsync Files Over SSH Non-standard Port

Rsync Files Over SSH Non-standard Port

So, It is mandatory to change your SSH default port number to something different which is very hard to guess. In such cases, how will you sync your files/folders with your Remote server? No worries, It is not that difficult. Here we will see how to sync files and folders using rsync with non-standard SSH port.

As you might know, rsync, also known as Remote Sync, is a fast, versatile, and powerful tool that can be used to copy and sync files/directories from local to local, or local to remote hosts. For more details about rsync, check man pages:

# man rsync

Or refer our previous guide from the link below.

  1. Rsync: 10 Practical Examples of Rsync Command in Linux

Change SSH Port to Non-standard Port

As we all know, By default rsync uses default SSH port 22 to sync files over local to remote hosts and vice versa. We should change our remote server’s SSH port to tighten the security.

To do this, open and edit the SSH configuration /etc/ssh/sshd_config file:

# vi /etc/ssh/sshd_config 

Find the following line. Uncomment and change the port number of your choice. I recommend you to choose any number which is very hard to guess.

Make sure you are using a unique number which is not used by existing services. Check this netstat article to know which services are running on which TCP/UDP ports.

For example, here I use port number 1431.

[...]
Port 1431
[...]

Save and close the file.

In RPM based systems such as RHELCentOS, and Scientific Linux 7, you need to allow the new port through your firewall or router.

# firewall-cmd --add-port 1431/tcp
# firewall-cmd --add-port 1431/tcp --permanent

On RHEL/CentOS/Scientific Linux 6 and above, you should also update selinux permissions to allow the port.

# iptables -A RH-Firewall-1-INPUT -m state --state NEW -m tcp -p tcp --dport 1431 -j ACCEPT
# semanage port -a -t ssh_port_t -p tcp 1431

Finally, restart SSH service to take effect the changes.

# systemctl restart sshd        [On SystemD]
OR
# service sshd restart          [On SysVinit]

Now let us see how to sync files using rsync with non-standard port.

How to Rsync with non-standard SSH Port

Run the following command from the terminal to sync files/folders using Rsync with non-standard ssh port.

Syntax:
# rsync -arvz -e 'ssh -p <port-number>' --progress --delete user@remote-server:/path/to/remote/folder /path/to/local/folder

For the purpose of this tutorial, I will be using two systems.

Remote System Details:

IP Address: 192.168.1.103
User name: tecmint
Sync folder: /backup1

Local System Details:

Operating System: Ubuntu 14.04 Desktop
IP Address: 192.168.1.100
Sync folder: /home/sk/backup2

Let us sync the contents of remote server’s /backup1 folder to my local system’s folder /home/sk/backup2/.

$ sudo rsync -arvz -e 'ssh -p 1431' --progress --delete tecmint@192.168.1.103:/backup1 /home/sk/backup2
Sample Output
tecmint@192.168.1.103's password: 
receiving incremental file list
backup1/
backup1/linux-headers-4.3.0-040300-generic_4.3.0-040300.201511020949_amd64.deb
        752,876 100%   13.30MB/s    0:00:00 (xfr#1, to-chk=2/4)
backup1/linux-headers-4.3.0-040300_4.3.0-040300.201511020949_all.deb
      9,676,510 100%   12.50MB/s    0:00:00 (xfr#2, to-chk=1/4)
backup1/linux-image-4.3.0-040300-generic_4.3.0-040300.201511020949_amd64.deb
     56,563,302 100%   11.26MB/s    0:00:04 (xfr#3, to-chk=0/4)

sent 85 bytes  received 66,979,455 bytes  7,050,477.89 bytes/sec
total size is 66,992,688  speedup is 1.00.

Let us check the contents of /backup1/ folder in the remote server.

$ sudo ls -l /backup1/
Sample Output
total 65428
-rw-r--r-- 1 root root  9676510 Dec  9 13:44 linux-headers-4.3.0-040300_4.3.0-040300.201511020949_all.deb
-rw-r--r-- 1 root root   752876 Dec  9 13:44 linux-headers-4.3.0-040300-generic_4.3.0-040300.201511020949_amd64.deb
-rw-r--r-- 1 root root 56563302 Dec  9 13:44 linux-image-4.3.0-040300-generic_4.3.0-040300.201511020949_amd64.deb

Now, let us check the contents of /backup2/ folder of local system.

$ ls /home/sk/backup2/
Sample Output
backup1

As you see in the above output, the contents of /backup1/ have been successfully copied to my local system’s /home/sk/backup2/ directory.

Verify /backup1/ folder contents:

$ ls /home/sk/backup2/backup1/
Sample Output
linux-headers-4.3.0-040300_4.3.0-040300.201511020949_all.deb            
linux-image-4.3.0-040300-generic_4.3.0-040300.201511020949_amd64.deb
linux-headers-4.3.0-040300-generic_4.3.0-040300.201511020949_amd64.deb

See, both remote and local system’s folders have same files.

Conclusion

Syncing files/folders using Rsync with SSH is not only easy, but also fast and secure method. If you’re behind a firewall that restricts port 22, no worries. Just change the default port and sync files like a pro.

Source

How to Find Out Who is Using a File in Linux

In this article, we will explain how to find out who is using a particular file in Linux. This will help you know the system user or process that is using an open file.

We can use the lsof command to know if someone is using a file, and if they are, who. It reads kernel memory in its search for open files and helps you list all open files. In this case, an open file may be a regular file, a directory, a block special file, a character special file, a stream, a network file and many others – because in Linux everything is a file.

Lsof is used on a file system to identify who is using any files on that file system. You can run lsof command on Linux filesystem and the output identifies the owner and process information for processes using the file as shown in the following output.

$ lsof /dev/null
List of All Opened Files in Linux
COMMAND    PID    USER   FD   TYPE DEVICE SIZE/OFF NODE NAME
systemd   1480 tecmint    0r   CHR    1,3      0t0    6 /dev/null
sh        1501 tecmint    0r   CHR    1,3      0t0    6 /dev/null
sh        1501 tecmint    1w   CHR    1,3      0t0    6 /dev/null
dbus-daem 1530 tecmint    0u   CHR    1,3      0t0    6 /dev/null
xfce4-ses 1603 tecmint    0r   CHR    1,3      0t0    6 /dev/null
xfce4-ses 1603 tecmint    1w   CHR    1,3      0t0    6 /dev/null
at-spi-bu 1604 tecmint    0r   CHR    1,3      0t0    6 /dev/null
dbus-daem 1609 tecmint    0u   CHR    1,3      0t0    6 /dev/null
at-spi2-r 1611 tecmint    0u   CHR    1,3      0t0    6 /dev/null
xfconfd   1615 tecmint    0u   CHR    1,3      0t0    6 /dev/null
xfwm4     1624 tecmint    0r   CHR    1,3      0t0    6 /dev/null
xfwm4     1624 tecmint    1w   CHR    1,3      0t0    6 /dev/null
xfce4-pan 1628 tecmint    0r   CHR    1,3      0t0    6 /dev/null
xfce4-pan 1628 tecmint    1w   CHR    1,3      0t0    6 /dev/null
Thunar    1630 tecmint    0r   CHR    1,3      0t0    6 /dev/null
Thunar    1630 tecmint    1w   CHR    1,3      0t0    6 /dev/null
xfdesktop 1632 tecmint    0r   CHR    1,3      0t0    6 /dev/null
xfdesktop 1632 tecmint    1w   CHR    1,3      0t0    6 /dev/null
....

To list user specific opened files, run the following command replace tecmint with the actual user name.

$ lsof -u tecmint
List of Files Opened by User
COMMAND    PID    USER   FD      TYPE             DEVICE  SIZE/OFF       NODE NAME
systemd   1480 tecmint  cwd       DIR                8,3      4096          2 /
systemd   1480 tecmint  rtd       DIR                8,3      4096          2 /
systemd   1480 tecmint  txt       REG                8,3   1595792    3147496 /lib/systemd/systemd
systemd   1480 tecmint  mem       REG                8,3   1700792    3150525 /lib/x86_64-linux-gnu/libm-2.27.so
systemd   1480 tecmint  mem       REG                8,3    121016    3146329 /lib/x86_64-linux-gnu/libudev.so.1.6.9
systemd   1480 tecmint  mem       REG                8,3     84032    3150503 /lib/x86_64-linux-gnu/libgpg-error.so.0.22.0
systemd   1480 tecmint  mem       REG                8,3     43304    3150514 /lib/x86_64-linux-gnu/libjson-c.so.3.0.1
systemd   1480 tecmint  mem       REG                8,3     34872    2497970 /usr/lib/x86_64-linux-gnu/libargon2.so.0
systemd   1480 tecmint  mem       REG                8,3    432640    3150484 /lib/x86_64-linux-gnu/libdevmapper.so.1.02.1
systemd   1480 tecmint  mem       REG                8,3     18680    3150450 /lib/x86_64-linux-gnu/libattr.so.1.1.0
systemd   1480 tecmint  mem       REG                8,3     18712    3150465 /lib/x86_64-linux-gnu/libcap-ng.so.0.0.0
systemd   1480 tecmint  mem       REG                8,3     27112    3150489 /lib/x86_64-linux-gnu/libuuid.so.1.3.0
systemd   1480 tecmint  mem       REG                8,3     14560    3150485 /lib/x86_64-linux-gnu/libdl-2.27.so
...

Another important use of lsof is to find out the process listening on a specific port. For example identify the process listening on port 80 using the following command.

$ sudo lsof -i TCP:80
Find Out Process Listening Port
COMMAND  PID   USER   FD   TYPE DEVICE SIZE/OFF NODE NAME
httpd    903   root    4u  IPv6  20222      0t0  TCP *:http (LISTEN)
httpd   1320 apache    4u  IPv6  20222      0t0  TCP *:http (LISTEN)
httpd   1481 apache    4u  IPv6  20222      0t0  TCP *:http (LISTEN)
httpd   1482 apache    4u  IPv6  20222      0t0  TCP *:http (LISTEN)
httpd   1493 apache    4u  IPv6  20222      0t0  TCP *:http (LISTEN)
httpd   1763 apache    4u  IPv6  20222      0t0  TCP *:http (LISTEN)
httpd   2027 apache    4u  IPv6  20222      0t0  TCP *:http (LISTEN)
httpd   2029 apache    4u  IPv6  20222      0t0  TCP *:http (LISTEN)
httpd   2044 apache    4u  IPv6  20222      0t0  TCP *:http (LISTEN)
httpd   3199 apache    4u  IPv6  20222      0t0  TCP *:http (LISTEN)
httpd   3201 apache    4u  IPv6  20222      0t0  TCP *:http (LISTEN)

Note: Since lsof reads kernel memory in its search for open files, rapid changes in kernel memory may result into unpredictable outputs. This is one of the major downsides of using lsof command.

For more information, look at the lsof man page:

$ man lsof

That’s all! In this article, we have explained how to know who is using a particular file in Linux. We have shown how to identify the owner and process information for processes using an open file. Use the feedback form below to reach us for any questions or comments.

Source

WP2Social Auto Publish Powered By : XYZScripts.com