Many thanks to all of you, for your donations and for your support.
I hope you had a great summer (or winter if you live in the South hemisphere). Here we’re eager to get into September, with LMDE 3 and Mint 19 behind us, we’re ready to get started on some of the big projects.
LMDE
LMDE 3 was released today. I’d like to thank all the people involved in the project and also all the people who reported issues to us and who helped us fix bugs during the BETA.
The upgrade path for the Cinnamon edition was also opened. Timeshift, Slick Greeter and mintupgrade were backported towards LMDE 2 to facilitate the upgrade and the switch from MDM with sysvinit to LightDM with Systemd.
If you are running LMDE 2 Cinnamon, please upgrade before the end of the year. We’ll continue to support LMDE 2 until the 1st of January 2019.
The LMDE 2 MATE edition cannot be upgraded (Debian’s version of MATE is only 1.16 and this edition is no longer present in LMDE 3), we recommend users perform data and software backups and upgrade their OS via fresh installations. MATE packages in LMDE 2 will also be supported until the 1st of the January 2019.
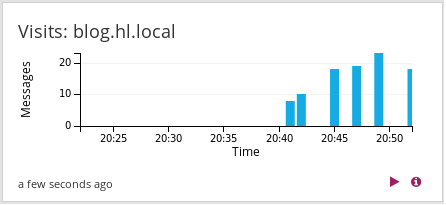
Software Sources
The Software Sources tool was given a new look. Similar to the welcome screen, it’s now using an Xapp sidebar and a headerbar.
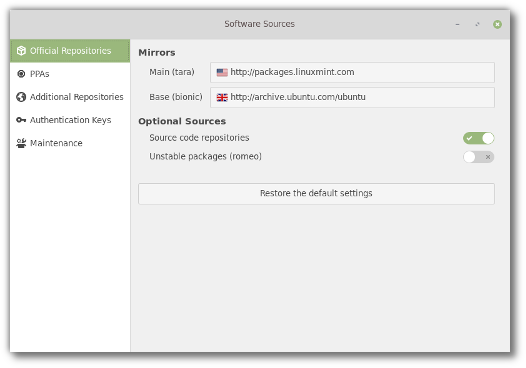
The optional sources section was also simplified and we’re planning to add a new option to make it easy to add debug repositories (to adapt to Debian’s decision to move debug symbols to dbgsym packages/repositories).
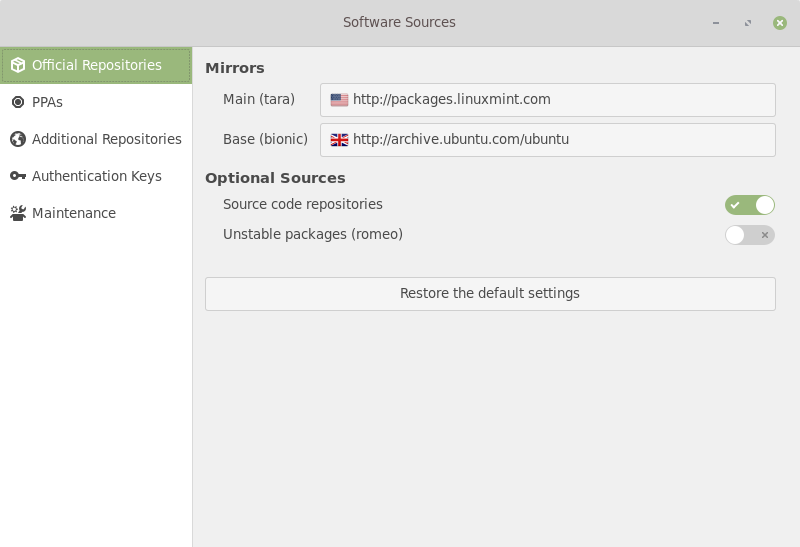
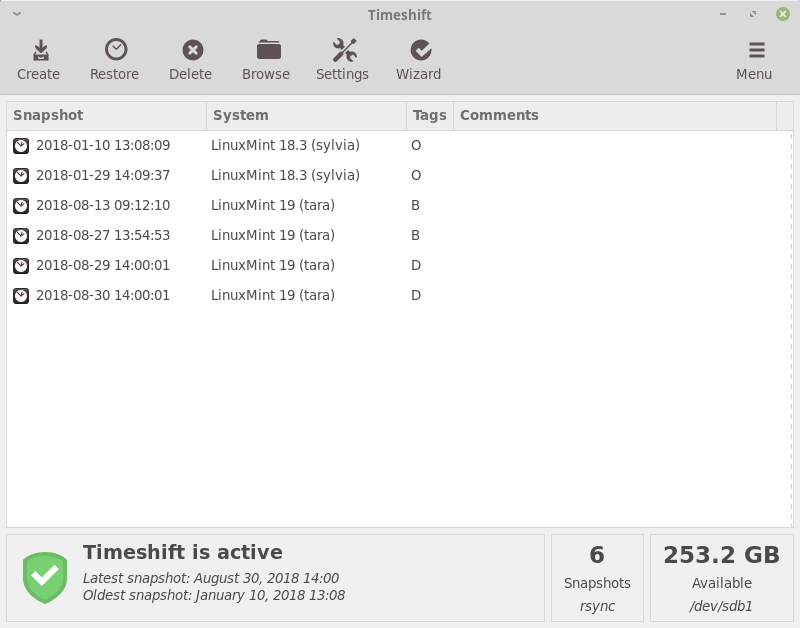
Mint-Y theme contrast
Within the feedback we received during the release of Linux Mint 19 it was highlighted that the Mint-Y theme didn’t have enough contrast and that some labels were hard to read.
Work started on improving the theme’s contrast.
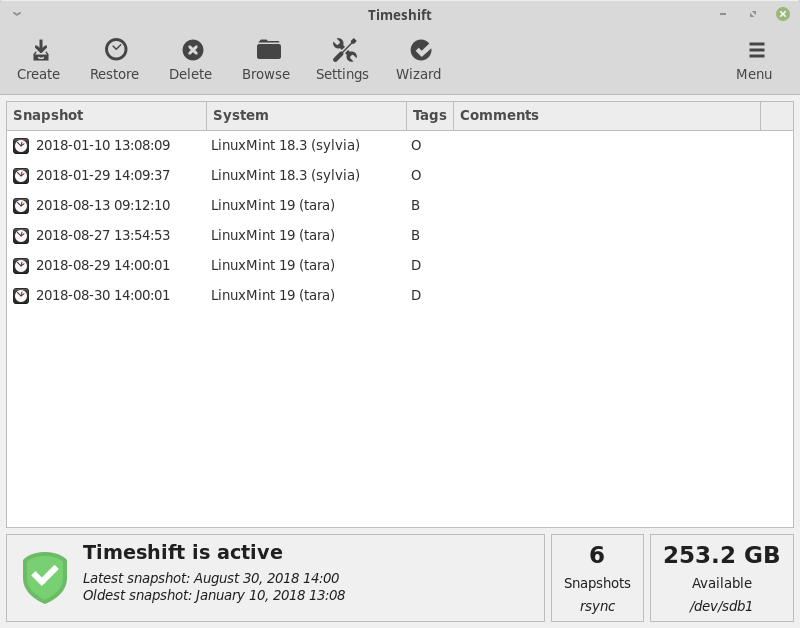
Here’s a picture of Timeshift as it appears in Mint 19:
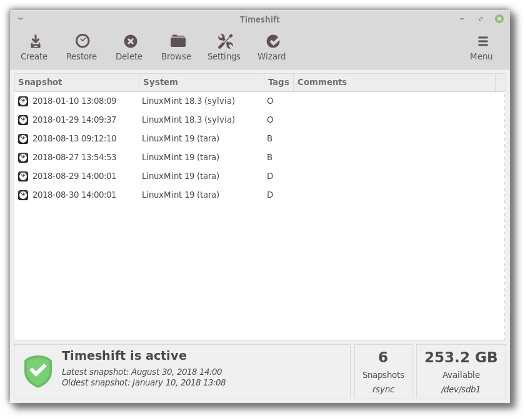
And here’s a picture of it with the contrast improvements:
The foreground colors were darkened (this is particularly visible here in the symbolic toolbar icons). The titlebar label is more pronounced as well, and the frame and contour of some of the widgets appear more clearly within the user interface.
Sponsorships:
Linux Mint is proudly sponsored by:
Donations in July:
A total of $11,880 were raised thanks to the generous contributions of 553 donors:
 $200 (18th donation), Jon Espenschied aka “xeno”
 $163 (3rd donation), Philippe L.
$123, Cary R.
 $109 (19th donation), Pasi K.
 $109 (5th donation), Marco L. aka “MAR9000”
 $109 (2nd donation), Norbert J.
 $109 (2nd donation), John F.
 $109, Thorsten L.
$109, Marc C.
$109, Russian Art and Culture Club Netherlands
$109, Pierre M.
$100 (6th donation), Jeff T. aka “JayBird707 Thanks Clem & Crew ”
$100 (3rd donation), Anon.
$100 (3rd donation), John P.
$100 (2nd donation), Charles W.
$100, Michael G.
$100, Gregory F.
 $100, Edward J. C.
$100, Randal B.
$100, Hugh D. aka “Huge”
$100, Paul H.
$100, Robert S.
$100, David S.
 $82, M H. U.
$82, Richard L.
 $75 (2nd donation), Duncan G. aka “catraeus”
 $70 (3rd donation), Gerald H.
$65, Werner H.
 $60 (2nd donation), Kostiantyn M.
$55, Arsen S. aka “arsen-s”
$54 (20th donation), Pasi K.
$54 (7th donation), Roger D. P. aka “Linux Users Group Monitor Niel”
$54 (3rd donation), David B.
 $54 (3rd donation), Jesus J. L. M.
$54 (3rd donation), Federico R.
$54 (2nd donation), Dan
$54, Steven d. R. aka “Scuba”
$54, Marlies T.
 $54, Attila V.
$54, Walter K.
 $54, Luis R.
$54, Ernest R.
$54, Andreas T.
$54, Christian B.
$50 (10th donation), Thomas T. aka “FullTimer1489”
$50 (7th donation), Adam H.
$50 (7th donation), Stephen A.
$50 (3rd donation), Teknosophy, LLC
$50 (3rd donation), Ian L.
$50 (3rd donation), Bruce M.
$50 (2nd donation), Michael S.
$50 (2nd donation), Caroline R.
 $50 (2nd donation), Karl B.
$50 (2nd donation), Eddie B.
$50 (2nd donation), Alan L.
$50 (2nd donation), Bruno Weber
$50 (2nd donation), William N.
$50, Holly G.
$50, Brian W.
$50, Tim O.
$50, Patrick D.
$50, Stephane R.
$50, Jan Q.
$50, Charles R.
$50, Robert J. C.
 $50, Pawel P.
$50, Harry M.
 $50, Martin W.
$50, Ralph R.
$50, Cyberhall, Inc.
$46, Michael Z.
$44 (2nd donation), Manuel López
$44 (2nd donation), Jürgen H.
$44, Alastair S aka “Altrux”
$44, Eric W.
 $44, Fernando G.
$44, Manuel B.
 $40 (3rd donation), Ike
$40 (2nd donation), P. C. .
$40, Andrew M.
 $40, Kerry S.
$38 (4th donation), Frédéric B.
$38, Louise M.
$37 (2nd donation), Andre L.
$35, Tim P.
$35, S.S. Gold Coast aka “zoom zoom”
$33 (101th donation), Olli K.
$33 (2nd donation), Frank J.
$33 (2nd donation), Michael D.
$33, Stephen M.
$33, Frank S.
 $33, Gordon T.
$33, Ian B.
$33, Ivan S. O.
$33, Piotr P. L.
$32, Terence P. aka “Terryphi”
$30 (4th donation), Tony aka “Troot”
$30 (3rd donation), Philippe A.
$30 (3rd donation), Klaus G.
$30 (2nd donation), S.S. Gold Coast aka “zoom zoom”
$30, Terrence E.
$30, Silvio H.
$30, J.d. L.
$30, Michael H.
$30, Florian M.
$30, David H.
$27 (14th donation), Joachim M.
$27 (10th donation), John K. aka “jbrucek”
$27 (5th donation), Ralf D.
$27 (4th donation), Paul N.
$27 (4th donation), Mark F.
 $27 (2nd donation), John F.
$27 (2nd donation), Manuel F.
$27, Neukirch B.
$27, Vigdish.
$27, Antun K.
$25 (13th donation), Kwan L. aka “DigitalHermit”
$25 (11th donation), Bill S.
$25 (7th donation), Platypus Products
$25 (7th donation), Michael C.
 $25 (7th donation), Charles W.
$25 (4th donation), John S.
$25 (4th donation), CW P.
$25 (3rd donation), C S.
$25 (3rd donation), Charles S.
$25 (2nd donation), Gary P. S.
$25 (2nd donation), Eugene H.
$25 (2nd donation), Frederic R.
$25 (2nd donation), K M. D.
$25 (2nd donation), Hector G.
$25 (2nd donation), John L.
$25 (2nd donation), Donald F.
 $25 (2nd donation), Troels M.
$25, Jeffrey V.
$25, Frederick N.
 $25, Rune E.
$25, Alfred C.
$25, John D. K.
$25, Gabriel S.
$25, James P.
$25, Martin G.
$25, Jörg M.
$25, John P.
$25, Taste M.
 $25, Aashranth B.
$25, Daniel M.
$25, Mark F.
$25, Vitaliy Y. aka “prez2017”
$25, Stonewall C.
$25, ronh
$25, Cheri H.
$25, Micah F.
$25, Calum T.
$24 (5th donation), Daniel V. M.
$22 (18th donation), Derek R.
$22 (18th donation), Andreas S.
$22 (11th donation), Ross M aka “ro55mo”
$22 (8th donation), Per J.
$22 (8th donation), Dick B. aka “Dick”
$22 (5th donation), Gerhard E.
$22 (4th donation), Martin L.
$22 (4th donation), Tom B.
$22 (4th donation), Nard aka “Plons”
$22 (4th donation), Klaus Schulz aka “northcup”
$22 (4th donation), Eduard L.
$22 (4th donation), Thomas W.
$22 (4th donation), Florent G.
$22 (3rd donation), Ralf S.
$22 (3rd donation), Franz Johannes Schütz aka “Josch”
$22 (3rd donation), Jose M. K. Z.
$22 (3rd donation), Tom S.
$22 (3rd donation), Bertrand M.
$22 (3rd donation), Chris C.
$22 (2nd donation), Nicolas B.
$22 (2nd donation), Jerry O.
 $22 (2nd donation), Ovidiu F.
$22 (2nd donation), Chris R.
$22 (2nd donation), Didier F.
$22 (2nd donation), Benjamin F.
$22 (2nd donation), Marcel R.
$22, Joerg N.
$22, Karsten R.
$22, Serban I. C.
$22, John M.
$22, Tapani H.
$22, Klaus-dieter H.
$22, Jason S.
$22, Michael B.
$22, Rintje B.
$22, Frank R.
$22, David P.
 $22, Harri R.
$22, Bernard L.
$22, Scott P.
$22, Yashodhan M.
$22, 3D Matchmovers
$22, Goran L.
$22, Silvia A.
 $22, IT teacher
$21 (6th donation), Malte J.
$21, Steffen K.
$20 (10th donation), Peter J.
$20 (7th donation), Justin Oros
$20 (5th donation), Brandon W.
$20 (5th donation), Nicklas L.
$20 (4th donation), Dan R.
$20 (4th donation), Anthony L.
$20 (4th donation), John D.
 $20 (4th donation), Yun-Jhong W.
$20 (4th donation), Bill H.
$20 (3rd donation), a donor
$20 (3rd donation), Laurence
$20 (3rd donation), William K.
 $20 (2nd donation), Ricardo L. V.
 $20 (2nd donation), Mladen M.
$20 (2nd donation), Garry R.
$20 (2nd donation), David L.
$20 (2nd donation), Mark W.
$20 (2nd donation), Ricky G.
$20 (2nd donation), Paul H.
$20 (2nd donation), An L.
$20 (2nd donation), Douglas W.
$20 (2nd donation), Thomas B.
$20, M A.
$20, Eric J. Rich aka “e”
$20, Robert R.
$20, Rares A. B. N.
$20, Derek C.
 $20, Ueda Y.
$20, Jonathan J.
$20,
$20, Anand S.
$20, Ryan M.
$20, William P.
$20, Charl P.
$20, Robert H.
$20, Robert M. J.
$20, Bryan M.
$20, Bajan52
$20, Jeff A.
$20, John L.
$20, William R.
$20, Ken L.
$20, Jason R. aka “jgrimmortal ”
$20, Sonja H.
$20, Lowell W.
$19 (14th donation), Anton W. aka “redant”
$19 (12th donation), Ke C.
$19 (9th donation), François P.
$19 (6th donation), Martin I.
$17 (18th donation), Johann J.
$17 (13th donation), Ray
$17, Pierre A.
$16 (4th donation), Erwin v K. aka “Erwin Musicman”
$16 (2nd donation), Murru A.
$16 (2nd donation), Alexander H.
$16, Jürgen K.
$16, Stéphane W.
$16, Torsten P.
$16, Claude M.
$16, Richard K.
$16, Henry Z.
$15 (10th donation), Michel C.
$15 (8th donation), David W.
$15 (8th donation), Lance M.
$15 (7th donation), Feroz E.
$15 (4th donation), Mary H.
$15 (4th donation), Luigi D.
$15 (3rd donation), Lukasz G.
$15 (3rd donation), Tsuchiya Akira
$15 (2nd donation), Thomas M.
$15, George P.
$15, Vickie M.
$15, Roger L. R.
$15, Janos U.
 $15, Radoslaw P.
$15, Rachel B.
$15, Steven M.
$15, American Pride Legal
$14, Robert G.
$13, Eduard K.
$12 (88th donation), Tony C. aka “S. LaRocca”
$12 (33rd donation), JobsHiringnearMe
 $12 (2nd donation), Jeffrey O. aka “Loloy D”
$12, Roberta P.
$11 (28th donation), Raymond E.
$11 (15th donation), Francisco L. D. A.
$11 (13th donation), Hans P.
$11 (11th donation), Gerard C.
$11 (8th donation), Denis D.
$11 (8th donation), Michael P. aka “www.perron.de”
$11 (7th donation), Roy S.
$11 (5th donation), Michael G.
$11 (5th donation), Kevin M.
$11 (5th donation), Henry G.
$11 (4th donation), Davide A.
$11 (3rd donation), Thomas Z. aka “Nagev for the Slamina”
$11 (3rd donation), Wolfgang M.
$11 (3rd donation), Martin H.
$11 (3rd donation), Jorge F. M.
$11 (2nd donation), Robert T.
 $11 (2nd donation), Tomislav K.
$11 (2nd donation), Lorenz S.
$11 (2nd donation), Piotr P. L.
$11 (2nd donation), Mario D. S.
$11 (2nd donation), John V.
$11 (2nd donation), Michael J.
$11 (2nd donation), Vittorio F.
$11 (2nd donation), Raymond L.
$11, Abilio R. T.
$11, Felix F.
$11, Jens W.
$11, Michael M.
$11, Alan W.
$11, Tokuda T.
$11, Volker S.
$11, Paul K.
$11, Heiko Z.
$11, Jesus I. A. B.
$11, Juergen K.
$11, Benoit V.
$11, Eduard G.
 $11, Branislav P.
$11, Hans-günter B.
$11, Paul B.
$11, Gottfried A.
$11, Diego S. P.
$11, Matt R.
$11, Miguel A. D. R.
$11, Frithjof
$11, Panagiotis P.
$11, Scrum Master Training
$11, Markus B.
$11, Michael S.
$11, Luis J.
$11, Scrum Master Training
$11, Redbows Ltd
$11, Nik C.
$11, Antonio Prados aka “Toniprados”
$11, website
$11, Marcel S.
$11, Johan V. D.
$10 (32nd donation), Thomas C.
$10 (23rd donation), Frank K.
$10 (19th donation), Jim A.
$10 (13th donation), Rick R.
$10 (11th donation), Wilson G.
$10 (10th donation), Antoine T.
$10 (10th donation), Chris K.
$10 (9th donation), Masaomi Yoshida
$10 (9th donation), hotelsnearbyme.net
$10 (6th donation), Joel E.
$10 (5th donation), Gary N.
$10 (4th donation), Jeff F.
$10 (4th donation), Yano Y.
$10 (3rd donation), Suraj S.
$10 (3rd donation), Erland Ö.
$10 (3rd donation), Pierre D.
$10 (3rd donation), Neil B.
$10 (3rd donation), Demosthenes Koptsis
$10 (2nd donation), John T.
 $10 (2nd donation), Esteban C.
$10 (2nd donation), merimaat
$10 (2nd donation), Joao K.
$10, Ricardo V. B.
$10, Johan C.
$10, Bradley T.
$10, Saurabh S.
$10, Jim T.
$10, Leah M.
$10, Edward C.
$10, Hector M.
$10, Graham J.
$10, Jeff F.
$10, Scott A.
$10, Pawel K.
$10, David P.
$10, Michal M.
 $10, Fabian A.
$10, Mirko Bukilić aka “Bukela”
$10, Moises M. N.
$10, Thomas W.
$10, Scott F.
 $10, Dzmitry B.
$10, Joseph F.
$10, Fnu P. A.
$10, Nathan Robinson
$10, Mark C.
$10, James M.
$10, Andrew B.
 $10, 范 文新
$10, Jose R. P. N.
$10, Carlos M. G.
$10, Alexander M.
$10, Linda P.
$10, Pedro M.
$10, j0ck1e
$10, 大竹 哲也
$8 (15th donation), Alessandro S.
$8 (2nd donation), Luiz A. I.
$8, Rimas V.
$7 (20th donation), CV Smith
$7 (2nd donation), Daniel J G II
$7, Ian P.
$7, Hendrik H.
$7, Daniel J G II
$6 (4th donation), gmq
$6, Rodrigo S. B.
$6, Tomasz W.
$5 (26th donation), Eugene T.
$5 (19th donation), Todd A aka “thobin”
$5 (19th donation), Kouji Sugibayashi
$5 (18th donation), Bhavinder Jassar
$5 (18th donation), Kouji Sugibayashi
 $5 (10th donation), J. S. .
$5 (9th donation), Blazej P. aka “bleyzer”
$5 (6th donation), nordvpn coupon
 $5 (5th donation), Халилова А.
$5 (5th donation), Dmitri B.
 $5 (5th donation), Konstantin S.
$5 (5th donation), Mattias E.
$5 (5th donation), Goto M.
$5 (5th donation), Keiko N.
$5 (4th donation), Kārlis M. aka “BismarX”
$5 (4th donation), nordvpn coupon
$5 (4th donation), I. B. .
$5 (3rd donation), Jason S.
$5 (3rd donation), Luiz H. R. C.
$5 (3rd donation), Sourav B. aka “rmad17”
$5 (3rd donation), Harold R. aka “cyberwolf751”
 $5 (3rd donation), Adjie aka “AJ”
$5 (3rd donation), James H.
$5 (3rd donation), Wiktor M. aka “wikuś”
$5 (3rd donation), Justin H. aka “DoubleActionJ”
$5 (2nd donation), Florian L.
$5 (2nd donation), Kirill
$5 (2nd donation), Прокопьев А.
$5 (2nd donation), Jalister
$5 (2nd donation), Tomasz R.
$5 (2nd donation), Marcelo S. Perlin
$5 (2nd donation), John H.
$5 (2nd donation), Cyril U.
$5 (2nd donation), Govindarajan N.
$5, Jonas N.
$5, Leigh A. B.
$5, Прокопьев А.
$5, Julio K.
$5, Stevan C.
$5, Wanda J.
$5, Mark C.
$5, Strelov A.
$5, Rauny O.
$5, Raghav K.
$5, Alexander Z.
$5, Jake J.
$5, Clinton B.
$5, Korpinen V.
$5, Iliya Kobzev aka “TechnoMag”
$5, Бабиков Е.
$5, Michael S.
$5, Jonathan O.
$5, Keith J. B.
$5, Kajol L. T.
$5, Davide M.
$5, aka “alex”
$5, Jonathan E.
$5, Remus F. B.
$5, Marcio R. D. A. S.
 $5, OrigAfric Softwares
 $5, Nenad G.
$5, Taylor P.
$5, Fabiana G.
 $5, Petr M.
$5, I migliori Casino AAMS
$5, Manuel M.
$5, Steven F.
$5, Francisco C.
$5, Dale B.
$5, Marvin D.
$5, Edson Luiz Luciani Ferreira aka “Edson Luciani”
$4 (5th donation), nordvpn coupon
$3.5 (3rd donation), Benceno el Sepulturero
$3 (5th donation), Takatosi A.
$3 (4th donation), Krste C.
$3 (2nd donation), Victor F.
$3 (2nd donation), Stefanos G.
$3 (2nd donation), Sean Madawala
 $3 (2nd donation), Alden C. G.
$3, Scott C.
$3, Aleksandrs R.
$3, Chrisentiae S.
$3, Bernardo B.
$3, Luciano Maciel Figueiró
$3, Sergei M.
$3, Mihai T. aka “whosyourdady3rm”
 $3, Roger Albeiro aka “Roco”
$75.38 from 57 smaller donations
If you want to help Linux Mint with a donation, please visit http://www.linuxmint.com/donors.php
Rankings:
- Distrowatch (popularity ranking): 2505 (2nd)
- Alexa (website ranking): 3845
Source