This guide may not exactly be relevant to this blog, but as an exercise in getting familiar with Linux, I’ll post it anyways. Here are a few disclaimers-
- Don’t follow this guide for compiling linux kernel, there are much better guides out there for that purpose (this is the one I followed). The guide exists to help you learn some new stuff which you didn’t know before, and to improve your understanding of Linux a bit.
- My knowledge of Linux and operating systems, in general, is somewhat limited, and hence, some things might be wrong (or at least not perfectly correct).
- The main reason for writing this tutorial is because I had to submit a document showing what I did. It’s not exactly related to hacking. It just gives you some insight into linux (which I perceive is helpful).
- Do everything on a virtual machine, and be prepared for the eventuality that you’ll break your installation completely.
 Linux Kernel
Running uname -r on your machine would show you what kernel version you’re using. uname -a would give you some more details regarding that.
Every once in a while, a new
stable
kernel release is made available on
kernel.org
. At the time of writing this, the release was 4.9.8. At the same time, there is also the latest release
candidate kernel
, which is not of our interest, as it’s bleeding edge (latest features are available in the kernel, but there could be bugs and compatibility issues), and hence not stable enough for our use.
I download the tar ball for the latest kernel (a compressed archive of ~100MB size, which becomes ~600 MB upon extraction). What we get upon extraction is the source files of your linux kernel. We need to compile this to get an object file which will run our OS. To get a feel for what this means, I have a little exercise for you-
Small (and optional) exercise
We will do the following-
- Make a folder, and move to that folder
- Write a small c++ hello world program
- Compile it, using make
- Run the compiled object file.
On the terminal, run the following-
Step 1:
mkdir testing
cd testing
Step 2:
cat > code.cpp
Paste this into the terminal
#include <iostream>
int main(){
std::cout << “Hello Worldn”;
return 0;
}
After pasting this, press ctrl+d on your keyboard (ctrl+d = EOL = end of line).
If this doesn’t work, just write the above code in your favourite text editor and save as code.cpp

Step 3:
make code
Step 4:
./code
Notice how we used the make command to compile our source code and get an executable. Also, notice how the make command itself executed this command for us-
g++ code.cpp -o code
In our case, since there was only one source file, make knew what to do (just compile the single file). However, in case there are multiple source, make can’t determine what to do.
For example, if you have 2 files, and the second one depends on the first one in some way. Then, you need the first one to be compiled before the second one. In case of the kernel, there are possibly millions of source code files, and how they get compiled is a very complex process.
If you navigate to the folder containing linux kernel (the folder where you extracted the tar ball), you’ll get an idea of the sheer magnitude of complexity behind a kernel. For example, open the Makefile file in that folder in your favourite text and editor and see the contents of the folder. Makefile contains instructions which make (the command line tool we used earlier) uses to determine how to compile the source files in that directory (and subdirectories).
Some tools
Compiling our simple c++ program didn’t need much, and your linux distribution (I’m using Ubuntu 16 for this tutorial) would come with the required tools pre-installed. However, compiling kernel needs some more stuff, and you’ll need to install the required tools. For me, this command installed everything that was needed-
sudo apt-get install libncurses5-dev gcc make git exuberant-ctags bc libssl-dev
Many of these tools would actually be pre-installed, so downloading and installing this won’t take too long.
(if you’re not on Ubuntu/Kali, then refer to this guide, as it has instruction for Red Hat based and SUSE based systems as well)
Download kernel
In the guide that I followed, he suggested that I clone this repository-
git clone git://git.kernel.org/pub/scm/linux/kernel/git/stable/linux-stable.git
After cloning the repo, I had to choose the latest stable kernel and then proceed further with it. This would be useful when you want to keep pulling updates and recompiling your kernel. However, for the purpose of this tutorial, let’s ignore this possibility (because cloning the git repo took a lot of time and the downloaded file was huge and everything was taking forever).
Instead, we just download and extract the tarball (as discussed earlier in the Linux Kernel section).
Configuration
Here, we have two options.
- Use a default configuration
- Use the configuration of your current kernel (on which your OS is running right now).
As in downloading the kernel step, I tried both methods, and for me, the default one worked better. Anyways, for current configuration, run the following-
cp /boot/config-`uname -r`* .config
This copies the configuration for your current kernel to a file in the current folder. So, before running this command, navigate to the folder containing the extracted tarball. For me, it was /home/me/Download/linux-4.9.8
For default config (recommended), run
make defconfig
If you don’t see a config file, don’t worry. In linux, files/directories starting with . are hidden. On your terminal, type vi .config (replace vi with your favourite text editor) and you can see the config file.
Compiling
Similar to the way you compiled your c++ program, you can compile the kernel. In case of c++ program, we didn’t have any Makefile, so we had to specify the name of the source file (make code), however, since we have a Makefile here, we can simply type make, and our Makefile and .config file (and probably many more files) will tell make what to do. Note that the config file contains the options which were chosen for your current kernel. However, on a later kernel, there might be some choices which weren’t available in the the previous kernel (the one you’re using). In that case, make will ask you what to do (you’ll get to choose between option – yes and no, or options – 1,2,3,4,5,6, etc.). Pressing enter chooses the default option. Again, I suggest you use the default configuration file to avoid any issues.
To summarise, simply run this command-
make
If you have multiple cores, then specify it as an argument (compilation will be faster). For example, if you have two cores, run make -j2
If you have 4 cores, run make -j4
Now, you can do something else for a while. Compilation will take some time. When it’s finished, follow the remaining steps.
Installation
Simply run this command-
sudo make modules_install install
Fixing grub
There are following things that need to be changed in the /etc/default/grub file. Open this file as sudo, with your favourite text editor, and do the following.
- Remove GRUB_HIDDEN_TIMEOUT_QUIET line from the file.
- Change GRUB_DEFAULT to 10 from 0
This is how my file looks after being edited.

What these changes do is-
- Grub menu for choosing OS to boot from is hidden by default in Ubuntu, it changes that to visible.
- The menu shows up for 0secs, before choosing the default option. It changes it to 10 secs, so we get a chance to choose which OS to boot from.
After all this, just run the command to apply the changes.
sudo update-grub2
Now restart the machine.
Did it work?
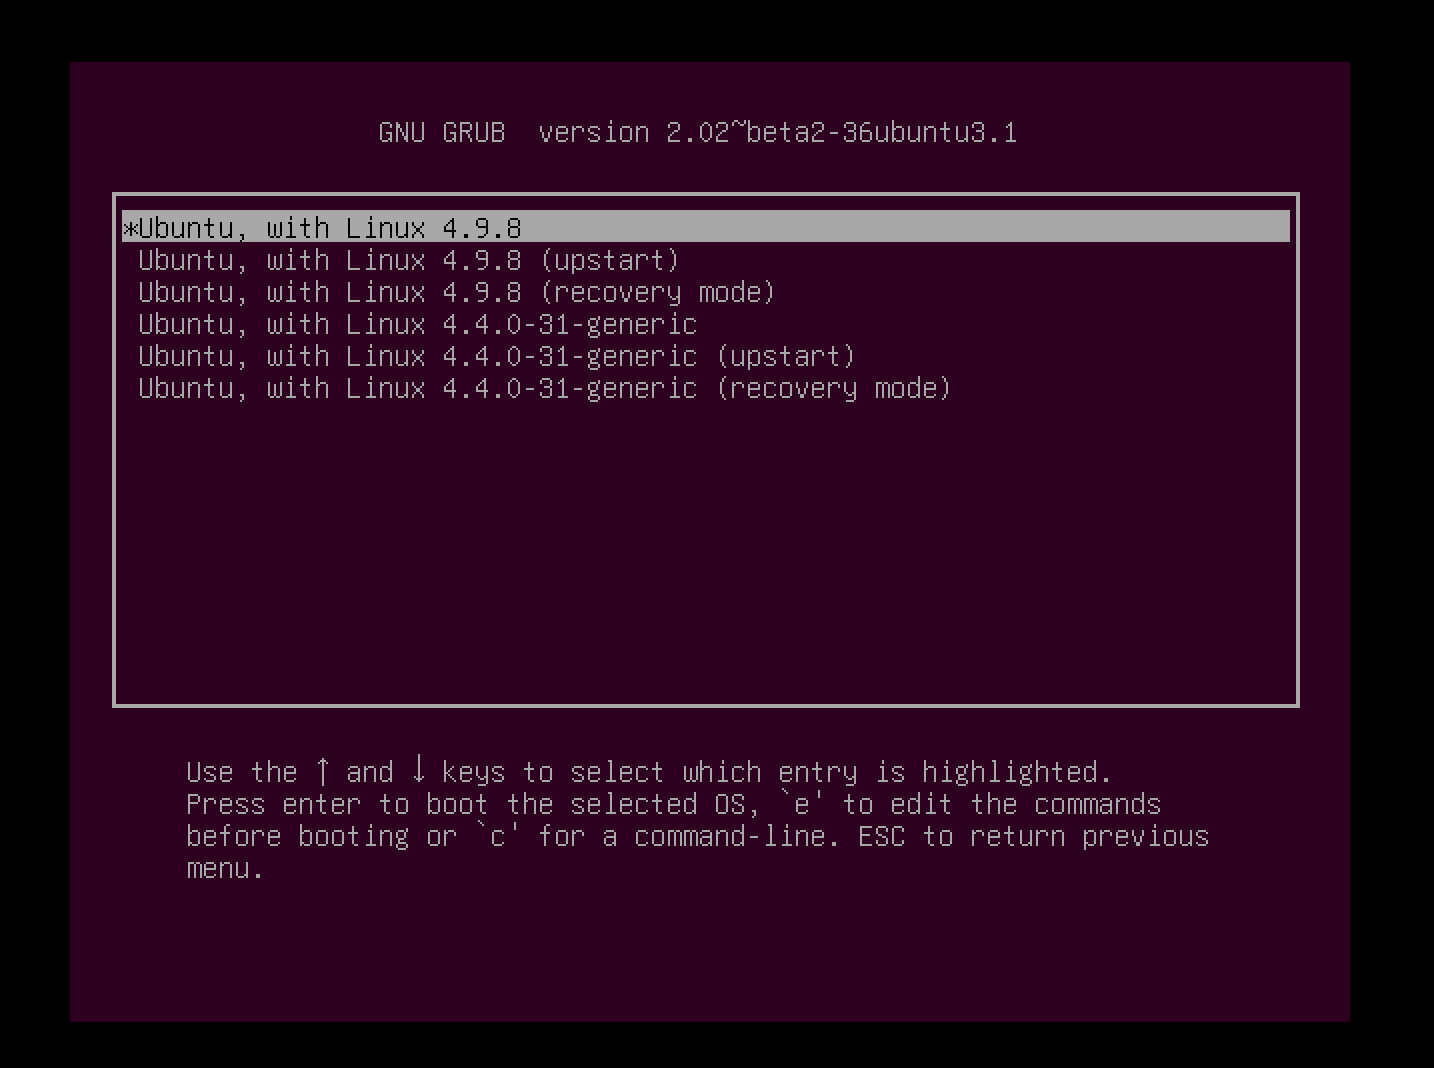
If it worked, then you’ll ideally see something like this upon restart –


In advanced options, you’ll see two kernels. If you did everything perfectly, and no drivers issues are there, then your new kernel will boot up properly (4.9.8 for me). If you did everything reasonably well, and didn’t mess things up too bad, then at least your original kernel should work, if not the new one. If you messed things up completely, then the new kernel won’t work, nor would the old kernel (which was working fine to begin with). In my case, in the first trial, my new kernel wasn’t working. In the second trial, both kernels were working.
Once you have logged in to your new kernel, just do a uname -r and see the version, and give yourself a pat on the back if it is the kernel version you tried to download.
 |
| I did give myself a pat on the back |
If your new kernel is not working, then either go through the steps and see if you did something wrong, or compare with this guide and see if I wrote something wrong. If it’s none of these, then try the other methods (default config instead of current kernel config, and vice versa). If that too doesn’t work, try out some other guides. The purpose of the guide, as explained already, isn’t to teach you how to compile linux kernel, but to improve your understanding, and I hope I succeeded in that.
Removing the kernel (optional and untidy section)
The
accepted answer here
is all you need. I’m gonna write it here anyways. Note that I’m writing this from memory, so some things may be a bit off. Follow the AskUbuntu answer to be sure.
Remove the following (this is correct)-
/boot/vmlinuz*KERNEL-VERSION*
/boot/initrd*KERNEL-VERSION*
/boot/System-map*KERNEL-VERSION*
/boot/config-*KERNEL-VERSION*
/lib/modules/*KERNEL-VERSION*/
/var/lib/initramfs/*KERNEL-VERSION*/
For me, Kernel version is 4.9.8. I don’t remember exactly what commands I typed, and am too lazy to check them again, but I think these would work (no guarantee).
cd /boot/
rm *4.9.8*
cd /lib/module
rm *4.9.8*
cd /var/lib/initramfs
rm *4.9.8*
Also, I have a faint recollection that the name of the initramfs folder was something a bit different in my case (not sure).
Kthnxbye
Source


 440 people viewed this
