11 Basic Linux Interview Questions and Answers
Theories apart, we are proud to announce a new section on Tecmint, dedicated to Linux Interview. Here we will bring to you Linux Interview Questions and all other aspects of Linux, which is must for a professional in this cut-throat competition world.

Basic Linux Interview Questions
A new article in this section (Linux Interview) will be posted on every weekend. The initiative taken by Tecmint is first of it’s kind among other Linux Dedicated websites, along with quality and unique articles.
We will start with Basic Linux Interview Question and will go advance article by article, for which your response is highly appreciated, which put us on a higher note.
Q.1: What is the core of Linux Operating System?
- Shell
- Kernel
- Command
- Script
- Terminal
Q.2: What Linus Torvalds Created?
- Fedora
- Slackware
- Debian
- Gentoo
- Linux
Q.3: Torvalds, Wrote most of the Linux Kernel in C++ programming Language, do you agree?
The remaining Lines of code 1,972,615 is written in C++, Assembly, Perl, Shell Script, Python, Bash Script, HTML, awk, yacc, lex, sed, etc.
Note : The Number of Lines of codes varies on daily basis and an average of more than 3,509 lines are being added to Kernel.
Q.4: Linux initially was developed for intel X86 architecture but has been ported to other hardware platform than any other Operating System. Do you agree?.
Q.5: Is it legal to edit Linux Kernel?
Q.6: What is the basic difference between UNIX and Linux Operating System.
Q. 7: Choose the odd one out.
- HP-UX
- AIX
- OSX
- Slackware
- Solaris
Q.8: Is Linux Operating system Virus free?
Q.9: Linux is which kind of Operating System?
- Multi User
- Multi Tasking
- Multi Process
- All of the above
- None of the above
Q.10: Syntax of any Linux command is:
- command [options] [arguments]
- command options [arguments]
- command [options] [arguments]
- command options arguments
Q.11: Choose the odd one out.
- Vi
- vim
- cd
- nano
That’s all for now. How much you learned for the above questions? How it helped you in your Interview? We would like to hear all these from you in our comment section. Wait till the next weekend, for new set of questions.
Basic Linux Interview Questions and Answers – Part II
Continuing the Interview Series, we are giving 10 Questions here, in this article. These questions and the questions in the future articles doesn’t necessarily means they were asked in any interview. We are presenting you an interactive learning platform through these kind of posts, which surely will be helpful.

Basic Linux Interview Questions – 2
Upon the analysis of comments in different forums on last article 11 Basic Linux Interview Questions of this series, it is important to mention here that to bring up a quality article to our readers. We give our time and money, and in return what we expect from you? Nothing. If you can’t praise our work, please don’t demoralize us from your negative comments.
If you find nothing new in a post, don’t forget that for someone it was helpful, and for that he/she was thankful. We can’t make everyone happy in each of our article. Hope you readers would take pain to understand this.
Q.1: Which command is used to record a user login session in a file?
- macro
- read
- script
- record
- sessionrecord
Let’s record the user’s login session with script command as shown.
[root@tecmint ~]# script my-session-record.txt

Script started, file is my-session-record.txt
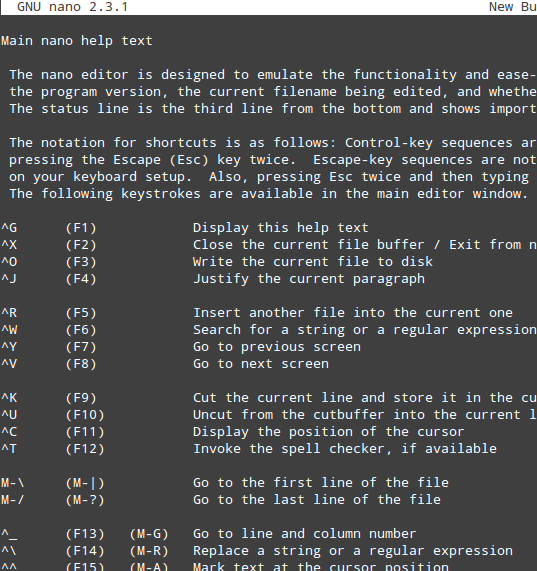
The content of log file ‘my-session-record.txt’ can be views as:
[root@tecmint ~]# nano my-session-record.txt

script started on Friday 22 November 2013 08:19:01 PM IST
[root@tecmint ~]# ls
^[[0m^[[01;34mBinary^[[0m ^[[01;34mDocuments^[[0m ^[[01;34mMusic^[[0m $
^[[01;34mDesktop^[[0m ^[[01;34mDownloads^[[0m my-session-record.txt ^[[01;34$
Q.2: The kernel log message can be viewed using which of the following command?
- dmesg
- kernel
- ls -i
- uname
- None of the above
[root@tecmint ~]# dmesg

Initializing cgroup subsys cpuset
Initializing cgroup subsys cpu
Linux version 2.6.32-279.el6.i686 (mockbuild@c6b9.bsys.dev.centos.org) (gcc version 4.4.6 20120305 (Red Hat 4.4.6-4) (GCC) ) #1 SMP Fri Jun 22 10:59:55 UTC 2012
KERNEL supported cpus:
  Intel GenuineIntel
  AMD AuthenticAMD
  NSC Geode by NSC
  Cyrix CyrixInstead
  Centaur CentaurHauls
  Transmeta GenuineTMx86
  Transmeta TransmetaCPU
  UMC UMC UMC UMC
Disabled fast string operations
BIOS-provided physical RAM map:
...
Q.3: Which command is used to display the release of Linux Kernel?
- uname -v
- uname -r
- uname -m
- uname -n
- uname -o
[root@tecmint ~]# uname -r

2.6.32-279.el6.i686
Q.4: Which command is used to identify the types of file?
- type
- info
- file
- which
- ls
[root@tecmint ~]# file wtop

wtop: POSIX shell script text executable
Q.5: Which command locate the binary, source and man page of a command?
[root@tecmint ~]# whereis /usr/bin/ftp

ftp: /usr/bin/ftp /usr/share/man/man1/ftp.1.gz
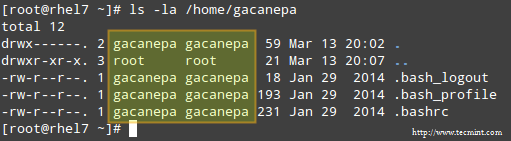
Q.6: When a user login, which files are called for user profile, by default??
[root@tecmint ~]# ls -al
-rw-r--r--.  1 tecmint     tecmint            176 May 11  2012 .bash_profile
-rw-r--r--.  1 tecmint     tecmint            124 May 11  2012 .bashrc
Q.7: The ‘resolv.conf’ file is a configuration file for?
[root@tecmint ~]# cat /etc/resolv.conf

nameserver 172.16.16.94
Q.8: Which command is used to create soft link of a file?
- ln
- ln -s
- link
- link -soft
- None of the above
[root@tecmint ~]# ln -s /etc/httpd/conf/httpd.conf httpd.original.conf
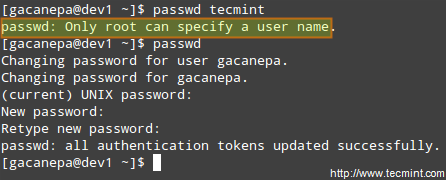
Q.9: The command ‘pwd’ is an alias of command ‘passwd’ in Linux?
[root@tecmint ~]# pwd

/home/tecmint
[root@tecmint ~]# passwd
Changing password for user root.
New password:
Retype new password:
Q.10: How will you check pci devices vendor and version on a Linux?
[root@tecmint ~]# lspci

00:00.0 Host bridge: Intel Corporation 5000P Chipset Memory Controller Hub (rev b1)
00:02.0 PCI bridge: Intel Corporation 5000 Series Chipset PCI Express x8 Port 2-3 (rev b1)
00:04.0 PCI bridge: Intel Corporation 5000 Series Chipset PCI Express x8 Port 4-5 (rev b1)
00:06.0 PCI bridge: Intel Corporation 5000 Series Chipset PCI Express x8 Port 6-7 (rev b1)
00:08.0 System peripheral: Intel Corporation 5000 Series Chipset DMA Engine (rev b1)
...
That’s all for now. I hope these above questions might be very helpful to you. In our next weekend we again come-up with some new set of questions.
10 Linux Interview Questions and Answers for Linux Beginners – Part 3
Continuing the Interview Questions series, with a big thanks for the nice feedback on last two articles of this series, we are here presenting 10 questions again for interactive learning.
- 11 Basic Linux Interview Questions and Answers – Part 1
- 10 Basic Linux Interview Questions and Answers – Part II

Linux Interview Questions Part – 3
1. How will you add a new user (say, tux) to your system.?
- useradd command
- adduser command
- linuxconf command
- All of the above
- None of the above
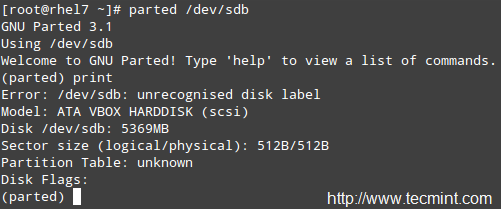
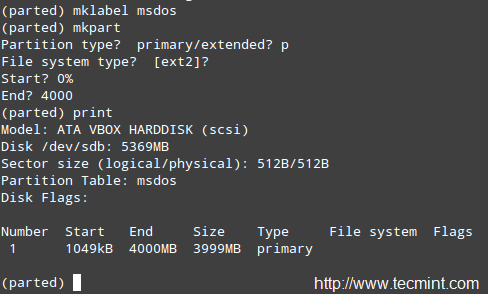
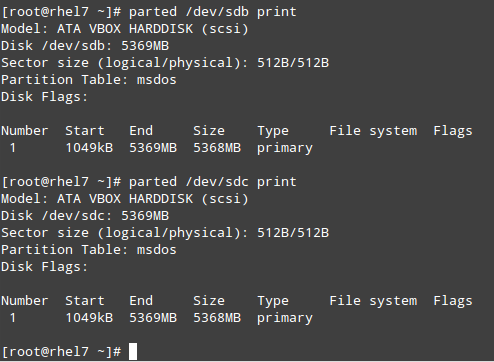
2. How many primary partition is possible on one drive?
- 1
- 2
- 4
- 16
3. The default port for Apache/Http is?
- 8080
- 80
- 8443
- 91
- None of the above.
4. What does GNU stand for?
- GNU’s not Unix
- General Unix
- General Noble Unix
- Greek Needed Unix
- None of the above
5. You typed at shell prompt “mysql” and what you got in return was “can’t connect to local MySQL server through socket ‘/var/mysql/mysql.sock’”, what would you check first.
Note:The above error message can be the result of ill configured my.cnf or mysql user permission. If mysql service starting doesn’t help, you need to see into the above said issues.
6. How to Mount a windows ntfs partition on Linux?
7. From the following which is not an RPM based OS.?
- RedHat Linux
- Centos
- Scientific Linux
- Debian
- Fedora
8. Which command can be used to rename a file in Linux.?
- mv
- ren
- rename
- change
- None of the Above
9. Which command is used to create and display file in Linux?
- ed
- vi
- cat
- nano
- None of the above
10. What layer protocol is responsible for user and the application program support such as passwords, resource sharing, file transfer and network management?
- Layer 4 protocols
- Layer 5 protocols
- Layer 6 protocols
- Layer 7 protocols
- None of the above
That’s all for now. I will be writing on another useful topic soon.
15 Basic MySQL Interview Questions for Database Administrators
Prior to This Article, three articles has already been published in ‘Linux Interview‘ Section and all of them were highly appreciated by our notable readers, however we were receiving feedback to make this interactive learning process, section-wise. From idea to action, we are providing you 15 MySQL Interview Questions.

Mysql Interview Questions
1. How would you check if MySql service is running or not?
root@localhost:/home/avi# service mysql status

/usr/bin/mysqladmin  Ver 8.42 Distrib 5.1.72, for debian-linux-gnu on i486
Copyright (c) 2000, 2013, Oracle and/or its affiliates. All rights reserved.

Oracle is a registered trademark of Oracle Corporation and/or its
affiliates. Other names may be trademarks of their respective
owners.

Server version 5.1.72-2
Protocol version 10
Connection Localhost via UNIX socket
UNIX socket /var/run/mysqld/mysqld.sock
Uptime: 1 hour 22 min 49 sec

Threads: 1  Questions: 112138  Slow queries: 1  Opens: 1485  Flush tables: 1  Open tables: 64  Queries per second avg: 22.567.
2. If the service is running/stop how would you stop/start the service?
root@localhost:/home/avi# service mysql stop

Stopping MySQL database server: mysqld.

root@localhost:/home/avi# service mysql start

Starting MySQL database server: mysqld.

Checking for corrupt, not cleanly closed and upgrade needing tables..
3. How will you login to MySQL from Linux Shell?
root@localhost:/home/avi# mysql -u root -p
Enter password:
Welcome to the MySQL monitor.  Commands end with ; or \g.
Your MySQL connection id is 207
Server version: 5.1.72-2 (Debian)

Copyright (c) 2000, 2013, Oracle and/or its affiliates. All rights reserved.

Oracle is a registered trademark of Oracle Corporation and/or its
affiliates. Other names may be trademarks of their respective
owners.

Type 'help;' or '\h' for help. Type '\c' to clear the current input statement.

mysql>
4. How will you obtain list of all the databases?
mysql> show databases;
+--------------------+
| Database           |
+--------------------+
| information_schema |
| a1                 |
| cloud              |
| mysql              |
| phpmyadmin         |
| playsms            |
| sisso              |
| test               |
| ukolovnik          |
| wordpress          |
+--------------------+
10 rows in set (0.14 sec)
5. How will you switch to a database, and start working on that?
mysql> use cloud;
Reading table information for completion of table and column names
You can turn off this feature to get a quicker startup with -A

Database changed
mysql>
6. How will you get the list of all the tables, in a database?
mysql> show tables;
+----------------------------+
| Tables_in_cloud            |
+----------------------------+
| oc_appconfig               |
| oc_calendar_calendars      |
| oc_calendar_objects        |
| oc_calendar_repeat         |
| oc_calendar_share_calendar |
| oc_calendar_share_event    |
| oc_contacts_addressbooks   |
| oc_contacts_cards          |
| oc_fscache                 |
| oc_gallery_sharing         |
+----------------------------+
10 rows in set (0.00 sec)
7. How will you get the Field Name and Type of a MySql table?
mysql> describe oc_users;
+----------+--------------+------+-----+---------+-------+
| Field    | Type         | Null | Key | Default | Extra |
+----------+--------------+------+-----+---------+-------+
| uid      | varchar(64)  | NO   | PRI |         |       |
| password | varchar(255) | NO   |     |         |       |
+----------+--------------+------+-----+---------+-------+
2 rows in set (0.00 sec)
8. How will you delete a table?
mysql> drop table lookup;

Query OK, 0 rows affected (0.00 sec)
9. What about database? How will you delete a database?
mysql> drop database a1;

Query OK, 11 rows affected (0.07 sec)
10. How will you see all the contents of a table?
mysql> select * from engines;
+------------+---------+----------------------------------------------------------------+--------------+------+------------+
| ENGINE     | SUPPORT | COMMENT                                                        | TRANSACTIONS | XA   | SAVEPOINTS |
+------------+---------+----------------------------------------------------------------+--------------+------+------------+
| InnoDB     | YES     | Supports transactions, row-level locking, and foreign keys     | YES          | YES  | YES        |
| MRG_MYISAM | YES     | Collection of identical MyISAM tables                          | NO           | NO   | NO         |
| BLACKHOLE  | YES     | /dev/null storage engine (anything you write to it disappears) | NO           | NO   | NO         |
| CSV        | YES     | CSV storage engine                                             | NO           | NO   | NO         |
| MEMORY     | YES     | Hash based, stored in memory, useful for temporary tables      | NO           | NO   | NO         |
| FEDERATED  | NO      | Federated MySQL storage engine                                 | NULL         | NULL | NULL       |
| ARCHIVE    | YES     | Archive storage engine                                         | NO           | NO   | NO         |
| MyISAM     | DEFAULT | Default engine as of MySQL 3.23 with great performance         | NO           | NO   | NO         |
+------------+---------+----------------------------------------------------------------+--------------+------+------------+
8 rows in set (0.00 sec)
11. How will you see all the data in a field (say, uid), from table (say, oc_users)?
mysql> select uid from oc_users;
+-----+
| uid |
+-----+
| avi |
+-----+
1 row in set (0.03 sec)
12. Say you have a table ‘xyz’, which contains several fields including ‘create_time’ and ‘engine’. The field ‘engine’ is populated with two types of data ‘Memory’ and ‘MyIsam’. How will you get only ‘create_time’ and ‘engine’ from the table where engine is ‘MyIsam’?
12. mysql> select create_time, engine from xyz where engine="MyIsam";

+---------------------+--------+
| create_time         | engine |
+---------------------+--------+
| 2013-12-15 13:43:27 | MyISAM |
| 2013-12-15 13:43:27 | MyISAM |
| 2013-12-15 13:43:27 | MyISAM |
| 2013-12-15 13:43:27 | MyISAM |
| 2013-12-15 13:43:27 | MyISAM |
| 2013-12-15 13:43:27 | MyISAM |
| 2013-12-15 13:43:27 | MyISAM |
| 2013-12-15 13:43:27 | MyISAM |
| 2013-10-23 14:56:38 | MyISAM |
| 2013-10-23 14:56:38 | MyISAM |
| 2013-10-23 14:56:38 | MyISAM |
| 2013-10-23 14:56:38 | MyISAM |
| 2013-10-23 14:56:38 | MyISAM |
| 2013-10-23 14:56:38 | MyISAM |
| 2013-10-23 14:56:38 | MyISAM |
+---------------------+--------+
132 rows in set (0.29 sec)
13. How will you show all the records from table ‘xrt’ where name is ‘tecmint’ and web_address is ‘tecmint.com’?
mysql> select  * from xrt where name = "tecmint" and web_address = “tecmint.com”;
+---------------+---------------------+---------------+
| Id                  | name                   | web_address |
+---------------+---------------------+----------------+
| 13                 |  tecmint               | tecmint.com  |
+---------------+---------------------+----------------+
| 41                 |  tecmint               | tecmint.com  |
+---------------+---------------------+----------------+
14. How will you show all the records from table ‘xrt’ where name is not ‘tecmint’ and web_address is ‘tecmint.com’?
mysql> select * from xrt where name != ”tecmint” and web_address = ”tecmint.com”;

+---------------+---------------------+---------------+
| Id            | name                | web_address   |
+---------------+---------------------+----------------+
| 1173          |  tecmint            | tecmint.com   |
+---------------+---------------------+----------------+
15. You need to know total number of row entry in a table. How will you achieve it?
mysql> select count(*) from Tables;

+----------+
| count(*) |
+----------+
|      282 |
+----------+
1 row in set (0.01 sec)
Read Also : 10 MySQL Database Interview Questions Intermediates
That’s all for now. How you feel about this ‘Linux Interview Question‘ section. Don’t forget to provide us with your valuable feedback in our comment section.
25 Apache Interview Questions for Beginners and Intermediates
We are very thankful to All our readers for the response we are getting for our new Linux Interview section. And now we have started section wise learning for Interview questions and continuing with the same today’s article focuses on Basic to Intermediate Apache interview Questions that will help you to prepare yourself.

Apache Job Interview Questions
In this section, we have covered some interesting 25 Apache Job Interview Questions along with their answers so that you can easily understand some new things about Apache that you might never known before.
Before you read this article, We strongly recommend you to don’t try to memorize the answers, always first try to understand the scenarios on a practical basis.
1. What is Apache web server?
2. How to check Apache and it’s version?
[root@tecmint ~]# rpm -qa | grep httpd

httpd-devel-2.2.15-29.el6.centos.i686
httpd-2.2.15-29.el6.centos.i686
httpd-tools-2.2.15-29.el6.centos.i686
[root@tecmint ~]# httpd -v

Server version: Apache/2.2.15 (Unix)
Server built:   Aug 13 2013 17:27:11
3. Apache runs as which user? and location of main config file?.
4. On which port Apache listens http and https both?
[root@tecmint ~]# netstat -antp | grep http

tcp        0      0 :::80                       :::*                        LISTEN      1076/httpd
tcp        0      0 :::443                      :::*                        LISTEN      1076/httpd
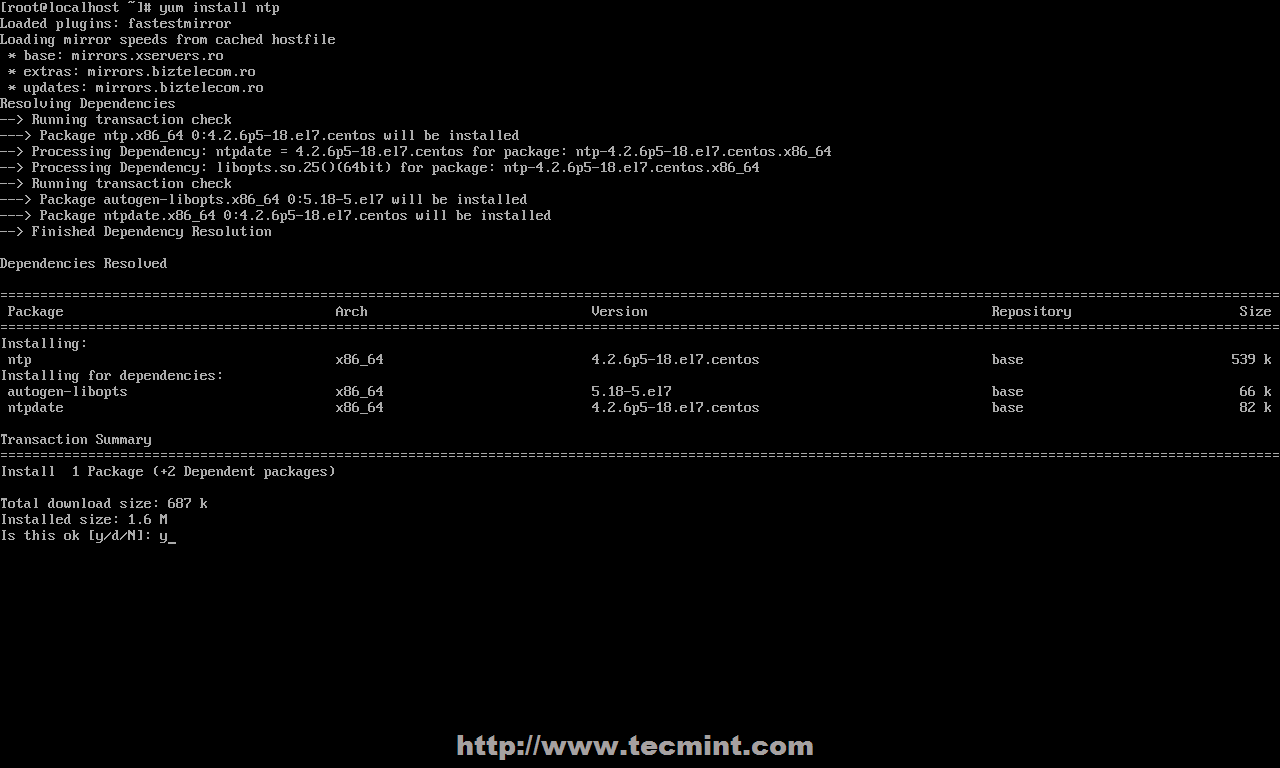
5. How do you install Apache Server on your Linux machine?
[root@tecmint ~]# yum install httpd
[root@tecmint ~]# apt-get install apache2
6. Where you can find all configuration directories of Apache Web Server?
[root@tecmint ~]# cd /etc/httpd/
[root@tecmint httpd]# ls -l
total 8
drwxr-xr-x. 2 root root 4096 Dec 24 21:44 conf
drwxr-xr-x. 2 root root 4096 Dec 25 02:09 conf.d
lrwxrwxrwx  1 root root   19 Oct 13 19:06 logs -> ../../var/log/httpd
lrwxrwxrwx  1 root root   27 Oct 13 19:06 modules -> ../../usr/lib/httpd/modules
lrwxrwxrwx  1 root root   19 Oct 13 19:06 run -> ../../var/run/httpd
[root@tecmint ~]# cd /etc/apache2
[root@tecmint apache2]# ls -l
total 84
-rw-r--r-- 1 root root  7113 Jul 24 16:15 apache2.conf
drwxr-xr-x 2 root root  4096 Dec 16 11:48 conf-available
drwxr-xr-x 2 root root  4096 Dec 16 11:45 conf.d
drwxr-xr-x 2 root root  4096 Dec 16 11:48 conf-enabled
-rw-r--r-- 1 root root  1782 Jul 21 02:14 envvars
-rw-r--r-- 1 root root 31063 Jul 21 02:14 magic
drwxr-xr-x 2 root root 12288 Dec 16 11:48 mods-available
drwxr-xr-x 2 root root  4096 Dec 16 11:48 mods-enabled
-rw-r--r-- 1 root root   315 Jul 21 02:14 ports.conf
drwxr-xr-x 2 root root  4096 Dec 16 11:48 sites-available
drwxr-xr-x 2 root root  4096 Dec  6 00:04 sites-enabled
7. Can Apache be secured with TCP wrappers?
8. How to change default Apache Port and How Listen Directive works in Apache?
Suppose you have multiple IPs assigned to your Linux machine and want Apache to receive HTTP requests on a special Ethernet port or Interface, even that can be done with Listen directive.
To change the Apache default port, please open your Apache main configuration file httpd.conf or apache2.conffile with VI editor.
[root@tecmint ~]# vi /etc/httpd/conf/httpd.conf

[root@tecmint ~]# vi /etc/apache2/apache2.conf
Search for the word ”Listen”, comment the original line and write your own directive below that line.
# Listen 80
Listen 8080

OR

Listen 172.16.16.1:8080
Save the file and restart the web server.
[root@tecmint ~]# service httpd restart

[root@tecmint ~]# service apache2 restart
9. Can we have two Apache Web servers on a single machine?
10. What do you mean by DocumentRoot of Apache?
11. How to host files in different folder and what is Alias directive?
To use Alias directive, Its the part of mod_alias module of Apache. The default syntax of Alias directive is:
Alias /images /var/data/images/
Here in above example, /images url prefix to the /var/data/images prefix that mean clients will query for “http://www.example.com/images/sample-image.png” and Apache will pick up the “sample-image.png” file from /var/data/images/sample-image.png on the server. It’s also known as URL Mapping.
12. What do you understand by “DirectoryIndex”?
The default setting of DirectoryIndex is .html index.html index.php, if you have different names of your first file, you need to make the changes in httpd.conf or apache2.conf for DirectoryIndex value to display that to your client browser.
#
# DirectoryIndex: sets the file that Apache will serve if a directory
# is requested.
#
# The index.html.var file (a type-map) is used to deliver content-
# negotiated documents.  The MultiViews Option can be used for the
# same purpose, but it is much slower.
#
DirectoryIndex index.html index.html.var index.cgi .exe
13. How to disable Directory listing when an index file is missing?
To stop Apache directory listing, you can set the following rule in the main configuration file globally or in .htaccess file for a particular website.
<Directory /var/www/html>
   Options -Indexes
</Directory>
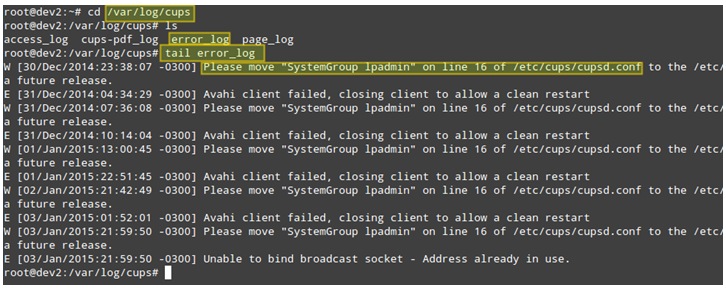
14. What are different log files of Apache Web Server?
15. What do you understand by “connection reset by peer” in error logs?
16. What is Virtual Host in Apache?
You are free to add as many directives you require for your domain, but the two minimal entries for a working website is the ServerName and DocumentRoot. We usually define our Virtual Host section at the bottom of httpd.conf file in Linux machines.
Sample VirtualHost
<VirtualHost *:80>
   ServerAdmin webmaster@dummy-host.example.com
   DocumentRoot /www/docs/dummy-host.example.com
   ServerName dummy-host.example.com
   ErrorLog logs/dummy-host.example.com-error_log
   CustomLog logs/dummy-host.example.com-access_log common
</VirtualHost>
- ServerAdmin : Its usually the email address of the website owner, where the error or notification can be sent.
- DocumentRoot : location where the web files are located in the server(Necessary).
- ServerName : Its the domain name which you want to access from your web browser(Necessary).
- ErrorLog : Its the location of the log file where all the domain related logs are being recorded.
17. What’s the difference between <Location> and <Directory>?
Answer :
- <Location> is used to set element related to the URL / address bar of the web server.
- <Directory> refers that the location of file system object on the server
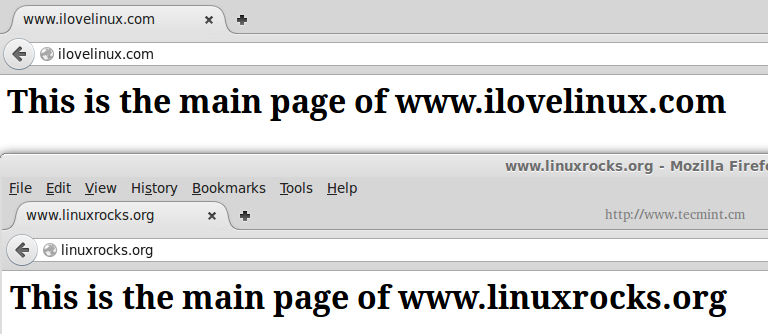
18. What is Apache Virtual Hosting?
For more information, read on How to Create Name/IP based Virtual Hosts in Apache.
19. What do you understand by MPM in Apache?
20. What is the difference between Worker and Prefork MPM?
- Basic difference between Worker and MPM is in their process of spawning the child process. In the Prefork MPM, a master httpd process is started and this master process starts manages all other child processes to serve client requests. Whereas, In the worker MPM one httpd process is active, and it uses different threads to serve client requests.
- Prefork MPM uses multiple child processes with one thread each, where worker MPM uses multiple child processes with many threads each.
- Connection handling in the Prefork MPM, each process handles one connection at a time, whereas in the Worker mpm each thread handles one connection at a time.
- Memory footprints Prefork MPM Large memory footprints, where Worker has smaller memory footprints.
21. What’s the use of “LimitRequestBody” and how to put limit on your uploads?
For example: I want to put limits of 100000 Bytes in the folder /var/www/html/tecmin/uploads. So, you need to add following directive in Apache configuration file.
<Directory "/var/www/html/tecmint/uploads">
LimitRequestBody 100000
</Directory>
22. What is mod_perl and mod _php?
Answer :
- mod_perl is an Apache module which is compiled with Apache for easy integration and to increase the performance of Perl scripts.
- mod_php is used for easy integration of PHP scripts by the web server, it embeds the PHP interpreter inside the Apache process. Its forces Apache child process to use more memory and works with Apache only but still very popular.
23. What is Mod_evasive?
For more information, read the article that guides you how to install and configure mod_evasive in Apache.
24. What is Loglevel debug in httpd.conf file?
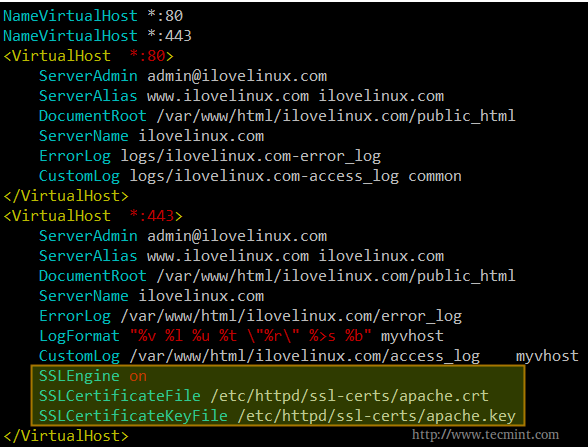
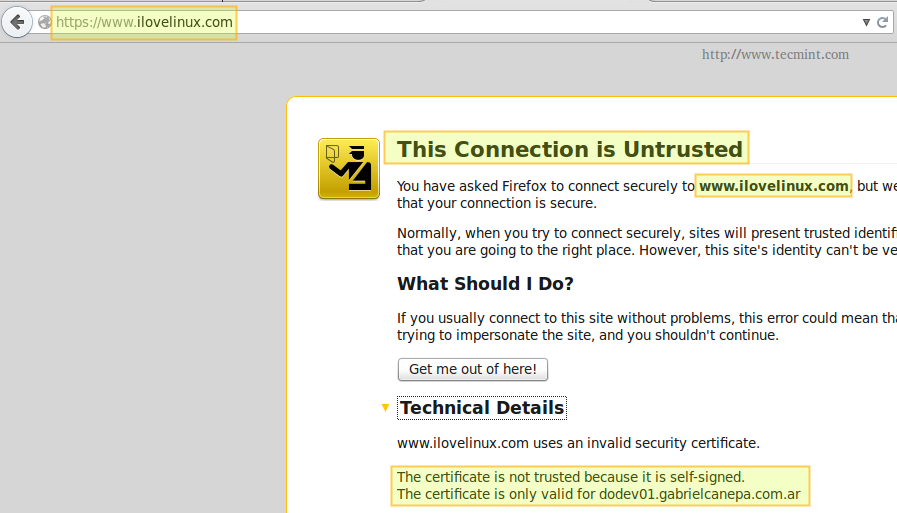
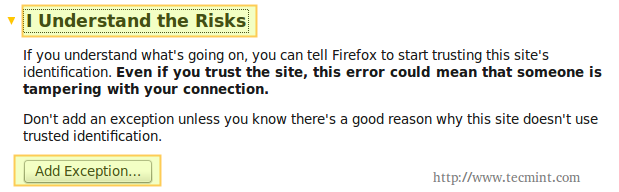
25. What’s the use of mod_ssl and how SSL works with Apache?
How SSL works with Apache
Whenever an https requests comes, these three steps Apache follows:
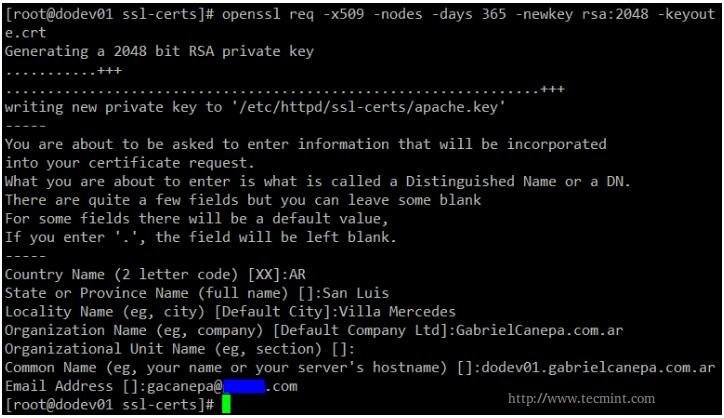
- Apache generates its private key and converts that private key to .CSR file (Certificate signing request).
- Then Apache sends the .csr file to the CA (Certificate Authority).
- CA will take the .csr file and convert it to .crt (certificate) and will send that .crt file back to Apache to secure and complete the https connection request.
These are just most popular 25 questions being asked these days by Interviewers, please provide some more interview questions which you have faced in your recent interview and help others via our Comment section below.
We are also recommend you to read our previous articles on Apache.
- 13 Apache Web Server Security and Hardening Tips
- How to Sync Two Apache Web Servers/Websites Using Rsync
10 MySQL Database Interview Questions for Beginners and Intermediates
In our last article, we’ve covered 15 Basic MySQL Questions, again we are here with another set interview questions for intermediate users. As we said earlier these questions can be asked in Job Interviews. But some of our critics on the last article said, that I don’t give response to my critics and the questions are very basic and will never be asked in any Database Administrator Interview.

10 Mysql Job Interview Questions
To them we must admit all the articles and question can not be composed keeping all the flock in mind. We are coming from basic to expert level step by step. Please Cooperate with us.
1. Define SQL?
2. What is RDBMS? Explain its features?
Answer : A Relational Database Management System (RDBMS) is the most widely used database Management System based on the Relational Database model.
Features of RDBMS
- Stores data in tables.
- Tables have rows and column.
- Creation and Retrieval of Table is allowed through SQL.
3. What is Data Mining?
4. What is an ERD?
5. What is the difference between Primary Key and Unique Key?
6. How to store picture file in the database. What Object type is used?
7. What is Data Warehousing?
8. What are indexes in a Database. What are the types of indexes?
Answer : Indexes are the quick references for fast data retrieval of data from a database. There are two different kinds of indexes.
Clustered Index
- Only one per table.
- Faster to read than non clustered as data is physically stored in index order.
Nonclustered Index
- Can be used many times per table.
- Quicker for insert and update operations than a clustered index.
9. How many TRIGGERS are possible in MySql?
Answer : There are only six triggers are allowed to use in MySQL database and they are.
- Before Insert
- After Insert
- Before Update
- After Update
- Before Delete
- After Delete
10. What is Heap table?
That’s all for now on MySQL questions, I will be coming up with another set of questions soon. Don’t forget to provide your valuable feedback in comment section.
10 Core Linux Interview Questions and Answers
Again its time to read some serious content in light mood, Yup! Its another article on Interview question and here we are presenting 10 Core Linux Questions, which surely will add to your knowledge.

10 Core Linux Interview Questions
1. You need to define a macro, a key binding for the existing command. How would you do it?
[root@localhost ~]# bind '"\e[24~":"date"'
Note : Different types of terminals or terminal emulators can emit different codes for the same key.
2. A user is new to Linux and he wants to know full list of available commands, what would you suggest him?
[root@localhost ~]$ compgen -c

l.
ll
ls
which
if
then
else
elif
fi
case
esac
for
select
while
until
do
done
...
3. Your assistant needs to print directory stack, what would you suggest?
[root@localhost ~]# dirs

/usr/share/X11
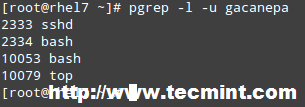
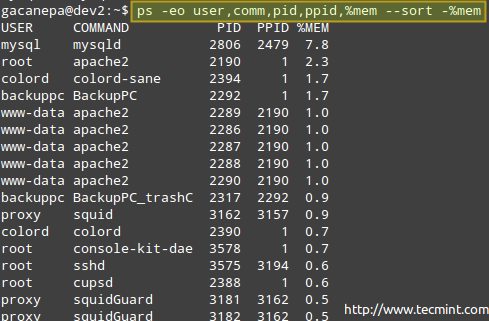
4. You have lots of running jobs, how would you remove all the running processes, without restarting the machine?
5. What does the command ‘hash’ is used for in bash Shell?
[root@localhost ~]# hash

hits    command
   2    /bin/ls
   2    /bin/su
6. Which builtin Linux command performs arithmetic operation of Integers in Bash?
#! /bin/bash

...

...

let c=a+b

...

...
7. You have a large text file, and you need to see one page at a time. What will you do?
[root@localhost ~]# cat file_name.txt | more
8. Who own the data dictionary?
9. How to know a command summary and useability in Linux?
Assume you came across a command in /bin directory, which you are completely unaware of, and have no idea what it does. What will you do to know its useability?
[root@localhost ~]# whatis zcat

zcat [gzip]          (1)  - compress or expand files
10. What command should you use to check the number of files and disk space used by each user’s defined quotas?
That’s all for now. Provide your valuable Feedback in our comment section. Stay tuned for more Linux and Foss posts.
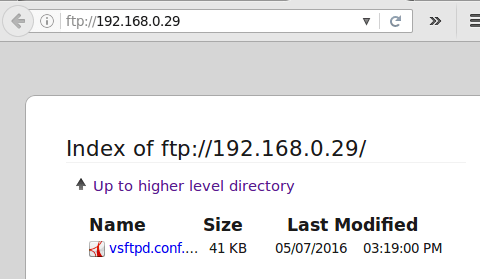
10 VsFTP (Very Secure File Transfer Protocol) Interview Questions and Answers
FTP stands for ‘File Transfer Protocol‘ is one of the most widely used and standard protocol available over Internet. FTP works in a Server/Client architecture and is used to transfer file. Initially FTP client were command-line based. Now most of the platform comes bundled with FTP client and server program and a lot of FTP Client/Server Program is available. Here we are presenting 10 Interview Questions based on Vsftp (Very Secure File Transfer Protocol) on a Linux Server.

10 VsFTP Interview Questions
1. What is the Difference between TFTP and FTP Server?
Note: Briefly you can say FTP usages port 21 by default when clarification between Data and Control is not required.
2. How to Restrict Users and Disallow browsing beyond their Home Directories? How?
chroot_local_user=YES
3. How would you manage number of FTP clients that connect to your FTP server?
Answer : We need to set ‘max_client parameter’. This parameter controls the number of clients connecting, if max_client is set to 0, it will allow unlimited clients to connect FTP server.The maximum client parameter needs to be changed in vsftpd.conf and the default value is 0.
4. How to limit the FTP login attempts to fight against botnet/illegal login attempts?
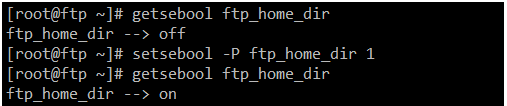
5. How to enable file upload from anonymous users to FTP Server?
6. How would you disabled downloads from FTP server?
7. How to enable and permit FTP login to local users?
8. Is it Possible to maintain log of FTP requests and responses?
Note: In order to create and maintains logs successfully, the parameter ‘xferlog_std_format’ must be enabled.
9. How to disable the login for few seconds, in case of failed login. How will you achieve this?
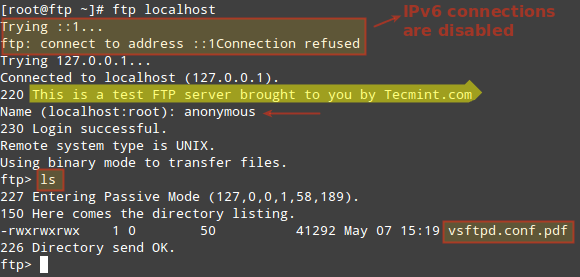
10. How to display certain text message before a client connects to FTP server. How would you get this done?
FTP is a very Useful tool and is vast yet very interesting. Moreover it is useful from Interview Point of View. We have taken the pain to bring these questions to you and will cover more of these questions in our future article. Till then stay tuned and connected to Tecmint.
Read Also: 10 Advance VsFTP Interview Questions and Answers – Part II
10 Advance VsFTP Interview Questions and Answers – Part II
We were overwhelmed with the response we’ve received on our last article. Where we’ve presented 10 wonderful question on Very Secure File Transfer Protocol. Continuing VSFTP interview article we are here presenting you yet another 10 Advance Interview Questions which surely will help you.

VsFTP Intervew Questions – Part II
Please note vsftpd.conf file is used to control various aspects of configuration as specified in this article. By default, the vsftpd searches for the configuration file under /etc/vsftpd/vsftpd.conf. However, the format of file is very simple and it contains comment or directive. Comment lines begins with a ‘#‘ are ignored and a directive line has the following format.
option=value
Before we start the Question and their well explained Answer we would like to answer a question “Who is going to attend FTP Interview?”. Well no one. Perhaps no one would be attending FTP interview. But we are presenting subject wise questions to maintain a systematic approach so that in any Interview, you wont get a new question which you wont be knowing on any of the topics/subjects we covered here.
11. How would you block an IP which is acting malicious on your internal private VSFTP network?
Block IP using host.deny file
Open ‘/etc/hosts.deny’ file.
# vi /etc/hosts.deny
Append the following line at the bottom of the file with the IP address that you want to block access to FTP.
#
# hosts.deny    This file contains access rules which are used to
#               deny connections to network services that either use
#               the tcp_wrappers library or that have been
#               started through a tcp_wrappers-enabled xinetd.
#
#               The rules in this file can also be set up in
#               /etc/hosts.allow with a 'deny' option instead.
#
#               See 'man 5 hosts_options' and 'man 5 hosts_access'
#               for information on rule syntax.
#               See 'man tcpd' for information on tcp_wrappers
#
vsftpd:172.16.16.1
Block IP using iptables rule
To block FTP access to particular IP address, add the following drop rule to iptables INPUT chain.
iptables -A RH-Firewall-1-INPUT -p tcp -s 172.16.16.1 -m state --state NEW -m tcp --dport 21 -j DROP
12. How to allow secured SSL connections to Anonymous users? How would you do?
# Add this line to enable secured SSL connection to anonymous users.
allow_anon_ssl=YES
13. How to allow Anonymous users to create new directory and write to that directory?
# Uncomment this to enable any form of FTP write command.
write_enable=YES
# Uncomment this if you want the anonymous FTP user to be able to create
# new directories.
anon_mkdir_write_enable=YES
14. How to enable Anonymous downloads, but disable permission to write?
# Add this line to enable read only permission to anonymous users.
allow_anon_ssl=YES
15. How to CHMOD all Anonymous uploads automatically. How would you do?
# Add this line to chmod all anonymous uploads automatically.
chmod_enable=YES
16. How to disable directory listing in a FTP server?
# Add this line to disable directory listing.
dirlist_enable=NO
17. How to maintain sessions for logins of VSFTP. How will you do?
# Add this line to maintain session logins.
session_support=YES
18. How to display time in local time zone, when listing the contents of directory?
# Add this line to display directory listing in local time zone.
usr_localtime=YES
19. How will you limit the maximum transfer rate from VSFTP server?
# Add this line to limit the ftp transfer rate.
anon_max_rate=0 # 0 means unlimited
20. How will you timeout the idle session of VSFTP?
# Add this line to set the ftp timeout session.
idle_session_timeout=300
That’s all for now. We will be coming up with next article very soon, till then stay tuned and connected and don’t forget to provide us with your valuable feedback in our comment section.
10 Useful Random Linux Interview Questions and Answers
To a little surprise this time we are not presenting Interview question on any specific subject but on random topics. These question will surely help you in cracking Interviews beside adding to your Knowledge.

10 Random Linux Questions and Answers
1. Let’s say you maintains a backup on regular basis for the company you are working. The backups are maintained in Compressed file format. You need to examine a log, two months old. What would you suggest without decompressing the compressed file?
# zcat f phpshell2.4.tar.gz
2. You need to track events on your system. What will you do?
Running ‘syslogd‘ application in terminal generates log file at the location ‘/var/log/syslog‘. The syslogd application is very useful in troubleshooting Linux sytems. A sample log file looks similar to below.

syslongd
3. How will you restrict IP so that the restricted IP’s may not use the FTP Server?
Block IP Address
Open ‘/etc/hosts.deny’ file.
# vi /etc/hosts.deny
Add the IP address that you want to block at the bottom of the file.
#
# hosts.deny    This file contains access rules which are used to
#               deny connections to network services that either use
#               the tcp_wrappers library or that have been
#               started through a tcp_wrappers-enabled xinetd.
#
#               The rules in this file can also be set up in
#               /etc/hosts.allow with a 'deny' option instead.
#
#               See 'man 5 hosts_options' and 'man 5 hosts_access'
#               for information on rule syntax.
#               See 'man tcpd' for information on tcp_wrappers
#
vsftpd:172.16.16.1
4. Tell us the difference between Telnet and SSH?
6. You need to stop your X server. When you tries to kill your X server, You got an error message that you cannot quit X server. What will you do?
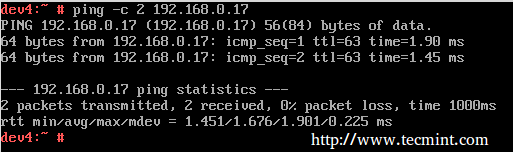
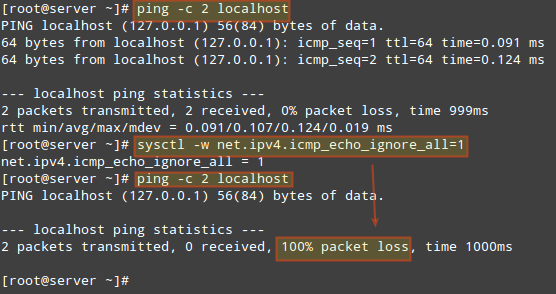
6. What is the difference between command ‘ping’ and ‘ping6’?
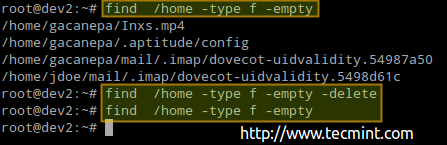
7. You want to search for all the *.tar files in your Home directory and wants to delete all at once. How will you do it?
# find /home/ name '*.tar' | xargs rm rf
8. What is the difference between locate and slocate command?
9. You need to search for the string “Tecmint” in all the “.txt” files in the current directory. How will you do it?
# find -name “*.txt” | xargs grep “Tecmint”
10. You want to send a message to all connected users as “Server is going down for maintenance”, what will you do?
# echo please save your work, immediately. The server is going down for Maintenance at 12:30 Pm, sharply. | wall

wall command
That’s all for now. Don’t Forget to give your valuable feedback in comment section below.
10 Useful Interview Questions on Linux Services and Daemons
Daemon is a computer program that runs as a background process and generally do not remains under the direct control of user. The parent process of a daemon in most cases are init, but not always.
In Linux, a Service is an application that runs in a background carrying out essential task or waiting for its execution.

Questions on Linux Services and Daemons
Generally, there is no difference between a Daemon and a Service. Daemon is Service but service may be bigger than Daemon. Daemon provide some services and services may contain more than one Daemon.
Here in this series of Interview Article, we would be covering Services and Daemons in Linux.
1. What is Exim Service? What is the purpose of this Service?
2. What is NIS server? What is the purpose of NIS Server?
3. What will you prefer for a reverse proxy in Linux?
4. You are getting following codes (2xx, 3xx, 4xx, 5xx) in Apache, at some point of time. What does this means?
Answer : In Apache each error code points towards a specific area of problem.
- 2xx : Request of connection Successful
- 3xx: Redirection
- 4xx: Client Error
- 5xx: Server Error
5. You are asked to stop Apache Service through its control Script. What will you do?
# apachectl stop		[On Debian based Systems]
# /etc/inid.t/httpd stop	[On Red Hat based Systems]
6. How is ‘apachectl restart’ different from ‘apachectl graceful’
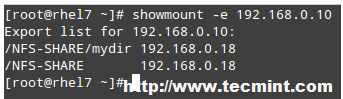
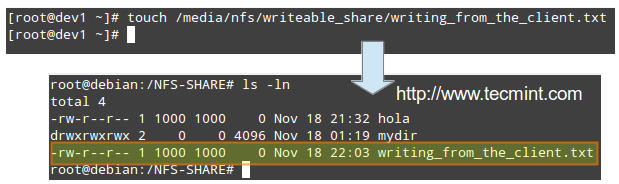
7. How will you configure the nfs mounts to export it, from your local machine?
8. You are supposed to create a new Apache VirtualHost configuration for the host www.Tecmint.com that is available at /home/Tecmint/public_html/ and maintains log at /var/log/httpd/ by default.
<VirtualHost *:80>
DocumentRoot /home/Tecmint/public_html
ServerName www.Tecmint.com
Server Alias Tecmint.com
CustomLog /var/log/httpd/Tecmint.com.log combined
ErrorLog /var/log/httpd/Tecmint.com.error.log
</VirtualHost>
9. You are supposed to dump all the packets of http traffic in file http.out. What will you suggest?
# tcpdump tcp port 80 -s0 -w http.out
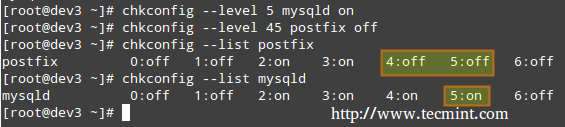
10. How will you add a service (say httpd) to start at INIT Level 3?
chkconfig –level 3 httpd on
That’s all for now. I’ll be here again with another interesting article very soon.
10 Useful SSH (Secure Shell) Interview Questions and Answers
SSH stands for Secure Shell is a network protocol, used to access remote machine in order to execute command-line network services and other commands over a Network. SSH is Known for its high security, cryptographic behavior and it is most widely used by Network Admins to control remote web servers primarily.

10 SSH Interview Questions
Here in this Interview Questions series article, we are presenting some useful 10 SSH (Secure Shell) Questionsand their Answers.
1. SSH is configured on what Port Number, by default? How to change the port of SSH?
We can check port number of SSH by running the below one liner script, directly on terminal.
# grep Port /etc/ssh/sshd_config		[On Red Hat based systems]

# grep Port /etc/ssh/ssh_config		        [On Debian based systems]
To change the port of SSH, we need to modify the configuration file of SSH which is located at ‘/etc/ssh/sshd_config‘ or ‘/etc/ssh/ssh_config‘.
# nano /etc/ssh/sshd_config	[On Red Hat based systems]

# nano /etc/ssh/ssh_config		[On Debian based systems]
Searh for the Line.
Port 22
And replace ‘22‘ with any UN-engaged port Number say ‘1080‘. Save the file and restart the SSH service to take the changes into effect.
# service sshd restart					[On Red Hat based systems]

# service ssh restart					[On Debian based systems]
2. As a security implementation, you need to disable root Login on SSH Server, in Linux. What would you suggest?
To disable SSH root login, open the configuration file located at ‘/etc/ssh/sshd_config‘ or ‘/etc/ssh/ssh_config‘.
# nano /etc/ssh/sshd_config			[On Red Hat based systems]

# nano Port /etc/ssh/ssh_config			[On Debian based systems]
Change the parameter ‘PermitRootLogin‘ to ‘no‘ and restart the SSH service as show above.
3. SSH or Telnet? Why?
4. Is it possible to login to SSH server without password? How
Create ssh-keygen using the command below.
$ ssh-keygen
Copy public keys to remote host using the command below.
$ ssh-copy-id -i /home/USER/.ssh/id_rsa.pub REMOTE-SERVER
Note: Replace USER with user name and REMOTE-SERVER by remote server address.
The next time we try to login to SSH server, it will allow login without asking password, using the keygen. For more detailed instructions, read how to login remote SSH server without password.
5. How will you allows users and groups to have access to SSH Sever?
Here again we need to edit the configuration file of SSH service. Open the configuration file and add users and groups at the bottom as show below and then, restart the service.
AllowUsers Tecmint Tecmint1 Tecmint2
AllowGroups group_1 group_2 group_3
6. How to add welcome/warning message as soon as a user login to SSH Server?
# nano /etc/issue
And add your custom message in this file. See, below a screen grab that shows a custom message as soon as user logged into server.
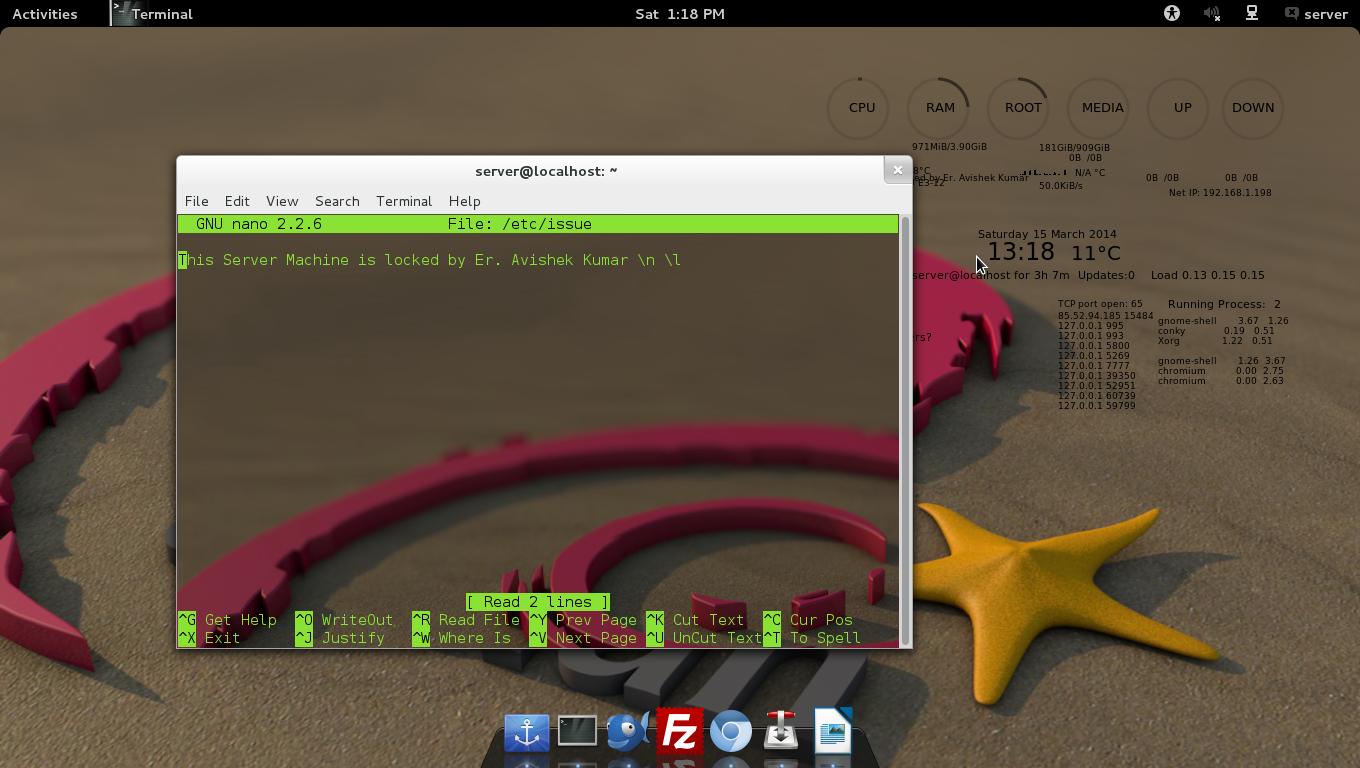
SSH Login Message
7. SSH has two protocols? Justify this statement.
Again, we need to open the SSH configuration file and add/edit the lines as shown below.
# protocol 2,1

to

Protocol 2
Save the configuration file and restart the service.
8. Is it possible to trace unauthorized login attempts to SSH Server with date of Intrusion along with their corresponding IP.
# cat /var/log/secure | grep “Failed password for”
Note: The grep command can be tweaked in any other way to produce the same result.
9. Is it possible to copy files over SSH? How?
A dummy SCP command in action is depicted below:
$ scp text_file_to_be_copied Your_username@Remote_Host_server:/Path/To/Remote/Directory
For more practical examples on how to copy files/folders using scp command, read the 10 SCP Commands to Copy Files/Folders in Linux.
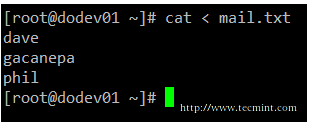
10. Is it possible to pass input to SSH from a local file? If Yes! How?
# ssh username@servername < local_file.txt
SSH is a very hot topic from interview point, of all times. The above questions would have surely added to your knowledge.
That’s all for now. I’ll soon be here with another interesting article.
10 Interview Questions and Answers on Various Commands in Linux
Our last article, “10 Useful SSH Interview Questions” was highly appreciated on various Social Networking sites as well as on Tecmint. This time we are presenting you with “10 Questions on various Linux commands“. These questions will prove to be brainstorming to you and will add to your knowledge which surely will help you in day-to-day interaction with Linux and in Interviews.

Questions on Various Commands
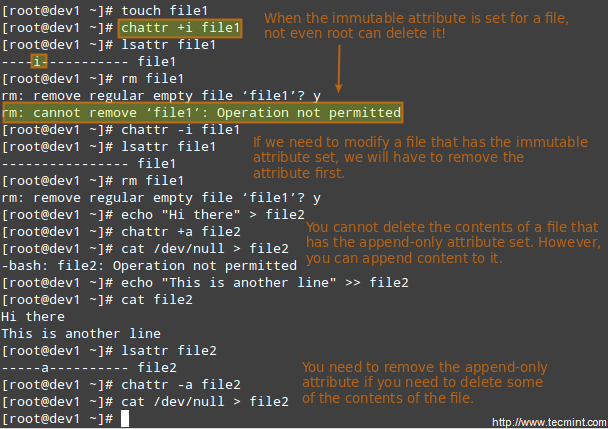
Q1. You have a file (say virgin.txt). You want this file to be alter-proof so that no one can edit or delete this file, not even root. What will you do?
The Syntax of command chattr, for the above purpose is:
# chattr +i virgin.txt
Now try to remove the file using normal user.
$ rm -r virgin.txt

rm: remove write-protected regular empty file `virgin.txt'? Y
rm: cannot remove `virgin.txt': Operation not permitted
Now try to remove the file using root user.
# rm -r virgin.txt

cannot remove `virgin.txt': Operation not permitted
Q2. If several users are using your Linux Server, how will you find the usage time of all the users, individually on your server?
# apt-get install acct
# ac -p

(unknown)                     14.18
server                             235.23
total      249.42
Q3. Which is preferred tool to create Network Statistics for your server?
# apt-get install mrtg
Q4. It is possible to send query to BIOS from Linux Command Line?
# biosdecode

# biosdecode 2.11

ACPI 2.0 present.
	OEM Identifier: LENOVO
	RSD Table 32-bit Address: 0xDDFCA028
	XSD Table 64-bit Address: 0x00000000DDFCA078
SMBIOS 2.7 present.
	Structure Table Length: 3446 bytes
	Structure Table Address: 0x000ED9D0
	Number Of Structures: 89
	Maximum Structure Size: 184 bytes
PNP BIOS 1.0 present.
	Event Notification: Not Supported
	Real Mode 16-bit Code Address: F000:BD76
	Real Mode 16-bit Data Address: F000:0000
	16-bit Protected Mode Code Address: 0x000FBD9E
	16-bit Protected Mode Data Address: 0x000F0000
PCI Interrupt Routing 1.0 present.
	Router ID: 00:1f.0
	Exclusive IRQs: None
	Compatible Router: 8086:27b8
	Slot Entry 1: ID 00:1f, on-board
	...
	Slot Entry 15: ID 02:0c, slot number 2
Q5. Most of the Linux Server are headless, i.e., they run in command mode only. No GUI is installed. How will you find hardware description and configuration of your box?
# dmidecode
The output of dmidecode is extensive. It will be a nice idea to redirect its output to a file.
# dmidecode > /path/to/text/file/text_file.txt
Q6. You need to know all the libraries being used and needed by a binary, say ‘/bin/echo’. How will you achieve desirable output?
$ ldd /bin/echo

linux-gate.so.1 =>  (0xb76f1000)
libc.so.6 => /lib/i386-linux-gnu/i686/cmov/libc.so.6 (0xb7575000)
/lib/ld-linux.so.2 (0xb76f2000)
Q7. You are working for the country’s army. You have a file (say “topsecret.txt”) which contains confidential and country’s security Information, Nuclear missiles, etc. What will be your preferred method to delete this file?
# shred -n 15 -z topsecret.txt
shread – overwrite a file to hide its contents, and optionally delete it.
- -n – Overwrites the files n times
- -z – Add a final overwrite with zeros to hide shredding.
Note: The above command overwrites the file 15 times before overwriting with zero, to hide shredding.
Q8. Is it possible to mount an NTFS partition on Linux?
For more information, read article on how to monitor an NTFS Partition on Linux.
Q9. What and where you need to edit so that the default desktop at login will be KDE, which at present is GNOME.
DESKTOP=”KDE”
DISPLAYMANAGER=”KDE”
Save the file with above content. Next time when machine boots, it automatically will load KDE as default display manager.
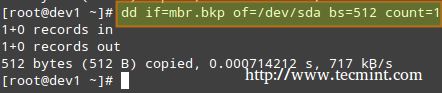
Q10. What does an intrid image file refers to?
That’s all for now. I’ll be here again with another interesting topic, worth knowing.
10 Useful ‘Interview Questions and Answers’ on Linux Shell Scripting
Greeting of the day. The vastness of Linux makes it possible to come up with a unique post every time. 
Questions on Shell Scripting
We have lots of tutorials on Shell Scripting language and Interview Questions for readers of all kind, here are the links to those articles.
Adding to the shell scripting posts here, in this article we will be going through questions related to Linux Shell from interview point of view.
1. How will you abort a shell script before it is successfully executed?
For example, create a following shell script as ‘anything.sh‘.
#!/bin/bash
echo "Hello"
exit -1
echo "bye"
Save the file and execute it.
# sh anything.sh

Hello
exit.sh: 3: exit: Illegal number: -1
From the above script, it is clear that the execution went well before exit -1 command.
2. How to remove the headers from a file using command in Linux?
Here it the exact command to remove headers from a file (or first line of a file).
# sed '1 d' file.txt
The only problem with above command is that, it outputs the file on standard output without the first line. In order to save the output to file, we need to use redirect operator which will redirects the output to a file.
# sed '1 d' file.txt > new_file.txt
Well the built in switch ‘-i‘ for sed command, can perform this operation without a redirect operator.
# sed -i '1 d' file.txt
3. How will you check the length of a line from a text file?
A ‘sed –n ‘n p’ file.txt‘, where ‘n‘ represents the line number and ‘p‘ print out the pattern space (to the standard output). This command is usually only used in conjunction with the -n command-line option. So, how to get the length count? Obviously! we need to pipeline the output with ‘wc‘ command.
# sed –n 'n p' file.txt | wc –c
To get the length of line number ‘5’ in the text file ‘tecmint.txt‘, we need to run.
# sed -n '5 p' tecmint.txt | wc -c
4. Is it possible to view all the non-printable characters from a text file on Linux System? How will you achieve this?
How to show non-printable characters in ‘vi‘ editor?
- Open vi editor.
- Go to command mode of vi editor by pressing [esc] followed by ‘:’.
- The final step is to type execute [set list] command, from command interface of ‘vi’ editor.
Note: This way we can see all the non-printable characters from a text file including ctrl+m (^M).
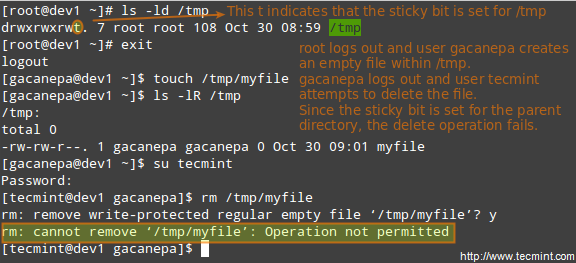
5. You are a Team-Leader of a group of staffs working for a company xyz. The company ask you to create a directory ‘dir_xyz’, such that any member of the group can create a file or access a file under it, but no one can delete the file, except the one created it. what will you do?
# mkdir dir_xyz
# chmod g+wx dir_xyz
# chmod +t dir_xyz
The first line of command create a directory (dir_xyz). The second line of command above allow group (g) to have permission to ‘write‘ and ‘execute‘ and the last line of the above command – The ‘+t‘ in the end of the permissions is called the ‘sticky bit‘. It replaces the ‘x‘ and indicates that in this directory, files can only be deleted by their owners, the owner of the directory or the root superuser.
6. Can you tell me the various stages of a Linux process, it passes through?
Here are the 4 stages of Linux process.
- Waiting: Linux Process waiting for a resource.
- Running : A Linux process is currently being executed.
- Stopped : A Linux Process is stopped after successful execution or after receiving kill signal.
- Zombie : A Process is said to be ‘Zombie’ if it has stopped but still active in process table.
7. What is the use of cut command in Linux?
For example, extract first 10 columns of a text file ‘txt_tecmint‘.
# cut -c1-10 txt_tecmint
To extract 2nd, 5th and 7th column of the same text file.
# cut -d;-f2 -f5 -f7 txt_tecmint
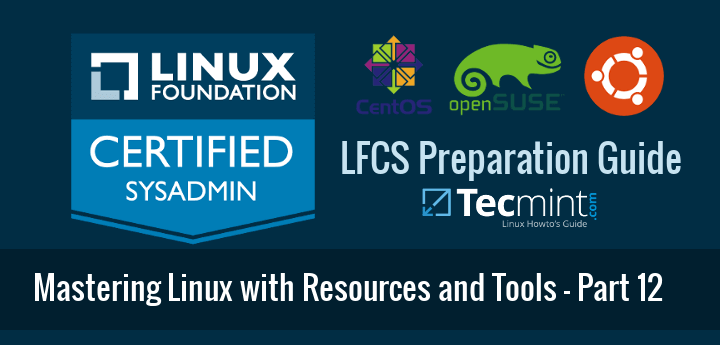
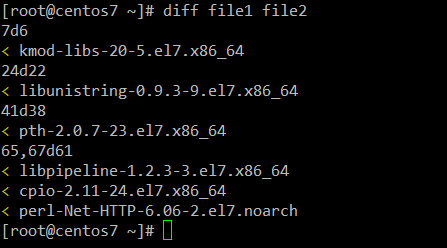
8. What is the difference between commands ‘cmp’ and ‘diff’?
The ‘diff‘ command reports the changes one should make so that both the files look the same. Whereas ‘cmp‘ command compares the two files byte-by-byte and reports the first mismatch.
9. Is it possible to substitute ‘ls’ command with ‘echo’ command?
10. You might have heard about inodes. can you describe inode briefly?
That’s all for now. We will be coming up with another interesting and knowledgeable Interview questions, in the next article.
Practical Interview Questions and Answers on Linux Shell Scripting
With the overwhelming response we are getting on the Interview Series articles, the first of its kind on any Linux How-to website in the form of Likes, Feedbacks in comment as well as on personal Email Address make us going from one article to the next article.
Here is the link to the Interview Series articles already published on Tecmint.com, where we have covered lots of topics viz., FTP, MySQL, Apache, Scripting, Linux Commands, etc.

Practical Interview Question on Shell Scripting
Continuing to the above series here we are coming with another 5 wonderful Linux Interview Questions and their answer. Your (The Tecmint.com Readers and frequent Visitors) support is always needed to make it successful.
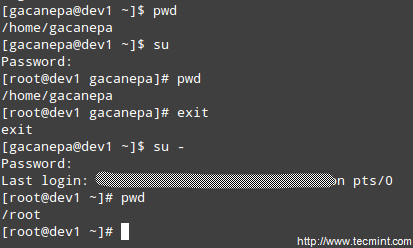
1. Write a shell script to get current date, time, user name and current working directory.
Now create a file called ‘userstats.sh‘ and add the following code to it.
#!/bin/bash
echo "Hello, $LOGNAME"
echo "Current date is `date`"
echo "User is `who i am`"
echo "Current directory `pwd`"
Place execute permission and run the script as shown below.
# chmod 755 userstats.sh
# ./userstats.sh
Sample Output
Hello, avi
Current date is Sat Jun  7 13:05:29 IST 2014
User is avi      pts/0        2014-06-07 11:59 (:0)
Current directory /home/avi/Desktop
2. Write a Shell Script that adds two numbers if provided as the command Line Argument and if the two numbers are not entered it outputs an Error Message along with a one-Line of how-to use description.
Again create a file called ‘two-numbers.sh‘ and add the following content to it.
#!/bin/bash
# The Shebang

if [ $# -ne 2 ]
# If two Inputs are not received from Standard Input

then
# then execute the below statements

    echo "Usage - $0   x    y"
    # print on standard output, how-to use the script (Usage - ./1.sh   x    y )

    echo "        Where x and y are two nos for which I will print sum"
    # print on standard output, “Where x and y are two nos for which I will print sum ”

    exit 1
    # Leave shell in Error Stage and before the task was successfully carried out.

fi
# End of the if Statement.

    echo "Sum of $1 and $2 is `expr $1 + $2`"
    # If the above condition was false and user Entered two numbers as a command Line Argument,
       it will show the sum of the entered numbers.
Set executer permission on the file and run the script as shown below.
# chmod 755 two-numbers.sh
Condition 1: Running the script without entering two numbers as command line argument, you will get the following output.
Sample Output
# ./two-numbers.sh

Usage - ./two-numbers.sh   x    y
        Where x and y are two nos for which I will print sum
Condition 2: When Numbers are entered as command line argument you will get the result as shown.
$ ./two-numbers.sh 4 5

Sum of 4 and 5 is 9
Hence the above shell script fulfills the condition as suggested in the question.
3. You needs to print a given Number say 10572, in reverse order using a Shell script such that the input is provided using command Line Argument only. If the input data is not provided as Command Line Argument, it should throw and error and should suggest, how to use the script. Write the script but before that tell me the algorithm that needs to be implemented here.
Algorithm
- 1. Let the Input Number = n
- 2. Set rev=0, sd=0 (Reverse and single digitis set to 0)
- 3. n % 10, will find and give single left most digit
- 4. reverse number is generated as rev * 10 + sd
- 5. Decrease Input Number (n) by 1.
- 6. if n > 0, then goto step 3 else goto setp 7
- 7. Print rev
Now again, create a file called ‘numbers.sh‘ and add the following given code it.
#!/bin/bash
if [ $# -ne 1 ]
then
    echo "Usage: $0   number"
    echo "       I will find reverse of given number"
    echo "       For eg. $0 0123, I will print 3210"
    exit 1
fi

n=$1
rev=0
sd=0

while [ $n -gt 0 ]
do
    sd=`expr $n % 10`
    rev=`expr $rev \* 10  + $sd`
    n=`expr $n / 10`
done
    echo  "Reverse number is $rev"
Grant a execute permission on the file and run the script as shown below.
# chmod 755 numbers.h
Condition 1: When Input is not provided as command line argument, you will get the following output.
Sample Output
./numbers.sh

Usage: ./numbers.sh  number
       I will find reverse of given number
       For eg. ./2.sh 123, I will print 321
Condition 2: When Input was provided as command line Argument.
$ ./numbers.sh 10572

Reverse number is 27501
The above script worked perfectly and the output was just what we needed.
4. You are supposed to calculate a real number calculation directly from terminal and not any shell script. What will you do (say the real numbers are 7.56 and 2.453)?
For example, run the following command to calculate numbers in real time using bc command as shown.
$ echo 7.56 + 2.453 | bc

10.013
5. You are supposed to find the value of pi upto 100 places of decimal, what is the easiest way to get the result done.
# pi 100

3.141592653589793238462643383279502884197169399375105820974944592307816406286208998628034825342117067
Obviously! We must have package ‘pi‘ installed. Just do a apt or yum to get a required package to install ‘pi‘ onto the distribution you are using.
That’s all for now. I’ll be here again with another interesting article very soon. Till then stay tuned and connected to Tecmint.com. Don’t forget to provide us with you valuable feedback in the comment section below.
11 Advance MySQL Database “Interview Questions and Answers” for Linux Users
We have already published two MySQL articles, well appreciated by Tecmint Community. This is the third article on MySQL Interview series and sixteen in the the Interview Genre Column.

11 MySQL Interview Questions
We have reached here all because of yours support and we seek the same in future form your end. Here in this article we will be concentrating on the practical aspect of MySQL, the question relevant for Interview aspect.
1. Using SELECT statement find the version of the server you are running and print the name of the current database?
Ans: The below MySQL command will show server version and currently selected Database.
mysql> SELECT VERSION(), DATABASE();

+-------------------------+------------+
| VERSION()               | DATABASE() |
+-------------------------+------------+
| 5.5.34-0ubuntu0.13.10.1 | NULL       |
+-------------------------+------------+
1 row in set (0.06 sec)
In the Database Column it is showing NULL value because we have not selected any database. So, select database as shown in the following command.
mysql> use Tecmint;

Reading table information for completion of table and column names
You can turn off this feature to get a quicker startup with -A

Database changed
mysql> select VERSION(), DATABASE();

+-------------------------+------------+
| VERSION()               | DATABASE() |
+-------------------------+------------+
| 5.5.34-0ubuntu0.13.10.1 | tecmint    |
+-------------------------+------------+
1 row in set (0.00 sec)
2. USE NOT Operator (!) to select all the users except ‘SAM’ from a table say ‘Tecmint’
Ans: The below statement will show all the columns of all the users from table ‘Tecmint‘ except the user ‘SAM‘.
mysql> SELECT * FROM Tecmint WHERE user !=SAM;

+---------------------+---------+---------+---------+---------+-------+
| date                | user    | host 	 | root     | local   | size  |
+---------------------+---------+---------+---------+---------+-------+
| 2001-05-14 14:42:21 | Anthony | venus  | barb     | venus   | 98151 |
| 2001-05-15 08:50:57 | TIM     | venus  | phil     | venus   | 978   |
+---------------------+---------+---------+---------+---------+-------+
3. Is it possible to implement ‘AND’ with NOT (!) Operator.
Ans: The AND operator is used when we use (=) and the operator OR is used when we use (!=). An example of (=) with AND Operator.
mysql> SELECT * FROM mail WHERE user = SAM AND root = phil
An Example of (!=) with OR Operator.
mysql> SELECT * FROM mail WHERE user != SAM OR root != phil

+---------------------+---------+---------+---------+---------+-------+
| date                | user    | host    | root    | local   | size  |
+---------------------+---------+---------+---------+---------+-------+
| 2001-05-14 14:42:21 | Anthony | venus   | barb    | venus   | 98151 |
+---------------------+---------+---------+---------+---------+-------+
- = : means Equal to
- != : Not Equal to
- ! : represents NOT Operator
The AND & OR are treated as joining operators in MySQL.
4. What IFNULL() statement is used for in MySQL?
Ans: The Query in MySQL can be written precisely using IFNULL() statement. The IFNULL() statement test its first argument and returns if it’s not NULL, or returns its second argument, otherwise.
mysql> SELECT name, IFNULL(id,'Unknown') AS 'id' FROM taxpayer;

+---------+---------+
| name 	  | id      |
+---------+---------+
| bernina | 198-48  |
| bertha  | Unknown |
| ben     | Unknown |
| bill    | 475-83  |
+---------+---------+
5. You want to see only certain rows from a result set from the beginning or end of a result set. How will you do it?
Ans: We need to use LIMIT clause along with ORDER BY to achieve the above described scenario.
Show 1 Record
mysql> SELECT * FROM name LIMIT 1;

+----+------+------------+-------+----------------------+------+
| id | name | birth      | color | foods                | cats |
+----+------+------------+-------+----------------------+------+
| 1  | Fred | 1970-04-13 | black | lutefisk,fadge,pizza | 0    |
+----+------+------------+-------+----------------------+------+
Show 5 Record
mysql> SELECT * FROM profile LIMIT 5;

+----+------+------------+-------+-----------------------+------+
| id | name | birth      | color | foods                 | cats |
+----+------+------------+-------+-----------------------+------+
| 1  | Fred | 1970-04-13 | black | lutefisk,fadge,pizza  | 0    |
| 2  | Mort | 1969-09-30 | white | burrito,curry,eggroll | 3    |
| 3  | Brit | 1957-12-01 | red   | burrito,curry,pizza   | 1    |
| 4  | Carl | 1973-11-02 | red   | eggroll,pizza         | 4    |
| 5  | Sean | 1963-07-04 | blue  | burrito,curry         | 5    |
+----+------+------------+-------+-----------------------+------+
mysql> SELECT * FROM profile ORDER BY birth LIMIT 1;

+----+------+------------+-------+----------------+------+
| id | name | birth      | color | foods          | cats |
+----+------+------------+-------+----------------+------+
| 9  | Dick | 1952-08-20 | green | lutefisk,fadge | 0    |
+----+------+------------+-------+----------------+------+
6. Oracle Vs MySQL. Which one and Why?
Ans: Well both has its advantages and disadvantages. As a matter of time I prefer MySQL.
Reason for Selection MySQL Over oracle
- Mysql is FOSS.
- MySQL is portable.
- MYSQL supports both GUI as well as Command Prompt.
- MySQL Administration is supported over Query Browser.
7. How will you get current date in MySQL?
Ans: Getting current date in MySQL is as simple as executing the below SELECT Statement.
mysql> SELECT CURRENT_DATE();

+----------------+
| CURRENT_DATE() |
+----------------+
| 2014-06-17     |
+----------------+
8. How will you export tables as an XML file in MySQL?
Ans: We use ‘-e‘ (export) option to export MySQL table or the whole database into an XML file. With large tables we may need to implement it manually but for small tables, applications like phpMyAdmin can do the job.
A native command of MySQL can do it.
mysql -u USER_NAME –xml -e 'SELECT * FROM table_name' > table_name.xml
Where USER_NAME is username of Database, table_name is the table we are exporting to XML and table_name.xml is the xml file where data is stored.
9. What is MySQL_pconnect? And how it differs from MySQL_connect?
Ans: MySQL_pconnect() opens a connection that is persistent to the MySQL Database which simply means that the database is not opened every-time the page loads and hence we can not use MySQL_close() to close a persistent connection.
A brief difference between MySQL_pconnect and MySQL_connect are.
Unlike MySQL_pconnect, MySQL_connect – Opens the Database every-time the page is loaded which can be closed any-time using statement MySQL_close().
10. You need to show all the indexes defined in a table say ‘user’ of Database say ‘mysql’. How will you achieve this?
Ans: The following command will show all the indexes of a table ‘user’.
mysql> show index from user;
+-------+------------+----------+--------------+-------------+-----------+-------------+----------+--------+------+------------+---------+---------------+
| Table | Non_unique | Key_name | Seq_in_index | Column_name | Collation | Cardinality | Sub_part | Packed | Null | Index_type | Comment | Index_comment |
+-------+------------+----------+--------------+-------------+-----------+-------------+----------+--------+------+------------+---------+---------------+
| user  |          0 | PRIMARY  |            1 | Host        | A         |        NULL |     NULL | NULL   |      | BTREE      |         |               |
| user  |          0 | PRIMARY  |            2 | User        | A         |           4 |     NULL | NULL   |      | BTREE      |         |               |
+-------+------------+----------+--------------+-------------+-----------+-------------+----------+--------+------+------------+---------+---------------+
2 rows in set (0.00 sec)
11. What are CSV tables?
Ans: CSV stands for Comma-Separated Values aka Character-Separated Values. CSV table stores data in plain text and tabular format. It typically contains one record per line.
Each record is separated by specific delimiters (Comma, Semi-colon, …) where each record has same sequence of field. CSV tables are most widely used to store phone contacts to Import and Export and can be used to store any sort of plain text data.
That’s all for now. I’ll be here again with another Interesting article, you people will love to read.
10 Useful Interview Questions and Answers on Linux Commands
Linux command Line and the interaction of users with Linux Shell with Linux Commands is the most wonderful part of Linux and is one of the most widely topic from interview point. Here in this article we are coming up with 10 wonderful questions that are important from the interview perspective and will surely add to yours knowledge base.

Linux Command Questions
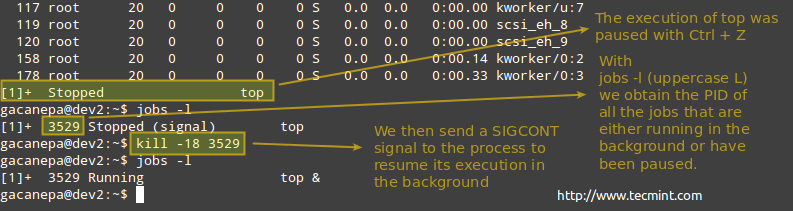
1. How will you suspend a running process and put it in the background?
2. What are the minimum number of partitions required to install Linux and How will you check boot messages?
In order to check boot messages we need to use cat or dmesg commands as shown below.
# cat /var/log/messages

OR

# dmesg
3. Name the Daemon responsible for tracking System Event on your Linux box?
4. What are the minimum requirements to run command ‘fsck’ on root partition?
5. How to copy /home directory hierarchically to another directory. How will you do it?
6. How will you automate the rotation of logs in Linux?
7. How to know who has scheduled the job?
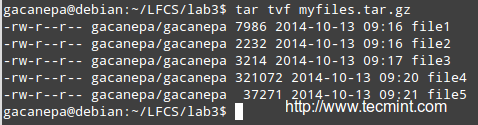
8. How to view the contents of the tar ball without extracting it. How will you do this?
9. What is page Fault and how it happens?
10. What are return codes in program?
That’s all for now. I’ll be here again with another interesting article soon.
10 Useful “Squid Proxy Server” Interview Questions and Answers in Linux
It’s not only to System Administrator and Network Administrator, who listens the phrase Proxy Server every now and then but we too. Proxy Server is now a corporate culture and is the need of the hour. Proxy server now a days is implemented from small schools, cafeteria to large MNCs. Squid (also known as proxy) is such an application which acts as proxy server and one of the most widely used tool of its kind.
This Interview article aims at strengthening your base from Interview point on the ground of proxy server and squid.

Squid Interview Questions
1. What do you mean by Proxy Server? What is the use of Proxy Server in Computer Networks?
Proxy servers are the backbone of WWW (World Wide Web). Most of the proxies of today are web proxies. A proxy server handles the complexity in between the Communication of client and Server. Moreover it provides anonymity on the web which simply means your identity and digital footprints are safe. Proxies can be configured to allow which sites client can see and which sites are blocked.
2. What is Squid?
3. What is the default port of squid and how to change its operating port?
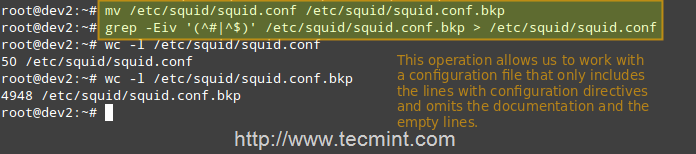
Open ‘/etc/squid/squid.conf’ file and with your choice of editor.
# nano /etc/squid/squid.conf
Now change this port to any other unused port. Save the editor and exit.
http_port 3128
Restart the squid service as shown below.
# service squid restart
4. You works for a company the management of which ask you to block certain domains through squid proxy server. What are you going to do?
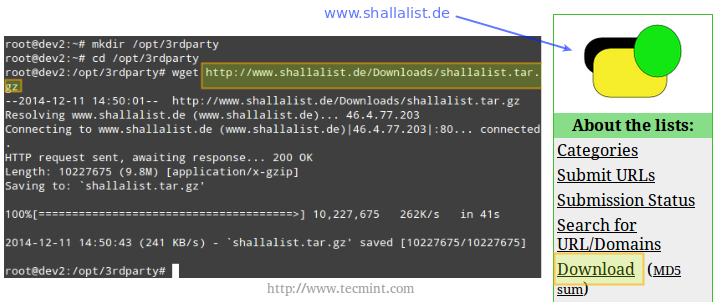
a. Create a file say ‘blacklist’ under directory ‘/etc/squid’.
# touch /etc/squid/blacklist
b. Open the file ‘/etc/squid/blacklist’ with nano editor.
# nano /etc/squid/blacklist
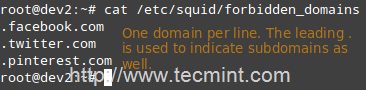
c. Add all the domains to the file blacklist with one domain per line.
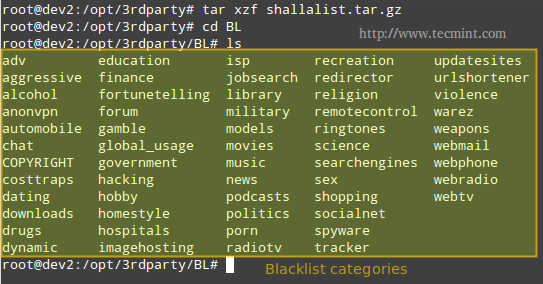
.facebook.com
.twitter.com
.gmail.com
.yahoo.com
...
d. Save the file and exit. Now open the Squid configuration file from location ‘/etc/squid/squid.conf’.
# nano /etc/squid/squid.conf
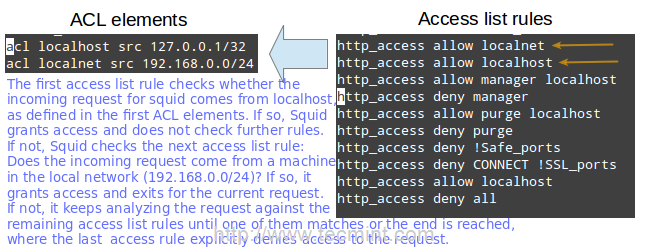
e. Add the lines below to the Squid configuration file.
acl BLACKLIST dstdom_regex -i “/etc/squid/blacklist”
http_access deny blacklist
f. Save the configuration file and exit. Restart Squid service to make the changes effective.
# service squid restart
5. What is Media Range Limitation and partial download in Squid?
The squid’s feature of partial download is implemented well within windows update where downloads are requested in the form of small packets which can be paused. Because of this feature a update downloading windows machine can be restarted without any fear of data loss. Squid makes the Media Range Limitation and Partial Download possible only after storing a copy of whole data in it. Moreover the partial download gets deleted and not cached when user points to another page until Squid is specially configured somehow.
6. What is reverse proxy in squid?
Technically it is feasible to use single squid server to act both as normal proxy server and reverse proxy server at the same point of time.
7. Since Squid can be used as web-cache Daemon, is it possible to Clear its Cache? How?
a. First stop Squid proxy server and delete cache from the location ‘/var/lib/squid/cache’ directory.
# service squid stop
# rm -rf /var/lib/squid/cache/*<
b. Create Swap directories.
# squid -z
8. A client approaches you, who is working. They want the web access time be restricted for their children. How will you achieve this scenario?
Say the web access allow time be 4’o clock to 7’o clock in the evening for three hours, sharply form Monday to Friday.
a. To restrict web access between 4 to 7 from Monday to Friday, open the Squid configuration file.
# nano /etc/squid/squid.conf
b. Add the following lines and save the file and exit.
acl ALLOW_TIME time M T W H F 16:00-19:00
shttp_access allow ALLOW_TIME
c. Restart the Squid Service.
# service squid restart
9. Squid stores data in which file format?
10. Where do cache gets stored by squid?
That’s all for now. I’ll be here again with another interesting article soon.
10 Basic Interview Questions and Answers on Linux Networking – Part 1
Most of the computer in this century is on network of one kind or other. A computer not attached to network is nothing more than a Metal. Network means connection of two or more computers using protocols (viz., HTTP, FTP, HTTPS, etc) in such a way that they tends to serve information as and when required.
Interview Questions on Networking
Networking is a vast subject and is ever expanding. It is the most frequently used interview topic. Networking questions are common to all the interviewing candidates of IT no matter he is a System Admin, a Programmer, or deals in any other branch of Information Technology. which in turn means that market demands, everyone should have the basic knowledge of Networks and Networking.
This is the first time we have touched an ever demanding Topic “Networking“. Here we have tried to serve the 10 basic interview questions and answers on networking.
1. What is a Computer Network?
Ans: A computer network is a connection network between two or more nodes using Physical Media Links viz., cable or wireless in order to exchange data over pre-configured services and Protocols. A computer network is a collective result of – Electrical Engineering, Computer Science, Telecommunication, Computer Engineering and Information Technology involving their theoretical as well as practical aspects into action. The most widely used Computer Network of Today is Internet which supports World Wide Web (WWW).
2. What is DNS?
Ans: DNS stands for Domain Name System. It is a Naming System for all the resources over Internet which includes Physical nodes and Applications. DNS is a way to locate to a resource easily over a network and serves to be an essential component necessary for the working of Internet.
It is always easy to remember xyz.com that to remember its IP(v4) address 82.175.219.112. The condition gets more worse when you have to deal with IP(v6) address 2005:3200:230:7e:35dl:2874:2190. Now think of the scenario when you have a list of 10 most visited resource over Internet? Didn’t the things get more worse to remember? It is said and proved scientifically that humans are good in remembering names as compared to numbers.
The Domain Name System functions to assign Domain Names by mapping corresponding IP addresses and works in a Hierarchical and Distributed Fashion.
3. What are IPv4 and IPv6? Who manages these?
Ans: IPv4 and IPv6 are the versions of Internet Protocol which stands for Version4 and Version6 respectively. IP address is an unique value which represents a device over network. All the device over Internet must have a valid and Unique address to function normally.
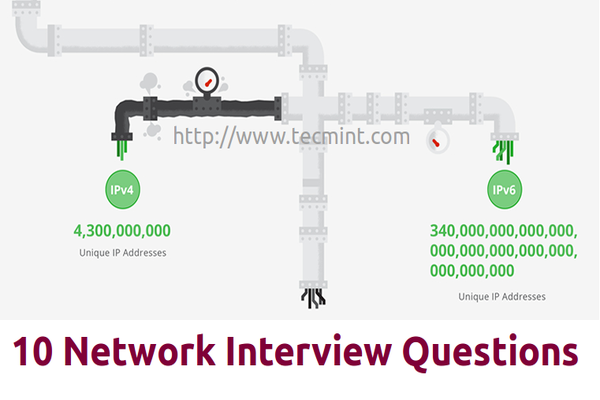
IPv4 is a 32 bit numeric representation of devices over Internet, most widely used till date. It supports upto 4.3 billion (4,300,000,000) unique IP addresses. Seeing the continuing growth of Internet with more and more devices and users linking to Internet there was a need of better version of IP address which could support more users. Hence came IPv6 in 1995. An example of IPv4 is:
82.175.219.112
IPv6 is a 128 bit numeric representation of devices over Internet. It supports as much as 340 trillion, trillion, trillion (340,000,000,000,000,000,000,000,000,000,000,000,000) unique IP address. This is sufficient to provide more than a billion of IP addresses to every human being on earth. Sufficient for centuries. With the invent of IPv6, we need not to bother about depleting Unique IP addresses. An example of IPv6 is:
2005:3200:230:7e:35dl:2874:2190
4. Give a brief description of PAN, LAN, HAN, SAN, CAN, MAN, WAN, GAN.
Ans: PAN stands for Personal Area Network. It is a connection of Computer and Devices that are close to a person VIZ., Computer, Telephones, Fax, Printers, etc. Range Limit – 10 meters.
LAN stands for Local Area Network. LAN is the connection of Computers and Devices over a small Geographical Location – Office, School, Hospital, etc. A LAN can be connected to WAN using a gateway (Router).
HAN stands for House Area Network. HAN is LAN of Home which connects to homely devices ranging from a few personal computers, phone, fax and printers.
SAN stands for Storage Area Network. SAN is the connection of various storage devices which seems local to a computer.
CAN stands for Campus Area Network, CAN is the connection of devices, printers, phones and accessories within a campus which Links to other departments of the organization within the same campus.
MAN stands for Metropolitan Area Network. MAN is the connection of loads of devices which spans to Large cities over a wide Geographical Area.
WAN stands for Wide Area Network. WAN connects devices, phones, printers, scanners, etc over a very wide geographical location which may range to connect cities, countries and ever continents.
GAN stands for Global Area Network. GAN connects mobiles across the globe using satellites.
5. What is POP3?
Ans: POP3 stands for Post Office Protocol Version3 (Current Version). POP is a protocol which listens on port 110 and is responsible for accessing the mail service on a client machine. POP3 works in two modes – Delete Mode and Keep Mode.
- Delete Mode: A mail is deleted from the mailbox after successful retrieval.
- Keep Mode: The Mail remains Intact in the mailbox after successful retrieval.
6. What is the criteria to check the network reliability?
Ans: A network Reliability is measured on following factors.
- Downtime: The time it takes to recover.
- Failure Frequency: The frequency when it fails to work the way it is intended.
7. What is a router?
Ans: A router is a physical device which acts as a gateway and connects to two network. It forwards the packets of data/information from one network to another. It acts as an interconnection Link between two network.
8. What are the use of cross and standard cables? Where do you find their usages?
Ans: A Network cable may be crossover as well as straight. Both of these cables have different wires arrangement in them, which serves to fulfill different purpose.
Area of application of Straight cable
- Computer to Switch
- Computer to Hub
- Computer to Modem
- Router to Switch
Ares of application of Crossover cable
- Computer to Computer
- Switch to Switch
- Hub to Hub
9. What do you mean by Bandwidth?
Ans: Every Signal has a limit of its upper range and lower range of frequency of signal it can carry. This range of limit of network between its upper frequency and lower frequency is termed as Bandwidth.
10. What do you mean by MAC address? Does it has some link or something in common to Mac OS of Apple?
Ans: MAC stands for Media Access Control. It is the address of the device identified at Media Access Control Layer of Network Architecture. Similar to IP address MAC address is unique address, i.e., no two device can have same MAC address. MAC address is stored at the Read Only Memory (ROM) of the device.
MAC Address and Mac OS are two different things and it should not be confused with each other. Mac OS is a POSIX standard Operating System Developed upon FreeBSD used by Apple devices.
That’s all for now. We will be coming up with another articles on Networking series every now and then. Till then, don’t forget to provide us with your valuable feedback in the comment section below.
15 Interview Questions on Linux “ls” Command – Part 1
The listing command in UNIX and UNIX like operating System ‘ls‘ is one of the most basic and widely used utility in command-line. It is POSIX compliant utility available for GNU coreutils and BSD variants.
The ‘ls’ command can be used with a variety of options to get desired results. This article aims at deep insight of file listing command in Linux with relevant examples.

15 ls Command Questions
1. How will you List files from a directory?
Ans: The Linux file listing command ‘ls‘ comes to rescue here.
# ls
List Files
Alternatively, we can use ‘echo’ command to list files within a directory in association with wildcard (*).
# echo *
List All Files
2. How will you list all the directories only using echo command?
# echo */
List All Directories
3. How will you list all the files within a directory including hidden files aka (.) dot files?
Ans: We need to use option ‘-a‘ (list hidden files) with command ‘ls‘.
# ls -a
List All Hidden Files
4. How do you list all the files within a directory including hidden files, but do not list implied ‘.’ and ‘..’?
Ans: We need to use option ‘-A‘ (do not list implied . and ..) with command ‘ls‘.
# ls -A

Do Not List Implied
5. How will you print the content of a directory in long format listing?
Ans: We need to use option ‘l‘ (long format) with command ‘ls‘.
# ls -l
List Files Long
In the above example, the output seems like.
drwxr-xr-x 5 avi tecmint 4096 Sep 30 11:31 Binary
Here, drwxr-xr-x is file permission for owner, group and world. Owner has Read(r), Write(w) and Execute(x) permission. The group to which this file belongs has Read(r) and Execute(x) permission but not Write(w) permission, same permission implies for the world that have access to this file.
- The Initial ‘d‘ means its a Directory.
- Number ‘5‘ represents Symbolic Link.
- The File Binary belongs to user avi and group tecmint.
- Sep 30 11:31 represents the date and time it was last modified.
6. You are supposed to print the content of directory in long format listing, showing hidden/dot files. How will you achieve this?
Ans: We need to use option ‘-a‘ (list hidden files) and ‘-l‘ (long listing) together with command ‘ls‘.
# ls -la

Print Content of Directory
Alternatively We can use option ‘-A‘ and ‘-l‘ with ‘ls‘ command, if we do not want to list implied ‘.’ and ‘..’.
# ls -lA
7. How will you figure out the author of each file?
Ans: We need to use option ‘–author‘ along with option ‘-l‘ to print the author name of each file.
# ls --author -l
List Author Files
8. How will you print escape for non-graphic character?
Ans: We just need to use option ‘-b‘ to print escape for non-graphic character.
# ls -b

Print Escape Character
9. List the size of files and folders in desired scale format. How will you achieve this?
Ans: Here option ‘–block-size=scale‘ along with option ‘-l‘ needs to be used. We need to remove ‘scale’ in the example with the desired scale viz M, K, etc.
# ls --block-size=M -l
# ls --block-size=K -l

List File Scale Format
10. List the files within a directory, but don’t show the backup files, i.e., those files that end with ~.
Ans: Here option ‘-B‘ (do not list implied entries ending with ~) comes to rescue.
# ls -B

List File Without Backup
11. Sort all the files within a directory by name and show associated last modification information.
Ans: We need to use option ‘-c‘ and option ‘-l‘ with command ls to fulfil the need as suggested above.
# ls -cl

Sort Files
12. Sort all the files within a directory by modification time and show associated information.
Ans: We need to use three options together i.e., ‘-l‘, ‘-t‘ and ‘-c‘ with command ls to sort files by modification time, newest first.
# ls -ltc
Sort Files by Modification
13. How will you control the output of ‘ls’ command to be colorful or no-color?
Ans: We need to use option ‘–color=parameter‘. The parameter to be used with color option are ‘auto’, ‘always’ and ‘never’ which are self explanatory.
# ls --color=never
# ls --color=auto
# ls --color=always

ls Colorful Output
14. You are supposed to list directory entries themselves, not their contents. What will you do?
Ans: Here the option ‘-d‘ comes handy.
# ls -d

List Directory Entries
15. Create an alias for long format listing “ls -l” as “ll” and output the result to a file and not standard output.
Ans: Here in the above scenario, we need to add alias to .bashrc file and then use redirect operator to write the output to file and not standard output. We will be using editor nano.
# ls -a
# nano .bashrc
# ll >> ll.txt
# nano ll.txt

Create Alias for ls command
That’s all for now. Don’t forget to provide us with your valuable feedback in the comments below. I’ll be here again with another interesting article soon. Till then stay tuned and connected.
Real Also:
10 Useful ‘ls’ Command Interview Questions – Part 2
Continuing the legacy of ls command here is the second interview article on Listing command. The first article of the series was highly appreciated by the Tecmint Community. If you’ve missed the first part of this series you may like to visit at:
This article is well presented in the manner that it gives deep insight of ls command with examples. We have taken extra care in the making of article so that it remains simple to understand yet serve the purpose to the fullest.

10 Interview Questions on ls Command
1. You are supposed to list the content of a directory in long list format, but not print the name of the author and group the file belongs. Also show the difference in output.
a. ls command listing the name of the files in long listing format when used with switch (-l).
# ls -l
List Files in- Long List Format
b. ls command listing the name of the files in long listing format along with the name of the author file belongs, when used with switch (–author) along with switch (-l).
# ls -l --author

List Files By Author
c. ls command listing the name of the files without the name of its owner, when used with switch (-g).
# ls -g
List Files Without Printing Owner Name
d. ls command listing the name of files in long listing format without the name of group it belongs, when used with switch (-G) along with switch (-l).
# ls -Gl

List Files Without Printing Group
2. Print the size of files and folders in the current directory, in human readable format. How will you do this?
Well we need to use switch -h (human-readable) along with switch (-l) and/or (-s) with the command ls to get the desired output.
# ls -hl

List Files in Human Readable Format
# ls -hs

List File Sizes in Long List Format
Note: The option -h uses the power of 1024 (standard in computation) and output the size of files and folders in the units of K, M and G.
3. Well if switch (-h) output size in power of 1024, that is standard, What else power values are supported in ls command?
There exist a switch -si which is similar to switch -h. The only difference is switch -si uses power of 1000 unlike switch -h which uses the power of 1024.
# ls -si

Supported Power Values of ls Command
It can also be used with switch -l to output the size of folder in the power of 1000, in long listing format.
# ls -si -l
List Files by Power Values
4. You are supposed to print the contents of a directory separated with comma. Is it possible? Can it be done in long listing format?
Yup! Linux ls command can output the contents of a directory separated by comma when used with the switch (-m). Since this comma separated entries are filled horizontally, ls command can’t separate contents with comma when listing contents vertically.
# ls -m

Print Contents of Directory by Comma
When used in long listing format, switch -m gets useless.
# ls -ml

Listing Content Horizontally
5. If there any way to print the contents of a directory upside down? i.e., in reverse order.
Yeah! The above situation can easily be achieved using the switch -r. The switch ‘-r‘ reverse the order of output. It can also be used with switch -l (long listing format).
# ls -r

List Content in Reverse Order
# ls -rl

Long List Content in Reverse Order
6. You are given a situation to print the sub-directories recursively. How will you achieve this situation? Mind it only sub directories and no files.
Okay! That is pretty easy with the switch -R when used with command ls. It can further be grouped with other options like -l (long list) and -m (comma separated), etc.
# ls -R

Print Sub Directories in Recursively
7. How to sort the files based upon the size?
The Linux command line option -S when used with ls gives the desired output. To sort the files based upon size in descending order with the largest file listed at first and smallest at last.
# ls -S

Sort Files with ls Command
To sort the files based upon size in descending order with the smallest file listed at first and largest at last.
# ls -Sr

Sort Files in Descending Order
8. List the contents of a directory with no additional information appearing one file per line.
The switch -1 comes to rescue here. ls command with switch -1 output the contents of the directory with one file per line and no additional information.
# ls -1

List Files Without Information
9. You are given a situation in which you have to print the contents of a directory on standard output enclosed by double quotes. How will you do this?
There exist an option -Q (quote-name) which output the content of ls enclosed in double quotes.
# ls -Q

Print Files with Double Quotes
10. You are working in a directory which contains lots of files and folders. You need to print the name of folders before directories. How will you get this?
# ls --group-directories-first
Print Directories First
That’s all for now. We will be coming up with the next part of this article series about Quirky ‘ls’ Command Tricks.
Nishita Agarwal Shares Her Interview Experience on Linux ‘iptables’ Firewall
Nishita Agarwal, a frequent Tecmint Visitor shared her experience (Question and Answer) with us regarding the job interview she had just given in a privately owned hosting company in Pune, India. She was asked a lot of questions on a variety of topics however she is an expert in iptables and she wanted to share those questions and their answer (she gave) related to iptables to others who may be going to give interview in near future.

All the questions and their Answer are rewritten based upon the memory of Nishita Agarwal.
“Hello Friends! My name is Nishita Agarwal. I have Pursued Bachelor Degree in Technology. My area of Specialization is UNIX and Variants of UNIX (BSD, Linux) fascinates me since the time I heard it. I have 1+ years of experience in storage. I was looking for a job change which ended with a hosting company in Pune, India.”
Here is the collection of what I was asked during the Interview. I’ve documented only those questions and their answer that were related to iptables based upon my memory. Hope this will help you in cracking your Interview.
1. Have you heard of iptables and firewall in Linux? Any idea of what they are and for what it is used?
Answer : I’ve been using iptables for quite long time and I am aware of both iptables and firewall. Iptables is an application program mostly written in C Programming Language and is released under GNU General Public License. Written for System administration point of view, the latest stable release if iptables 1.4.21.iptables may be considered as firewall for UNIX like operating system which can be called as iptables/netfilter, more accurately. The Administrator interact with iptables via console/GUI front end tools to add and define firewall rules into predefined tables. Netfilter is a module built inside of kernel that do the job of filtering.
Firewalld is the latest implementation of filtering rules in RHEL/CentOS 7 (may be implemented in other distributions which I may not be aware of). It has replaced iptables interface and connects to netfilter.
2. Have you used some kind of GUI based front end tool for iptables or the Linux Command Line?
Answer : Though I have used both the GUI based front end tools for iptables like Shorewall in conjugation of Webmin in GUI and Direct access to iptables via console.And I must admit that direct access to iptables via Linux console gives a user immense power in the form of higher degree of flexibility and better understanding of what is going on in the background, if not anything other. GUI is for novice administrator while console is for experienced.
3. What are the basic differences between between iptables and firewalld?
Answer : iptables and firewalld serves the same purpose (Packet Filtering) but with different approach. iptables flush the entire rules set each time a change is made unlike firewalld. Typically the location of iptables configuration lies at ‘/etc/sysconfig/iptables‘ whereas firewalld configuration lies at ‘/etc/firewalld/‘, which is a set of XML files.Configuring a XML based firewalld is easier as compared to configuration of iptables, however same task can be achieved using both the packet filtering application ie., iptables and firewalld. Firewalld runs iptables under its hood along with it’s own command line interface and configuration file that is XML based and said above.
4. Would you replace iptables with firewalld on all your servers, if given a chance?
Answer : I am familiar with iptables and it’s working and if there is nothing that requires dynamic aspect of firewalld, there seems no reason to migrate all my configuration from iptables to firewalld.In most of the cases, so far I have never seen iptables creating an issue. Also the general rule of Information technology says “why fix if it is not broken”. However this is my personal thought and I would never mind implementing firewalld if the Organization is going to replace iptables with firewalld.
5. You seems confident with iptables and the plus point is even we are using iptables on our server.
What are the tables used in iptables? Give a brief description of the tables used in iptables and the chains they support.
Answer : Thanks for the recognition. Moving to question part, There are four tables used in iptables, namely they are:
- Nat Table
- Mangle Table
- Filter Table
- Raw Table
Nat Table : Nat table is primarily used for Network Address Translation. Masqueraded packets get their IP address altered as per the rules in the table. Packets in the stream traverse Nat Table only once. ie., If a packet from a jet of Packets is masqueraded they rest of the packages in the stream will not traverse through this table again. It is recommended not to filter in this table. Chains Supported by NAT Table are PREROUTING Chain, POSTROUTING Chain and OUTPUT Chain.
Mangle Table : As the name suggests, this table serves for mangling the packets. It is used for Special package alteration. It can be used to alter the content of different packets and their headers. Mangle table can’t be used for Masquerading. Supported chains are PREROUTING Chain, OUTPUT Chain, Forward Chain, INPUT Chain, POSTROUTING Chain.
Filter Table : Filter Table is the default table used in iptables. It is used for filtering Packets. If no rules are defined, Filter Table is taken as default table and filtering is done on the basis of this table. Supported Chains are INPUT Chain, OUTPUT Chain, FORWARD Chain.
Raw Table : Raw table comes into action when we want to configure packages that were exempted earlier. It supports PREROUTING Chain and OUTPUT Chain.
6. What are the target values (that can be specified in target) in iptables and what they do, be brief!
Answer : Following are the target values that we can specify in target in iptables:
-
- ACCEPT : Accept Packets
- QUEUE : Paas Package to user space (place where application and drivers reside)
- DROP : Drop Packets
- RETURN : Return Control to calling chain and stop executing next set of rules for the current Packets in the chain.
7. Lets move to the technical aspects of iptables, by technical I means practical.
How will you Check iptables rpm that is required to install iptables in CentOS?.
Answer : iptables rpm are included in standard CentOS installation and we do not need to install it separately. We can check the rpm as:
# rpm -qa iptables

iptables-1.4.21-13.el7.x86_64
If you need to install it, you may do yum to get it.
# yum install iptables-services
8. How to Check and ensure if iptables service is running?
Answer : To check the status of iptables, you may run the following command on the terminal.
# service iptables status			[On CentOS 6/5]
# systemctl status iptables			[On CentOS 7]
If it is not running, the below command may be executed.
---------------- On CentOS 6/5 ----------------
# chkconfig --level 35 iptables on
# service iptables start

---------------- On CentOS 7 ----------------
# systemctl enable iptables
# systemctl start iptables
We may also check if the iptables module is loaded or not, as:
# lsmod | grep ip_tables
9. How will you review the current Rules defined in iptables?
Answer : The current rules in iptables can be review as simple as:
# iptables -L
Sample Output
Chain INPUT (policy ACCEPT)
target     prot opt source               destination
ACCEPT     all  --  anywhere             anywhere             state RELATED,ESTABLISHED
ACCEPT     icmp --  anywhere             anywhere
ACCEPT     all  --  anywhere             anywhere
ACCEPT     tcp  --  anywhere             anywhere             state NEW tcp dpt:ssh
REJECT     all  --  anywhere             anywhere             reject-with icmp-host-prohibited

Chain FORWARD (policy ACCEPT)
target     prot opt source               destination
REJECT     all  --  anywhere             anywhere             reject-with icmp-host-prohibited

Chain OUTPUT (policy ACCEPT)
target     prot opt source               destination
10. How will you flush all iptables rules or a particular chain?
Answer : To flush a particular iptables chain, you may use following commands.
# iptables --flush OUTPUT
To Flush all the iptables rules.
# iptables --flush
11. Add a rule in iptables to accept packets from a trusted IP Address (say 192.168.0.7)
Answer : The above scenario can be achieved simply by running the below command.
# iptables -A INPUT -s 192.168.0.7 -j ACCEPT
We may include standard slash or subnet mask in the source as:
# iptables -A INPUT -s 192.168.0.7/24 -j ACCEPT
# iptables -A INPUT -s 192.168.0.7/255.255.255.0 -j ACCEPT
12. How to add rules to ACCEPT, REJECT, DENY and DROP ssh service in iptables.
Answer : Hoping ssh is running on port 22, which is also the default port for ssh, we can add rule to iptables as:
To ACCEPT tcp packets for ssh service (port 22).
# iptables -A INPUT -s -p tcp --dport 22 -j ACCEPT
To REJECT tcp packets for ssh service (port 22).
# iptables -A INPUT -s -p tcp --dport 22 -j REJECT
To DENY tcp packets for ssh service (port 22).
# iptables -A INPUT -s -p tcp --dport 22 -j DENY
To DROP tcp packets for ssh service (port 22).
# iptables -A INPUT -s -p tcp --dport 22 -j DROP
13. Let me give you a scenario. Say there is a machine the local ip address of which is 192.168.0.6. You need to block connections on port 21, 22, 23, and 80 to your machine. What will you do?
Answer : Well all I need to use is the ‘multiport‘ option with iptables followed by port numbers to be blocked and the above scenario can be achieved in a single go as.
# iptables -A INPUT -s 192.168.0.6 -p tcp -m multiport --dport 21,22,23,80 -j DROP
The written rules can be checked using the below command.
# iptables -L

Chain INPUT (policy ACCEPT)
target     prot opt source               destination
ACCEPT     all  --  anywhere             anywhere             state RELATED,ESTABLISHED
ACCEPT     icmp --  anywhere             anywhere
ACCEPT     all  --  anywhere             anywhere
ACCEPT     tcp  --  anywhere             anywhere             state NEW tcp dpt:ssh
REJECT     all  --  anywhere             anywhere             reject-with icmp-host-prohibited
DROP       tcp  --  192.168.0.6          anywhere             multiport dports ssh,telnet,http,webcache

Chain FORWARD (policy ACCEPT)
target     prot opt source               destination
REJECT     all  --  anywhere             anywhere             reject-with icmp-host-prohibited

Chain OUTPUT (policy ACCEPT)
target     prot opt source               destination
Interviewer : That’s all I wanted to ask. You are a valuable employee we won’t like to miss. I will recommend your name to the HR. If you have any question you may ask me.
As a candidate I don’t wanted to kill the conversation hence keep asking about the projects I would be handling if selected and what are the other openings in the company. Not to mention HR round was not difficult to crack and I got the opportunity.
Shilpa Nair Shares Her Interview Experience on RedHat Linux Package Management
Shilpa Nair has just graduated in the year 2015. She went to apply for Trainee position in a National News Television located in Noida, Delhi. When she was in the last year of graduation and searching for help on her assignments she came across Tecmint. Since then she has been visiting Tecmint regularly.

Linux Interview Questions on RPM
All the questions and answers are rewritten based upon the memory of Shilpa Nair.
“Hi friends! I am Shilpa Nair from Delhi. I have completed my graduation very recently and was hunting for a Trainee role soon after my degree. I have developed a passion for UNIX since my early days in the collage and I was looking for a role that suits me and satisfies my soul. I was asked a lots of questions and most of them were basic questions related to RedHat Package Management.”
Here are the questions, that I was asked and their corresponding answers. I am posting only those questions that are related to RedHat GNU/Linux Package Management, as they were mainly asked.
1. How will you find if a package is installed or not? Say you have to find if ‘nano’ is installed or not, what will you do?
Answer : To find the package nano, weather installed or not, we can use rpm command with the option -q is for query and -a stands for all the installed packages.
# rpm -qa nano
OR
# rpm -qa | grep -i nano

nano-2.3.1-10.el7.x86_64
Also the package name must be complete, an incomplete package name will return the prompt without printing anything which means that package (incomplete package name) is not installed. It can be understood easily by the example below:
We generally substitute vim command with vi. But if we find package vi/vim we will get no result on the standard output.
# vi
# vim
However we can clearly see that the package is installed by firing vi/vim command. Here is culprit is incomplete file name. If we are not sure of the exact file-name we can use wildcard as:
# rpm -qa vim*

vim-minimal-7.4.160-1.el7.x86_64
This way we can find information about any package, if installed or not.
2. How will you install a package XYZ using rpm?
Answer : We can install any package (*.rpm) using rpm command a shown below, here options -i (install), -v (verbose or display additional information) and -h (print hash mark during package installation).
# rpm -ivh peazip-1.11-1.el6.rf.x86_64.rpm

Preparing...                          ################################# [100%]
Updating / installing...
   1:peazip-1.11-1.el6.rf             ################################# [100%]
If upgrading a package from earlier version -U switch should be used, option -v and -h follows to make sure we get a verbose output along with hash Mark, that makes it readable.
3. You have installed a package (say httpd) and now you want to see all the files and directories installed and created by the above package. What will you do?
Answer : We can list all the files (Linux treat everything as file including directories) installed by the package httpd using options -l (List all the files) and -q (is for query).
# rpm -ql httpd

/etc/httpd
/etc/httpd/conf
/etc/httpd/conf.d
...
4. You are supposed to remove a package say postfix. What will you do?
Answer : First we need to know postfix was installed by what package. Find the package name that installed postfix using options -e erase/uninstall a package) and –v (verbose output).
# rpm -qa postfix*

postfix-2.10.1-6.el7.x86_64
and then remove postfix as:
# rpm -ev postfix-2.10.1-6.el7.x86_64

Preparing packages...
postfix-2:3.0.1-2.fc22.x86_64
5. Get detailed information about an installed package, means information like Version, Release, Install Date, Size, Summary and a brief description.
Answer : We can get detailed information about an installed package by using option -qa with rpm followed by package name.
For example to find details of package openssh, all I need to do is:
# rpm -qa openssh

[root@tecmint tecmint]# rpm -qi openssh
Name        : openssh
Version     : 6.8p1
Release     : 5.fc22
Architecture: x86_64
Install Date: Thursday 28 May 2015 12:34:50 PM IST
Group       : Applications/Internet
Size        : 1542057
License     : BSD
....
6. You are not sure about what are the configuration files provided by a specific package say httpd. How will you find list of all the configuration files provided by httpd and their location.
Answer : We need to run option -c followed by package name with rpm command and it will list the name of all the configuration file and their location.
# rpm -qc httpd

/etc/httpd/conf.d/autoindex.conf
/etc/httpd/conf.d/userdir.conf
/etc/httpd/conf.d/welcome.conf
/etc/httpd/conf.modules.d/00-base.conf
/etc/httpd/conf/httpd.conf
/etc/sysconfig/httpd
Similarly we can list all the associated document files as:
# rpm -qd httpd

/usr/share/doc/httpd/ABOUT_APACHE
/usr/share/doc/httpd/CHANGES
/usr/share/doc/httpd/LICENSE
...
also, we can list the associated License file as:
# rpm -qL openssh

/usr/share/licenses/openssh/LICENCE
Not to mention that the option -d and option -L in the above command stands for ‘documents‘ and ‘License‘, respectively.
7. You came across a configuration file located at ‘/usr/share/alsa/cards/AACI.conf’ and you are not sure this configuration file is associated with what package. How will you find out the parent package name?
Answer : When a package is installed, the relevant information gets stored in the database. So it is easy to trace what provides the above package using option -qf (-f query packages owning files).
# rpm -qf /usr/share/alsa/cards/AACI.conf
alsa-lib-1.0.28-2.el7.x86_64
Similarly we can find (what provides) information about any sub-packge, document files and License files.
8. How will you find list of recently installed software’s using rpm?
Answer : As said earlier, everything being installed is logged in database. So it is not difficult to query the rpm database and find the list of recently installed software’s.
We can do this by running the below commands using option –last (prints the most recent installed software’s).
# rpm -qa --last
The above command will print all the packages installed in a order such that, the last installed software appears at the top.
If our concern is to find out specific package, we can grep that package (say sqlite) from the list, simply as:
# rpm -qa --last | grep -i sqlite

sqlite-3.8.10.2-1.fc22.x86_64                 Thursday 18 June 2015 05:05:43 PM IST
We can also get a list of 10 most recently installed software simply as:
# rpm -qa --last | head
We can refine the result to output a more custom result simply as:
# rpm -qa --last | head -n 2
In the above command -n represents number followed by a numeric value. The above command prints a list of 2 most recent installed software.
9. Before installing a package, you are supposed to check its dependencies. What will you do?
Answer : To check the dependencies of a rpm package (XYZ.rpm), we can use switches -q (query package), -p (query a package file) and -R (Requires / List packages on which this package depends i.e., dependencies).
# rpm -qpR gedit-3.16.1-1.fc22.i686.rpm

/bin/sh
/usr/bin/env
glib2(x86-32) >= 2.40.0
gsettings-desktop-schemas
gtk3(x86-32) >= 3.16
gtksourceview3(x86-32) >= 3.16
gvfs
libX11.so.6
...
10. Is rpm a front-end Package Management Tool?
Answer : No! rpm is a back-end package management for RPM based Linux Distribution.
YUM which stands for Yellowdog Updater Modified is the front-end for rpm. YUM automates the overall process of resolving dependencies and everything else.
Very recently DNF (Dandified YUM) replaced YUM in Fedora 22. Though YUM is still available to be used in RHEL and CentOS, we can install dnf and use it alongside of YUM. DNF is said to have a lots of improvement over YUM.
Good to know, you keep yourself updated. Lets move to the front-end part.
11. How will you list all the enabled repolist on a system.
Answer : We can list all the enabled repos on a system simply using following commands.
# yum repolist
or
# dnf repolist

Last metadata expiration check performed 0:30:03 ago on Mon Jun 22 16:50:00 2015.
repo id                                                                           repo name                                                                                             status
*fedora                                                                           Fedora 22 - x86_64                                                                                    44,762
ozonos                                                                            Repository for Ozon OS                                                                                    61
*updates                                                                          Fedora 22 - x86_64 - Updates
The above command will only list those repos that are enabled. If we need to list all the repos, enabled or not, we can do.
# yum repolist all
or
# dnf repolist all

Last metadata expiration check performed 0:29:45 ago on Mon Jun 22 16:50:00 2015.
repo id                                                                         repo name                                                                                      status
*fedora                                                                         Fedora 22 - x86_64                                                                             enabled: 44,762
fedora-debuginfo                                                                Fedora 22 - x86_64 - Debug                                                                     disabled
fedora-source                                                                   Fedora 22 - Source                                                                             disabled
ozonos                                                                          Repository for Ozon OS                                                                         enabled:     61
*updates                                                                        Fedora 22 - x86_64 - Updates                                                                   enabled:  5,018
updates-debuginfo                                                               Fedora 22 - x86_64 - Updates - Debug
12. How will you list all the available and installed packages on a system?
Answer : To list all the available packages on a system, we can do:
# yum list available
or
# dnf list available

ast metadata expiration check performed 0:34:09 ago on Mon Jun 22 16:50:00 2015.
Available Packages
0ad.x86_64                               0.0.18-1.fc22                   fedora
0ad-data.noarch                          0.0.18-1.fc22                   fedora
0install.x86_64                          2.6.1-2.fc21                    fedora
0xFFFF.x86_64                            0.3.9-11.fc22                   fedora
2048-cli.x86_64                          0.9-4.git20141214.723738c.fc22  fedora
2048-cli-nocurses.x86_64                 0.9-4.git20141214.723738c.fc22  fedora
....
To list all the installed Packages on a system, we can do.
# yum list installed
or
# dnf list installed

Last metadata expiration check performed 0:34:30 ago on Mon Jun 22 16:50:00 2015.
Installed Packages
GeoIP.x86_64                            1.6.5-1.fc22                     @System
GeoIP-GeoLite-data.noarch               2015.05-1.fc22                   @System
NetworkManager.x86_64                   1:1.0.2-1.fc22                   @System
NetworkManager-libnm.x86_64             1:1.0.2-1.fc22                   @System
aajohan-comfortaa-fonts.noarch          2.004-4.fc22                     @System
....
# yum list
or
# dnf list

Last metadata expiration check performed 0:32:56 ago on Mon Jun 22 16:50:00 2015.
Installed Packages
GeoIP.x86_64                             1.6.5-1.fc22                    @System
GeoIP-GeoLite-data.noarch                2015.05-1.fc22                  @System
NetworkManager.x86_64                    1:1.0.2-1.fc22                  @System
NetworkManager-libnm.x86_64              1:1.0.2-1.fc22                  @System
aajohan-comfortaa-fonts.noarch           2.004-4.fc22                    @System
acl.x86_64                               2.2.52-7.fc22                   @System
....
13. How will you install and update a package and a group of packages separately on a system using YUM/DNF?
Answer : To Install a package (say nano), we can do,
# yum install nano
To Install a Group of Package (say Haskell), we can do.
# yum groupinstall 'haskell'
To update a package (say nano), we can do.
# yum update nano
To update a Group of Package (say Haskell), we can do.
# yum groupupdate 'haskell'
14. How will you SYNC all the installed packages on a system to stable release?
Answer : We can sync all the packages on a system (say CentOS or Fedora) to stable release as,
# yum distro-sync      [On CentOS/RHEL]
or
# dnf distro-sync      [On Fedora 20 Onwards]
Seems you have done a good homework before coming for the interview,Good!. Before proceeding further I just want to ask one more question.
15. Are you familiar with YUM local repository? Have you tried making a Local YUM repository? Let me know in brief what you will do to create a local YUM repo.
Answer : First I would like to Thank you Sir for appreciation. Coming to question, I must admit that I am quiet familiar with Local YUM repositories and I have already implemented it for testing purpose in my local machine.
1. To set up Local YUM repository, we need to install the below three packages as:
# yum install deltarpm python-deltarpm createrepo
2. Create a directory (say /home/$USER/rpm) and copy all the RPMs from RedHat/CentOS DVD to that folder.
# mkdir /home/$USER/rpm
# cp /path/to/rpm/on/DVD/*.rpm /home/$USER/rpm
3. Create base repository headers as.
# createrepo -v /home/$USER/rpm
4. Create the .repo file (say abc.repo) at the location /etc/yum.repos.d simply as:
cd /etc/yum.repos.d && cat << EOF > abc.repo
[local-installation]name=yum-local
baseurl=file:///home/$USER/rpm
enabled=1
gpgcheck=0
EOF
Important: Make sure to remove $USER with user_name.
That’s all we need to do to create a Local YUM repository. We can now install applications from here, that is relatively fast, secure and most important don’t need an Internet connection.
Okay! It was nice interviewing you. I am done. I am going to suggest your name to HR. You are a young and brilliant candidate we would like to have in our organization. If you have any question you may ask me.
Me: Sir, it was really a very nice interview and I feel very lucky today, to have cracked the interview..
Obviously it didn’t end here. I asked a lots of questions like the project they are handling. What would be my role and responsibility and blah..blah..blah
Friends, by the time all these were documented I have been called for HR round which is 3 days from now. Hope I do my best there as well. All your blessings will count.
When we share ours experience with other, other get to know many things from us and we get to know our mistakes.
It enhances our confidence level. If you have given any such interview recently, don’t keep it to yourself. Spread it! Let all of us know that. You may use the below form to share your experience with us.