PM2 is a free open source, advanced, efficient and cross-platform production-level process manager for Node.jswith a built-in load balancer. It works on Linux, MacOS as well as Windows. It supports app monitoring, efficient management of micro-services/processes, running apps in cluster mode, graceful start and shutdown of apps.
It keeps your apps “alive forever” with auto restarts and can be enabled to start at system boot, thus allowing for High Availability (HA) configurations or architectures.
Notably, PM2 allows you to run your apps in cluster mode without making any changes in your code (this also depends on the number of CPU cores on your server). It also allows you to easily manage app logs, and so much more.
In addition, it also has incredible support for major Node.js frameworks such as Express, Adonis Js, Sails, Hapiand more, without need for any code changes. PM2 is being used by companies such IBM, Microsoft, PayPal, and more.
In this article, we will explain how to install and use PM2 to run Nodejs apps in Linux production server. We will create an app for demonstrating some of PM2’s fundamental features for you to get started with it.
Step 1: Install Nodejs and NPM in Linux
1. To install most recent version of Node.js and NPM, first you need to enable official NodeSource repository under your Linux distribution and then install Node.js and NPM packages as shown.
On Debian/Ubuntu
---------- Install Node.js v11.x ----------
$ curl -sL https://deb.nodesource.com/setup_11.x | sudo -E bash -
$ sudo apt-get install -y nodejs

---------- Install Node.js v10.x ----------
$ curl -sL https://deb.nodesource.com/setup_10.x | sudo -E bash -
$ sudo apt-get install -y nodejs
On CentOS/RHEL and Fedora
---------- Install Node.js v11.x ----------
$ curl -sL https://rpm.nodesource.com/setup_11.x | bash -

---------- Install Node.js v10.x ----------
$ curl -sL https://rpm.nodesource.com/setup_10.x | bash -
Step 2: Create a Nodejs Application
2. Now, let’s create a testing application (we will assume it has a client and admin side which share the same database), the microservices will run on ports 3000, and 3001 respectively.
$ sudo mkdir -p /var/www/html/app
$ sudo mkdir -p /var/www/html/adminside
$ sudo vim /var/www/html/app/server.js
$ sudo vim /var/www/html/adminside/server.js
Next, copy and paste the following pieces of code in the server.js files (replace 192.168.43.31 with your server IP).
##mainapp code
const http = require('http');

const hostname = '192.168.43.31';
const port = 3000;

const server = http.createServer((req, res) => {
	res.statusCode = 200;
  	res.setHeader('Content-Type', 'text/plain');
  	res.end('This is the Main App!\n');
});

server.listen(port, hostname, () => {
  	console.log(`Server running at http://${hostname}:${port}/`);
});
##adminside code
const http = require('http');

const hostname = '192.168.43.31';
const port = 3001;

const server = http.createServer((req, res) => {
	res.statusCode = 200;
  	res.setHeader('Content-Type', 'text/plain');
  	res.end('This is the Admin Side!\n');
});

server.listen(port, hostname, () => {
  	console.log(`Server running at http://${hostname}:${port}/`);
});
Save the file and exit.
Step 3: Install PM2 Product Process Manager in Linux
3. The latest stable version of PM2 is available to install via NPM as shown.
$ sudo npm i -g pm2
4. Once PM2 installed, you can start your node applications using following commands.
$ sudo node /var/www/html/app/server.js
$ sudo node /var/www/html/adminside/server.js
Note that, in a production environment, you should start them using PM2, as shown (you may not need sudo command if your app is stored in a location where a normal user has read and write permissions).
$ sudo pm2 start /var/www/html/app/server.js
$ sudo pm2 start /var/www/html/adminside/server.js
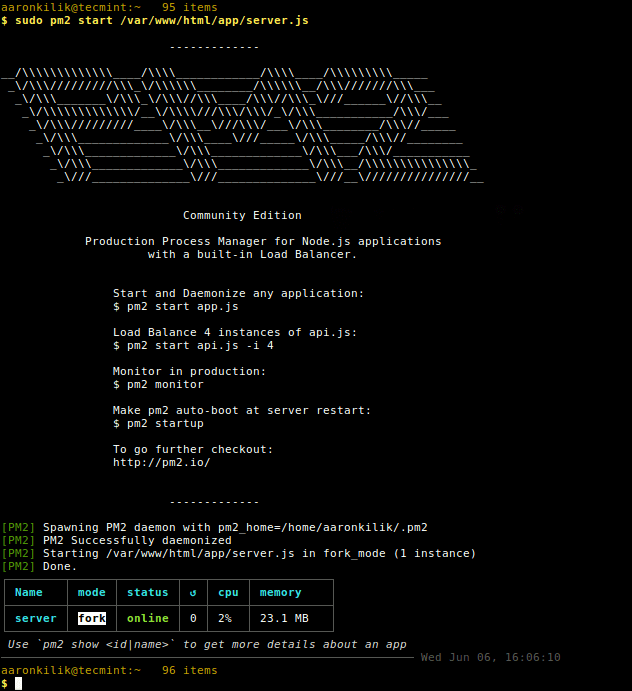
Start Nodejs App Using PM2
Step 4: How to Use and Manage PM2 in Linux
5. To start an application in cluster mode using the -i flag to specify the number of instances, for example.
$ sudo pm2 start /var/www/html/app/server.js -i 4
$ sudo pm2 scale 0 8			#scale cluster app to 8 processes
6. To list all your node application (process/microservices), run the following command.
$ sudo pm2 list
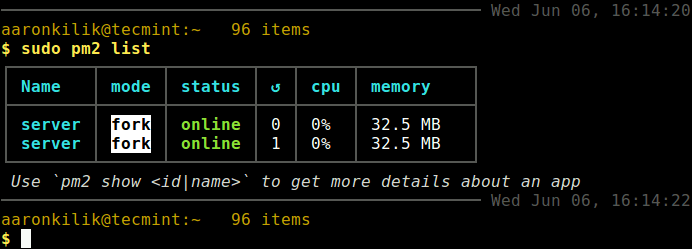
List All PM2 Managed Node Apps
7. To monitor logs, custom metrics, process information from all processes by running the following command.
$ sudo pm2 monit
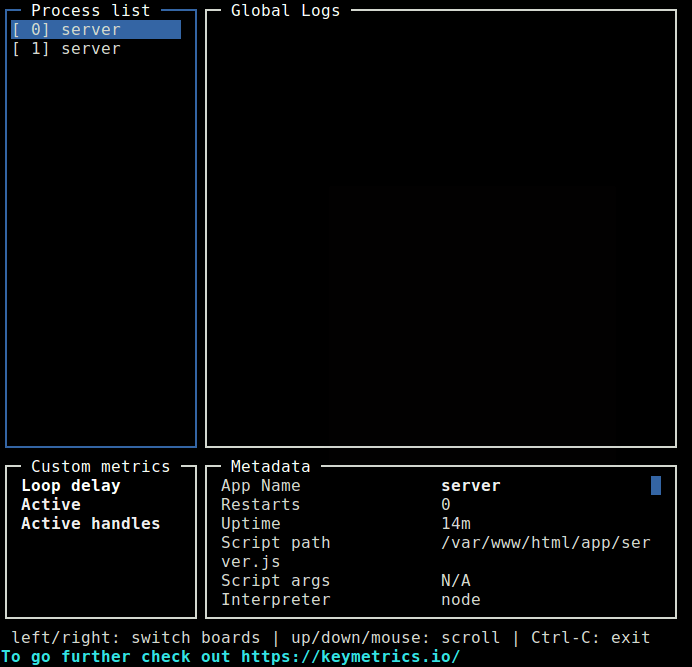
Monitor All Node Processes
8. To view details of a single Node process as shown, using the process ID or name.
$ sudo pm2 show 0
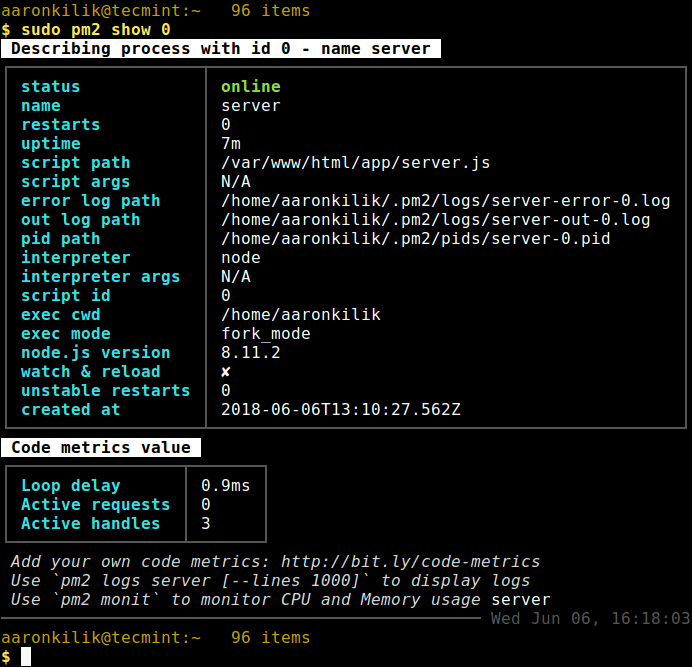
View Details of Single App
Step 5: How to Manage Node Apps Using PM2 in Linux
9. The following is a list of some common process (single or all) management commands you should take note of.
$ sudo pm2 stop all                  		#stop all apps
$ sudo pm2 stop 0                    		#stop process with ID 0
$ sudo pm2 restart all               		#restart all apps
$ sudo pm2 reset 0		         	#reset all counters
$ sudo pm2 delete all                		#kill and remove all apps
$ sudo pm2 delete 1                 		#kill and delete app with ID 1
10. To manage application logs, use the following commands.
$ sudo pm2 logs                      	#view logs for all processes
$ sudo pm2 logs 1	         	#view logs for app 1
$ sudo pm2 logs --json               	#view logs for all processes in JSON format
$ sudo pm2 flush			#flush all logs
11. To manage the PM2 process, use the following commands.
$ sudo pm2 startup            #enable PM2 to start at system boot
$ sudo pm2 startup systemd    #or explicitly specify systemd as startup system
$ sudo pm2 save               #save current process list on reboot
$ sudo pm2 unstartup          #disable PM2 from starting at system boot
$ sudo pm2 update	      #update PM2 package
Step 6: Access Node Apps From Web Browser
12. To access all your node application from a remote web browser, first you need to open following ports on your system firewall, to allow client connections to the apps as shown.
-------- Debian and Ubuntu --------
$ sudo ufw allow 3000/tcp
$ sudo ufw allow 3001/tcp
$ sudo ufw reload

-------- RHEL and CentOS --------
# firewall-cmd --permanent --add-port=3000/tcp
# firewall-cmd --permanent --add-port=3001/tcp
# firewall-cmd --reload
13. Then access your apps from a web browser with these URLs:
http://198.168.43.31:3000
http://198.168.43.31:3001

Access Node Apps from Browser
Last but not least, PM2 is a simple, in-built module system to extend its core capabilities, some of the modules include pm2-logrotate, pm2-webshell, pm2-server-monit, and more – you can also create and use your own modules.
For more information, go to the PM2 GitHub repository: https://github.com/Unitech/PM2/.
That’s all! PM2 is an advanced, and efficient production-level process manager for Node.js with a built-in load balancer. In this article, we showed how to install and use PM2 to manage Nodejs apps in Linux. If you have any queries, send them to use via the comment form below.