10 lsof Command Examples in Linux

This is our on-going series of Linux commands and in this article we are going to review lsof command with practical examples. lsof meaning ‘LiSt Open Files’ is used to find out which files are open by which process. As we all know Linux/Unix considers everything as a files (pipessocketsdirectoriesdevices etc). One of the reason to use lsof command is when a disk cannot be unmounted as it says the files are being used. With the help of this command we can easily identify the files which are in use.

lsof command examples

10 Linux lsof Command Examples

1. List all Open Files with lsof Command

In the below example, it will show long listing of open files some of them are extracted for better understanding which displays the columns like CommandPIDUSERFDTYPE etc.

# lsof

COMMAND    PID      USER   FD      TYPE     DEVICE  SIZE/OFF       NODE NAME
init         1      root  cwd      DIR      253,0      4096          2 /
init         1      root  rtd      DIR      253,0      4096          2 /
init         1      root  txt      REG      253,0    145180     147164 /sbin/init
init         1      root  mem      REG      253,0   1889704     190149 /lib/libc-2.12.so
init         1      root   0u      CHR        1,3       0t0       3764 /dev/null
init         1      root   1u      CHR        1,3       0t0       3764 /dev/null
init         1      root   2u      CHR        1,3       0t0       3764 /dev/null
init         1      root   3r     FIFO        0,8       0t0       8449 pipe
init         1      root   4w     FIFO       0,8       0t0       8449 pipe
init         1      root   5r      DIR       0,10         0          1 inotify
init         1      root   6r      DIR       0,10         0          1 inotify
init         1      root   7u     unix 0xc1513880       0t0       8450 socket

Sections and it’s values are self-explanatory. However, we’ll review FD & TYPE columns more precisely.

FD – stands for File descriptor and may seen some of the values as:

  1. cwd current working directory
  2. rtd root directory
  3. txt program text (code and data)
  4. mem memory-mapped file

Also in FD column numbers like 1u is actual file descriptor and followed by u,r,w of it’s mode as:

  1. r for read access.
  2. w for write access.
  3. u for read and write access.

TYPE – of files and it’s identification.

  1. DIR – Directory
  2. REG – Regular file
  3. CHR – Character special file.
  4. FIFO – First In First Out

2. List User Specific Opened Files

The below command will display the list of all opened files of user tecmint.

# lsof -u tecmint

COMMAND  PID    USER   FD   TYPE     DEVICE SIZE/OFF   NODE NAME
sshd    1838 tecmint  cwd    DIR      253,0     4096      2 /
sshd    1838 tecmint  rtd    DIR      253,0     4096      2 /
sshd    1838 tecmint  txt    REG      253,0   532336 188129 /usr/sbin/sshd
sshd    1838 tecmint  mem    REG      253,0    19784 190237 /lib/libdl-2.12.so
sshd    1838 tecmint  mem    REG      253,0   122436 190247 /lib/libselinux.so.1
sshd    1838 tecmint  mem    REG      253,0   255968 190256 /lib/libgssapi_krb5.so.2.2
sshd    1838 tecmint  mem    REG      253,0   874580 190255 /lib/libkrb5.so.3.3

3. Find Processes running on Specific Port

To find out all the running process of specific port, just use the following command with option -i. The below example will list all running process of port 22.

# lsof -i TCP:22

COMMAND  PID    USER   FD   TYPE DEVICE SIZE/OFF NODE NAME
sshd    1471    root    3u  IPv4  12683      0t0  TCP *:ssh (LISTEN)
sshd    1471    root    4u  IPv6  12685      0t0  TCP *:ssh (LISTEN)

4. List Only IPv4 & IPv6 Open Files

In below example shows only IPv4 and IPv6 network files open with separate commands.

# lsof -i 4

COMMAND    PID    USER   FD   TYPE DEVICE SIZE/OFF NODE NAME
rpcbind   1203     rpc    6u  IPv4  11326      0t0  UDP *:sunrpc
rpcbind   1203     rpc    7u  IPv4  11330      0t0  UDP *:954
rpcbind   1203     rpc    8u  IPv4  11331      0t0  TCP *:sunrpc (LISTEN)
avahi-dae 1241   avahi   13u  IPv4  11579      0t0  UDP *:mdns
avahi-dae 1241   avahi   14u  IPv4  11580      0t0  UDP *:58600

# lsof -i 6

COMMAND    PID    USER   FD   TYPE DEVICE SIZE/OFF NODE NAME
rpcbind   1203     rpc    9u  IPv6  11333      0t0  UDP *:sunrpc
rpcbind   1203     rpc   10u  IPv6  11335      0t0  UDP *:954
rpcbind   1203     rpc   11u  IPv6  11336      0t0  TCP *:sunrpc (LISTEN)
rpc.statd 1277 rpcuser   10u  IPv6  11858      0t0  UDP *:55800
rpc.statd 1277 rpcuser   11u  IPv6  11862      0t0  TCP *:56428 (LISTEN)
cupsd     1346    root    6u  IPv6  12112      0t0  TCP localhost:ipp (LISTEN)

5. List Open Files of TCP Port ranges 1-1024

To list all the running process of open files of TCP Port ranges from 1-1024.

# lsof -i TCP:1-1024

COMMAND  PID    USER   FD   TYPE DEVICE SIZE/OFF NODE NAME
rpcbind 1203     rpc   11u  IPv6  11336      0t0  TCP *:sunrpc (LISTEN)
cupsd   1346    root    7u  IPv4  12113      0t0  TCP localhost:ipp (LISTEN)
sshd    1471    root    4u  IPv6  12685      0t0  TCP *:ssh (LISTEN)
master  1551    root   13u  IPv6  12898      0t0  TCP localhost:smtp (LISTEN)
sshd    1834    root    3r  IPv4  15101      0t0  TCP 192.168.0.2:ssh->192.168.0.1:conclave-cpp (ESTABLISHED)
sshd    1838 tecmint    3u  IPv4  15101      0t0  TCP 192.168.0.2:ssh->192.168.0.1:conclave-cpp (ESTABLISHED)
sshd    1871    root    3r  IPv4  15842      0t0  TCP 192.168.0.2:ssh->192.168.0.1:groove (ESTABLISHED)
httpd   1918    root    5u  IPv6  15991      0t0  TCP *:http (LISTEN)
httpd   1918    root    7u  IPv6  15995      0t0  TCP *:https (LISTEN)

6. Exclude User with ‘^’ Character

Here, we have excluded root user. You can exclude a particular user using ‘^’ with command as shown above.

# lsof -i -u^root

COMMAND    PID    USER   FD   TYPE DEVICE SIZE/OFF NODE NAME
rpcbind   1203     rpc    6u  IPv4  11326      0t0  UDP *:sunrpc
rpcbind   1203     rpc    7u  IPv4  11330      0t0  UDP *:954
rpcbind   1203     rpc    8u  IPv4  11331      0t0  TCP *:sunrpc (LISTEN)
rpcbind   1203     rpc    9u  IPv6  11333      0t0  UDP *:sunrpc
rpcbind   1203     rpc   10u  IPv6  11335      0t0  UDP *:954
rpcbind   1203     rpc   11u  IPv6  11336      0t0  TCP *:sunrpc (LISTEN)
avahi-dae 1241   avahi   13u  IPv4  11579      0t0  UDP *:mdns
avahi-dae 1241   avahi   14u  IPv4  11580      0t0  UDP *:58600
rpc.statd 1277 rpcuser    5r  IPv4  11836      0t0  UDP *:soap-beep
rpc.statd 1277 rpcuser    8u  IPv4  11850      0t0  UDP *:55146
rpc.statd 1277 rpcuser    9u  IPv4  11854      0t0  TCP *:32981 (LISTEN)
rpc.statd 1277 rpcuser   10u  IPv6  11858      0t0  UDP *:55800
rpc.statd 1277 rpcuser   11u  IPv6  11862      0t0  TCP *:56428 (LISTEN)

7. Find Out who’s Looking What Files and Commands?

Below example shows user tecmint is using command like ping and /etc directory .

# lsof -i -u tecmint

COMMAND  PID    USER   FD   TYPE DEVICE SIZE/OFF NODE NAME
bash    1839 tecmint  cwd    DIR  253,0    12288   15 /etc
ping    2525 tecmint  cwd    DIR  253,0    12288   15 /etc

8. List all Network Connections

The following command with option ‘-i’ shows the list of all network connections ‘LISTENING & ESTABLISHED’.

# lsof -i

COMMAND    PID    USER   FD   TYPE DEVICE SIZE/OFF NODE NAME
rpcbind   1203     rpc    6u  IPv4  11326      0t0  UDP *:sunrpc
rpcbind   1203     rpc    7u  IPv4  11330      0t0  UDP *:954
rpcbind   1203     rpc   11u  IPv6  11336      0t0  TCP *:sunrpc (LISTEN)
avahi-dae 1241   avahi   13u  IPv4  11579      0t0  UDP *:mdns
avahi-dae 1241   avahi   14u  IPv4  11580      0t0  UDP *:58600
rpc.statd 1277 rpcuser   11u  IPv6  11862      0t0  TCP *:56428 (LISTEN)
cupsd     1346    root    6u  IPv6  12112      0t0  TCP localhost:ipp (LISTEN)
cupsd     1346    root    7u  IPv4  12113      0t0  TCP localhost:ipp (LISTEN)
sshd      1471    root    3u  IPv4  12683      0t0  TCP *:ssh (LISTEN)
master    1551    root   12u  IPv4  12896      0t0  TCP localhost:smtp (LISTEN)
master    1551    root   13u  IPv6  12898      0t0  TCP localhost:smtp (LISTEN)
sshd      1834    root    3r  IPv4  15101      0t0  TCP 192.168.0.2:ssh->192.168.0.1:conclave-cpp (ESTABLISHED)
httpd     1918    root    5u  IPv6  15991      0t0  TCP *:http (LISTEN)
httpd     1918    root    7u  IPv6  15995      0t0  TCP *:https (LISTEN)
clock-app 2362   narad   21u  IPv4  22591      0t0  TCP 192.168.0.2:45284->www.gov.com:http (CLOSE_WAIT)
chrome    2377   narad   61u  IPv4  25862      0t0  TCP 192.168.0.2:33358->maa03s04-in-f3.1e100.net:http (ESTABLISHED)
chrome    2377   narad   80u  IPv4  25866      0t0  TCP 192.168.0.2:36405->bom03s01-in-f15.1e100.net:http (ESTABLISHED)

9. Search by PID

The below example only shows whose PID is 1 [One].

# lsof -p 1

COMMAND PID USER   FD   TYPE     DEVICE SIZE/OFF   NODE NAME
init      1 root  cwd    DIR      253,0     4096      2 /
init      1 root  rtd    DIR      253,0     4096      2 /
init      1 root  txt    REG      253,0   145180 147164 /sbin/init
init      1 root  mem    REG      253,0  1889704 190149 /lib/libc-2.12.so
init      1 root  mem    REG      253,0   142472 189970 /lib/ld-2.12.so

10. Kill all Activity of Particular User

Sometimes you may have to kill all the processes for a specific user. Below command will kills all the processes of tecmint user.

# kill -9 `lsof -t -u tecmint`

Note: Here, it’s not possible to give example of all available options, this guide is only to show how lsofcommand can be use. You may refer man page of lsof command to know more about it. Please share it if you find this article is useful through our comment box below.

Source

Translate rwx Permissions into Octal Format in Linux

Sometimes you may find it useful to display the access rights of files or directories in octal form instead of rwxor perhaps you want to display both.

Instead of using good old ls -l command, in most modern Linux distributions (if not all) you will find stat, an utility that displays file or filesystem status.

When run without arguments but followed by a given filename, stat will display a good deal of information about the file or directory. If used with the -c option, stat allows you to specify an output format. It is precisely this option that’s of particular interest to us.

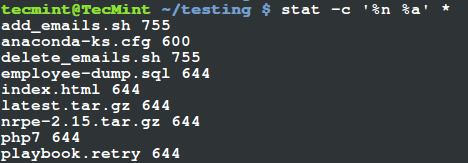
To display all files in the current working directory followed by the access rights in octal form, type:

# stat -c '%n %a' *
Sample Output
add_emails.sh 755
anaconda-ks.cfg 600
delete_emails.sh 755
employee-dump.sql 644
index.html 644
latest.tar.gz 644
nrpe-2.15.tar.gz 644
php7 644
playbook.retry 644

Find Linux File Permissions in Octal Format

Find Linux File Permissions in Octal Format


In the command above, the format sequence:

  1. %n – means file name
  2. %a – means access rights in octal form

Alternatively, you can append %a to %A, the argument passed to stat if you want to display the permissions in rwx format as well.

In that case, you can type:

# stat -c '%n %A' *
Sample Output
add_emails.sh -rwxr-xr-x
anaconda-ks.cfg -rw-------
delete_emails.sh -rwxr-xr-x
employee-dump.sql -rw-r--r--
index.html -rw-r--r--
latest.tar.gz -rw-r--r--
nrpe-2.15.tar.gz -rw-r--r--
php7 -rw-r--r--
playbook.retry -rw-r--r--

Find Linux File Permissions in Directory

Find Linux File Permissions in Directory

To view the file type in the output, you can add %F format sequence.

# stat -c '%c %F %a'

There are several other format sequences you can specify, refer to the stat man page to find out more.

# man stat

In this tip, we have covered an important Linux utility called stat, that helps you to display a file or file system status. Our main focus here was to translate the rwx access rights from the traditional ls -l output to octal form.

As I had mentioned earlier on, many modern Linux distributions now come with stat utility. But you must also remember that your shell may come with its own version of stat, therefore refer to your shell’s documentation for more information concerning options and how to use them.

Source

How to Create a Shared Directory for All Users in Linux

As a system administrator, you may have a certain directory that you want to give read/write access to every user on a Linux server. In this guide, we will review how to enable write access to all users on a particular directory (shared directory) in Linux.

This calls for setting the appropriate access permissions, and the most effective as well as reliable method to allocating a common group for all the users who will share or have write access to the specific directory.

So, start by creating the directory and common group in case it doesn’t already exist on the system as follows:

$ sudo mkdir -p /var/www/reports/
$ sudo groupadd project 

Then add an existing user who will have write access to the directory: /var/www/reports/ to the group project as below.

$ sudo usermod -a -G project tecmint 

Create Common Directory Group

Create Common Directory Group

The flags and arguments used in the above command are:

  1. -a – which adds the user to the supplementary group.
  2. -G – specifies the group name.
  3. project – group name.
  4. tecmint – existing username.

Afterwards, proceed to configure the appropriate permissions on the directory, where the option -R enables recursive operations into subdirectories:

$ sudo chgrp -R project /var/www/reports/
$ sudo chmod -R 2775 /var/www/reports/

Explaining the permissions 2775 in the chmod command above:

  1. 2 – turns on the setGID bit, implying–newly created subfiles inherit the same group as the directory, and newly created subdirectories inherit the set GID bit of the parent directory.
  2. 7 – gives rwx permissions for owner.
  3. 7 – gives rwx permissions for group.
  4. 5 – gives rx permissions for others.

You can create more system users and add them to the directory group as follows:

$ sudo useradd -m -c "Aaron Kili" -s/bin/bash -G project aaronkilik
$ sudo useradd -m -c "John Doo" -s/bin/bash -G project john
$ sudo useradd -m -c "Ravi Saive" -s/bin/bash -G project ravi

Then create subdirectories where the new users above will store their project reports:

$ sudo mkdir -p /var/www/reports/aaronkilik_reports
$ sudo mkdir -p /var/www/reports/johndoo_reports
$ sudo mkdir -p /var/www/reports/ravi_reports

Now you can create files/folders and share with other users on the same group.

That’s it! In this tutorial, we reviewed how to enable write access to all users on a particular directory. To understand more about users/groups in Linux, read How to Manage Users/Groups File Permissions and Attributes.

Remember to offer us your thoughts about this article via the feedback form below.

Source

How Do I Access or Mount Windows/USB NTFS Partition in RHEL/CentOS/Fedora

Sometimes it may happens in some stage, you may have to access data on a Windows partition, USB device or any similar device. Today most of the modern Linux systems automatically recognize and mount any disks.

However, in some occasions where you may required to configure your system manually to mount ntfs partitions on your Linux system. Specially when you are using dual boot operating environment. Fortunately, this process is not so complicated task its just very fairly straight forward.

How to mount ntfs partition in linux

How to mount Windows NTFS Partition in Linux

This article explains you on how to access or mount Windows XPVista NTFS or USB filesystem using the ‘mount‘ command in RHEL/CentOS/Fedora systems.

How to Mount Windows NTFS Partition in Linux

First you need to enable EPEL (Extra Packages for Enterprise Linux) Repository. You may refer the article on how to enable EPEL Repository under RHELCentOS and Fedora systems.

To mount any NTFS based filesystem, you need to install a tool called NTFS3G. Before heading up for installation let’s understand NTGS3G.

What is NTFS3G

NTFS3G is an open source cross-platform, stable, GPL licensed, POSIXNTFS R/W driver used in Linux. It provides safe handling of Windows NTFS file systems viz create, remove, rename, move files, directories, hard links, etc.

Once EPEL is installed and enabled, let’s install ntfs-3g package using the below command with root user.

# yum -y install ntfs-3g
Fuse Install

Next, install and load FUSE driver to mount detected devices with below command. FUSE module is included in the kernel itself in version 2.6.18-164 or newer.

# yum install fuse
# modprobe fuse
Identify NTFS Partition

Once fuse module is loaded, type below command to find out NTFS Partitions in Linux.

# fdisk -l
 Device Boot      Start    End      Blocks   Id  System
/dev/sdb1         1	   21270    7816688   b  W95 FAT32
Mount NTFS partition

First create a mount point to mount the NTFS partition.

# mkdir /mnt/nts

Simply run the following command to mount the partition. Replace sda1 with your actual partition found.

# mount -t ntfs-3g /dev/sda1 /mnt/nts

Once it’s mounted on /mnt/ntfs, you may use regular Linux ls -l command to list the content of mounted filesystem.

[root@tecmint ntfs]# ls -l
total 27328
drwx------.  2 root root    16384 Sep  2 19:37 Cert
drwx------. 20 root root    16384 Aug 24  2011 club_application
drwx------.  6 root root    16384 Aug 11 15:37 docs
drwx------.  7 root root    16384 Jul 31  2012 Downloads
drwx------.  2 root root    16384 Dec 10 20:28 images
-rwxr-xr-x.  1 root root    31744 Jan 18 00:29 Material List.doc

If you want to make mount point permanent at the boot time, then simple add the following line at the end of /etc/fstab file. This will remain as permanent.

/dev/sda1    /mnt/usb    ntfs-3g        defaults    0    0
Umount NTFS Partition

Simply, use the following command to unmount the mounted partition.

# umount /mnt/usb

Read Also : How to Mount ISO Images in Linux

Source

4 Ways to Disable Root Account in Linux

The root account is the ultimate account on a Linux and other Unix-like operating systems. This account has access to all commands and files on a system with full read, write and execute permissions. It is used to perform any kind of task on a system; to create/update/access/delete other users’ accountsinstall/remove/upgrade software packages, and so much more.

Because the root user has absolute powers, any actions he/she performs are critical on a system. In this regard, any errors by the root user may have huge implications on the normal operation of a system. In addition, this account may also be abused by using it improperly or inappropriately either accidentally, maliciously, or through contrived ignorance of policies.

Therefore, it is advisable to disable the root access in your Linux server, instead, create an administrative account which should be configured to gain root user privileges using the sudo command, to perform critical tasks on the server.

In this article, we will explain four ways to disable root user account login in Linux.

Attention: Before you block access to the root account, make sure you have created an administrative account, capable of using sudo command to gain root user privileges, with the useradd command and give this user account a strong password. The flag -m means create user’s home directory and -c allows to specify a comment:

# useradd -m -c "Admin User" admin
# passwd admin

Next, add this user to the appropriate group of system administrators using the usermod command, where the switch -a means append user account and -G specifies a group to add the user in (wheel or sudo depending on your Linux distribution):

# usermod -aG wheel admin    #CentOS/RHEL
# usermod -aG sudo admin     #Debian/Ubuntu 

Once you have created a user with administrative privileges, switch to that account in order to block root access.

# su admin

1. Change root User’s Shell

The simplest method to disable root user login is to change its shell from /bin/bash or /bin/bash (or any other shell that permits user login) to /sbin/nologin, in the /etc/passwd file, which you can open for editing using any of your favorite command line editors as shown.

  
$ sudo vim /etc/passwd

Change the line:

root:x:0:0:root:/root:/bin/bash
to
root:x:0:0:root:/root:/sbin/nologin

Change root User Shell

Change root User Shell

Save the file and close it.

From now on, when root user logs in, he/she will get the message “This account is currently not available.” This is the default message, but, you can change it and set a custom message in the the file /etc/nologin.txt.

This method is only effective with programs that require a shell for user login, otherwise, sudoftp and emailclients can access the root account.

2. Disable root Login via Console Device (TTY)

The second method uses a PAM module called pam_securetty, which permits root access only if the user is logging in on a “secure” TTY, as defined by the listing in /etc/securetty.

The above file allows you to specify which TTY devices the root user is allowed to login on, emptying this file prevents root login on any devices attached to the computer system.

To create an empty file, run.

$ sudo mv /etc/securetty /etc/securetty.orig
$ sudo touch /etc/securetty
$ sudo chmod 600 /etc/securetty

This method has some limitations, it only affects programs such as login, display managers (i.e gdmkdm and xdm) and other network services that launch a TTY. Programs such as su, sudo, ssh, and other related openssh tools will have access to the root account.

3. Disabl SSH Root Login

The commonest way of accessing remote servers or VPSs is via SSH and to block root user login under it, you need to edit the /etc/ssh/sshd_config file.

$ sudo vim /etc/ssh/sshd_config

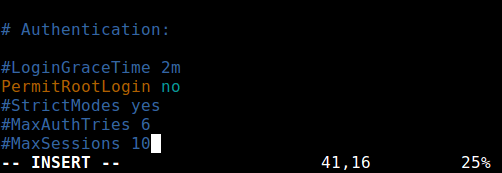
Then uncomment (if it is commented) the directive PermitRootLogin and set its value to no as shown in the screenshot.

Disable Root Login in SSh

Disable Root Login in SSh

Once you are done, save and close the file. Then restart the sshd service to apply the recent change in configurations.

$ sudo systemctl restart sshd 
OR
$ sudo service sshd restart 

As you may already know, this method only affects openssh tools set, programs such as ssh, scp, sftp will be blocked from accessing the root account.

4. Restrict root Acess to Services Via PAM

Pluggable Authentication Modules (PAM in short) is a centralized, pluggable, modular, and flexible method of authentication on Linux systems. PAM, through the /lib/security/pam_listfile.so module, allows great flexibility in limiting the privileges of specific accounts.

The above module can be used to reference a list of users who are not allowed to log in via some target services such as login, ssh and any PAM aware programs.

In this case, we want to disable root user access to a system, by restricting access to login and sshd services. First open and edit the file for the target service in the /etc/pam.d/ directory as shown.

$ sudo vim /etc/pam.d/login
OR
sudo vim /etc/pam.d/sshd

Next, add the configuration below in both files.

auth    required       pam_listfile.so \
        onerr=succeed  item=user  sense=deny  file=/etc/ssh/deniedusers

When you are done, save and close each file. Then create the plain file /etc/ssh/deniedusers which should contain one item per line and not world readable.

Add the name root in it, then save and close it.

$ sudo vim /etc/ssh/deniedusers

Also set the required permissions on this.

$ sudo chmod 600 /etc/ssh/deniedusers

This method only affect programs and services that are PAM aware. You can block root access to the system via ftp and email clients and more.

For more information, consult the relevant man pages.

$ man pam_securetty
$ man sshd_config
$ man pam

That’s all! In this article, we have explained four ways of disabling the root user login (or account) in Linux. Do you have any comments, suggestions or questions, feel free to reach us via the feedback form below.

Source

How to Find Out List of All Open Ports in Linux

In this article, we will briefly talk about ports in computer networking and move to how you can list all open ports in Linux.

In computer networking, and more definitely in software terms, a port is a logical entity which acts as a endpoint of communication to identify a given application or process on an Linux operating system. It is a 16-bit number (0 to 65535) which differentiates one application from another on end systems.

The two most popular Internet transport protocols, Transmission Control Protocol (TCP) and the User Datagram Protocol (UDP) and other less known protocols use port numbers for communication sessions (source and destination port numbers in conjunction with the source and destination IP addresses).

In addition, a combination of an IP address, port and protocol such as TCP/UDP is known as a socket, and every service must have a unique socket.

Below are the different categories of ports:

  1. 0-1023 – the Well Known Ports, also referred to as System Ports.
  2. 1024-49151 – the Registered Ports, also known as User Ports.
  3. 49152-65535 – the Dynamic Ports, also referred to as the Private Ports.

You can view a list of different applications and port/protocol combination in /etc/services file in Linux using cat command:

$ cat /etc/services 
OR
$ cat /etc/services | less
Network Services and Ports
# /etc/services:
# $Id: services,v 1.48 2009/11/11 14:32:31 ovasik Exp $
#
# Network services, Internet style
# IANA services version: last updated 2009-11-10
#
# Note that it is presently the policy of IANA to assign a single well-known
# port number for both TCP and UDP; hence, most entries here have two entries
# even if the protocol doesn't support UDP operations.
# Updated from RFC 1700, ``Assigned Numbers'' (October 1994).  Not all ports
# are included, only the more common ones.
#
# The latest IANA port assignments can be gotten from
#       http://www.iana.org/assignments/port-numbers
# The Well Known Ports are those from 0 through 1023.
# The Registered Ports are those from 1024 through 49151
# The Dynamic and/or Private Ports are those from 49152 through 65535
#
# Each line describes one service, and is of the form:
#
# service-name  port/protocol  [aliases ...]   [# comment]

tcpmux          1/tcp                           # TCP port service multiplexer
tcpmux          1/udp                           # TCP port service multiplexer
rje             5/tcp                           # Remote Job Entry
rje             5/udp                           # Remote Job Entry
echo            7/tcp
echo            7/udp
discard         9/tcp           sink null
discard         9/udp           sink null
systat          11/tcp          users
systat          11/udp          users
daytime         13/tcp
daytime         13/udp
qotd            17/tcp          quote
qotd            17/udp          quote
msp             18/tcp                          # message send protocol
msp             18/udp                          # message send protocol
chargen         19/tcp          ttytst source
chargen         19/udp          ttytst source
ftp-data        20/tcp
ftp-data        20/udp
# 21 is registered to ftp, but also used by fsp
ftp             21/tcp
ftp             21/udp          fsp fspd
ssh             22/tcp                          # The Secure Shell (SSH) Protocol
ssh             22/udp                          # The Secure Shell (SSH) Protocol
telnet          23/tcp
telnet          23/udp

To list all open ports or currently running ports including TCP and UDP in Linux, we will use netstat, is a powerful tool for monitoring network connections and statistics.

List All Network Ports Using Netstat Command
$ netstat -lntu

Proto Recv-Q Send-Q Local Address               Foreign Address             State      
tcp        0      0 0.0.0.0:22                  0.0.0.0:*                   LISTEN      
tcp        0      0 0.0.0.0:3306                0.0.0.0:*                   LISTEN      
tcp        0      0 0.0.0.0:25                  0.0.0.0:*                   LISTEN      
tcp        0      0 :::22                       :::*                        LISTEN      
tcp        0      0 :::80                       :::*                        LISTEN      
tcp        0      0 :::25                       :::*                        LISTEN      
udp        0      0 0.0.0.0:68                  0.0.0.0:*                               

Where,

  1. -l – prints only listening sockets
  2. -n – shows port number
  3. -t – enables listing of tcp ports
  4. -u – enables listing of udp ports

You can also use ss command, a well known useful utility for examining sockets in a Linux system. Run the command below to list all your open TCP and UCP ports:

List All Network Ports Using ss Command
$ ss -lntu

Netid State      Recv-Q Send-Q               Local Address:Port       Peer Address:Port 
udp   UNCONN     0      0                    *:68                     *:*     
tcp   LISTEN     0      128                  :::22                    :::*     
tcp   LISTEN     0      128                  *:22                     *:*     
tcp   LISTEN     0      50                   *:3306                   *:*     
tcp   LISTEN     0      128                  :::80                    ::*     
tcp   LISTEN     0      100                  :::25                    :::*     
tcp   LISTEN     0      100                  *:25  

Make it a point to read through the man pages of the commands above for more usage information.

In summary, understanding the concept of ports in computer networking is very vital for system and network administrators. You can as well go through this netstat guide with simple, precise and well explained examples.

Last but not least, get in touch with us by sharing other methods for listing open ports in Linux or asking a question via the response form below.

Source

What’s Difference Between Grep, Egrep and Fgrep in Linux?

One of the renowned search tool on Unix-like systems which can be used to search for anything whether it be a file, or a line or multiple lines in file is grep utility. It is very vast in functionality which can be attributed to the large number of options it supports like: searching using string pattern, or reg-ex pattern or perl based reg-ex etc.

Difference Between grep, egrep and fgrep

Difference Between grep, egrep and fgrep in Linux

Due its varying functionalities, it has many variants including grepegrep (Extended GREP), fgrep (Fixed GREP), pgrep (Process GREP), rgrep (Recursive GREP) etc. But these variants have minor differences to original grepwhich has made them popular and to be used by various Linux programmers for specific tasks.

Main thing that remains to be investigated is what are the differences between the three main variants i.e. ‘grep’‘egrep’ and ‘fgrep’ of grep that makes Linux users choose one or the other version as per requirement.

Some Special Meta-Characters of grep

  1. + – Equivalent to one or more occurrences of previous character.
  2. ? – This denotes almost 1 repetition of previous character. Like: a? Would match ‘a’ or ‘aa’.
  3. ( – Start of alternation expression.
  4. ) – End of alternation expression.
  5. | – Matching either of the expression separated by '|'. Like: “(a|b)cde” would match either ‘abcde’ or ‘bbcde’.
  6. { – This meta-character indicates start of range specifier. Like: “a{2}” matches “aa” in file i.e. a 2 times.
  7. } – This meta-character indicates end of range specifier.

Differences Between grep, egrep and fgrep

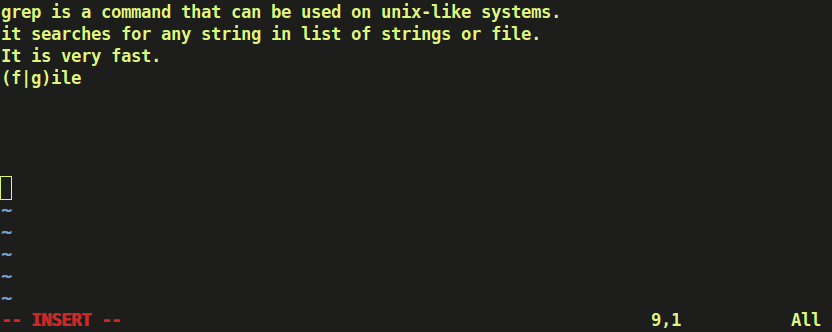
Some main differences between grepegrep and fgrep can be highlighted as follows. For this set of examples we are assuming the file on which operation is being performed to be:

Linux grep Command

Linux grep Command

Grep Command

grep or Global Regular Expression Print is the main search program on Unix-like systems which can search for any type of string on any file or list of files or even output of any command.

Suggested Read: 12 Practical Examples of Linux grep Command

It uses Basic Regular Expressions apart from normal strings as a search pattern. In Basic Regular Expressions (BRE), meta-characters like: '{','}','(',')','|','+','?' loose their meaning and are treated as normal characters of string and need to be escaped if they are to be treated as special characters.

Suggested Read: 11 Advance ‘Grep’ Commands on Character Classes and Bracket Expressions

Also, grep uses Boyer-Moore algorithm for fast searching any string or regular expression.

$ grep -C 0 '(f|g)ile' check_file
$ grep -C 0 '\(f\|g\)ile' check_file

Linux grep Command Example

Linux grep Command Example

Like here, when the command is run without escaping '(' ')' and '|' then it searched for the complete string i.e. “(f|g)ile” in the file. But when the special characters were escaped, then instead of treating them as part of string, grep treated them as meta-characters and searched for words “file” or “gile” in the file.

Egrep Command

Egrep or grep -E is another version of grep or the Extended grep. This version of grep is efficient and fast when it comes to searching for a regular expression pattern as it treats meta-characters as is and doesn’t substitute them as strings like in grep, and hence you are freed from the burden of escaping them as in grep. It uses ERE or the Extended Regular Expression set.

In case of egrep, even if you do not escape the meta-characters, it would treat them as special characters and substitute them for their special meaning instead of treating them as part of string.

$ egrep -C 0 '(f|g)ile' check_file
$ egrep -C 0 '\(f\|g\)ile' check_file

Linux egrep Command Examples

Linux egrep Command Examples

Like here, egrep searched for “file” string when the meta-characters were not escaped as it would mean by the meaning of these characters. But, when these characters were escaped, then egrep treated them as part of string and searched for complete string “(f|g)ile” in the file.

fgrep Command

Fgrep or the Fixed grep or grep -F is yet another version of grep which is fast in searching when it comes to search for the entire string instead of regular expression as it doesn’t recognize the regular expressions, neither any meta-characters. For searching any direct string, this is the version of grep which should be selected.

Fgrep searches for complete string and doesn’t even recognize special characters as part of regular expression even if escaped or not escaped.

$ fgrep -C 0 '(f|g)ile' check_file
$ fgrep -C 0 '\(f\|g\)ile' check_file

Linux fgrep Command Examples

Linux fgrep Command Examples

Like, when meta-characters were not escaped, fgrep searched for the complete string “(f|g)ile” in the file, and when the meta-characters were escaped, then the fgrep command searched for “\(f\|g\)ile” all characters as is in the file.

We’ve already covered some practical examples of grep command you can read them here, if you want to get more out of grep command in Linux.

Learn 12 Practical Examples of Linux grep Command

Conclusion

Above highlighted are the differences between ‘grep’‘egrep’ and ‘fgrep’. Apart from difference in the set of regular expressions used, and speed of execution, rest command line parameters remain same for all the three versions of grep and even instead of “egrep” or “fgrep”, “grep -E” or “grep -F” are recommended to be used.

If you find any other differences between these three versions of grep, do mention them in your comments.

Source

Deprecated Linux Networking Commands and Their Replacements

In our previous article, we have covered some useful command line networking utilities for Sysadmin’s for network management, troubleshooting and debugging on Linux. We mentioned some networking commands that are still included and supported in many Linux distributions, but are now, in reality, deprecated or obsoleted and therefore should be carry out in favor of more present-day replacements.

Although these networking tools/utilities are still available in official repositories of mainstream Linux distributions, but they do not actually come pre-installed by default.

This is evident in Enterprise Linux distributions, a number of popular networking commands no longer work on RHEL/CentOS 7, while they actually work on RHEL/CentOS 6. Latest Debian and Ubuntu releases don’t include them as well.

In this article, we will share deprecated Linux networking commands and their replacements. These commands include ifconfignetstatarpiwconfigiptunnelnameif, as well as route.

All the listed programs with exception of iwconfig are found in the net-tools package which has not been under active maintenance for so many years.

Importantly, you should keep in mind that “unmaintained software is dangerous”, it poses a great security risk to your Linux system. The modern replacement for net-tools is iproute2 – an assortment of utilities for controlling TCP/IP networking in Linux.

The following table shows the summary of the exact deprecated commands and their replacements, that you should take note of.

Linux Deprecated Commands Linux Replacement Commands
arp ip n (ip neighbor)
ifconfig ip a (ip addr), ip link, ip -s (ip -stats)
iptunnel ip tunnel
iwconfig iw
nameif ip link, ifrename
netstat ss, ip route (for netstat -r), ip -s link (for netstat -i), ip maddr (for netstat -g)
route ip r (ip route)

You will find more details about some of the replacements in these following guides.

  1. ifconfig vs ip: What’s Difference and Comparing Network Configuration
  2. 10 Useful “IP” Commands to Configure Network Interfaces

ReferenceDoug Vitale Tech Blog post.
Net-tools Project Homehttps://sourceforge.net/projects/net-tools/
iproutre2 Description Page: https://wiki.linuxfoundation.org/networking/iproute2

All in all, it’s good to keep these changes in mind, as most of these obsolete tools will totally be replaced sometime in the future. Old habits die hard but you have to move on. In addition, installing and using unmaintained packages on your Linux system is an insecure and dangerous practice.

Source

Exodus – Safely Copy Linux Binaries From One Linux System to Another

Exodus is a simple yet useful program for easily and securely copying Linux ELF binaries from one system to another. For example, if you have htop (Linux Process Monitoring Tool) installed on your desktop machine, but not installed on your remote Linux server, exodus gives a way to copy/install the htop binary from the desktop machine to the remote server.

It bundles all of the binary’s dependencies, compiling a statically linked wrapper for the executable that invokes the relocated linker directly, and installing the bundle in the ~/.exodus/ directory, on the remote system.

You can see it in action here.

Exodus Htop Demo
Exodus really comes in handy in two critical cases: 1) if you do not have root access on a machine and/or 2) if the package you want to use is not available for the Linux distribution you are running on another machine.

Install Exodus in Linux Systems

You can install exodus using Python PIP package manager, as follows. The command below will perform a user specific installation (only for the account you have logged on with).

$ sudo apt install python-pip                [Install PIP On Debian/Ubuntu]
$ sudo yum install epel-release python-pip   [Install PIP On CentOS/RHEL]
$ sudo dnf install python-pip	             [Install PIP On Fedora]
$ pip install --user exodus-bundler          [Install Exodus in Linux] 

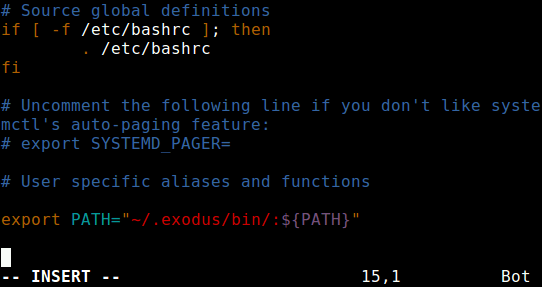
Next, add the directory ~/.local/bin/ to your PATH variable in your ~/.bashrc file, in order to run the exodus executable like any other system command.

export PATH="~/.local/bin/:${PATH}"

Add Exodus Path in Bashrc

Add Exodus Path in Bashrc

Save and close the file. Then open another terminal window to start using exodus.

Note: It is also highly recommended that you install gcc and one of either musl libc or diet libc (C libraries used to compile small statically linked launchers for the bundled applications), on the machine where you’ll be packaging binaries.

Use Exodus to Copy Local Binary To a Remote Linux System

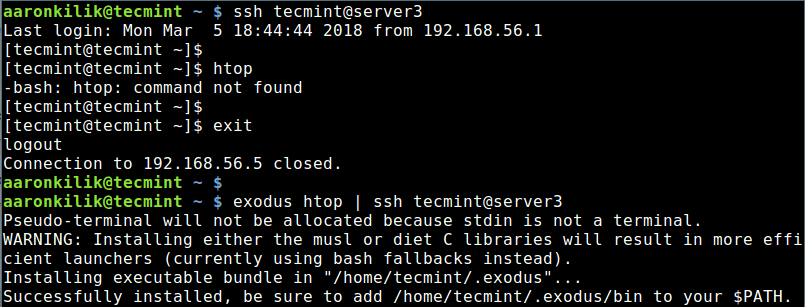
Once you have installed exodus, you can copy a local binary (htop tool) to a remote machine by simply running the following command.

$ exodus htop | ssh tecmint@server3

Exodus Copy Htop Binaries to Remote Linux

Exodus Copy Htop Binaries to Remote Linux

Then login to the remote machine, and add the directory /home/tecmint/.exodus/bin to your PATH in your ~/.bashrc file, in order to run the htop like any other system command.

export PATH="~/.exodus/bin:${PATH}"

Add Exodus Path in Remote Linux Bashrc

Add Exodus Path in Remote Linux Bashrc

Save and close the file, then source it as follows, for the changes to take effect.

$ source ~/.bashrc

Now you should be able to run htop on your remote Linux machine.

$ htop

If you have two or more binaries with the same name (for example, more than one version of htop installed on your system, one /usr/bin/htop and another /usr/local/bin/htop), you can copy and install them in parallel with the -r flag, it enables for assigning of aliases for each binary on the remote machine.

The following command will install the two htop versions in parallel with /usr/bin/grep called htop-1 and /usr/local/bin/htop called htop-2 as shown.

$ exodus -r htop-1 -r htop-2 /usr/bin/htop /usr/local/bin/htop | ssh tecmint@server3

Attention: Exodus has a number of limitations and it may fail to work with non-ELF binaries, incompatible CPU architectures, incompatible Glibc and kernel versions, driver dependent libraries, pro-grammatically loaded libraries and non-library dependencies.

For more information, see the exodus help page.

$ exodus -h           

Exodus Github repositoryhttps://github.com/intoli/exodus

Conclusion

Exodus is simple yet powerful tool for copying binaries from one Linux machine to another remote Linux system. Try it out and give us your feedback via the comment form below.

Source

Find Out All Live Hosts IP Addresses Connected on Network in Linux

There are plenty of network monitoring tools you can find in the Linux ecosystem, that can generate for you a summary of the total number of devices on a network including all their IP addresses and more.

However, sometimes what you actually need may be a simple command line tool that can provide you the same information by running a single command.

This tutorial will explain you how to find out all live hosts IP addresses connected to a given network. Here, we will use Nmap tool to find out all IP addresses of devices connected on a same network.

Suggested Read: 29 Examples of ‘Nmap’ Commands for System/Network Administration

The Nmap (short form for Network Mapper) is an open source, powerful and a very versatile command line tool for exploring networks, perform security scans, network audit and finding open ports on remote machine and so much more.

In case you do not have Nmap installed on your system, run the appropriate command below for your distribution to install it:

$ sudo yum install nmap         [On RedHat based systems]
$ sudo dnf install nmap         [On Fedora 22+ versions]
$ sudo apt-get install nmap     [On Debian/Ubuntu based systems]


Once you have 
Nmap installed, the syntax for using it is:

$ nmap  [scan type...]  options  {target specification}

Where the argument {target specification}, can be replaced by hostnamesIP addressesnetworks and so on.

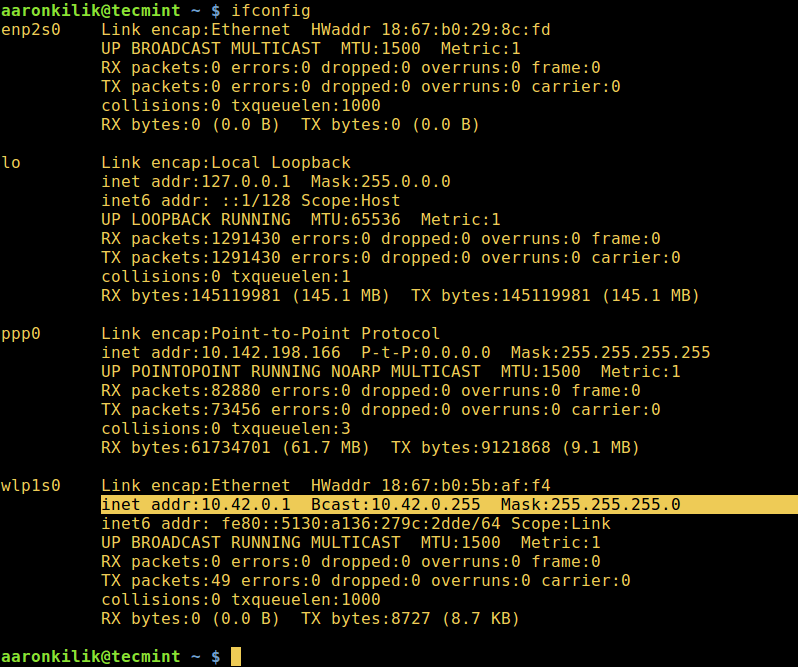
Therefore to list the IP addresses of all hosts connected to a given network, first of all identify the network and its subnet mask using the ifconfig command or ip command like so:

$ ifconfig
OR
$ ip addr show

Find Network Details in Linux

Find Network Details in Linux

Next, run the Nmap command below:

$ nmap  -sn  10.42.0.0/24

Find All Live Hosts on Network

Find All Live Hosts on Network

In the command above:

  1. -sn – is the type of scan, which means a ping scan. By default, Nmap performs port scanning, but this scan will disable port scanning.
  2. 10.42.0.0/24 – is the target network, replace it with your actual network.

For a comprehensive usage information, make an effort to look into Nmap man page:

$ man nmap

Else, run Nmap without any options and arguments to view a summarized usage information:

$ nmap

In addition, for those interested in learning security scanning techniques in Linux, you can read through this practical guide to Nmap in Kali Linux.

Well, that’s it for now, remember to send us your questions or comments through the response form below. You can as well share with us other methods for listing the IP addresses of all devices connected to a given network.

Source

WP2Social Auto Publish Powered By : XYZScripts.com