This tutorial only covers general security tips for CentOS 7 which can be used to harden the system. The checklist tips are intended to be used mostly on various types of bare-metal servers or on machines (physical or virtual) that provides network services.
Security and Hardening of CentOS 7
However, some of tips can be successfully applied on general purpose machines too, such as Desktops, Laptops and card-sized single-board computers (Raspberry Pi).
Requirements
- CentOS 7 Minimal Installation
1. Physical Protection
Lock down your server rooms access, use racks locking and video surveillance. Take into consideration that any physical access to server rooms can expose your machine to serious security issues.
BIOS passwords can be changed by resetting jumpers on the motherboard or by disconnecting the CMOS battery. Also, an intruder can steal the hard disks or directly attach new hard disks to the motherboard interfaces (SATA, SCSI etc), boot up with a Linux live distro and clone or copy data without leaving any software trace.
2. Reduce Spying Impact
In case of highly sensitive data you should probably use advanced physical protection such as placing and locking the server into a Faraday Cage or use a military TEMPEST solution in order to minimize the impact of spying the system via radio or electrical leaking emanations.
3. Secure BIOS/UEFI
Start the process of harden your machine by securing BIOS/UEFI settings, especially set a BIOS/UEFI password and disable boot media devices (CD, DVD, disable USB support) in order to prevent an unauthorized users from modifying the system BIOS settings or altering the boot device priority and booting the machine from an alternate medium.
In order to apply this type of changes to your machine you need to consult the motherboard manufacturer manual for specific instructions.
4. Secure Boot Loader
Set a GRUB password in order to prevent malicious users to tamper with kernel boot sequence or runlevels, edit kernel parameters or start the system into single user mode in order to harm your system and reset root password to gain privileged control.
5. Use Separate Disk Partitions
When installing CentOS on systems intended as production servers use dedicated partitions or dedicated hard disks for the following parts of the system:
/(root)
/boot
/home
/tmp
/var
6. Use LVM and RAID for Redundancy and File System Growth
The /var partition is the place where log messages are written to disk. This part of the system can exponential grow in size on heavily traffic servers which expose network services such as web servers or file servers.
Thus, use a large partition for /var or consider on setting up this partition using logical volumes (LVM) or combine several physical disks into one larger virtual RAID 0 device to sustain large amounts of data. For data redundancy consider on using LVM layout on top of RAID 1 level.
For setting up LVM or RAID on the disks, follow our useful guides:
- Setup Disk Storage with LVM in Linux
- Create LVM Disks Using vgcreate, lvcreate and lvextend
- Combine Several Disks into One Large Virtual Storage
- Create RAID 1 Using Two Disks in Linux
7. Modify fstab Options to Secure Data Partitions
Separate partitions intended for storing data and prevent the execution of programs, device files or setuid bit on these type of partitions by adding the following options to fstab file as illustrated on the below excerpt:
/dev/sda5 /nas ext4 defaults,nosuid,nodev,noexec 1 2
To prevent privilege-escalation and arbitrary script execution create a separate partition for /tmp and mount it as nosuid, nodev and noexec.
/dev/sda6 /tmp ext4 defaults,nosuid,nodev,noexec 0 0
8. Encrypt the Hard Disks at block level with LUKS
In order to protect sensitive data snooping in case of physical access to machine hard drives. I suggest you to learn how to encrypt disk by reading our article Linux Hard Disk Data Encryption with LUKS.
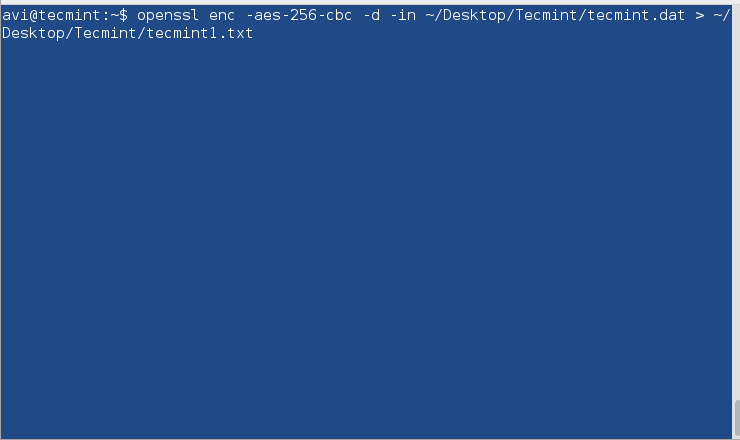
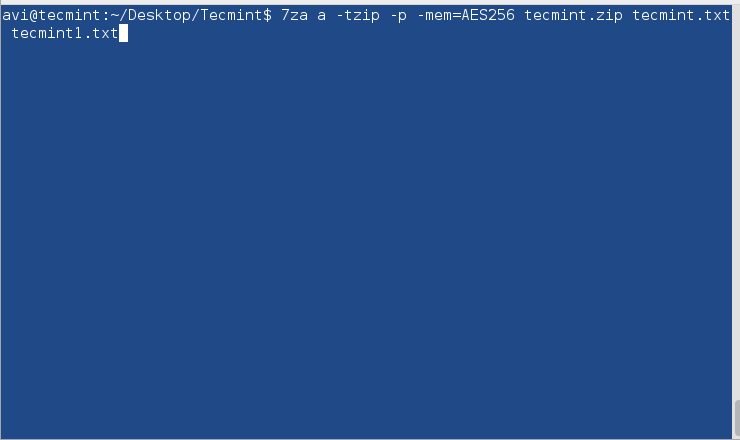
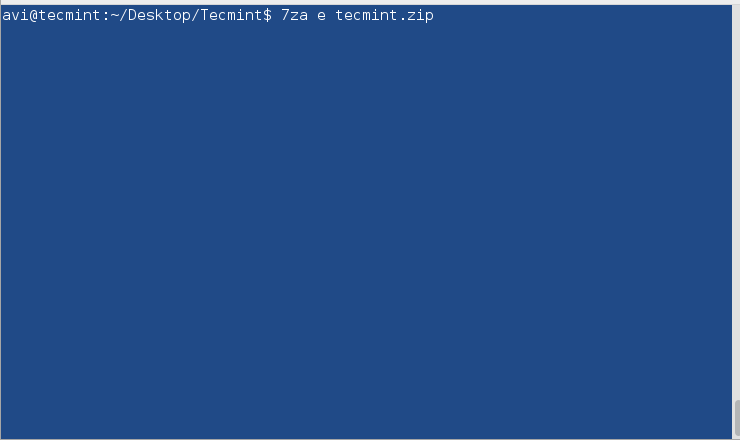
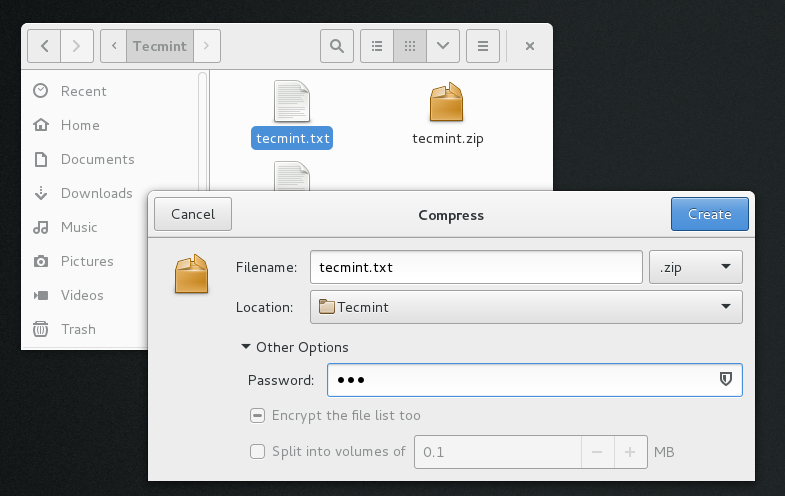
9. Use PGP and Public-Key Cryptography
In order to encrypt disks, use PGP and Public-Key Cryptography or openssl command to encrypt and decrypt sensitive files with a password as shown in this article Configure Encrypted Linux System Storage.
10. Install Only the Minimum Amount of Packages Required
Avoid installing unimportant or unnecessary programs, applications or services to avoid package vulnerabilities. This can decrease the risk that the compromise of a piece of software may lead to compromise other applications, parts of the system or even file systems, finally resulting in data corruption or data loss.
11. Update the system frequently
Update the system regularly. Keep Linux kernel in sync with the latest security patches and all the installed software up-to-date with the latest versions by issuing the below command:
# yum update
12. Disable Ctrl+Alt+Del
In order to prevent users to reboot the server once they have physical access to keyboard or via a Remote Console Application or a virtualized console (KVM, Virtualizing software interface) you should disable Ctrl+Alt+Del key sequence by executing the below command.
# systemctl mask ctrl-alt-del.target
13. Remove Unnecessary Software Packages
Install minimal software required for your machine. Never install extra programs or services. Install packages only from trusted or official repositories. Use minimal installation of the system in case the machine is destined to run its entire live as a server.
Verify installed packages using one of the following commands:
# rpm -qa
Make a local list of all installed packages.
# yum list installed >> installed.txt
Consult the list for useless software and delete a package by issuing the below command:
# yum remove package_name
Read Also: Disable and Remove Unwanted Packages on Minimal Installation of CentOS 7.
14. Restart systemd services after daemon updates
Use the below command example to restart a systemd service in order to apply new updates.
# systemctl restart httpd.service
15. Remove Unneeded Services
Identify the services that are listening on specific ports using the following command.
# ss -tulpn
To list all installed services with their output status issue the below command:
# systemctl list-units -t service
For instance, CentOS 7 default minimal installation comes with Postfix daemon installed by default which runs by the name of master under port 25. Remove Postfix network service in case your machine will not be used as a mail server.
# yum remove postfix
Read Also: Stop and Disable Unwanted Services in CentOS 7.
16. Encrypt Transmitted Data
Do not use unsecure protocols for remote access or file transfer such as Telnet, FTP or other plain text high protocols such as SMTP, HTTP, NFS or SMB which, by default, does not encrypt the authentication sessions or sent data.
Use only sftp, scp for file transfers and SSH or VNC over SSH tunnels for remote console connections or GUI access.
In order to tunnel a VNC console via SSH use the below example which forwards the VNC port 5901 from the remote machine to your local machine:
# ssh -L 5902:localhost:5901 remote_machine
On local machine run the below command in order to virtual connect to the remote endpoint.
# vncviewer localhost:5902
17. Network Port Scanning
Conduct external port checks using the nmap tool from a remote system over the LAN. This type of scanning can be used to verify network vulnerabilities or test the firewall rules.
# nmap -sT -O 192.168.1.10
Read Also: Learn How to Use Nmap with these 29 Examples.
18. Packet-filtering Firewall
Use firewalld utility to protect the system ports, open or close specific services ports, especially well-known ports (<1024).
Install, start, enable and list the firewall rules by issuing the below commands:
# yum install firewalld
# systemctl start firewalld.service
# systemctl enable firewalld.service
# firewall-cmd --list-all
19. Inspect Protocol Packets with tcpdump
Use tcpdump utility in order to sniff network packets locally and inspect their content for suspicious traffic (source-destination ports, tcp/ip protocols, layer two traffic, unusual ARP requests).
For a better analysis of the tcpdump captured file use a more advanced program such as Wireshark.
# tcpdump -i eno16777736 -w tcpdump.pcap
Read Also: 12 tcpdump Command Examples and Analyze Network Using Wireshark Tool.
20. Prevent DNS Attacks
Inspect the contents of your resolver, typically /etc/resolv.conf file, which defines the IP address of the DNS servers it should use to query for domain names, in order to avoid man-in-the-middle attacks, unnecessary traffic for root DNS servers, spoof or create a DOS attack.
This is just the first part. On the next part we’ll discuss other security tips for CentOS 7.
Continuing the previous tutorial on how to secure CentOS 7, in this article we’ll discuss other security tips that will be presented on the below checklist.
Hardening and Securing of CentOS 7 Server
Requirements
- The Mega Guide To Harden and Secure CentOS 7 – Part 1
21. Disable Useless SUID and SGID Commands
If the setuid and setgid bits are set on binary programs, these commands can run tasks with other user or group rights, such as root privileges which can expose seriously security issues.
Often, buffer overrun attacks can exploit such executables binaries to run unauthorized code with the rights of a root power user.
# find / -path /proc -prune -o -type f \( -perm -4000 -o -perm -2000 \) -exec ls -l {} \;
To unset the setuid bit execute the below command:
# chmod u-s /path/to/binary_file
To unset the setgid bit run the below command:
# chmod g-s /path/to/binary_file
22. Check for Unowned Files and Directories
Files or directories not owned by a valid account must be deleted or assigned with permissions from a user and group.
Issue the below command to list files or directories with no user and group.
# find / -nouser -o -nogroup -exec ls -l {} \;
23. List World-Writeable Files
Keeping word-writable file on the system can be dangerous due to the fact that anyone can modify them. Execute the below command in order to display word-writeable files, except Symlinks, which are always world-writeable.
# find / -path /proc -prune -o -perm -2 ! -type l –ls
24. Create Strong Passwords
Create a password of minimum of eight characters. The password must contain digits, special characters and uppercase letters. Use pwmake to generate a password of 128 bits from /dev/urandom file.
# pwmake 128
25. Apply Strong Password Policy
Force the system to use strong passwords by adding the below line in /etc/pam.d/passwd file.
password required pam_pwquality.so retry=3
Adding the above line, the password entered cannot contain more than 3 characters in a monotonic sequence, such as abcd, and more than 3 identical consecutive characters, such as 1111.
To force users to use a password with a minimum length of 8 characters, including all classes of characters, strength-check for character sequences and consecutive characters add the following lines to the /etc/security/pwquality.conf file.
minlen = 8
minclass = 4
maxsequence = 3
maxrepeat = 3
26. Use Password Aging
The chage command can be used for user password aging. To set a user’s password to expire in 45 days, use the following command:
# chage -M 45 username
To disable password expiration time use the command:
# chage -M -1 username
Force immediate password expiration (user must change password on next login) by running the following command:
# chage -d 0 username
27. Lock Accounts
User accounts can be locked by executing the passwd or usermod command:
# passwd -l username
# usermod -L username
To unlock accounts use the -u option for passwd command and -U option for usermod.
28. Prevent Accounts Shell Access
To prevent a system account (ordinary account or service account) to gain access to bash shell, change root shell to /usr/sbin/nologin or /bin/false in the /etc/passwd file by issuing the command below:
# usermod -s /bin/false username
To change the shell when creating a new user issue the following command:
# useradd -s /usr/sbin/nologin username
Read Also: Learn 15 Examples of “useradd” Command in Linux
29. Lock Virtual User Console with vlock
vlock is a program used for locking one multiple sessions on Linux console. Install the program and start locking your terminal session by running the below commands:
# yum install vlock
# vlock
30. Use a Centralized System to Manage Accounts and Authentication
Using a centralized authentication system can greatly simplify account management and control. Services that can offer this type of account management are: IPA Server, LDAP, Kerberos, Microsoft Active Directory, Nis, Samba ADS or Winbind.
Some of these services are by default highly secured with cryptographic protocols and symmetric-key cryptography, such as Kerberos.
Read Also: Setup NFS Server with Kerberos-based User Authentication in Linux
31. Force Read-Only Mounting of USB Media
Using blockdev utility you can force all removable media to be mounted as read-only. For instance, create a new udev configuration file named 80-readonly-usb.rules in the /etc/udev/rules.d/ directory with the following content:
SUBSYSTEM=="block",ATTRS{removable}=="1",RUN{program}="/sbin/blockdev --setro %N"
Then, apply the rule with the below command:
# udevadm control -reload
32. Disabling Root Access via TTY
To prevent the root account from performing system log-in via all console devices (tty), erase the contents of securetty file by typing the following command terminal prompt as root.
# cp /etc/securetty /etc/securetty.bak
# cat /dev/null > /etc/securetty
Remember that this rule does not apply to SSH login sessions
To prevent root login via SSH edit the file /etc/ssh/sshd_config and add the below line:
PermitRootLogin no
Read Also: Enable or Disable SSH Root Login and Limit SSH Access
5 Best Practices to Secure and Protect SSH Server
33. Use POSIX ACLs to Expand System Permissions
Access Control Lists can define access rights for more than just a single user or group and can specify rights for programs, processes, files, and directories. If you set ACL on a directory, its descendants will inherit the same rights automatically.
For example,
# setfacl -m u:user:rw file
# getfacl file
Read Also: Setup ACL and Disk Quotas for Users/Groups in Linux
34. Setup SELinux in Enforce Mode
The SELinux enhancement to the Linux kernel implements the Mandatory Access Control (MAC) policy, allowing users to define a security policy that provides granular permissions for all users, programs, processes, files, and devices.
The kernel’s access control decisions are based on all the security relevant context and not on the authenticated user identity.
To get Selinux status and enforce policy run the below commands:
# getenforce
# setenforce 1
# sestatus
Read Also: Setup Mandatory Access Control Policy with SELinux
35. Install SELinux Additional Utilities
Install policycoreutils-python package which provides additional Python utilities for operating SELinux: audit2allow, audit2why, chcat, and semanage.
To display all boolean values together with a short description, use the following command:
# semanage boolean -l
For instance, to display and set the value of httpd_enable_ftp_server, run the below command:
# getsebool httpd_enable_ftp_server
To make the value of a boolean persist across reboots, specify the -P option to setsebool, as illustrated on the following example:
# setsebool -P httpd_enable_ftp_server on
36. Use Centralized Log Server
Configure rsyslog daemon to send sensitive utilities log messages to a centralized log server. Also, monitor log files with the help of logwatch utility.
Sending log messages to a remote server assures that once the system has been compromised, the malicious users cannot completely hide their activity, always leaving traces on remote log files.
Read Also: 4 Best Linux Log Monitoring and Management Tools
37. Enable Process Accounting
Enable process accounting by installing psacct utility.
Read Also: Monitor Linux User Activity with psacct or acct Tools
Use lastcomm command to displays information about previously executed commands as recorded in the system accounting file and sa to summarize information about previously executed commands as recorded in the system accounting file.
38. Hardening /etc/sysctl.conf
Use the following kernel parameters rules to protect the system:
Disabling Source Routing
net.ipv4.conf.all.accept_source_route=0
Disable IPv4 forwarding
ipv4.conf.all.forwarding=0
Disable IPv6
net.ipv6.conf.all.disable_ipv6 = 1
net.ipv6.conf.default.disable_ipv6 = 1
net.ipv6.conf.lo.disable_ipv6 = 1
Disable the acceptance and sending of ICMP redirected packets unless specifically required.
net.ipv4.conf.all.accept_redirects=0
net.ipv4.conf.all.secure_redirects=0
net.ipv4.conf.all.send_redirects=0
Disable Reverse Path Forwarding
net.ipv4.conf.all.rp_filter=2
Ignore all ICMP echo requests (set to 1 to enable)
net.ipv4.icmp_echo_ignore_all = 0
Read Also: Set Kernel Runtime Parameters in a Persistent and Non-Persistent Way
39. Use VPN Services to Access your Premises over Unprotected Public Networks
Always use VPN services for carriers to remotely access LAN premises over Internet. Such type of services can be configured using a free open source solution, such as OpenVPN, or using a proprietary solution, such as Cisco VPN (install vpnc command-line utility provided by Epel Repositories).
Read Also: Install OpenVPN Server with Windows Clients in CentOS 7
40. Perform External System Scan
Evaluate your system security for vulnerabilities by scanning the system from remote points over your LAN using specific tools such as:
- Nmap – network scanner 29 Examples of Nmap Command
- Nessus – security scanner
- OpenVAS – used to scan for vulnerabilities and for comprehensive vulnerability management.
- Nikto – an excellent common gateway interface (CGI) script scanner Scan Web Vulnerability in Linux
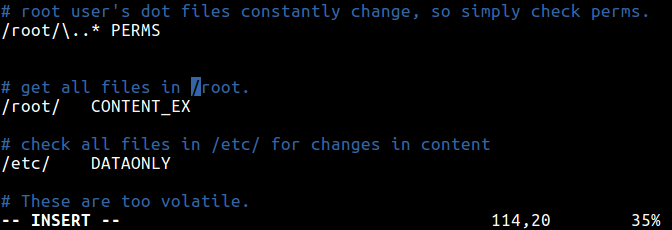
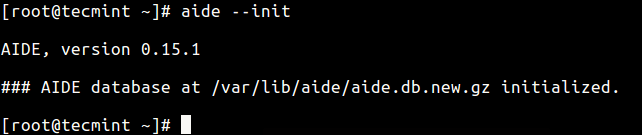
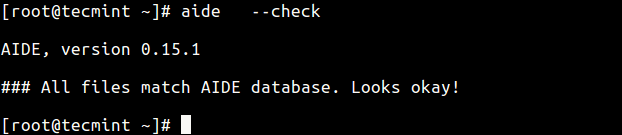
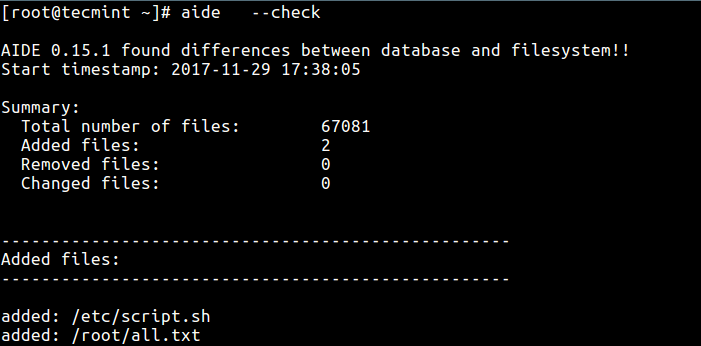
41. Protect System Internally
Use internal system protection against viruses, rootkits, malware and, as a good practice, install intrusion detection systems that can detect unauthorized activity (DDOS attacks, port scans), such as:
- AIDE – Advanced Intrusion Detection Environment – http://aide.sourceforge.net/
- ClamAV – Antivirus Scanner https://www.clamav.net
- Rkhunter – Rootkit Dcanner
- Lynis – Security Auditing and Scanning Tool for Linux
- Tripwire – Security and Data Integrity http://www.tripwire.com/
- Fail2Ban – Intrusion Network Prevention
- OSSEC – (HIDS) Host-based Intrusion Detection System http://ossec.github.io/
- Mod_Security – Protect Brute Force or DDoS Attacks
Append date and time format to store commands execution by issuing the below command:
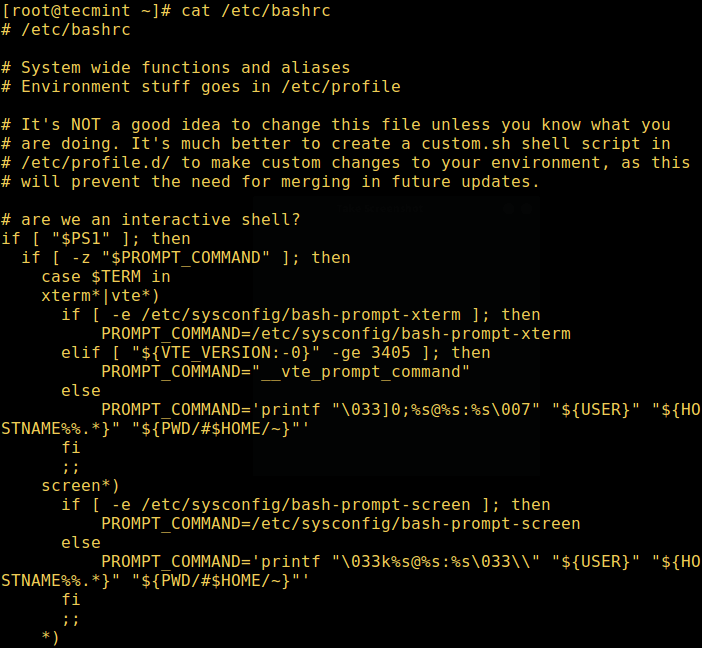
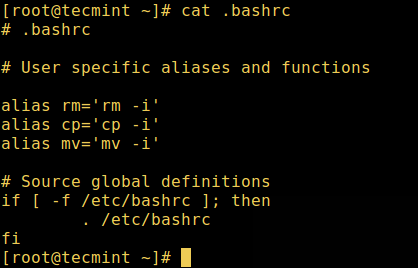
# echo 'HISTTIMEFORMAT="%d/%m/%y %T "' >> .bashrc'
Force to instantly record HISTFILE every time a command is typed (instead of logout):
# echo ‘PROMPT_COMMAND="history -a"’ >> .bashrc
Limit timeout login session. Automatically tear-down the shell when no activity is performed during idle time period. Very useful to automatically disconnect SSH sessions.
# echo ‘TMOUT=120’ >> .bashrc
Apply all the rules by executing:
# source .bashrc
Read Also Set User Environment Variables in Linux
43. Backup Data
Use backup utilities, such as tar, cat, rsync, scp, LVM snapshots, etc in order to store a copy of your system, preferably offsite, in case of a system failure.
If the system gets compromised you can perform data restore from previous backups.
Finally, don’t forget that no matter how many security measures and contra-measures you take in order to keep your system safe, you will never be 100% completely secure as long as your machine is plugged-in and powered-on.
Source