The Linux “tar” stands for tape archive, which is used by large number of Linux/Unix system administrators to deal with tape drives backup. The tar command used to rip a collection of files and directories into highly compressed archive file commonly called tarball or tar, gzip and bzip in Linux. The tar is most widely used command to create compressed archive files and that can be moved easily from one disk to another disk or machine to machine.

Linux Tar Command Examples
In this article we will be going to review and discuss various tar command examples including how to create archive files using (tar, tar.gz and tar.bz2) compression, how to extract archive file, extract a single file, view content of file, verify a file, add files or directories to archive file, estimate the size of tar archive file, etc.
The main purpose of this guide is to provide various tar command examples that might be helpful for you to understand and become expert in tar archive manipulation.
1. Create tar Archive File
The below example command will create a tar archive file tecmint-14-09-12.tar for a directory /home/tecmint in current working directory. See the example command in action.
# tar -cvf tecmint-14-09-12.tar /home/tecmint/

/home/tecmint/
/home/tecmint/cleanfiles.sh
/home/tecmint/openvpn-2.1.4.tar.gz
/home/tecmint/tecmint-14-09-12.tar
/home/tecmint/phpmyadmin-2.11.11.3-1.el5.rf.noarch.rpm
/home/tecmint/rpmforge-release-0.5.2-2.el5.rf.i386.rpm
Let’s discuss each option that we have used in the above command for creating a tar archive file.
- c – Creates a new .tar archive file.
- v – Verbosely show the .tar file progress.
- f – File name type of the archive file.
2. Create tar.gz Archive File
To create a compressed gzip archive file we use the option as z. For example the below command will create a compressed MyImages-14-09-12.tar.gz file for the directory /home/MyImages. (Note : tar.gz and tgz both are similar).
# tar cvzf MyImages-14-09-12.tar.gz /home/MyImages
OR
# tar cvzf MyImages-14-09-12.tgz /home/MyImages

/home/MyImages/
/home/MyImages/Sara-Khan-and-model-Priyanka-Shah.jpg
/home/MyImages/RobertKristenviolent101201.jpg
/home/MyImages/Justintimerlake101125.jpg
/home/MyImages/Mileyphoto101203.jpg
/home/MyImages/JenniferRobert101130.jpg
/home/MyImages/katrinabarbiedoll231110.jpg
/home/MyImages/the-japanese-wife-press-conference.jpg
/home/MyImages/ReesewitherspoonCIA101202.jpg
/home/MyImages/yanaguptabaresf231110.jpg
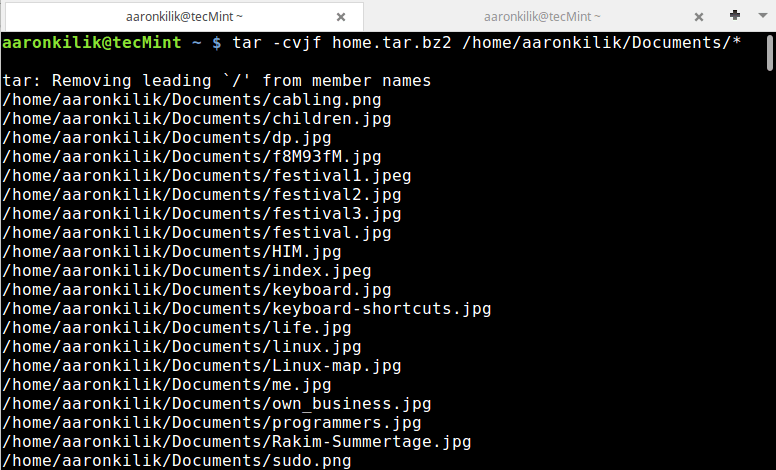
3. Create tar.bz2 Archive File
The bz2 feature compress and create archive file less than the size of the gzip. The bz2 compression takes more time to compress and decompress files as compared to gzip which takes less time. To create highly compressed tar file we use option as j. The following example command will create a Phpfiles-org.tar.bz2 file for a directory /home/php. (Note: tar.bz2 and tbz is similar as tb2).
# tar cvfj Phpfiles-org.tar.bz2 /home/php
OR
# tar cvfj Phpfiles-org.tar.tbz /home/php
OR
# tar cvfj Phpfiles-org.tar.tb2 /home/php

/home/php/
/home/php/iframe_ew.php
/home/php/videos_all.php
/home/php/rss.php
/home/php/index.php
/home/php/vendor.php
/home/php/video_title.php
/home/php/report.php
/home/php/object.html
/home/php/video.php
4. Untar tar Archive File
To untar or extract a tar file, just issue following command using option x (extract). For example the below command will untar the file public_html-14-09-12.tar in present working directory. If you want to untar in a different directory then use option as -C (specified directory).
## Untar files in Current Directory ##
# tar -xvf public_html-14-09-12.tar

## Untar files in specified Directory ##
# tar -xvf public_html-14-09-12.tar -C /home/public_html/videos/

/home/public_html/videos/
/home/public_html/videos/views.php
/home/public_html/videos/index.php
/home/public_html/videos/logout.php
/home/public_html/videos/all_categories.php
/home/public_html/videos/feeds.xml
5. Uncompress tar.gz Archive File
To Uncompress tar.gz archive file, just run following command. If would like to untar in different directory just use option -C and the path of the directory, like we shown in the above example.
# tar -xvf thumbnails-14-09-12.tar.gz

/home/public_html/videos/thumbnails/
/home/public_html/videos/thumbnails/katdeepika231110.jpg
/home/public_html/videos/thumbnails/katrinabarbiedoll231110.jpg
/home/public_html/videos/thumbnails/onceuponatime101125.jpg
/home/public_html/videos/thumbnails/playbutton.png
/home/public_html/videos/thumbnails/ReesewitherspoonCIA101202.jpg
/home/public_html/videos/thumbnails/snagItNarration.jpg
/home/public_html/videos/thumbnails/Minissha-Lamba.jpg
/home/public_html/videos/thumbnails/Lindsaydance101201.jpg
/home/public_html/videos/thumbnails/Mileyphoto101203.jpg
6. Uncompress tar.bz2 Archive File
To Uncompress highly compressed tar.bz2 file, just use the following command. The below example command will untar all the .flv files from the archive file.
# tar -xvf videos-14-09-12.tar.bz2

/home/public_html/videos/flv/katrinabarbiedoll231110.flv
/home/public_html/videos/flv/BrookmuellerCIA101125.flv
/home/public_html/videos/flv/dollybackinbb4101125.flv
/home/public_html/videos/flv/JenniferRobert101130.flv
/home/public_html/videos/flv/JustinAwardmovie101125.flv
/home/public_html/videos/flv/Lakme-Fashion-Week.flv
/home/public_html/videos/flv/Mileyphoto101203.flv
/home/public_html/videos/flv/Minissha-Lamba.flv
7. List Content of tar Archive File
To list the contents of tar archive file, just run the following command with option t (list content). The below command will list the content of uploadprogress.tar file.
# tar -tvf uploadprogress.tar

-rw-r--r-- chregu/staff   2276 2011-08-15 18:51:10 package2.xml
-rw-r--r-- chregu/staff   7877 2011-08-15 18:51:10 uploadprogress/examples/index.php
-rw-r--r-- chregu/staff   1685 2011-08-15 18:51:10 uploadprogress/examples/server.php
-rw-r--r-- chregu/staff   1697 2011-08-15 18:51:10 uploadprogress/examples/info.php
-rw-r--r-- chregu/staff    367 2011-08-15 18:51:10 uploadprogress/config.m4
-rw-r--r-- chregu/staff    303 2011-08-15 18:51:10 uploadprogress/config.w32
-rw-r--r-- chregu/staff   3563 2011-08-15 18:51:10 uploadprogress/php_uploadprogress.h
-rw-r--r-- chregu/staff  15433 2011-08-15 18:51:10 uploadprogress/uploadprogress.c
-rw-r--r-- chregu/staff   1433 2011-08-15 18:51:10 package.xml
8. List Content tar.gz Archive File
Use the following command to list the content of tar.gz file.
# tar -tvf staging.tecmint.com.tar.gz

-rw-r--r-- root/root         0 2012-08-30 04:03:57 staging.tecmint.com-access_log
-rw-r--r-- root/root       587 2012-08-29 18:35:12 staging.tecmint.com-access_log.1
-rw-r--r-- root/root       156 2012-01-21 07:17:56 staging.tecmint.com-access_log.2
-rw-r--r-- root/root       156 2011-12-21 11:30:56 staging.tecmint.com-access_log.3
-rw-r--r-- root/root       156 2011-11-20 17:28:24 staging.tecmint.com-access_log.4
-rw-r--r-- root/root         0 2012-08-30 04:03:57 staging.tecmint.com-error_log
-rw-r--r-- root/root      3981 2012-08-29 18:35:12 staging.tecmint.com-error_log.1
-rw-r--r-- root/root       211 2012-01-21 07:17:56 staging.tecmint.com-error_log.2
-rw-r--r-- root/root       211 2011-12-21 11:30:56 staging.tecmint.com-error_log.3
-rw-r--r-- root/root       211 2011-11-20 17:28:24 staging.tecmint.com-error_log.4
9. List Content tar.bz2 Archive File
To list the content of tar.bz2 file, issue the following command.
# tar -tvf Phpfiles-org.tar.bz2

drwxr-xr-x root/root         0 2012-09-15 03:06:08 /home/php/
-rw-r--r-- root/root      1751 2012-09-15 03:06:08 /home/php/iframe_ew.php
-rw-r--r-- root/root     11220 2012-09-15 03:06:08 /home/php/videos_all.php
-rw-r--r-- root/root      2152 2012-09-15 03:06:08 /home/php/rss.php
-rw-r--r-- root/root      3021 2012-09-15 03:06:08 /home/php/index.php
-rw-r--r-- root/root      2554 2012-09-15 03:06:08 /home/php/vendor.php
-rw-r--r-- root/root       406 2012-09-15 03:06:08 /home/php/video_title.php
-rw-r--r-- root/root      4116 2012-09-15 03:06:08 /home/php/report.php
-rw-r--r-- root/root      1273 2012-09-15 03:06:08 /home/php/object.html
10. Untar Single file from tar File
To extract a single file called cleanfiles.sh from cleanfiles.sh.tar use the following command.
# tar -xvf cleanfiles.sh.tar cleanfiles.sh
OR
# tar --extract --file=cleanfiles.sh.tar cleanfiles.sh

cleanfiles.sh
11. Untar Single file from tar.gz File
To extract a single file tecmintbackup.xml from tecmintbackup.tar.gz archive file, use the command as follows.
# tar -zxvf tecmintbackup.tar.gz tecmintbackup.xml
OR
# tar --extract --file=tecmintbackup.tar.gz tecmintbackup.xml

tecmintbackup.xml
12. Untar Single file from tar.bz2 File
To extract a single file called index.php from the file Phpfiles-org.tar.bz2 use the following option.
# tar -jxvf Phpfiles-org.tar.bz2 home/php/index.php
OR
# tar --extract --file=Phpfiles-org.tar.bz2 /home/php/index.php

/home/php/index.php
13. Untar Multiple files from tar, tar.gz and tar.bz2 File
To extract or untar multiple files from the tar, tar.gz and tar.bz2 archive file. For example the below command will extract “file 1” “file 2” from the archive files.
# tar -xvf tecmint-14-09-12.tar "file 1" "file 2"

# tar -zxvf MyImages-14-09-12.tar.gz "file 1" "file 2"

# tar -jxvf Phpfiles-org.tar.bz2 "file 1" "file 2"
14. Extract Group of Files using Wildcard
To extract a group of files we use wildcard based extracting. For example, to extract a group of all files whose pattern begins with .php from a tar, tar.gz and tar.bz2 archive file.
# tar -xvf Phpfiles-org.tar --wildcards '*.php'

# tar -zxvf Phpfiles-org.tar.gz --wildcards '*.php'

# tar -jxvf Phpfiles-org.tar.bz2 --wildcards '*.php'

/home/php/iframe_ew.php
/home/php/videos_all.php
/home/php/rss.php
/home/php/index.php
/home/php/vendor.php
/home/php/video_title.php
/home/php/report.php
/home/php/video.php
15. Add Files or Directories to tar Archive File
To add files or directories to existing tar archived file we use the option r (append). For example we add file xyz.txt and directory php to existing tecmint-14-09-12.tar archive file.
# tar -rvf tecmint-14-09-12.tar xyz.txt

# tar -rvf tecmint-14-09-12.tar php

drwxr-xr-x root/root         0 2012-09-15 02:24:21 home/tecmint/
-rw-r--r-- root/root  15740615 2012-09-15 02:23:42 home/tecmint/cleanfiles.sh
-rw-r--r-- root/root    863726 2012-09-15 02:23:41 home/tecmint/openvpn-2.1.4.tar.gz
-rw-r--r-- root/root  21063680 2012-09-15 02:24:21 home/tecmint/tecmint-14-09-12.tar
-rw-r--r-- root/root   4437600 2012-09-15 02:23:41 home/tecmint/phpmyadmin-2.11.11.3-1.el5.rf.noarch.rpm
-rw-r--r-- root/root     12680 2012-09-15 02:23:41 home/tecmint/rpmforge-release-0.5.2-2.el5.rf.i386.rpm
-rw-r--r-- root/root 0 2012-08-18 19:11:04 xyz.txt
drwxr-xr-x root/root 0 2012-09-15 03:06:08 php/
-rw-r--r-- root/root 1751 2012-09-15 03:06:08 php/iframe_ew.php
-rw-r--r-- root/root 11220 2012-09-15 03:06:08 php/videos_all.php
-rw-r--r-- root/root 2152 2012-09-15 03:06:08 php/rss.php
-rw-r--r-- root/root 3021 2012-09-15 03:06:08 php/index.php
-rw-r--r-- root/root 2554 2012-09-15 03:06:08 php/vendor.php
-rw-r--r-- root/root 406 2012-09-15 03:06:08 php/video_title.php
16. Add Files or Directories to tar.gz and tar.bz2 files
The tar command don’t have a option to add files or directories to an existing compressed tar.gz and tar.bz2archive file. If we do try will get the following error.
# tar -rvf MyImages-14-09-12.tar.gz xyz.txt

# tar -rvf Phpfiles-org.tar.bz2 xyz.txt

tar: This does not look like a tar archive
tar: Skipping to next header
xyz.txt
tar: Error exit delayed from previous errors
17. How To Verify tar, tar.gz and tar.bz2 Archive File
To verfify any tar or compressed archived file we use option as W (verify). To do, just use the following examples of command. (Note : You cannot do verification on a compressed ( *.tar.gz, *.tar.bz2 ) archive file).
# tar tvfW tecmint-14-09-12.tar

tar: This does not look like a tar archive
tar: Skipping to next header
tar: Archive contains obsolescent base-64 headers
tar: VERIFY FAILURE: 30740 invalid headers detected
Verify -rw-r--r-- root/root    863726 2012-09-15 02:23:41 /home/tecmint/openvpn-2.1.4.tar.gz
Verify -rw-r--r-- root/root  21063680 2012-09-15 02:24:21 /home/tecmint/tecmint-14-09-12.tar
tar: /home/tecmint/tecmint-14-09-12.tar: Warning: Cannot stat: No such file or directory
Verify -rw-r--r-- root/root   4437600 2012-09-15 02:23:41 home/tecmint/phpmyadmin-2.11.11.3-1.el5.rf.noarch.rpm
tar: /home/tecmint/phpmyadmin-2.11.11.3-1.el5.rf.noarch.rpm: Warning: Cannot stat: No such file or directory
Verify -rw-r--r-- root/root     12680 2012-09-15 02:23:41 home/tecmint/rpmforge-release-0.5.2-2.el5.rf.i386.rpm
tar: /home/tecmint/rpmforge-release-0.5.2-2.el5.rf.i386.rpm: Warning: Cannot stat: No such file or directory
Verify -rw-r--r-- root/root         0 2012-08-18 19:11:04 xyz.txt
Verify drwxr-xr-x root/root         0 2012-09-15 03:06:08 php/
18. Check the Size of the tar, tar.gz and tar.bz2 Archive File
To check the size of any tar, tar.gz and tar.bz2 archive file, use the following command. For example the below command will display the size of archive file in Kilobytes (KB).
# tar -czf - tecmint-14-09-12.tar | wc -c
12820480

# tar -czf - MyImages-14-09-12.tar.gz | wc -c
112640

# tar -czf - Phpfiles-org.tar.bz2 | wc -c
20480
Tar Usage and Options
- c – create a archive file.
- x – extract a archive file.
- v – show the progress of archive file.
- f – filename of archive file.
- t – viewing content of archive file.
- j – filter archive through bzip2.
- z – filter archive through gzip.
- r – append or update files or directories to existing archive file.
- W – Verify a archive file.
- wildcards – Specify patterns in unix tar command.
That’s it for now, hope the above tar command examples are enough for you to learn and for more information please use man tar command.
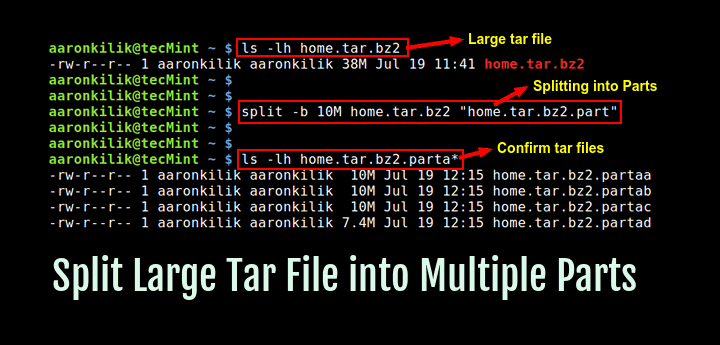
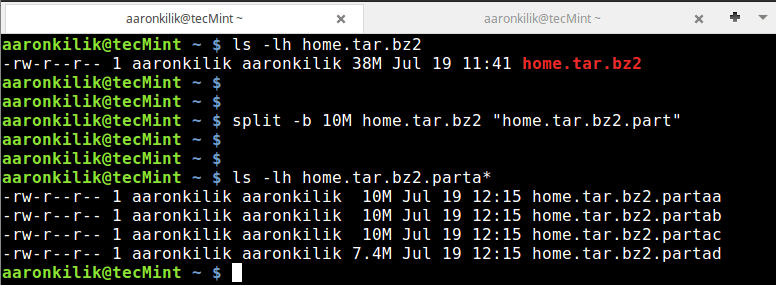
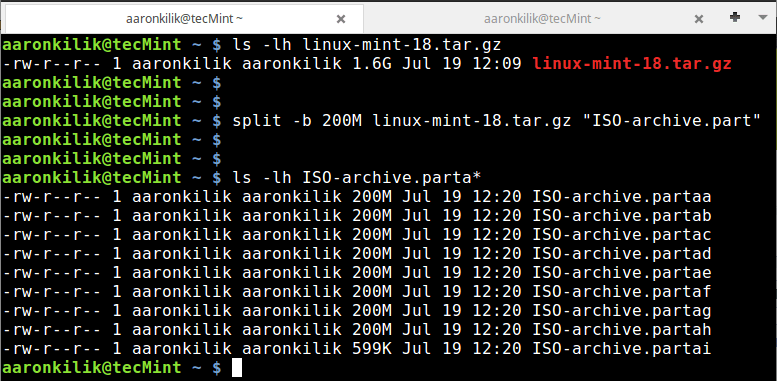
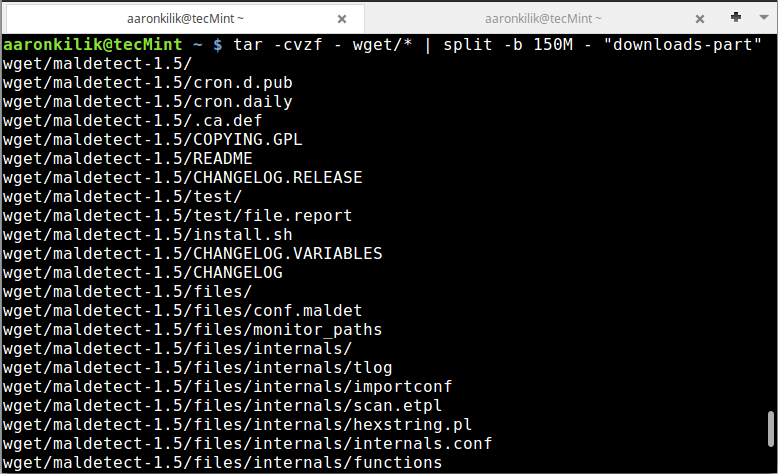
If you are looking to split any large tar archive file into multiple parts or blocks, just go through this article:
Don’t Miss: Split Large ‘tar’ Archive into Multiple Files of Certain Size
If we’ve missed any example please do share with us via comment box and please don’t forget to share this article with your friends. This is the best way to say thanks…..
Source