Thanks for all the likes, good words and support you gave us in the first two part of this article. In the first article we discussed commands for those users who have just switched to Linux and needed the necessary knowledge to start with.
- 20 Useful Commands for Linux Newbies
In the second article we discussed the commands which a middle level user requires to manage his own system.
- 20 Advanced Commands for Middle Level Linux Users
What Next? In this article I will be explaining those commands required for administrating the Linux Server.

Linux Expert Commands
41. Command: ifconfig
ifconfig is used to configure the kernel-resident network interfaces. It is used at boot time to set up interfaces as necessary. After that, it is usually only needed when debugging or when system tuning is needed.
Check Active Network Interfaces
[avishek@tecmint ~]$ ifconfig

eth0      Link encap:Ethernet  HWaddr 40:2C:F4:EA:CF:0E
          inet addr:192.168.1.3  Bcast:192.168.1.255  Mask:255.255.255.0
          inet6 addr: fe80::422c:f4ff:feea:cf0e/64 Scope:Link
          UP BROADCAST RUNNING MULTICAST  MTU:1500  Metric:1
          RX packets:163843 errors:0 dropped:0 overruns:0 frame:0
          TX packets:124990 errors:0 dropped:0 overruns:0 carrier:0
          collisions:0 txqueuelen:1000
          RX bytes:154389832 (147.2 MiB)  TX bytes:65085817 (62.0 MiB)
          Interrupt:20 Memory:f7100000-f7120000

lo        Link encap:Local Loopback
          inet addr:127.0.0.1  Mask:255.0.0.0
          inet6 addr: ::1/128 Scope:Host
          UP LOOPBACK RUNNING  MTU:16436  Metric:1
          RX packets:78 errors:0 dropped:0 overruns:0 frame:0
          TX packets:78 errors:0 dropped:0 overruns:0 carrier:0
          collisions:0 txqueuelen:0
          RX bytes:4186 (4.0 KiB)  TX bytes:4186 (4.0 KiB)
Check All Network Interfaces
Display details of All interfaces including disabled interfaces using “-a” argument.
[avishek@tecmint ~]$ ifconfig -a

eth0      Link encap:Ethernet  HWaddr 40:2C:F4:EA:CF:0E
          inet addr:192.168.1.3  Bcast:192.168.1.255  Mask:255.255.255.0
          inet6 addr: fe80::422c:f4ff:feea:cf0e/64 Scope:Link
          UP BROADCAST RUNNING MULTICAST  MTU:1500  Metric:1
          RX packets:163843 errors:0 dropped:0 overruns:0 frame:0
          TX packets:124990 errors:0 dropped:0 overruns:0 carrier:0
          collisions:0 txqueuelen:1000
          RX bytes:154389832 (147.2 MiB)  TX bytes:65085817 (62.0 MiB)
          Interrupt:20 Memory:f7100000-f7120000

lo        Link encap:Local Loopback
          inet addr:127.0.0.1  Mask:255.0.0.0
          inet6 addr: ::1/128 Scope:Host
          UP LOOPBACK RUNNING  MTU:16436  Metric:1
          RX packets:78 errors:0 dropped:0 overruns:0 frame:0
          TX packets:78 errors:0 dropped:0 overruns:0 carrier:0
          collisions:0 txqueuelen:0
          RX bytes:4186 (4.0 KiB)  TX bytes:4186 (4.0 KiB)

virbr0    Link encap:Ethernet  HWaddr 0e:30:a3:3a:bf:03
          inet addr:192.168.122.1  Bcast:192.168.122.255  Mask:255.255.255.0
          UP BROADCAST MULTICAST  MTU:1500  Metric:1
          RX packets:0 errors:0 dropped:0 overruns:0 frame:0
          TX packets:0 errors:0 dropped:0 overruns:0 carrier:0
          collisions:0 txqueuelen:0
          RX bytes:0 (0.0 B)  TX bytes:0 (0.0 B)
Disable an Interface
[avishek@tecmint ~]$ ifconfig eth0 down
Enable an Interface
[avishek@tecmint ~]$ ifconfig eth0 up
Assign IP Address to an Interface
Assign “192.168.1.12” as the IP address for the interface eth0.
[avishek@tecmint ~]$ ifconfig eth0 192.168.1.12
Change Subnet Mask of Interface eth0
[avishek@tecmint ~]$ ifconfig eth0 netmask 255.255.255.
Change Broadcast Address of Interface eth0
[avishek@tecmint ~]$ ifconfig eth0 broadcast 192.168.1.255
Assign IP Address, Netmask and Broadcast to Interface eth0
[avishek@tecmint ~]$ ifconfig eth0 192.168.1.12 netmask 255.255.255.0 broadcast 192.168.1.255
Note: If using a wireless network you need to use command “iwconfig“. For more “ifconfig” command examples and usage, read 15 Useful “ifconfig” Commands.
42. Command: netstat
netstat command displays various network related information such as network connections, routing tables, interface statistics, masquerade connections, multicast memberships etc..,
List All Network Ports
[avishek@tecmint ~]$ netstat -a

Active UNIX domain sockets (servers and established)
Proto RefCnt Flags       Type       State         I-Node   Path
unix  2      [ ACC ]     STREAM     LISTENING     741379   /run/user/user1/keyring-I5cn1c/gpg
unix  2      [ ACC ]     STREAM     LISTENING     8965     /var/run/acpid.socket
unix  2      [ ACC ]     STREAM     LISTENING     18584    /tmp/.X11-unix/X0
unix  2      [ ACC ]     STREAM     LISTENING     741385   /run/user/user1/keyring-I5cn1c/ssh
unix  2      [ ACC ]     STREAM     LISTENING     741387   /run/user/user1/keyring-I5cn1c/pkcs11
unix  2      [ ACC ]     STREAM     LISTENING     20242    @/tmp/dbus-ghtTjuPN46
unix  2      [ ACC ]     STREAM     LISTENING     13332    /var/run/samba/winbindd_privileged/pipe
unix  2      [ ACC ]     STREAM     LISTENING     13331    /tmp/.winbindd/pipe
unix  2      [ ACC ]     STREAM     LISTENING     11030    /var/run/mysqld/mysqld.sock
unix  2      [ ACC ]     STREAM     LISTENING     19308    /tmp/ssh-qnZadSgJAbqd/agent.3221
unix  2      [ ACC ]     STREAM     LISTENING     436781   /tmp/HotShots
unix  2      [ ACC ]     STREAM     LISTENING     46110    /run/user/ravisaive/pulse/native
unix  2      [ ACC ]     STREAM     LISTENING     19310    /tmp/gpg-zfE9YT/S.gpg-agent
....
List All TCP Ports
[avishek@tecmint ~]$ netstat -at

Active Internet connections (servers and established)
Proto Recv-Q Send-Q Local Address           Foreign Address         State
tcp        0      0 localhost:mysql         *:*                     LISTEN
tcp        0      0 *:5901                  *:*                     LISTEN
tcp        0      0 *:5902                  *:*                     LISTEN
tcp        0      0 *:x11-1                 *:*                     LISTEN
tcp        0      0 *:x11-2                 *:*                     LISTEN
tcp        0      0 *:5938                  *:*                     LISTEN
tcp        0      0 localhost:5940          *:*                     LISTEN
tcp        0      0 ravisaive-OptiPl:domain *:*                     LISTEN
tcp        0      0 ravisaive-OptiPl:domain *:*                     LISTEN
tcp        0      0 localhost:ipp           *:*                     LISTEN
tcp        0      0 ravisaive-OptiPle:48270 ec2-23-21-236-70.c:http ESTABLISHED
tcp        0      0 ravisaive-OptiPle:48272 ec2-23-21-236-70.c:http TIME_WAIT
tcp        0      0 ravisaive-OptiPle:48421 bom03s01-in-f22.1:https ESTABLISHED
tcp        0      0 ravisaive-OptiPle:48269 ec2-23-21-236-70.c:http ESTABLISHED
tcp        0      0 ravisaive-OptiPle:39084 channel-ecmp-06-f:https ESTABLISHED
...
Show Statistics for All Ports
[avishek@tecmint ~]$ netstat -s

Ip:
    4994239 total packets received
    0 forwarded
    0 incoming packets discarded
    4165741 incoming packets delivered
    3248924 requests sent out
    8 outgoing packets dropped
Icmp:
    29460 ICMP messages received
    566 input ICMP message failed.
    ICMP input histogram:
        destination unreachable: 98
        redirects: 29362
    2918 ICMP messages sent
    0 ICMP messages failed
    ICMP output histogram:
        destination unreachable: 2918
IcmpMsg:
        InType3: 98
        InType5: 29362
        OutType3: 2918
Tcp:
    94533 active connections openings
    23 passive connection openings
    5870 failed connection attempts
    7194 connection resets received
....
OK! For some reason if you want not to resolve host, port and user name as a output of netstat.
[avishek@tecmint ~]$ netstat -an
Fine, you may need to get the output of netstat continuously till interrupt instruction is passed (ctrl+c).
[avishek@tecmint ~]$ netstat -c
For more “netstat” command examples and usage, see the article 20 Netstat Command Examples.
43. Command: nslookup
A network utility program used to obtain information about Internet servers. As its name suggests, the utility finds name server information for domains by querying DNS.
[avishek@tecmint ~]$ nslookup tecmint.com

Server:		192.168.1.1
Address:	192.168.1.1#53

Non-authoritative answer:
Name:	tecmint.com
Address: 50.16.67.239
Query Mail Exchanger Record
[avishek@tecmint ~]$ nslookup -query=mx tecmint.com

Server:		192.168.1.1
Address:	192.168.1.1#53

Non-authoritative answer:
tecmint.com	mail exchanger = 0 smtp.secureserver.net.
tecmint.com	mail exchanger = 10 mailstore1.secureserver.net.

Authoritative answers can be found from:
Query Name Server
[avishek@tecmint ~]$ nslookup -type=ns tecmint.com

Server:		192.168.1.1
Address:	192.168.1.1#53

Non-authoritative answer:
tecmint.com	nameserver = ns3404.com.
tecmint.com	nameserver = ns3403.com.

Authoritative answers can be found from:
Query DNS Record
[avishek@tecmint ~]$ nslookup -type=any tecmint.com

Server:		192.168.1.1
Address:	192.168.1.1#53

Non-authoritative answer:
tecmint.com	mail exchanger = 10 mailstore1.secureserver.net.
tecmint.com	mail exchanger = 0 smtp.secureserver.net.
tecmint.com	nameserver = ns06.domaincontrol.com.
tecmint.com	nameserver = ns3404.com.
tecmint.com	nameserver = ns3403.com.
tecmint.com	nameserver = ns05.domaincontrol.com.

Authoritative answers can be found from:
Query Start of Authority
[avishek@tecmint ~]$ nslookup -type=soa tecmint.com

Server:		192.168.1.1
Address:	192.168.1.1#53

Non-authoritative answer:
tecmint.com
	origin = ns3403.hostgator.com
	mail addr = dnsadmin.gator1702.hostgator.com
	serial = 2012081102
	refresh = 86400
	retry = 7200
	expire = 3600000
	minimum = 86400

Authoritative answers can be found from:
Query Port Number
Change the port number using which you want to connect
[avishek@tecmint ~]$ nslookup -port 56 tecmint.com

Server:		tecmint.com
Address:	50.16.76.239#53

Name:	56
Address: 14.13.253.12
Read Also : 8 Nslookup Commands
44. Command: dig
dig is a tool for querying DNS nameservers for information about host addresses, mail exchanges, nameservers, and related information. This tool can be used from any Linux (Unix) or Macintosh OS X operating system. The most typical use of dig is to simply query a single host.
[avishek@tecmint ~]$ dig tecmint.com

; <<>> DiG 9.8.2rc1-RedHat-9.8.2-0.17.rc1.el6 <<>> tecmint.com
;; global options: +cmd
;; Got answer:
;; ->>HEADER<
Turn Off Comment Lines
[avishek@tecmint ~]$ dig tecmint.com +nocomments

; <<>> DiG 9.8.2rc1-RedHat-9.8.2-0.17.rc1.el6 <<>> tecmint.com +nocomments
;; global options: +cmd
;tecmint.com.			IN	A
tecmint.com.		14400	IN	A	40.216.66.239
;; Query time: 418 msec
;; SERVER: 192.168.1.1#53(192.168.1.1)
;; WHEN: Sat Jun 29 13:53:22 2013
;; MSG SIZE  rcvd: 45
Turn Off Authority Section
[avishek@tecmint ~]$ dig tecmint.com +noauthority

; <<>> DiG 9.8.2rc1-RedHat-9.8.2-0.17.rc1.el6 <<>> tecmint.com +noauthority
;; global options: +cmd
;; Got answer:
;; ->>HEADER<
Turn Off Additional Section
[avishek@tecmint ~]$ dig  tecmint.com +noadditional

; <<>> DiG 9.9.2-P1 <<>> tecmint.com +noadditional
;; global options: +cmd
;; Got answer:
;; ->>HEADER<
Turn Off Stats Section
[avishek@tecmint ~]$ dig tecmint.com +nostats

; <<>> DiG 9.8.2rc1-RedHat-9.8.2-0.17.rc1.el6 <<>> tecmint.com +nostats
;; global options: +cmd
;; Got answer:
;; ->>HEADER<
Turn Off Answer Section
[avishek@tecmint ~]$ dig tecmint.com +noanswer

; <<>> DiG 9.8.2rc1-RedHat-9.8.2-0.17.rc1.el6 <<>> tecmint.com +noanswer
;; global options: +cmd
;; Got answer:
;; ->>HEADER<
Disable All Section at Once
[avishek@tecmint ~]$ dig tecmint.com +noall

; <<>> DiG 9.8.2rc1-RedHat-9.8.2-0.17.rc1.el6 <<>> tecmint.com +noall
;; global options: +cmd
Read Also : 10 Linux Dig Command Examples
45. Command: uptime
You have just connected to your Linux Server Machine and founds Something unusual or malicious, what you will do? Guessing…. NO, definitely not you could run uptime to verify what happened actually when the server was unattended.
[avishek@tecmint ~]$ uptime

14:37:10 up  4:21,  2 users,  load average: 0.00, 0.00, 0.04
46. Command: wall
one of the most important command for administrator, wall sends a message to everybody logged in with their mesg permission set to “yes“. The message can be given as an argument to wall, or it can be sent to wall’s standard input.
[avishek@tecmint ~]$ wall "we will be going down for maintenance for one hour sharply at 03:30 pm"

Broadcast message from root@localhost.localdomain (pts/0) (Sat Jun 29 14:44:02 2013):

we will be going down for maintenance for one hour sharply at 03:30 pm
47. command: mesg
Lets you control if people can use the “write” command, to send text to you over the screen.
mesg [n|y]
n - prevents the message from others popping up on the screen.
y – Allows messages to appear on your screen.
48. Command: write
Let you send text directly to the screen of another Linux machine if ‘mesg’ is ‘y’.
[avishek@tecmint ~]$ write ravisaive
49. Command: talk
An enhancement to write command, talk command lets you talk to the logged in users.
[avishek@tecmint ~]$ talk ravisaive
Note: If talk command is not installed, you can always apt or yum the required packages.
[avishek@tecmint ~]$ yum install talk
OR
[avishek@tecmint ~]$ apt-get install talk
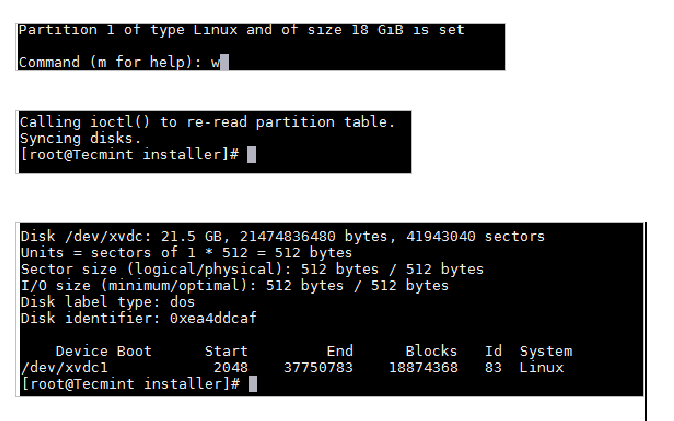
50. Command: w
what command ‘w’ seems you funny? But actually it is not. t’s a command, even if it’s just one letter long! The command “w” is a combination of uptime and who commands given one immediately after the other, in that order.
[avishek@tecmint ~]$ w

15:05:42 up  4:49,  3 users,  load average: 0.02, 0.01, 0.00
USER     TTY      FROM              LOGIN@   IDLE   JCPU   PCPU WHAT
server   tty7     :0               14:06    4:43m  1:42   0.08s pam: gdm-passwo
server   pts/0    :0.0             14:18    0.00s  0.23s  1.65s gnome-terminal
server   pts/1    :0.0             14:47    4:43   0.01s  0.01s bash
51. Command: rename
As the name suggests, this command rename files. rename will rename the specified files by replacing the first occurrence from the file name.
Give the file names a1, a2, a3, a4.....1213
Just type the command.
 rename a1 a0 a?
 rename a1 a0 a??
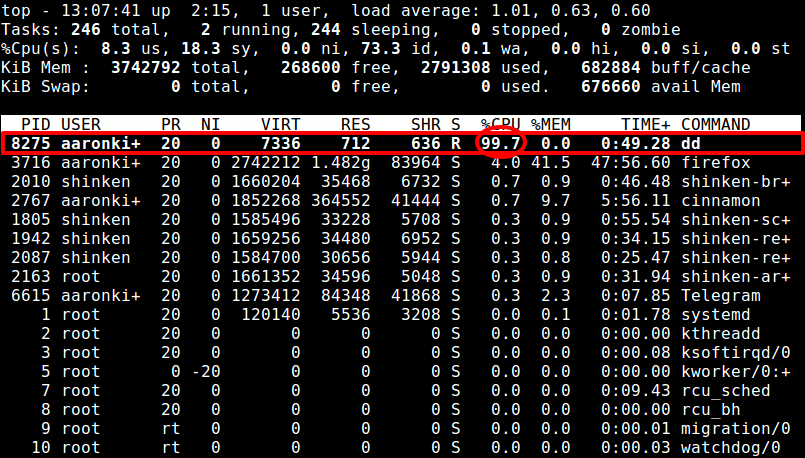
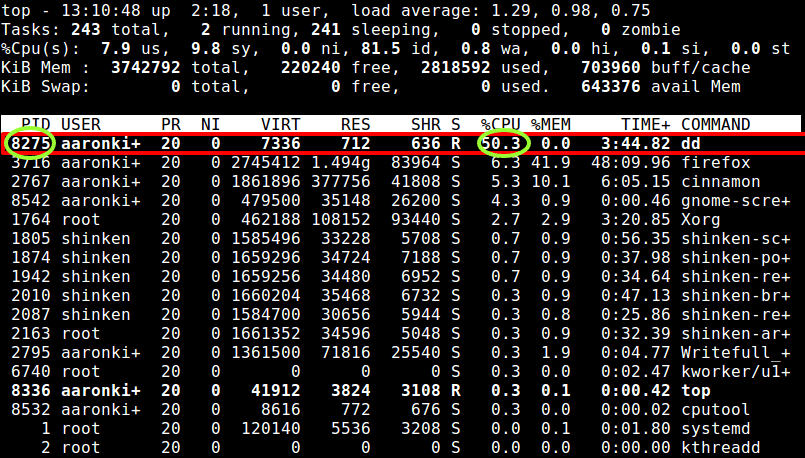
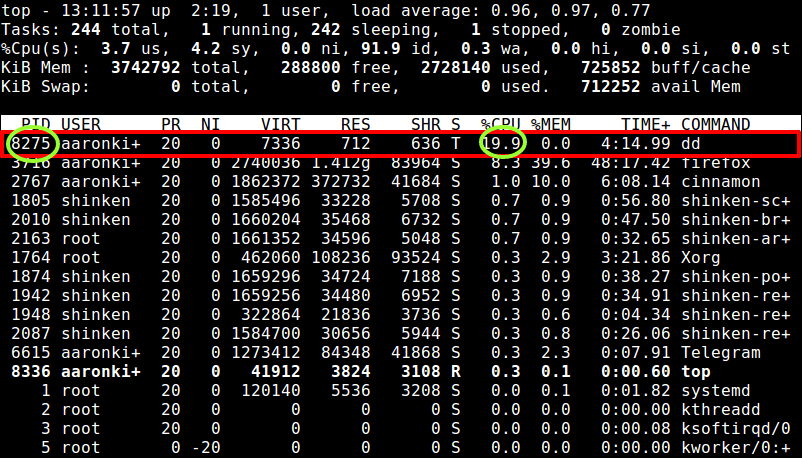
52. Command: top
Displays the processes of CPU. This command refresh automatically, by default and continues to show CPUprocesses unless interrupt-instruction is given.
[avishek@tecmint ~]$ top

top - 14:06:45 up 10 days, 20:57,  2 users,  load average: 0.10, 0.16, 0.21
Tasks: 240 total,   1 running, 235 sleeping,   0 stopped,   4 zombie
%Cpu(s):  2.0 us,  0.5 sy,  0.0 ni, 97.5 id,  0.0 wa,  0.0 hi,  0.0 si,  0.0 st
KiB Mem:   2028240 total,  1777848 used,   250392 free,    81804 buffers
KiB Swap:  3905532 total,   156748 used,  3748784 free,   381456 cached

  PID USER      PR  NI  VIRT  RES  SHR S  %CPU %MEM    TIME+ COMMAND
23768 ravisaiv  20   0 1428m 571m  41m S   2.3 28.9  14:27.52 firefox
24182 ravisaiv  20   0  511m 132m  25m S   1.7  6.7   2:45.94 plugin-containe
26929 ravisaiv  20   0  5344 1432  972 R   0.7  0.1   0:00.07 top
24875 ravisaiv  20   0  263m  14m  10m S   0.3  0.7   0:02.76 lxterminal
    1 root      20   0  3896 1928 1228 S   0.0  0.1   0:01.62 init
    2 root      20   0     0    0    0 S   0.0  0.0   0:00.06 kthreadd
    3 root      20   0     0    0    0 S   0.0  0.0   0:17.28 ksoftirqd/0
    5 root       0 -20     0    0    0 S   0.0  0.0   0:00.00 kworker/0:0H
    7 root       0 -20     0    0    0 S   0.0  0.0   0:00.00 kworker/u:0H
    8 root      rt   0     0    0    0 S   0.0  0.0   0:00.12 migration/0
    9 root      20   0     0    0    0 S   0.0  0.0   0:00.00 rcu_bh
   10 root      20   0     0    0    0 S   0.0  0.0   0:26.94 rcu_sched
   11 root      rt   0     0    0    0 S   0.0  0.0   0:01.95 watchdog/0
   12 root      rt   0     0    0    0 S   0.0  0.0   0:02.00 watchdog/1
   13 root      20   0     0    0    0 S   0.0  0.0   0:17.80 ksoftirqd/1
   14 root      rt   0     0    0    0 S   0.0  0.0   0:00.12 migration/1
   16 root       0 -20     0    0    0 S   0.0  0.0   0:00.00 kworker/1:0H
   17 root       0 -20     0    0    0 S   0.0  0.0   0:00.00 cpuset
   18 root       0 -20     0    0    0 S   0.0  0.0   0:00.00 khelper
   19 root      20   0     0    0    0 S   0.0  0.0   0:00.00 kdevtmpfs
   20 root       0 -20     0    0    0 S   0.0  0.0   0:00.00 netns
   21 root      20   0     0    0    0 S   0.0  0.0   0:00.04 bdi-default
   22 root       0 -20     0    0    0 S   0.0  0.0   0:00.00 kintegrityd
   23 root       0 -20     0    0    0 S   0.0  0.0   0:00.00 kblockd
   24 root       0 -20     0    0    0 S   0.0  0.0   0:00.00 ata_sff
Read Also : 12 TOP Command Examples
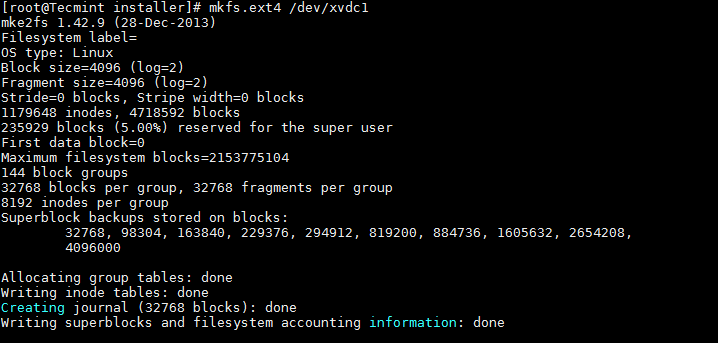
53. Command: mkfs.ext4
This command create a new ext4 file system on the specified device, if wrong device is followed after this command, the whole block will be wiped and formatted, hence it is suggested not to run this command unless and until you understand what you are doing.
Mkfs.ext4 /dev/sda1 (sda1 block will be formatted)
mkfs.ext4 /dev/sdb1 (sdb1 block will be formatted)
Read More: What is Ext4 and How to Create and Convert
54. Command: vi/emacs/nano
vi (visual), emacs, nano are some of the most commonly used editors in Linux. They are used oftenly to edit text, configuration,… files. A quick guide to work around vi and nano is, emacs is a.
vi-editor
[avishek@tecmint ~]$ touch a.txt (creates a text file a.txt)
[avishek@tecmint ~]$ vi a.txt (open a.txt with vi editor)
[press ‘i’ to enter insert mode, or you won’t be able to type-in anything]
echo "Hello" (your text here for the file)
- alt+x (exit insert mode, remember to keep some space between the last letter.
- ctrl+x command or your last word will be deleted).
- :wq! (saves the file, with the current text, remember ‘!’ is to override).
nano editor
[avishek@tecmint ~]$ nano a.txt (open a.txt file to be edited with nano)
edit, with the content, required
ctrl +x (to close the editor). It will show output as:
Save modified buffer (ANSWERING "No" WILL DESTROY CHANGES) ?
 Y Yes
 N No           ^C Cancel
Click ‘y’ to yes and enter file name, and you are done.
55. Command: rsync
Rsync copies files and has a -P switch for a progress bar. So if you have rsync installed, you could use a simple alias.
alias cp='rsync -aP'
Now try to copy a large file in terminal and see the output with remaining items, similar to a progress bar.
Moreover, Keeping and Maintaining backup is one of the most important and boring work a system administrator, needs to perform. Rsync is a very nice tool (there exists, several other) to create and maintain backup, in terminal.
[avishek@tecmint ~]$ rsync -zvr IMG_5267\ copy\=33\ copy\=ok.jpg ~/Desktop/

sending incremental file list
IMG_5267 copy=33 copy=ok.jpg

sent 2883830 bytes  received 31 bytes  5767722.00 bytes/sec
total size is 2882771  speedup is 1.00
Note: -z for compression, -v for verbose and -r for recursive.
56. Command: free
Keeping track of memory and resources is as much important, as any other task performed by an administrator, and ‘free‘ command comes to rescue here.
Current Usage Status of Memory
[avishek@tecmint ~]$ free

             total       used       free     shared    buffers     cached
Mem:       2028240    1788272     239968          0      69468     363716
-/+ buffers/cache:    1355088     673152
Swap:      3905532     157076    3748456
Tuned Output in KB, or MB, or GB
[avishek@tecmint ~]$ free -b

             total       used       free     shared    buffers     cached
Mem:    2076917760 1838272512  238645248          0   71348224  372670464
-/+ buffers/cache: 1394253824  682663936
Swap:   3999264768  160845824 3838418944
[avishek@tecmint ~]$ free -k

             total       used       free     shared    buffers     cached
Mem:       2028240    1801484     226756          0      69948     363704
-/+ buffers/cache:    1367832     660408
Swap:      3905532     157076    3748456
[avishek@tecmint ~]$ free -m

             total       used       free     shared    buffers     cached
Mem:          1980       1762        218          0         68        355
-/+ buffers/cache:       1338        641
Swap:         3813        153       3660
[avishek@tecmint ~]$ free -g

             total       used       free     shared    buffers     cached
Mem:             1          1          0          0          0          0
-/+ buffers/cache:          1          0
Swap:            3          0          3
Check Current Usage in Human Readable Format
[avishek@tecmint ~]$ free -h

             total       used       free     shared    buffers     cached
Mem:          1.9G       1.7G       208M         0B        68M       355M
-/+ buffers/cache:       1.3G       632M
Swap:         3.7G       153M       3.6G
Check Status Contineously After Regular Interval
[avishek@tecmint ~]$ free -s 3

             total       used       free     shared    buffers     cached
Mem:       2028240    1824096     204144          0      70708     364180
-/+ buffers/cache:    1389208     639032
Swap:      3905532     157076    3748456

             total       used       free     shared    buffers     cached
Mem:       2028240    1824192     204048          0      70716     364212
-/+ buffers/cache:    1389264     638976
Swap:      3905532     157076    3748456
Read Also : 10 Examples of Free Command
57. Command: mysqldump
Ok till now you would have understood what this command actually stands for, from the name of this command.mysqldump commands dumps (backups) all or a particular database data into a given a file.For example,
[avishek@tecmint ~]$ mysqldump -u root -p --all-databases > /home/server/Desktop/backupfile.sql
Note: mysqldump requires mysql to be running and correct password for authorisation. We have covered some useful “mysqldump” commands at Database Backup with mysqldump Command
58. Command: mkpasswd
Make a hard-to-guess, random password of the length as specified.
[avishek@tecmint ~]$ mkpasswd -l 10

zI4+Ybqfx9
[avishek@tecmint ~]$ mkpasswd -l 20

w0Pr7aqKk&hmbmqdrlmk
Note: -l 10 generates a random password of 10 characters while -l 20 generates a password of character 20, it could be set to anything to get desired result. This command is very useful and implemented in scripting language oftenly to generate random passwords. You might need to yum or apt the ‘expect’ package to use this command.
[root@tecmint ~]# yum install expect
OR
[root@tecmint ~]# apt-get install expect
59. Command: paste
Merge two or more text files on lines using. Example. If the content of file1 was:
1
2
3

and file2 was:

a
b
c
d
the resulting file3 would be:

1    a
2    b
3    c
     d
60.Command: lsof
lsof stands for “list open files” and displays all the files that your system has currently opened. It’s very useful to figure out which processes uses a certain file, or to display all the files for a single process. Some useful 10 lsof Command examples, you might be interested in reading.
[avishek@tecmint ~]$ lsof

COMMAND     PID   TID            USER   FD      TYPE     DEVICE SIZE/OFF       NODE NAME
init          1                  root  cwd       DIR        8,1     4096          2 /
init          1                  root  rtd       DIR        8,1     4096          2 /
init          1                  root  txt       REG        8,1   227432     395571 /sbin/init
init          1                  root  mem       REG        8,1    47080     263023 /lib/i386-linux-gnu/libnss_files-2.17.so
init          1                  root  mem       REG        8,1    42672     270178 /lib/i386-linux-gnu/libnss_nis-2.17.so
init          1                  root  mem       REG        8,1    87940     270187 /lib/i386-linux-gnu/libnsl-2.17.so
init          1                  root  mem       REG        8,1    30560     263021 /lib/i386-linux-gnu/libnss_compat-2.17.so
init          1                  root  mem       REG        8,1   124637     270176 /lib/i386-linux-gnu/libpthread-2.17.so
init          1                  root  mem       REG        8,1  1770984     266166 /lib/i386-linux-gnu/libc-2.17.so
init          1                  root  mem       REG        8,1    30696     262824 /lib/i386-linux-gnu/librt-2.17.so
init          1                  root  mem       REG        8,1    34392     262867 /lib/i386-linux-gnu/libjson.so.0.1.0
init          1                  root  mem       REG        8,1   296792     262889 /lib/i386-linux-gnu/libdbus-1.so.3.7.2
init          1                  root  mem       REG        8,1    34168     262840 /lib/i386-linux-gnu/libnih-dbus.so.1.0.0
init          1                  root  mem       REG        8,1    95616     262848 /lib/i386-linux-gnu/libnih.so.1.0.0
init          1                  root  mem       REG        8,1   134376     270186 /lib/i386-linux-gnu/ld-2.17.so
init          1                  root    0u      CHR        1,3      0t0       1035 /dev/null
init          1                  root    1u      CHR        1,3      0t0       1035 /dev/null
init          1                  root    2u      CHR        1,3      0t0       1035 /dev/null
init          1                  root    3r     FIFO        0,8      0t0       1714 pipe
init          1                  root    4w     FIFO        0,8      0t0       1714 pipe
init          1                  root    5r     0000        0,9        0       6245 anon_inode
init          1                  root    6r     0000        0,9        0       6245 anon_inode
init          1                  root    7u     unix 0xf5e91f80      0t0       8192 @/com/ubuntu/upstart
init          1                  root    8w      REG        8,1     3916        394 /var/log/upstart/teamviewerd.log.1 (deleted)
This is not the end, a System Administrator does a lot of stuff, to provide you such a nice interface, upon which you work. System Administration is actually an art of learning and implementing in a very much perfect way. We will try to get you with all other necessary stuff which a linux professional must learn, linux in its basic actually itself, is a process of learning and learning.
Source